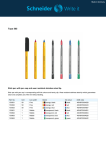
1
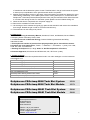
Rotiphorese® PROclamp Tank Blotting 3513.1 (5814.1) Rotiphorese® PROclamp MINI (MAXI) Tank Blotting System Tank + Blotting module incl. accessories 3517.1 (5816.1) Rotiphorese® PROclamp MINI (MAXI) Tank Blotting Module Blotting module incl. accessories WARNING: Please read the entire operator’s manual thoroughly before operating this unit. Warning: Like all apparatus run by electricity these units are capable of delivering potentially lethal voltage when connected to a power supply. They should be operated only by qualified technically trained personnel. The tank blotting units from ROTH are designed for long term laboratory use and to obtain reproducible results. Please spend a few moments reading the instruction manual thoroughly. These units comply with the statutory CE safety rules: 73/23/EEC: Low voltage directive: IEC 1010-1:1990 plus amendment 1:1992 EN 61010-1:1993/BS EN 61010-1:1993 Please verify that you received the unit completely and without any damage. Any faults or losses have to be reported to ROTH immediately. ROTH can not accept responsibility for goods that were sent back without informing them. Please take a look at the packing list and check whether all components and accessories are present. Please retain all packaging material until the warranty period has expired. For further information, please contact us at Tel.: 0721/5606-0. 1 SPECIFICATIONS Technical features: User-friendly injection molded construction, 100 % leak-proof Doubly insulated cables, rated safe up to 1000 volts Gold plated electrical connectors, corrosion-free and rated safe up to 1000 volts Recessed power connectors, integral with the safety lid 0.2 mm diameter platinum electrodes, 99.99 % pure User replacable platinum electrodes TYPE Overall dimensions (W x L x H) Approx. total buffer volume Electrode separation distance No. of gel cassette slots Max. gel size Max. operating voltage Max. operating current Electrical connectors MINI 13 x 20 x 13.5 cm 1.5 Liter 6 cm 4 10 x 10 cm 200 V 1000 mA 4 mm male, fully shrouded MAXI 30 x 18 x 27 cm 6.4 Liter 6 cm 4 20 x 20 cm 350 V 2000 mA 4 mm male, fully shrouded Environmental Conditions This apparatus is intended for indoor use only. The unit can be operated safely at an altitude of 2000 m. The normal operating temperature range is between 4 °C and 65 °C. Maximum relative humidity 80 % for temperatures up to 31 °C decreasing linearly to 50 % relative humidity at 40 °C. All Roth products available for delivery have undergone rigorous quality controls. PACKING LIST TYPE Instrument Tank with lid + cables Cooling coil Blotting module Blotting cassettes Blotting mats MINI 3513.1 (syst.) 1 1 4 8 3517.1 (mod.) 1 4 8 MAXI 5814.1 (syst.) 5816.1 (mod.) 1 1 1 1 4 4 18 18 AVAILABLE ACCESSORIES (All accessories can be purchased from Carl Roth GmbH + Co. KG. Please use the indicated ordering numbers. Additional reagents and accessories can be found in top I.) TYPE Tank (without lid) Replacement lid for tank Cooling coil Blotting cassette Blotting mats MINI 3509.1 3511.1 3518.1 3519.1 (4 pairs) MAXI 5807.1 5809.1 5812.1 5827.1 5829.1 (3 pairs) 2 USING THE VERTICAL GEL ELECTROPHORESIS UNITS A. Safety Precautions Please read the entire instruction manual thoroughly before using the apparatus. Always isolate electrophoresis units from their power supply before removing the safety cover. Isolate the power supply from the mains first then disconnect the leads. Do not exceed the maximum operating voltage or current (see table 1). Acrylamide is a volatile, concentrated neurotoxin which is suspected to be carcinogenic. Please always wear protective clothing when working with acrylamide and follow and observe the working instructions / directions for disposal carefully. Polymerized gels contain residue of unpolymerized monomer. Please wear always protective gloves while working. Do not fill the unit with running buffer above the maximum fill lines. Do not move the unit when it is running. Caution: During electrophoresis very low quantities of various gases are produced at the electrodes. The type of gas produced depends on the composition of the buffer employed. To disperse these gases make sure that the apparatus is run in a well ventilated area. B. General Care and Maintenance Clean the apparatus with hand warm water and a mild detergent only. Often, a thorough rinse with distilled water is all that is required. Dry components with clean tissues prior to use, e.g. ROTH tissues (ref. 0087.1) Important: Acrylic plastic is not resistant to aromatic or halogenated hydrocarbons, ketones, esters, alcohols (over 25 %) and acids (over 25 %), they will cause „crazing“of the plastic and should not be used for cleaning. Do not use abrasive creams or scourers. The units should never come into contact with the following cleaning agents; these will cause irreversible and accumulative damage: Acetone, Phenol, Chloroform, Carbon tetrachloride, Methanol, Ethanol, Isopropyl alcohol, Alkalis. Before use, and then on a monthly basis, check the unit for any leaks at the bonded joints. Place the unit on a sheet of dry tissue and then fill with distilled water only to the maximum fill line. If any leakage is seen do not attempt to repair or use the apparatus, but notify Carl Roth GmbH & Co. KG immediately (+49/0721/5606-172). The replacement platinum electrodes are partially shrouded for protection. However, when cleaning the main tank do not use cleaning brushes in the electrode area. Ensure that the connectors are clean and dry before usage or storage. C. RNase Decontamination Clean the units with a mild detergent as described above. Wash with 3% hydrogen peroxide (H2O2) for 10 minutes. Rinsed with 0.1% DEPC- (diethyl pyrocarbonate) treated distilled water, Caution: DEPC is a suspected carcinogen. Always take the necessary precautions when using. Roti®-Nucleic Acid free (Art. No. HP69) and RNAse AWAY(TM) (Art. No. A998) may also be used. Please consult the instructions for use with acrylic gel tanks. D. Fitting Electrode Cables. 1. Note the position of the lid on the unit. This shows the correct polarity and the correct orientation of the cables, black is negative and red positive. 2. Remove the lid from the unit. Note if the lid is not removed, fitting the cables may result in untightening of the gold plug and damage to the electrode. 3. Screw the cables into the tapped holes as fully as possible so that there is no gap between the lid and the leading edge of the cable fitting. 4. Refit the lid. 3 E. Preparations The appropriate volume of transfer buffer for the PROclamp MINI and MAXI Tank-Blot units depends on the number of cassettes inserted (see table below). The buffer should be cooled and degassed prior to the addition of SDS, in order to avoid forming of gas bubbles between gel and membrane, which will hinder transfer. TYPE Buffer volume in ml (approx.) MINI MAXI 1 1380 6400 No. of Cassettes 2 3 1290 1200 6040 5680 4 1110 5320 The most commonly used transfer buffer is • 25 mM Tris, 192 mM glycine, 20 % methanol, pH 8.3, Ref. Towbin et al (1979). This buffer can be used with or without 0.05-0.1 % (w/v) SDS. Other transfer buffers are: • • 48 mM Tris, 39 mM glycine, 20 % methanol, pH 9.2, Ref. Bjerrum and Schafer-Nielsen (1986) 10 mM NaHCO3, 3 mM Na2CO3, 20 % methanol, pH 9.9, Ref. Dunn (1986). Note: Transfer parameters depend on the buffer system used! See following table for appr. values. Transfer Buffer Overnight 1 hour 3 hours Towbin Buffer 25-40 V 50-100 V 25-50 V 40-80 mA 200-400 mA 100-200 mA 25-40 V 50-100 V 25-50 V 40-80 mA 200-400 mA 100-200 mA 10 V 40-80 V 20-40 V 40-80 mA 200-500 mA 100-250 mA Bjerrum Buffer Dunn Buffer 1. Half fill the tank with transfer buffer. 2. Pre-equilibrate the gel for 30 minutes in cool transfer buffer to remove SDS and salts. This serves to prevent the gel changing size during transfer and to reduce heating effects. 3. Soak a gel-sized piece of transfer membrane in transfer buffer for 15 minutes. 4. Cut two pieces of blotting paper (A125.1) and a piece of transfermembrane (Roti®-PVDF T830.1, Roti®-Fluoro-PVDF 2803.1, Roti®-NC HP40.1) to the size of the gel to be blotted. 5. If you are using PVDF-membrane, incubate the membrane in 100% methanol until it is completely soaked. Nitrocellulose should be equilibrated in transfer buffer. 6. Soak the fibre pads and the blotting papers in transfer buffer. F. Assembly of blot sandwiches Assemble the gel/membrane sandwich in the compression cassette as described and shown (fig. 1). Be careful to avoid air bubbles, which can be done as follows: Either use a tray filled with transfer buffer. Assembly is performed entirely under buffer. Or assemble the transfer unit on top of a flat tray. After positioning of each layer, use a clean glass rod or pipette wet in transfer buffer to roll out any trapped bubbles. Note: Try to avoid repositioning the membrane as some transfer may occur on first contact. Assemble in the order: 1. Black cassette clamp (-ve side) 2. Pre-soaked fibre pad 3. Some sheets of pre-soaked blotting paper (approx. 2 mm thick overall) 4 4. Gel 5. Pre-wetted transfer membrane 6. Some sheets of pre-soaked blotting paper (approx. 2 mm thick overall) 7. Pre-soaked fibre pad 8. Red cassette clamp (+ve side) For very thin gels use 2 mats on each side. Close the hinge carefully so as to not disturb the sandwich. Cathode (black) (-ve) Anode (red) (+ve) Blotting Paper Blotting Paper Fibre Pads Gel Transfer Membrane Compression Cassette Compression Cassette G. Blotting 1. Insert the cassettes into the Blotting module. 2. Optional: It is a good idea to note the orientation and order the blot sandwiches were loaded in. 3. Use of a magnetic stirring bar and plate is recommended to mix the buffer to give consistency of transfer. A 4mm diameter stirring bar should be placed in the centre of the tank. 4. Insert the Blotting module into the tank with the transfer membrane on the +ve side. Note: The +ve (red) side of each cassette should be placed nearest to the +ve side of the module. 5. Add further transfer buffer up to the maximum fill line indicated on each side of the tank. Now the top loops of the platinum coils should be just covered. Do not fill beyond the maximum fill lines. 6. Apply the safety lid and turn the magnetic stirrer on, in order to keep the buffer in weak agitation. 7. Connect to a power supply. Refer to Table 1 for run conditions. Note that operating conditions should be optimised for your applications. Factors that will affect the success of transfer include: gel porosity, buffer composition and pH, transfer time, transfer field density (V/cm), molecular weight range, temperature of buffer, choice 5 of membrane and the detection system chosen. Residual salts in the gel could cause the system to heat up so pre-equilibration of the gel with transfer buffer is important. 8. Monitor the temperature as the run proceeds. Improved transfer can usually be obtained by using chilled buffer. Additionally, for the MINI system frozen Cooling Pads (3512.1, accessories of the Rotiphorese® PROclamp Vertical Electrophoresis Units) may be inserted on each side of the tank to cool the buffer during the blot. For the MAXI system please use the included cooling coil. 9. When the blot time is completed, turn the power supply off. 10. Remove the cassettes from the main tank. 11. Lift the hinge of each cassette and gently pry apart the blot sandwich and remove the membrane from the gel. Restain the gel in order to check the blot efficiency. 12. The membrane is now ready to be probed. H. References: 1. Molecular Cloning A Laboratory Manual, Sambrook, Fritsch, and Maniatis, Second Edition, Cold Spring Harbor Laboratory Press, 1989. 2. Current Protocols in Molecular Biology, Greene Publishing Associates and WileyInterscience,1989. 3. Electrophoretic transfer of proteins from polyacrylamide gels to nitrocellulose sheets: Procedure and some applications, Towbin, J., Staehelin, T., and Gordon, J. (1979). Proc. Natl., Acad. Sci. USA, 76, 4350-4354. 4. Blotting Techniques Ch.1, 7.10, p. 85-97. In: Gel Electrophoresis of Proteins, A Practical Approach, B.D.Hames and D.Rickwood, eds., IRL Press. (1990), I. Further reagents All chemicals and accessories required and be found in our main catalogue or on the internet at www/carlroth.com Rotilabo® Blottingpapers 0.36 mm CL67.1 ® Rotilabo Blottingpapers 1 mm CL74.1 ® Rotilabo Blottingpapers 1.5 mm CL75.1 Roti®-Fluoro PVDF Membrane (roll) 2803.1 ® Roti -PVDF Membrane (roll) T830.1 ® Roti -NC Membrane (roll) HP40.1 Giemsa-protein staining solution Roti®-Blue A152.1 Ponceau S protein dye (C.I. 27195) 5938.1 Rotiphorese PROclamp MINI Tank Blot System 3513.1 Rotiphorese PROclamp MINI Tank Blot Module 3517.1 Rotiphorese PROclamp MAXI Tank Blot System 5814.1 Rotiphorese PROclamp MAXI Tank Blot Module 5816.1 Carl Roth GmbH + Co. KG Schoemperlenstraße 3-5 76185 Karlsruhe Postfach 100121 76231 Karlsruhe Telefon: +49 (0) 721/ 5606-0 Telefax: +49 (0) 721/ 5606-149 E-mail: [email protected] Internet: www.carlroth.de e.d. 11/2014 6