1
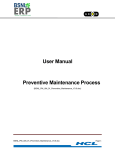
MINI-Vertical-Dual-Electrophoresis unit Also for handcasting of gels: Y001.1 MINI-Vertical-Dual-Elektrophoresis unit Standard Tank + running module + accessories + casting module Y002.1 MINI-Vertical-Dual-Elektrophoresis unit Cooled cooled Tank + running module + accessories + casting module For electrophoresis of precast gels only: Y003.1 MINI-Vertical-Dual-Elektrophoresis unit Standard Tank + running module + accessories Y004.1 MINI-Vertical-Dual-Elektrophoresis unit Cooled cooled Tank + running module + accessories WARNING: Please read the entire operator’s manual thoroughly before operating this unit. Warning: Like all apparatus run by electricity these units are capable of delivering potentially lethal voltage when connected to a power supply. They should be operated only by qualified technically trained personnel. The vertical electrophoresis units from ROTH are designed for long term laboratory use and to obtain reproducible results. Please spend a few moments reading the instruction manual thoroughly. These units comply with the statutory CE safety rules: 73/23/EEC: Low voltage directive: IEC 1010-1:1990 plus amendment 1:1992 EN 61010-1:1993/BS EN 61010-1:1993 Please verify, that you received the unit completely and without any damage. Any faults or losses have to be reported to ROTH immediately. ROTH can not accept responsibility for goods, that were sent back without informing them. Please take a look at the packing list and check whether all components and accessories are present. Please retain all packaging material until the warranty period has expired. For further information, please contact us at Tel.: 0721/5606-0. 1 SPECIFICATION Technical features Durable acrylic construction All acrylic joints chemically bonded Doubly insulated cables, rated safe up to 1000 volts Gold plated electrical connectors, corrosion-free and rated safe up to 1000 volts Recessed power connectors, integral with the safety lid 0.2 mm diameter platinum electrodes, 99,99 % pure User replacable platinum electrodes Silicone rubber dovetail seal provides leak-free sealing and is easy to clean or replace User-friendly clamping system With a wide range of accessories Environmental Conditions This apparatus is intended for indoor use only. The unit can be operated safely at an altitude of 2000 m. The normal operating temperature range is between 4 °C and 65 °C. Maximum relative humidity 80 % for temperatures up to 31°C decreasing linearly to 50 % relative humidity at 40 °C. All Roth products available for delivery have undergone rigorous quality controls. PACKING LIST Vertical MINI-Dual Electrophoresis Unit (Y001.1, Y002.1, Y003.1, Y004.1) No. Items 1 1 1 2 2 2 1 2 2 Description tank with lid running module casting module (only Y001.1 and Y002.1) 2.0 mm notched glass plates (10x10cm) 2.0 mm plain glass plates (10x10cm) 1.0 mm spacer sets dummy plate (10x10cm) 1.0 mm combs with 12 slots exchange electrodes Available Accessories (All accessories can be purchased from Carl Roth GmbH + Co. KG. Please use the indicated ordering numbers. Additional reagents and accessories can be found in top K.) Tank (without lid) Cooled tank (without lid) Replacement lid for tank Running module Casting module U-shaped fixing plate (incl. seals) for running module (2 sets) Seals for running module (8 per set) Gaskets for casting module (2 per set) Replacement screws for running module (4 per set) Replacement platin electrode (Ø 0.2 mm) Glass plates (10x10cm) with spacers (0.75 mm) Glass plates (10x10cm) with spacers (1.0 mm) Y005.1 Y006.1 Y009.1 Y007.1 Y008.1 Y010.1 Y011.1 T796.1 Y012.1 T794.1 (pair) (pair) 0523.1 0530.1 2 Glass plates (10x10cm) with spacers (1.5 mm) Glass plates (10x10cm) with spacers (2.0 mm) Standard glass plates (10x10cm) Notched glass plates (10x10cm) Dummy plate (10x10cm) Spacer (0.75 mm) Spacer (1.0 mm) Spacer (1.5 mm) Spacer (2.0 mm) (pair) (pair) (pair) (pair) (1 plate) (pair) (pair) (pair) (pair) 0531.1 0536.1 0513.1 0520.1 0537.1 N624.1 N625.1 N626.1 N627.1 Combs Wells Depth (mm) 0.75 1.0 1.5 2.0 8* Art. No. 0550.1 0554.1 0555.1 0556.1 10 Art. No. N638.1 N643.1 N648.1 N653.1 12 Art. No. N639.1 N644.1 N649.1 N654.1 16* Art. No. N640.1 N645.1 N650.1 N655.1 20 Art. No. 0558.1 0570.1 0595.1 N597.1 *Compatible with multi-channel pipettor Tab. 1 Operational for 1 mm thick gels Buffer vol. upper tank lower tank 100 ml 1.600 ml Approx. Gel volume Voltage (V) maximal 150 – 225 V recommended 100 – 150 V (10 – 15 V/cm) 7 ml Current (mA) maximal recommended 25 – 45 mA (1 Gel) 10 – 15 mA 50 – 85 mA (2 Gels) USING THE VERTICAL GEL ELECTROPHORESIS UNITS A. Safety Precautions Please read the entire instruction manual thoroughly before using the apparatus. Always isolate electrophoresis units from their power supply before removing the safety cover. Isolate the power supply from the mains first then disconnect the leads. Do not exceed the maximum operating voltage or current (see table 1). Acrylamide is a volatile, concentrated neurotoxin which is suspected to be carcinogenic. Please always wear protective clothing when working with acrylamide and follow and observe the working instructions / directions for disposal carefully. Polymerized gels contain residue of unpolymerized monomer. Please wear always protective gloves while working. Do not fill the unit with running buffer above the maximum fill lines. Do not move the unit when it is running. CAUTION: During electrophoresis very low quantities of various gases are produced at the electrodes. The type of gas produced depends on the composition of the buffer employed. To disperse these gases make sure that the apparatus is run in a well ventilated area. 3 B. General Care and Maintenance Clean the apparatus with destilled water only. Important: Acrylic plastic is not resistant to aromatic or halogenated hydrocarbons, ketones, esters, alcohols (over 25 %) and acids (over 25 %), they will cause „crazing“ especially of the UV transparent plastic and should not be used for cleaning. Do not use abrasive creams or scourers. Dry components with clean tissues prior to use, e.g. ROTH tissues (ref. 0087.1) Before use, and then on a monthly basis, check the unit for any leaks at the bonded joints. Place the unit on a sheet of dry tissue and then fill with distilled water only to the maximum fill line. If any leakage is seen do not attempt to repair or use the apparatus, but notify Carl Roth GmbH & Co. KG immediately (+49/0721/5606-172). The replacement platinum electrodes are partially shrouded for protection. However, when cleaning the main tank do not use cleaning brushes in the electrode area. Usually a thorough rinse with distilled water is all that is required. Ensure that the connectors are clean and dry before usage or storage. C. Filling the Base Cooling unit (only for Y002.1 and Y004.1) The base cooling core can be used in two ways. Static cold water can be used as a simple heat sink or the tank can be actively regulated using flowing water from a tap or a water bath. Static Temperature Regulation 1. Attach a short length of rubber hose to each connector. 2. Fill the cooling device with fully-desalinated water containing 0.02% sodium azide or water preservative. 3. Hold the unit in a tilted position and close the tubes with strong clamps. 4. The unit can be cooled to 4 °C prior to electrophoresis. Attention: Do NOT freeze! Active Temperature Regulation: 1. Connect one tube with the water tap. Fix the other tube to the sink ensuring that it doesn’t slip. Alternatively, both tubes can also be connected to the feed inlet and outlet of the cooling water bath. 2. The maximum recommended water flow is 1 liter / min. Do not exceed this figure. 3. If you are using a circulating water bath, which exceeds this flow rate you can attach a T-connector in line.One branch of the connector can return water to the bath and the other can flow to the cooling core and incorporate a flow regulator such as an adjustable tubing clamp. Measure and adjust the flow rate before attaching the line to gel unit. D. Storing the water-cooled units Should storage be necessary for a few days only (e.g. over the weekend), the water-cooled units (Art. No. Y002.1 and Y004.1) can remain connected to the cooling water. Please take care, however, that the water supply has been turned off tightly. If the unit is being operated with a stagnant water tank (with 0.02% sodium azide), it can be covered up and stored with the cooling water. If any algae forms, fill the cooling water tank with a neutral disinfectant and allow it to react overnight. Please rinse the cooling device thoroughly with clear water before using the unit again and fill it with fully-desalinated water (with sodium azide or a stabilizer). If the unit is to be stored away for a longer period, please disconnect the tubes and allow the water to drain off. Assemble the machine to dry for a day. 4 E. Preparing the gel plates 1. Wash the glass plates, spacer and combs with a mild detergent (e.g. washing-up liquid). Do not use a scouring agent. For gels which require an extremely clean surface (e.g. large or very thin gels, silver staining) you can follow up by washing the glass plates with ethanol, acetone and ethanol again. 2. If required, the glass plates can be hydrosiliconed by vaporizing them with di-Methyldichloro-hydrosilicon for easier separation of plate from gel after gel run. 3. We recommend that you only touch the glass plates with gloves (finger prints can be removed with acetone). F. Assembly of glass plates 1. Lay the clean glass plates with the fixed spacers upwards on a flat, clean base. Then place the likewise clean, indented glass plates (notched plates) on top. If standard glass plates without fixed spacers are being used, the spacers should be placed along the outer edges of the short sides of the plates and notched plates laid on top. Be sure to arrange the glass plates in such a way that the mattfinished sides will be at the lower edge of the gel. Fig.1 Assembly of glass plates 2. Open the screws on both sides of the running module and remove the clamping plates. Please check that there is no dirt on the rubber seals of the upper buffer tank. If necessary, clean the seals with a non-fluffing cloth. Press the seals back into their grooves should they become loose. 3. Place the assembled glass plates on the running module with the indentation on the top and facing the inside in such a way that the bottomedge of the plates and the lower edge of the running module are flush. Place the clamping plate on top and screw it down loosely. Place the second stack of glass plates or the compensating plate on the other side. 4. Place the unit carefully in position. Check on a flat surface (e.g. levelling table) if the lower edge of the glass plates is really flush. Correct the position of the glass plates if necessary by pushing them down into the surface of the table, while the screws are still loose. 5. Tighten the screws. The pressure on all screws must be increased evenly and slowly in small increments to prevent the glass plates from cracking. 6. Place the unit on the gel casting module in such a way that the glass plates lie on the seals. Fix the unit to the gel casting module by turning the screws halfway. G. Casting the gel 1. For reproducible results and for your safety, we recommend using acrylamide stock solutions (e.g. Rotiphorese®Gel 30, Rotiphorese® Gel 40; further acrylamide stock solutions can be found in the main Roth catalogue). Acrylamide solutions should be stored in a cool, dark place (refrigerator). For casting the gels, the solutions should have room temperature. Avoid exposure to heat and sun. 2. Separation of proteins: for a 12% gel, size 10 x 10 cm, prepare a total of 30 ml mixture in a clean glass: 12 ml of 30% acrylamide stock solution, 7.5 ml Tris (1.5 M, pH 8.8), 300 μl SDS (10%), distilled water to make up 30 ml. Add the following directly before casting: 300 μl freshly prepared ammonium persulfate (10%), 12 μl TEMED. Separation of DNA: for a 12% gel, size 10 x 10 cm, prepare a total of 30 ml mixture in a clean glass: 12 ml of 30% acrylamide stock solution, 6 ml 5 x TBE, distilled water to make up 30 ml. Add the following directly before casting: 210 μl freshly prepared ammonium persulfate (10%), 12 μl TEMED. Mix carefully avoiding the formation of air bubbles. 5 3. Test a small amount in an extra vessel before casting the gel. Polymerization should take place within 5 – 10 min. If this is not the case, adapt the conditions by either increasing or decreasing the TEMED amount. Do not cast gels in direct sunlight. 4. The gel casting can be carried out directly in the gel caster. Pour in the mixture slowly between the glass plates. Avoid the formation of air bubbles. 5. If you wish to cast a two-phase gel (collecting gel and separating gel), first cast the separating gel to app. 2 cm under the edge of the indentation in the notched plate. Please ensure that there are no air bubbles in the gel and then carefully cover the separating gel 3-5 mm high with isopropanol. Better polymerization can be achieved by excluding all air. 6. Following polymerization of the separating gel pour off the isopropanol. Absorb remnants of isopropanol with kim wipes, while carefully avoiding to touch the gel surface. Rinse the upper rim of the separating gel with destilled water and remove aqueous remnants. 7. Prepare and pour the collecting gel, carefully avoiding the formation of air bubbles. Separating gels are usually composed of 5 % acrylamide. Prepare a total of 5 ml mixture in a clean glass: 830 μl of 30 % acrylamide stock solution, 630 μl Tris (1 M, pH 6.8), 50 μl SDS (10 %), distilled water to make up 5 ml. Add the following directly before casting: 50 μl freshly prepared ammonium persulfate (10 %), 5 μl TEMED. 8. Insert a comb between the gel plates before gel polymerizes and allow the acrylamide solution to complete polymerizing. Attention: Push the comb slowly! Avoid any splashing of the acrylamide! We recommend wearing eye protection for this step. 9. The gel can be used as soon as the collecting gel has polymerized. Remove the screws from the gel casting device and take out the running module with the cast gels. For gel runs: Do NOT open the screws on the running module, but place it with the gel into the tank. For storage: Carefully open the screws, releasing the pressure gradually and evenly. Wrap the slightly damp gel in cling foil and store it at 4 °C for maximum 2 days. H. Gel and buffer volumes / Conditions for the gel run If you are only working with one gel, please insert a dummy plate on the other side of the running module. Pour app. 1 l running buffer into the outer (lower) and app. 100 ml running buffer into the inner (upper) buffer tank. Running buffer for protein gels: Tris-glycine-buffer: (25 mM Tris-base, 250 mM glycine (pH 8.3), 0.1% SDS), running buffer for DNA-gels: 1 x TBE. Recommendations for working conditions are given in Table 1, the conditions vary, however, depending on the gel amount, its composition, and the cross-linking grade of polyacrylamide. The required current increases proportionally to the gel amount or thickness, provided it’s not limited by the voltage. For example, two gels require twice the amount of current compared to one gel at the same voltage. By increasing the gel concentration, the electric resistance is also increased and as a result the velocity of migration is reduced. Higher voltages can be fed, however, please take care that the gel is not overheated. Conductivity of gels with non-dissociated buffer systems varies enormously and the conditions must be determined empirically. The run conditions are to be taken as a guideline only and apply to SDS Tris-glycine gels. If the plates become hot increase the water flow rates within the recommended limits or reduce the power settings. l. Sample application 1. Carefully remove the sample comb and immediately rinse out the slots with a syringe or plastic Pasteur pipette filled with running buffer. No forerun is necessary when using denatured SDS gels. When using native protein gels or DNA gels, allow these to run first for app. 30 min in the unit before applying the samples. Table 2 shows the protein amounts which can successfully be applied. Tab. 2 Gel wells 1 mm x 4 mm 1.5 mm x 4 mm Single band 1-6 µg Numerous bands 30-60 µg Sample volume <40 µl 1-10 µg 50-100 µg <60 µl 6 2. Mix the protein samples with 1/3 volume Roti-Load 4 x (SDS-running buffer) or resuspend the pellet in app. 20 μl 1 x Roti-Load. Heat the sample for 3 min to 100 °C or for 50 min to 80 °C. Centrifuge for 5 min at 12000 g. DNA is mixed with 1/5 volume 6 x sample buffer (e.g. 6 x Roti- Load DNA) or pelleted DNA is resuspended in 1 x running buffer (e.g. 1 x Roti-Load DNA). 3. Apply the samples using a pipettor with gel loading tip. Avoid removing any samples from the sediment at the bottom of the tube. The pipettor tip should be held 1-2 mm above the base of the recess during sample application to minimize dilution of sample and to apply a thick layer of sample. Fill the unused slots with the same volume of sample 1 x buffer to receive constant electric resistance over the total gel. Close the safety lid tightly to ensure that the electric connectors have good contact. 4. Couple the electrophoresis chamber to the mains receiver and connect the latter to the current. Set the mains receiver at the required values (see table 1) according to the manufacturer’s instructions. J. At the End of the Run 1. 2. 3. 4. 5. 6. 7. 8. 9. Turn the power supply settings to zero, turn off the mains supply and disconnect the power leads. Turn off the water supply if the unit is being cooled. Remove the safety lid by pressing against the tank from the top and take out the lid by the handles. Remove the running module from the tank and pour the buffer from the top buffer chamber. Now you can loosen the screws carefully and gradually and then remove the gel(s). Separate the glas plates with a broad, stiff blade beginning at the bottom of the gel. Carefully transfer the gel to a staining chamber and stain it with Giemsa or via silver staining. It can also be transferred onto a membrane for blotting. DNA-gels can be stained with ethidium bromide. After removing the gel, clean the plates thoroughly and rinse in distilled water. A clean sheet of foam rubber placed at the bottom of the sink serves as a usual support and minimises the risk of glass plate damage. Drain the lower buffer chamber using a vaccum pump or pour off the buffer carefully. Rinse the chambers with distilled water, then dry the electrode connectors with tissue. Do not use organic solvents. Ensure that the connectors are clean and dry before usage or storage. K. Additional Items and Reagents Acetone, >99.5%, for synthesis Ammonium persulfate (APS) Clamps Disinfectant, neutral Ethanol 70%, DAB Ethidium bromide Ethidium bromide solution 1% Filter papers Giemsa-protein staining solution Roti®-Blue 5x Isopropanol Levelling table Roti-Blue 5x colloidal Coomassie staining Rotilabo®-clips Roti®-Load 1, 4x (reducing) Roti®-Load 2, 4x (non-reducing) Roti-Load 3 (LDS), 4x (non-reducing) Roti®-Load DNA 1x (with glycerol) Roti®-Load DNA 6x (with saccharose / glycerol / ficoll) Roti®-Load DNAstain 1+2 6x (with glycerol / fluorescent stain EvaGreen®) 5025 9592 e.g. 1589 oder 0566 K354 7301 7870 2218 4926 A152 6752 N854 A152 0827 K929 K930 3359 0100 T847 / X904 / X905 5783, 5784 7 Roti®-Mark 10-150 Roti®-Mark PRESTAINED Roti®-Mark STANDARD Rotiphorese Blue R Coomassie staining Rotiphorese®-Gel 30 or 40 Rotiphorese® 10 x SDS PAGE ready-to-use running buffer Silver staining Roti®-Black N (DNA) Silver staining Roti®-Black P (Protein) Silver staining/Bleaching Roti®-Bleach Sodium azide TEMED Water preservative Zinc staining for protein gels, Roti®-White Tube adapters Tube binders Tube T-shape connectors T850 T852 T851 3074 3029 oder 3030 3060 N769 L533 N766 K305 2367 C786 or 9025 K063 see Rotilabo®- tubing connectors in the catalogue see Rotilabo®-tube clips in the catalogue see Rotilabo®-T-shape in the catalogue L. Trouble shooting and tips The gel leaks during casting Please ensure that the glass plates and spacers are clean and there are no dirt particles sticking to them. - Take care that the gel plates are flush to the lower edge of the running module after clamping. - Please also make sure that all screws have been tightened evenly. - Smear some vaseline on the spacers before assembling the gel plates. - Seal the bottom edge of the gel with agarose after fixing the gel plates into the running module and gel casting device. For this prepare 1% agarose in 375 mM Tris, pH 8.8 (protein gels) or 1 x TBE (DNAgels) by melting until no more streaks are visible. Tilt the gel casting device with the plates and allow some of the hot agarose to run down inside on one side of the gel. Place the gel casting device upright so that the agarose can spread on the bottom and form a sealing. You can fill the agarose to a height of app. 5 mm and then cast the polyacrylamide gel a few minutes later. The agarose needn’t be removed prior to the run, but remains between the plates during the run. - Before fixing the gel plates, the bottom end can be taped with packing tape. Fasten the plates together after assembling them with strong clamps and stick a strip of broad packing tape lengthwise to the lower edge of the glass plates to close the slit. The tape should overlap a few centimeters on both sides. After folding and sticking the tape onto the glass plates it should be pressed down firmly. The glass plates can now be fixed for casting the gel into the running module and gel casting device. After the gel has polymerized, the packing tape must be removed before the gel can be fixed again and prepared for the run. Air bubbles in the gel during casting - Either remove the bubbles immediately with a thin spacer or tilt the gel slightly and knock the air bubbles down to the edge. The gel doesn’t polymerize entirely - Can occur due to low temperatures, too low amounts of TEMED, too old (degraded) TEMED, too old APS or too low acrylamide concentration. Use fresh solutions, particularly freshly prepared APS. Keep all other solutions in the refrigerator. Degas the gel solution before use. Gel doesn’t run / no air bubbles on the electrodes - Check all connections, contact pnotcheds and switches. Take care that the level of the upper buffer covers the indentation of the notched plate. Glass plates are cracked after the run or break during the run 8 - The gel was subjected to too much tension. Don’t tighten the screws so firmly. Take care that the pressure on all screws is increased slowly and evenly. Reduce the voltage during the run. The gel won’t get quite so hot. 9 Gel edge pulled up to top, “Smiling” - Gel temperature was not distributed evenly. Reduce the voltage during the run, increase the cooling. Be sure to fill empty wells with sample buffer. Vertical smears in the bands - Possibly there were dirt particles in the gel mix. Use Roth acrylamide stock solutions, making sure that the gel solution is prepared in clean glass containers. The solution can be filtered and degassed before adding APS and TEMED. - The sample was not centrifuged before applying or sediment was also applied. - Too much protein was applied. Dilute the sample. - Reduce the voltage during the run. Bands are horizontally smudged - Is caused by diffusion of the sample prior to the run. Apply probes more quickly and then carry out the run immediately. Bands are diffuse - Too large protein amounts for too small wells, or gel is too thin. Apply less protein. - Too high a voltage reduces the running time, but results in a poorer separation of proteins. Reduce the voltage during the run. - With DNA-gels: Use the same mixture 5 x TBE to prepare the gel and the running buffer. Slight variations in the concentration can impair separation consideraby Carl Roth GmbH + Co. KG Schoemperlenstraße 3-5 76185 Karlsruhe Postfach 100121 76231 Karlsruhe Telefon: +49 (0) 721/ 5606-0 Telefax: +49 (0) 721/ 5606-149 E-mail: [email protected] Internet: www.carlroth.com e.d. 11/2014 10