1
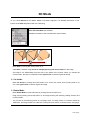
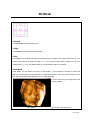
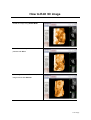
User’s Manual
iView Plus
Client
SIMPLE OPERATION / SUPREME IMAGE / SPEEDY WORKING
March 4th, 2003
OnDemandSoft Co., Ltd.
© 2002 iView Plus Client. All rights reserved.
No part of this publication may be reproduced, stored or transmitted in any form or by any means
without the express written consent of the publisher.
2/21 Page
Table of Contents
General Information
……………………………………………………… 4
Hardware Requirements
……………………………………………………… 5
How to Start
……………………………………………………… 6
Album Mode
……………………………………………………… 7
3D Mode
……………………………………………………… 10
Tool Button
……………………………………………………… 15
How to Edit 3D image
……………………………………………………… 16
Customer Service/Technical Support
……………………………………………………… 21
3/21 Page
General Information
Maintenance
It is very important to keep iView Client CD dust-and scratch-free discs.
To clean a CD, wipe it in a straight line from the center towards the edge using a soft, lint-free clith. A
cleaning agent may damage the disc. Write (Label) only on the printed side of the CD and only with a
soft felt-tipped pen.
Clean the CD with a soft, slightly dampened lint-free cloth. Do not use any cleaning agents as they
may have a corrosive effect.
Do not expose the CD to humidity, rain, direct sunlight or excessive heat.
4/21 Page
Hardware Requirements
To run iView Client, at least the following hardware specification is recommended.
CPU
Pentium III 1Gb or later
RAM
128 or more
Hard Driver
100 MB or more
CD
16X or later
5/21 Page
How to Start
1. Check if your computer meets hardware requirements to run iView Client.
2. Insert iView Client CD into CD ROM.
3. Click Run.exe
to run iView Client.
6/21 Page
Album Mode
In Album Mode, You can
- see saved or edited 2D or 3D ultrasound images.
- save them in the hard disk of your computer
- send them through email
- use it as background in your computer.
7/21 Page
Album Mode
Tool buttons provided in Album Mode is as following:
Tools
Function description
1. Album Directory
Select image directory from the directory list by
pressing left mouse button on it. All images saved
under the selected directory are previewed to the
right. As you press Up/Down key from keyboard, you
can choose image and the image is high-lighted with
yellow-border and shown to the center of the screen.
2. Zoom In / Zoom Out
Press Zoom In or Zoom Out to magnify/reduce
images shown to the center of the screen.
3. Prev / Next
You can choose one of the previewed images by
pressing Prev or Next. The selected preview image is
shown to the center of the screen.
4. Capture Image
Press Capture Image to save image shown to the
center to hard disk of your computer. It is saved in
BMP file format
5. Import Image
Press Import Image to import 2D or 3D image to
Album Mode. 2D or 3D images saved on hard disk is
imported to UserData Directory of Album Mode. To
see the imported images, select UserData directory.
6. Send Mail
Press Send Mail to E-mail enclosing your desired
baby images. Refer to the next page.
7. Slide Show
Press Slide Show to see baby images in Slide vision.
8. Wall Paper
Press Wall Paper to set baby image to wallpaper on
the screen. Refer to the next page.
8/21 Page
Album Mode
For detailed information of Send Mail, Slide Show and Wallpaper , refer to the following:
Send Mail
Press Send Mail to send email enclosing baby’s images.
The following dialog box appears when you press Send Mail button.
1. Attach
Select baby image by pressing left mouse button on your desired image and press
Attach button. The selected images are shown on the top box. To select several
images at one time, select images pressing Shift key on your keyboard.
2. Write Mail
Press Write Mail to write E-mail. E-mail window appears. You can see the attached
images using Attach are enclosed in your E-mail.
3. Close
Press Close to exit the Window.
Slide Show Press Slide Show to see ultrasound images as slide show. Press Esc on the
keyboard or press left mouse button on the screen to escape Slide Show.
Wall Paper
Press Wall Paper to set image shown to the center as background image in your
computer.
9/21 Page
3D Mode
In 3D Mode, you can edit original 3D images for yourselves. You can rotate, slice and save in hard
disk. If it is difficult for you to edit 3D image, you may send it to us for help enclosing the images. We
will send back the image to you after edition.
10/21 Page
3D Mode
The followings are Tool buttons, available in 3D Mode.
1. 3D Files
Select 3D image file by pressing left mouse button on 3D file name. The
selected 3D image is shown to the center.
2. Threshold
Press and drag T scroll bar pressing left mouse button to control
threshold. As you control threshold high/low, you can cut or show the
unclear part of image.
3. Contrast
Press and drag C scroll bar pressing left mouse button to control
contrast. As you control contrast high/low, the image gets bright/dark.
4. Cine
Press Cine to see animation image of 3D. The 3D image will rotate in
some degrees.
Click on 3D image to stop Cine.
5. Capture Image
Press Capture Image to save image shown to the center to hard disk of
your computer. It is saved in BMP file format.
6. Help Me!!
When you have difficulty in editing 3D image well, please send it to us
by using Help Me!! function.
7. Edit 3D
Check Edit 3D by pressing left mouse button on it to tune up 3D image
shown to the center. Hidden tool buttons under Edit 3D are shown.
Refer to the next page for hidden functions under Edit 3D.
11/21 Page
3D Mode
As you check Edit 3D on 3D Mode, Hidden tool buttons appears. For detailed information of tool
buttons under Edit 3D, please refer to the following:
When you mark Edit 3D, Slice, Cut Inside, Rotate Mode, Smooth, Undo,
Save and View Mode are activated.
Detailed information of the activated tools are as follows.
1. Slice
Mark Slice by clicking left mouse button on it.
After Slice is marked, Drag mouse to left/right pressing left mouse button on 3D image.
3D image is cut shallow/deep from the front to the inside of the monitor. When you release left
mouse button, the slice is completed. Press right mouse to restore original 3D image.
2. Cut Inside
Mark Cut Inside by clicking left mouse button on it. And move mouse around cutting area to cut
out. Click right mouse to restore original 3D image.
3. Rotate Mode
Mark Rotate Mode to rotate 3D image by clicking left mouse button on it.
Drag mouse pressing mouse left button on 3D image referring the following rotating direction and
mouse position.
As you see on the following picture of next page, when you drag mouse on a section divided by
dotted line, 3D image rotates in the direction of the pink-arrow shows. (Continued to the next page).
12/21 Page
3D Mode
4. Smooth
Press Smooth to make image smooth.
5. Undo
Press Undo to restore the original 3D image.
6. Save
Press Save to save edited 3D image in hard disk of your computer. The image is saved with [*****E]
name in pair with the original 3D image. (***** is the original image name.). When you edit once
edited image - [*****E] - and save it again, the newly edited image is overwrited.
7. View Mode
In View Mode, you can select one among 3 View modes. In 2D images in the right or around 3D
imageIf you click and drag mouse left button, image will be sliced or cut.If you click red square in the
center with mouse right button pressed, you can slide 2D image.
You can see one big 3D image without 2D
section images
View Mode 1
(Continued to the next page.)
13/21 Page
3D Mode
<View Mode 2>
<View Mode 3>
In [View Mode 2] and [View Mode 3], you can see three section images and one 3D image.
Section images in [View Mode 2] and [View Mode 3]:
: The camera on each section image border shows where user’s eyes are located. User’s
eyes - the camera - observe 3D image on bottom right screen and the observed section image are
shown in the section image box.
:
: Click right mouse button on red square under section image box and drag to left and right.
As you drag the red square left/right, you can observe section image from the front to the back.
: Click on the Green Border Line of section image box and drag it to inside/outside. Only the
image shown inside of the section image box is used to reconstruct 3D image on the screen.
When you drag one Green Border Line of section image box, it affects other related section image
box border too.
*Note: If there is no camera on the section image border, it means the camera - user’s eyes – are
located in front of the monitor.
14/21 Page
Tool Button
In top right of the screen, you can see Baby
Information, Print, Homepage, Help and Exit Tool
Button in order.
Baby Information
Print
Press
to input parents information, pregnancy date etc.
Press
to print out image. To print out, please verify
printer driver is installed.
Homepage
Press
to go to our website,
http://www.ondemandsoft.com.
Help
Exit
Press
to User Manual.
Press
to close iView Plus Client.
15/21 Page
How to Edit 3D image
Principle of Edition
* Note:
The followings are examples of how to edit 3D image. In real situation, according to baby position,
editing will be a little different. However, basic procedure is equal.
1. Please use 2D images as reference.
2. If baby turn down on the screen, please use Rotation to raise and rotate it.
3. Please move forward the part to cut and use Slice to cut part.
4. Please use Threshold, Contrast or Smooth to make image clear.
Baby Face
The following is original 3D image, acquired
from ultrasound. (The bottom 2D image is
the same direction with 3D image on the
screen.
Raise the image using Rotate Mode. You
may see clean 2D image of baby face.
16/21 Page
How to Edit 3D image
Rotate the image using Rotate Mode.
Move forward the part to delete. Delete
placenta with Slice.
Make image better with Threshold, make
image smooth with Smooth.
17/21 Page
How to Edit 3D image
10 week’s baby
Original image acquired from ultrasound.
Move forward the part to delete. Delete with
Slice.
Cut with Slice. Please use the bottom 2D
image, as reference to find out where is
baby and where to cut. Control image with
Threshold, Smoothing, Contrast.
18/21 Page
How to Edit 3D image
Spine
Original image acquired from ultrasound.
Move as arrow directs with Rotate Mode.
Please refer to the bottom 2D image as
reference to find out where the spine is or
where to cut.
(Continued to the next page)
19/21 Page
How to Edit 3D image
For spine, it’s better to use Threshold to get
better, clean image than Front-Slice, which
you used for baby face or 10 week’s baby.
For spine, it’s better to have a little dark
image to see spine well. It is recommended
not to use Smoothing too much.
20/21 Page
Customer Service/Technical Support
OnDemandSoft Co., Ltd.
501, Tower 2, DIP, Daemyung 7dong, Namgu, Daegu, 705701, South Korea
Tel: 82 53 652 9764
Fax: 82 53 652 9765
Email: [email protected]
21/21 Page