1
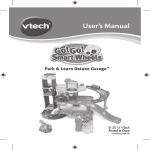
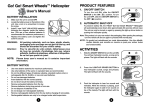
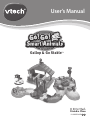
User’s Manual
Gallop & Go Stable
TM
© 2014 VTech
Printed in China
91-003023-000 US
CA
INTRODUCTION
Thank you for purchasing the VTech® Go! Go! Smart Animals™
Gallop & Go StableTM!
STABLE
FOOD
TROUGH
5 SMARTPOINT®
LOCATIONS
RIDING RING
SEE-SAW
Introduction
Race and train your horse at the Go! Go! Smart Animals™ Gallop
& Go Stable™ by VTech®. Learn about horses, colors and more with
the helpful SmartPoint® horse. Move the horse around the riding ring
or place her on the see-saw in the middle to watch her move up and
down. Then, feed her from the trough and put her to bed in the stable.
For added fun, connect this playset to other Go! Go! Smart Animals™
and Go! Go! Smart Wheels® playsets (each sold separately).
SEE-SAW
CONTROLLER
HORSE
3
INCLUDED IN THIS PACKAGE
• One VTech® Go! Go! Smart Animals™ horse
• One stable base with three SmartPoint® locations
• One stable roof
• One stable back wall
• One spinning weather vane
• One SmartPoint® food trough piece
•
•
•
•
Included In This Package
• One user’s manual
• One sheet of labels
One riding ring with one SmartPoint® location
One horseshoe accessory
Four riding ring fences
One swinging gate
4
•
•
•
•
One arch
One straight track
Two male/female connector tracks
One female connector track
Included In This Package
• Two straight stable fences with gates
• One straight stable fence
• One short straight track
• One 90-degree track
• One 60-degree track
• One cross track
5
WARNING: All packing materials, such as tape, plastic sheets,
packaging locks and tags are not part of this toy,
and should be discarded for your child’s safety.
ATTENTION :Pour la sécurité de votre enfant, débarrassezvous de tous les produits d’emballage tels que
rubans adhésifs, feuilles de plastique, attaches et
étiquettes. Ils ne font pas partie du jouet.
NOTE: Please keep user’s manual as it contains important
information.
Turn the packaging lock counter-clockwise
several times.
Pull out and discard the packaging lock.
GETTING STARTED
BATTERY INSTALLATION - Horse
1. Make sure the unit is turned OFF.
2. Locate the battery cover on the bottom
of the horse. Use a coin or a screwdriver
to loosen the screw.
3. Install 2 new ‘AAA’ (AM-4/LR03)
batteries following the diagram inside
the battery box. (The use of new
alkaline batteries is recommended for
maximum performance.)
4. Replace the battery cover and tighten
the screw to secure the battery cover.
Getting Started
Unlock the packaging locks:
6
•
•
•
•
•
•
•
•
•
•
•
•
Use new alkaline batteries for maximum performance.
Use only batteries of the same or equivalent type as
recommended.
Do not mix different types of batteries: alkaline, standard
(carbon-zinc) or rechargeable (Ni-Cd, Ni-M horse H), or new and
used batteries.
Do not use damaged batteries.
Insert batteries with the correct polarity.
Do not short-circuit the battery terminals.
Remove exhausted batteries from the toy.
Remove batteries during long periods of non-use.
Do not dispose of batteries in fire.
Do not charge non-rechargeable batteries.
Remove rechargeable batteries from the toy before charging (if
removable).
Rechargeable batteries are only to be charged under adult
supervision.
Getting Started
BATTERY NOTICE
7
80-180600-001-001
Label size: 240x155mm
P/N:92-007509-000-100
Label Instructions
Please adhere the labels to the playset securely as
indicated below:
8
ASSEMBLY INSTRUCTIONS
1. Insert the four riding ring fences into the holes around the riding
ring. Insert the horseshoe accessory into the corresponding hole
at the back of the riding ring. Insert the swinging gate into the
corresponding hole of the riding ring. You will hear a click sound to
indicate the accessories are secure.
2. Connect the short straight track to the stable base, then put the
back wall of the stable into its position on the stable base. Insert
the three straight fences into the stable base. You will hear a click
sound to indicate the stable pieces are secure.
Assembly Instructions
With the VTech® Go! Go! Smart Animals™ Gallop & Go StableTM,
safety comes first. To ensure your child’s safety, adult assembly is
required.
9
4. Insert the arch into corresponding holes of the straight track. You
will hear a click sound to indicate the arch is secure.
After the previous steps, connect the riding ring and stable to
the included track pieces.You can configure them into different
arrangements.
Assembly Instructions
3. Insert the spinning weather vane into the roof of the stable, then
put the roof onto the stable. You will hear a click sound to indicate
the roof is secure.
10
PRODUCT FEATURES - HORSE
To turn the unit ON, slide the ON/OFF
SWITCH to the ON ( ) position. To turn
the unit OFF, slide the ON/OFF SWITCH
to the OFF ( ) position.
2.AUTOMATIC SHUT-OFF
To preserve battery life, the VTech® Go! Go! Smart Animals™
horse will automatically power-down after approximately 60 seconds
without input. The unit only can be turned on again by pressing the
light-up button or pushing the horse quickly.
ACTIVITIES - HORSE
1. Slide the ON/OFF SWITCH to the ON
position to turn the unit on. You will hear
horse sounds, a song and a phrase.
The light will flash with the sound.
Product Features/Activities
1.ON/OFF SWITCH
2. Press the LIGHT-UP BUTTON to hear
fun sounds, sing-along songs and
phrases. The light will flash with the
sounds.
11
4. For added fun, the horse interacts with
VTech® Go! Go! Smart Animals™
playsets (each sold separately). Simply
roll the horse over one of the playset’s
SmartPoint® locations to see the light
flash and to hear greetings, fun sounds,
short tunes and sing-along songs. You
can also play with your animal on Go!
Go! Smart Wheels® playsets (each
sold separately).
ACTIVITIES - PLAYSET
Activities
3. Push the horse to hear fun sounds and
melodies. While a melody is playing,
push the horse again to add in fun
sounds on top of the melody. The light
will flash with the sounds.
1. Roll the SmartPoint® horse over the
playset’s five SmartPoint® locations to
trigger fun sounds, phrases and singalong songs.
2. Flip the food trough to change between
apples and corn.
12
3. Spin the weather vane to hear a clicking
sound.
CARE & MAINTENANCE
1. Keep the unit clean by wiping it with a slightly damp cloth.
2. Keep the unit out of direct sunlight and away from any direct heat.
3. Remove the batteries when the unit will not be in use for an extended
period of time.
4. Do not drop the unit on hard surfaces and do not expose the unit
to moisture or water.
Care & Maintenance
4. Turn the see-saw controller to spin the
see-saw around.
13
TROUBLESHOOTING
If for some reason the program/activity stops working or malfunctions,
please follow these steps:
1. Please turn the unit OFF.
2. Interrupt the power supply by removing the batteries.
3. Let the unit stand for a few minutes, then replace the batteries.
4. Turn the unit ON. The unit should now be ready to play again.
If the problem persists, please call our Consumer Services Department
at 1-800-521-2010 in the U.S. or 1-877-352-8697 in Canada, and a
service representative will be happy to help you.
For information on this product’s warranty, please call VTech® at
1-800-521-2010 in the U.S. or 1-877-352-8697 in Canada.
IMPORTANT NOTE:
Creating and developing Infant Learning products is accompanied
by a responsibility that we at VTech® take very seriously. We make
every effort to ensure the accuracy of the information which forms
the value of our products. However, errors sometimes can occur. It
is important for you to know that we stand behind our products and
encourage you to call our Consumer Services Department at 1-800521-2010 in the U.S. or 1-877-352-8697 in Canada with any problems
and/or suggestions that you might have. A service representative
will be happy to help you.
Troubleshooting
5. If the product still does not work, replace with a new set of batteries.
14
• Reorient or relocate the receiving antenna.
• Increase the separation between the equipment and receiver.
• Connect the equipment into an outlet on a circuit different from that
to which the receiver is connected.
• Consult the dealer or an experienced radio/TV technician for help.
THIS DEVICE COMPLIES WITH PART 15 OF THE FCC
RULES. OPERATION IS SUBJECT TO THE FOLLOWING TWO
CONDITIONS: (1) THIS DEVICE MAY NOT CAUSE HARMFUL
INTERFERENCE, AND (2) THIS DEVICE MUST ACCEPT ANY
INTERFERENCE RECEIVED, INCLUDING INTERFERENCE
THAT MAY CAUSE UNDESIRED OPERATION.
Other Info
NOTE:
This equipment has been tested and found to comply with the limits
for a Class B digital device, pursuant to Part 15 of the FCC Rules.
These limits are designed to provide reasonable protection against
harmful interference in a residential installation. This equipment
generates, uses and can radiate radio frequency energy and, if not
installed and used in accordance with the instructions, may cause
harmful interference to radio communications. However, there is no
guarantee that interference will not occur in a particular installation. If
this equipment does cause harmful interference to radio or television
reception, which can be determined by turning the equipment off and
on, the user is encouraged to try to correct the interference by one or
more of the following measures:
CAN ICES-3 (B)/NMB-3(B)
Caution: Changes or modifications not expressly approved by the
party responsible for compliance could void the user’s authority to
operate the equipment.
15
To register your product online at www.vtechkids.com/warranty
PRODUCT WARRANTY
This Warranty is applicable only to the original purchaser,
is non-transferable and applies only to “VTech” products or
parts. This product is covered by a 3-month Warranty from
the original purchase date, under normal use and service,
against defective workmanship and materials. This Warranty does not apply
to (a) consumable parts, such as batteries; (b) cosmetic damage, including
but not limited to scratches and dents; (c) damage caused by use with nonVTech products; (d) damage caused by accident, misuse, unreasonable use,
immersion in water, neglect, abuse, battery leakage, or improper installation,
improper service, or other external causes; (e) damage caused by operating
the product outside the permitted or intended uses described by VTech in the
owner’s manual; (f) a product or part that has been modified (g) defects caused
by normal wear and tear or otherwise due to the normal aging of the product; or
(h) if any VTech serial number has been removed or defaced.
Prior to returning a product for any reason, please notify the VTech Consumer
Services Department, by sending an email to [email protected] or
calling 1-800-521-2010. If the service representative is unable to resolve the
issue, you will be provided instructions on how to return the product and have
it replaced under Warranty. Return of the product under Warranty must adhere
to the following rules:
If VTech believes that there may be a defect in the materials or workmanship of
the product and can confirm the purchase data and location of the product, we
will at our discretion replace the product with a new unit or product of comparable
value. A replacement product or parts assumes the remaining Warranty of the
original product or 30 days from the date of replacement, whichever provides
longer coverage.
THIS WARRANTY AND THE REMEDIES SET FORTH ABOVE ARE EXCLUSIVE
AND IN LIEU OF ALL OTHER WARRANTIES, REMEDIES AND CONDITIONS,
WHETHER ORAL, WRITTEN, STATUTORY, EXPRESS OR IMPLIED. IF VTECH
CANNOT LAWFULLY DISCLAIM STATUTORY OR IMPLIED WARRANTIES
THEN TO THE EXTENT PERMITTED BY LAW, ALL SUCH WARRANTIES
SHALL BE LIMITED TO THE DURATION OF THE EXPRESS WARRANTY AND
TO THE REPLACEMENT SERVICE AS DETERMINED BY VTECH IN ITS SOLE
DISCRETION.
To the extent permitted by law, VTech will not be responsible for direct, special,
incidental or consequential damages resulting from any breach of Warranty.
This Warranty is not intended to persons or entities outside the United States
of America. Any disputes resulting from this Warranty shall be subject to the
final and conclusive determination of VTech .