1
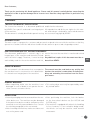
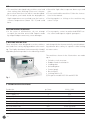
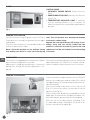
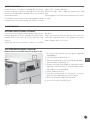
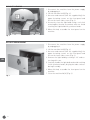
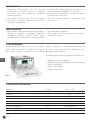
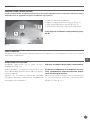
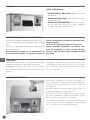
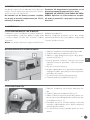
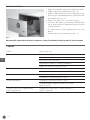
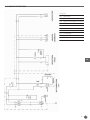
User manual
Instrukcja obsługi
CUTLERY DRYERS
URZĄDZENIE DO POLEROWANIA
SZTUĆCÓW
Item: 231517
You should read this user manual carefully before
using the appliance
Przed uruchomieniem urządzenia należy koniecznie
dokładnie przeczytać niniejszą instrukcję obsługi
Keep this manual with the appliance.
Diese Gebrauchsanweisung bitte beim Gerät aufbewahren.
Bewaar deze handleiding bij het apparaat.
Zachowaj instrukcję urządzenia.
Gardez ces instructions avec cet appareil.
Conservate le istruzioni insieme all’apparecchio.
Păstraţi manualul de utilizare alături de aparat.
Хранить руководство вместе с устройством.
For indoor use only.
Nur zur Verwendung im Innenbereich.
Alleen voor gebruik binnenshuis.
Do użytku wewnątrz pomieszczeń.
Pour l’usage à l’intérieur seulement.
Destinato solo all’uso domestico.
Numai pentru uz casnic.
Использовать только в помещениях.
INDEX
1. WARNINGS .....................................................................................3
2. MACHINE DESCRIPTION ...............................................................4
3. TECHNICAL SPECIFICATIONS ......................................................4
4. INSTALLATION ...............................................................................5
5. USE .................................................................................................6
6. MAINTENANCE ..............................................................................7
7. MALFUNCTIONS ............................................................................9
8. WIRING DIAGRAM .......................................................................10
9. LIST OF SPARE PARTS ...............................................................11
2
Dear Customer,
Thank you for purchasing this Hendi appliance. Please read this manual carefully before connecting the
appliance in order to prevent damage due to incorrect use. Read the safety regulations in particular very
carefully.
1. WARNINGS
“INSTRUCTION MANUAL” IDENTIFICATION
The instruction manual is a document published
by HENDI. For a specific order and is an integral part
of the machine.
This document is suitably identified to permit tracing
and/or further reference.
All reproduction and disclosure rights for this manual and relevant cited and/or enclosed documents
are reserved. Copyright by HENDI.
DOCUMENT SCOPE
The main scope is to prepare the customer and personnel assigned to interact with the machine so that they
operate in accordance with the indications found in this document to protect and safeguard personnel.
HOW TO READ AND USE THE “INSTRUCTION MANUAL”
This document, published in 1 contract copy, is an even in the event the machine is transferred to third
integral part of the machine and therefore includ- parties.
ed in the initial supply. Therefore, it must be kept Any additional copies of this document must be orand suitably used for the entire machine work life, dered from HENDI.
USING THE MANUAL
The use manual is the document that accompanies The manual must be read before any activity that
the machine from its construction to its demolition. involves the machine is undertaken including hanIt is therefore an integral part of the machine.
dling and unloading the machine from the transport means.
GENERAL WARNINGS
• When unpacking, make sure the machine is not • This cutlery dryer must only be operated by suitadamaged. In case of doubt, to not operate the mably trained adults.
chine. Contact customer service.
INSTALLATION
• Internal packaging must be removed from the ma- • After positioning the machine, lock the brakes
chine before use. The machine may be damaged
on the front wheels before use (for ASC30A and
if the protection devices used for transport are not
ASC50A only).
removed, or not fully removed before use. Consult • The machine is equipped with wheels for handling
the relevant paragraph in the use manual.
in loco; however, it is not suited for being towed:
• After installing the machine, make sure it does not
the wheels can only be used for small manual
rest on the power cord.
movements.
3
EN
USE
• This machine is designed to dry stainless steel and • Ultraviolet light: direct exposure burns eyes and
silver cutlery after washing. Do not use it for purskin.
poses other than those for which it was designed. • Do not overload the machine. Follow the instruc• Do not place your hands inside the drying basin.
tions in the manual.
High temperatures are reached near the heat re- • Resting against or sitting on the machine may
sistance temperatures (about 150 °C) and could
cause it to tip.
burn.
CUSTOMER SERVICE/REPAIRS
• In the event of malfunctions, do not attempt • For any repairs, contact an authorized HENDI serto repair the machine unassisted. Repairs made
vice centre and request original spare parts.
by unqualified personnel may cause damages.
2. MACHINE DESCRIPTION
These machines were designed to resolve stainless tank along with the thermostatically controlled heatsteel and silver cutlery drying problems after wash- ing element dries cutlery to a perfect shine leaving
ing. The highly absorbent (environmentally friendly) no water stains.
vegetable granulate product in the vibrating circular
The machines shown in the illustrations are made
up of:
• Stainless steel structure
• Rubber lined circular basin
• Loading door
• Unloading door
• Control panel
• Basin flap (*)
• Locking wheels (*).
(*) Except for models ASC10A and ASC15A
EN
Fig. 1
3. TECHNICAL SPECIFICATIONS
Production
Max. cutlery dimension
Power supply (1~)
Frequency
Absorption
Total installed power
Eco grain load (Corncob)
Machine dimensions
Weight
Average noise level when operating
4
pc./hour
mm
V
Hz
A
W
kg
mm
kg
db(A)
2000 ÷ 3000
250
230
50/60
3
570
2,5
570x510x(H)380
45
< 80
4. INSTALLATION
SAFETY DEVICES FOR TRANSPORT
Before starting the machine make sure all the safety devices used for transport have been removed. Keeping all pieces for future use is recommended if the machine is moved in the future.
1. Lift the machine lid.
2. Unscrew and remove the fastening knob (A)
(Fig. 1).
3. Remove the basin lock brackets (B) (Fig. 1).
4. Assemble the lid and screw in the fastening knob.
The lid (D) must be closed before using the machine.
Fig. 2
POSITIONING
Install the machine on a flat surface. Make sure the machine does not touch walls or other appliances in the
installation area.
EN
ELECTRICAL CONNECTIONS
The machine is equipped with a power plug cord for
connections to the user’s mains.
Verify that the voltage and frequency of the power supply comply with the data of the nameplate
applied on the machine.
Make sure that the electrical system is able to support the require maximum load, also considering
the other appliances in use.
CONNECT THE MACHINE TO A SOCKET WITH GROUNDING
The manufacturer is not liable to damages or inju- When replacing the power supply cable please apply
ries caused by neglect to observe the abovemen- to the HENDI Technical Service.
tioned safety regulations.
5
5. USE
CONTROL PANEL
1. AUTOMATIC POWER SWITCH Powers the machine
2. POWER INDICATOR LIGHT Indicates that the machine is on.
3. TEMPERATURE INDICATOR LIGHT It indicates
that the heating element is on. It switches off
when the machine has reached the required temperature.
Fig. 3
LOADING THE CORNCOB
Start the machine using the power switch (1) (Fig.3).
Slowly pour the corncob (eco granular) in the upper
loading door.
Pour the exact amount of corncob indicated in the
technical specifications table.
Never allow the machine to run without having
first making sure there is a corn cob in the drying
EN
tank. This will prevent over-heating and damage
to the tank’s rubber lining.
Replace the corn cob with every 25-30 days of use.
Always verify that the cutlery loaded into the
machine is wet but free from oil, grease and acid
substances in order not to deteriorate the coating
of the tank.
THERMOSTAT
The machine is equipped with a thermostat to adjust The machine normally operates with the thermostat
dryer element temperature (corncob).
adjusted between 40° and 50°C in normal environAdjustment is made by manufactures. technicians mental conditions where machine use is foreseen.
during their testing. No further adjustment is required.
LOADING THE MACHINE
Start the machine using the power switch (1) (Fig. 3).
Wait for the temperature indicator light (3) to switch
off (approximately 20 min) before placing cutlery inside the machine.
Turn the UV lamp on by means of the selector (3)
(Fig. 3). Position the cutlery recovery basin on the
specific shelf (Fig. 5).
Place cutlery to be dried in the loading door on the
upper part of the machine. Gradually introduce cutlery to be dried to prevent them from entangling.
After the use of the dryer, before switching it off,
it is advisable to keep it running for 10-15 min to allow the corncob to thoroughly dry.
Fig. 4
6
SAFETY WARNINGS
Safety features have been included by the manufacturer to protect operators during their work and
therefore should not be removed unless for cleaning
and maintenance.
Do not place your hands inside the drying basin. High
temperatures are reached near the heat resistance
(about 150 °C) and could burn.
Ultraviolet light: direct exposure burns eyes and
skin.
Resting against or sitting on the machine may cause
it to tip.
6. MAINTENANCE
INTERNAL AND EXTERNAL CLEANING
Clean the machine daily removing any materials deposited during use. Use a sponge with warm water
and dry with a soft cloth. Do not use abrasive substances.
Important: do not use alcohol, solvents or similar
products.
Clean the machine interior (basin) every time the
corncob is replaced. Only use a sponge with warm
water and dry with a soft cloth.
ECO GRAIN REPLACEMENT (CORNCOB)
Replace the corn cob with every 25-30 days of use.
1. Disconnect the machine from the power supply by
unplugging it.
2. Lift the machine lid (A) (Fig. 6).
3. Unscrew and remove the fastening knob and remove the basin lid (B) (Fig. 7).
4. Remove corncob from the basin: Manually removing (with a small shovel) the corncob and vacuuming residue is recommended.
5. Clean the basin interior.
6. Pour the exact amount of corncob (see technical
specifications table) directly into the basin.
7. When finished, assemble the basin lid.
8. Close the machine lid (A) (Fig. 6).
Fig. 5
7
EN
UV LIGHT CLEANING
1. Disconnect the machine from the power supply
by unplugging it.
2. Lift the machine lid (A) (Fig. 6)..
3. Unscrew and remove (with the supplied key) the
upper fastening screws on the front panel and
loosen the lower side screws (Fig. 6).
4. Accurately clean the light bulb using a soft cloth
removing dust that be accumulate with use. Avoid
touching the light bulb with your bare hands.
5. When finished, assemble the front panel on the
machine.
Fig. 6
UV LIGHT REPLACEMENT
1. Disconnect the machine from the power supply
by unplugging it.
2. Lift the machine lid (A) (Fig. 6).
3. Unscrew and remove (with the supplied key) the
upper fastening screws on the front panel and
loosen the lower side screws (Fig. 6).
4. Remove the light bulb by rotating it 90° and extracting with care.
5. Carefully handle the light bulb and avoid touching
it with your bare hands, dirtying the tube surfaces
during assembly.
6. When finished, assemble the front panel on the
machine.
7. Close the machine lid (A) (Fig. 6).
EN
Fig. 7
8
7. MALFUNCTIONS
Malfunction
Possible causes
The machine does not work
No power in the socket.
The plug is not correctly inserted.
The automatic power switch is not on (O).
The machine lid is not correctly closed.
The automatic circuit breaker was triggered.
The UV light does not turn on
Light plug disconnected.
Light bulb burned out.
The machine does not heat
Heating element broken (call customer service).
Thermostat broken (call customer service).
The corncob (eco grain) tends to burn
Thermostat broken (call customer service).
Faulty or incorrectly positioned temperature probe
(call customer service).
The dried cutlery is not polished or appears
stained
The corncob (eco grain) has lost its absorbent and polishing properties (replace it).
EN
9
8. WIRING DIAGRAM
Key
QF1
HL1
SQ1
M1
C1
R1
HL3
EH
E1
M2
EN
10
Automatic switch
Line indicator light
Safety limit switch
Motor
Condenser
Resistance
Heat indicator light
Thermostat
UV light
Fan
9. LIST OF SPARE PARTS
8 W UV light
Mini – ceiling light 8W 230 V 50 Hz
Moto-vibrator 220/230V MF rpm1440 with grounding 50Hz
Condenser
Fan 120x120 220V
Flat resistance- 230V - 440W
Thermostat
Automatic switch
Indicator light
Limit switch
Perforated service box safe for contact with food
Service box safe for contact with food
Ecological grain GRAECOL 3 kg
HENDI 231517
32207068
32207069
32302101
32702026
32401022
32604027
32501038
32201291
32201104
32201078
31704067
31704069
HENDI 975909
EN
11
PL
SPIS TREŚCI
1. OSTRZEŻENIA ................................................................................13
2. OPIS URZĄDZENIA ........................................................................14
3. SPECYFIKACJA TECHNICZNA.......................................................14
4. INSTALACJA ...................................................................................15
5. OBSŁUGA .......................................................................................16
6. KONSERWACJA..............................................................................17
7. AWARIE ...........................................................................................18
8. SCHEMAT ELEKTRYCZNY..............................................................19
9. LISTA CZĘŚCI ZAMIENNYCH .........................................................20
12
Szanowny Kliencie,
Dziękujemy za zakup urządzenia firmy Hendi. Prosimy o uważne zapoznanie się z niniejszą instrukcją
przed podłączeniem urządzenia, aby uniknąć uszkodzeń spowodowanych niewłaściwą obsługą. Należy
zwrócić szczególną uwagę na zasady bezpieczeństwa.
1. OSTRZEŻENIA
INSTRUKCJA OBSŁUGI
Instrukcja stanowi dokument wydany przez firmę
HENDI POLSKA Sp. z o.o. do określonego zamówienia i jest integralną częścią urządzenia.
Niniejszy dokument jest powinien być łatwo identyfikowany, aby umożliwić szybkie wyszukanie i
odwołania.
Wszelkie prawa do kopiowania i ujawniania niniejszej instrukcji i powoływanych w niej albo załączonych dokumentach są zastrzeżone. Prawa autorskie HENDI POLSKA Sp. z o.o.
ZAKRES DOKUMENTU
Głównym celem dokumenty jest przygotowanie klienta i pracowników wyznaczonych do obsługi maszyny
do prawidłowej eksploatacji zgodnie ze wskazówkami i w bezpieczny sposób.
KORZYSTANIE Z INSTRUKCJI
Niniejszy egzemplarz instrukcji stanowi integralną Wszelkie dodatkowe kopie dokumentu należy zaczęść urządzenia. Instrukcję należy zachować na mówić w firmie HENDI POLSKA Sp. z o.o.
cały okres eksploatacji urządzenia, nawet w przypadku przekazania urządzenia osobom trzecim.
KORZYSTANIE Z INSTRUKCJI
Instrukcja stanowi dokument towarzyszący urzą- Przed rozpoczęciem eksploatacji, a także przez
dzeniu od momentu wytworzenia do utylizacji. Dla- rozładowaniem urządzenia ze środka transportu
tego stanowi jego integralny element.
należy zapoznać się z instrukcją.
OSTRZEŻENIA OGÓLNE
• Podczas rozpakowywania należy uważać, aby nie
obsługą klienta.
uszkodzić urządzenia. W przypadku wątpliwo- • Urządzenie mogą obsługiwać wyłącznie odpości nie używać urządzenia. Skontaktować się z
wiednio wyszkoleni pracownicy.
INSTALACJA
• Przed oddaniem urządzenia do eksploatacji naNależy zapoznać się z odpowiednim punktem
leży zdjąć opakowanie. Nieusunięcie albo nieinstrukcji.
pełne usunięcie zabezpieczeń transportowych • Po instalacji urządzenia sprawdzić, czy nie stoi
może doprowadzić do uszkodzenia urządzenia.
ono na kablu zasilającym.
13
PL
PRZEZNACZENIE
• Urządzenie przeznaczone jest do suszenia • Promienie UV: bezpośrednie wystawienie na ich
i polerowania sztućców stalowych i srebrnych
działanie prowadzi do poparzeń oczu i skóry.
po umyciu. Nie należy używać go niezgodnie • Nie przepełniać urządzenia. Postępować zgodnie
z przeznaczeniem.
z poleceniami w instrukcji.
• Nie wkładać rąk do komory suszenia. Urządze- • Opieranie się albo siadanie na urządzeniu może
nie pracuje w wysokiej temperaturze (ok. 150°C),
je przewrócić.
może dojść do poparzeń.
SERWIS/NAPRAWY
• W przypadku nieprawidłowego działania lub prodo uszkodzenia urządzenia.
blemów nie próbować samodzielnie naprawiać • W celu naprawy należy skontaktować się z autoryurządzenia. Naprawy wykonane przez niewyzowanym serwisem.
kwalifikowanych pracowników mogą prowadzić
2. OPIS URZĄDZENIA
Urządzenie przeznaczone jest do suszenia i polero- wodzie stosowany jest wysokochłonny (ekologiczny)
wania sztućców stalowych i srebrnych po umyciu. granulat roślinny umieszczany w wibrującym okrąDo suszenia sztućców i usuwania z nich śladów po głym pojemniku z grzałką.
Urządzenia przedstawione na zdjęciach składają się z:
PL
•
•
•
•
•
Obudowy ze stali nierdzewnej
Okrągłej, wyłożonej gumowym materiałem komory
Otworu wlotowego
Otworu wylotowego
Panelu sterowania
Rys. 1
3. SPECYFIKACJA TECHNICZNA
Wydajność
Maksymalna długość sztućców
Zasilanie
Częstotliwość
Zabezpieczenie
Moc
Granulat ekologiczny (kukurydziany)
Wymiary urządzenia
Waga
Średnia emisja hałasu podczas pracy
14
szt./godz.
mm
V
Hz
A
W
kg
mm
kg
dB (A)
2000 – 3000
250
230
50/60
3
570
2,5
570x510x(H)380
45
< 80
4. INSTALACJA
ZABEZPIECZENIA TRANSPORTOWE
Przed uruchomieniem urządzenia należy usunąć wszystkie zabezpieczenia transportowe. Należy zachować
zabezpieczenia na wypadek transportu urządzenia w przyszłości.
1. Podnieść pokrywę urządzenia.
2. Odkręcić i zdjąć pokrętło mocujące (A) (rys. 2).
3. Zdjąć klamry blokujące komorę (B) (rys. 2).
4. Zamontować pokrywę i zamocować pokrętłem.
Przed użyciem urządzenia należy zamknąć pokrywę (D).
Rys. 2
UMIEJSCOWIENIE
Urządzenie należy zainstalować na płaskiej powierzchni. Upewnić się, że urządzenie nie styka się ze ścianami
albo innymi urządzeniami.
PL
POŁĄCZENIA ELEKTRYCZNE
Urządzenie wyposażone jest w kabel zasilający
do podłączenia do sieci.
Należy sprawdzić, czy napięcie i częstotliwość zasilania odpowiadają parametrom na tabliczce znamionowej urządzenia.
Upewnić się, że instalacja elektryczna obsługuje
wymagane obciążenie maksymalne, uwzględniając
inne podłączone urządzenia.
Podłączyć urządzenie do gniazdka z uziemieniem.
Producent nie odpowiada za uszkodzenia ani obrażenia spowodowane nieprzestrzeganiem powyższych zasad bezpieczeństwa.
Aby wymienić kabel zasilający, należy skontaktować
się z autoryzowanym serwisem technicznym firmy
HENDI POLSKA Sp. z o.o.
15
5. OBSŁUGA
PANEL STEROWANIA
1. AUTOMATYCZNY WŁĄCZNIK Włącza zasilanie
urządzenia
2. KONTROLKA ZASILANIA Sygnalizuje, że urządzenie jest włączone.
3. KONTROLKA TEMPERATURY Oznacza, że grzałka jest włączona. Wyłącza się, gdy urządzenie
osiągnie wymaganą temperaturę.
Rys. 3
WSYPYWANIE GRANULATU KUKURYDZIANEGO
Uruchomić urządzenie za pomocą włącznika (1) (rys. 3).
Powoli wsypywać granulat kukurydziany przez górny
wlot.
Wsypać ilość granulatu wskazaną w tabeli specyfikacji technicznych.
Nie uruchamiać urządzenia nie upewniwszy się,
że w pojemniku znajduje się granulat. Pozwoli to
PL
TERMOSTAT
Urządzenie wyposażono w termostat pozwalający
regulować temperaturę granulatu suszącego.
Urządzenie regulowane jest przez serwisantów producenta podczas prób. Dalsza regulacja nie jest wymagana.
uniknąć przegrzania i uszkodzenia gumowej okładziny pojemnika.
Co 25-30 dni eksploatacji wymieniać granulat.
Zawsze dokładnie sprawdzać, czy sztućce ładowane do urządzenia są mokre i wolne od oleju,
tłuszczy i kwasów, które mogą uszkodzić powłokę
pojemnika.
Urządzenie zazwyczaj pracuje przy termostacie
ustawionym w zakresie od 40° do 50°C w normalnych warunkach, dla których przewidziano eksploatację urządzenia.
ŁADOWANIE URZĄDZENIA
Uruchomić urządzenie za pomocą włącznika (1)
(rys. 3). Odczekać aż zgaśnie kontrolka temperatury (3) (ok. 20 min.) przed umieszczeniem sztućców
w urządzeniu.
Włączyć lampę UV za pomocą przycisku (3) (rys. 3).
Zamontować półkę na sztućce (rys. 5).
Sztućce do wysuszenia podać przez otwór w górnej części urządzenia. Stopniowo wkładać sztućce
do wysuszenia, aby uniknąć ich sklejania.
Po zakończeniu używania i przed wyłączeniem zaleca się pozostawienie urządzenia pracującego
na 10-15 min w celu osuszenia granulatu.
Rys. 4
16
OSTRZEŻENIA DOTYCZĄCE BEZPIECZEŃSTWA
Urządzenie wyposażono w zabezpieczenia fabryczne
mające chronić operatorów, poza myciem i konserwacją nie wolno ich zdejmować.
Nie wkładać rąk do komory suszenia. Urządzenie pracuje w wysokiej temperaturze (ok. 150°C),
może dojść do poparzeń.
Promienie UV: bezpośrednie wystawienie na ich
działanie prowadzi do poparzeń oczu i skóry.
ZABRANIA SIĘ OPIERAĆ I/LUB SIADAĆ NA URZĄDZENIU. Opieranie się i/lub siadanie na urządzeniu może je przewrócić i przyczynić się do uszkodzeń ciała.
6. KONSERWACJA
CZYSZCZENIE WEWNĄTRZ I NA ZEWNĄTRZ
Codziennie czyścić urządzenie usuwając ewentualne nagromadzone osady. Myć gąbką z ciepłą wodą
i osuszyć miękką ścierką. Nie stosować środków
ściernych.
Ważne: nie używać alkoholu, rozpuszczalników ani
podobnych produktów.
Wnętrze urządzenia (komorę) czyścić przy każdej
wymianie granulatu. Myć tylko gąbką z ciepłą wodą
i osuszyć miękką ścierką.
WYMIANA GRANULATU KUKURYDZIANEGO
1. Odłączyć urządzenie od zasilania odłączając kabel.
2. Podnieść pokrywę urządzenia (A) (rys. 6).
3. Odkręcić i zdjąć pokrętło mocujące i zdjąć pokrywę komory (B) (rys. 7).
4. Usunąć granulat z komory: Zalecane jest ręczne
(łopatką) usunięcie granulatu i odessanie pozostałości.
5. Wyczyścić wnętrze komory.
6. Wsypać odpowiednią ilość granulatu kukurydzianego (patrz tabela specyfikacji technicznych) bezpośrednio do komory.
7. Po zakończeniu założyć pokrywę komory.
8. Zamknąć pokrywę urządzenia (A) (rys. 6).
Rys. 5
CZYSZCZENIE LAMPY UV
1. Odłączyć urządzenie od zasilania odłączając kabel.
2. Podnieść pokrywę urządzenia (A) (rys. 6).
3. Odkręcić (dołączonym kluczem) i zdjąć górne śruby mocujące z przedniego panelu i poluzować dolne śruby boczne (rys. 6).
4. Dokładnie wyczyścić żarówkę miękką ściereczką
usuwając nagromadzony kurz. Unikać dotykania
żarówki gołymi rękami.
5. Po zakończeniu założyć przedni panel na urządzenie.
Rys. 6
17
PL
WYMIANA LAMPY UV
1. Odłączyć urządzenie od zasilania odłączając kabel.
2. Podnieść pokrywę urządzenia (A) (rys. 6).
3. Odkręcić (dołączonym kluczem) i zdjąć górne śruby mocujące z przedniego panelu i poluzować dolne śruby boczne (rys. 6).
4. Obrócić żarówkę o 90° i ostrożnie ją wyjąć.
5. Ostrożnie obchodzić się z żarówką, unikać dotykania jej gołymi rękoma i zabrudzenia powierzchni w
trakcie montażu.
6. Po zakończeniu założyć przedni panel na urządzenie.
7. Zamknąć pokrywę urządzenia (A) (rys. 6).
Rys. 7
Aby zapewnić odpowiednie działanie urządzenia, lampę (świetlówkę) należy wymieniać do 8000 godzin
7. AWARIE
Awaria
Urządzenie nie włącza się
Możliwe przyczyny
Brak zasilania w gniazdku
Nieprawidłowo podłączona wtyczka
PL
Włącznik nie został włączony
Nieprawidłowe zamknięcie pokrywy urządzenia
Zadziałanie automatycznego wyłącznika
Lampa UV nie włącza się
Wtyczka lampy odłączona
Przepalona żarówka
Urządzenie nie nagrzewa się
Uszkodzenie grzałki (wezwać serwis)
Granulat przypala się
Uszkodzenie termostatu (wezwać serwis)
Uszkodzenie termostatu (wezwać serwis)
Uszkodzona albo niepoprawnie podłączona sonda
(wezwać serwis)
Osuszone sztućce nie są wypolerowane
lub występują plamy
18
Granulat utracił właściwości chłonne i polerujące
(wymienić granulat)
8. SCHEMAT ELEKTRYCZNY
Przycisk
QF1 Włącznik
HL1 Kontrolka zasilania
SQ1 Wyłącznik bezpieczeństwa
M1 Silnik
C1 Kondensator
R1 Rezystor
HL3 Kontrolka nagrzewania
EH Termostat
E1 Lampa UV
M2 Wentylator
PL
19
9. LISTA CZĘŚCI ZAMIENNYCH
Lampa UV 8W
Mini - oświetlenie górne 8W 230 V 50 Hz
Silnik wibracyjny 220/230V MF obr/min 1440 z uziemieniem 50Hz
Kondensator
Wentylator 120x120 220V
Rezystor płaski - 230V - 440W
Termostat
Włącznik
Kontrolka
Wyłącznik bezpieczeństwa
Perforowana skrzynka dopuszczona do kontaktu z żywnością
Serwisowa skrzynka dopuszczona do kontaktu z żywnością
Granulat ekologiczny waga 3 kg
PL
20
HENDI 231517
32207068
32207069
32302101
32702026
32401022
32604027
32501038
32201291
32201104
32201078
31704067
31704069
HENDI 975909
21
22
23
Hendi B.V.
Hendi Food Service Equipment Romania S.R.L.
Steenoven 21
Str. Zizinului nr. 106A, Complex Duplex 3 Hala G4
3911 TX Rhenen, The Netherlands
Brasov 500407 RO, Romania
Tel:
+31 (0)317 681 040
Tel:
+40 268 320330
Fax:
+31 (0)317 681 045
Fax:
+40 268 320335
Email:
[email protected]
Email:
offi[email protected]
Hendi Polska Sp. z o.o.
Hendi HK Ltd.
ul. Magazynowa 5
1603-5, Tower II, Enterprise Square
62-023 Gądki, Poland
9 Sheung Yuet Road, Kowloon Bay, Hong Kong
Tel:
+48 61 6587000
Tel:
+852 2801 5019
Fax:
+48 61 6587001
Fax:
+852 2801 5057
Email:
[email protected]
Email:
[email protected]
Hendi Food Service Equipment GmbH
Find Hendi on internet:
Gewerbegebiet Ehring 15
www.hendi.eu
5112 Lamprechtshausen, Austria
www.facebook.com/HendiFoodServiceEquipment
Tel:
+43 (0) 6274 200 10 0
www.linkedin.com/company/hendi-food-service-equipment-b.v.
Fax:
+43 (0) 6274 200 10 20
www.youtube.com/HendiEquipment
Email:
offi[email protected]
- Changes, printing and typesetting errors reserved.
- Producent zastrzega sobie prawo do zmian
oraz błędów drukarskich w instrukcji.
© 2015 Hendi BV Rhenen - The Netherlands
Ver: 09-06-2015