1
Finding Your
Way around
the System
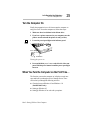
You’ve bought your new computer and taken everything out of
the box. Now you may be asking yourself, “OK, now what do I
do?” Well, this chapter is for you. This chapter helps you set up
your computer, gives you tips on working comfortably and takes
you on a tour of the computer’s features.
Make Sure You Have Everything
Your computer comes with everything you need to get up and running quickly. However, before you rush off, it's a good idea to
make sure you received everything you were supposed to. This
information is listed on the Quick Start Card at the top of the box.
If any items are missing or damaged, notify your dealer immediately. For additional help, contact Toshiba as described in “If You
Need Further Assistance” on page 227.
1
2
Finding Your Way around the System
Select a Place To Work
Select a Place To Work
You computer is portable, designed to be used in a variety of circumstances and locations. However, by giving some thought to
your work environment, you can protect the computer and make
your work hours more comfortable.
Keep the Computer Comfortable
Use a flat surface with enough room to operate comfortably. If
you're planning to use a printer or other external device, make sure
there's enough space for it as well.
To keep your computer in prime operating condition, make sure
your work area is free from:
❖ dust, moisture and direct sunlight.
❖ liquids and corrosive chemicals.
Don’t spill liquids into the computer. If you spill a liquid into
the keyboard, turn the computer off, unplug it from the AC
power source, and let it dry completely before turning it on
again.
If the computer does not operate correctly after you turn it
back on, contact a Toshiba authorized service provider.
❖ objects that generate a strong electromagnetic field, such as
stereo speakers (except ones you have connected to the computer) or speakerphones.
❖ rapid changes in temperature or humidity and sources of tem-
perature changes such as air conditioner vents or heaters.
❖ extreme heat, cold or humidity. Operate the computer within a
temperature range of 40 to 95 degrees Fahrenheit (5 to 35
degrees Celsius) and a relative humidity of 20 to 80 percent.
Part I: Getting To Know Your Computer
Finding Your Way around the System
Select a Place To Work
3
Keep Yourself Comfortable
Strain and stress injuries are becoming more common as people
spend more time using their computers. However, with a little care
and proper use of the equipment, you can work comfortably
throughout the day.
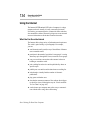
Using the computer keyboard incorrectly can result in discomfort and possible injury. If your hands, wrists, and/or
arms bother you while typing, discontinue using the computer and rest. If your discomfort persists, consult a
physician.
In addition to the hints provided in the following sections, there
are a number of books available on ergonomics, repetitive strain
injury, and repetitive stress syndrome.
Placement of the Computer
Proper placement of the computer and external devices is important to avoid stress-related injuries:
❖ Place the computer on a flat surface at a comfortable height
and distance. Your arms and hands should be in a relaxed position with your forearms parallel to the floor. The display
should be no higher than eye level.
❖ Maintain good posture with your body relaxed and your
weight distributed evenly. You should be able to type without
twisting your torso or neck, and see the display panel without
slouching.
❖ Adjust the display panel to avoid glare.
❖ If you use a paper holder, set it at about the same height and
distance as the computer.
Part I: Getting To Know Your Computer
4
Finding Your Way around the System
Select a Place To Work
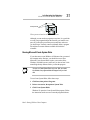
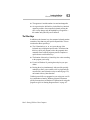
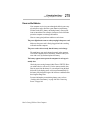
Seating and Posture
Proper seating is one of the primary factors in reducing work
strain. Some people find a backless chair more comfortable than a
conventional chair. Whichever type you choose, refer to the following guidelines to adjust your chair for maximum computing
comfort.
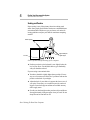
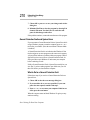
Below eye level
Approximately 90
degree angles
Foot rest
Correct posture and positioning of the computer
❖ Position your chair so the keyboard is at or slightly below the
level of your elbow. You should be able to type comfortably
with your shoulders relaxed.
If you are using a conventional chair:
❖ Your knees should be slightly higher than your hips. If neces-
sary, use a foot rest to raise the level of your knees and ease the
pressure on the back of your thighs.
❖ Adjust the back of your chair so it supports the lower curve of
your spine. If necessary, use a cushion to provide extra back
support. Lower back support cushions are available at many
office supply stores.
❖ Sit with your back straight so that your knees, hips and elbows
form approximately 90 degree angles when you work. Do not
slump forward or lean back too far.
Part I: Getting To Know Your Computer
Finding Your Way around the System
Select a Place To Work
5
Lighting
Proper lighting can improve the legibility of the display and
reduce eye strain.
❖ Position the display panel so that sunlight or bright indoor
lighting does not reflect off the screen. Use tinted windows or
shades to reduce glare.
❖ Avoid placing your computer in front of a bright light that
could shine directly in your eyes.
❖ If possible, use soft, indirect lighting in your computer work
area.
Arms and Wrists
❖ Avoid bending, arching, or angling your wrists. Keep them in
a relaxed, neutral position while typing.
❖ Exercise your hands, wrists and arms to improve circulation.
Work Habits
The key to avoiding discomfort or injury from repetitive strain is
to vary your activities. If possible, schedule a variety of tasks into
your work day. Finding ways to break up the routine can reduce
stress and improve your efficiency.
❖ Take frequent breaks to change position, stretch your muscles,
and relieve your eyes.
❖ Avoid performing repetitive activities for prolonged periods of
time. Vary activities from one task to another.
❖ Focusing your eyes on your computer screen for long periods
of time can cause eye strain. Look away from the computer
frequently and focus your eyes on a distant object.
Part I: Getting To Know Your Computer
6
Finding Your Way around the System
Find Out Where Everything's Located
Find Out Where Everything's Located
If you've never used a notebook computer before, you're probably
wondering how an entire computer can fit into so small a case.
The next few pages take you on a guided tour of the computer and
its components.
Rather than reading through this section, you may prefer to use it
as a reference as you move through the remainder of the manual
and need to locate specific parts of the computer. This information
is also available in the electronic form of this manual, described in
“Using Online Documentation” on page 187.
Don't worry if you don't know what some parts of the computer
do. Some items in this tour are for more advanced computing
functions that you may want to use as your computing needs and
skills increase.
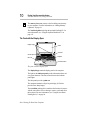
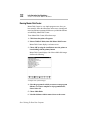
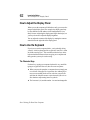
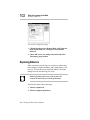
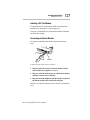
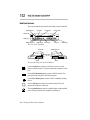
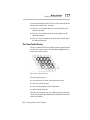
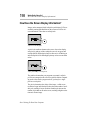
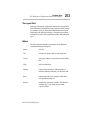
The Front with the Display Closed
Display latch
The front with the display closed
Pressing the display latch lets you open the computer's display
panel. For more information, see “Open the Display” on page 22.
Part I: Getting To Know Your Computer
Finding Your Way around the System
Find Out Where Everything's Located
7
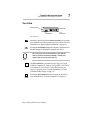
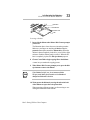
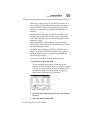
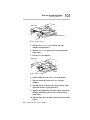
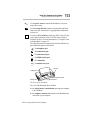
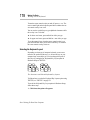
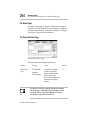
The Left Side
Security lock slot
Power button
Reset button
PC Card slot
The left side
Attaching a special cable to the security lock slot lets you anchor
your computer to your desk or other large, heavy object. For more
information, see “Applying Physical Restraints” on page 165.
Pressing the reset button restarts the computer. Use this button if
all other attempts at restarting the computer have failed.
Don’t use a pencil to press the reset button. Pencil lead can
break off inside the computer and damage it. Instead, use a
slender object such as an unbent paper clip.
The PC Card slot lets you install up to two Type I or Type II
PCMCIA-compatible PC Cards, or one Type III PC Card. The PC
Card sockets are covered by PC Card socket protectors (see
page 119) when not in use. For more information, see “Little
Cards that Do Big Things” on page 115.
On
Pressing the power button turns the computer on and off. For
more information, see “Turn the Computer On” on page 25.
Part I: Getting To Know Your Computer
8
Finding Your Way around the System
Find Out Where Everything's Located
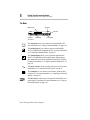
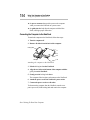
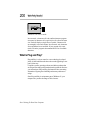
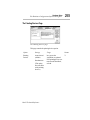
The Back
NoteDock port
Serial port
PS/2 port
Video port
Parallel port
Power socket
The back
The video port allows you to connect an external monitor. For
more information, see “Using an External Monitor” on page 139.
The parallel port lets you connect a printer or other parallel
device, including ECP-compatible devices. For more information,
see “Connecting a Parallel Printer” on page 21.
The NoteDock port allows you to connect the optional NoteDock™. The NoteDock provides all the ports of the computer
plus another PS/2 port and two additional Type III PC Card slots.
For more information, see “Using the Optional NoteDock™” on
page 151.
The power socket is where you plug in the power cord. For more
information, see “Connect to a Power Source” on page 15.
The serial port lets you connect a serial mouse, printer or other
serial device. For more information, see “Connecting an External
Modem” on page 127.
The PS/2 port provides access to an optional external PS/2-compatible mouse or keyboard. For more information, see “Using an
External Keyboard” on page 143.
Part I: Getting To Know Your Computer
Finding Your Way around the System
Find Out Where Everything's Located
9
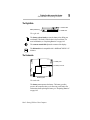
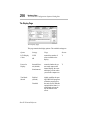
The Right Side
Contrast control
Battery release latch
Diskette drive
The right side
The battery release latch prevents the battery from falling out
accidentally. This latch is locked when it is moved down. For
more information, see “Replacing Batteries” on page 102.
The contrast control dial adjusts the contrast of the display.
The diskette drive is compatible with 1.44MB and 720KB 3 1/2"
diskettes.
The Underside
Battery cover
Memory slot cover
NoteDock guides
The underside
The battery cover protects the battery. The battery provides
power to the computer when you’re not using a wall outlet. For
information about replacing the battery, see “Replacing Batteries”
on page 102.
Part I: Getting To Know Your Computer
10
Finding Your Way around the System
Find Out Where Everything's Located
The memory slot cover protects a slot for adding extra memory
to your computer. For more information, see “Adding Memory
(Optional)” on page 16.
The NoteDock guides help align the optional NoteDock™. For
more information, see “Using the Optional NoteDock™” on
page 151.
The Front with the Display Open
Display hinges
Screen
AccuPoint
Indicator panel
Palm rest
Keyboard
AccuPoint buttons
The front with the display open
The display hinges attach the display panel to the computer.
The lights on the indicator panel provide information about various system functions. The next section discusses the indicator
panel lights.
The front panel provides a palm rest.
The computer's screen is a liquid crystal display (LCD) that
provides clear, sharp images.
The AccuPoint pointing device combines the function of a mouse
with the convenience of never having to remove your hands from
the keyboard. For more information, see “Using the AccuPoint
Pointing Device” on page 24.
Part I: Getting To Know Your Computer
11
Finding Your Way around the System
Find Out Where Everything's Located
The 82-key keyboard provides all the functionality of a full-sized
101-key keyboard. For more information, see “How to Use the
Keyboard” on page 62.
The AccuPoint buttons and the AccuPoint let you access commands in your programs. The larger (primary) button acts as the
left button on a mouse. The smaller (secondary) button acts as the
right mouse button. For more information, see “Using the AccuPoint Pointing Device” on page 24.
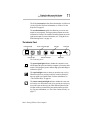
The Indicator Panel
Power/speed light
Cursor control mode light
Disk light
Power light
On
Caps lock light
Numeric mode light
Battery light
The indicator panel
On
The power/speed light indicates whether the computer is on or
off and shows the speed at which the computer is processing information. The light glows green to indicate high speed and orange to
indicate low speed.
The caps lock light comes on when you press the Caps Lock key.
When this light is on, pressing a letter key on the keyboard produces an upper-case (capital) letter. For more information, see
“The Character Keys” on page 62.
The cursor control mode light indicates whether the cursor control overlay is on. When the overlay is on, pressing an overlay key
moves the cursor as shown by the white indicator printed on the
left front of the key instead of the letter printed on the top of the
key. For more information, see “The Cursor Control Overlay” on
page 177.
Part I: Getting To Know Your Computer
12
Finding Your Way around the System
Find Out Where Everything's Located
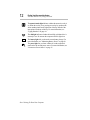
The numeric mode light indicates whether the numeric overlay is
on. When the overlay is on, pressing an overlay key produces the
white number printed on the right front of the key instead of the
letter printed on the top of the key. For more information, see
“Typing Numbers” on page 64.
The disk light indicates whether the hard disk or diskette drive is
currently in use. Do not turn the computer off if this light is on.
The battery light tells you about the current battery charge. For
more information, see “Monitoring Battery Power” on page 90.
The power light lets you know whether or not the computer is
connected to an external power source. For more information, see
“Connect to a Power Source” on page 15.
Part I: Getting To Know Your Computer
Finding Your Way around the System
Find Out Where Everything's Located
Part I: Getting To Know Your Computer
13
Let's Start
at the Very
Beginning…
Now that you know where everything is, it’s time to get to work. If
you’re new to computers or have never used a notebook computer
before, this chapter provides easy-to-follow steps for getting the
computer up and running.
Connect to a Power Source
Your computer requires power to operate. By connecting the
computer to a power source you can provide power to run the
computer and charge the battery. With the computer's built-in
power supply, providing power to your computer requires only a
power cord. Just plug the cord into the computer and a live power
outlet.
15
16
Let's Start at the Very Beginning…
Adding Memory (Optional)
Before you can use the battery to run the computer, you must
charge it. Leave the computer plugged in for at least two and a half
hours with the computer turned off. Soon the battery will be completely charged and ready to power the computer.
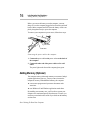
To connect your computer to a power source, follow these steps:
Power socket
Power cable
Connecting the power cable to the computer
1 Connect the power cable to the power socket on the back of
the computer.
2 Connect the other end of the power cable to a live wall
outlet.
The power light on the front of the computer glows green.
Adding Memory (Optional)
Your computer comes with enough memory to run most of today's
popular applications. However, you may want to increase the
computer's memory. With additional memory, the computer:
❖ can run more programs and open more documents at the
same time.
❖ runs Windows 95 and Windows applications much faster.
By installing extra memory now, you’ll be able to operate your
computer at its maximum capacity from the start. Of course, you
can always come back to this section if you decide to add memory
at a later time.
Part I: Getting To Know Your Computer
Let's Start at the Very Beginning…
Adding Memory (Optional)
17
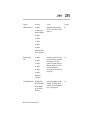
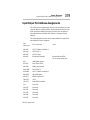
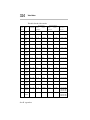
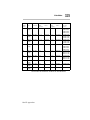
Sizes of Memory Modules
Additional memory is easy to install. Memory modules, available
from your dealer, come in the following sizes:
Memory Module Size
Total Memory in System
8MB
16MB
16MB
24MB
32MB
40MB
Install the Memory Module
The memory module installs into the memory expansion slot on
the bottom of the computer as follows:
1 Click Start, then click Shut Down.
If the computer is already turned off, skip to step 3.
2 Click the button next to Shut down the computer, then
click Yes.
Windows 95 shuts down and turns the computer off
automatically.
3 Unplug the computer.
Installing a memory card with the computer's power on may
damage the computer, the card or both.
4 Close the display and remove any cables you may have
connected. (If you’re following the steps in this chapter,
you haven’t connected any yet.)
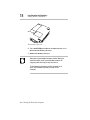
5 Turn the computer upside down.
Part I: Getting To Know Your Computer
18
Let's Start at the Very Beginning…
Adding Memory (Optional)
Screws
The memory slot cover
6 Use a small Phillips screwdriver to remove the two screws
that secure the memory slot cover.
7 Remove the memory slot cover.
Static electricity can damage the memory module. Before you
handle the module, touch a grounded metal surface to discharge any static electricity you may have built up.
To avoid damaging the memory module, be careful not to
touch its pin connector (the side you insert into the
computer).
Part I: Getting To Know Your Computer
Let's Start at the Very Beginning…
Adding Memory (Optional)
19
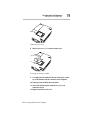
Screws
Removing the screws
8 Remove the two screws from the memory slot.
Inserting the memory module
9 Carefully place the module in the slot. Line up the connector on the module with the connector in the computer.
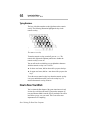
10 Gently press the module down into place.
11 Secure the module in place with the two screws you
removed in step 6.
12 Replace the memory slot cover.
Part I: Getting To Know Your Computer
20
Let's Start at the Very Beginning…
Adding Memory (Optional)
13 Replace the screws you removed in step 4 and tighten
them.
14 Turn the computer over.
When you turn your computer on, it will recognize the additional
memory automatically.
Removing a Memory Module
If you ever need to remove the memory module:
1 Follow steps 1 through 8 in the previous section to open the
memory slot and remove the screws that secure the card.
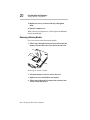
Tab
Removing the memory module
2 Lift up the memory card tab to remove the card.
3 Replace the screws that held the card in place.
4 Follow steps 10 through 12 in the previous section to close
and secure the memory slot.
Part I: Getting To Know Your Computer
Let's Start at the Very Beginning…
Connecting a Parallel Printer
21
Connecting a Parallel Printer
If you've already purchased a printer, now is a great time to connect it to the computer. If you don't have a printer yet, don't worry.
You can always connect one later.
The most common type of printer is a parallel printer. To connect
a parallel printer, you'll need a standard parallel printer cable. You
may have received a cable when you purchased your printer. Otherwise, printer cables are available from your dealer and at most
computer and electronics stores.
If your printer is ECP- or IEEE-compliant, make sure your
printer cable is an IEEE 1284 cable.
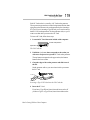
To connect the printer to the computer, follow these steps:
1 Identify the two ends of the printer cable. One end (with
the male DB-25 connector) connects to the computer. The
other end connects to the printer.
To the computer
To the printer
Identifying the ends of the printer cable
2 Connect the printer cable to your printer.
If you’re unsure how to do this, please check the documentation that came with your printer.
Part I: Getting To Know Your Computer
22
Let's Start at the Very Beginning…
Open the Display
Parallel port
Printer cable
Connecting the printer cable to the parallel port
3 Turn the computer off.
4 Connect the printer cable to the computer's parallel port.
Don’t connect the printer cable if the computer’s power is on.
Doing so may cause damage to the printer, the computer or
both.
5 Plug the printer's power cable into a live AC outlet.
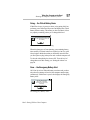
Open the Display
The final step before you turn your computer on is to open the
display.
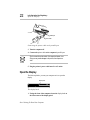
Display latch
The display latch
1 Facing the front of the computer, locate the display latch on
the front center of the display panel.
Part I: Getting To Know Your Computer
Let's Start at the Very Beginning…
Fill In Your Registration Card and Mail It
23
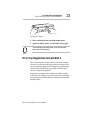
Opening the display
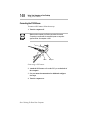
2 Push on the display latch and lift the display panel.
3 Adjust the display panel to a comfortable viewing angle.
To avoid damaging the display panel, do not force the panel
beyond where it moves easily.
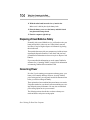
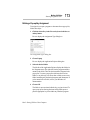
Fill In Your Registration Card and Mail It
Take a few minutes now to fill in and mail your product registration card. The card was on the keyboard of your computer when
you first opened the display panel. Sending in your product registration card lets Toshiba keep you up to date with information
about new products and upgrades.
Registering your computer also extends your Toshiba warranty
world-wide at no charge to you. See the registration card and warranty information for details about the warranty options available
through Toshiba.
Part I: Getting To Know Your Computer
24
Let's Start at the Very Beginning…
Using the AccuPoint Pointing Device
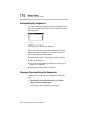
Using the AccuPoint Pointing Device
The computer's AccuPoint pointing device enables you to move
the cursor and to select items on the screen. If you're familiar with
desktop computers, you may have used a mouse or trackball for
this purpose. The AccuPoint provides all the functionality of a
mouse or trackball without your hands ever leaving the keyboard.
If you would rather use a mouse or trackball, you can connect one
to the computer’s serial port or PS/2 port. You may also use the
mouse port on the optional NoteDock™.
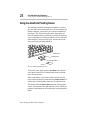
G
H
AccuPoint
Primary button
Secondary button
The AccuPoint pointing device
To move the cursor, gently push the AccuPoint in the direction
you want the cursor to move. Pushing harder on the AccuPoint
moves the cursor faster.
When a step instructs you to click or choose an item, move the
cursor to the item, then press and release the primary button. To
double-click, click the primary button twice in rapid succession.
The function of the secondary button depends on the programs
you use. It corresponds to the right button on a mouse. Check your
programs’ documentation to find whether they use the right mouse
button.
Part I: Getting To Know Your Computer
Let's Start at the Very Beginning…
Turn the Computer On
25
Turn the Computer On
Finally, the preparation is over. It's time to turn the computer on
and get to work. To turn the computer on, follow these steps:
1 Make sure there’s no diskette in the diskette drive.
2 If you have a printer connected to your computer, turn the
printer on and wait until the printer is ready (on line).
On
3 Locate the power/speed light on the indicator panel.
Power button
Turning the power on
4 Press and hold the power button on the left side of the computer. Hold the power button in until the power/speed light
turns on.
When You Turn the Computer on the First Time…
The first time you turn the computer on, it displays several messages and leads you through a series of startup screens. These
screens lead you through the following activities:
❖ Choosing between Windows 95 and Windows 3.11
(Satellite 100CS only).
❖ Setting up Windows 95.
❖ Setting up Windows 95 to work with your printer.
Part I: Getting To Know Your Computer
26
Let's Start at the Very Beginning…
When You Turn the Computer on the First Time…
❖ Selecting the Date/Time Properties.
❖ Creating Windows 95 diskettes.
❖ Exploring additional Windows 95 features.
Choose Windows 95 or Windows 3.11
If you purchased a Satellite 100CS, the system displays a number
of introductory screens, then prompts you to choose between
Windows 95 and Windows 3.11. Click Next to select the default
(Windows 95), or choose Windows 3.11 from the drop-down list
box.
Read the introductory screens carefully to avoid accidentally
accepting the wrong operating system. Once you choose
Windows 95 or Windows 3.11, the operating system you did
not select is deleted permanently from your system.
If you purchased a Satellite 105CS computer, you won’t have this
choice—Windows 95 comes pre-installed.
All of the instructions in this guide are specific to Windows 95. If
you choose Windows 3.11, a number of things will be different,
including:
❖ “Getting Comfortable with Windows 95” on page 37 refers to
Windows 95 only.
❖ Start MaxTime, Hardware Setup and Fn-esse by double-click-
ing their icons in the Toshiba Utilities group in Program
Manager.
❖ There is no Suspend command in Windows 3.11. Use Resume
Mode instead.
Part I: Getting To Know Your Computer
Let's Start at the Very Beginning…
When You Turn the Computer on the First Time…
27
❖ Windows 95 contains the files your computer needs to com-
municate with optional PC Cards. If you’re using Windows
3.11, use Toshiba Card Manager with your optional PC Cards.
❖ The steps in “Changing the Display Mode” on page 185 are
for Windows 95. To change the display mode in Windows
3.11, double-click the Chips CPL icon in the Control Panel.
Continue with the next section.
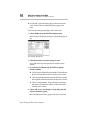
Set Up Windows 95
The first time you turn your computer on, the Setup program displays the Welcome to Windows Setup dialog box.
Follow these steps to set up Windows 95:
1 In the Welcome to Windows Setup screen, click Next.
Setup starts gathering information about your system.
2 Select your Regional Settings and click Next. The default is
English (American).
3 Select the keyboard layout and click Next. The default is
United States.
4 Enter the requested User Information, then click Next.
Setup displays the License information.
5 Read the License information.
6 Click the button next to I accept the agreement in order to
continue the installation, then click Next.
7 Type in the number from the Certificate of Authenticity
that came with your computer, then click Next to continue
with Configuring Your Computer.
Setup installs devices for your system and prompts you to
restart the computer.
8 Click Finish to restart the computer.
You are now ready to set up Windows 95 for your printer.
Part I: Getting To Know Your Computer
28
Let's Start at the Very Beginning…
When You Turn the Computer on the First Time…
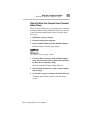
Set Up Windows 95 for Your Printer
If you already have a printer, choose Next when the system
prompts you to set up your printer. If you plan to purchase a
printer later, choose Cancel now and see “Setting Up Windows 95
to Work with Your Printer” on page 67 when you’re ready to connect it.
To set up Windows 95 to work with your printer when you first
open Windows 95, follow these steps:
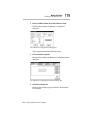
1 When Windows 95 opens the Printers dialog box, scroll
through the list of manufacturers and then printers until
you find yours.
If your printer is not listed, it probably came with its own diskette. Refer to your printer documentation for installation
instructions.
2 Select your printer and choose Next.
3 Set the port to LPT1: and choose Next.
4 Type a new name for your printer or accept the default
and choose Next.
5 If your printer is connected and turned on, choose Finish
to print a test page. To finish the setup procedure without
printing a test page, choose No, then Finish.
Select Date/Time Properties
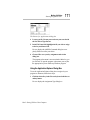
As Setup continues, Windows 95 displays the Date/Time Properties dialog box. This dialog box has two tabs. Click on a tab to
bring it to the front.
1 On the Time Zone tab, select your time zone by clicking
the up and down arrow keys.
2 On the Date and Time tab, set the correct date and time, if
necessary.
3 When you’re done, click Close.
Part I: Getting To Know Your Computer
Let's Start at the Very Beginning…
Create or Purchase Master Diskettes
29
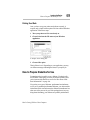
Create Windows 95 Diskettes
The Microsoft Create System Disks program creates program diskettes for the Windows 95 operating system. To run this program,
choose Next when prompted during the initial startup procedure.
If you prefer to make these diskettes later, choose Cancel. When
you’re ready to make these diskettes, refer to “Running Microsoft
Create System Disks” on page 31.
Complete the Initial Startup Procedure
After you’ve finished making Windows 95 diskettes, Windows 95
completes its setup procedure and displays the Welcome to
Windows 95 screen (if you selected Windows 95 for your operating system). This screen provides the following options:
❖ The Windows 95 Tour gives you a brief overview of
Windows 95. For a more complete introduction, see “Getting
Comfortable with Windows 95” on page 37.
❖ Select What’s New for answers to common questions about
Windows 95.
❖ Online Registration lets you register Windows 95. This works
only if you already have a modem installed.
Once you’ve finished looking at any or all of the above options,
choose Close to finish the initial startup procedure and open
Windows 95.
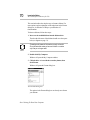
Create or Purchase Master Diskettes
When you buy a program at a computer store, you receive one or
more program diskettes. These program diskettes contain the files
necessary to install the program on your computer's hard disk.
You can also use them to reinstall your software if necessary.
However, your computer comes with Windows 95 and a number
of other programs already installed on the hard disk. If any of these
programs is ever damaged or deleted, you'll need program diskettes to reinstall it.
Part I: Getting To Know Your Computer
30
Let's Start at the Very Beginning…
Create or Purchase Master Diskettes
There are two ways to obtain program diskettes for your preinstalled software:
❖ Buy blank diskettes and run Microsoft Create System Disks
and Toshiba’s Master Disk Creator.
❖ Purchase the diskettes from Toshiba using the order form that
came with your computer.
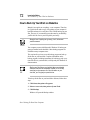
Preparing to Create Master Diskettes
Disk image files on your hard disk contain all the information to
create program diskettes for the factory pre-installed programs on
your computer. Microsoft Create System Disks and Master Disk
Creator copy these disk images to diskettes.
You cannot reinstall programs from the disk image files on
the hard disk. You must use program diskettes created with
Create System Disks or Master Disk Creator to reinstall any of
the pre-installed programs.
To run these programs, you need:
❖ a few hours.
❖ blank, formatted, 3 1/2" high-density (1.44MB) diskettes,
approximately 30 for Create System Disks and from 5 to 25
for Master Disk Creator. You can buy pre-formatted diskettes,
or follow the instructions in “How to Prepare Diskettes for
Use” on page 69 to format them yourself. We recommend you
use high-quality new diskettes.
The diskettes must be write-enabled (the write-protect tab at
the left corner of the diskette must cover the square hole).
Part I: Getting To Know Your Computer
Let's Start at the Very Beginning…
Create or Purchase Master Diskettes
31
Write-protect tab
Write-protected and write-enabled diskettes
Although you can run these programs at any time, it's a good idea
to create your program diskettes the first time you start the computer. If you decide to put off the process until later, make sure
you don't forget. You don't want to accidentally delete a program
file and have no master diskettes available from which to
reinstall it.
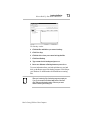
Running Microsoft Create System Disks
If you chose not to create Windows 95 diskettes when you turned
the computer on the first time, you should do so now. Since
Microsoft Create System Disks requires you to make all the
Windows 95 diskettes at once, make sure you have at least 30 formatted high-density diskettes before you start the program.
You can run Create System Disks only once. After you create
the diskettes, the program deletes the images from your hard
disk.
To run Create System Disks, follow these steps:
1 Click Start, then point to Programs.
2 Point to Accessories, then point to System Tools.
3 Click Create System Disks.
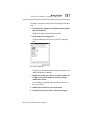
Windows 95 opens the Create System Disks program. Follow
the instructions on the screen to create the program diskettes.
Part I: Getting To Know Your Computer
32
Let's Start at the Very Beginning…
Create or Purchase Master Diskettes
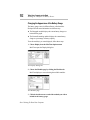
Running Master Disk Creator
Master Disk Creator is a very simple program to use. Once you
have started it, follow the instructions on the screen, inserting and
removing diskettes as prompted. Make sure you label the diskettes
as indicated by Master Disk Creator.
To run Master Disk Creator, follow these steps:
1 Click Start, then point to Programs.
2 Point to Toshiba Utilities, then click Master Disk Creator.
Master Disk Creator displays a welcome screen.
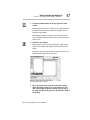
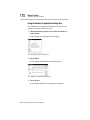
3 Choose OK by using the AccuPoint to move the pointer to
it and clicking with the primary button.
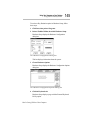
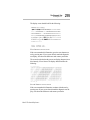
Master Disk Creator displays a list of the available disk images
similar to the following:
A sample list of disk images
4 Select the programs for which you want to create program
diskettes. To create a complete set of program diskettes,
choose Select All.
5 Choose Make Disks.
6 Label the diskettes with the names shown on the screen.
Part I: Getting To Know Your Computer
Let's Start at the Very Beginning…
Create or Purchase Master Diskettes
33
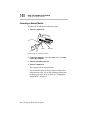
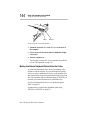
Eject button
Diskette drive
Protective cover
Label
Inserting a diskette
7 Insert a blank diskette when Master Disk Creator prompts
you for one.
The illustration above shows the correct insertion procedure.
Make sure your fingers are touching the label and that the
protective cover points toward the diskette drive. When the
diskette is almost completely in the drive, you will feel a slight
resistance. Push the diskette gently to secure it. When the diskette is completely in place, the disk eject button pops out.
8 Choose Create Disk to begin copying files to the diskette.
A meter lets you monitor the copying process.
9 When Master Disk Creator prompts you to, press the disk
eject button to remove the diskette.
If the diskette drive light is on, do not remove a diskette.
Doing so could destroy the information on the diskette and
damage the diskette and/or the drive.
10 Write-protect the diskette by moving the tab on the back
of the diskette to expose the write-protect hole.
Write-protecting a diskette prevents you from erasing or overwriting the information on the diskette.
Part I: Getting To Know Your Computer
34
Let's Start at the Very Beginning…
Create or Purchase Master Diskettes
11 Continue inserting and removing diskettes according to
the instructions on the screen.
Since creating program diskettes will take some time, now is a
good time to fill in your registration card if you haven't yet
done so.
12 When you've finished making the master diskettes, store
them together in a safe place.
Part I: Getting To Know Your Computer
Let's Start at the Very Beginning…
Create or Purchase Master Diskettes
Part I: Getting To Know Your Computer
35
Getting Comfortable with
Windows 95
Your computer starts Windows 95 when you turn the power on.
Windows 95 is the computer’s operating system, providing a
means of communication between your computer, your programs,
and you. While using Windows 95 for the first time may be a bit
confusing, you’ll find it extremely easy once you gain a bit of
experience.
This chapter introduces Windows 95 by taking you through a few
basic tasks. If you’re new to computers or have never used Windows before, the skill and confidence you’ll gain will more than
offset the small amount of time you spend going through these
lessons.
If you’ve used an earlier version of Windows, you’ll notice that
Windows 95 is very different. Even though many of the steps will
seem obvious to you, you may still want to at least skim through
the information in this chapter. Otherwise, Windows 95 Help discusses a number of the major differences in an easy question-andanswer format. Click Start, then Help to open Help, click the index
tab, then type tips and double-click “for Windows 3.1 users.”
37
38
Getting Comfortable with Windows 95
Exploring the Desktop
One of the wonderful things about Windows 95 is its flexibility.
There are many paths to reach a desired goal. While the steps in
this chapter will accomplish the indicated tasks, there are often
quicker ways of doing things. For example, if you’ve used earlier
versions of Windows, many familiar key combinations will still
work. If you’re curious, refer to online help or your Windows 95
documentation for more information.
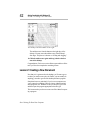
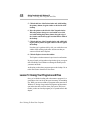
Exploring the Desktop
The desktop is the launching point for everything you want to do
in Windows 95. You use its features to start programs, find documents, set up system components and most other computing tasks.
The following illustration identifies the major features of the
desktop:
Icons
Recycle Bin icon
Taskbar
Start button
The desktop
The Start button does just what it says. You use the Start button to
start programs, documents and anything else you might want to
use within Windows 95. To learn how to use the Start button, see
“Lesson 3: Starting Programs” on page 44.
Part I: Getting To Know Your Computer
Getting Comfortable with Windows 95
Lesson 1: Using the AccuPoint Pointing Device
39
The taskbar lets you know what documents you currently have
open. It may also display the time. Right now, the taskbar is blank
because you haven’t started anything. As you work through the
lessons in this chapter, the taskbar will change to reflect what
you’re doing.
The icons provide shortcuts to programs, documents and system
features and components. To learn how to create and use these
icons, refer to your Windows 95 documentation.
One special icon is the Recycle Bin. You use the Recycle Bin to
delete files and remove object from the desktop. You’ll learn more
about the Recycle Bin in “Lesson 6: Removing Objects from the
Desktop” on page 49.
Lesson 1: Using the AccuPoint Pointing Device
The AccuPoint is your basic tool for moving around and working
in Windows 95. This lesson teaches you some of the things you
can do with the AccuPoint.
Follow these steps:
1 With your index finger, push gently against the left side of
the AccuPoint.
Notice how the arrow (pointer) moves to the right edge of the
screen.
2 Push a bit harder against the right side of the AccuPoint.
Notice that the pointer moves faster as you increase the pressure on the AccuPoint.
3 Practice moving around the screen.
Experiment with moving in different directions and at different
speeds. See how quickly you can point to a particular spot on
the screen.
Part I: Getting To Know Your Computer
40
Getting Comfortable with Windows 95
Lesson 1: Using the AccuPoint Pointing Device
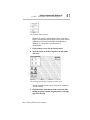
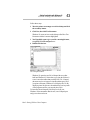
4 Move the pointer to the Start button and click the primary
button (it’s the larger one).
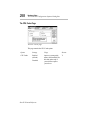
The desktop with the Start menu open
Windows 95 opens the Start menu. You’ll use this quite a bit
once you get deeper into Windows 95.
5 Click an empty area of the desktop to close the Start menu.
6 With the pointer in an empty area of the desktop, click the
secondary button (the smaller one).
Throughout the remainder of this manual, the term “click” will
refer to clicking the primary button. Instructions requiring the
secondary button will specifically mention that button. For
example, “click the secondary button.”
Part I: Getting To Know Your Computer
Getting Comfortable with Windows 95
Lesson 1: Using the AccuPoint Pointing Device
41
The desktop shortcut menu
Windows 95 opens the desktop shortcut menu. As the name
implies, shortcut menus provide quick access to many features
of Windows 95. For more information about shortcuts in
Windows 95, refer to help or your Windows 95
documentation.
7 Click an empty area to close the shortcut menu.
8 Move the pointer to the My Computer icon and rapidly
click twice.
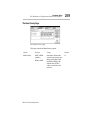
The desktop with the My Computer window open
The My Computer window opens. This process is known as
“double-clicking.”
9 Click the taskbar at the bottom of the screen and, while
holding the primary button, drag the pointer to the right
edge of the desktop.
Part I: Getting To Know Your Computer
42
Getting Comfortable with Windows 95
Lesson 2: Creating a New Document
The desktop with the taskbar on the right
The taskbar moves from the bottom to the right edge of the
desktop. You may move the taskbar to any of the desktop’s
four edges. This process is known as “clicking and dragging.”
10 Click the taskbar once again and drag it back to the bottom of the desktop.
Congratulations. You’re now an AccuPoint expert and have all the
tools you’ll need to complete the remaining lessons.
Lesson 2: Creating a New Document
Now that you’ve gotten used to the desktop, you’ll want to go on
to where you can do some real work. Before you can actually do
anything, you need to get off of the desktop and into a program.
Sometimes however, particularly if you’re a new computer user,
you’ll want to do something, like type a letter, without knowing
what program to use. Windows 95 lets you choose a type of file
and then opens the program appropriate to that file type.
This lesson teaches you how to create a text file without first opening a program.
Part I: Getting To Know Your Computer
Getting Comfortable with Windows 95
Lesson 2: Creating a New Document
43
Follow these steps:
1 Move the pointer to an empty area of the desktop and click
the secondary button.
2 Click New, then click Text Document.
Windows 95 creates an icon on the desktop called New Text
Document with the icon name highlighted.
3 You’ll probably want to give your file a meaningful name,
so type My New File and press Enter.
4 Double-click the icon.
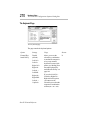
The Notepad window
Windows 95 opens the new file in Notepad, the text editor
built into Windows 95. Notice that as you open the file there’s
a new icon on the taskbar that reads My New File - Notepad
(the name may be too long to fit into the taskbar space, but if
you point to the name, Windows 95 will display all of it). By
displaying icons like this one, the taskbar helps you keep track
of the programs and files you currently have open.
To learn more about Notepad, click Help or refer to your
Windows 95 documentation. But for now, leave Notepad open
and go on to the next lesson.
Part I: Getting To Know Your Computer
44
Getting Comfortable with Windows 95
Lesson 3: Starting Programs
Lesson 3: Starting Programs
After you’ve gained some experience and added some programs
of your own, you’ll know exactly what program you want to use
for a particular task. This lesson teaches you how to start programs
from the desktop, using two of the programs built into
Windows 95.
Follow these steps:
1 Click Start, then point to Programs.
2 Point to Accessories, then click Paint.
The desktop with Paint open
Windows 95 opens Paint, a simple drawing program. Your
desktop now looks something like the above illustration.
Notice again the new addition to the taskbar.
3 To open a second program click Start, then click
Programs.
4 Click Windows Explorer.
Part I: Getting To Know Your Computer
Getting Comfortable with Windows 95
Lesson 4: Resizing and Reshaping Windows
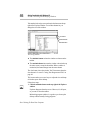
45
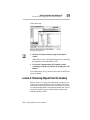
The Explorer
Windows 95 opens the Explorer and adds a new icon to the
taskbar. The Explorer provides access to all your computer’s
resources. For example, the Explorer lets you see all the icons
in a particular folder on the computer’s hard drive.
Now you have three programs open on the desktop. Each of these
programs is in its own window, with a border separating it from
the desktop and other windows. You’ll learn more about working
with windows in the next lesson. Leave them open for now and go
ahead.
Lesson 4: Resizing and Reshaping Windows
If you’ve been following the steps in this chapter, you now have a
screen cluttered with several program windows. Fortunately, it’s
simple to recreate order out of this chaos. You can resize windows
so you can see more than one of them at a time. You can also hide
windows by removing them from the desktop without actually
closing your document or program.
Part I: Getting To Know Your Computer
46
Getting Comfortable with Windows 95
Lesson 4: Resizing and Reshaping Windows
Take another look at the screen and notice the buttons at the top
right of the Explorer Window. Two of these buttons let you
change the size of the window:
Close button
Maximize button
Minimize button
The sizing buttons
❖ The minimize button reduces the window to a button on the
taskbar.
❖ The maximize button increases the window so that it takes up
the entire screen, except for the taskbar. When a window is
maximized, the button changes into the restore button.
The close button closes the window. You’ll learn more about the
close button in “Lesson 5: Closing Your Programs and Files” on
page 48.
This lesson teaches you several ways to adjust the size and shape
of windows open on the desktop.
Follow these steps:
1 Click the minimize button at the top right of the Explorer
window.
Explorer disappears from the screen. However, it’s still open,
as you can see from the taskbar.
Minimizing program windows is a good way to clean up the
desktop without actually closing programs.
Part I: Getting To Know Your Computer
Getting Comfortable with Windows 95
Lesson 4: Resizing and Reshaping Windows
47
2 Click the maximize button at the top right of the Paint
window.
Paint expands to the full size of the screen, except for the taskbar. Notice that the maximize button has changed. It’s now
called the restore button.
Maximizing a program is a good way to work when you’re
only using that program and don’t want any other distractions
on the screen.
3 Click the restore button.
Paint returns to its previous size and location. Again, notice
how the restore button has changed back into the maximize
button.
For the next few steps assume that you want to be able to see
both Paint and Notepad at the same time.
Resizing the Paint window
4 Move the pointer to the right side of the Paint window.
When the pointer changes to a two-headed arrow click
and, while holding the primary button, drag the edge of
the window until it takes up just less than half the width of
the desktop.
Part I: Getting To Know Your Computer
48
Getting Comfortable with Windows 95
Lesson 5: Closing Your Programs and Files
5 Click the title bar of the Paint window and, while holding
the primary button, drag the window to the far left of the
desktop.
6 Move the pointer to the left side of the Notepad window.
When the pointer changes to a two-headed arrow click
and, while holding the primary button, drag the edge of
the window until it takes up just less than half the width of
the desktop.
7 Click the title bar of the Notepad window and, while holding the primary button, drag the window to the far right of
the desktop.
Now that you’ve got them side-by-side, you could refer to one
window while working in the other. Assume now that you
want to refer back to the Explorer.
8 Click the Explorer icon on the taskbar.
The Explorer window returns to its previous size and location.
In your real work, resizing and moving windows gives you a great
deal of flexibility. Don’t hesitate to rearrange the desktop to suit
your tastes and needs.
At this point you have three programs open on the desktop. Go on
to the next lesson to learn how to close them.
Lesson 5: Closing Your Programs and Files
Once you’re finished working with a document or program, it’s a
good idea to close it to free up the space in memory for something
else. While you can run a number of programs at the same time in
Windows 95, having a large number of programs and documents
open at the same time can slow down your system. This lesson
teaches you how to close the program you’ve opened earlier in this
chapter.
Part I: Getting To Know Your Computer
Getting Comfortable with Windows 95
Lesson 6: Removing Objects from the Desktop
49
Follow these steps:
Closing the Explorer
1 Click the close button at the top right of the Explorer
window.
That’s all there is to it. The Explorer program closes, removing
the Explorer icon from the taskbar as well.
2 Close Paint, Notepad and the My Computer window
(assuming it’s still open by this time) by clicking their close
buttons.
You’re almost done. Now go on to the next section to finish cleaning up the desktop.
Lesson 6: Removing Objects from the Desktop
Back in “Lesson 2: Creating a New Document” on page 42, you
created a new icon on the desktop. Since everything you’ve done
to this point has been just practice for your real work, you’ll want
to return the desktop back to its original uncluttered state. This lesson teaches you how to remove objects from the desktop and
introduces the Recycle Bin.
Part I: Getting To Know Your Computer
50
Getting Comfortable with Windows 95
Lesson 6: Removing Objects from the Desktop
To remove your new icons from the desktop, follow these steps:
1 Click the My New File icon and, while holding the primary
button, drag it over the Recycle Bin icon.
The My New File icon disappears. But, with Windows 95, it
isn’t really gone. It’s merely set aside to where you can delete
it completely later.
2 Double-click the Recycle Bin icon.
The Recycle Bin window
Windows 95 opens the Recycle Bin window. Notice that My
New File is listed.
3 To completely remove My New File, click it and click File,
then click Delete.
My New File is gone forever.
Later on—in your real work, not in this tutorial—you’ll use the
Recycle Bin to other things. Still, the process is the same. Drag its
icon to the Recycle Bin and, sometime when you’re absolutely
certain that you never want to see it again, delete it from there.
That’s most of the basics. Now go on to the next lesson to learn
what to do if you get lost somewhere in the vast complexity of
Windows 95.
Part I: Getting To Know Your Computer
Getting Comfortable with Windows 95
Lesson 7: I’m Lost—Now What Do I Do?
51
Lesson 7: I’m Lost—Now What Do I Do?
Windows 95 has an excellent help facility. If you can’t figure out
how to do something, the answer is probably only a few clicks
away. This lesson teaches you how to use some of the help features in Windows 95.
Assume that you want to draw a picture but don’t know how.
Follow these steps:
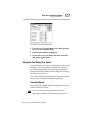
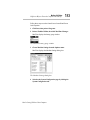
1 Click Start, then click Help.
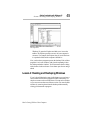
Windows 95 opens the Help window.
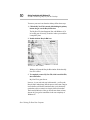
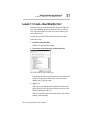
2 If you don’t see the Index page, click the Index tab.
The Help window on the Index page
Help displays the Index page. Most of the screen contains a list
of topics. The upper part of the screen, where the cursor is
flashing, lets you type in a topic.
3 Type picture.
Notice as you type that the topic list adjusts to fit what you’re
typing. When you type the letter p, the topic list moves to the
first entry that begins with P, etc.
There are a number of topics listed under Picture. One of them,
drawing, looks promising.
Part I: Getting To Know Your Computer
52
Getting Comfortable with Windows 95
Lesson 8: Turning Your Computer Off
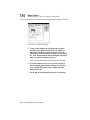
4 Double-click drawing.
The Drawing help screen
Help opens a topic screen, giving a brief description of how to
draw pictures, including an icon to start the Paint program.
5 Click the click here icon.
Windows 95 opens the Paint program.
Not every help topic screen contains an icon to start a program.
However, when you do encounter one, it’s a great way to
move from reading about your question to an instant solution.
6 Just to clean up the desktop, close both Help and Paint by
clicking their close buttons.
You’re almost done! The next (and last) lesson tells you how to
shut down Windows and turn your computer off.
Lesson 8: Turning Your Computer Off
It’s very important that you let Windows 95 shut down your
computer before you turn the power off. As it shuts down,
Windows 95 performs a number of tasks that ensure that everything’s in place the next time you turn the computer on. This
lesson teaches you how to shut down Windows 95 and turn your
computer off.
Part I: Getting To Know Your Computer
Getting Comfortable with Windows 95
Lesson 8: Turning Your Computer Off
53
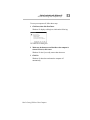
To turn your computer off, follow these steps:
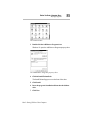
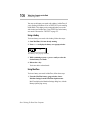
1 Click Start, then click Shut Down.
Windows 95 displays a dialog box similar to the following:
The Shut Down dialog box
2 Make sure the button next to Shut Down the computer is
selected. If it isn’t, click it now.
Windows 95 asks if you really want to shut down now.
3 Click Yes.
Windows 95 shuts down and turns the computer off
automatically.
Part I: Getting To Know Your Computer
Learning
the Basics
The information in this chapter is intended for the novice
computer user. Simple steps describe many day-to-day computer
operations. There are also lists of helpful computing tips. By the
end of the chapter, you'll have developed many of the basic skills
that more advanced users take for granted.
Computing Tips
It seems that everybody’s grandmother has a list of rules that will
make your life better. This section presents a few rules that your
grandmother would include if she were teaching you how to use
your computer.
55
56
Learning the Basics
Computing Tips
Two Things Every User Learned the Hard Way
❖ Save your work frequently.
Both novice and experienced computer users occasionally forget
to save their work. When the power goes out and you are looking
at a blank screen that contained, only moments ago, an entire afternoon's work, you’ll say, “I wish I had saved!”
See the instructions in “How to Save Your Work” on page 64.
❖ Back up your files on a regular basis.
It's easy to put off backing up because it takes time. However, if
the power goes out or you can't access your hard disk, you'll wish
you had taken the time to do backups.
See the instructions in “How to Back Up Your Work on Diskettes”
on page 72.
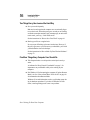
Five More Things Every Computer User Should Do
❖ Take frequent breaks to avoid repetitive strain injuries and eye
strain.
As indicated in “Keep Yourself Comfortable” on page 3, it's
important to stay comfortable while you're working at your
computer.
❖ Exit Windows 95 before turning the computer off, unless Resume
Mode is on. See “How to Start Where You Left Off” on page 60
for information about Resume Mode.
Windows 95 records information, such as you Desktop setup during its shutdown procedure. If you don’t let Windows 95 shut
down, it can forget things such as new icon positions.
Part I: Getting To Know Your Computer
Learning the Basics
Computing Tips
57
❖ Set up your computer to fit your tastes and needs.
You're the one that's going to be looking at the screen while you
work. If you don't like the colors on the screen, go ahead and
change them. See your Windows 95 documentation for information on changing the appearance of your screen.
❖ Scan all new files for viruses.
It’s unlikely, but possible, that even new programs that you buy
from your local computer store may contain a computer virus. See
“Viruses and How To Cure Them” on page 165 for information
about detecting and removing computer viruses.
❖ Run Create System Disks and Master Disk Creator or purchase
master program diskettes.
At some point, you may need installation diskettes for the programs that came pre-installed on your computer’s hard disk. See
“Create or Purchase Master Diskettes” on page 29 for more
information.
Five Things You Should Never Do
❖ Don't spill a drink into the computer.
If you do spill a drink that gets into the keyboard, turn the computer off immediately and unplug it. Leave it off overnight to give
the keyboard time to dry out before you return to work.
❖ Don't format a disk that contains valuable information.
Formatting removes all the information that's currently on the
disk. If your files are important to you, always double-check a disk
before you format it.
❖ Don't turn the computer off when a drive indicator light is on.
Turning off the computer while it's reading from or writing to a
disk may damage the disk, the drive or both.
Part I: Getting To Know Your Computer
58
Learning the Basics
How to Start a Program
❖ Don't put your diskettes or the computer near magnets, such as
large stereo speakers.
Information on disks is stored magnetically. Getting a magnet too
close to a disk can erase important files.
❖ Don't be afraid to use your computer, it's just a machine.
Many people are so nervous with their first computer that they forget it’s merely a tool. Provided you follow the advice in this manual, you’re unlikely to do your computer any harm. So use it and
have fun.
How to Start a Program
Starting a program in Windows 95 is as easy as clicking the Start
button, pointing to Programs and choosing the program's icon
from the Programs menu. Of course, that only works if there is an
icon for the program in the Programs menu.
Starting an MS-DOS program from a system prompt is a little
more complex. To start an MS-DOS program, refer to the program's documentation for specific instructions.
Starting a Program from an Icon
To start a program from an icon, follow these steps, which use the
Windows 95 Wordpad program as an example:
1 Click Start, then point to Programs.
Windows 95 displays the Programs menu.
2 Point to Accessories.
Windows 95 displays the Accessories menu.
3 Click Wordpad.
Windows 95 opens Wordpad. Wordpad is a text editor — a
scaled-down word processor without the frills.
That’s really all there is to it. To close Wordpad, click the close
button at the upper right corner of the window.
Part I: Getting To Know Your Computer
Learning the Basics
When You Turn the Computer On…
59
Starting a Program from the Explorer
These steps demonstrate how to start a program if it is not in the
Start menu. To use this method, you need to know the file name
and directory of the program you want to start.
This example, like the one above, opens Wordpad, using its file
name of WORDPAD.EXE.
To start a program from the Explorer, follow these steps:
1 Click Start, then point to Programs.
2 Click Windows Explorer.
Windows 95 opens the Explorer.
3 In the left part of the screen, under the C: icon, doubleclick Program Files.
The Explorer shows the contents of the Program Files folder
on the right side of the screen. The left side of the screen shows
all the folders contained within Program Files.
4 Double-click Accessories.
The Explorer shows the Accessories files on the right side of
the screen.
5 Double-click Wordpad.exe.
Windows 95 opens Wordpad.
When You Turn the Computer On…
Turning your computer on seems as easy as just pressing the
power button. However, what you're not seeing is everything the
computer does before it finishes its startup process.
Part I: Getting To Know Your Computer
60
Learning the Basics
When You Turn the Computer On…
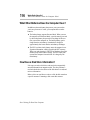
All Those Messages...
When you turn the computer on, it flashes a number of messages
across the screen before it loads Windows 95. Don't worry if you
don't understand any of these messages. They indicate that the
computer's going through its normal startup procedure.
If you're really interested in what's going on, there's more information in “What Really Happens When You Turn the Computer
On?” on page 201.The next section tells you how to get to work
immediately without waiting for all of the messages to appear.
How to Start Where You Left Off
Many times, you'll turn your computer off, intending to continue a
bit later. Then, when you're ready to return to work, you turn the
power on and wait while the computer displays messages and
loads Windows 95, before you can load your program. Finally,
you load your file and start to be productive.
There's an easier way. By using Windows 95’s Suspend command or Toshiba’s Resume Mode, you can start your computer
and have everything back to where it was when you turned the
power off. These modes provide a sort of electronic bookmark.
They use the computer's backup battery to store its current state in
memory while the power is off and, when you turn the computer
back on, to restore the state the system was in before you turned
the power off.
Suspending the computer is energy efficient. By avoiding the startup procedure, it extends the amount of work you can get done
before recharging your battery.
Most of the time, you’ll find the Windows 95 Suspend command
quite convenient. However, if you want to use Toshiba’s System
Auto Off and Panel Power On/Off options, you’ll need to turn on
Resume Mode. For more information about these options, refer to
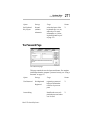
“MaxTime” on page 241.
Part I: Getting To Know Your Computer
Learning the Basics
When You Turn the Computer On…
61
Using the Suspend Command
To turn the computer off using the Windows 95 Suspend
command:
1 If you’re on a network, save any network files you are
using.
Your network connections may be lost when you suspend your
computer.
2 Click Start.
3 Click Suspend.
The Suspend command saves the current system settings,
shuts down Windows 95, and turns the computer off.
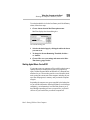
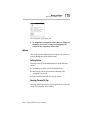
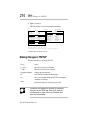
Using Resume Mode
There are several ways to turn Resume Mode on and off. This
section describes how to use a key combination, called a hotkey, to
select Resume Mode. This is the quickest method. Turn to “Starting Again Where You Left Off” on page 99 for other methods.
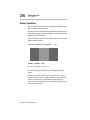
To select Resume Mode, follow these steps:
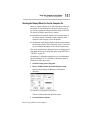
1 Start MaxTime, if it’s not already running.
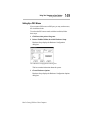
2 Press Fn + F3 to display the power-up pop-up window.
Resume On
The power-up pop-up window
3 While continuing to hold Fn, press F3 until Resume Mode is
highlighted.
4 Release the Fn key.
The system is now in Resume Mode. The next time you turn
your computer off and back on, you’ll be right back where you
left off.
Part I: Getting To Know Your Computer
62
Learning the Basics
How to Adjust the Display Panel
How to Adjust the Display Panel
Where you use the computer will affect how easily you can see the
images on the display panel. For example, the display panel may
be more difficult to read outdoors in full sunlight than it is in a
dimly lit room. Adjusting the display panel angle often helps, but
you may also need to adjust the display brightness.
You can adjust the contrast of the display by rotating the contrast
control dial on the right side of the display panel.
How to Use the Keyboard
If you've never used a computer before, you're probably asking
yourself, “is this keyboard just like a typewriter? And if it is, what
are all the extra keys for?” This section describes the keys on the
keyboard and the differences between typing on a computer and
that typewriter you may be used to using.
The Character Keys
For these keys, typing on a computer keyboard is very much like
typing on a typewriter. However, there are some exceptions:
❖ When you press the spacebar, a computer does not simply pass
over an area of the page like a typewriter does. Although you
may not see anything on the screen, each time you press the
spacebar, the computer creates a space character just as it creates characters representing letters or symbols.
❖ The lowercase l (el) and the number 1 are not interchangeable.
Part I: Getting To Know Your Computer
Learning the Basics
How to Use the Keyboard
63
❖ The uppercase O and the number 0 are not interchangeable.
❖ On a typewriter, the shift lock key locks all the keys into their
uppercase positions. On a computer keyboard, pressing the
Caps Lock key changes only the alphabet keys to uppercase—
the number and symbol keys aren’t affected.
The Other Keys
In addition to the character keys, the computer keyboard contains
a number of keys that carry out special computer tasks. This section describes these special keys.
❖ The 12 function keys (F1, F2, etc.) across the top of the
keyboard carry out program-specific tasks. To find out what
these keys do in your program, refer to the program's documentation. Some software programs provide a template or
quick reference card for these keys.
❖ The function of the Ctrl key (Control key) also varies according
to the program you're using.
❖ If you're in Windows 95, pressing the Alt key lets you open
menus.
❖ Pressing the Fn key simultaneously with one of the specially
marked keys allows you to emulate a 101-key keyboard (discussed below), turn keyboard overlays on and off (page 176)
and control various system functions.
Toshiba's powerful Fn-esse program lets you assign your own Fn
key combination to launch a Windows program or document
quickly from anywhere in Windows 95. Instructions for using this
program are given in “Starting Programs Faster” on page 167.
Part I: Getting To Know Your Computer
64
Learning the Basics
How to Save Your Work
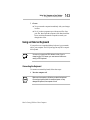
Typing Numbers
The keys with white numbers on the right front are the numeric
overlay. The following illustration highlights the keys in the
numeric overlay.
.
/
The numeric overlay
To turn the numeric overlay on and off, press Fn + F11. The
numeric lock light on the indicator panel shows whether the
numeric overlay is on or off.
You can still use the overlaid keys to type alphabetic characters
while the numeric overlay is on. To do so:
❖ for lower case letters, hold Fn down while you press the keys.
❖ for upper case letters, hold Fn + Shift down while you press the
keys.
To use the cursor control overlay keys when the numeric overlay
is on, press and hold Shift while you use the overlay keys. To
return to the numeric overlay, release Fn.
How to Save Your Work
You've written the first chapter of the great American novel and
it's time for a well deserved break. If you turn the computer off
now (and Resume Mode is turned off), all your hard work will be
lost. Before you go, save your work. This is one of the most
important rules of computing.
Part I: Getting To Know Your Computer
Learning the Basics
How to Save Your Work
65
When you're working in a file, all your work exists in the computer's memory. But information stored in memory is temporary:
when you turn the computer off, everything in memory is lost.
Therefore it's important to save your files to the hard disk or to
a diskette.
Saving your files is quick and easy, and it's a good idea to get in
the habit of saving frequently. That way, if you run into trouble,
such as the power going out, you won't lose the product of many
long hours of work.
Many programs offer a feature that saves your files after a set
period of time. Check your programs’ documentation to see if they
have an automatic save feature.
You use the same procedure to save files in all Windows programs. This section describes this procedure. If you're using an
MS-DOS program, refer to your program documentation for
instructions on saving files.
To save a file in a Windows program, follow these steps:
1 Choose Save from the File menu.
If you're working with a previously existing file, one that
already has a file name, that's all there is to it. If you've created
a new file, your program displays a Save As dialog box, like
the following example. You use this dialog box to specify
where to store the file and to give it a file name.
A sample Save As dialog box
2 Choose the drive and directory where you want your file to
be stored.
3 Type a file name and choose OK.
Part I: Getting To Know Your Computer
66
Learning the Basics
How to Print Something You've Created
Windows 95 supports file names of up to 255 characters. If
you plan on sharing your files with a computer using MS-DOS
or an older version of Windows, consider that file names in
those operating systems may consist of up to eight characters
followed by a period and a three-character extension. You may
use all the letters and numbers on the keyboard plus the following characters: _, ^, $, ~, !, #, %, &, {, }, (, ), @, ' and ~. A file
name must not contain a space.
Most programs assign an extension that identifies the file as
being created in that program with a particular format. For
example, Microsoft Word saves files with a .DOC extension.
While you can create your own extension, this is usually
unwise. Using the default for your program is a helpful
reminder of where your file came from. Also the program is
unlikely to recognize a strange extension and may refuse to
handle your file correctly.
How to Print Something You've Created
By this time, you've probably created a document and saved it—
if not, save it now. Naturally, you want to see the results of your
work by printing your file.
Before you can print your work, you need to have:
❖ connected the printer to the computer (discussed in “Connect-
ing a Parallel Printer” on page 21)
❖ set up your program to work with the printer (discussed below)
You only need to perform the setup step the first time you connect
the printer. If you’ll be using more than one printer or changing
printers, you'll need to set up your programs to run with the additional printer(s).
Part I: Getting To Know Your Computer
Learning the Basics
How to Print Something You've Created
67
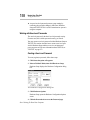
Setting Up Windows 95 to Work with Your Printer
When you turned your computer on for the first time, the
Windows 95 Setup program offered you the opportunity to introduce Windows 95 to your printer. Read this section if you didn’t
have a printer at that time, or want to set up a different printer.
Setting up a printer involves choosing a printer driver. This special
program acts as a translator that turns your work into a form the
printer can understand. This section describes how to select a
printer driver in Windows 95. If you're using any non-Windows
programs, you'll also need to set up a printer driver for each of
those programs. Refer to your program's documentation for more
information.
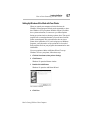
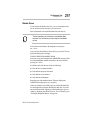
You set up a printer with the Add Printer Wizard. To set up
Windows 95 to use your printer, follow these steps:
1 Click the Start button, then point to Settings.
2 Click Printers.
Windows 95 opens the Printers window.
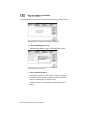
3 Double-click Add Printer.
Windows 95 opens the Add Printer Wizard.
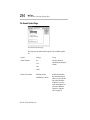
The Printer Wizard
4 Click Next.
Part I: Getting To Know Your Computer
68
Learning the Basics
How to Print Something You've Created
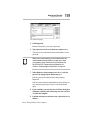
The Add Printer Wizard may ask you whether you’re installing a local or a network printer.
If your printer is Plug and Play, Windows 95 recognizes it
automatically. Ignore the remainder of this section.
5 If the printer you’re setting up is connected to a network,
select Network printer and click Next. If the printer isn’t
connected to a network, select Local printer and click Next.
The Add Printer Wizard asks you to select your printer.
6 From the list of manufacturers and printers, select your
printer and click Next.
The Add Printer Wizard asks for the printer port.
7 Select the port settings according to the instructions in
your printer’s documentation and the port to which your
printer is connected, then click Next.
The Add Printer Wizard asks you to enter a “friendly” printer
name.
8 Enter a name for your printer.
If you’re using more than one printer, make sure the name is
descriptive enough to tell the difference.
9 If you want this printer to be the default printer for
Windows 95, click Yes, then click Next. If you don’t want
this printer to be the default printer, click No, then click
Next.
Windows 95 prompts you to print a test page.
10 If your printer is connected and turned on, choose Finish
to print a test page. To finish the setup procedure without
printing a test page, choose No, then Finish.
You're ready to print.
Part I: Getting To Know Your Computer
Learning the Basics
How to Prepare Diskettes for Use
69
Printing Your Work
Once you have set up your printer and software correctly, it
requires only a simple action to print a file from within a Windows
application. Follow these steps:
1 Turn your printer on if it’s not already on.
2 Choose Print from the File menu of your Windows
application.
A sample Print dialog box
3 Choose OK to print.
That's all there is to it. Depending on your application, you may
see different messages indicating the status of your print job.
How to Prepare Diskettes for Use
Formatting makes it possible to use a diskette. You don't really
need to know what's going on when you format a diskette, but if
you're interested, the details are covered in “How Does a Disk
Store Information?” on page 196.
You can buy two types of diskettes: preformatted and unformatted. If you've purchased preformatted diskettes, you don't need the
information in this section because the diskettes' manufacturer has
taken care of the process for you. If the package doesn't say anything about formatting, your diskettes are probably unformatted.
Part I: Getting To Know Your Computer
70
Learning the Basics
How to Prepare Diskettes for Use
This section describes the simplest way to format a diskette. For
more options, and an explanation of the other items in the Format
dialog box, see Windows 95 Help or your Windows 95
documentation.
To format a diskette, follow these steps:
1 Insert a write-enabled diskette into the diskette drive.
The tab at the left corner of the diskette should cover the square
hole (see diagram on page 31).
Formatting a disk erases all information currently on the disk.
Do not format a disk unless you're sure it's blank or contains
only files you no longer need.
2 Double-click My Computer.
Windows 95 opens the My Computer window.
3 Click the drive A: icon with the secondary button, then
click Format.
Windows 95 opens the Format dialog box.
The Format dialog box
The options in the Format dialog box are already set to format
your diskette.
Part I: Getting To Know Your Computer
Learning the Basics
How to Copy Something to a Diskette
71
4 Click Start.
Windows 95 formats the diskette, displaying the Format
Results screen when it’s finished.
5 Click Close.
6 Close the My Computer window.
How to Copy Something to a Diskette
Diskettes provide an easy means of transferring files from one
computer to another. Copying a file to a diskette also gives you a
backup copy in case something happens to the original on your
hard disk. This section describes how to use the My Computer
folder to copy a file from the hard disk to a diskette.
To copy a file from the hard disk to a diskette, follow these steps:
1 Insert a formatted diskette into the diskette drive. If you're
unsure how to format a diskette, refer to “How to Prepare
Diskettes for Use” on page 69.
2 Double-click My Computer.
Windows 95 opens the My Computer window.
3 Double-click the drive that contains the file you want to
copy.
Windows 95 displays the contents of the drive.
4 Double-click the folder that contains the file, then click the
file you want to copy.
As in earlier versions of Windows, you can use the Ctrl and
Shift keys to select more than one file.
5 Click File, then click Send To.
6 Click the icon for the diskette drive (drive A).
Windows 95 copies the file(s).
Part I: Getting To Know Your Computer
72
Learning the Basics
How to Back Up Your Work on Diskettes
How to Back Up Your Work on Diskettes
Murphy's law applies to everything—even computers. Therefore,
it's a good idea to make a copy of everything on your computer's
hard disk and store it in a safe place. This is called backing up your
files. That way, if you somehow press the Delete key accidentally,
you'll be able to recover your files quickly and easily.
Murphy’s Law: If anything can go wrong, it will, at the worst
possible moment.
Your computer comes with Microsoft's Windows 95 backup program pre-installed on the hard disk. Other backup programs are
available at many computer stores.
This section tells you how to use the backup program to back up
all the files on your hard disk. Complete information on the
backup program, including instructions for backing up only a portion of the files on your hard disk, is in Help and your Windows 95
documentation.
Backing up all the files on your hard disk takes a considerable
amount of time and lots of diskettes. However, in the unlikely
event that you lose some or all of the information on your
hard disk, you’ll be glad you spent the time.
To back up all the files on your hard disk to diskette, follow these
steps:
1 Click Start, then point to Programs.
2 Point to Accessories, then point to System Tools.
3 Click Backup.
Windows 95 opens the Backup window.
Part I: Getting To Know Your Computer
Learning the Basics
How to Back Up Your Work on Diskettes
73
The Backup window
4 Click the files and folders you want to back up.
5 Click Next Step.
6 Click the drive where you want to back up the files.
7 Click Start Backup.
8 Type a name for the backup and press Enter.
9 Insert new diskettes as Backup instructs you to do so.
To restore information from your backup diskettes to your hard
disk, use the Restore page in the backup program. Check Help or
your Windows 95 documentation for information on restoring
files.
When you’re restoring files, the backup program prompts you
if you try to overwrite a file that already exists on the hard
disk. Make sure the backup version is the one you want
before overwriting the existing file.
Part I: Getting To Know Your Computer
74
Learning the Basics
How and When to Turn the Computer Off
How and When to Turn the Computer Off
It's a good idea to turn your computer off when you're not using it
for an extended length of time. There are, however, several things
to keep in mind when you want to turn off the power:
❖ Use the Suspend command instead of Shut Down if you intend
to use the computer shortly after turning it off. The next time
you turn the computer on, you’ll return to where you left off. If
you’re using battery power, this also saves power. For more
information on suspending the computer, refer to “How to
Start Where You Left Off” on page 60.
❖ Don't turn the power off if the disk-in-use light on the indicator
panel is on. Doing so may damage your hard disk or diskette
drive.
❖ If Resume Mode is turned off, shut down Windows 95 before
you turn the computer off. The computer beeps when the
Windows 95 shutdown procedure is complete. Turning the
computer off before you hear the beep may produce unpredictable results.
❖ If you close the display panel while the computer is on, it beeps
loudly until you turn the power off. To prevent this alarm from
going off in the future, use MaxTime or TSETUP to set the
Panel Close Alarm option to Disabled. See “MaxTime” on
page 241 or “TSETUP” on page 273 for more information.
To turn the computer off, press and hold the power button until
you hear a beep.
Caring for Your Computer
Take care of your computer and your computer will take care of
you. It sounds like a cliche, but it’s true. This section offers a few
easy tips on looking after your computer.
Part I: Getting To Know Your Computer
Learning the Basics
Caring for Your Computer
75
Cleaning the Computer
To keep your computer clean, perform the following tasks
regularly:
❖ Clean the exterior case of the computer with a lightly damp-
ened cloth.
❖ To clean the screen, dilute a glass cleaner by adding an equal
amount of water. Spray a small amount of the diluted cleaner
on a cloth and gently wipe the screen.
Keep liquid, including cleaning fluid, out of the computer's
keyboard and other openings. Never spray cleaner directly
onto the computer. Never use harsh or caustic chemical products to clean the computer.
❖ Ask your Toshiba dealer for suggestions for appropriate clean-
ing products.
Moving the Computer
Your notebook computer is built to withstand reasonable shock
and vibration. Before carrying or transporting your computer,
remember these points:
1 Make sure all disk activity has ended (the drive indicator
light stops glowing).
2 Turn the computer off.
3 Disconnect the power cord.
Part I: Getting To Know Your Computer
76
Learning the Basics
Caring for Your Computer
4 Disconnect all external optional devices.
5 Close the display panel.
Do not pick up the computer by its display panel or by the
back (where the ports are located).
For long trips, transport the computer in a carrying case. You can
purchase a carrying case for your computer from your Toshiba
dealer or through the Toshiba Accessory Catalog.
Part I: Getting To Know Your Computer
Learning the Basics
Caring for Your Computer
Part I: Getting To Know Your Computer
77
Before You Go
to a Computer
Store...
If you’re new to computers, buying computer hardware and programs (software) can be a confusing experience.
This chapter provides advice and explains what you need to know
to purchase programs and devices that will work with your
computer.
Buying Programs
The entertainment, business and personal programs you can buy
are almost endless.
What Types of Programs Can I Buy?
The following sections describe some types of programs that may
fit your needs.
79
80
Before You Go to a Computer Store...
Buying Programs
If You’re a Writer
Almost everyone needs a word processor. This includes professional writers as well as others who use computers for daily
correspondence.
If you want to go beyond working with text and create a book, an
advertisement or a newsletter you’ll need a desktop publishing
program.
If you are a public speaker, a presentation package can help you
design professional-looking overheads, handouts, questionnaires
and announcements.
If You Want to Draw
If you are a graphics artist or a creative artist, a variety of flexible
two- and three-dimensional drawing programs are available.
Some require a tablet connected to your computer through the
serial port.
If You’re an Accountant or Financial Analyst
There are a number of outstanding spreadsheet programs on the
market. In addition, personal and professional accounting software
is a category you should investigate.
If You’re a Designer
Your computer dealer can introduce you to a variety of sophisticated design programs including programs to design a garden, or
to build or remodel a house, as well as the more common Computer Aided Design (CAD) tools.
Part I: Getting To Know Your Computer
Before You Go to a Computer Store...
Buying Programs
81
If You’re a Researcher or Student
Online services such as CompuServe, America Online and Prodigy, and access to the Internet provide almost endless resources for
conducting professional research.
In addition, you can purchase dictionaries, and other reference
materials on disk for your own personal library.
Understanding the Information on the Box
In addition to listing the features of the product on the box, the
manufacturer usually prints the system requirements.
Below is an actual example of the system requirements for a
graphics program.
“Requires: Microsoft Windows 95, 8MB of RAM, VGA
video adapter, mouse or other pointing device, 55MB free
hard disk space”
“Recommended: SVGA video adapter and monitor, sound
card and speakers, CD-ROM drive”
The following sections explain each of the characteristics above.
Windows Compatibility
The computer comes with Microsoft Windows 95. Windows 95
can run programs written for Windows (version 3.0 or later) or
Windows for Workgroups version 3.11.
Processor
Your computer has an Intel 75MHz Pentium processor. It will run
programs requiring up to 75MHz of processor speed and a 286,
386, 486 or Pentium processor.
Part I: Getting To Know Your Computer
82
Before You Go to a Computer Store...
Buying Programs
Memory
The computer comes with 8MB of Random Access Memory
(RAM). Unless you've added additional memory, use this number
when evaluating program requirements. Some programs may list
two memory numbers: an amount which is essential for running
the program and a recommended amount for better performance.
To check your system’s RAM, follow these steps:
1 Click the My Computer icon with the secondary button,
then click Properties.
Windows 95 displays the System Properties window.
2 Click the Performance tab.
Windows 95 displays your computer’s performance status,
including the amount of memory installed in your computer.
Hard Disk
The computer comes with a 504MB hard disk drive. Although this
capacity well exceeds the 55MB stated in the system requirements
example, it is the amount of available hard disk that matters. Much
of your hard disk may be filled with programs and data.
To determine the available space on your hard disk, follow these
steps:
1 In the desktop, double-click the My Computer icon.
Windows 95 opens the My Computer window.
Part I: Getting To Know Your Computer
Before You Go to a Computer Store...
Buying Programs
83
2 Click (don’t double-click) on the C: icon.
Windows 95 displays the space remaining (Free Space) and
total capacity of the drive at the bottom of the My Computer
window. These numbers are listed in megabytes (MB). See
“How Big Is a Megabyte, Anyway?” on page 197 for more
information on megabytes.
If you can’t see these numbers, widen the window until you
can see them. To resize a window, see “Lesson 4: Resizing and
Reshaping Windows” on page 45.
Graphics Card
A graphics card is also called a display adapter. It may be a board
installed in a desktop computer or a chip, as in your computer.
Program requirements are generally listed by the type of adapter
or the maximum resolution the adapter supports.
The display adapter is compatible with the VGA (Video Graphics
Array) and SVGA (Super VGA) standards. The adapter has a
maximum resolution of 1024 x 768. For programs requiring resolutions higher than 640 x 480, you’ll need an external monitor or
the internal display’s virtual display mode. See “Using an External
Monitor” on page 139 for more information about connecting an
external monitor to your computer. Information about virtual display mode is found in “Changing the Display Mode” on page 185.
Pointing Device
The AccuPoint is a pointing device that performs all the functions
of a mouse.
Part I: Getting To Know Your Computer
84
Before You Go to a Computer Store...
Buying Programs
Tips on Buying Programs
Before you buy:
❖ It’s a good idea to see a demonstration of the program.
❖ Talk to friends and your company’s computer experts about
the programs they recommend.
❖ Make sure you have enough space available on the hard disk.
For more information, see “Hard Disk” on page 82.
❖ Make sure your computer has enough memory.
For more information, see “Memory” on page 82.
Installing Programs
Windows 95 makes installing programs onto your computer’s
hard disk easy. Most programs come with installation programs
on diskette. By following the steps in this section, you’ll ensure
that your installation program installs the program files completely
and sets them up to run with Windows 95.
More and more programs are being written specifically for
Windows 95 all the time. If you purchase a program designed
for Windows 95, follow the installation instructions in the
program’s documentation.
To install a new program in Windows 95, follow these steps:
1 Click Start, then point to Settings.
2 Click Control Panel.
Windows 95 opens the Control Panel.
Part I: Getting To Know Your Computer
Before You Go to a Computer Store...
Buying Programs
85
The Control Panel
3 Double-click the Add/Remove Programs icon.
Windows 95 opens the Add/Remove Programs property sheet.
The Add/Remove Programs property sheet
4 Click the Install/Uninstall tab.
The Install/Uninstall page moves to the front of the sheet.
5 Click Install.
6 Insert the program’s installation diskette into the diskette
drive.
7 Click Next.
Part I: Getting To Know Your Computer
86
Before You Go to a Computer Store...
Buying Programs
Windows 95 searches the installation diskette for the installation program.
If Windows 95 doesn’t find the installation program or
searches the wrong drive, click the Browse button and find
the installation program manually.
8 Click Finish to run the installation program.
9 Continue with the program’s normal installation process.
Creating a Backup Copy of Program Diskette(s)
You’ll need one blank, formatted diskette for each program diskette you have to copy.
Follow these steps:
1 Place the original diskette into the diskette drive.
2 From the desktop, double-click the My Computer icon.
Windows 95 opens the My Computer window.
3 Click the A: icon (don’t double-click).
4 Click File, then click Copy Disk.
5 In the Copy Disk dialog box, click Start.
Windows 95 copies the files on the diskette into memory and
displays a message asking you to insert the destination diskette
(the one you’re copying to) into the diskette drive.
6 Remove the original diskette from the diskette drive and
replace it with your blank one.
7 Click OK.
Windows 95 copies the files onto the new diskette.
8 Store the original diskettes in a safe place.
Part I: Getting To Know Your Computer
Before You Go to a Computer Store...
Buying Hardware
87
Buying Hardware
In addition to the basic system requirements, some programs
require devices such as a modem or printer. These items are available as add-on devices for your computer.
What Kind of Devices Can I Buy?
Many devices are available as PC Cards. For more information
about these cards, see “Little Cards that Do Big Things” on
page 115.
The Toshiba Accessories Catalog lists the add-on devices you can
purchase from Toshiba. Talk to your dealer about these Toshiba
options and other third-party devices.
This manual also lists a large number of available options. To find
these, try looking in the Index under “devices.”
Tips on Buying Hardware
❖ If a device is cheaper than you think it should be, it may be an
older version. On the other hand, depending on your needs, an
older version may suit you just fine.
❖ Check the warranty and support policy.
Part I: Getting To Know Your Computer
Taking Your
Computer on
the Road
Probably the main reason you bought your computer was so you
could use it in a variety of places. Of course, some of the places
you’ll be using it may not have a convenient power source.
This chapter describes all the aspects of running your computer on
battery power.
Toshiba's Energy-Saver Design
EPA POLLUTION PREVENTER
Toshiba is a partner in the Environmental Protection Agency's
(EPA) Energy Star Program. As an Energy Star Partner, Toshiba
has determined that this product meets the Energy Star guidelines
for energy efficiency.
The computer enters a low-power stand-by state when it is not
being used, thereby conserving energy and saving money in the
process. It has a number of other features that enhance its energy
efficiency.
Many of these energy-saving features have been set by Toshiba.
By leaving these features active, your computer can operate at its
maximum energy efficiency.
89
90
Taking Your Computer on the Road
Running the Computer on Battery Power
Running the Computer on Battery Power
The computer contains a removable Nickel-metal hydride
(NiMH) battery pack that provides power when you are away
from an AC outlet. You can recharge the battery many times. If
you spend a lot of time on the road, you may also purchase additional batteries, giving you the potential of many more working
hours away from a power source.
To charge the battery, plug the computer into a live wall socket.
The battery charges when the computer is on or off. It takes
approximately two and a half hours to charge the battery with the
computer off, or approximately three to eleven hours when the
computer is on. There is also an optional battery charger that
charges up to two batteries at the same time. See “Charging More
than One Battery at a Time” on page 111 for more information
about the battery charger.
Aside from the battery pack that powers the computer, there are
two additional batteries: the backup battery and the real-time clock
(RTC) battery. The backup battery maintains its charge for
approximately three days with the computer turned off. If you're
really curious about these batteries, see “What Other Batteries
Does the Computer Have?” on page 196.
Monitoring Battery Power
The computer’s battery light gives you an indication of the current
battery charge. The possible states of the battery light are:
❖ Green indicates a full charge.
❖ Orange indicates the battery is charging.
❖ Flashing orange indicates that the charge is running low.
Part I: Getting To Know Your Computer
Taking Your Computer on the Road
Running the Computer on Battery Power
91
Toshiba's MaxTime program also contains a battery gauge that
lets you check how much time you have before the power runs
out. You can set MaxTime so that it is always visible, providing a
constant reminder of your current battery state. This section
describes how to use MaxTime to monitor the battery charge. To
learn more about MaxTime, read the complete description of
MaxTime features which starts in “MaxTime” on page 241.
The computer calculates the remaining battery charge as it operates, based on your current rate of power use.
The computer drains battery power more quickly at low temperatures. Check your remaining charge frequently if you're
working in temperatures below 50 degrees Fahrenheit.
Opening the Battery Gauge
The battery gauge window is the first screen you see when you
open MaxTime. To open MaxTime, follow these steps:
1 Click Start, then point to Programs.
2 Point to Toshiba Utilities, then click MaxTime Manager.
MaxTime displays a window showing the battery gauge:
The MaxTime battery gauge window with two modules
displayed
The illustration above shows the battery gauge in two different
forms. The next section describes how to choose between these
forms.
Part I: Getting To Know Your Computer
92
Taking Your Computer on the Road
Running the Computer on Battery Power
Changing the Appearance of the Battery Gauge
The battery gauge comes in different flavors, called modules.
Each provides the same information in a different way:
❖ The Bargraph module displays the current battery charge as a
horizontal bar graph.
❖ The Percent Remaining module displays the current battery
charge as a percentage of battery capacity.
To set the module(s) you want displayed, follow these steps:
1 Choose Display from the MaxTime Options menu.
MaxTime opens the Display dialog box.
The Display dialog box
2 Choose the Modules page by clicking the Modules tab.
MaxTime displays a screen showing the available modules.
The Modules page
3 Click the checkbox next to each of the modules you wish to
include in the battery gauge.
Part I: Getting To Know Your Computer
Taking Your Computer on the Road
Running the Computer on Battery Power
93
You may select either or both of these modules. If you don't
choose either module, MaxTime displays the Bargraph
module.
4 If you choose to display more than one module, the Format
options are activated:
❖ Choose Stack Modules to display all selected modules at
once.
❖ Choose Cycle Modules to cycle between the selected
modules.
5 If you choose Cycle Modules, you can choose one or both
of the following settings:
❖ Click Show Manual Control Button to include a manual
control button in the MaxTime window. You can click this
button to switch to the next selected module.
❖ Click Auto Cycle Every xx Seconds to switch to the next
selected module every xx seconds, where xx is a number
you set by clicking the + and - buttons.
6 Choose OK to save your changes, exit the dialog box and
return to the battery gauge.
The battery gauge now shows the module(s) you selected.
Keeping the Battery Gauge Visible at All Times
When you first open the MaxTime battery gauge, it acts as a normal Windows program. Opening other programs may cover the
battery gauge. If you prefer to see the battery gauge at all times,
change the Style option in MaxTime.
The Style Option has these values:
❖ Normal - sets the battery gauge to act as a normal Windows
program. Other programs may display on top of the battery
gauge.
❖ Always on Top - displays the battery gauge on top of all other
Windows programs. This gives you a constant reminder of
how long you have before running out of power.
Part I: Getting To Know Your Computer
94
Taking Your Computer on the Road
Running the Computer on Battery Power
❖ On Title Bar - places the battery gauge on the title bar of the
active window. This also displays the battery gauge at all
times.
To set how the battery gauge displays, follow these steps:
1 Choose Display from the MaxTime Options menu.
MaxTime opens the Display dialog box with the Style page on
top.
The Display dialog box
2 Click the checkbox next to the setting you want.
If you don't select any of the options, the computer selects
Normal.
3 If you choose On Title Bar, the On Title Bar Options
become available:
❖ Click Always Left Justified to place the MaxTime window at
the left side of the title bar of the currently active window.
❖ Click Always Right Justified to place the MaxTime window
at the right side of the title bar of the currently active window.
❖ Click Custom Placement - Drag to Position to choose the
placement of the MaxTime window on the title bar of the
currently active window.
4 Choose OK to save your changes, exit the dialog box and
return to the battery gauge.
MaxTime displays the battery gauge in the way you selected.
Part I: Getting To Know Your Computer
Taking Your Computer on the Road
Running the Computer on Battery Power
95
What to Do When Your Computer Doesn’t Know the
Battery Charge
When you insert a fresh battery, your computer may not be able to
calculate the battery’s charge immediately. In this case, you may
want to estimate the battery charge yourself. To do this, follow
these steps:
1 If MaxTime is open, go to step 4.
2 Click Start, then point to Programs.
3 Point to Toshiba Utilities, then click MaxTime Manager.
MaxTime displays the battery gauge window.
The MaxTime battery gauge window
4 Choose Set Battery Charge from the MaxTime Options
menu. This menu item is only available if the system does
not know the current battery charge.
MaxTime opens the Set Battery Charge dialog box.
5 Click and drag the slider left or right to set the estimated
battery charge.
6 Choose OK to accept your change and exit the dialog box.
The battery gauge window changes to reflect the charge
you set.
Part I: Getting To Know Your Computer
96
Taking Your Computer on the Road
Running the Computer on Battery Power
What to Do When the Battery Alarm Sounds
Don't panic.
The computer has three alarms, designed to give you sufficient
warning before your battery becomes fully discharged. Two of the
alarms, the Low Battery Alarm and the Critical Battery Alarm,
function only when you're running Windows 95 and MaxTime is
open (although MaxTime may be minimized). The third, the
Emergency Battery Alert, operates at all times.
This section describes the three battery alarms, what they mean
and how to set each one to fit your personal computing style.
Going... the Low Battery Alarm
If MaxTime is open, it warns you when you're beginning to get
low on battery power. MaxTime beeps once and displays the Low
Battery Alarm warning. This means you have less than 20% battery capacity remaining, unless you’ve changed this level.
Low BatteryAlarm
Your computer's battery power is low.
You have approximately 30 minutes left
on this battery.
OK
The Low Battery Alarm warning
This warning is just a reminder that the battery charge is a finite
resource that can eventually run out. Unless you've told the system
to display this message at a really low power level, you don't need
to do anything at this point.
To close the Alarm dialog box, choose OK. To change the level of
charge that sets off this warning, see “Setting the Alarms” on
page 98.
Part I: Getting To Know Your Computer
Taking Your Computer on the Road
Running the Computer on Battery Power
97
Going... the Critical Battery Alarm
If MaxTime is open, it warns you when you're getting fairly low
on battery power. MaxTime beeps once and displays the Critical
Battery Alarm warning. This means you have less than 10% battery capacity remaining, unless you’ve changed this level.
Critical BatteryAlarm
Your computer's battery power is low.
You have approximately 0 minutes left
on this battery.
OK
The Critical Battery Alarm warning
When this alarm goes off, start planning your remaining battery
time carefully. No frantic actions are required yet, but it's a good
idea to begin to think about what you absolutely must do before
you find a place to plug in the power cord or turn the computer off.
To close the Alarm dialog box, choose OK. To set the level of
charge that sets off this warning, see “Setting the Alarms” on
page 98.
Gone... the Emergency Battery Alert
OK. Now it's serious. When the battery runs down and you have
only about five minutes of time left, the computer starts beeping
continuously. If MaxTime is open, it also displays the Emergency
Battery Alert.
Emergency BatteryAlert!
You have almost no battery
capacity left on this battery!
Find an alternate power source
immediately!
Disable Audible BatteryAlarm
OK
The Emergency Battery Alert
Part I: Getting To Know Your Computer
98
Taking Your Computer on the Road
Running the Computer on Battery Power
When you reach this point, plug the computer into a live power
outlet or save all your files and turn the computer off immediately.
Doing this ensures that you won't lose any work and also provides
relief to everybody around you who's getting tired of the beeping
sound from your computer.
If you don't manage to plug the computer in or turn it off before
the battery completely runs out of power, the computer turns off
automatically. Don't panic, all is not lost. Before shutting down,
the computer automatically turns on Resume Mode (more fully
described on page 99). Resume Mode keeps track of where you
were so when you turn the power on again you can continue
where you left off.
The computer's backup battery will keep this information in memory for about eight hours before it too runs out of power. So, the
clock is ticking. If you ever want to see those unsaved files again,
replace the battery or find a power outlet before eight hours are up.
Setting the Alarms
The Low Battery and Critical Battery alarm sound when the
remaining battery charge reaches threshold power levels. The
Low Battery Alarm is initially set to 20% of battery capacity. The
initial threshold for the Critical Battery Alarm is 10% of battery
capacity.
If these threshold levels don't fit your needs, you can use MaxTime
to change them.
Part I: Getting To Know Your Computer
Taking Your Computer on the Road
Running the Computer on Battery Power
99
To set the threshold levels for the Low Battery and Critical Battery
alarms, follow these steps:
1 Choose Alarms from the MaxTime options menu.
MaxTime displays the Alarms dialog box.
The Alarms dialog box
2 Switch to the desired page by clicking the tab for the alarm
you want to set.
3 To change the Percent Remaining Threshold, click the +
or - buttons.
4 Choose OK to save your settings and return to the MaxTime battery gauge window.
Starting Again Where You Left Off
If you want to turn your computer off for a while but don't want to
spend all the time it normally takes to start your computer up
again, Toshiba's Resume Mode and Windows 95’s Suspend command are for you. These modes provide a sort of electronic bookmark, storing the current state of the computer, including all your
open files and programs, in memory until you turn the computer
on again.
Suspending the computer uses power supplied by the backup battery to store this information. If the backup battery ever discharges
completely, your information is lost. What this means to you is
that, although suspending will store your open files, you should
still save all your work before you turn the computer off.
Part I: Getting To Know Your Computer
100
Taking Your Computer on the Road
Running the Computer on Battery Power
There are four ways to suspend the computer:
❖ Click the Start button, then click Suspend.
❖ Use a special key combination (hotkey) to turn on Resume
Mode from the keyboard, then turn the computer off by pressing the power button.
❖ Use MaxTime to turn on Resume Mode in Windows 95.
❖ Use TSETUP to turn on Resume Mode in MS-DOS. TSETUP
is described in “TSETUP” on page 273.
The Windows 95 Suspend feature is the easiest way to suspend
the computer, however, if you want to use the Panel Power On/
Off and System Auto Off options, you must suspend the computer
using Toshiba’s Resume Mode. These options are described in
“MaxTime” on page 241.
The following sections describe how to turn Resume Mode on and
off with a hotkey and in MaxTime.
Using a Hotkey
To select Resume Mode with a hotkey, follow these steps:
1 Start MaxTime, if it’s not already running.
2 Press Fn + F3 to display the power-up pop-up window.
Resume On
The power-up pop-up window
3 While continuing to press Fn, press F3 until the pop-up window indicates Resume On.
4 Release the Fn key.
You're now in Resume Mode.
Part I: Getting To Know Your Computer
Taking Your Computer on the Road
Running the Computer on Battery Power
101
Using MaxTime
MaxTime lets you select Resume Mode when you’re using
Windows 95. Follow these steps:
1 From the MaxTime battery gauge window, choose
Machine Settings from the MaxTime Options menu.
MaxTime displays the Machine Settings dialog box.
The Machine Settings dialog box
2 Switch to the System Configuration page by clicking the
System Configuration tab.
Part I: Getting To Know Your Computer
102
Taking Your Computer on the Road
Replacing Batteries
The System Configuration page
3 Click the checkbox next to Resume Mode. An X in this box
turns Resume Mode on. An empty box turns Resume
Mode off.
4 Choose OK to save your settings and return to the MaxTime battery gauge window.
Replacing Batteries
When your battery runs out of power, you have two options: plug
in the computer or replace the battery with a charged spare, if you
have one. You may also need to replace the battery if it becomes
damaged or wears out after long years of use.
Replacing the battery requires you to open up part of the
computer. Be careful when you’re following these steps.
To replace the battery, follow these steps:
1 Turn the computer off.
2 Turn the computer upside down.
Part I: Getting To Know Your Computer
Taking Your Computer on the Road
Replacing Batteries
103
Battery cover
Battery release latch
Releasing the battery
3 Slide the battery release latch toward the top of the
computer and hold it there.
4 Slide the battery cover about 1/2 inch toward the battery
release latch.
5 Lift the cover off completely.
Battery latch
Battery
Removing the battery
6 With one hand, move the battery latch off the battery.
7 With the other hand, remove the battery from the
computer.
8 Wipe the battery terminals of the charged battery with a
clean cloth to ensure a good connection.
9 Align the charged battery so the label is down, and the side
terminals (the bumpy side) face away from the battery
release latch.
10 With one hand, move the battery latch to the left and hold
it there.
Part I: Getting To Know Your Computer
104
Taking Your Computer on the Road
Disposing of Used Batteries Safely
11 With the other hand, insert the battery into the slot.
Make sure it is held in place by the battery latch.
12 Place the battery cover over the battery and slide it back
into place until it snaps closed.
13 Turn the computer right side up.
Disposing of Used Batteries Safely
Eventually, after years of faithful service, you'll need to retire your
battery and replace it with a new one. Under federal, state and
local laws, it may be illegal to dispose of old batteries by placing
them in the trash.
The materials that came with your computer may include an insert
regarding the disposal of batteries. If not, check with your local
government for information on where to recycle or dispose of old
batteries.
If you cannot find the information you need, contact Toshiba for
assistance. See “Contacting Toshiba” on page 228 for information
on contacting Toshiba offices around the world.
Conserving Power
It's a fact: if you're running your computer on battery power, your
battery will eventually discharge. However, by using Toshiba's
power-saving options, you can greatly increase the amount of time
before you need to recharge the battery.
These options have been combined into preset battery save modes.
Using these modes lets you choose between maximum power savings and peak system performance. You may also set individual
power-saving options to suit your own tastes.
The following sections describe how to choose a battery save
mode and discuss each power-saving option.
Part I: Getting To Know Your Computer
Taking Your Computer on the Road
Conserving Power
105
The Easy Way—Choosing a Battery Save Mode
There are two battery save modes:
❖ Full power provides maximum system performance, while
using the most power.
❖ Low power provides maximum battery life by reducing over-
all system performance.
The following table shows the battery save option settings for both
battery save modes:
Battery Save Options
Full Power
Low Power
Processing Speed
High
Low
CPU Sleep Mode
Disabled
Enabled
Display Auto Off
Disabled
3 Min.
HDD Auto Off
Disabled
3 Min.
System Auto Off
Disabled
30 Min
LCD Brightness
Bright
Semi-Bright
There is also a User Setting that lets you set the power-saving
options individually.
Part I: Getting To Know Your Computer
106
Taking Your Computer on the Road
Conserving Power
You may set the battery save mode with a hotkey, in MaxTime (if
you're working in Windows 95) or in TSETUP (if you're working
in MS-DOS). This chapter covers setting the battery save mode
with a hotkey and in MaxTime. Using TSETUP to set the battery
save mode is discussed in “TSETUP” on page 273.
Using a Hotkey
To select a battery save mode with a hotkey, follow these steps:
1 Start MaxTime, if it’s not already running.
2 Press Fn + F2 to display the battery save pop-up window.
Low
The battery save pop-up window
3 While continuing to press Fn, press F2 until you select the
desired battery save mode.
4 Release the Fn key.
You're now in the selected mode.
Using MaxTime
To select a battery save mode in MaxTime, follow these steps:
1 From the MaxTime battery gauge window, choose
Machine Settings from the MaxTime Options menu.
MaxTime displays the Machine Settings dialog box, with the
Battery Options page on top.
Part I: Getting To Know Your Computer
Taking Your Computer on the Road
Conserving Power
107
The Machine Settings dialog box
2 Click the arrow next to the Battery Save Mode option list
box to view the available settings.
3 Click the desired setting to highlight it.
4 Choose OK to save your settings and return to the MaxTime battery gauge window.
Setting Your Own Battery Save Options
If you set the battery save mode to User Settings, you can set your
computer's power-saving options individually. For example, if
you want the computer's processing speed set to its maximum
level but want to take advantage of all the other power-saving features, this is the way to do it.
This section describes each of the power-saving options. Settings
that save power are indicated with an Energy Star logo.
Processing Speed
This option sets the speed at which the computer processes information. You have two choices:
Low sets a lower processing speed and saves power.
EPA POLLUTION PREVENTER
High sets the computer to its maximum processing speed.
Part I: Getting To Know Your Computer
108
Taking Your Computer on the Road
Conserving Power
CPU Sleep Mode
This option temporarily shuts down the computer's central processing unit (CPU) when it is inactive. Pressing a key, moving the
AccuPoint or a signal from a device returns the processor to its
normal operating speed. You have two choices:
Enabled turns CPU Sleep Mode on.
EPA POLLUTION PREVENTER
Disabled turns CPU Sleep Mode off.
Display Auto Off
This option saves power by temporarily shutting down the display
if you have not used the keyboard or AccuPoint for a selected
period of time. To turn the display back on, press a key or move
the AccuPoint. You have eight choices:
Disabled turns off Display Auto Off.
EPA POLLUTION PREVENTER
1 Min, 3 Min, 5 Min, 10 Min, 15 Min, 20 Min and 30 Min
blank the display if you haven't used the keyboard or AccuPoint for the selected amount of time.
If you're using an external monitor, Display Auto Off blanks the
monitor after the selected time.
HDD Auto Off
This option saves power by temporarily shutting down the hard
disk if it hasn't been accessed for a set period of time. The drive
turns back on the next time the computer reads from or writes to it.
You have eight choices:
Disabled turns the option Off.
EPA POLLUTION PREVENTER
1 Min, 3 Min, 5 Min, 10 Min, 15 Min, 20 Min and 30 Min turn
the hard disk drive off if the computer hasn't accessed the hard
disk for the time selected.
Part I: Getting To Know Your Computer
Taking Your Computer on the Road
Looking After Your Battery
109
System Auto Off
This option saves power by turning the computer off if it hasn't
been used for a selected period of time. This option is available
only if Resume Mode is turned on. You have seven choices:
Disabled leaves the computer on until you use the power button to turn it off.
EPA POLLUTION PREVENTER
10 Min, 20 Min, 30 Min, 40 Min, 50 Min and 60 Min turn the
computer off if you haven't used it for the time selected.
LCD Brightness
This option saves power by reducing the brightness of the computer's display.
Semi-bright reduces the brightness of the display.
EPA POLLUTION PREVENTER
Bright sets the display to its maximum brightness.
Looking After Your Battery
It doesn't take much effort, but by treating your battery right you
can make sure it provides maximum power storage for a long
time. The following sections offer tips on how to take care of your
battery.
Five Steps to a Happy Battery
❖ Don't leave the computer plugged in and unused for more than
a week at a time. If you’re not going to use the computer for a
long period, disconnect the power cord and let the battery discharge completely.
❖ Alternate between batteries if you have a spare.
❖ Don't touch the metal terminals on the battery with another
metal object.
Part I: Getting To Know Your Computer
110
Taking Your Computer on the Road
Looking After Your Battery
❖ Always turn your computer off when you're replacing the
battery.
❖ Follow the steps in the next section to maintain your battery's
maximum potential.
Maximizing Your Battery's Potential
Over time, the amount of charge your battery can store may
decrease. If you notice a decrease in your battery life, or as a
monthly maintenance routine, follow these steps:
1 Set the battery save mode to Full Power by following the
steps in “Conserving Power” on page 104.
2 Turn the computer off.
3 Disconnect the power plug.
4 Turn the computer on and leave it on until the battery
completely discharges and the system automatically shuts
down.
5 Remove the battery and wait 30 seconds.
6 Reinsert the battery.
7 Connect the power plug and leave the computer off until
the battery is fully charged (approximately two and a half
hours).
The battery light glows green when the battery is fully
charged.
Part I: Getting To Know Your Computer
Taking Your Computer on the Road
Additional Power Options
111
Additional Power Options
Depending on the amount of time you spend away from external
power sources, the capacity of one battery pack may be sufficient
for your needs. However, if you need more portable power,
Toshiba provides two options:
❖ You can buy extra battery packs.
❖ You can buy a battery charger that charges more than one bat-
tery at a time.
Additional Battery Packs Extend Battery Time
Having one or more extra batteries gives you the opportunity to
replace a discharged battery with a charged spare. This can greatly
increase the amount of time you can work without having to find a
power outlet.
Charging More than One Battery at a Time
The optional battery charger provides an alternative to charging
the battery in your computer. This is especially useful if you have
one or more extra batteries. You can charge up to two spares at a
time in the battery charger while continuing to work on the computer. While the battery charger requires a power source, it provides an easy way for you to take more than one charged battery
with you when you travel.
Charging the Computer’s Battery in Your Car
The optional Statpower automobile power adapter lets you plug
the computer into the cigarette lighter of your car. This is a great
way to charge the computer’s battery between stops.
Part I: Getting To Know Your Computer
112
Taking Your Computer on the Road
How about a Carrying Case?
How about a Carrying Case?
When you're on the road, you'll probably want a way to carry your
computer with you. Toshiba offers four choices of carrying cases
for your computer:
❖ a sturdy fabric carrying case
❖ a leather attaché
❖ a leather Executive Portfolio
❖ a backpack-style case
All of these cases help protect the computer from the bumps and
bruises of normal travel. They also provide plenty of extra space
for manuals, power cords and diskettes.
Part I: Getting To Know Your Computer
Taking Your Computer on the Road
How about a Carrying Case?
Part I: Getting To Know Your Computer
113
Little Cards
that Do
Big Things
PCMCIA-compatible PC Cards greatly increase the capabilities of
your computer. These cards pack all the performance of full-sized
expansion cards into a case the size of a credit card.
Your computer comes with two stacked PC Card sockets that let
you take advantage of these little cards. You can install up to two
Type I or Type II cards or one Type III card (Type III cards are
much thicker). When you buy a PC Card, check the package for
the Type of card you’re buying.
This chapter describes the different types of PC Cards, tells you
how to install PC Cards and provides general tips on using them.
Since each card is different, you'll have to read your cards' documentation to use the card, but this chapter will help you get started.
If your PC Card came with a diskette, read “Programs that
Make Your PC Card Work” on page 117 before installing any
of its programs. The programs on the diskette may conflict
with the built-in Windows 95 drivers.
115
116
Little Cards that Do Big Things
What Do PC Cards Do?
What Do PC Cards Do?
New PC Cards are being introduced every day. Among the PC
Cards currently available are:
❖ Modems and fax/modems
❖ Network adapters
❖ Hard disk and solid state memory drives
❖ SCSI adapters
❖ Global Positioning System (GPS) receivers
Some PC Cards combine the functions of several different cards.
One popular example is a PC Card that combines sound with a
SCSI adapter. These are handy if you want to get the most out of
your PC Card slot.
PC Card technology has changed considerably over the last
few years and it’s important that your card is current with the
times. Check the package to make sure the PC Card you buy
conforms to the PCMCIA 2.1 standard (or later). Cards not
conforming to this standard may work with your computer,
but are likely to be much more difficult to set up and use.
Cards You Can Buy From Toshiba
Toshiba’s Noteworthy PC Cards are specifically designed to work
with your computer and are available from your Toshiba dealer.
Among the Noteworthy PC Cards currently available are:
❖ Fax/Modems (some cellular-ready)
❖ Token ring network adapters
❖ Ethernet network adapters
❖ SCSI adapters
Part I: Getting To Know Your Computer
Little Cards that Do Big Things
Programs that Make Your PC Card Work
117
Programs that Make Your PC Card Work
PC Cards require Card and Socket Services software. While this
title sounds rather complex, it's nothing to worry about—it's
merely a set of programs that acts as a translator between the PC
Card and the computer, and makes hot swapping (switching cards
while the computer is on) possible.
Windows 95 comes with all the Card and Socket Services programs already installed. Rather than using the version of these programs that come with your PC Card, using the Windows 95
versions ensures complete compatibility with all the features of
Windows 95.
To set up the Card and Socket Services programs for your PC
Card, see “Setting Up Your PC Card for Your Computer” on
page 120.
PC Cards and Suspending the Computer
Windows 95’s Card and Socket Services software is designed to
support Toshiba’s Resume Mode and the Windows 95 Suspend
command. If you use another manufacturer’s Card and Socket
Services software instead, the system may not recognize your PC
Card when you turn the computer on after suspending.
Shut down and restart the computer and the system will recognize
the card.
Hot Swapping
One of the really great things about PC Cards is that you can
replace one PC Card with another even while the computer is on.
This is called “hot swapping.” For example, if you want to switch
between a hard disk and a modem PC Card, you can do it while
you’re working without turning the computer off and back on
again.
Part I: Getting To Know Your Computer
118
Little Cards that Do Big Things
Inserting PC Cards
Hot Swapping Cautions
While you can insert a PC Card at any time, applying a bit of common sense about when you remove a card will make your computing life much happier. Just remember not to remove a card while
it’s in use. You probably won’t break anything, but you could lose
valuable information. Some examples:
❖ Do not remove a modem card while it is communicating.
❖ Do not remove a hard disk card while the system is accessing
the card.
❖ Do not remove a SCSI card while any of the SCSI devices are
operating.
❖ Do not remove a network card while the network drivers are
loaded.
Before removing a PC Card, stop the card by clicking the PC Card
(PCMCIA) icon on the taskbar.
Inserting PC Cards
OK. You've bought your first PC Card and want to install it. This
section describes how to install the card.
Windows 95 provides the Card and Socket Services for your
PC Card. Even if your PC Card comes with its own version of
Card and Socket Services, you should use the files included
in Windows 95.
The PC Card slot has two PC Card sockets. You may insert Type I
or Type II cards into either the upper or lower socket. You may
only insert a Type III card into the lower socket. Inserting a
Type III card takes up all the space for both sockets—you cannot
have a Type III card installed with any other card.
Part I: Getting To Know Your Computer
Little Cards that Do Big Things
Inserting PC Cards
119
Each PC Card socket is covered by a PC Card socket protector.
These protectors prevent dust or other foreign materials from damaging the sockets. Remove the socket protector before inserting a
PC Card. If you’re inserting a Type III card, you’ll need to remove
both PC Card socket protectors. Set the protectors aside, as you’ll
want to use them after you remove the PC Card.
To insert a PC Card, follow these steps:
1 Locate the PC Card slot on the left side of the computer.
PC Card socket protectors
Eject buttons
The PC Card slot
2 Unfold the eject button that corresponds to the socket you
wish to use and press it to eject the PC Card socket protector.
The top button corresponds to the upper socket, the bottom
button to the lower socket.
3 Grasp the edges of the socket protector and slide it out of
the slot.
Set the protector aside so you can reinsert it after you remove
the PC Card.
PC Card
Inserting a Type II PC Card into the PC Card slot
4 Insert the PC Card.
If you have a Type III card, insert it into the lower socket. If
you have a Type I or Type II card, insert it into either socket.
Part I: Getting To Know Your Computer
120
Little Cards that Do Big Things
Setting Up Your PC Card for Your Computer
5 When the card is almost all the way into the slot, push
firmly, but gently, to ensure a firm connection with the
computer.
When the card is fully seated, an eject button pops out: the top
button for the upper socket and the bottom button for the lower
socket.
6 Pull the eject button out slightly and fold it to the left.
Do not force the eject button into position.
Setting Up Your PC Card for Your Computer
Some PC Cards, such as many fax/modems and hard disk (AT)
cards, are ready to use as soon as you install them. Others, such as
hard disk cards, network cards and SCSI adapters, require some
additional work to set them up to work for your computer.
Windows 95 makes setting up your PC Cards quick and easy.
This section describes how to set up Windows 95 to work with
your PC Card(s).
Setting Up PC Card Support in Windows 95
When you insert your PC Card, Windows 95 should display the
New Hardware Found dialog box, prompting you to set up your
PC Card. Follow the instructions on the screen to set up your PC
Card.
If Windows 95 doesn’t detect your card automatically, follow
these steps:
1 Click the My Computer icon with the secondary button,
then click Properties.
Windows 95 opens the System Properties sheet.
Part I: Getting To Know Your Computer
Little Cards that Do Big Things
Setting Up Your PC Card for Your Computer
121
2 Click the Device Manager tab to access the Device
Manager page.
The Device Manager page should list a PCMCIA socket. If it
doesn’t, refer to the steps under “The system does not recognize your PC Card or PCMCIA socket controller.” on
page 223 to set up PC Card support.
3 Click the “+” to the left of the PCMCIA Socket icon in
Device Manager.
Device Manager lists the controller(s).
4 The controller icon(s) will appear in one of the following
ways:
❖ If the icon appears normally, PC Card support is set up cor-
rectly. Close the System Properties sheet and Control
Panel.
❖ If there is a red X over the icon, you need to set up the PC
Card drivers, Continue with the remainder of this section.
❖ If there is a yellow exclamation point (!) over the icon, refer
to “PC Cards” on page 221 for troubleshooting
information.
5 Click OK to close the System Properties sheet and return
to the Control Panel.
6 Double-click the PC Card (PCMCIA) icon.
Windows 95 opens the PCMCIA Wizard.
7 Follow the instructions on the screen to set up PC Card
support.
Depending on the type of card inserted, Windows 95 may need to
install additional software. For example, a network card will need
to be set up for your network environment.
Part I: Getting To Know Your Computer
122
Little Cards that Do Big Things
Removing a PC Card
Removing a PC Card
To remove a PC Card, follow these steps:
1 Click the PC Card icon on the taskbar.
2 Click Stop xxxx, where xxxx is the identifier or name for
your PC Card.
Windows 95 displays a message that you may safely remove
the card.
Eject buttons
Locating the PC Card eject buttons
3 If the eject button that corresponds to the socket in which
your PC Card installed is folded, unfold it and press it to
eject the PC Card.
The top button corresponds to the upper socket, the bottom
button to the lower socket.
4 Grasp the edges of the PC Card and slide it out of the slot.
5 Reinsert the PC Card socket protector(s).
Part I: Getting To Know Your Computer
Little Cards that Do Big Things
Removing a PC Card
Part I: Getting To Know Your Computer
123
Connecting to
the World
You’ve used your computer at 30,000 feet and in your den while
watching television. Now you want to send e-mail (electronic
mail), explore the world of the Internet or transmit data back to
the office while you’re on the road.
This chapter describes what you’ll need, how to prepare your
system for communications and some of the interesting things to
do on the Internet. The chapter concludes with tips on connecting
your computer to a network.
What You’ll Need
To communicate with the outside world you’ll need:
❖ a modem
❖ a telephone line
❖ communications software
125
126
Connecting to the World
What You’ll Need
Choosing a Modem
A modem converts the digital signals from a computer into the
analog signals required by a voice-grade telephone line. Two
types of modems work with your computer. You can use either:
❖ a PCMCIA-compatible PC Card modem that slips into one of
your computer’s PC Card sockets.
Cards that support the cellular network let you communicate
from your car or a cellular telephone.
❖ an external modem connected to the computer through the
serial port.
Which Modem is for Me?
You would use an external modem only while in your office or at
home. For traveling you need a PC Card modem. Really, the only
reason to use an external modem is if you already own one and
don’t want to invest in a PC Card modem right now.
Faster is Better
Modems support a variety of speeds from 300 bits per second
(bps) to 28.8 megabits per second (for use on regular telephone
lines). In general, you should buy the fastest modem you can
afford.
The faster the modem, the quicker you’ll be able to send and
receive messages, files and other online services. Transmission
speed has a lot to do with how easy the modem is to use.
Where to Buy a Modem
Toshiba sells PC Card fax/modems specifically designed to work
with your computer. Refer to the Accessories Catalog provided
with your computer for more information on how to purchase one.
Your dealer may be able to sell you other fax/modem and fax/
voice/modem PC Cards.
Part I: Getting To Know Your Computer
Connecting to the World
What You’ll Need
127
Installing a PC Card Modem
If you purchased a PC Card modem, install it according to the
instructions in “Inserting PC Cards” on page 118.
After you’ve installed the card, connect the telephone cable from
the card to the wall jack.
Connecting an External Modem
To connect an external modem to the computer, follow these
steps:
Cable
Serial port
Connecting the cable to the serial port
1 Plug one end of the serial cable into the modem and the
other end into the computer’s serial port.
2 Plug one end of the modem’s power cable into the modem
and other end into a live wall outlet.
3 Plug one end of the telephone cable into the line out jack on
the modem and the other end into the wall jack.
Make sure you turn the modem’s power on before you attempt to
use it.
Part I: Getting To Know Your Computer
128
Connecting to the World
What You’ll Need
Setting Up the External Modem
Before you can use your modem, you must tell Windows 95 what
the model number of your modem is and who manufactured it. To
set up your modem, follow these steps:
1 Click the Start button and point to Settings.
2 Click Control Panel.
Windows 95 displays the Control Panel.
3 Double-click the Add New Hardware icon.
Windows 95 opens the Add New Hardware Wizard.
4 Click Next.
The Add New Hardware Wizard asks if it should detect the
new hardware for you.
5 Select No, then click Next.
The Add New Hardware Wizard displays a menu of different
hardware types.
6 Select Modem, then click Next.
The Add New Hardware Wizard asks if it should detect the
modem for you.
7 Click Next. If it finds a modem, go to step 11.
8 Click Next.
The Install New Modem window displays a list of manufacturers and their respective model numbers.
9 Select the manufacturer and model number of your
modem, then click Next.
10 Select the port the modem is connected to (typically
COM1), then click Next.
11 Input the location information requested, then click Next.
12 Click Finish.
Part I: Getting To Know Your Computer
Connecting to the World
What You’ll Need
129
Connecting to a Telephone Line
Once you have the modem, you need a voice-grade telephone line
with a standard modular phone jack. As the business world
becomes more accustomed to busy executives and their portable
computing needs, it's becoming much easier to find these jacks.
For example, many hotels that cater to business travelers have one
or more phone jacks in each room.
If you are using the telephone line at home, disable call waiting
before you connect through the modem. Call waiting interrupts
transmission.
If you have a modem that is capable of transmitting over the cellular network you can use any cellular line. Always stop and remain
stationary while transmitting data over a cellular phone. Transmitting data while you move will cause problems when the cellular
network hands off the call to the next cell.
Using a Communications Program
There are three types of communications programs:
❖ general purpose communications programs
❖ remote control programs
❖ specialized communications programs
This section discusses these types of programs and gives some
general information you'll need to get a communications program
up and running.
General-Purpose Communications Programs
A general-purpose communications program lets you use the
modem to call another computer for the purpose of sending and
receiving messages or files.
Your computer comes pre-installed with a general-purpose
communications program, Hyperterminal. Hyperterminal is a
basic Windows 95 program. See your Windows 95 documentation for more information about how to use Hyperterminal.
Part I: Getting To Know Your Computer
130
Connecting to the World
What You’ll Need
If your needs are more complex than Hyperterminal can handle,
there are a number of options available to you. For example, your
modem may have come with a communications program. Also,
general-purpose communications programs are available at most
computer stores.
You can use this type of program to dial into an online service,
such as CompuServe, or the Internet. If you use a general-purpose
communications program for this purpose, you must be familiar
with how to use the online service or be conversant with UNIX (to
use the Internet).
For more information about online services, see “Using Online
Services” on page 133. For more information about connecting to
the Internet see “Using the Internet” on page 134.
Telecommuting with Remote Control Programs
A remote control program lets you operate a computer over a telephone line. With this type of program, you can call in from home
and actually work as if you were in your office. You can access all
of the drives on your office computer or network, and transfer files
to and from your computer.
There are a number of remote control packages available at most
computer stores. You can also telecommute using the Internet. For
more information on the Internet, refer to “Using the Internet” on
page 134.
Specialized Software
As more and more people join online services and the Internet,
online service providers and independent companies are offering
programs designed to make accessing the online service or the
Internet easier.
Part I: Getting To Know Your Computer
Connecting to the World
Sending a Fax
131
Installing the Program
Whichever type of program you choose, follow the installation
instructions contained in the program's documentation.
Assigning the Communications Port
Unless the program is Windows 95 aware, you must tell the program what the COM port is and configure the computer for the
same COM port. Since Hyperterminal is Windows 95 aware, all
you have to do is tell Windows 95 what modem you are calling
from. Don’t worry about selecting a COM port.
If you’re using a PC Card modem, the communications port is
already set to COM2. If you're using an external modem, the serial
port should be configured as COM1.
Assigning the COM port is the way you connect your communications program to the physical port on your computer. The
serial port can be COM1 or COM2. The name you assign to
the physical port must be the same as the name selected in
your program, or the modem won’t work.
Sending a Fax
Sending a fax through your computer's fax/modem is almost as
simple as printing a document. All you need is a fax program. One
may have come with your PC Card. Otherwise, commercial fax
programs are available at computer stores.
Once your fax program is installed, Windows 95 treats it as if it is
another printer. To send a fax:
1 Choose Print Setup from within the program you’re using
to prepare your document.
2 Select your fax printer driver from the list of available
printers.
Part I: Getting To Know Your Computer
132
Connecting to the World
Using an Electronic Bulletin Board Service
3 Choose Print.
What happens next depends upon your fax program. However,
it's something like this: your program prompts you for a telephone number and gives you an opportunity to attach a standard cover sheet.
4 Choose Send to send the fax.
Using an Electronic Bulletin Board Service
The idea of using bulletin boards is an old one. Everybody's seen
them. Big flat pieces of cork with lots of papers pinned to them.
They’re used to post messages, advertise a business or just to read
some amusing stuff that somebody else had put up.
With the rise of the computer age, bulletin boards have gone electronic. Now there are thousands of electronic bulletin board services (BBSs) around the world. Like their mundane counterpart,
these services let you post messages for friends or questions to
which a wide variety of people can respond. Many BBSs also
offer software (programs) that you can copy to your computer
(called downloading).
When you download software from a BBS, it's a good idea to
check it for computer viruses. See “Viruses and How To Cure
Them” on page 165.
Most BBSs serve a particular interest group and are run by an individual or small group of people. For example, a science fiction
BBS may have messages from people looking for out-of-print
books and offer a few sample sections of new works.
Most computer companies offer a BBS as one way to provide
customers with software updates and answers to their questions.
Toshiba's 24-hour BBS offers Toshiba computing information
and is a good source of Toshiba utilities files and technical bulletins. Complete information about accessing Toshiba's BBS is
found in “Toshiba's Bulletin Board Service” on page 229.
Part I: Getting To Know Your Computer
Connecting to the World
Using Online Services
133
Some BBSs charge for their services. Also, smaller BBSs may not
have toll-free telephone numbers. You'll have to add the cost of a
toll call into the amount you pay to use the BBS.
For a list of BBSs, ask your dealer or computer store.
Using Online Services
You've probably heard of some of the more popular online services, such as CompuServe, Prodigy and America Online. Think
of online services as super BBSs. They provide easy access to
home shopping, travel arrangements, stock quotes and forums on
a huge variety of topics.
You can send messages to other members, post questions on
almost any subject and access a variety of reference materials.
Most online services also have vast libraries of software that you
can download for your own use.
Like many BBSs, online services cost money. Some charge a
monthly fee, while others charge for the time you're connected to
the service. Still others combine a monthly fee with additional
online charges for specialized services.
If you're using an online service that charges for online time,
make sure to pay attention to the amount of time you're connected to the service. It’s easy to get so involved that you lose
track of the time.
Many companies provide technical support through online services. For example, the Toshiba Forum on CompuServe provides
24 hour product support and lets you share tips with thousands of
Toshiba computer users. To access the Toshiba Forum, type go
toshiba at any CIS prompt.
Most online services offer starter packs. You can obtain these
from a computer store or by calling the service. For a toll-free
number to call, watch television advertisements or look in PC
magazines.
Part I: Getting To Know Your Computer
134
Connecting to the World
Using the Internet
Using the Internet
The Internet (INTERnational NETwork of computers) is a huge
computer network. Actually, it's really a network of networks.
Universities, government agencies, commercial offices and other
sites around the world are connected, giving users on one network
access to information on all the other connected networks.
What You Can Do on the Internet
The Internet offers a huge variety of information and experiences.
The world is, quite literally, at your fingertips. For example,
you can:
❖ send electronic mail (e-mail) to any of the millions of Internet
users around the world.
❖ participate in thousands of specialized “newsgroups” covering
almost any topic through the Usenet, a network of user groups.
❖ carry on a real-time conversation with someone in the next
building or around the world.
❖ join a mailing list and receive articles published by others on
specific topics.
❖ publish your own articles and circulate them to a mailing list.
❖ look through a virtually limitless number of electronic
publications.
❖ play games with other users.
❖ download an enormous amount of free software (don’t forget
to check for viruses, following the steps in “Viruses and How
To Cure Them” on page 165).
❖ work at home on a computer many miles away or communi-
cate with the office using video conferencing.
Part I: Getting To Know Your Computer
Connecting to the World
Using the Internet
135
❖ access information over the Internet’s Wide Area Information
Service (WAIS).
❖ search the World Wide Web (WWW) using a hypertext search
for interesting network sites and information.
While you’re on the WWW, look up Toshiba America’s home
page at http://www.toshiba.com.
Where Do I Sign Up?
To use the Internet as an individual, you need an account with a
service provider. Some service providers also provide software
that makes the Internet easier to use. The easiest way to get on the
Internet is to buy one of the programs that comes from a service
provider.
When you dial-up the service provider’s Internet site for the first
time you will be asked to supply your credit card number. This initial process opens an account for you with the service provider.
What Does it Cost?
Although “traveling” on the Internet is free, accessing it through
a service provider costs money. Most software packages for the
Internet come with some free access time. After you’ve used up
this time you may pay hourly charges in addition to a monthly
charge.
If you use a service provider that can only be accessed over a
private telephone network such as SprintNet, you’ll have to pay
additional telephone charges for access to the telephone network.
Make sure you ask about all the charges before you choose a
software package and service provider.
Part I: Getting To Know Your Computer
136
Connecting to the World
Connecting to a Network
How Do I Learn More About the Internet?
Explaining how to use the Internet goes far beyond the scope
of this manual. However, there are a number of excellent books
available that can help you get started. Each book presents the
Internet in a slightly different way, telling you how to access information that is of particular interest to the author. Skim through a
number of books to find the one that seems to point you in the
direction you want to go.
Connecting to a Network
Although your computer is designed to be carried around on your
travels, there may be times that you want to tap into your company's network. This section gives tips on how to connect your
computer to an existing network.
Since most of the details in connecting to a network depend upon
the network operating system your company uses and the type of
cabling or wireless system installed, this section gives only a brief
overview specific to your computer. Talk to your network administrator for assistance in getting up and running on your network.
What Do I Need to Connect to a Network?
Before you can connect to a network, you need to purchase a network adapter card. These come in two forms that will work with
your computer:
❖ PCMCIA-compatible PC network adapter card
❖ Parallel network adapter
The PC Card runs faster, but takes up one of your PC Card slots.
The parallel adapter leaves more space for PC Cards and can be
connected so that you can still use a parallel printer.
Part I: Getting To Know Your Computer
Connecting to the World
Connecting to a Network
137
Making the Connection
Connecting to a Microsoft network requires these general steps:
1 Insert the PC network adapter card in the slot.
Windows 95 automatically detects the card and installs the
software for it.
2 Enter the network information.
Ask your network administrator for the Workgroup name and
other requested information.
3 Click Close.
Windows 95 copies the necessary network files, then prompts
you to restart your computer.
4 Click Yes.
Windows 95 restarts and prompts you to enter your name and
password.
5 Type your name and password and click OK.
To connect to another type of network, refer to Windows Help,
your network adapter documentation, and ask your network
administer for assistance.
Networks and Suspending the Computer
If you’re connected to a network, don’t suspend the computer until
you’ve logged off of the network. Not all networks and programs
work with Windows 95’s Suspend command and Toshiba’s
Resume Mode. When you turn the computer back on after suspending, you may lose access to your network drives and programs. If this happens, press the reset button to restart your
computer.
Don’t use a pencil to press the reset button. Pencil lead can
break off inside the computer and damage it.
Part I: Getting To Know Your Computer
Using Your
Computer on
Your Desktop
Your computer was designed to be easy to carry around and use
while you travel. However, it’s also powerful enough to use as
your primary desktop computer.
This chapter describes how to connect several optional devices
that can make your computer look at home on your desk.
Using an External Monitor
You can easily attach an external monitor to your computer. Some
external monitors display more information than the computer’s
built-in screen. Also, having an external monitor makes the entire
display bigger.
139
140
Using Your Computer on Your Desktop
Using an External Monitor
Connecting an External Monitor
To connect an external monitor, follow these steps:
1 Turn the computer off.
Cable
Video port
Connecting an external monitor
2 Connect the monitor’s video cable to the video port on the
back of the computer.
3 Turn the external monitor on.
4 Turn the computer on.
The computer uses the external monitor.
If your external monitor can display higher resolution video
modes than 640 x 480, you can take advantage of this feature
by changing the video mode. To do this, see “Changing the
Display Mode” on page 185.
Part I: Getting To Know Your Computer
Using Your Computer on Your Desktop
Using an External Monitor
141
Directing the Display When You Turn the Computer On
When you turn the computer on, it sends information to the external monitor. To send information to the built-in display as well,
you’ll need to change the setting in Hardware Setup or TSETUP.
The Power On Display option has two settings:
❖ Internal/External sends the display to the external monitor. If
no external monitor is attached, it sends information to the
computer’s built-in display. (This is the default).
❖ Simultaneous sends display output to both the external monitor
and the built-in display. This is especially useful if you’re making a presentation and cannot see the external monitor easily.
This section explains how to change the Power On Display option
using Hardware Setup. To change this option using TSETUP, see
“TSETUP” on page 273.
The Hardware Configuration program lets you set configuration
options in Windows 95. To set the Power On Display option in
Windows 95, follow these steps:
1 Click Start, then point to Programs.
2 Point to Toshiba Utilities, then click Hardware Setup.
Hardware Setup displays the Hardware Configuration
dialog box.
The Hardware Configuration dialog box
This box contains information about the system.
3 Choose Hardware Options.
Part I: Getting To Know Your Computer
142
Using Your Computer on Your Desktop
Using an External Monitor
Hardware Setup displays the Hardware Configuration Options
dialog box.
The Hardware Configuration Options dialog box
4 Click the Display tab.
Hardware Setup displays a page of display options.
The Display page
5 Click the circle to the left of the desired Power On Display
setting.
6 Choose OK.
Hardware Setup displays a dialog box asking if you want to
reboot (restart) the computer.
Part I: Getting To Know Your Computer
Using Your Computer on Your Desktop
Using an External Keyboard
143
7 Choose:
❖ Yes to restart the computer immediately with your changes
in effect.
❖ No, if you have programs open with unsaved files. Save
your files, then restart the computer (click Start, then Shut
Down, and select Restart the computer) to make your
changes take effect.
Using an External Keyboard
If you prefer to use a standard desktop keyboard, you can attach
one to your computer. The PS/2 port supports any PS/2-compatible keyboard.
You can only connect one PS/2 device at a time. If you’re
already using a PS/2 mouse, you must remove it before connecting a PS/2 keyboard.
Connecting the Keyboard
To connect an external keyboard, follow these steps:
1 Turn the computer off.
Make sure the computer is off before you attach the keyboard.
Connecting a keyboard with the computer’s power on may
damage the keyboard, the computer or both.
Part I: Getting To Know Your Computer
144
Using Your Computer on Your Desktop
Using an External Keyboard
Cable
PS/2 port
Connecting an external keyboard
2 Attach the keyboard cable to the PS/2 port on the back of
the computer.
3 See the keyboard’s documentation for additional configuration steps.
4 Turn the computer on.
The keyboard is ready to use. If you experience any problems,
refer to “The Keyboard” on page 216.
Making Your External Keyboard Pretend it Has the Fn Key
An external keyboard doesn’t have the Fn key contained on the
computer’s built-in keyboard. If you use the computer’s hotkeys
or have set up key combinations in Fn-esse, you’ll probably miss
these features when using an external keyboard. Don’t worry: with
the Fn Key Emulation option in Hardware Setup or TSETUP, you
can make your external keyboard act as if it had the Fn key.
For more information about Fn-esse, see “Starting Programs
Faster” on page 167.
To find out how to set the Fn Key Emulation option using
TSETUP, see“TSETUP” on page 273.
Part I: Getting To Know Your Computer
Using Your Computer on Your Desktop
Using an External Keyboard
145
To set the Fn Key Emulation option in Hardware Setup, follow
these steps:
1 Click Start, then point to Programs.
2 Point to Toshiba Utilities, then click Hardware Setup.
Hardware Setup displays the Hardware Configuration
dialog box.
The Hardware Configuration dialog box
This box displays information about the system.
3 Choose Hardware Options.
Hardware Setup displays the Hardware Configuration Options
dialog box.
The Hardware Configuration Options dialog box
4 Click the Keyboard tab.
Hardware Setup displays a page with the External Keyboard
Fn Key option.
Part I: Getting To Know Your Computer
146
Using Your Computer on Your Desktop
Using a Serial Mouse
The Keyboard page
5 Click the circle to the left of the desired External Keyboard
Fn Key setting.
6 Choose OK to close Hardware Setup with your setting in
effect.
Using a Serial Mouse
You may want to use a mouse instead of the AccuPoint. You can
use a serial mouse or a PS/2 mouse. See “Using a PS/2 Mouse” on
page 147 if you wish to use a PS/2 mouse.
To connect a serial mouse, follow these steps:
1 Turn the computer off.
Cable
Serial port
Connecting the cable to the serial port
2 Plug the mouse cable into the computer’s serial port.
3 Turn the computer on.
Part I: Getting To Know Your Computer
Using Your Computer on Your Desktop
Using a PS/2 Mouse
147
Before you use the serial mouse for the first time, you will need to
complete the following steps:
1 Click the Start button and point to Settings.
2 Click Control Panel.
Windows 95 displays the Control Panel.
3 Double-click Add New Hardware.
Windows 95 starts the Add New Hardware Wizard.
4 Click Next.
The Add New Hardware Wizard asks if it should search for
new hardware.
5 Select No, then click Next.
The Add New Hardware Wizard prompts you to choose a
hardware type.
6 Select Mouse, then click Next.
The Add New Hardware Wizard prompts you to choose your
mouse.
7 Select your mouse from the list provided and click Next.
Typically, you’ll select Standard Serial Mouse.
8 Click Finish, then Yes to load the new settings.
Using a PS/2 Mouse
If you prefer to use a PS/2-compatible mouse, you can attach one
to your computer. The PS/2 port supports any PS/2-compatible
mouse.
You can only connect one PS/2 device at a time. If you’re
already using a PS/2 keyboard, you must remove it before
connecting a mouse.
Part I: Getting To Know Your Computer
148
Using Your Computer on Your Desktop
Using a PS/2 Mouse
Connecting the PS/2 Mouse
To connect a PS/2 mouse, follow these steps:
1 Turn the computer off.
Make sure the computer is off before you attach the mouse.
Connecting a mouse with the computer’s power on may damage the mouse, the computer or both.
Cable
PS/2 port
Connecting a PS/2 mouse
2 Attach the PS/2 mouse cable to the PS/2 port on the back of
the computer.
3 See your mouse documentation for additional configuration steps.
4 Turn the computer on.
Part I: Getting To Know Your Computer
Using Your Computer on Your Desktop
Using a PS/2 Mouse
149
Setting Up a PS/2 Mouse
If you connect a PS/2 mouse to PS/2 port, you may use the mouse,
the AccuPoint or both.
To set how the PS/2 mouse works with the AccuPoint, follow
these steps:
1 Click Start, then point to Programs.
2 Point to Toshiba Utilities, then click Hardware Setup.
Hardware Setup displays the Hardware Configuration
dialog box.
The Hardware Configuration dialog box
This box contains information about the system.
3 Choose Hardware Options.
Hardware Setup displays the Hardware Configuration Options
dialog box.
Part I: Getting To Know Your Computer
150
Using Your Computer on Your Desktop
Using a PS/2 Mouse
The Hardware Configuration Options dialog box
4 Click the Pointing Devices tab.
Hardware Setup displays a page of pointing device options.
The Pointing Devices page
5 Choose the desired option.
Auto-Selected checks for a PS/2 mouse. If one is connected,
the mouse is active and the AccuPoint is disabled. If no PS/2
mouse is connected, the AccuPoint is active.
Simultaneous lets you use both the AccuPoint and the PS/2
mouse.
Part I: Getting To Know Your Computer
Using Your Computer on Your Desktop
Using the Optional NoteDock™
151
6 Choose OK.
Hardware Setup displays a dialog box asking if you want to
reboot (restart) the computer.
7 Choose:
❖ Yes to restart the computer immediately with your changes
in effect.
❖ No, if you have programs open with unsaved files. Save
your files, then restart the computer (click Start, then Shut
Down, and select Restart the computer) to make your
changes take effect.
Using the Optional NoteDock™
The NoteDock port allows you to connect your computer to an
optional enhanced port replicator, the NoteDock. The NoteDock is
an excellent investment if you’re using your computer both in and
out of the office.
Imagine that you’re a salesperson who frequently works away
from the office. When you return to your desk, you want to be able
to connect to your network, print reports from your computer, and
use a mouse instead of the AccuPoint. Connecting cables for each
of these devices every time you return to the office is time-consuming and inconvenient.
By connecting external devices to the NoteDock instead of
directly to your computer, you can leave the devices connected
while you are using your computer away from your desk. When
you return, you can quickly connect your computer to the NoteDock and have immediate access to the devices.
Part I: Getting To Know Your Computer
152
Using Your Computer on Your Desktop
Using the Optional NoteDock™
NoteDock Features
This section identifies and describes the features of the NoteDock.
Headphone jack
Line-in jack
Line-out jack
Power socket
Keyboard port
Mouse port
Video port
Security lock
Serial port
MIDI/joystick port
Parallel port
The rear of the NoteDock
Volume dial
Diskette drive port
PC Card slots
(Slot 2)
(Slot 3)
The right and left sides of the NoteDock
Use the serial port to connect a serial device, such as a serial
printer, modem or mouse. This port replaces the computer’s serial
port.
Use the PS/2 keyboard port to connect a PS/2 keyboard. This
port replaces the computer’s PS/2 keyboard port.
Use the PS/2 mouse port to connect a PS/2-compatible pointing
device.
Use the video port to connect an external monitor. This port
replaces the computer’s video port.
Use the parallel port to connect a parallel printer or other parallel
device. This port replaces the computer’s parallel port.
Part I: Getting To Know Your Computer
Using Your Computer on Your Desktop
Using the Optional NoteDock™
153
Use the power socket to connect the NoteDock to AC power,
using a power cord.
Use the security lock slot to attach a security cable to the NoteDock. This cable is discussed in “Applying Physical Restraints”
on page 165.
Use the two PC Card slots to install Type III PC Cards. The slot
on the right is referred to as Slot 2. The slot on the left side is
referred to as Slot 3. For more information, see “Using PC Cards
in the NoteDock” on page 155.
The following features are designed for a different Toshiba computer and do not operate on this model:
The headphone jack
The audio line-in jack
The audio line-out jack
The MIDI/Joystick port
The volume dial
The diskette drive port
Guide pin
Locking latch
Computer connector
Guide pin
Power connector
The front of the NoteDock
The view of the NoteDock above identifies:
❖ the locking latch and metal latches that secure the computer
to the NoteDock.
❖ the computer connector that connects to the NoteDock port
on the back of your computer.
Part I: Getting To Know Your Computer
154
Using Your Computer on Your Desktop
Using the Optional NoteDock™
❖ the power connector that provides power to the computer
when you connect the NoteDock to a power source.
❖ the guide pins that help align the computer with the Note-
Dock, ensuring a proper connection.
Connecting the Computer to the NoteDock
To attach the computer to the NoteDock, follow these steps:
1 Turn the computer off.
2 Remove all cables from the back of the computer.
Locking latch
Guide pin
Attaching the computer to the NoteDock
3 Lift the locking latch on the NoteDock.
4 Align the two holes on the bottom of the computer with the
guide pins on the NoteDock.
5 Gently press the locking latch down.
The computer slides into place and connects to the NoteDock.
6 Attach the power cord to the NoteDock’s power socket.
7 Connect the power cord to a wall socket.
To disconnect the computer from the NoteDock, turn the computer’s power off, lift the locking latch and remove the computer.
Part I: Getting To Know Your Computer
Using Your Computer on Your Desktop
Using the Optional NoteDock™
155
Using PC Cards in the NoteDock
The NoteDock provides two additional PC Card slots. These slots
function in the same way as those in the computer.
For information about setting up PC Cards, refer to “Setting Up
Your PC Card for Your Computer” on page 120.
The first time you use the NoteDock, Windows 95 will create a
“Dock 1” configuration, that will be able to determine when you
are docked (connected) to the NoteDock.
To use the PCMCIA card slots in the NoteDock, you will need to
setup PC Card support the first time you connect to the NoteDock.
To setup PC Card support, follow these steps:
1 Click the Start button and point to Settings.
2 Click Control Panel.
Windows 95 displays the Control Panel.
3 Select the PC Card (PCMCIA) icon.
4 Follow the setup instructions.
Part I: Getting To Know Your Computer
Keeping Your
Files Safe
At some time, you'll almost certainly have files on your computer
that you want to keep private. Your computer comes with several
options that can help you keep your computer and files safe from
unwanted intrusion.
This chapter describes the security options for your computer.
Using a Password
Setting a password lets you leave your computer, secure in the
knowledge that nobody can access your files. When you set a
password, you must enter the password before working on your
computer.
There are three types of passwords on the computer:
❖ A power-on password requires you to enter the password
every time you start or restart the computer.
❖ An instant password lets you get up and walk away from your
computer for a few moments without having to turn the computer off.
157
158
Keeping Your Files Safe
Using a Password
❖ A supervisor-level password protects system settings by
restricting who can make changes in MaxTime, Hardware
Setup and TSETUP. This is useful if more than one person is
using the computer.
Working with User-Level Passwords
The user-level password is the basic level of password security.
For most users, this is all the password security you’ll need.
You may create a user-level password in either Hardware Setup or
TSETUP. This section describes how to create a user-level password in Hardware Setup and how to use it as an instant and
power-on password. For more information about TSETUP, see
“TSETUP” on page 273.
Creating a User-Level Password
To create (register) a password, follow these steps:
1 Click Start, then point at Programs.
2 Point at Toshiba Utilities, then click Hardware Setup.
Hardware Setup displays the Hardware Configuration dialog
box.
The Hardware Configuration dialog box
3 Click Hardware Options.
Hardware Setup opens the Hardware Configuration Options
screen.
4 Click the Password tab to access the Password page.
Part I: Getting To Know Your Computer
Keeping Your Files Safe
Using a Password
159
The Password page
5 Click Registered.
Hardware Setup asks you to enter a password.
6 Type a password of one to 16 characters and press Enter.
You may use any combination of letters and numbers in your
password.
Make sure you use a password you can remember easily and
create a password service diskette. If you ever lose or forget
your password, contact Toshiba service (US telephone number 800-999-4273). Password service diskettes are discussed in “Protecting Against Forgetfulness” on page 160.
7 When Hardware Setup prompts you to do so, verify the
password by typing it again and pressing Enter.
If the two passwords match, Hardware Setup displays
Registered.
If the two passwords don't match Hardware Setup displays an
error message. Repeat steps 5 and 6 to enter the password
again.
8 If you would like, you may also enter an Owner String that
will appear with the password message any time you start
or restart the computer.
9 Continue with the next section to create a password service
diskette.
Part I: Getting To Know Your Computer
160
Keeping Your Files Safe
Using a Password
Protecting Against Forgetfulness
If you ever forget your password, a password service diskette lets
you bypass the password when starting your computer.
To create a password service diskette, follow these steps:
1 Follow the steps in the previous section to create a
password.
2 Insert a low-density (720KB) diskette into the diskette
drive.
The computer overwrites all existing information on the password service diskette. Make sure the diskette you use does
not contain any important information.
3 While still in Hardware Setup, click OK.
Hardware Setup asks you to confirm your choice.
4 Press Y.
Hardware Setup writes your password to the diskette and
prompts you to remove the diskette.
5 Remove the diskette and click Reboot.
The computer restarts with your password in effect.
6 Place your password service diskette in a safe place, away
from the computer.
If you forget your password and have lost your password service diskette, contact Toshiba service (US telephone number
800-999-4273).
Do not use your password service diskette for any other purpose.
If you try to access the diskette, you’ll receive an error message,
and will have to reset your password and create a new password
service diskette.
Part I: Getting To Know Your Computer
Keeping Your Files Safe
Using a Password
161
Power-On Password
Whenever you start or restart your computer with a power-on
password in effect, the computer prompts you to enter the password before it goes through its normal startup procedure. The
power-on password operates whether or not the computer is
operating in Resume Mode.
When your computer prompts you to enter your password, type
it in and press Enter. If you enter the password correctly, the computer continues with its normal startup procedure. If you enter an
incorrect password, the computer beeps. After three incorrect
attempts, the computer beeps, then turns off automatically.
If you’ve forgotten your password, follow these steps:
1 Turn the computer on with Resume Mode turned off.
The system prompts you for your password.
2 Insert the password service diskette into the diskette drive
and press Enter.
The system prompts you, “Set Password Again (Y/N)?”
The password service diskette is not reusable. Once you use
it, you must create a new diskette, even if you set the same
password.
3 To enter Hardware Setup and reset your password, press
Y. Follow the instructions in “Creating a User-Level Password” on page 158 to reset your password.
To remove your password, press N. It will no longer be
registered.
Part I: Getting To Know Your Computer
162
Keeping Your Files Safe
Using a Password
Instant Password
An instant password secures your system with a single keystroke.
Use this feature when you need to leave your desk for a few minutes and don’t want to turn the computer off.
To use an instant password, press Fn + F1. Pressing this hotkey
freezes the keyboard and AccuPoint and blanks the screen. An
instant password has no effect on an optional serial mouse or
trackball.
To unlock the password, follow these steps:
1 Press Enter.
If a password is registered, the screen remains blank.
2 Enter your password and press Enter.
If you enter the password correctly, the computer returns to
where it was when you pressed the hotkey.
Disabling a User-Level Password
To disable your password, follow these steps:
1 Click Start, then point at Programs.
2 Point at Toshiba Utilities, then click Hardware Setup.
Hardware Setup displays the Hardware Configuration dialog
box.
3 Click Hardware Options.
Hardware Setup opens the Hardware Configuration Options
screen.
4 Click the Password tab to access the Password page.
5 Click Not Registered.
Hardware Setup asks you to enter the current password.
Part I: Getting To Know Your Computer
Keeping Your Files Safe
Using a Password
163
6 Type the existing password and press Enter.
If you entered the correct password, Hardware Setup displays
Not Registered.
If you entered an incorrect password, Setup displays an error
message. Repeat steps 5 and 6 to enter the password again.
If you enter an incorrect password three times, Hardware
Setup displays an Access Denied message indicating that you
cannot change the password. The password remains registered.
7 Click OK to restart the computer with the password
disabled.
Working with Supervisor-Level Passwords
When a supervisor-level password is set, you must enter the supervisor password to make changes in MaxTime, Hardware Setup or
TSETUP. This section describes how to create and use a supervisor-level password.
Creating a Supervisor-Level Password
To create a supervisor-level password, follow these steps:
1 If you’re currently in Windows 95, click Start, then click
Shut Down.
2 Click the button next to Restart the computer in MS-DOS
mode and click Yes.
Windows 95 shuts down the computer, then restarts it in
MS-DOS mode and displays a system prompt.
3 Type c:\dos\svpw and press Enter.
The Supervisor Password program asks if you want to register
(create) a password.
4 Press Y.
The Supervisor Password program asks you to enter a
password.
Part I: Getting To Know Your Computer
164
Keeping Your Files Safe
Using a Password
5 Type in a password and press Enter.
A password can be any combination of up to 10 letters and
numbers. To protect from spying eyes, the Supervisor Password program displays an asterisk (*) for each character you
type.
The Supervisor Password program indicates that your password is registered.
6 Type in the password again to verify it and press Enter.
7 Type exit to return to Windows 95.
Deleting a Supervisor-Level Password
To delete a supervisor-level password, follow these steps:
1 If you’re currently in Windows 95, click Start, then click
Shut Down.
2 Click the button next to Restart the computer in MS-DOS
mode and click Yes.
Windows 95 shuts down the computer, then restarts it in
MS-DOS mode and displays a system prompt.
3 Type c:\dos\svpw and press Enter.
The Supervisor Password program asks if you want to delete a
password.
4 Press Y.
The Supervisor Password program asks you to enter your
password. Once again, the program displays an asterisk for
each character you type.
5 The Supervisor Password program indicates that a password is not registered.
6 Type exit to return to Windows 95.
Part I: Getting To Know Your Computer
Keeping Your Files Safe
Applying Physical Restraints
165
Applying Physical Restraints
You can connect the optional Noteworthy Computer Lock to deter
theft. One end of this cable fits into the security lock slot on the left
side of the computer. Secure the other end of the cable to your
desk or other large, heavy object.
If you’re using an optional NoteDock, you’ll want to purchase two
of these cables: one for the computer and another for the
NoteDock.
Viruses and How To Cure Them
Over the last few years, there have been a number of computer
virus scares. Pranksters seem to find pleasure in unleashing these
potentially destructive programs on the general public.
Viruses, while a potential problem, don't have to have a devastating effect on your computer. By taking a few simple precautions,
you can avoid infection. And, by making sure you have a complete backup of all your programs and data files, you can ensure
a speedy recovery if you do run into problems.
There are many virus detection/removal programs available. Ask
your dealer for help in selecting one that adequately meets your
needs.
Part I: Getting To Know Your Computer
Making Life
Easier
Your computer is a computing powerhouse right out of the box.
You can run the most powerful business programs and work for
hours away from an external power source without needing to
change anything. By adding extras and using the additional builtin features of your computer, you can make your life even easier.
This chapter discusses some convenient options that are already
included with your computer.
Starting Programs Faster
Normally, when you have a Windows program open and want to
open a different program, you need to wade through the long maze
of the Start menu. While you may use Windows 95 shortcuts,
Toshiba’s Fn-esse program provides a quick way to open programs and documents from within any Windows program.
167
168
Making Life Easier
Starting Programs Faster
By assigning a key combination with the Fn key, you can:
❖ open a Windows program or a document in a Windows
program.
❖ display a pop-up list of Windows programs and/or documents
from which to choose.
❖ switch between open programs and documents.
You can assign any key that is not associated with a hotkey or a
keyboard overlay. This section explains how to assign your Fn key
combinations and use them to open programs and documents
quickly.
Starting Fn-esse
To start Fn-esse, follow these steps:
1 Click Start, and point to Programs.
2 Point to Toshiba Utilities, then click Fn-esse.
Fn-esse displays the Fn-esse window:
The Fn-esse window
The keys are color coded as follows:
❖ available keys are black
❖ assigned keys are blue
❖ unavailable keys are dark gray
❖ keys associated with a pop-up list have a small red dot on the
upper left corner of the key
Part I: Getting To Know Your Computer
Making Life Easier
Starting Programs Faster
169
Assigning a Key to a Program or Document
There are three ways to assign a key to open a program or
document:
❖ drag-and-drop
❖ the Browse for Applications dialog box
❖ the Application Explorer dialog box
The following sections describe each of these methods. Experiment with each to find the one that best suits your tastes.
Using Drag-and-Drop
To use the drag-and-drop method of assigning a key to a program
or document, follow these steps:
1 Open both Fn-esse and the Windows Explorer.
2 Resize the Explorer window so that you can see both the
Fn-esse keyboard and the Explorer at the same time.
If you’re unsure how to do this, refer to “Lesson 4: Resizing
and Reshaping Windows” on page 45.
3 In the Explorer window, highlight the program or document file you wish to assign to a key.
4 Click and hold the primary button as you drag the highlighted item from the Explorer to the key on the Fn-esse
keyboard to which you wish to assign it.
5 Release the primary button.
Fn-esse displays the Add/Edit Command dialog box completely filled in to reflect the selected program or document.
6 Choose OK to close the Add/Edit Command dialog box
with your key assignment in place.
The program or document is now associated with the key you
just selected. To open the program or document, press Fn plus
the appropriate key from within any Windows program.
Part I: Getting To Know Your Computer
170
Making Life Easier
Starting Programs Faster
Using the Browse for Applications Dialog Box
To use the Browse for Applications dialog box to assign a key to a
program or document, follow these steps:
1 Click the desired key in the Fn-esse keyboard with the secondary button.
Fn-esse displays the Assignment Type dialog box.
The Assignment Type dialog box
2 Choose Direct.
Fn-esse displays the Add/Edit Command dialog box:
The Add/Edit Command dialog box
3 Choose Browse.
Fn-esse displays the Browse for Applications dialog box.
Part I: Getting To Know Your Computer
Making Life Easier
Starting Programs Faster
171
The Browse for Applications dialog box
4 Locate your file. You may narrow down your search with
the List Files of Type list box.
5 In the File Name field, highlight the file you wish to assign
to the key and choose OK.
Fn-esse displays the Add/Edit Command dialog box completely filled in to reflect your choice.
6 Choose OK to save your key assignment and exit the
dialog box.
The program or document is now associated with the key you
just selected. To open the program or document, press Fn plus
the appropriate key from within any Windows program.
Using the Application Explorer Dialog Box
To use the Application Explorer dialog box to assign a key to a
program or document, follow these steps:
1 Click the desired key in the Fn-esse keyboard with the secondary button.
Fn-esse displays the Assignment Type dialog box.
Part I: Getting To Know Your Computer
172
Making Life Easier
Starting Programs Faster
2 Choose Direct.
Fn-esse displays the Add/Edit Command dialog box.
3 Choose Applications.
Fn-esse displays the Application Explorer dialog box.
The Application Explorer dialog box
4 Select the desired program folder.
5 Select the desired program or document and choose OK.
6 Fn-esse displays the Add/Edit Command dialog box again
with everything filled in to reflect your choice.
7 Choose OK.
The program or document is now associated with the key you
just selected. To open the program or document, press Fn plus
the appropriate key from within any Windows program.
Part I: Getting To Know Your Computer
Making Life Easier
Starting Programs Faster
173
Defining a Pop-up Key Assignment
To assign a key to open a program or document from a pop-up list,
follow these steps:
1 Click the desired key in the Fn-esse keyboard with the secondary button.
Fn-esse displays the Assignment Type dialog box:
The Assignment Type dialog box
2 Choose Popup.
Fn-esse displays the Application Explorer dialog box.
3 Select the desired folder.
The left side of the Application Explorer displays the folders in
the Programs menu. The right side lists the programs and documents in the folder. These are the items that will appear in the
pop-up list. To create a pop-up list with items from various
folders, or to pick only a few items from a folder, create a new
folder containing only the desired programs and documents. If
you're unsure how to do this, refer to your Windows 95
documentation.
4 Choose OK.
The folder is now associated with the key you just selected. To
open a pop-up list showing the items in that folder, press Fn
plus the appropriate key from within any Windows program.
Part I: Getting To Know Your Computer
174
Making Life Easier
Starting Programs Faster
Viewing Existing Key Assignments
To view the existing key assignments, choose Assignments from
the Fn-esse keyboard. Fn-esse displays the Function Key Assignments dialog box:
The Function Key Assignments dialog box
This box lists all the key assignments and the program or document to which they're assigned. To view items in a pop-up list,
choose the Expand pop-up lists checkbox.
The buttons at the bottom of the dialog box operate as follows:
❖ OK exits the dialog box.
❖ Edit opens the Assignment Type dialog box, allowing you to
change a key assignment.
❖ Help displays context-sensitive online help.
Changing or Removing Existing Key Assignments
To change or remove an existing key assignment, follow these
steps:
1 Click in the Fn-esse keyboard on the key you wish to
change with the secondary button.
Fn-esse displays the Assignment Type dialog box.
Part I: Getting To Know Your Computer
Making Life Easier
Starting Programs Faster
175
The Assignment Type dialog box
2 To change the key assignment, choose Direct or Popup and
continue as if you were creating a new assignment. To
remove the key assignment, choose Clear.
Options
This section describes additional Fn-esse options. All of these are
accessed through the Fn-esse Options menu.
Setting Colors
Choosing Colors opens an additional menu with the following
choices:
❖ Assigned Keys sets the color for the assigned keys.
❖ Mark Popups sets the color for the dot indicating a key
assigned to a pop-up list.
❖ Hints sets the background color for pop-up hints.
Keeping Fn-esse On Top
Choosing (checking) Always on Top keeps the Fn-esse keyboard
on top of your currently active window.
Part I: Getting To Know Your Computer
176
Making Life Easier
Working with the Keyboard
Marking Pop-ups
Choosing (checking) Mark Popups marks keys assigned to pop-up
lists with a small dot on the Fn-esse keyboard.
Automatically Minimizing the Fn-esse Window
Choose (check) Minimize on Use to minimize the Fn-esse window automatically when you use it to open or switch to a program
or document.
Displaying Hints
Pop-up hints appear on the Fn-esse keyboard whenever you
move the AccuPoint pointer slowly over the keys. Hints show you
what program, program group or document is associated with a
particular key.
If a key is unassigned, the hint reads “~NONE~.”
Choosing Hints from the Options menu turns pop-up hints on
and off.
Confirming Key Assignment Changes
If you choose Confirm Changes from the Options menu, Fn-esse
asks you to confirm changes in existing key assignments.
Working with the Keyboard
This section introduces additional keyboard options.
Making Your Keyboard Pretend it Has More Keys
The 101-key enhanced keyboard has two Enter, Ctrl and Alt keys.
The computer’s keyboard has only one of each.
Most of the time there’s no difference between the two keys.
However, some programs assign separate functions to the right
and left Ctrl and Alt keys, or to the regular and numeric pad Enter
Part I: Getting To Know Your Computer
Making Life Easier
Working with the Keyboard
177
keys on the enhanced keyboard. The Fn key allows the keyboard to
simulate these separate keys, as follows:
❖ Press Fn + Ctrl to simulate the Ctrl key on the right side of the
enhanced keyboard.
❖ Press Fn + Alt to simulate the Alt key on the right side of the
enhanced keyboard.
❖ Press Fn + Enter to simulate the Enter key on the numeric pad of
the enhanced keyboard.
The Cursor Control Overlay
The keys with the white arrows and blue symbols on the left front
are the cursor control overlay. This illustration highlights the keys
in the cursor control overlay:
/
The cursor control overlay
You can use these keys to:
❖ move the cursor up, down, left or right on the screen.
❖ move up or down one page.
❖ move to the beginning or end of a document.
❖ delete or insert characters.
How these keys function may vary with the program you're using.
Check your program's documentation for information on how the
cursor keys function.
Part I: Getting To Know Your Computer
178
Making Life Easier
Working with the Keyboard
To turn the cursor control overlay on and off, press Fn + F10. The
cursor control light on the indicator panel shows whether the cursor control overlay is on or off.
You can use the overlaid keys to type alphabetic characters while
the overlay is on. To do this:
❖ for lower case letters, press and hold Fn while you type.
❖ for upper case letters, press and hold Fn + Shift while you type.
To use the numeric keys when the cursor control overlay is on,
press and hold Shift while you use the overlaid keys. To return to
the cursor control overlay, release Fn.
Selecting the Keyboard Layout
Depending on what type of computer keyboard you are accustomed to, the position of the Caps Lock, Ctrl and Alt keys on your
computer may seem odd to you. You can change the layout of
these keys by setting the Int. Keyboard Key Layout option in
Hardware Setup or TSETUP:
Z
Shift
Alt
Caps
Lock
A
Ctrl
Fn
A
Z
Shift
Caps
Lock
Ctrl
Alternative
Fn
Alt
Normal
The Alternative and Normal keyboard key layouts
To find out how to set the Int. Keyboard Key Layout option using
TSETUP, see “TSETUP” on page 273.
To set the Int. Keyboard Key Layout option in Hardware Setup,
follow these steps:
1 Click Start, then point to Programs.
Part I: Getting To Know Your Computer
Making Life Easier
Working with the Keyboard
179
2 Point to Toshiba Utilities, then click Hardware Setup.
Hardware Setup displays the Hardware Configuration
dialog box.
The Hardware Configuration dialog box
This box displays information about the system.
3 Choose Hardware Options.
Hardware Setup displays the Hardware Configuration options
dialog box.
The Hardware Configuration Options dialog box
4 Click the Keyboard tab.
Hardware Setup displays a page with the Int. Keyboard Key
Layout option.
Part I: Getting To Know Your Computer
180
Making Life Easier
Using Device Manager to Configure Your System
The Keyboard page
5 Click the circle to the left of the desired Int. Keyboard Key
Layout setting.
Normal is the default setting.
6 Choose OK.
Hardware Setup displays a dialog box asking if you want to
reboot (restart) the computer.
7 Choose:
❖ Yes to restart the computer immediately with your changes
in effect.
❖ No, if you have programs open with unsaved files. Save
your files and restart the computer (click Start, then click
Shut Down and select Restart the computer) to make your
changes take effect.
Using Device Manager to Configure Your System
The Windows 95 Device Manager lets you set up many of the
individual components of your system. You’ll need to use it if, for
example, you want to change the COM port name assigned to the
serial port or the range of memory reserved for the display adapter.
This section gives a brief overview of how to use Device
Manager.
Part I: Getting To Know Your Computer
Making Life Easier
Using Device Manager to Configure Your System
181
To change a component’s setting in Device Manager, follow these
steps:
1 Click on the My Computer icon with the secondary button,
then click Properties.
Windows 95 opens the System Properties sheet.
2 Click on the Device Manager tab.
The System Properties sheet moves to the Device Manager
page.
The Device Manager
This page lists all of the components of the system that you can
change through Device Manager.
3 Double-click on the type of device you want to modify. For
example, if you want to modify the serial port settings,
double-click on Ports.
Device Manager extends the branch, showing all devices of
the type you chose.
4 Double-click on the device you want to modify.
5 Click the Resources tab to move to the Resources page.
Part I: Getting To Know Your Computer
182
Making Life Easier
Different Ways to Turn the Computer On and Off
6 Make the desired changes.
If you’re unused to working with the computer’s configuration,
it’s a good idea to leave the Use Automatic Settings box
checked. These settings were set to work together within the
system and with most available optional devices.
7 Click OK when you’ve finished your changes.
Different Ways to Turn the Computer On and Off
Now that you’ve mastered turning your computer on by pressing
the power button, it’s time to learn some new tricks. This section
explains how to:
❖ set the computer to turn on automatically at a time you choose
(the Alarm Power On option). This option is helpful if you are
expecting to receive files by modem and want to do the transfer at night, when the rates are cheaper. You can set the computer to turn on and receive the files while you are asleep.
❖ turn the computer on and off by opening and closing the dis-
play panel (the Panel Power On/Off option). This option not
only makes it easier to turn the computer’s power on, but
makes it impossible to close the display panel while the computer is on. This option is only available if you turn Resume
Mode on.
❖ set the computer to turn off automatically after a set amount of
time in which no computing activity has occurred (the System
Auto Off option). This option is only available if you turn
Resume Mode on.
You can set the Alarm Power On, Panel Power On/Off and System Auto Off options using either MaxTime or TSETUP. This
section shows you how to change the options using MaxTime. For
information on using TSETUP, refer to “TSETUP” on page 273.
Part I: Getting To Know Your Computer
Making Life Easier
Different Ways to Turn the Computer On and Off
183
Follow these steps to set the Alarm Power On and Panel Power
On/Off options:
1 Click Start, then point to Programs.
2 Point to Toshiba Utilities, then click MaxTime Manager.
MaxTime displays the battery gauge window.
The MaxTime battery gauge window
3 Choose Machine Settings from the Options menu.
MaxTime displays the Machine Settings dialog box.
The Machine Settings dialog box
4 Switch to the System Configuration page by clicking the
System Configuration tab.
Part I: Getting To Know Your Computer
184
Making Life Easier
Different Ways to Turn the Computer On and Off
The System Configuration page
5 To turn on the computer at a particular time, click the
checkbox next to Disable Alarm Power On. This box is
blank when Alarm Power On is turned on. Choose the
Alarm Power On Time Format you wish to use, then click
the + and - buttons until the Time field displays the time at
which you want the computer to turn on.
An X in the checkbox turns off the Alarm Power On feature.
6 To set the computer to turn on or off when you open or
close the display panel, click the checkbox next to Panel
Power On/Off. This option is only available if Resume
Mode is turned on.
7 Choose OK to exit the dialog box and save your changes.
Part I: Getting To Know Your Computer
Making Life Easier
Changing the Display Mode
185
Changing the Display Mode
Perhaps you would like to change how much information your
screen displays, or adjust the number of colors it uses. You can
control these options by using the screen display program. Any
changes you make using this program affect Windows 95 only
and will not change how your screen looks in DOS.
To open the program, follow these steps:
1 Click Start, then point to Settings.
2 Click Control Panel.
Windows 95 displays the Control Panel.
3 Double-click the Display icon.
Windows 95 opens the Display Properties sheet.
4 Click the Settings tab to move to the Settings page.
5 Change the number of colors the display can show by
changing the Color palette setting.
Setting the palette to High Color (16-bit) provides 64k colors.
True Color (24-bit) provides 16 million colors. Some color
modes and resolutions are available only on an external monitor. See “Video Modes” on page 323 for the modes available
on the internal display.
6 Change the screen resolution by clicking and dragging the
Desktop area slider.
7 When you’ve made all your changes, click OK. To close
the Display Properties sheet without enabling your
changes, click Cancel.
Part I: Getting To Know Your Computer
Using Online
Documentation
Your computer comes equipped with this manual in the form of an
electronic book, called online documentation. Cross-references in
the text allow you to move through a series of related topics in the
order you desire.
This section shows you how to:
❖ open the online documentation.
❖ select and read a topic.
❖ use the index.
❖ create and use bookmarks.
❖ cross-reference selected topics.
❖ search for selected information.
❖ get help with using the online documentation.
❖ reinstall online documentation.
187
188
Using Online Documentation
Opening Online Documentation
Opening Online Documentation
To open online documentation, follow these steps:
1 Click Start, then point to Programs.
2 Point to Toshiba Utilities, then click Online
Documentation.
Windows 95 opens the online documentation program.
Reading a Selected Topic
The online manual is a “virtual” book, that looks and operates like
a spiral-bound notebook referenced with index tabs. You can
expand each section in the table of contents by clicking the file
folder icon to the left of each chapter heading.
To read a section of a manual:
❖ To select a subsection, click its index tab or click Contents and
select the section from the list displayed.
❖ To move to the beginning of the table of contents, click
Contents.
❖ To move up or down in a section, click and drag the scroll box
or click the up and down arrows at the right side of the screen.
❖ To move forward or backward one section at a time, click the
left and right arrow icons at the bottom of the screen.
Part I: Getting To Know Your Computer
Using Online Documentation
Using the Index
189
Using the Index
The online documentation program provides an alphabetical index
for quick access to related topics. To use the index to select a
topic:
1 Choose Index.
Online documentation displays the Index dialog box.
2 Select the topic you wish to read and choose OK.
Online documentation displays the topic.
Using Bookmarks
Online documentation has a bookmark feature that allows you to
switch quickly between marked sections. Bookmarks are saved
for your future reference until you choose to delete them.
Creating a New Bookmark
To create (or define) a bookmark, follow these steps:
1 Choose Define from the Bookmark menu, or click the yellow bookmark icon in the lower-right corner of the screen.
Online documentation displays the Define Bookmark dialog
box. This dialog box automatically shows the current chapter
in the Bookmark Name field as the default name, and displays
a list of currently defined bookmarks.
2 Choose OK to accept the current chapter name as the
bookmark.
To change the default bookmark name, type the new name and
choose OK.
If the name is already assigned to another bookmark, online
documentation displays a message stating that the name
already exists. Type the new bookmark name and choose OK.
Part I: Getting To Know Your Computer
190
Using Online Documentation
Using Cross-References
Online documentation creates a consecutively numbered bookmark and places it in the online text. The bookmark appears at the
upper edge of the online “book.”
To view a marked section, click its assigned bookmark. Online
documentation switches to the corresponding text location.
Deleting a Bookmark
To delete a previously defined bookmark, follow these steps:
1 Choose Define from the Bookmark menu or click the yellow bookmark icon in the lower-right corner of the screen.
Online documentation displays the Define Bookmark dialog
box, which displays the list of currently defined bookmarks.
2 Select the bookmark name you wish to delete from the list.
3 Choose delete.
Online documentation deletes the bookmark.
4 Choose OK to close the Define Bookmark dialog box.
Using Cross-References
Online documentation’s cross-reference feature allows you to
move quickly to sections containing information related to the
material in your current section. For example, from the batteries
section you can cross-reference to the MaxTime section.
Cross-references are shown in green underlined text.
To view a cross-reference, follow these steps:
1 Position the pointer over the cross-reference.
The pointer changes to a pointing hand icon.
Part I: Getting To Know Your Computer
Using Online Documentation
Searching for a Topic
191
2 Click the cross-reference.
Online documentation displays the section containing the
information relating to the cross-reference you selected.
When you have finished reading the cross-referenced material,
clicking Go Back returns you to the original topic.
Searching for a Topic
Online documentation has a full-text search feature that locates
every topic that contains a word or phrase you are looking for. To
use the full-text search feature, follow these steps:
1 Choose Search.
Online documentation displays the Search dialog box.
2 Type the word or phrase for which you would like to
search in the Search by Word field.
You can substitute the last characters in a word with an asterisk
(*) to find all the forms of the word. For example, typing bat*,
would find “batch,” “battery,” “batteries,” “battery-powered”
and “battery-save.”
3 Choose OK to start the search.
Online documentation displays the Search Results dialog box,
displaying the list of topics containing the selected text.
4 Select the topic you wish to view and choose Go To.
Online documentation displays the topic with the word or
phrase highlighted.
To exit the Search Results dialog box, choose Cancel.
To start a new search, choose To Search.
Part I: Getting To Know Your Computer
192
Using Online Documentation
Getting Help
Getting Help
Choose Help Contents from the Help menu or press F1 to open
online help. The help text explains the options available in the
online documentation feature you’re currently using.
Reinstalling Online Documentation
If for some reason you remove the online documentation from the
hard disk, you’ll need to restore it before you can use it again. To
restore the online documentation to your hard disk, you must use
the master program diskette that contains the online documentation files. For more information about master program diskettes,
see “Create or Purchase Master Diskettes” on page 29.
Follow these steps to reinstall online documentation:
1 Click Start, then click Run.
Windows 95 displays the Run dialog box.
2 In the Run dialog box, type the command line a:\install and
choose OK.
Follow the instructions on the screen to define the location of
the files. If the directory you choose does not exist, the installation program creates it for you.
3 When the installation is complete, eject the diskette from
the drive.
Part I: Getting To Know Your Computer
Using Online Documentation
Reinstalling Online Documentation
Part I: Getting To Know Your Computer
193
What’s Really
Going On?
By now, you've probably become pretty good at using your computer. However, you may be curious as to what is really going on
while you're pounding away at the keyboard. This chapter gives
you details of how your computer works.
What Is a Computer?
In one sense, your Satellite 100CS or Satellite 105CS is a computer. Technically speaking however, the processor chip, where
the actual computing takes place, is the computer. All the other
components are outside the computer because they either provide
information to the processor or receive the results of the processor's computations.
195
196
What’s Really Going On?
What Other Batteries Does the Computer Have?
What Other Batteries Does the Computer Have?
In addition to the main battery that powers your system when
you're away from an AC outlet, your computer has two other
batteries:
❖ The backup battery supports Resume Mode. When you turn
the computer off in Resume Mode, a special memory powered
by the backup battery keeps track of everything for the next
time you turn the computer on. The backup battery gets its
charge from the main battery. It maintains its charge for
approximately four hours after the main battery discharges.
❖ The RTC (real-time clock) battery stores the computer's con-
figuration information, which is stored in the RTC memory.
When you make changes in TSETUP or Hardware Setup, this
memory keeps track of those settings. The RTC battery also
operates the computer's internal clock. It is charged by the
main battery.
How Does a Disk Store Information?
Like a tape recorder, a disk drive reads and writes magnetically
encoded information on magnetic media. The drive positions a
read/write head above the surface of the disk when it records and
retrieves information.
Before a drive can read from or write to a disk, the disk must have
a specific structure. Formatting a disk creates this structure.
Part I: Getting To Know Your Computer
What’s Really Going On?
How Big Is a Megabyte, Anyway?
Tracks
197
Sectors (within one track)
Item of information
Tracks and sectors of a disk
Formatting divides each side of the disk into concentric circles
called tracks. Each track is divided into sectors. Each item of information stored on a disk has a specific address composed of its
side, track and sector number. This address makes it possible for
the computer to locate the information on the disk.
How Big Is a Megabyte, Anyway?
When you read about the size of your hard disk, you may be confused by the discrepancy between megabytes and millions of
bytes. “Wait a minute,” you say, “doesn’t a megabyte equal one
million bytes?” Well, not exactly...
Computers use base two arithmetic, also called binary arithmetic.
Because of this, all numbers in computing are based on powers of
two. One megabyte is actually equal to 1,048,576 bytes (220), the
closest binary number to 1,000,000.
In the early days of personal computers, the difference was very
minor because hard disks were small and computers didn’t have
much memory. As hard disk capacities and memory sizes have
increased, the difference has become much more significant.
The hard disk that comes with your computer holds approximately
504 megabytes. You can convert this to millions of bytes by multiplying the number of megabytes (504) by the number of bytes in a
megabyte (1,048,576). The result is 528,482,304, approximately
528 million bytes.
Part I: Getting To Know Your Computer
198
What’s Really Going On?
How Does the Screen Display Information?
How Does the Screen Display Information?
Images on the computer's built-in liquid crystal display (LCD) are
created by turning individual dots on the screen on or off in various combinations. These dots are called pixels.
A pixel on the display
A pixel is the smallest element on the screen. On a color display,
each pixel is made up of three subpixels: one red, one green and
one blue (RGB). Each subpixel may be either on or off. Mixing on
and off subpixels is like blending the primary colors to create other
colors.
A pel formed by several pixels
The smallest element that your programs can control is called a
pel. Pels are arranged on the screen in a grid-like fashion. Depending on the video mode a program selects, a pel may be a single
pixel or several pixels.
The pel size determines the clarity of the image—called screen
resolution. Larger individual pels reduce the total number of available pels, resulting in lower resolution. Smaller pels increase the
number of pels that can fit on the screen, resulting in higher resolution and a clearer image.
Part I: Getting To Know Your Computer
What’s Really Going On?
How Does the Screen Display Information?
199
Displaying Colors
The pel size also determines how many colors the display can produce. By combining pixels of different colors within a pel, the display can produce many more colors than are available within a
single pixel. Therefore, larger individual pels increase the number
of colors available to the display.
Video Modes
Video modes are sets of industry-standard rules about resolution
and the maximum number of distinct colors that can be displayed
simultaneously on the screen. Programs that adhere to the rules of
a video mode will run on any system that supports that mode.
Most display adapters provide several video modes. The
computer's SVGA-compatible display adapter supports all VGA
modes and some SVGA modes.
The video mode required by a program depends on:
❖ whether the program displays graphics or text.
❖ the resolution required for the text or graphics.
❖ the number of colors used.
❖ the font size (in pixels) of the text.
Based on these requirements, computers recognize two categories
of video modes: graphics modes and text modes.
In a graphics mode, programs can turn on and off individual pels
to display a variety of images. The computer controls every pel on
the screen individually. This provides maximum display flexibility while somewhat reducing the speed at which the display produces images.
An image produced this way could be a drawing or picture, like a
pie chart, graph or photograph. It could also be an icon or a variation on a text character, like italics or bold type.
Windows 95 and Windows programs use graphics modes.
Part I: Getting To Know Your Computer
200
What’s Really Going On?
What Is Plug and Play?
Character cell in a text mode
In a text mode, a character cell is the smallest element a program
can control. A character cell is a grid of pels. All cells are the same
size. Each cell displays a single letter or symbol. Character cells
are arranged in rows and columns. In a text mode, only characters
from a predefined set are available. If your program uses a text
mode, refer to the program's documentation for a list of available
characters.
What Is Plug and Play?
Plug and Play is a clever name for a new technology developed
jointly by Intel and Microsoft that seeks to make upgrading a computer system easy.
Computer systems, operating software and add-on products that
are designed according to this standard work together the first time
you connect them. Plug and Play eliminates the time-consuming
frustration of figuring out which IRQ and memory addresses to
assign.
Since Plug and Play is an important part of Windows 95, your
computer lets you take advantage of all its features.
Part I: Getting To Know Your Computer
What’s Really Going On?
What Really Happens When You Turn the Computer On?
201
What Really Happens When You Turn the
Computer On?
When you press the power button, the following occurs:
1 The computer's BIOS (Basic Input/Output System) loads
a bootstrap program.
This program, named from the expression “pull yourself up by
your bootstraps,” checks and displays the amount of memory
in the system before proceeding.
2 The bootstrap program attempts to load Windows 95.
It looks first for a diskette in the diskette drive and then at the
hard disk. If a diskette without the necessary startup files is in
the drive, the bootstrap program displays an error message.
If you’ve changed the Boot Priority option in TSETUP, the
computer will check the hard disk before the diskette drive.
3 As Windows 95 loads, it configures the system.
4 Windows 95 loads the desktop.
Part I: Getting To Know Your Computer
If Something
Goes Wrong…
Some problems you may encounter when using your computer
are relatively easy to identify and solve. Others may require help
from your dealer or the manufacturer of a program.
This chapter offers suggestions to help you track down the source
of any problem and solve it. At the end of the chapter is a list of the
addresses and telephone numbers for Toshiba services and
support.
Develop Good Habits
We all know that an ounce of prevention is worth a pound of cure,
but sometimes we're in such a hurry to use a computer that we fail
to adequately prepare for the inevitable problems that will occur.
203
204
If Something Goes Wrong…
Diagnosing the Problem
On a regular basis, back up the information stored on your
hard disk. There are two ways you can do this:
❖ copy files to diskette in Windows 95, following the steps in
“How to Copy Something to a Diskette” on page 71 or “How
to Back Up Your Work on Diskettes” on page 72.
❖ connect a tape drive to the system and use a specialized pro-
gram to copy everything on the hard disk to a tape.
Some people use a combination of these methods, backing up all
files to tape each week and copying critical files to diskette on a
daily basis.
If you've added your own programs to your system, you should
back up these programs as well as the data. If something goes
wrong that requires you to format your hard disk and start over,
reloading your data and programs from a backup will save time.
Diagnosing the Problem
The components used to manufacture computers are built to last
for years. They rarely fail and when they do, don't panic: it's usually something simple.
Your first task is to define the problem by observing carefully
what is happening. It's a good idea to stop what you're doing and
jot down on a piece of paper what seems to be going wrong. If you
receive an error message, write it down. This activity will suggest
things you can try to further diagnose the problem.
Try to remember what you were doing just before the problem
occurred. If you installed a new program or device, try removing it
and see if the problem goes away.
Part I: Getting To Know Your Computer
If Something Goes Wrong…
Diagnosing the Problem
205
Is it Hardware or Software?
The next thing to decide is if your problem is related to the programs you're using or to the computer itself (the hardware). This
may not be as easy as it sounds. Some software problems masquerade as hardware problems and vice versa.
To check your hardware, follow these steps:
1 Click the My Computer icon with the secondary button,
then click Properties.
Windows 95 opens the System Properties dialog box.
2 Click the Device Manager tab.
The Device Manager page displays a list of system components. If a component is not working properly, a yellow exclamation point (!) appears beside the component name.
If none of the components has a yellow ! beside it, the problem
is most likely software-related.
If there is a red X beside it, the device is disabled. Double-click
on the device and check the configuration name listed as Current in Device Usage.
If it looks like your problem is software-related, it will require
a software solution. Having an authorized service provider
add or replace system components will have no effect on the
software.
Pay Attention to the Little Things
If you've used your computer for a while, you know how it normally works.
❖ Is everything suddenly working slower than usual?
❖ Do you see any error messages or unusual characters on the
screen? If so, what are they?
Part I: Getting To Know Your Computer
206
If Something Goes Wrong…
Diagnosing the Problem
❖ Is there anything missing from the screen that you're used to
seeing?
❖ Are any indicator lights on or flashing? If so, which ones?
❖ Do you hear any beeps? If so, how many? Are they long or
short?
It helps if you can make the problem happen every time you try
the same steps. A problem that can be reproduced can be solved.
So, after you've read the next section, try to make the problems
happen again.
Where Do I Go From Here?
The following table lists the sections of this chapter that refer to
specific areas of the computer.
Component
Page
General Protection Faults and System Errors
Power and the Batteries
PC Cards
Modems
Printers
Software and CPU Sleep Mode
Turning the Computer On
The Keyboard
The AccuPoint
The Display
The Disk Drives
Optional Devices
Resolving Resource Conflicts
page 210
page 215
page 221
page 225
page 224
page 209
page 212
page 216
page 216
page 217
page 218
page 219
page 226
Part I: Getting To Know Your Computer
If Something Goes Wrong…
Ten Things to Do to Keep Your Sanity
207
Ten Things to Do to Keep Your Sanity
❖ If you're able to do so, save your work immediately.
If the system is locked (you can type or move the mouse, but
nothing happens when you do), you won't be able to save your
work. In this case, you may have to start again from the last version of the file on disk or from your backup.
❖ Review what you just did.
Many problems occur because you made an error. Read the
section in your software manual that deals with what you are
currently doing and follow any suggestions that seem to apply.
❖ If your screen displays an error message, go to your software man-
ual first.
If you can't find the error in your software manual, refer to your
Windows 95 manual. If the error is not documented anywhere,
write it down exactly as it appears on the screen.
If you must call for help, you need to be able to tell the technician
on the other end of the phone (who can't see your screen) exactly
what the error message said.
❖ Make sure all cables are firmly attached.
Loose cables can cause unrelated error conditions and/or messages. For example, if you're using an external monitor and the
monitor's data cable (connected to the computer's video port)
comes loose, the colors on the monitor may seem to fade. You
may think the monitor is the problem, but really it's just a loose
cable.
❖ Make sure the battery has power or the computer is plugged into a
live wall outlet.
❖ Call a friend who has experience with a similar configuration.
Almost all computer users have someone they can call to discuss
such problems. If you don't know anyone to call, find an electronic
information source such as Toshiba's Bulletin Board Service or
CompuServe.
Part I: Getting To Know Your Computer
208
If Something Goes Wrong…
Ten Things to Do to Keep Your Sanity
❖ If you've just installed a new program or a new device, the prob-
lem is probably related to that program or device.
You may need to uninstall the program or remove the device,
make sure everything works correctly and then reinstall the program or device using a different Interrupt Request level (IRQ),
memory address, or other option.
❖ Read the manuals.
It's very difficult to provide a fail-safe set of steps you can follow
every time you experience a problem with the computer. Your
ability to solve problems will improve as you learn about how
computers and programs work together.
Read all the manuals provided with your computer, as well as the
manuals that come with the programs and devices you purchase.
In addition, your local computer store or book store contains a
variety of self-help books you can use to supplement the information in this manual.
If you're one of those people for whom computers are an utter
mystery, you're not alone! Don't hesitate to purchase an elementary computer book.
❖ Press Ctrl + Alt + Del.
If you're in Windows 95 when you do this, Windows 95 displays
the Close Program window. You can choose End Task to close the
offending program, or Shut Down to restart the computer. Even if
Windows 95 closes the program for you, it's a good idea to restart
the computer.
If the computer is in Resume Mode, you may have to press the
reset button, located on the left side of the computer.
❖ Take a break.
If you've been fighting to solve a problem for a long period of
time, you're probably frustrated by now. Stand up and take a deep
breath. Often, you can find a new solution to a problem just by
stepping away from it for a few moments.
Part I: Getting To Know Your Computer
If Something Goes Wrong…
Software Tips
209
Software Tips
For the most part, this chapter discusses specific problems related
to the computer itself. It does not cover software problems because
there's no way Toshiba can know which programs you are using.
This is why one of the steps in “Ten Things to Do to Keep Your
Sanity” on page 207 involves searching your software manuals.
This section provides some general software tips.
Software and CPU Sleep Mode
If you've turned on (enabled) CPU sleep mode, and you open a
program that immediately stops working (locks), turn off (disable)
sleep mode and try to run the program again.
You can disable sleep mode in MaxTime or TSETUP. For
instructions on using TSETUP to disable sleep mode, refer to
“TSETUP” on page 273.
Follow these steps to disable sleep mode in MaxTime:
1 Click Start, then point to Programs.
2 Point to Toshiba Utilities, then click MaxTime Manager.
Windows 95 opens MaxTime.
3 Choose Machine Settings from the MaxTime Options
menu.
MaxTime displays the Machine Settings dialog box.
4 Click Battery Options.
MaxTime displays the battery options.
5 Set the Battery Save Mode to User Settings.
6 Choose Disabled for Sleep Mode.
Part I: Getting To Know Your Computer
210
If Something Goes Wrong…
Software Tips
7 Choose OK or press Enter to save your changes and exit the
dialog box.
8 Minimize MaxTime or close the program by choosing Exit
from the File menu. You don't have to restart the computer for this change to take effect.
If the problem continues, contact the manufacturer of the program.
General Protection Faults and System Errors
If you encounter a General Protection Fault or System Error while
using a Windows program, restart the computer (press Ctrl + Alt +
Del) before you continue. (Press the reset button if Resume Mode
is enabled.)
A General Protection Fault is an indication that Windows 95 has
tried to assign two or more programs to the same area in memory.
A System Error indicates a problem within one program. While a
System Error is not as serious as a General Protection Fault, it's
still a good idea to quit Windows 95 and restart your computer
before continuing to work.
Unlike a General Protection Fault, a System Error usually lets you
save files, if you have other programs open. Make sure you save
these files before you shut down the computer.
What to Do for a General Protection Fault
Follow these steps if you receive a General Protection Fault or a
System Error:
1 Choose OK to close the error message dialog box.
2 If you are able to do so, save any open files. If your computer does not respond, continue with step 3.
3 Press Ctrl + Alt + Del to restart your computer. If this has no
effect, press the reset button.
When the computer starts and loads Windows 95 again you may
continue working.
Part I: Getting To Know Your Computer
If Something Goes Wrong…
Software Tips
211
Memory Card Problems
Bad or improperly connected memory cards may also cause these
errors. To correct this problem:
1 Click Start, then click Shut Down.
Windows 95 displays the Shut Down Windows dialog box.
2 Click the button next to Shut down the computer, then
click Yes.
Windows 95 shuts down and turns the computer off
automatically.
3 Remove the memory card.
4 Reinstall the memory card, making sure it’s seated
properly.
5 Replace the memory expansion slot cover.
6 Check for the error again.
7 If the error reoccurs, remove the memory card entirely
and check for the error again.
If removing the memory card eliminates the error, the memory
card may be bad. If the error reoccurs without the memory
card installed, the error is not caused by the memory card.
Your Computer May Be Too Fast for Your Program
If an older program will not run, the computer may be running too
fast for it. Try setting the Processing Speed option in MaxTime to
Low, or change the CPU Cache option in TSETUP to
Write-through.
Part I: Getting To Know Your Computer
212
If Something Goes Wrong…
Solving Computer Problems
Solving Computer Problems
If you're sure your problem is not software related, you probably
have a good idea which component is not working properly. The
rest of this chapter explains possible solutions for various problems. The chapter discusses each system component in turn.
Turning the Computer On
When you turn the power on with Resume Mode off, the system
loads what's called a bootstrap program stored in the computer's
Basic Input/Output System (BIOS), then loads Windows 95.
These problems might appear when you turn the power on:
The computer won't start.
Make sure you attached the power cord properly or installed a
charged battery. Press and hold the power button for a few
seconds.
The computer is not accessing the hard disk or the diskette drive.
If the Boot Priority option in Hardware Setup or TSETUP is set to
HDD→FDD and you have a hard disk problem you won’t be able
to start the computer. Insert a system diskette into the diskette
drive and press F10 while you turn the power on.
The computer seems to start correctly but, when you press a key
on the keyboard or press the AccuPoint, nothing happens.
You are probably in Resume Mode and have a software or
resource conflict. When this happens, turning the power on returns
you to the problem instead of restarting the system. To clear the
condition, press Ctrl + Alt + Del or the reset button on the left side of
the computer.
Clearing the condition may get you running by disabling Resume
Mode, but it won't solve a resource conflict. Read the documentation that came with the conflicting device and “Resolving
Resource Conflicts” on page 226.
Part I: Getting To Know Your Computer
If Something Goes Wrong…
Solving Computer Problems
213
The computer displays the WARNING: RESUME MODE FAILURE
message.
The backup battery is discharged. To charge the backup battery,
plug the computer in and turn it on for at least 24 hours.
The computer displays the Non-System disk or disk error message.
Make sure there are no diskettes in the diskette drive. If there is
one, remove it and press any key to continue. If pressing any key
does not work, press Ctrl + Alt + Del or press the reset button to
restart the computer.
Verifying the System
A system verification test confirms that all the components
connected to the computer are working. This includes testing the
memory, hard disk, diskette drive, etc. Use this test if you suspect
a problem with any of these internal components.
Running the Test
To verify the system, follow these steps:
1 Turn the computer off.
2 Hold the spacebar as you press the power button. If
Resume Mode is on, hold the spacebar as you press the
reset button.
System verification displays the following message, which
remains on the screen for a few seconds as the computer tests
memory:
(C) Copyright 19xx Toshiba Corp. All rights reserved.
MEMORY TEST xxxxKB
Successful Test Results
If the system verification test completes successfully, the computer sounds a short beep and attempts to open the operating system, first from drive A, then from drive C.
Part I: Getting To Know Your Computer
214
If Something Goes Wrong…
Solving Computer Problems
Unsuccessful Test Results
If the system verification test fails, the computer does one of the
following:
❖ Stops updating the memory counter and does not proceed to
display information or messages.
❖ Sounds a beep but displays no new messages.
❖ Displays random characters and does not function normally.
❖ Displays an error message.
Other Circumstances
The computer normally beeps at the conclusion of a successful
system verification. If the system speaker is set to Disabled in
MaxTime or TSETUP, this beep will not occur.
If the speaker is turned on (enabled) and the system verification
completes but you don't hear a beep, the speaker may be faulty,
though this does not affect the computer's operation. Contact your
dealer.
If the system verification completes successfully but Windows 95
won't load, refer to “Turning the Computer On” on page 212. If all
seems correct, treat this as a hardware error and contact your
dealer.
See if You Can Reproduce the Error
Verify the system again. Before you do so, turn the computer off
and make sure all optional devices are connected properly. Then,
run the test again. If the test fails a second time, you have demonstrated that you can reproduce the problem and it's time to contact
your dealer.
Part I: Getting To Know Your Computer
If Something Goes Wrong…
Solving Computer Problems
215
Power and the Batteries
Your computer receives its power through the built-in power supply and power cord or from the system batteries (main battery,
real-time clock (RTC) battery and backup battery). Power problems are interrelated. For example, a bad power cord will neither
power the computer nor recharge the batteries.
Here are some typical problems and how to solve them:
The power light doesn't come on when you plug in the power cord.
Make sure the power cord is firmly plugged into both a working
wall outlet and the computer.
The power cord works correctly, but the battery won't charge.
The main battery may not be inserted correctly in the computer.
Turn off the computer, remove the battery, clean the battery contacts with a soft, dry cloth and replace the battery.
The battery appears not to power the computer for as long as it
usually does.
Check the power-saving features in MaxTime or TSETUP. Have
you added a device, such as a PC Card or memory module, that
takes its power from the battery? Is your software using the hard
disk more? Is the display power set to turn off automatically? Is
the battery fully charged to begin with? All these conditions affect
how long the charge lasts.
For more information on maximizing battery power, refer to
“Looking After Your Battery” on page 109 and “Conserving
Power” on page 104.
Part I: Getting To Know Your Computer
216
If Something Goes Wrong…
Solving Computer Problems
The Keyboard
If, when you type, strange things happen or nothing happens, the
problem may or may not be related to the keyboard itself.
The keyboard produces unexpected characters.
A keypad overlay may be on. If the numeric keypad or cursor control light is on, press Fn + F10 to turn off the cursor control light or
Fn + F11 to turn off the numeric keypad light.
Make sure the software you are using is not remapping the
keyboard.
You’ve connected an external keyboard and Windows 95 displays
one or more keyboard error messages.
The keyboard you connected may be defective or incompatible
with the computer. Try using a different brand of keyboard.
Nothing happens when you press the keys on the external
keyboard.
Make sure the PS/2 keyboard is plugged into the PS/2 keyboard
port and not the PS/2 mouse port on the NoteDock™.
You may have plugged the external PS/2 keyboard in while the
computer was turned on. Press Ctrl + Alt + Del or press the reset button to restart the computer so it recognizes the device.
The keyboard locks and the computer will not restart.
Make sure the power is on and press the reset button.
The AccuPoint
Some of the keyboard conditions listed above may also affect the
AccuPoint.
Your finger easily slides off the AccuPoint.
The AccuPoint cap may be oily. Remove the cap and clean it with
a cotton swab dipped in rubbing alcohol.
Part I: Getting To Know Your Computer
If Something Goes Wrong…
Solving Computer Problems
217
Or the cap may have become worn. Replace the cap with one of
the spares that came with your computer. Follow these steps:
1 Remove the AccuPoint cap by grasping it firmly and pulling it straight up.
The AccuPoint spindle is now visible.
2 Position the new cap on the spindle and press it into place.
The Display
Here are some typical display problems and their solutions:
The display is blank.
Display Auto Off may have gone into effect. Press any key to activate the screen.
You may have activated the instant security feature by pressing Fn
+ F1. Enter your password if you have registered one, or press Enter
to return to work.
The display doesn’t look right.
See “Changing the Display Mode” on page 185 to adjust your
screen resolution or color settings.
The built-in screen flickers.
Some flickering is a normal result of the way the screen produces
colors. To reduce the amount of flickering, try using fewer colors.
Windows 95 displays a message that there is a problem with your
display settings and that the adapter type is incorrect or the current settings don’t work with your hardware.
Reduce the size of the color palette to one that is supported by the
computer’s internal display. See “Changing the Display Mode” on
page 185 for instructions.
Part I: Getting To Know Your Computer
218
If Something Goes Wrong…
Solving Computer Problems
The Disk Drives
Problems with the hard disk or with a diskette drive usually show
up as an inability to access the disk or as sector errors. Sometimes
a disk problem may cause one or more files to appear to have garbage in them. Typical disk problems are:
You are having trouble accessing a disk, or some of the data
appears to be missing.
Make sure you're identifying the drive by its correct name
(A or C).
Run ScanDisk, which analyzes the directories, files and File Allocation Table (FAT) on the disk and repairs any damage it finds. To
run ScanDisk, follow these steps:
1 Click Start, then point to Programs.
2 Point to Accessories, then point to System Tools.
3 Click ScanDisk.
Windows 95 opens the ScanDisk window.
Your data files are damaged or corrupted.
Refer to your software documentation for file recovery procedures. Many software packages automatically create backup files.
You may also be able to recover lost data by using utility software,
which is available from your dealer.
A diskette won't go into the built-in diskette drive.
You may already have a diskette in the drive. Make sure the drive
is empty.
You may be inserting the diskette improperly. Hold the label of
the diskette with the hub side facing down, and insert it so the
metal head window cover goes into the drive first.
The metal cover or loose labels may be obstructing the path into
the drive. Carefully inspect the diskette. If the metal cover is loose,
replace the diskette. If the label is loose, replace the label and try
inserting the diskette again.
Part I: Getting To Know Your Computer
If Something Goes Wrong…
Solving Computer Problems
219
The computer displays the Non-system disk or disk error message.
If you're starting the computer from the hard disk, make sure
there's no diskette in the diskette drive.
If you’re starting the computer from a diskette, the diskette in the
drive doesn’t have the files necessary to start the computer.
Replace it with a bootable diskette.
A diskette won't format properly.
Make sure you’ve chosen the correct disk capacity in the Format
dialog box. You can't format double-density diskettes as high-density diskettes and vice versa.
Try using a different diskette. If the computer completes the formatting of the new diskette, run ScanDisk to check the new
diskette. If the drive formats properly and ScanDisk doesn't report
any errors during the test, the problem is probably a faulty diskette.
The drive can't read a diskette.
Try another diskette. If you can access the second diskette, the first
diskette (not the disk drive) is probably causing the problem. Run
ScanDisk on the faulty diskette.
If the problem occurs with each diskette you attempt to access, run
the diagnostic test. Refer to “The Diagnostic Test” on page 289.
Optional Devices
Optional devices can include a printer, PC Cards, an external monitor, or any other device you connect to your computer to expand
its capabilities. This section begins with some general comments
and continues with sections for specific devices.
Part I: Getting To Know Your Computer
220
If Something Goes Wrong…
Solving Computer Problems
General Things to Look Out For
❖ Make sure you turn on the power to all optional devices before
you turn the computer on.
❖ Check that all connecting cables are correctly and firmly
attached. Loose cables can cause erroneous or intermittent
signals. You may need to inspect connecting cables for loose
wires, and check connectors for loose, bent or pushed-in pins.
On very rare occasions, the cable wiring may be faulty. Try a
different cable or check the device's wiring requirements.
A Plan for Action
The smooth operation of the system depends on the interaction of
all devices, programs and features. If the system or one of its
attached devices isn't working, resolving the problem can be time
consuming and frustrating.
The recommended procedure for getting multiple devices to work
together is to add and configure one optional device at a time.
After you add each device, test to make sure it, and all previously
connected devices work.
The problem is probably with the most recently connected device
or its driver and configuration options.
Make sure there are no resource conflicts between the device
you're adding and the other devices connected to the system.
A word to the wise: if you get too tired, take a break. You'll be
surprised how different things will look when you've had a
good night's sleep.
Part I: Getting To Know Your Computer
If Something Goes Wrong…
Solving Computer Problems
221
PC Cards
PCMCIA-compatible PC Cards include many types of devices,
such as a removable hard disk, additional memory, fax/modem or
pager. The applications for these devices continue to grow as new
products come onto the market almost daily.
Most PC Card problems occur during installation and setup of
new cards. If you're having trouble getting one or more of these
devices to work together, several sections in this chapter may
apply.
❖ Resource conflicts can cause problems when using PC Cards.
Refer to “Optional Devices” on page 219 and “Resolving
Resource Conflicts” on page 226.
❖ If the device is a modem, see “Modems” on page 225.
Card Information Structure (CIS)
When you insert a PC Card into a slot, the computer attempts to
determine the type of card and the resources it requires by reading
its CIS. Sometimes the CIS contains enough information for you
to use the card immediately. Other cards must be configured
before you can use them.
Use the Windows 95 PC Card (PCMCIA) Wizard to configure
the card.
Some card manufacturers use special software called enablers to
support their cards. Enablers result in non-standard configurations
that can cause problems when installing another PC Card.
If Windows 95 does not have built-in drivers for your PC Card
and the card did not come with a Windows 95 driver, it may not
work under Windows 95. Contact the manufacturer of the PC
Card for information on operating the card under Windows 95.
Part I: Getting To Know Your Computer
222
If Something Goes Wrong…
Solving Computer Problems
Basic Things to Check
❖ Make sure the card is inserted properly into the slot.
Refer to “Little Cards that Do Big Things” on page 115 for
how to insert PC Cards, and to the documentation that came
with the PC Card.
❖ Make sure all cables are connected.
❖ Make sure the computer is loading only one version of Card
and Socket Services.
❖ Every once in a while a defective PC Card slips through. If
another PCMCIA-equipped computer is available, try the card
in that machine. If the card malfunctions again, it may be
defective.
Resolving Problems
Here are some common problems and their solutions:
The slots appear to be dead. PC Cards that used to work no longer
work.
Follow these steps to view the PC Card status:
1 Click the My Computer icon with the secondary button,
then click Properties.
Windows 95 displays the System Properties dialog box.
2 Click the Device Manager tab.
3 Double-click the device listed as your PC Card.
Windows 95 displays your PC Card’s Properties dialog box.
This dialog box contains information about your PC Card configuration and status.
Part I: Getting To Know Your Computer
If Something Goes Wrong…
Solving Computer Problems
223
The computer stops working (hangs) when you insert a PC Card.
The problem may be caused by an I/O (input/output) conflict
between the card and another device in the system. Make sure
each device has its own I/O base address.
The PCMCIA socket should have its own I/O base address. Since
all cards share the same socket, each card is not required to have
its own address.
Hot swapping (removing one PC Card and inserting another
without turning the computer off) fails.
Follow this procedure each time you want to remove a PC Card:
1 Click the PC Card icon on the taskbar.
2 Click Stop xxxx, where xxxx is the identifier for your PC
Card.
Windows 95 displays a message that you may safely remove
the card.
The system does not recognize your PC Card or PCMCIA socket
controller.
Windows 95 may not have built-in drivers for your PC Card. Follow these steps to install PC Card support:
1 Click Start, then point to Settings.
2 Click Control Panel.
Windows 95 opens the Control Panel.
3 Double-click Add New Hardware.
Windows 95 opens the Add New Hardware Wizard.
4 Click Next.
5 Follow the instructions on the screen to install support for
your PC Card or PCMCIA socket controller.
Part I: Getting To Know Your Computer
224
If Something Goes Wrong…
Solving Computer Problems
There is still a yellow exclamation point (!) over the PCMCIA controller icon in Device Manager.
You’ve gone through the PCMCIA Wizard in Windows 95 as
described in “Setting Up PC Card Support in Windows 95” on
page 120, but the system still reports the controller with a yellow !.
Your computer may not be firmly attached to the optional NoteDock. To fix the connection:
1 Click Start, then click Shut Down.
Windows 95 displays the Shut Down Windows dialog box.
2 Click the button next to Shut down the computer, then
click Yes.
Windows 95 shuts down and turns the computer off
automatically.
3 Lift the locking latch on the NoteDock.
4 Gently lift the computer and slide it off of the NoteDock.
5 Reconnect the computer and NoteDock, making sure to
press them together firmly.
Refer to “Connecting the Computer to the NoteDock” on
page 154 for instructions.
Printers
This section lists some of the most common printer problems.
The printer doesn’t print.
Make sure the printer cable is firmly attached to both the computer
and the printer. Make sure you installed the proper printer drivers,
as shown in “Setting Up Windows 95 to Work with Your Printer”
on page 67.
If your printer is ECP- or IEEE 1284-compliant, make sure you
have an IEEE 1284 printer cable.
Part I: Getting To Know Your Computer
If Something Goes Wrong…
Solving Computer Problems
225
You may have connected the printer with the computer on. Disable Resume Mode, turn off the computer, and turn off the printer.
Turn the printer back on, make sure it’s ready (online), then turn
the computer back on.
You may have selected an incorrect Printer Port Type setting. To
change this option setting, refer to “Hardware Setup” on page 259.
The printer doesn’t print what I see on the screen.
Many programs display information on the screen differently from
the way they print it. See if your program has a print preview
mode. This mode lets you see your work exactly as it will print.
Contact the software manufacturer for more information.
Modems
A modem, fax/modem or fax/voice/modem is a serial device. This
section lists common modem problems.
The modem won't receive or transmit properly.
Make sure the RJ-11 cable (the one that goes from the modem to
the telephone line) is firmly connected to the modem's RJ-11 jack
and the telephone line socket.
Check the serial port settings to make sure the hardware and software are referring to the same COM port (in Device Manager
under Modems for PC Card modems or in Hardware Setup or
TSETUP for an external modem).
Check the communications parameters (baud rate, parity, data
length and stop bits) specified in the communications program. It
should be configured to transmit at 300, 1200, 2400, 4800, 9600,
14400 or 28800 bps (bits per second). Refer to the program’s documentation and modem manual for information on how to change
these settings.
Part I: Getting To Know Your Computer
226
If Something Goes Wrong…
Solving Computer Problems
The modem is on, configured properly and still won't transmit or
receive data.
Make sure the line has a dial tone. Connect a telephone handset to
the line to check this.
The other system may be busy or off-line.
The PC Card modem used to work, but doesn’t anymore.
Check in Device Manager to see if the modem is listed.
If it is listed but has an X next to it, the modem is disabled. Double-click the device and then check the Undocked and Docked (if
present) options before clicking OK.
If the modem is listed and has and exclamation point (!) next to it
there may be a conflict with another device and that Windows 95
is unable to resolve the conflict. See “Resolving Resource Conflicts” on page 226 for suggestions on solving the conflict.
Resolving Resource Conflicts
Just as a business person needs a telephone and a computer to get a
job done, the computer and the components you add to the system
need certain resources to accomplish a task. A device, such as a
CD-ROM drive or a modem, needs a direct line to the computer's
Central Processing Unit (CPU). It also needs room in the computer's memory to store information as it works.
The direct line to the CPU is called an Interrupt ReQuest (IRQ)
level or channel. You'll hear both terms used by technical experts.
They mean the same thing. The memory required by a device
begins at a specific place or address in memory called the Direct
Memory Address (DMA).
The devices that come pre-installed, including the hard disk, diskette drive, and ports, have pre-assigned IRQ levels and DMAs. If
you connect a new device that uses an IRQ or DMA that conflicts
with the pre-assigned settings, the system and/or the device won't
work.
Part I: Getting To Know Your Computer
If Something Goes Wrong…
If Your Hard Disk Goes Blank...
227
Windows 95 automatically resolves most conflicts through its
Plug and Play support. If Windows 95 is unable to solve the problem, you’ll need to check the pre-assigned settings for IRQs,
DMAs and input/output assignments (listed in “System
Resources” on page 317) and make sure you haven’t assigned the
same settings to any additional devices.
If Your Hard Disk Goes Blank...
Take a deep breath. Take another deep breath. Now look at the
Reconfiguration Guide that came with your computer. This short
guide provides information on how to reinstall all the programs
that were pre-installed on your computer when you bought it.
These programs include:
❖ Microsoft Windows 95
❖ Toshiba programs such as MaxTime, Hardware Setup,
and Fn-esse
❖ Any other programs that came bundled with your computer
To reinstall these programs, you need to have created or purchased
master diskettes. If you do not have these diskettes, contact
Toshiba Product Support for assistance.
In addition to reinstalling the pre-installed programs, you need to
reinstall any programs or work you had saved on the hard disk.
Use your backup installation and data diskettes to recover these
files.
If You Need Further Assistance
If you have followed the recommendations in this chapter and are
still having problems, you may need additional technical assistance. This section contains the steps to take as you prepare to ask
for help.
Part I: Getting To Know Your Computer
228
If Something Goes Wrong…
If You Need Further Assistance
Before You Call
Since some problems may be related to the operating system or
the program you're using, it's important to investigate other
sources of assistance first. Try the following before contacting
Toshiba:
❖ Review the troubleshooting information in your Windows 95
documentation.
❖ If the problem occurs while you are running a program, con-
sult the program’s documentation for troubleshooting suggestions. Contact the software company's technical support group
for their assistance.
❖ Consult the dealer from whom you purchased your computer
and/or program. Your dealer is your best source for current
information.
For the number of a Toshiba dealer near you in the United States,
call 1-800-457-7777.
Contacting Toshiba
If you still need help and suspect that the problem is hardware
related, or if you would like to learn more about a particular topic,
Toshiba provides a variety of ways to receive help and to learn
more.
Toshiba's Automated Fax Service
Toshiba's Automated Fax Service System (AUTOFAX) provides
ready access to useful information about Toshiba computers and
accessories. You may select the documents using your touch-tone
telephone. Toshiba's AUTOFAX System will send the requested
information to your fax machine.
Part I: Getting To Know Your Computer
If Something Goes Wrong…
If You Need Further Assistance
229
Follow these steps to access the system:
1 Dial the Toshiba AUTOFAX System at (800) 999-4273.
2 Select option 4, then option 1. (You will be connected to the
AUTOFAX system.)
3 To have an index of available documents faxed to you,
press 1.
4 If you know the document number for the information you
need, press 2.
5 Follow the automated instructions provided by the system.
When entering the area code for your fax number, do not
include the “1” prefix.
The AUTOFAX System automatically calls your fax number and
sends the requested information. The process usually takes minutes, however, please allow up to 24 hours to receive the information due to varying load conditions.
If your fax machine telephone number is busy or otherwise
unavailable, the system makes up to three attempts to complete a
transaction.
Toshiba's Bulletin Board Service
Toshiba's Bulletin Board Service (BBS) is available 24-hours a
day, and is free of charge to anyone with a PC and a modem.
You may use the following telephone numbers:
714-837-4408
714-837-4409
The Toshiba BBS uses the following protocol:
Data Bits: 8
Parity: None
Stop Bits: 1
Part I: Getting To Know Your Computer
230
If Something Goes Wrong…
If You Need Further Assistance
Accessing Toshiba Online
You can reach Toshiba on CompuServe (CIS), the Microsoft Network (MSN) or the Internet World Wide Web (WWW):
❖ On CompuServe, type go toshiba
❖ On the Microsoft Network, type go toshiba
❖ On the Internet World Wide Web, type http://www.toshiba.com./
tais/csd/support/
Toshiba Voice Contact
To aid Toshiba, make sure you have:
❖ The computer and any optional devices related to the problem.
❖ The Windows 95 diskettes, the Toshiba Companion
Diskette, and the rest of the master diskettes. You created these
using Create System Disks and Master Disk Creator or purchased them directly from Toshiba.
❖ The name and version of the program involved in the problem
along with its installation diskettes.
❖ The information about what you were doing when the problem
occurred.
❖ The exact error messages and when they occurred.
You can reach Toshiba PC Product Support at:
800-999-4273
Part I: Getting To Know Your Computer
If Something Goes Wrong…
If You Need Further Assistance
231
Toshiba's Worldwide Offices
For additional help, contact one of these Toshiba offices:
Argentina
Smart, S.A.
Mexico (Street) 630,
Buenos Aires, 1097
Argentina
Australia
Toshiba Australia Pty. Ltd.
Information Systems Division
84-92 Talavera Road North Ryde
N.S.W. 2113
Sydney
Australia
Austria
Toshiba Europe GmbH
Geschäftsbereich
Deutschland-Österreich
Hammfelddamm 8,
D-41460 Neuss
Austria
Belgium
Toshiba Information Systems
(Belgium)
S.A.N.V.
Rue Colonel Bourg Straat 123-125
B1140 Brussels
Belgium
Brazil
Sistema Operacional
Rua Helena 170; 8 Andar,
V. Olimpia, CEP 04552-050
Sao Paulo, Brasil
Canada
Toshiba of Canada Ltd.
191 McNabb Street,
Markham, Ontario
L3R 8H2
Canada
Denmark
Scribona System AS,
Naverland 27,
DK2600 Glostrup
Denmark
Finland
Scribona System OY,
Sinimäentie 14,
02631 Espoo
Finland
France
Toshiba Systèms France S.A.
7, rue Ampère,
92804 Puteaux Cédex
France
Germany
Toshiba Europe GmbH
Geschäftsbereich
Deutschland-Österreich
Hammfelddamm 8,
D-41460 Neuss
Germany
Part I: Getting To Know Your Computer
232
If Something Goes Wrong…
If You Need Further Assistance
Italy
CERO S.p.A
Via Saronnese, 16,
1-20025 Legnano (MI)
Italy
Japan
Toshiba Corporation
International OperationsPersonal Computers
1-1, Shibaura 1-chome,
Minato-ku, Tokyo, 105-01
Japan
Mexico
Toshiba de Mexico
Paseo de la Reforma no. 30, 4-Piso,
Centro 06048 D.F.
Mexico City
Mexico
Netherlands
Toshiba Information Systems,
Benelux B.V.
Rivium Boulevard
41 2909 LK Capelle a/d Ussel
Netherlands
Norway
Scribona Norway AS,
Postboks 51, Kalbakken,
0901 Oslo 9
Norway
Portugal
DLI Distribucao,
Av. do Forte n.3Piso 4 (Ed. Suecia 11), P2795 Linda-a-Velha
Portugal
Spain
Toshiba Information Systems,
Parque Empresarial San Fernando
Edificio Europa, la planta,
Escalera A 28831 Madrid
Spain
Sweden
Scribona System AB
Sundbybergsväegen 1,
17127 Solna,
Sweden
Switzerland
Ozalid AG
Herostasse 7
8048 Zürich
Switzerland
United Kingdom
Toshiba Information Systems
(U.K) LTD
Toshiba Court/Weybridge Business
Park
Addlestone Road
Weybridge, Surrey KT15 2UL
United Kingdom
Part I: Getting To Know Your Computer
If Something Goes Wrong…
If You Need Further Assistance
233
United States
Toshiba America Information
Systems, Inc.
9740 Irvine Boulevard
Irvine, California 92718
United States
For the most recent list of addresses, access Toshiba’s AUTOFAX
system (see page 228).
Part I: Getting To Know Your Computer
The Hotkeys
Hotkeys are keys that, pressed in combination with the Fn key, turn
system functions on and off. Hotkeys have a dark blue legend on
the front of the key indicating the option or feature the key
controls.
Instant Password Security
F1
Fn +
This hotkey locks the keyboard and blanks the display. You must enter your password, if registered,
or press Enter to begin work again.
237
238
The Hotkeys
Power
Power
F2
Fn +
This hotkey displays the battery save pop-up window (in Windows 95 with MaxTime running) and
switches among battery save modes: Full Power,
Low Power, and User Settings.
Resume Mode
F3
Fn +
This hotkey displays the power-up pop-up window (in Windows 95 with MaxTime running) and
turns Resume Mode on and off.
Sound
F4
Fn +
This hotkey cycles the alarm volume through off,
low, medium and high. Off is always first.
Display
F5
Fn +
This hotkey alternates among the following display options: built-in display only, simultaneous
display and external monitor only.
Part II: Technical Reference
The Hotkeys
Keyboard
239
Keyboard
F10
Fn +
This hotkey turns the cursor control overlay on
and off.
F11
Fn +
This hotkey turns the numeric overlay on and off.
F12
Fn +
This hotkey turns the scroll lock feature on and off.
Part II: Technical Reference
MaxTime
MaxTime opens automatically each time you start Windows 95. If
MaxTime is not already open, follow these steps:
1 Click Start, then point to Programs.
2 Point to Toshiba Utilities, then click MaxTime Manager.
Upon opening, MaxTime displays the MaxTime battery
gauge.
The MaxTime battery gauge
241
242
MaxTime
The Display Dialog Box
The Display Dialog Box
To open the Display dialog box, choose Display from the MaxTime Options menu.
The Display dialog box
This dialog box controls the appearance of the MaxTime window.
It provides three pages of display options, arranged like a stack of
file folders. Each page of options has its own file folder tab.
To view or change these options, click the corresponding tab.
Buttons
The following table summarizes the buttons on the Display dialog
box:
Button
Function
OK
saves current settings and exits the dialog box.
Cancel
ignores current settings and exits the dialog box.
Defaults
returns to the default settings.
Help
accesses online help.
Part II: Technical Reference
MaxTime
The Display Dialog Box
243
The Style Page
The Style page
This page controls the Display Style options: Window Behavior,
Title Bar Style, and “On Title Bar” Options.
The Window Behavior option controls where the MaxTime window appears on your screen. The available settings are:
Settings
Description
Normal (default)
allows the MaxTime window to be covered by
other active windows.
Always On Top
keeps the MaxTime window on top of all other
windows.
On Title Bar
places the MaxTime window on the title bar of the
currently active window.
For more information about the Display Style option, refer to
“Keeping the Battery Gauge Visible at All Times” on page 93.
Part II: Technical Reference
244
MaxTime
The Display Dialog Box
The Title Bar Style option controls the size of the MaxTime window's title bar. The available settings are:
Settings
Description
Regular (default)
displays the MaxTime title bar at full size.
Mini
reduces the size of the MaxTime title bar. This setting is only available when you have the Display
Style option set to Normal or Always On Top.
None
hides the MaxTime title bar. This setting is only
available when you have the Display Style option
set to On Title Bar.
The “On Title Bar” Options option controls where on the title bar
the MaxTime window appears when you have the Window
Behavior options set to On Title Bar. The available settings are:
Settings
Description
Always Left Justified
always places the MaxTime window at the left
side of the title bar of the currently active window.
Always Right Justified
always places the MaxTime window at the right
side of the title bar of the currently active window.
Custom Placement Drag to Position
allows you to choose the placement of the MaxTime window on the title bar of the currently
active window.
Part II: Technical Reference
MaxTime
The Display Dialog Box
245
The Modules Page
The Modules page
This page controls the Display Modules options: Show and
Format.
The Show option lets you choose which modules are displayed in
the MaxTime window. The available modules are:
Module
Description
Bargraph (default)
displays the current battery charge as a horizontal
bar graph.
Percent Remaining
displays the current battery charge as a percentage.
For more information about choosing the MaxTime modules,
refer to “Changing the Appearance of the Battery Gauge” on
page 92.
Part II: Technical Reference
246
MaxTime
The Display Dialog Box
If you choose more than one module for the Show option, the Format option is activated. The available settings are:
Settings
Description
Stack Modules
shows all selected modules at once.
Cycle Modules
cycles between the selected modules.
If you set the Format option to Cycle Modules, you can choose
one or both of the following settings:
Settings
Description
Show Manual Control
Button
includes a manual control button in the MaxTime
window. You can click this button to switch to the
next selected module.
Auto Cycle Every xx
Seconds
switches to the next selected module every xx seconds, where xx is a number you set by clicking the
+ and - buttons.
The Size Page
The Size page
This page controls the size of the modules in the MaxTime window. The available settings are: Small and Large.
Part II: Technical Reference
MaxTime
The Alarms Dialog Box
247
The Alarms Dialog Box
To open the Alarms dialog box, choose Alarms from the MaxTime Options menu.
The Alarms dialog box
This dialog box displays the options for the Low Battery Alarm
and the Critical Battery Alarm on two separate pages, arranged
like a stack of file folders. Each page of options has its own file
folder tab. The options for these alarms are identical.
To view or change these options, click the corresponding tab.
Buttons
The following table summarizes the buttons on the Alarms dialog
box:
Button
Function
OK
saves current settings and exits the dialog box.
Cancel
ignores current settings and exits the dialog box.
Defaults
returns to the default settings.
Help
accesses online help.
Part II: Technical Reference
248
MaxTime
The Set Battery Charge Dialog Box
Alarm Options
The Alarms dialog box lets you set the following option:
Option
Settings
Usage
Percent Remaining
Threshold
xx% (where xx is a percentage you set)
allows you to set the
trigger point for the battery alarm.
For more information about setting the battery alarms, refer to
“Setting the Alarms” on page 98.
The Set Battery Charge Dialog Box
To open the Set Battery Charge dialog box, choose Set Battery
Charge from the MaxTime Options menu. You may only choose
this option when the battery charge is unknown to the system.
This dialog box allows you to estimate the battery charge.
Buttons
The following table summarizes the buttons on the Set Battery
Charge dialog box:
Button
Function
OK
saves current settings and exits the dialog box.
Cancel
cancels current settings and exits the dialog box.
Help
accesses online help.
Part II: Technical Reference
MaxTime
The Set Battery Charge Dialog Box
249
Battery Charge Options
The following table summarizes the battery charge options:
Option
Settings
Usage
Battery Charge
xx% (where xx is a percentage you set)
allows you to estimate
the percentage of battery charge remaining.
Disable automatic battery charge inquiry
Enabled (check)
enables and disables
the system's automatic
battery charge inquiry.
Disabled (no check)
For more information on setting an unknown battery charge, see
“What to Do When Your Computer Doesn’t Know the Battery
Charge” on page 95.
Part II: Technical Reference
250
MaxTime
The Machine Settings Dialog Box
The Machine Settings Dialog Box
To open the Machine Settings dialog box, choose Machine Settings from the MaxTime Options menu.
The Machine Settings dialog box
This dialog box controls the battery, sound control, and system
configuration options. It provides three pages of options, arranged
like a stack of file folders. Each page of options has its own file
folder tab.
If a supervisor-level password is registered, you must enter it
before you can use the Machine Settings dialog box. See
“Working with Supervisor-Level Passwords” on page 163 for
more information about supervisor-level passwords.
To view or change these options, click the corresponding tab.
Part II: Technical Reference
MaxTime
The Machine Settings Dialog Box
251
The Battery Options Page
The Battery Options page
This page controls the battery options. The available options are:
Option
Settings
Usage
Show Settings For
Battery Power
Operation
shows settings for use
with battery power
operation or external
power operation.
External Power
Operation
Battery Save Mode
Full Power
Low Power
User Settings
Part II: Technical Reference
allows you to select a
preset battery save
mode or customize the
battery save options.
For more information,
see “Conserving
Power” on page 104.
252
MaxTime
The Machine Settings Dialog Box
Option
Settings
Usage
Processing Speed
High (default)
sets the speed at which
the Central Processing
Unit (CPU) processes
information. For more
information, see “Processing Speed” on
page 107.
Low
CPU Sleep Mode
Enabled
(Low Power default)
Disabled
(Full Power default)
Display Auto Off
1 Min.
3 Min.
(Low Power default)
5 Min.
10 Min.
15 Min.
20 Min.
30 Min.
Disabled
(Full Power default)
Part II: Technical Reference
when enabled, temporarily shuts down the
processor when there
are no processing
requests, such as keyboard input or pointing
device movement. For
more information, see
“CPU Sleep Mode” on
page 108.
turns the display off if it
is not used for the time
selected. For more
information, see “Display Auto Off” on
page 108.
MaxTime
The Machine Settings Dialog Box
253
Option
Settings
Usage
HDD Auto Off
1 Min.
turns the hard disk
drive off if it is not used
for the time selected.
For more information,
see “HDD Auto Off”
on page 108.
3 Min.
(Low Power default)
5 Min.
10 Min.
15 Min.
20 Min.
30 Min.
Disabled
(Full Power default)
System Auto Off
10 Min.
20 Min.
30 Min.
40 Min.
50 Min.
turns the system off if
you haven't used the
computer for the time
selected. For more
information, see “System Auto Off” on
page 109.
60 Min.
Disabled (default)
LCD Brightness
Bright
(Full Power default)
Semi-Bright
(Low Power default)
Part II: Technical Reference
sets the brightness of
the display. For more
information, see “LCD
Brightness” on
page 109.
254
MaxTime
The Machine Settings Dialog Box
The Sound Control Page
The Sound Control page
This page sets the sound control options. The available options
are:
Option
Settings
Usage
Alarm Volume
0%
sets the volume at
which the speaker plays
sounds.
33%
66%
100%
Panel Close Alarm
Enabled (check)
Disabled (no check)
Part II: Technical Reference
enables and disables
the alarm that sounds
when you close the display panel while the
computer is on. For
more information, see
“How and When to
Turn the Computer
Off” on page 74.
MaxTime
The Machine Settings Dialog Box
255
Option
Settings
Usage
Audible Low Battery
Alarm
Enabled (check)
enables and disables
the system's built-in
audible battery alarm.
Enable System Beep
Enabled (check)
Disabled (no check)
Disabled (no check)
enables and disables
the system beeps.
The System Configuration Page
The System Configuration page
This page controls the system configuration options. The available
options are:
Option
Settings
Usage
Alarm Power On
hour:minute
sets the system to turn
on at the time selected
(in AM, PM, or 24hour format). For more
information, see “Different Ways to Turn
the Computer On and
Off” on page 182.
Part II: Technical Reference
256
MaxTime
The Machine Settings Dialog Box
Option
Settings
Usage
Disable Alarm
Power On
Enabled (check)
when enabled, turns
off the Alarm Power
On feature.
Resume Mode
Resume Mode (check)
Disabled (no check)
Boot Mode (no check)
Panel Power On/Off
Enabled (check)
Disabled (no check)
Part II: Technical Reference
turns Resume Mode on
and off. For more information, see “Starting
Again Where You Left
Off” on page 99.
turns the computer on/
off when you open/
close the computer's
display panel. This
option is only available
when Resume Mode is
selected. For more
information, see “Different Ways to Turn
the Computer On and
Off” on page 182.
MaxTime
The Machine Settings Dialog Box
Part II: Technical Reference
257
Hardware
Setup
To open Hardware Setup, follow these steps:
1 Click Start, then point to Programs.
2 Point to Toshiba Utilities, then click Hardware Setup.
Hardware Setup displays the following dialog box:
The Hardware Configuration dialog box
259
260
Hardware Setup
The Hardware Configuration Dialog Box
The Hardware Configuration Dialog Box
This dialog box displays system information. The values are
calculated by the system and cannot be changed. It is for reference
only.
If a supervisor-level password is registered, you must enter it
before you can use Hardware Setup. See “Working with
Supervisor-Level Passwords” on page 163 for more information about supervisor-level passwords.
Buttons
The following table summarizes the buttons on the Hardware
Configuration dialog box:
Button
Function
Exit
exits the dialog box.
Help
accesses online help.
About
displays information about the Hardware Setup
program.
Hardware Options
opens the Hardware Configuration Options
dialog box.
Part II: Technical Reference
Hardware Setup
The Hardware Configuration Dialog Box
261
The SETUP section
This section of the Hardware Configuration dialog box displays
general information about the system:
Information
Discussion
BIOS Version
indicates the version and date of the computer's
Basic Input/Output System (BIOS).
Configuration
indicates whether you're using the default configuration settings (Default Settings), or have changed
any of the configuration settings (Custom
Settings).
The MEMORY section
This section shows how the computer's memory is allocated.
These values are calculated automatically by the system and
cannot be changed.
Memory Type
Description
Base
displays the amount of conventional memory
available to the computer.
Extended
displays the amount of extended memory
available.
Shadow RAM
displays the amount of memory available for
Shadow RAM. Shadow RAM copies (shadows)
the computer’s BIOS functions from ROM into
faster RAM to improve system speed.
Total
displays the total amount of memory installed.
Part II: Technical Reference
262
Hardware Setup
The Hardware Configuration Options Dialog Box
The HDD section
This section shows that the hard disk is set to Enhanced IDE
mode. This is for your information only and cannot be changed.
The Hardware Configuration Options Dialog Box
To open this dialog box, choose Hardware Options in the Hardware Configuration dialog box.
The Hardware Configuration Options dialog box
This dialog box controls the hardware configuration options. It
provides eight pages of options, arranged like a stack of file folders. Each page of options has its own file folder tab.
To view or change these options, click the corresponding tab.
Restart Indicators
When you change an option that does not require the system to
restart, Hardware Setup displays a small gray triangle to the left of
the tab caption.
When you change an option that requires the system to restart,
Hardware Setup displays a small lightning bolt icon to the left of
the tab caption and in the computer screen at the lower right corner
of the dialog box.
Part II: Technical Reference
Hardware Setup
The Hardware Configuration Options Dialog Box
263
The Legend Field
Each page of hardware configuration options has a Legend field.
This field displays information to help you choose option settings.
For example, when you choose the Parallel/Printer, the Legend
field displays the following message: “The parallel port options
facilitate the selection of the parallel port address and printer port
type.”
Buttons
The following table summarizes the buttons on the Hardware
Configuration Options dialog box:
Button
Function
OK
accepts your changes and exits the dialog box.
Cancel
ignores the changes you made and exits the dialog
box.
Help
accesses online help.
Default
returns all options to their default settings. To
make the defaults permanent, you must click OK.
Reset
returns all options to the settings in effect when
you opened the dialog box.
Reboot
immediately restarts the computer. This button is
available only if you change an option that
requires a restart.
Part II: Technical Reference
264
Hardware Setup
The Hardware Configuration Options Dialog Box
The Serial Page
The options on this page are grayed out and cannot be changed.
Use the Ports icon in Windows 95 Device Manager to change the
Serial Port setting. Refer to “Using Device Manager to Configure
Your System” on page 180 for instructions.
The Parallel/Printer Page
The Parallel/Printer page
This page controls the computer's parallel port:
Option
Settings
Usage
Restart
Printer Port
Type
ECP (default)
configures the parallel
port to be used with a
printer or other parallel
device. Refer to the
device's documentation to
determine the setting it
requires.
Y
Standard
Bi-directional
The Parallel Port option is grayed out and cannot be changed.
Use the Ports icon in Windows 95 Device Manager to change
this setting. Refer to “Using Device Manager to Configure
Your System” on page 180 for instructions.
Part II: Technical Reference
Hardware Setup
The Hardware Configuration Options Dialog Box
265
The Pointing Devices Page
The Pointing Devices page
This page controls the pointing devices option.
Option
Settings
Usage
Restart
Pointing
Devices
Auto-selected
(default)
lets you use the
AccuPoint, an optional
PS/2 pointing device connected to the NoteDock,
or both.
Y
Simultaneous
(This option
does not affect
serial pointing
devices.)
Part II: Technical Reference
266
Hardware Setup
The Hardware Configuration Options Dialog Box
The Display Page
The Display page
This page controls the display options. The available settings are:
Option
Settings
Usage
Restart
LCD Display
Colors
222K
controls the number of
colors available to the
display.
Y
Power On
Display
Internal/External (default)
controls whether the system sends output to the
internal display, the external display, or both when
you turn the computer on.
Y
4K
Simultaneous
Text Mode
Stretch
Enabled
(default)
Disabled
Part II: Technical Reference
slightly modifies the spacing in MS-DOS programs
so that the program uses
the entire screen. With this
option disabled, there is a
small blank space at the
top and bottom of the
screen.
Hardware Setup
The Hardware Configuration Options Dialog Box
267
Option
Settings
Usage
Restart
LCD Display
Mode
Color (default)
controls whether the computer displays images in
color or in black and
white.
Y
Monochrome
The VGA Segment Address option is grayed out and cannot
be changed. Use the Display adapters icon in Windows 95
Device Manager to change this setting. Refer to “Using
Device Manager to Configure Your System” on page 180 for
instructions.
Part II: Technical Reference
268
Hardware Setup
The Hardware Configuration Options Dialog Box
The CPU Cache Page
The CPU Cache page
This page controls the CPU Cache option.
Option
Settings
Usage
Restart
CPU Cache
Enabled
(default)
improves system performance when enabled. Disable this option only if
your software requires
you to do so.
Y
Disabled
Part II: Technical Reference
Hardware Setup
The Hardware Configuration Options Dialog Box
269
The Boot Priority Page
The Boot Priority page
This page controls the Boot Priority option.
Option
Settings
Usage
Restart
Boot Priority
FDD→HDD
(default)
determines whether the
system looks for the operating system first on the
hard disk (HDD) or the
diskette drive (FDD)
when you turn the computer on.
N
HDD→FDD
Part II: Technical Reference
270
Hardware Setup
The Hardware Configuration Options Dialog Box
The Keyboard Page
The Keyboard page
The page controls the keyboard options.
Option
Settings
Usage
Restart
External Keyboard Fn Key
Disable
(default)
allows you to use the
selected key combination
to emulate the computer's
Fn key on an external
keyboard. For more information, see “Making Your
External Keyboard Pretend it Has the Fn Key” on
page 144.
N
Left-Ctrl +
Left-Alt
Right-Ctrl +
Right-Alt
Left-Alt +
Left-Shift
Right-Alt +
Right-Shift
Left-Alt +
CapsLock
Part II: Technical Reference
If you select Left-Ctrl +
Left-Alt or Right-Ctrl +
Right-Alt for this option,
you cannot use the
selected keys to reboot the
computer in combination
with Del (Ctrl + Alt + Del).
Hardware Setup
The Password Page
271
Option
Settings
Usage
Restart
Int. Keyboard
Key Layout
Normal
(default)
selects the layout of the
keyboard's Caps Lock, Ctrl,
and Alt keys. For more
information, see “Selecting the Keyboard Layout”
on page 178.
Y
Alternative
The Password Page
The Password page
This page controls the user-level password feature. For complete
information about the computer’s password security, see “Using a
Password” on page 157.
Option
Settings
Usage
Restart
User Password
Not Registered
registering a password
helps prevent unauthorized use of your computer.
Y
identifies the owner of a
particular password whenever it’s used.
Y
Registered
Owner String
Part II: Technical Reference
TSETUP
Run TSETUP outside of Windows 95, at a system prompt. If
you try to run TSETUP from an MS-DOS session under
Windows 95, results can be unpredictable.
1 If you’re currently in Windows 95, click Start, then click
Shut Down.
2 Click the button next to Restart the computer in MS-DOS
mode and click Yes.
Windows 95 shuts down the computer, then restarts it in
MS-DOS mode and displays a system prompt.
273
274
TSETUP
Making Changes in TSETUP
3 Type: c:\dos\tsetup
TSETUP displays a screen similar to the following:
SYSTEM SETUP
Total
Base
Extended
Shadow BIOS ROM
MEMORY
= 8192KB
=
640KB
= 7360KB
=
192KB
DISPLAY
Display Adaptor
= VGA Compatible
LCD Display Mode
= Color
VGA Segment Address = E000H
LCD Display Colors = 222K Colors
Power On Display
= Internal/External
Text Mode Stretch
= Enabled
HDD Mode
HARD DISK
= Enhanced IDE (Normal)
Serial Port
Parallel Port
BIOS VERSION = X.XX
I/O PORTS
= COM1 (IRQ4/3F8H)
= LPT1 (378H)
OTHERS
Power-up Mode
= Boot
CPU Cache
= Enabled
Battery Save Mode
= Full Power
Alarm Volume
= High
System Beep
= Enabled
Panel Power On/Off = Disabled
Alarm Power On
= Disabled
Keyboard
= Layout/Fn
Pointing Devices
= Auto-Selected
Boot Priority
= FDD→HDD
PASSWORD
Not Registered
↑↓←→:Select items Space, BkSp:Change Values
Esc:Exit without saving Home:Set default values
End:Save changes and Exit
A sample System Setup screen
Making Changes in TSETUP
This table lists the keys to use in TSETUP.
Key(s)
Result
← and →
Moves between the two columns.
↑ and ↓
Moves between items in a column.
Spacebar and BkSp
Changes the selected item.
Esc
Quits TSETUP without saving changes.
End
Saves your changes and quits TSETUP, restarting the
computer if necessary.
Home
Resets each option to its factory preset value.
If a supervisor-level password is registered, you must enter it
before you can use TSETUP. See “Working with SupervisorLevel Passwords” on page 163 for more information about
supervisor-level passwords.
Part II: Technical Reference
TSETUP
Closing TSETUP
275
Closing TSETUP
To close TSETUP and keep your changes, press End. When
TSETUP asks you to confirm your action, press Y. TSETUP
closes with your changes in effect and restarts the computer or
returns you to the system prompt, depending on the changes you
made.
To close TSETUP without saving your changes, press Esc, then Y.
TSETUP returns you to the system prompt.
MEMORY
This group shows how the computer's memory is allocated.
Memory Type
Description
Total
displays the total amount of memory installed.
Base
displays the amount of conventional memory
available to the computer.
Extended
displays the amount of extended memory
available.
Shadow BIOS ROM
displays the amount of memory available for
Shadow BIOS ROM. Shadow BIOS ROM copies
(shadows) the computer’s BIOS functions from
ROM into faster RAM to improve system speed.
These values are calculated by the system and cannot be changed.
Part II: Technical Reference
276
TSETUP
DISPLAY
DISPLAY
This group configures the Liquid Crystal Display (LCD) and
video port output.
Option
Settings
Usage
Restart
Display Adaptor
VGA Compatible (default)
automatically turns on the
computer's internal display adapter. This setting
cannot be changed.
N/A
LCD Display
Mode
Color (default)
controls whether the computer displays images in
color or in black and
white.
Y
VGA Segment
Address
E000h (default)
Lets you set the memory
location for video BIOS.
The default of E000 EFFF uses 64KB of UMB
(upper memory block)
memory. The other
options use only 48KB of
UMB memory.
Y
controls the number of
colors available to the
display.
Y
controls whether the system sends output to the
internal display, the external display, or both when
you turn the computer on
in boot mode.
Y
Monochrome
E4000h
C000h
LCD Display
Colors
222K Colors
(default)
4096 Colors
Power On
Display
Internal/External (default)
Simultaneous
Part II: Technical Reference
TSETUP
DISPLAY
277
Option
Settings
Usage
Restart
Text Mode
Stretch
Enable (default)
The screen has a height of
480 pixels. In a text mode,
which uses 400 pixels, this
leaves a small amount of
space above and below
the text on the screen.
Enabling this mode
stretches the text to fill
the entire screen.
N
Disable
Changes you make to the VGA Segment Address setting in
TSETUP will not affect Windows 95. To set this option for
Windows 95, use the Display adapters icon in Windows 95
Device Manager. Refer to “Using Device Manager to Configure Your System” on page 180.
Part II: Technical Reference
278
TSETUP
HARD DISK
HARD DISK
This section shows that the hard disk is set to Enhanced IDE
mode. You cannot change this setting
Option
Setting
HDD Mode
Enhanced IDE (Normal) (default)
PASSWORD
This group lets you set or reset the user-level system password.
For more information about the computer’s password features, see
“Using a Password” on page 157.
Settings
Restart
Registered
N
Not Registered
(default)
Part II: Technical Reference
TSETUP
I/O PORTS
279
I/O PORTS
This group allows you to configure communications port settings
for the serial and parallel ports.
Changes you make to these settings in TSETUP will not affect
Windows 95. To set these options for Windows 95, use the
Ports icon in Windows 95 Device Manager. Refer to “Using
Device Manager to Configure Your System” on page 180.
Option
Settings
Usage
Restart
Serial Port
COM1
(IRQ4/3F8H)
(default)
sets the serial port name
through which your communications software
sends output to the serial
port.
Y
sets the parallel port name
through which the computer communicates with
the parallel port.
Y
COM2
(IRQ3/2F8H)
COM3
(IRQ4/3E8H)
COM4
(IRQ3/2E8H)
Not Used
Parallel Port
LPT1 (378H)
(default)
LPT2 (278H)
LPT3 (3BCH)
Not Used
Part II: Technical Reference
280
TSETUP
OTHERS
If you set the Parallel Port to anything other than Not Used, a
drop-down list box appears offering a choice between ECP and
Standard Bi-directional. ECP is the setting to use for most printers
and any other ECP-supported devices. Set this to Bi-directional
only if the documentation for your parallel device instructs you to
do so.
OTHERS
This group allows you to set many other configuration options.
Whether or not you need to use these options depends primarily
on the software and devices you use.
Option
Settings
Usage
Restart
Power-up Mode
Resume
alternates between
Resume Mode and Boot
Mode.
N
improves system performance. Disable this option
only if your software or
optional devices require
you to do so.
Y
Boot (default)
CPU Cache
Enabled
(default)
Disabled
If you set the CPU Cache
to Enabled, a drop-down
box lets you choose
between Write-back
(default) and Writethrough. Write-back provides maximum performance. Write-through
reduces performance to
offer compatibility with
older programs that may
not run on a fast system.
Part II: Technical Reference
TSETUP
OTHERS
281
Option
Settings
Usage
Restart
Battery Save
Mode
Full Power
allows you to select a preset battery save mode or
customize the battery
save options. For more
information about choosing a battery save mode,
see “The Easy Way—
Choosing a Battery Save
Mode” on page 105.
N
sets the volume at which
the system’s alarms beep
(such as the low battery
alarm). This also affects
sounds generated by any
PC Card modem installed.
N
enables and disables your
software’s use of the system speaker.
N
turns the computer on/off
when you open/close the
computer's display panel.
This option is only available when Resume Mode
is selected. For more
information, see “Different Ways to Turn the
Computer On and Off”
on page 182.
N
Low Power
User Settings
Alarm Volume
Off
Low
Medium
High (default)
System Beep
Enabled
(default)
Disabled
Panel Power
On/Off
Enabled
Disabled
(default)
Part II: Technical Reference
282
TSETUP
OTHERS
Option
Settings
Usage
Restart
Alarm Power
On
xx:xx:xx
(hour:minute:
second)
turns the computer on at
the time set. For more
information, see “Different Ways to Turn the
Computer On and Off”
on page 182.
N
selects the layout of the
keyboard's Caps Lock, Ctrl,
and Alt keys. For more
information, see “Selecting the Keyboard Layout”
on page 178.
Y
allows you to use the
selected key combination
to emulate the computer's
Fn key on an external
keyboard. For more information, see“Making Your
External Keyboard Pretend it Has the Fn Key” on
page 144.
N
Disabled
(default)
Int. Keyboard
Key Layout
Normal
(default)
Alternative
Ext. Keyboard
“Fn” Key
Equivalent
Disabled
(default)
left Ctrl + left
Alt
right Ctrl +
right Alt
left Alt + left
Shift
right Alt + right
Shift
left Alt +
CapsLock
Part II: Technical Reference
TSETUP
OTHERS
283
Option
Settings
Usage
Restart
Pointing
Devices
Auto-selected
(default)
sets which pointing device
is active when you connect an external PS/2
pointing device to the
computer.
Y
determines whether the
system looks for the operating system first on the
hard disk (HDD) or the
diskette drive (FDD)
when you turn the computer on.
N
Simultaneous
(This option
does not affect
serial pointing
devices.)
Boot Priority
FDD→HDD
(default)
HDD→FDD
The following battery save options appear in a drop-down list box
when you highlight Battery Save Mode. You can only change the
settings in this box if the Battery Save Mode is set to User
Settings:
Option
Settings
Usage
Restart
Processing
Speed
High (default)
sets the speed at which
the Central Processing
Unit (CPU) processes
information. High runs at
75MHz. Low adds
pauses, effectively reducing processing speed to
40MHz.
Y
Low
Part II: Technical Reference
284
TSETUP
OTHERS
Option
Settings
Usage
Restart
CPU Sleep
Mode
Enabled (Low
Power default)
when enabled, temporarily shuts down the processor when there are no
processing requests, such
as keyboard input or
pointing device movement. For more information, see“CPU Sleep
Mode” on page 108.
N
turns the display off if it is
not used for the time set.
For more information,
see“Display Auto Off” on
page 108.
N
Disabled (Full
Power default)
Display Auto
Off
01 Min.
03 Min. (Low
Power default)
05 Min.
10 Min.
15 Min.
20 Min.
30 Min.
Disabled (Full
Power default)
Part II: Technical Reference
TSETUP
OTHERS
285
Option
Settings
Usage
Restart
HDD Auto Off
01 Min.
turns the hard disk drive
off if it is not used for the
time set.
N
turns the system off if you
haven't used the computer
for the time set. This
option is available only if
Resume Mode is on. For
more information,
see“System Auto Off” on
page 109.
N
sets the brightness of the
display. For more information, see“LCD Brightness” on page 109.
N
03 Min. (low
power default)
05 Min.
10 Min.
15 Min.
20 Min.
30 Min.
Disabled (Full
Power default)
System Auto
Off
10 Min.
20 Min.
30 Min.
40 Min.
50 Min.
60 Min.
Disabled
(default)
LCD Brightness
Bright (Full
Power default)
Semi-Bright
(Low Power
default)
Part II: Technical Reference
286
TSETUP
OTHERS
The following sound options are in a drop-down list box that
appears when you select Low, Medium or High for Alarm
Volume:
Option
Settings
Usage
Restart
Low Battery
Alarm
Enabled
(default)
enables and disables the
system's built-in audible
battery alarm.
N
enables and disables the
alarm that sounds when
you close the display
panel while the computer
is on. For more information, see “How and When
to Turn the Computer Off”
on page 74.
N
Disabled
Panel Close
Alarm
Enabled
(default)
Disabled
Part II: Technical Reference
TSETUP
OTHERS
Part II: Technical Reference
287
The
Diagnostic Test
This chapter explains how to use the diagnostic test program
TDIAGS.EXE to determine if your system components are working properly.
Use the diagnostic test if you have a problem you could not identify with the tips listed in the chapter “If Something Goes
Wrong…”. The test verifies that the following system components
(hardware) are in working order:
❖ system (the computer's internal hardware)
❖ memory
❖ video
❖ diskette drive
❖ hard disk drive
❖ printer (if you have one attached)
This chapter explains each of these tests in detail.
289
290
The Diagnostic Test
Starting the Diagnostic Test
Starting the Diagnostic Test
To test hardware, it's important to start the diagnostic test without
optional features or programs (for example, without memoryresident programs). To do so, you should run TDIAGS from the
Toshiba Companion Diskette using the Toshiba Companion Utility (even though the TDIAGS program is on the hard disk).
Before you start the test, check all cables for loose connections. If
any errors occur during the test, check all cable connections again.
To start the test, follow these steps:
1 Click Start, then click Shut Down.
Windows 95 displays the Shut Down Windows dialog box.
2 Click the button next to Restart the computer in MS-DOS
mode and click Yes.
Windows 95 shuts down, then restarts in MS-DOS mode and
displays a system prompt.
3 Put the Toshiba Companion Diskette in drive A and press
Ctrl + Alt + Del.
After a moment, the computer displays a Welcome screen.
4 Press Enter.
The Toshiba Companion Utility loads the diagnostic test and
displays its main menu:
Main Menu
Install Utilities and Files
View README Documents
Setup Your Computer
Run Diagnostics
Run Master Diskette Creator
Exit to DOS
Part II: Technical Reference
The Diagnostic Test
Choosing Test Options
291
5 Use the arrow keys to select Run Diagnostics and press
Enter.
TDIAGS asks you to confirm that you want to run the
diagnostic test.
6 To run the diagnostic test, press Y (for yes), and press Enter.
The following sections explain the diagnostic test options.
Choosing Test Options
Before the test begins, the program asks several questions about
which components you wish to test.
1 The first question asks if you want to test the diskette
drive(s). The computer displays:
Test the FDD (Y/N)?
2 To test the diskette drive(s), type Y and press Enter. To
bypass the test, type N and press Enter.
The test writes test patterns on any disk in the drive. These
patterns destroy all information on the disk(s). Make sure
there is no information you want to keep on the disk(s)
you use.
If you choose the FDD test, you must format and write enable
these disks before the test. For 3 1/2" disks, move the writeprotect tab to cover the square hole.
Part II: Technical Reference
292
The Diagnostic Test
Choosing Test Options
The next prompt asks if you want to test the hard disk drive:
Test the HDD (Y/N)?
3 To test the hard disk, type Y and press Enter. Otherwise,
type N and press Enter.
The hard disk test overwrites a portion of the information
stored on the disk. Back up any important files before you test
the hard disk.
The following prompt appears:
Test the printer (Y/N)?
4 Type Y to test the printer, or N to skip the test, and
press Enter.
Before beginning the test, make sure the printer is connected to
the computer, the power is turned on, and the printer is on line.
If you chose to test the printer, the prompt displays:
Compatible with IBM printer (Y/N)?
5 To test an IBM or an IBM-compatible printer, type Y and
press Enter. To test a non–IBM-compatible printer, type N
and press Enter.
If you choose an IBM printer when your printer is not an IBM
or IBM-compatible printer, the test output will be unintelligible and may cause the printer to eject multiple blank pages. If
you're not sure about your printer's compatibility, type N for a
non–IBM-compatible printer.
Part II: Technical Reference
The Diagnostic Test
Test Sequence
293
Test Sequence
The diagnostic test checks the computer's components and printer
in a predefined sequence as follows:
❖ system test
❖ memory test
❖ display test
❖ FDD (floppy disk drive or diskette drive) test
❖ HDD (hard disk drive) test
❖ printer test
While a test is in progress, the program displays:
IN PROGRESS TSSDSS
where T indicates the test number, the first SS indicates the subtest
number, D indicates the drive (if tested), and the second SS indicates the hardware status. This message may remain on the screen
for a moment. The following sections describe each subtest.
System Functions and Memory
The system functions and the memory tests run together for
approximately two seconds. The system functions test doesn't
display any messages. The memory test displays the following
message:
PROGRESS xxxxxx
where xxxxxx is the current memory location being tested. The
memory test includes conventional and extended memory.
If either test aborts:
1 Write down everything that appears on the screen.
2 Press Ctrl + Pause to return to the diagnostics menu.
3 Consult your dealer.
Part II: Technical Reference
294
The Diagnostic Test
Test Sequence
Character Attributes
When the memory test completes, the diagnostic test displays the
following screen:
CHARACTER ATTRIBUTES
NEXT LINE SHOWS NORMAL DISPLAY.
NNNNNNNNNNNNNNNNNNNNNNNNNNNNNN
NEXT LINE SHOWS INTENSIFIED DISPLAY.
IIIIIIIIIIIIIIIIIIIIIIIIIIIIII
NEXT LINE SHOWS REVERSE DISPLAY.
RRRRRRRRRRRRRRRRRRRRRRRRRRRRRR
NEXT LINE SHOWS BLINKING DISPLAY.
BBBBBBBBBBBBBBBBBBBBBBBBBBBBBB
BLUE
RED
MAGENTA
GREEN
CYAN
YELLOW
WHITE
Press [Enter] key
Character attributes test screen
Look under the message NEXT LINE SHOWS BLINKING
DISPLAY to make sure the line is actually blinking.
If your screen doesn't match the diagnostic test display, write
down the differences and contact your dealer. If your screen
matches the display, press Enter to go to the next test.
320 X 200 Graphic display
The next test is the 320 x 200 GRAPHIC DISPLAY (13) test. The
test screen displays 16 colored horizontal bars with the name of
the color.
Go to the next test by pressing Enter.
Character Sets
The next two tests are character set tests. The first checks that the
screen can display characters in a 40 column by 25 row format
(the characters are wider than normal).
Part II: Technical Reference
The Diagnostic Test
Test Sequence
295
The display screen should look like the following:
First character set test screen
If the screen matches this illustration, go to the next character set
test by pressing Enter. If your screen doesn't match the diagnostic
test display, write down the differences and contact your dealer.
The second test checks that the screen can display characters in an
80 column by 25 row format. The display should look like the
following:
80*25 CHARACTER DISPLAY
01234567890123456789012345678901234567890123456789012345678901234567890123456789
!"3%&'()*+,-./0123456789:;<=>?@ABCDEFGHIJKLMNOPQRSTUVWXYZ[\]^_`abcdefghijklmno
!"3%&'()*+,-./0123456789:;<=>?@ABCDEFGHIJKLMNOPQRSTUVWXYZ[\]^_`abcdefghijklmnop
"3%&'()*+,-./0123456789:;<=>?@ABCDEFGHIJKLMNOPQRSTUVWXYZ[\]^_`abcdefghijklmnopq
3%&'()*+,-./0123456789:;<=>?@ABCDEFGHIJKLMNOPQRSTUVWXYZ[\]^_`abcdefghijklmnopqr
%&'()*+,-./0123456789:;<=>?@ABCDEFGHIJKLMNOPQRSTUVWXYZ[\]^_`abcdefghijklmnopqrs
&'()*+,-./0123456789:;<=>?@ABCDEFGHIJKLMNOPQRSTUVWXYZ[\]^_`abcdefghijklmnopqrst
'()*+,-./0123456789:;<=>?@ABCDEFGHIJKLMNOPQRSTUVWXYZ[\]^_`abcdefghijklmnopqrstu
()*+,-./0123456789:;<=>?@ABCDEFGHIJKLMNOPQRSTUVWXYZ[\]^_`abcdefghijklmnopqrstuv
)*+,-./0123456789:;<=>?@ABCDEFGHIJKLMNOPQRSTUVWXYZ[\]^_`abcdefghijklmnopqrstuvw
*+,-./0123456789:;<=>?@ABCDEFGHIJKLMNOPQRSTUVWXYZ[\]^_`abcdefghijklmnopqrstuvwx
+,-./0123456789:;<=>?@ABCDEFGHIJKLMNOPQRSTUVWXYZ[\]^_`abcdefghijklmnopqrstuvwxy
,-./0123456789:;<=>?@ABCDEFGHIJKLMNOPQRSTUVWXYZ[\]^_`abcdefghijklmnopqrstuvwxyz{
-./0123456789:;<=>?@ABCDEFGHIJKLMNOPQRSTUVWXYZ[\]^_`abcdefghijklmnopqrstuwxyz{|
./0123456789:;<=>?@ABCDEFGHIJKLMNOPQRSTUVWXYZ[\]^_`abcdefghijklmnopqrstuwxyz{|}
/0123456789:;<=>?@ABCDEFGHIJKLMNOPQRSTUVWXYZ[\]^_`abcdefghijklmnopqrstuwxyz{|}~
0123456789:;<=>?@ABCDEFGHIJKLMNOPQRSTUVWXYZ[\]^_`abcdefghijklmnopqrstuwxyz{|}~D
123456789:;<=>?@ABCDEFGHIJKLMNOPQRSTUVWXYZ[\]^_`abcdefghijklmnopqrstuwxyz{|}~DÇ
23456789:;<=>?@ABCDEFGHIJKLMNOPQRSTUVWXYZ[\]^_`abcdefghijklmnopqrstuwxyz{|}~DÇü
3456789:;<=>?@ABCDEFGHIJKLMNOPQRSTUVWXYZ[\]^_`abcdefghijklmnopqrstuwxyz{|}~DÇüé
456789:;<=>?@ABCDEFGHIJKLMNOPQRSTUVWXYZ[\]^_`abcdefghijklmnopqrstuwxyz{|}~DÇüéâ
PRESS [ENTER] KEY.
Second character set test screen
If the screen matches this illustration, continue with the tests by
pressing Enter. If your screen doesn't match the diagnostic test display, write down the differences and contact your dealer.
Part II: Technical Reference
296
The Diagnostic Test
Test Sequence
Graphics Capabilities
The next subtests check the screen's graphic capabilities for each
of the computer's graphics modes.
During the test, the resolution and mode number appear above an
image representing the mode's capabilities. The number inside the
brackets is the mode number.
The next illustration shows the test image for one of the 320 x 200
graphics modes (mode 4).
320*200 GRAPHICS DISPLAY : [4]
PRESS [ENTER] KEY
Graphics capabilities test screen
A similar screen appears for each of the computer's graphics
modes.
Press Enter to proceed with the next screens. Each screen has a
similar image (three boxes of different shades of gray), differing
primarily in resolution. If a different image appears on your
screen, contact your dealer. If the screens match the display, press
Enter to go to the next test.
Part II: Technical Reference
The Diagnostic Test
Test Sequence
297
Diskette Drives
If you selected the diskette drive test, you see a prompt that asks
you to insert a disk into each drive you want to test.
Insert a formatted, write-enabled diskette into each drive(s).
This test may destroy all information on the diskettes. Make
sure there is no information you want to keep on the diskettes
you use.
To skip this test and return to the diagnostics menu, press
Ctrl + Pause.
After you insert the diskette(s) in the drive(s), press Enter. The test
begins and displays this message:
FLOPPY DISK IN PROGRESS 503000
If an error occurs, the test displays the ABORTED message. Write
down the highlighted numbers and return to the main menu by
pressing Ctrl + Pause.
If a diskette drive fails the test, check the following:
❖ Does the drive contain a diskette?
❖ Is the diskette properly formatted?
❖ Is the diskette write-enabled?
❖ Is the diskette undamaged?
Repeat the test with another diskette. If the test displays the
ABORTED message again, see your dealer.
If the test completes successfully, and you selected the hard disk
test, the diagnostic test begins checking the hard disk. If you did
not select the hard disk or printer test, the diskette drive test concludes by displaying the TDIAGS screen. To exit TDIAGS, go to
“Exiting the Diagnostic Menus” on page 300.
Part II: Technical Reference
298
The Diagnostic Test
Test Sequence
Hard Disk
If the diskette drive(s) test is successful and you selected the hard
disk drive test, the hard disk test displays this message:
HARD DISK TEST IN PROGRESS 805100
If an error occurs, the test displays the ABORTED message. Write
down all messages and highlighted numbers and consult your
dealer. Your computer or your drive may need service. To return
to the main menu, press Enter.
The hard disk test does not destroy all of the information
stored on the hard disk. However, this test overwrites a small
portion of the disk. Back up any important files before you
test the hard disk.
If the test completes successfully, and you selected the printer
test, the diagnostic test begins the printer test. If you did not
select the printer test, the hard disk test concludes by displaying
the TDIAGS screen. To exit TDIAGS, go to “Exiting the Diagnostic Menus” on page 300.
Printer
If the hard disk drive tests successfully and you selected to test the
printer, the printer test displays this message:
PRINTER TEST IN PROGRESS 60xxxx
where xxxx is a counter that shows the test is still in progress. If
you specified an IBM-compatible printer, the test sends the following output to the printer:
PRINTER TEST
1. THIS LINE SHOWS NORMAL PRINT.
2.
THIS LINE SHOWS DOUBLE WIDTH PRINT.
3. THIS LINE SHOWS COMPRESSED PRINT.
4. THIS LINE SHOWS EMPHASIZED PRINT.
5. THIS LINE SHOWS DOUBLE STRIKE PRINT.
6. ALL CHARACTERS PRINT
IBM-compatible printer output
Part II: Technical Reference
The Diagnostic Test
Test Sequence
299
If you specified a non–IBM-compatible printer, the test sends the
following output to the printer:
!"#$%'()*+,-./0123456789:;<=>?@ABCDEFGHIJKLMNOPQRSTUVWXYZ[\]~_^abcdefghijklmno
!"#$%'()*+,-./0123456789:;<=>?@ABCDEFGHIJKLMNOPQRSTUVWXYZ[\]~_^abcdefghijklmnop
"#$%'()*+,-./0123456789:;<=>?@ABCDEFGHIJKLMNOPQRSTUVWXYZ[\]~_^abcdefghijklmnopq
#$%'()*+,-./0123456789:;<=>?@ABCDEFGHIJKLMNOPQRSTUVWXYZ[\]~_^abcdefghijklmnopqr
$%'()*+,-./0123456789:;<=>?@ABCDEFGHIJKLMNOPQRSTUVWXYZ[\]~_^abcdefghijklmnopqrs
%'()*+,-./0123456789:;<=>?@ABCDEFGHIJKLMNOPQRSTUVWXYZ[\]~_^abcdefghijklmnopqrst
'()*+,-./0123456789:;<=>?@ABCDEFGHIJKLMNOPQRSTUVWXYZ[\]~_^abcdefghijklmnopqrstu
()*+,-./0123456789:;<=>?@ABCDEFGHIJKLMNOPQRSTUVWXYZ[\]~_^abcdefghijklmnopqrstuv
)*+,-./0123456789:;<=>?@ABCDEFGHIJKLMNOPQRSTUVWXYZ[\]~_^abcdefghijklmnopqrstuvw
*
/0123456789
@ C G
O Q S
[\] ^ b d f hijkl
Non-IBM-compatible printer output
If an error occurs, the test displays the ABORTED message. Write
down all messages and highlighted numbers and check the following items:
❖ Is the printer power cord securely plugged into a live wall
outlet?
❖ Is the printer cable properly connected to the computer?
❖ Is the printer turned on?
❖ Is the printer ready (on line or selected)?
Run the test. If the test displays the ABORTED message again, or
your printout doesn't match the output shown in the illustrations,
consult your dealer to have the printer and the cable serviced.
If the printer tests successfully, the test displays the
COMPLETED message. Press Enter to return to the TDIAGS
screen. To exit TDIAGS, continue with the next section.
Part II: Technical Reference
300
The Diagnostic Test
Exiting the Diagnostic Menus
Exiting the Diagnostic Menus
To exit the diagnostic menu, follow these steps:
1 When TDIAGS completes system components testing,
type N and press Enter.
TDIAGS returns you to the Main menu.
2 Remove the Toshiba Companion Diskette from the diskette drive and press Ctrl + Alt + Del or the reset button to
restart the computer.
The computer restarts.
Part II: Technical Reference
The Diagnostic Test
Exiting the Diagnostic Menus
Part II: Technical Reference
301
Features and
Specifications
This appendix lists the features of the computer and summarizes
its specifications.
Built-in Features
This section lists the computer’s features.
Technology and Processor
Microprocessor
75MHz, 2.9 volt/3.3 volt Intel Pentium with Voltage Reduction Technology (VRT) and a 16KB
write-back internal cache
LSI and CMOS
large scale integrated and complementary metaloxide semiconductor technology, providing minimum size and weight, low power usage and high
reliability
305
306
Features and Specifications
Built-in Features
Memory
3.3-volt 16 megabit EDO DRAM, delivers high
performance with a 70 nanosecond (ns) access
time, hyperpage mode, 64-bit data bus width
Video Graphics
Controller
Chips & Technologies F65548 SVGA graphics
controller with a 32-bit VESA local bus supports
BiTBLT accelerator, supports high-resolution,
high-color video modes listed in Appendix D
“Video Modes” on page 323; 1MB VRAM using
5 volt, 60 nanosecond DRAM memory
ECP
the parallel port is an IEEE 1284 8-bit Enhanced
Capability Port (ECP-compliant port), providing
increased performance when you’re using an
ECP-compatible parallel device
Power
Computer
Integrated 30 watt, AC power adapter input voltage: 100-240V AC, 50/60Hz
Main Battery
removable, rechargeable Nickel-metal hydride
(NiMH) battery pack
Backup Battery
NiMH battery provides power for special memory
features, such as Resume Mode
RTC battery
NiMH battery provides power for the internal realtime clock and calendar
Intelligent power
supply
detects low battery charge and displays the time
remaining, in MaxTime
Part III: Appendixes
Features and Specifications
Built-in Features
Automatic power off
features
307
saves battery power by automatically turning off
the display, hard disk and system when they have
not been accessed for a set length of time
Storage Capacity
3 1/2” diskette drive
accommodates both 1.44MB, high density (2HD)
and 720KB, double-density (2DD) diskettes
Hard disk
2 1/2” integrated Enhanced IDE drive and controller provides non-volatile storage for 504MB (528
million bytes)
Ports
Parallel
selectable, ECP-compatible parallel port that
provides a Centronics-compatible connection to
a printer or other parallel output or bi-directional
device
Serial
9-pin, RS-232-C-compatible high-speed buffered
UART serial port lets you connect an external
modem, mouse, serial printer or other serial device
Video
15-pin, analog VGA port lets you connect an
external VGA or SVGA monitor (color or
monochrome)
Keyboard-PS/2 mouse
PS/2-compatible port allows you to connect a
101/102-key keyboard or a PS/2 mouse
Part III: Appendixes
308
Features and Specifications
Built-in Features
NoteDock™
176-pin port lets you connect an optional NoteDock that contains a number of ports and two PC
Card slots, and supports an ID function for use
with Windows 95: when customizing multiple
docking configurations Windows 95 will be able
to identify the connected unit
Standard Hardware
Memory
8MB, 3.3 volt, 16-megabit EDO (Extended Data
Output) dynamic RAM chips
Display
10.4 inch (measured diagonally) Dual Scan
Supertwist Nematic (DSTN) color LCD that displays up to 256 colors simultaneously at 640 x 480
resolution
Keyboard
enhanced 82-key (84-key in Europe) keyboard
emulates the IBM PS/2 keyboard and includes
embedded numeric and cursor control overlays
and dedicated cursor control keys
AccuPoint and buttons
provides the complete function of a mouse or other
pointing device from within the keyboard
Part III: Appendixes
Features and Specifications
Built-in Features
309
Standard Software
Operating System
Microsoft Windows 95 with SVGA drivers and
the MaxTime power management program
Configuration
Programs
Hardware Setup and TSETUP let you change configuration options and set preferences
Power
APM and MaxTime monitor the battery charge
and provide access to the computer’ power-saving
features
Faxing and
Telecommunications
Microsoft Fax and Hyperterminal (Windows 95)
Special Features
Resume Mode
electronic bookmark that records what you’re
doing when you turn the computer off and returns
you to the same place when you turn the power
back on
Advanced Power
Management
determines the system’s power needs and automatically configures the computer for maximum
power savings
Security
instant and power-on passwords help protect your
files
Part III: Appendixes
310
Features and Specifications
Optional Accessories and Devices
Documentation
User’s Guide
explains how to set up the computer, gives instructions for basic computing tasks and documents all
system components and features
Online Documentation
provides the User’s Guide in hypertext form
Load this manual into memory and refer to it when
you have questions about the computer
Microsoft Windows
95 documentation
documents the Windows 95 operating system
Optional Accessories and Devices
This section lists the options available for the computer.
Power Devices
Battery charger
charges extra battery packs
Additional battery
packs
use as spare or replacement packs to extend the
time you can operate the computer away from a
live wall outlet
Part III: Appendixes
Features and Specifications
Optional Accessories and Devices
311
Memory Cards
8MB
expands the computer’s memory to 16MB
16MB
expands the computer’s memory to 24MB
32MB
expands the computer’s memory to 40MB
Expansion Capability
PC Card slot
lets you install one Type III or up to two Type I or
Type II PC Cards. Maximum slot thickness:
10.5 mm
NoteDock™
optional docking station that provides access to the
following: PS/2 mouse port, PS/2 keyboard port,
two Type III PC Card slots, serial port, video port,
parallel port, AC in and security lock slot
Others
Carrying case
Part III: Appendixes
sturdy fabric or leather carrying case protects the
computer while traveling
312
Features and Specifications
Specifications
Security
Cable
Noteworthy Computer Lock cable to deter
computer theft
Specifications
Physical Dimensions
Weight
6.9 lbs (3.13 kilograms)
Size
width x depth x height
11.8" x 9.1" x 2.2" (299mm x 233mm x 53mm)
Part III: Appendixes
Features and Specifications
Specifications
Part III: Appendixes
313
Power Cord
Connectors
The computer features a universal power supply you can use
worldwide. This appendix shows the shapes of the typical AC
power cord connectors for various parts of the world.
USA and Canada
United Kingdom
UL approved
CSA approved
BS approved
Australia
Europe
AS approved
VDA approved
NEMKO approved
315
System
Resources
This appendix lists the pre-assigned IRQ levels, DMA channels
and I/O port addresses.
IRQ Level Assignments
The direct line to the CPU is called an Interrupt ReQuest (IRQ)
level or channel. You'll hear both terms used by technical experts.
They mean the same thing. The following table lists the IRQ level
assignments for the computer:
IRQ
Use
Notes
0
Timer
1
Keyboard
2
PIC #2
3
COM2
COM4 or PC Card
4
COM1
COM3 or PC Card
5
Available
Choice for PC Card
6
3 1/2" diskette drive
317
318
System Resources
DMA Channel Assignments
IRQ
Use
Notes
7
LPT1
Choice for ECP or PC Card
8
Real-time clock
9
Software redirect to INT 0Ah
Choice for ECP or PC Card
10
Reserved
Choice for ECP or PC Card
11
Reserved
Choice for ECP or PC Card
12
PS/2 Mouse/AccuPoint or PC
Card
13
Numeric Data Processor
14
Hard disk, ECP, or PC Card
15
ECP or PC Card
DMA Channel Assignments
Direct Memory Access (DMA) allows some devices to transfer
data to and from memory at high speeds, without using the CPU.
Such devices are each assigned a unique DMA channel. The computer has two DMA controllers with four channels on each controller, a total of eight DMA channels.
The following table lists the computer's DMA channel
assignments.
DMA
Use
0
Reserved
1
Reserved
2
3 1/2” diskette drive, or ECP
3
Reserved
4
Cascade from DMAC 1
5
Reserved
6
Reserved
7
Reserved
Part III: Appendixes
Notes
ECP
ECP
System Resources
Input/Output Port Address Assignments
319
Input/Output Port Address Assignments
The CPU accesses input/output devices, such as modems, by reading from them or writing to them. Each command to read or write
must specify the address (in memory) for the port. Each device
that communicates with the CPU must have a unique I/O port
address.
The following table lists the device names and their assigned I/O
port addresses for the computer.
Port
address(h)
Device/function
000-01F
82C37: DMA Controller 1
020-03F
82C59: PIC 1
040-05F
82C54: Timer
060-06F
Keyboard Controller
070
NMI mask register
070-07F
Real Time Clock
080-09F
DMA page register
0A0-0BF
82C59: PIC 2
0C0-0DF
82C37: DMA Controller 2
0E0-0EF
Special Register
0F0-0F7
Math Coprocessor
100-1EF
VGA
1F0-1FF
Hard Disk Controller
201
Not used
202-21F
Not used
220-22F
Not used
230-23F
Not used
240-24F
Not used
250-25F
Not used
Part III: Appendixes
Notes
060 and 064 are KBC
061 is system status port
320
System Resources
Input/Output Port Address Assignments
Port
address(h)
Device/function
260-277
Not used
278-27F
LPT2
280-2E7
Not used
2E8-2EF
Serial Port (COM4)
2F0-2F7
Not used
2F8-2FF
Serial Port (COM2)
300-33F
Not used
340-35F
Not used
360-377
Not used
378-37F
LPT1
380-387
Not used
388-38B
Not used
38C-38F
Not used
390-39F
Not used
3A0-3AF
Bisynchronous 1
3B0-3BF
LPT3
3C0-3DF
CGA, EGA, VGA
3E0-3E7
Not used
3F0-3F7
3 1/2" diskette drive controller
3E8-3EF
Serial Port (COM3)
3F8-3FF
Serial Port (COM1)
400-47F
Not used
480-49F
DMA High-Page Register
Part III: Appendixes
Notes
I/O ports 3F6 and 3F7 are
used for the HDC also
System Resources
Input/Output Port Address Assignments
Part III: Appendixes
321
Video
Modes
This appendix lists the video modes supported by the display
adapter, and identifies the characteristics of each mode.
The columns of the following tables are defined as follows:
Mode is the mode number in hexadecimal, and is generally used by
programmers to specify video modes in programs.
Type identifies the display adapter that first supported the mode, and
specifies whether the mode is text or graphics.
Resolution is the measure of the screen’s dimensions in terms of horizontal and vertical pixels (in graphics modes), or rows and columns of characters (in text modes).
Grid is the default number of pels per character.
LCD Colors is the maximum number of simultaneous colors, or
shades of gray, that the mode can display on the built-in screen.
CRT Colors is the maximum number of simultaneous colors, or shades
of gray, that the mode can display on an external monitor.
Scan Freq hor/vert is the horizontal and vertical scanning frequency in
Hertz. This is for external monitors only.
323
324
Video Modes
This table lists the video modes:
Internal LCD
External Monitor
Mode
(hex)
Type
Resolution
Grid
(pelxpel)
Colors
Grid
(pelxpel)
Colors
Scan Freq
hor/vert
0, 1
VGA
Text
40 x 25
8x8
16/222K
8x8
16/256K
31.5KHz/70Hz
2, 3
VGA
Text
80 x 25
8x8
16/222K
8x8
16/256K
31.5KHz/70Hz
0*, 1*
VGA
Text
40 x 25
8 x 14
16/222K
8 x 14
16/256K
31.5KHz/70Hz
2*, 3*
VGA
Text
VGA
Text
VGA
Text
VGA
Graph
80 x 25
8 x 14
16/222K
8 x 14
16/256K
31.5KHz/70Hz
40 x 25
8(9) x 16
16/222K
9 x 16
16/256K
31.5KHz/70Hz
80 x 25
8(9) x 16
16/222K
9 x 16
16/256K
31.5KHz/70Hz
320 x 200
8x8
4/222K
8x8
4/256K
31.5KHz/70Hz
6
VGA
Graph
640 x 200
8x8
2/222K
8x8
2/256K
31.5KHz/70Hz
7
VGA
Text
80 x 25
8(9) x 14
Mono
9 x 14
Mono
31.5KHz/70Hz
7+
VGA
Text
80 x 25
8(9) x 16
Mono
9 x 16
Mono
31.5KHz/70Hz
D
VGA
Graph
320 x 200
8x8
16/222K
8x8
16/256K
31.5KHz/70Hz
E
VGA
Graph
640 x 200
8x8
16/222K
8x8
16/256K
31.5KHz/70Hz
F
VGA
Graph
640 x 350
8 x 14
Mono
8 x 14
Mono
31.5KHz/70Hz
10
VGA
Graph
VGA
Graph
VGA
Graph
VGA
Graph
640 x 350
8 x 14
16/222K
8 x 14
16/256K
31.5KHz/70Hz
640 x 480
8 x 16
2/222K
8 x 16
2/256K
31.5KHz/60Hz
640 x 480
8 x 16
16/222K
8 x 16
16/256K
31.5KHz/60Hz
320 x 200
8x8
256/222K
8x8
256/256K
31.5KHz/70Hz
20
SVGA
Graph
640 x 480
8 x 16
16/222K
8 x 16
16/256K
31.5KHz/60Hz
37.9KHz/72Hz
37.5KHz/75Hz
22
SVGA
Graph
800 x 600
8x8
16/222K
8x8
16/256K
37.9KHz/60Hz
48.1KHz/72Hz
46.9KHz/75Hz
0+, 1+
2+, 3+
4, 5
11
12
13
Part III: Appendixes
Video Modes
Internal LCD
325
External Monitor
Mode
(hex)
Type
Resolution
Grid
(pelxpel)
Colors
Grid
(pelxpel)
Colors
Scan Freq
hor/vert
24
SVGA
Graph
1024 x 768
8 x 16
16/222K
8 x 16
16/256K
35.5KHz/87Hz+
48.4KHz/60Hz
57.5KHz/70Hz
60.0KHz/75Hz
30
SVGA
Graph
640 x 480
8 x 16
256/222K
8 x 16
256/256K
31.5KHz/60Hz
37.9KHz/72Hz
37.5KHz/75Hz
32
SVGA
Graph
800 x 600
8 x 16
256/222K
8 x 16
256/256K
37.9KHz/60Hz
48.1KHz/72Hz
46.9KHz/75Hz
34
SVGA
Graph
1024 x 768
8 x 16
256/222K
8 x 16
256/256K
35.5KHz/87Hz+
48.4KHz/60Hz
57.5KHz/70Hz
60.0KHz/75Hz
40
SVGA
Graph
640 x 480
N/A
N/A
8 x 16
32K/32K
31.5KHz/60Hz
72KHz/37.9Hz
75KHz/37.5Hz
41
SVGA
Graph
640 x 480
N/A
N/A
8 x 16
64K/64K
31.5KHz/60Hz
72KHz/37.9Hz
75KHz/37.5Hz
42
SVGA
Graph
800 x 600
N/A
N/A
8 x 16
32K/32K
37.9KHz/60Hz
43
SVGA
Graph
SVGA
Graph
800 x 600
N/A
N/A
8 x 16
64k/64k
37.9KHz/60Hz
640 x 480
N/A
N/A
8 x 16
16M/16M
31.5KHz/60Hz
50
+ These modes are interlaced. All others are non-interlaced.
Part III: Appendixes