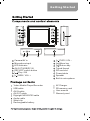
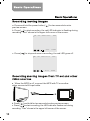
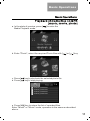
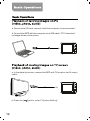
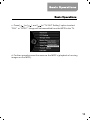
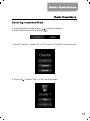
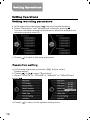
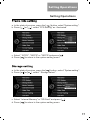
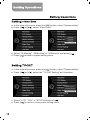
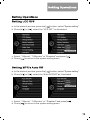
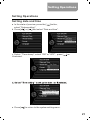
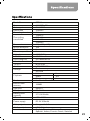
1
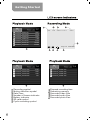
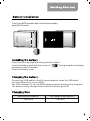
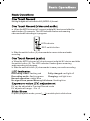
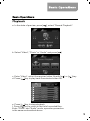
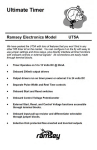
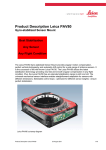
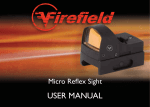
Components and control elements
1
LCD screen indicators
2
Battery installation
Battery Life / Inserting SD Card
3
4
One touch record
LED Indicator
EV adjustment
5
5
5
Slide Show
Recording with digital devices
Motion detection
Overwrite Enable
Playback
Recording moving images from TV set and other video sources
Playback of media files on Yukon MPR
5
6
7
8
9
10
11
Playback of moving images on PC
12
Playback of moving images on TV screen
12
Updating media files
14
Copying recorded files
14
Deleting recorded files
15
Setting recording parameters
Resolution setting
Frame rate setting
Storage setting
Setting video time
Setting TV-OUT
Setting LCD OFF
Setting MPR’s Auto Off
Setting vibration
Language setting
Setting date and time
Setting format
16
16
17
17
18
18
19
19
20
20
21
22
Specifications
23
Getting Star ted
1
6
2
7
3
4
8
12
9
10
5
15
1
2
3
4
5
6
7
14
13
Camera/AV in
Microphone input
LED indicator
AV OUT/USB/DC IN
REC/OFF switch button
[ ] Play / OK
[ ] REW / VOL +
11
8
9
10
11
12
13
14
15
џYukon Mobile Player/Recorder
џUSB cable
џAV IN cable
џAV OUT cable
џDigisight N550/N750 cable
Audio cable
џWaist clip
џRechargeable battery
[ ] FWD / VOL [ ] Menu key
[ ] Return key
Tripod thread
SD card slot
Power/photo
Speaker
Built-in microphone
џAC Charger
џSD memory card
џUser manual
џWarranty card
Getting Star ted
2
1
1/7
20120105_234207.AVI
AUTO
3
4
2009/07/17 13:21:15
000333
689K
20120105_234153.AVI
3.91M
20120105_234025.AVI
7.34M
20120105_234007.AVI
REC
5.0M
20120101_013126.AVI
2.37M
20120101_010421.AVI
16.55M
20120101_010259.AVI
25.65M
9
02:41:07 02345MB
SD
10
5
6
7
8
1/4
1/4
20120105_234451.WAV
1019K
20120105_233946.JPG
20120105_234354.WAV
520K
20120105_233943.JPG
20120105_234324.WAV
196K
20120105_233938.JPG
20120105_222448.WAV
54K
20120105_233934.JPG
12
11
1
2
3
4
5
6
7
Recording symbol
Motion detection symbol
Date/Time
Number of frames indicator
Battery indicator
SD card symbol
Cyclic recording symbol
8
9
10
11
12
Elapsed recording time
Remaining memory
Recorded video files
Recorded audio files
Recorded photo files
Your Yukon MPR operates with a mobile phone battery
pack (KB-02 series)
Rechargeable
Li-ion battery
Open the cover by slightly pushing and pull it back.
Insert the battery pack with the corner of "
" facing toward s the battery
compartment as illustrated.
Close the battery cover.
Connect the USB cable to the AC power adapter. Insert the USB cable
into the USB port (4) of your MPR.
The LED indicator (3) on your MPR lights red when charging is in progress.
The battery is fully charged when the LED indicator goes off.
Battery pack capacity
1400 mAh
Full charge time (approx.)
240 min
Battery pack capacity
1400 mAh
Battery pack capacity
1400 mAh
Insert the SD card with the "
illustrated.
SD card capacity
2GB
4GB
8GB
16GB
32GB
720x480
Continuous recording time (approx.)
140 min (fully charged battery)
Continuous recording time (approx.)
240 min (fully charged battery)
" mark facing the SD slot as
640x480
320x240
Approx. 65 min
Approx. 75 min
Approx. 310 min
Approx. 130 min
Approx. 150 min
Approx. 620 min
Approx. 260 min
Approx. 300 min
Approx.1240 min
Approx. 520 min
Approx. 600 min
Approx. 2480 min
Approx. 1040 min
Approx. 1200 min
Approx. 4960 min
Moving images are recorded in AVI (MPEG-4) format.
a. When the MPR is turned off, connect a digital NV device and slide the
switch button (5) upwards. The LED indicator flashes red meaning
video and audio recording is in progress.
LED indicator
REC switch button
b. Slide the switch button (5) downward s to save a video and audio
recording.
a. When the MPR is turned off , do not connect a digital NV device and slide
the switch button (5) . The LED indicator flashes green meaning
audio recording is in progess.
b. Slide the switch button (5) downwards to save your audio recording .
Recording video: flashing red
Fully charged: red light off
Recording audio: flashing green
Charging: red light is on
Normal operation: stable blue
No signal / Low power/Memory full alarm: flashing b lue
EV can be adjusted in Preview/Record mode
EV adjustment range: -3 to +3
In photo playback mode, press [
] to enable photo slide show.
Recording with digital night vision monoculars
Ranger 5x42/Ranger Pro 5x42
l Connect the plug of the Ranger’s AV cable to the Ranger’s “AV out” port
(see scheme 1 below).
l Connect the yellow plug of the recorder’s AV IN cable to the yellow jack of
the Ranger’s AV cable.
l Connect the thin plug of the recorder’s AV IN cable to the “CAM IN” port of
the video recorder.
l Start the video recorder, turn on the NV Ranger 5x42/Ranger Pro 5x42.
l Adjust the image according to the instructions before recording.
Recording with digital riflescopes Digisight N550/N750
l Connect the yellow plug of the included Digisight N550/N750 cable to the
“AV out” port of the digital riflescope (see scheme 2).
l Connect the other plug of the Digisight N550/N750 cable to the “CAM IN”
port of the video recorder.
l Start the video recorder and the riflescope.
l Adjust the image according to the instructions before recording.
6
Basic Operations
a. When the MPR is off, connect a digital NV device, press and
hold the power button [ ] for two seconds to enter preview screen.
b. Press the menu button [
] and select "System setting",
press [ ] to enter System Setting menu.
c. Press [
] or [
] and select "Motion detection”
d. Select "ON" and press [
as illustrated .
] to activate the Motion Detection function
After setting, return to the preview screen by pressing [ ].
Sign “AUTO” in the upper part of the screen means m otion detection
is activated.
7
Basic Operations
a. When the MPR is off, connect a digital NV device, press and
hold the power button[ ] for two seconds to enter preview screen.
b. Press the menu button [
], select "S ystem setting " and press [
to enter System Setting menu.
c. Press [
] or [
] and select "Overwrite Enable".
d. Select "ON" and press [
] to start enable overwrite.
After setting, return to the preview screen, "[
bottom-left part of the screen.
8
]" shows in the
]
a. In the state of preview, press [
], select "Record Playback".
b. Select "Video", "Photo" or "Audio" and press [
].
c. Enter "Video", select the required video file with [
d. Press [ ] key to play back the selected video file.
] or [
] key.
1/7
20120105_234207.AVI
689K
20120105_234153.AVI
3.91M
20120105_234025.AVI
7.34M
20120105_234007.AVI
5.0M
20120101_013126.AVI
2.37M
20120101_010421.AVI
16.55M
20120101_010259.AVI
25.65M
e. Press [ ] key to stop playback.
f. Press [ ] key to return to the list of recorded files.
Enter "Photo" and "Audio" mode, operation procedure
is the same as described above.
9
a. Press and hold the power button [
preview screen.
] for two seconds to enter
b. Press [ ] to start recording, the red LED indicator is flashing during
recording. "Rec" shows in the upper left corner of the screen.
REC
AUTO
SD
c. Press [
2009/07/17 13:21:15
02:41:07
000333
02345MB
] to stop and save a recording, the red LED goes off.
REC
AUTO
SD
2009/07/17 13:21:15
02:41:07
000333
02345MB
a. When the MPR is off, connect the MPR with TV or an other
video source via AV input cable.
b. Press [ ] and hold for two seconds to enter preview screen.
c. Press [ ] to start recording, the LED indicator flashes red during
recording. "Rec" shows in the upper left corner of the screen.
10
Basic Operations
a. In the state of preview, press [
Media Playback mode.
] to enter the
b. Enter "Photo", select the required Photo files with [
c. Press [
d. Press [
] or [
] key.
] key to play back the selected photo file.
] key to stop playing.
1/4
20120105_233946.JPG
20120105_233943.JPG
20120105_233938.JPG
20120105_233934.JPG
e. Press [
] key to return the list of recorded files.
Enter "Music" or "Movie" mode, operation is the same as described
above.
11
a. Remove the SD card, connect it with the computer via a card reader.
b.Connect the MPR with the computer via a USB cable. "PC Connection"
message shows on the screen.
a. In the state of preview, connect the MPR with TV/monitor via AV output
cable.
b.Press the [
12
]button, select "System Setting"
c. Press [
] or [
], and [
] in "TV-OUT Setting" option to select
"PAL" or "NTSC". Image will be transmitted from the MPR to the TV.
d. Further operations are the same as the MPR's (playback of moving
images on the MPR).
13
a. Remove the SD card, connect it with the computer via a card reader.
b. Connect the MPR with the computer via a USB cable.
"PC Connection" message shows on the screen.
c. Media formats
Music
MP3/MP2.5
Movie
AVI
Photo
JPG/JPEG
a. In the playback mode, press [ ] to enter submenu.
b. Select the required file, press [
].
c. Select "Copy to", Press "Nand flash" or "SD" as illustrated.
14
a. In the playback mode press [
] to enter submenu.
b. Select the required file, press [
].
c. Select "Delete", press "All" or "Current" or "Cancel" as illustrated.
d. Press [
] , select "Yes" or "No" as illustrated.
15
a. In the state of preview,press [
] into record system setting.
b. Select “ Resolution " and "Microphone" submenu, press [ ].
You can use either internal microphone or attach an external one
using microphone input (2).
c. Press [
] to back to the state of preview.
a. In the state of preview, press the [
] button, select
"System setting".
b. Press [
] or [
], select "Resolution".
c. Select "720x576" or "720x480" or "640x480" or "320x240"and
press [ ].
d. Press [
16
] to return to the system setting menu.
Setting Operations
Setting Operations
a. In the state of preview, press the [
] button, select "System setting ".
b. Press [
] or [
], select "FPS Setting" as illustrated.
c. Select "15FPS", "25FPS" or "30FPS"and press [
d. Press [
] to return to the system setting menu.
].
a. In the state of preview, press the [
] button, select " System setting ".
b. Press [
] or [
], select " Storage select ".
c. Select “Internal Memory" or "SD Card" and press [
d. Press [
] to return to the system setting menu.
].
17
a. In the state of preview, press the [
] button, select "System setting".
b. Press [
] or [
], select "Video Time".
c. Select "10 Minutes", "20 Minutes" or "30 Minutes" and press [
d. Press [
] to back to system setting menu.
].
a. In the state of preview, press the [
] button, select "System setting".
b. Press [
] or [
], select the "TV-OUT Setting" as illustrated.
LCD
TV PAL Output
TV NTSC Output
c. Select "LCD", "PAL" or "NTSC"and press [
].
d. Press [
] to return to the system setting menu.
18
a. In the state of preview, press the [
] button, select "System setting ".
b. Press [
] or [
], select the "LCD OFF" as illustrated.
c. Select "1 Minute", "5 Minutes" or “Disabled" and press [
d. Press [
] to return to the system setting menu.
].
a. In the state of preview, press the [
] button, select "System setting ".
b. Press [
] or [
], select the “ Auto Off DVR " as illustrated.
c. Select "1 Minute", "5 Minutes" or " Disabled "and press [
d. Press [
] to return to the system setting menu.
]
19
Setting Operations
a. In the state of preview, press the [
] button, select "System setting ".
b. Press [
] or [
], select the "Vibrate Setting" as illustrated.
Vibration Setting
c. Select "ON" or "OFF" and press [ ].
d. Press [
] to return to the system setting menu.
a. In the state of preview, press the [
] button, select "System setting".
b. Press [
] or [
], select "Language".
c. Select the required language and press [ ].
d. Press [
] to return to the system setting menu.
20
Setting Operations
Setting Operations
Setting date and time
a. In the state of preview, press the [
] button,
select "System setting ".
b. Press [
] or [
] and select “ Date and time ".
c. Select "Time stamp", select "ON" or "OFF", press [
illustrated.
].as
2012/07/02/12:24
e. Press [
] to return to the system setting menu.
21
Setting Operations
a. In the state of preview, press the [
] button, select "System setting ".
b. Press [
] or [
], select "Format".
c. Select “Internal Memory" or "SD Card", press [
d. Press [
22
] as illustrated.
] to back to system setting menu as illustrated.
Model#
27041
Screen
Color system
Resolution
Recording format
2.5" TFT LCD
PAL/NTSC
320x240
AVI
720x576
720x480
640x480
320x240
30fps/25fps/15fps
Yes
Yes
Yes
10/20/30Mins
1/3/5 Mins/Never
5/10 Mins/Never
Yes
NTSC/PAL
LCD/NTSC/PAL
Flash memory
SD Card
Video
Yes
Audio
Yes
Photo
Yes
Yes/Music/Movie/Photo
Recording
resolution
Frame rate
Motion detection
Cycle recording
Time stamp
Video time
LCD Off
Auto Power Off
Vibration Function
TV-OUT
AV-IN
Storage
Playback
Media
Built-in flash
memory
180MB
USB jack
DC Input
USB2.0
DC 5V 1A
Battery pack
capacity
3.7V 1400mAh
SD card
1GB~32GB
Power supply
DC 5V 200mAh
AV Input jack
AV Output jack
Interface
3 rings with 2.5mm
USB-AV jack
English, Russian, Chinese, German,
Spanish, Italian, French, Czech, Swedish
23