1
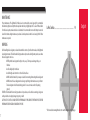
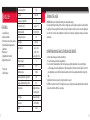
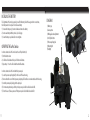
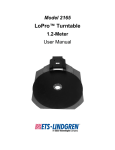
USER MANUAL
LASER RADIATION:
Do not stare into beam or view
directly with optical instruments
Max Output: 5mW
532
Wavelength: 625-660nm
LASER RADIATION
AVOID EXPOSURE TO BEAM
CLASS 3R LASER PRODUCT
Distributed by:
Sellmark Corporation
2201 Heritage Parkway
Mansfield, TX 76063
LoPro Combo
www.sightmark.com
SM25004
English
ABOUT SIGHTMARK®
Sightmark offers a wide range of products that include red dot scopes, reflex sights,
rangefinders, riflescopes, laser sights, night vision, binoculars and award-winning flashlights
and boresights. Sightmark products are inspired by military and law enforcement
applications. All products are designed to be the most effective weapon accessories possible.
MAKE YOUR MARK
TROUBLESHOOTING
Never ship back a product without getting proper authorization beforehand. Doing so could result in losing the
laser sight due to a multitude of reasons, i.e. sending it to the wrong address and other problems associated with
unexpected packages.
If the LoPro green laser does not hold zero:
1) Check that the firearm’s mount in securely attached. Also, verify the laser sight is mounted securely to the rifle. If
there is any shifting, retighten the mounting system according to the mounting instructions but do not over tighten.
The sight will need to be re-zeroed afterwards.
2) When test firing a rifle to check that the point of impact is relative to windage and elevation adjustments, firing from
a shooting rest will help eliminate shifting during firing.
3) Be sure to use factory-loaded ammunition of the same bullet type, weight and perferably, lot number.
If the product does not turn on:
1) Check that the battery is in working order. Also, check that the polarity of the battery is correct.
2) Check that there is no residue, film or corrosion on the battery contacts that may be preventing the unit from
activating.
SIGHTMARK WARRANTY
Please visit www.sightmark.com for warranty details and information.
www.sightmark.com
www.sightmark.com
Copyright © 2012 Sellmark
8
MAINTENANCE
Proper maintenance of the Sightmark LoPro Green Laser is recommended to ensure longevity. It is recommended
that when the sight becomes dirty that it is wiped down with a dry or slightly damp cloth. To clean off dirt and debris
from the laser’s aperture, make sure the laser is deactivated. It is recommended to remove the battery to ensure the
laser will not activate during maintenance procedures. Clean the aperture lens with a lens cleaning cloth. No futher
maintenance is required.
LoPro Combo ....................................................................... 1-8
WARNING
Before handling the laser designator, read and understand the contents of your firearm’s manual, and the Sightmark
laser designator manual. Follow all standard safety precautions and procedures during firearm operation, even when
the laser designator is not in use.
• NEVER point the laser designator directly at, or into, an eye. This may cause damage to the eye, or blindness
• Avoid looking directly into the laser
• Avoid shining the laser into mirrors or other reflective surfaces
• ALWAYS check the chamber of your weapon is clear before mounting or dismounting the laser designator
• ALWAYS remove the laser designator when cleaning or performing other maintenance on your firearm
• The laser designator should be tested during periods of non-use to make sure it is still operating properly
FAILURE to follow standard firearm safety precautions and procedures, as well as the above warnings, is dangerous
and may result in serious injury, damage to property, or death.
CAUTION-USE OF CONTROLS OR ADJUSTMENT OR PERFORMANCE OF PROCEDURES OTHER THAN THOSE SPECIFIED
HEREIN MAY RESULT IN HAZARDOUS RADIATION EXPOSURE.
*Visit our website at www.sightmark.com to view this manual in other languages.
7
English
Laser wavelength, nm
ENGLISH
FEATURES:
• Low profile design
• Reliable and durable
• Push button or pressure pad operation
• Hand adjustable windage/elevation
adjustments
• Weatherproof
• Lightweight and shockproof
• Digital switch operation
• Pressure pad
• CR123A battery
Laser type
Laser power output, mW
<5
Dot size (in @ 50yd)
approx. 1.5
Visibility day/night
50 yds/600 yds
LED Output (Lumens)
Battery type
Battery life, hrs
Battery voltage, V
Maximum recoil, Gs
Adjustment value
Elevation adjustment range, MOA
Windage adjustment range, MOA
220
ZEROING THE LASER:
WARNING: Make sure to follow the firearm instruction manual and warnings.
Zeroing and test firing should be performed safely on a firing range. Laser boresights are a quick and accurate method
to sighting in all weapon sights. If the firearm’s optical sight is already zeroed, the laser can be zeroed by aligning the
laser dot to the crosshair’s center. Adjustments to the laser dot are made by operating the windage and elevation
adjustments.
CR123A
Laser - 12 hrs
Light - 17hrs
Laser/Light - 4.5hrs
3
1000
1 MOA
380
500
Body material
high performance
thermoplastic
Mount type
weaver/picatinny
Dimensions
85x77x38mm
Weight
1
532
Class IIIA
OPERATING WINDAGE AND ELEVATION ADJUSTMENTS:
In order to make windage and elevation adjustments:
1) Locate the windage and elevation adjustments (3).
2) Use your hand to make adjustments. The turrets are large enough that adjustments can be made with gloves
on. The windage and elevation adjustments are 1 MOA, meaning that 1 click moves the point of impact 1 inch at 100
yards. Adjustments can be both felt and heard allowing the shooter to make adjustments without looking at the
dials.
3) Adjustments remain zeroed, and no locking mechanism is needed.
NOTE: When mounted in front of most 3x magnification scopes or higher, the elevation adjustment will clear the field
of view and not interfere with the scope’s image.
6.2oz
6
INSTALLING THE BATTERY:
The Sightmark LoPro Combo is powered by one CR123A battery. Should the laser grow dim or not activate,
the battery needs to be replaced. To install a new battery:
1) Unscrew the battery cap (1) counterclockwise and remove the battery
2) Insert a new battery with the positive (+) side facing up.
3) Screw the battery cap clockwise. Do not overtighten.
OPERATING THE LoPro Combo:
In order to activate the LoPro Combo locate the on/off push button (4).
1) Push the button down.
2) A click should be heard and the specific function will activate.
3) Repeat step 1. Once the click is heard the unit will deactivate.
DIAGRAM:
1) Battery cap
2) Laser aperture
3) Windage/elevation adjustment
4) On/off push button
5) Pressure pad input jack
6) Mounting bolt
7) Flashlight
4
3
2
In order to activate the LoPro Combo with the pressure pad.
1) Locate the pressure pad input jack (5) on the back of the laser housing.
2) Remove the rubber cover from the pressure pad input jack. The rubber cover remains attached to the housing.
3) Insert the pressure pad’s jack plug into the input jack.
4) For momentary activation, press firmly on the pressure pad. A click should be heard and felt.
5) To turn the laser off, release pressure off the pressure pad. A click should be heard and felt.
5
6
5
7
1
2
WARNINGS AND PRECAUTIONS:
OVERVIEW:
Before handling the laser sight, read and understand the contents of your firearm’s manual, warnings, and
the Sightmark LoPro manual. Follow all standard safety precautions and procedures during firearm operation, even when the laser sight is not in use.
• Never point the laser sight directly at, or into, an eye. This may cause damage to the eye or blindness.
• Avoid looking directly into the laser.
• Never allow children to use or handle this product
• Avoid shining the laser into mirrors or other reflective surfaces and dropping the unit.
• ALWAYS check that the chamber of your weapon is clear before mounting or dismounting the laser sight.
• ALWAYS remove the laser sight when cleaning, or performing other maintenance on your firearm.
• The laser sight should be tested during periods of non-use to make sure it is still operating properly.
CAUTION: Use of controls or adjustments or performance of procedures other than specified herein may
result in hazardous radiation exposure.
Failure to follow standard firearm safety precautions and procedures, as well as the above warnings, is
dangerous and may result in:
• Serious injury
• Damage to property
• Death
WARNING: Always follow your firearm’s instruction manual and warnings. Follow safe firearm practices.
Information about the products:
The Sightmark LoPro Combo features a low profile design, allowing it to be mounted in front of a riflescope without
interference with field of view. Designed to be mounted on a picatinny or weaver rail for an AR15, the LoPro Green
Laser can also be mounted on the side of the quad rail. The laser is offset for clearing front sight post.
Featuring 1 MOA click value adjustments, the hand adjustable windage and elevation turrets allow the user to zero
in the laser dot for close range shooting. Visibility ranges from 50 yards in the daytime to 600 yards at night.
Featuring a matte black finish, the LoPro Combo is constructed of a high performance thermoplastic, so it is heat
and corrosion resistant, impact resistant, waterproof and shockproof.
Reliable and durable, the Sightmark LoPro Combo takes one CR123 battery and has 27 hours of battery life and
comes with velcro strips so switch can be mounted for easy turn on/off.
Distributed by:
Sellmark Corporation
2201 Heritage Parkway
Mansfield, TX 76063
LASER RADIATION:
Do not stare into beam or view
directly with optical instruments
Max Output: 5mW
Wavelength: 625-660nm
532
LASER RADIATION
AVOID EXPOSURE TO BEAM
CLASS 3R LASER PRODUCT
MOUNTING:
WARNING: Never attempt to mount the laser sight on a loaded firearm.
To mount the LoPro Combo, please read and strictly adhere to the following directions:
1) The LoPro Combo comes with a weaver/picatinny mount (6).
2) Unload the weapon. Remove the bolt/firing pin to ensure the
weapon is incapable of firing.
3) Install the laser onto a weaver or picatinny base. Tighten the
mounting screws (6) between 45-65” pounds of torque.
4) Once the alignment is checked, tighten the mounting
screws. A flathead screw driver can be used to
tighten the mount.
5) Next, zero the sight.
4