1
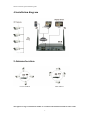
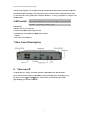
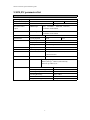
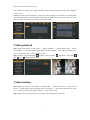
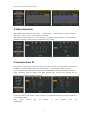
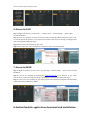
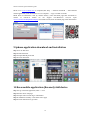
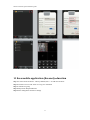
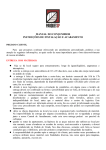
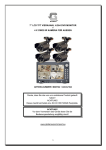
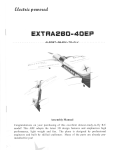
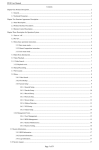
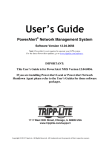
Wireless NVR kit Quick installation guide 1 Wireless NVR kit Quick installation guide Hardware description 1 Statement Sincerely thanks for purchasing our products,pls contact us if any problem or requirement. This manual is network video recorder. This user manual may contain incorrect place in technology,place not matching with product Function or operation, or printing mistake. We will update our user manual according to our updating in produnct,and will periodically Improve or updating the product and programming.the updating content will add in the new User manuai,we won’t inform. If the product’s description in user manual is inconsistent with the real products,pls based on The real products. 2 Safety cautions 1.Pls don’t put a container with liquid on DVR (like Vase). 2.DVR should put at a ventilation place,and prevent clogged the ventilation hole. 3.Check the power voltage,in case if damage by wrong voltage. 4.DVR should work at the technical standard range of temperature and humidity. 5.Place DVR on level,pls avoid intstalling at a sharp pounding place. 6.Moisture dust in PCB will cause short,circuit,for long-term use of the DVR,you can Perodically remove dust in PCB by brush. 7.It will cause burst if replace battery in wrong way,we don’t suggest user to replace by Himself,if need replace,only use the same type or equivalent type battery,pls don’t try to Open or maintain the battery. 8.DVR installation need according to specification,you can take the national or local standard As reference. 3 Open-package inspection After receive product,pls open giftbox,remove NVR and put it on suitable place,check accessories.If any damage or lack,kindly pls contact to the distributor 2 Wireless NVR kit Quick installation guide 4 Installation diagram 5 Antenna location Correct method fault method The signal coverage of Antenna is similar to a round circule.Antenna located in center of the 3 Wireless NVR kit Quick installation guide round circule,signal of surrounding is much stronger,but much weaker if antenna endpoints backoff direction.according to the signal divergency characteristics of antenna,and in order to guarantee the video quality,IPC antenna should try to keep in parallel or tangent with NVR antenna. 6 HD Install Notice that the HDD had been used need supplier recommend,and need make suer already cut off the power. Install Steps: 1.Remove the screw of the dvr 2.Connect the HDD cable and power line 3.Assmble the screw,andfix the HDD in the bottom of NVR 4.Close the cover and fix it 7 Rear Panel Description 8 Turn on/off Confirm that AC voltage accessible matches withDVR.Ensure that the DVR power outlet connect with a good middle ground grounding.After switching power, the device started,【POWER】light is on.Turn into system,if the panel status light flashing,it’s normal conditions. 4 Wireless NVR kit Quick installation guide 9 NVR,IPC parameter list NVR paeameter OPerating System Embedded linux OS AV(audio/video)input Network Video 4CH Network Video input broadbank 20Mbps AV(audio/video) output 8CH HDMI input 1ch, resolution: 1024x768, 1336x768, 1440x900,1920x1080P VGA output 1ch, resolution: 1024x768, 1336x768, 1440x900,1920x1080P AV CODEC Video Resolution DI/720P/960P Specification synch-playback 4CH Video Control Video/Capture mode Maual、Time、Motion、Alarm Playback mode Real time 、Routine、Event Backup USB backup Type 1*SATA interface Max Capacity 4 TB at most for each Network Interface 1 adaptable RJ45 10M/100M, 2 WIFI interface HDD External Interface USB Interface 8CH 2 USB 2.0 Network Control Protocol UPnP (play&plug)、SMTP(email survice)、 PPPoE (dial-up)、DHCP (Automatically Obtain an Ip address),etc... Others Power DC 12V 3A Consumption(excluding HDD) 5W Working Temperature -10℃—55℃ Working Humidity 10%—90% Size 257x210x45mm Weight(excluding HDD) ≤1Kg 5 Wireless NVR kit Quick installation guide IPC Specification Operating System Embedded linux Image Sensor 1/4”Progressive Scan Sensor S/N Ratio >39.1dB Resolution 1280x720 16:9 High Defination Minimum Illumination Color:0.1 Lux B/W:0.01 Lux Lens 4mm OSD Dare Time&Title White Balance Auto Day&Night Auto/Color/BW 3D-DNR Auto Mirror/Flip On/Off Privacy Masking 4 Zone Selectable Frame Specification Three Steaming at the Same Time: H.264 128x720@30fps or below H.264 640x480@30fps or below Anti-thunder Level Standard IEC6100-4-5 Power Input DC12V-1A Consumption ≤6W Interface RJ45/WIFI 802.11b/g/n Working Temperature/Humidity -10℃ to +50℃/30% to80% RH Storage Temperature/Humidity -20℃ to +60℃/20% to90% RH Size 205(L)x70(W)X50(H)mm Weight 500g Software operation 1 add camera by matching code Steps: right click the blank of main interface -> click“System Setup”System Setup->“Channel Setup”->“Channel Setup”.Click“quick adding”,then Pop up “video manage” Two ways for Wireless NVR to add IPC “Code Add”and “Auto Add”. Adding camera by matching code,the camera transmits video images through wireless and NVR,IP is 17.20.14.X; 6 Wireless NVR kit Quick installation guide Auto adding the camera ,the camera transmits video images through the cable and NVR,IP is 172.25.123.X; Note:the camera has been matched by factory,no need to add other cameras.If you need to match one code.Firstly,take one network cable and connect any NVR lan port and power on the device to make sure there is still have any channel can add one camera. 2 Video playback Step: Right click mouse in main menu — Video playblack — choose channel NO. — choose record mode —in Search time,input beginning time and end time —click search,recording will Come out ,drag time bar —click playback to start Tips: Playback icon introduction: playback l fram previous play puse fast forward x2,x4,x8 playblack l frame next 3 Video backup Step: Right click mouse in main menu —Video backup —choose channel No.—choose record mode —in Search time ,input beginning time and end time —click serach,recording will come out —choose the cideo which need to backup —click video backup Tips: Support 32G U disk backup max ,recording will be packed every one hour 7 Wireless NVR kit Quick installation guide 4 Video detection Step 1:Right click mouse in mian menu → System setup → Record setup → choose motion → choose all →click Copy to →click OK to save setting. Step 2:Choose Video detection →set sensitivity as requirsd→choose motion→set Alarm,Bizzar or Email as required→click Copuy to→click OK to save setting . 5 Generate Esee ID Precindition to generate Esee ID is that make sure video recorder is connected with network,and IP address is available Right click mouse in main menu —System setup—Network setup If user is familiar with LAN,then no need to choose DHCP which help to get IP address automa— tically .Manually input IP address and DNS address,video recorder will generate ID by network,once generate,it will appear in menu If user not familiar with LAN,or video recorder is in independent network,can choose DHCP to get availableIP address After video recorder get IP address ,it will generate Esee ID automatically 8 Wireless NVR kit Quick installation guide 6 Access in LAN Step 1: Right click mouse in main menu — System setup —Network setup —check video recorder IP address Step 2:Access by computer in same LAN ,input video recorder IP address and prot( If prot is 80, no need to input)in IE prowser or any other browser.Then it will access LAN log in webpage,input user name and password,click log in Step 3:Once access successfully,can get video Tips: Please make sure video recorder and computer in same network segement 7 Access in WAN Step 1: Right click mouse in main menu—System setup—Network setup —check video recorder IP address Step 2: Access by computer in WAN,input www.e-seenet.com in IE browser or any other browser.Then it will access log in webpage ,input ID,user name and password,click log in Step 3: Once access successfully,can get video recorder side upload and computer side download speed,each channel need above 20KB 8 Android mobile application download and installation 9 Wireless NVR kit Quick installation guide No.1: Go to www.e-seenet.com in computer,click help — software download — find Android mobile applocation,click download to save in computer —copy to mobile to install No.2: Scan two-dimension code by mobile directly ,enter download page,click download to mobile .If mobile.If mobile do not support two-dimension scan,can input www.e-seenet.com/help/download.php in mobille browser,enter download page,click download to mobile 9 Iphone application download and installation Step 1: Go to APP store Step 2: Search Eseenet Step 3: Input APP ID passworld Step 4: Click download 10 Esee mobile application (Eseenet)-Add device Step 1: Log in Eseenet application,Click “+”icon Step 2: Enter device edit page Step 3: Input video recorder log in information Step 4: Added successfully .it will show below page Step 5: Click channel No.to get video 10 Wireless NVR kit Quick installation guide 11 Esee mobile application (Eseenet)—function Step 1: It will connect channel 1 video by default,click “+”to add more channel Step 2: Click this icon to edit video recor log in in formation Step 3: Add device group Step 4: Play/Pause Snapshot/Rerord Step 5: File management and more settings 11 Wireless NVR kit Quick installation guide 12 Wireless NVR kit Quick installation guide 13 Wireless NVR kit Quick installation guide 14