1
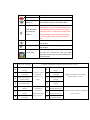
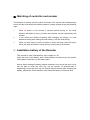
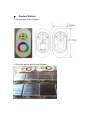
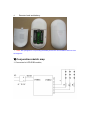
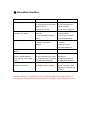
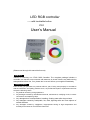
LED RGB controller
------with touchable button
V3.0
User’s Manual
(Please read through this manual before use)
Forward,
Thanks for choosing our CT302 RGB Controller. The complete package includes a
controller, one remoter, one connector with antenna, do check if there’s any defect during
transportation before use, if so, please don’t use and inform your supplier immediately.
, After-Sales,
From the day you purchase our products within a year, if being used properly in accordance
with the instruction, and quality problems occur, we provide free repair or replacement services
except the following cases:
1. Any defects caused by wrong operations..
2. Any damages caused by unauthorized removal, maintenance, modifying circuit, incorrect
connections and replacing chips.
3. Any damages due to transportation, breaking, flooding water after the purchase.
4. Any damages caused by earthquake, fire, flood, lightning strike etc force majeure of
natural disasters.
5. Any damages caused by negligence, inappropriate storing at high temperature and
humidity environment or near harmful chemicals.
6. Product has been updated.
, Safety warnings
,
1. Please don’t install this controller in lightening, intense magnetic and high-voltage
fields.
2. To reduce the risk of component damage and fire caused by short circuit, make sure
correct connection
3. Always be sure to mount this unit in an area that will allow proper ventilation to ensure
a fitting temperature.
4. Check if the voltage and power adapter suit the controller (please select DC12V
&DC24V power supply with constant voltage)
5. Don’t connect cables with power on; make sure a correct connection and no short
circuit checked with instrument before power on.
6. Please don’t open controller cover and operate if problems occur.
The manual is only suitable for this model; any update is subject to change without prior
notice.
Product Brief
CT302, a multifunctional LED controller, and which is a common RGB controller with
touchable function, using the most advanced PWM technology; It’s dedicated to control
overall RGB color changes of full color LED lights with 4-wires, 3 channels (common
anode), such as RGB LED module, LED strip, LED flexible tape, and other LED lights.
Ⅰ. Technical Specs:
Model:CT302
Input Voltage:
DC12V
Loadable Current: Max5A×3
Wireless mode
touchable/RF
Output Power:
180W
Color Modes:
15 modes
Grey Steps:
256 steps per RGB
Remoter material
ABS+PC
Remoter Size:
L113.5×W55×H21(mm)
Intensity Steps:
8 Steps
Controller size:
L85×W65×H24(mm)
Working Temp:
-35℃-55℃
Packing Size:
L120×W72×H50(mm)
Controllable
Max 20M
Gross Weight:
150g
3 pcs AAA batteries
Power Amplifier:
Compatible with our power
Distance:
Accessories:
repeater
Ⅱ. Function Instructions
Sign
Button
Description
On/Off(1)
Press Key 1 to turn on/off in any state.
light changing
Press Key 2 to activate light changing mode, a
mode(2)
new mode each press, 15 modes in total.
Press Key 3 once to activate white light mode,
color light/white
changing brightness by pressing Key 4/Key 5.
light switching
Press Key 3 twice to activate color light mode,
mode(3)
changing brightness by pressing Key 4/Key 5
or changing light color by touching the color
ring.
Intensity up(4)
Increase the brightness by every pressing,
total 8 steps.
Intensity down(5) Decrease the brightness by every pressing,
total 8 steps.
In the color lighting mode, slide your finger on
Color Ring
the color ring, choose the color you need
optionally, and the color ring is only effective for
the body finger.
1
2
3
4
5
6
7
8
Auto color changing
8 grades of brightness to adjust by pressing Key 4 or Key 5.
three colors jumps to
9
change
seven colors jumps
8 grades of speed
to change
to adjust by
three colors jumps to
pressing Key 4 or
gradual change
Key 5
seven colors jumps
red color jumps to
8 grades of
Blue color jumps to
brightness to
change
adjust by pressing
Purple color jumps
Key 4 or Key 5.
to change
11
12
to gradual change
change
10
13
14
15
Green color jumps to
change
Yellow color jumps
to change
8 grades of brightness to adjust by
Cyan color jumps to
pressing Key 4 or Key 5.
change
white color jumps to
change
Red/blue light
twinkles alternately
Green/blue light
8 grades of speed to adjust by pressing
twinkles alternately
Key 4 or Key 5.
Red/green light
twinkles alternately
Ⅲ. Matching of controller and remoter
The distance of wireless control is about 20 meters. One remoter can simultaneously
control all valid code within the effective distance, please operate as per the following
ways:
1.
2.
3.
Press 4# button on the remoter 3 seconds before turning on, the white
indicator will blinker 3 times, and then the controller can be controlled by this
remoter.
It can’t affect the finished matching after changing the battery, no need
additional setting after loading the new battery, it can be used directly.
When you don’t want to use the remoter to control the lamp, press 4# keys 3
times, the lamp will blinker 6 times quickly, clearing way is successful.
Ⅳ. Installation battery of the Remoter
This remoter is used 3 AA batteries, each voltage is 1.5V.
Open the cover of the battery; load 3 AAA batteries correctly as per the positive
and negative instructions in the battery pack.
Notice: When loading the battery, please remember not to touch the color ring or
use the palm to cover the color ring, use the remoter 10 seconds later. If
happening to touch the color ring, the remoter has no reaction after changing the
battery, please take off the batteries, and reload the battery 10 seconds later.
Ⅴ.
Product Picture
1. Remoter and sketch diagram:
2. Controller picture and Sketch Diagram:
4.
Remoter back and battery:
(※Note: We apologize for not providing the battery due to the uncontrollable cases such as
air freight etc
Ⅵ.Conjunction sketch map
1. Connected to LED RGB module;
Ⅶ. Exception Handles
Malfunction
Causation
Settle
No light
1. No power;
1. Check the power
2. The protection of the power
2. Check the fault, then
supply is active;
Incorrect color
Amplifier not in phase
No response from the remoter
power on again;
3. Wrong connection
3. Check the connection
4. Wrong connection from
4. Re-connect RGB wires
RGB wire
correspondently
5. In-phase cable connected
5. Re-connect in-phase
wrong
wires correspondently
6. Wrong battery installation;
6. Install the battery
7. Beyond controllable
distance
correctly;
7. Reduce remote
controllable distance;
Delay response from the
8. battery power is not enough;
8. Replace battery;
9. Output cable is too long
9. Reduce cable or use
remoter
Uneven intensity between
10. Wire diameter is too small
loop supply.
front and rear, with voltage
11. Overload beyond controller
10. Change wider wire
drop
or power supply capability
10. add power amplifier
Signal chaos between
12. Controlled may be
12. Clear the memory as
controller and remoter
controlled by other remoters;
the No. 3 and No.1(See
Matching of controller and
remoter)
Friendly reminding:The effective power of switching mode power supply is 80%, the
actual power should be more than actual load of LED lights, usually at least 20% more.