1
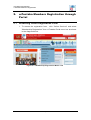
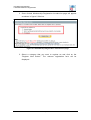
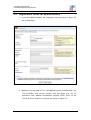
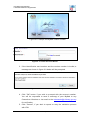
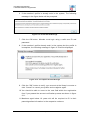
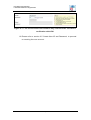
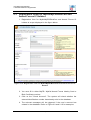
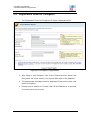
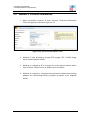
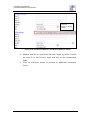
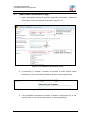
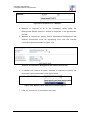
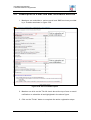
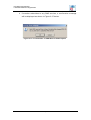
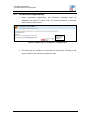
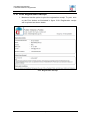
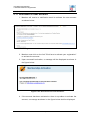
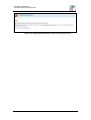
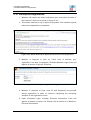
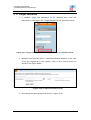
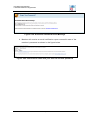
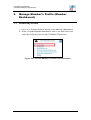
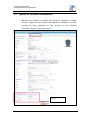
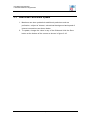
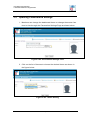
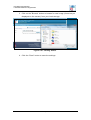
CHAPTER 2
u-PUSTAKA Member Registration
In this chapter you will learn how to register as u-Pustaka member
and Online Membership through u-Pustaka Portal and also learn how
to manage your profile through u-Pustaka Dashboard and InterLending Member Management module.
CONTENT
Introduction
2–1
u-Pustaka Member’s Registration through Portal
2–2
Manage Member’s Profile (Member’s Dashboard)
2 – 23
u-Pustaka User Manual
u-Pustaka Member Registration
1.
Introduction
There are two types of u-Pustaka membership:
u-Pustaka
u-Pustaka Members are entitled to all the services
Members
and benefits offered by u-Library. This includes all
online services as well as borrowing of books
from the Libraries (Inter-Lending Services).
Online Membership
Online membership is open to all who are
interested in knowledge acquisition and lifelong
learning. Users who have successfully registered
as an online member can enjoy the online
services provided by the u- Pustaka.
Chapter 2
1
u-Pustaka User Manual
u-Pustaka Member Registration
2.
u-Pustaka Members Registration through
Portal
2.1
Accessing Online Registration Form
1. To access the registration form , click “Online Services" and select
"Membership Registration" from u-Pustaka Portal menu bar as shown
in the diagram below.
Figure 2.1: Membership Registration Menu Link
Chapter 2
2
u-Pustaka User Manual
u-Pustaka Member Registration
2. Once clicked, Membership Registration Introduction page will appear
as shown in figure 2.2 below.
Figure 2.2: Membership Registration Introduction page
3. Select a category that you want to register as and click on the
“Register Now button”. The relevent registration form will be
displayed.
Chapter 2
3
u-Pustaka User Manual
u-Pustaka Member Registration
2.2
Registration Forms for MyKad Holders
1. If you are a MyKad holder, the registration form as shown in figure 2.5
will be displayed.
Figure 2.5: Registration Form for MyKad holders
2. Members are required to fill in valid MyKad number without dash (e.g.
771212135003) and version number with two digits (e.g. 01) for
verification with Jabatan Pendaftaran Negara (JPN). Click on the
“Check Account” button to verify as per shown in figure 2.7.
Chapter 2
4
u-Pustaka User Manual
u-Pustaka Member Registration
Figure 2.6: Sample for MyKad version number
Figure 2.7: Check Account Button
3. If the identification card number and the version number is invalid, a
message as shown in figure 2.8 below will be prompted.
Figure 2.8: JPN Verification Failed Message.
4. Click "OK" button if you wish to proceed with the account creation.
You will be requested to send a softcopy of your MyKad to any
Consortium Libraries or via email to the [email protected]
for verification.
5. Click "Cancel", if you wish to repeat or retry the validation process
with JPN.
Chapter 2
5
u-Pustaka User Manual
u-Pustaka Member Registration
6. If the member’s profile is already exist in the system, The following
message in the figure below will be prompted.
Figure 2.9: Profile Exist Message.
7. Click the OK button. Member must login using a valid user ID and
password.
8. If the member’s profile already exist in the system but the profile is
incomplete, the following message in figure 2.10 will be displayed.
Figure 2.10: Incomplete Profile Message
9. Click the "OK" button to verify your account at the library’s counter or
click “Cancel" to cancel your profile and re-register again.
10. You should be able to move to the next field within the registration
form if you passed the account verification process as shown in figure
2.11.
11. Members aged below 18 years old will be required to fill in their
parents/gurdian information in the respective columns.
Chapter 2
6
u-Pustaka User Manual
u-Pustaka Member Registration
Figure 2.11: The screen shows the member may continue after successful
verification with JPN
12. Please refer to section 2.5 Create User ID and Password, to proceed
on creating the user account.
Chapter 2
7
u-Pustaka User Manual
u-Pustaka Member Registration
2.3
Registration forms for MyKid/MyPR/BirthCert and
Amred Forces IC Holders
1. Registration form for MyKid/MyPR/BirthCert and Armed Forces IC
holders is as per displayed in the figure below.
Figure 2.12: Registration Form for MyKid/MyPR/BirthCerth and Armed Forces IC
Holders
2. You must fill in either MyPR / MyKid/ Armed Forces Identity Card or
Birth Certificate number.
3. Click on the "Check Account". The system will check whether the
entered identification number has already exist in the database.
4. The relevant messages will be triggered if the user’s account has
existed in the database. Refer to Figure 2.9 and 2.10 for examples.
Chapter 2
8
u-Pustaka User Manual
u-Pustaka Member Registration
5. Please refer to Section 2.5 Create User ID and Password, to proceed
on creating the user account.
Chapter 2
9
u-Pustaka User Manual
u-Pustaka Member Registration
2.4
Registration forms for Foreigners
1. The Registration Form for Foreginers is as per displayed below.
Figure 2.13: Foreigners’ Registration
2. After filling in your Passport, click on the "Check Account" button and
the system will check wether your account has exist in the database.
3. The appropriate messages shall be displayed if the account has exist
and/or incomplete.
4. Please refer to Section 2.5 Create User ID and Password, to proceed
on creating the user account.
Chapter 2
10
u-Pustaka User Manual
u-Pustaka Member Registration
2.5
Create User ID and Password
1. In Select User ID and Password” section, member is allowed to enter
his/her preferred User ID and Password.
Figure 2.14: Enter Prefered User ID and Password
2. User ID can comprise of letters (a-z) and number (0-9) of maximum
10 characters length, e.g. mohamad78
3. User Password must be alphanumeric and comprises minimum of 8
characters and maximum of 16 characters, e.g. 1MalaySia.
4. Click the "Check Availability" to check the User ID availability. If User
ID is available, message will appear as shown in the following figure.
Figure 2.15: Message shows the user ID can be used
If the ID has been used by other member, the following message in
figure 2.16 will appear.
Figure 2.16: Message shows ID is used by other member
5. Member
is
required
to
tick
on
the
check
box
under
the
DECLARATION to indicate that he/she accepts the u-Pustaka terms
and conditions.
Chapter 2
11
u-Pustaka User Manual
u-Pustaka Member Registration
Figure 2.17: Declaration Statement
6. Click "Register" button to create the a User Account.
7. Upon successful creation of the user account, message will appear as
shown in figure 2.18.
Figure 2.18: Successfull Creation of User Account Message
8. Email that also contains a link to the member’s account will be sent to
allow member to sign-in back to his/her profile in case of unexpected
termination during completion of the registration forms by the
member. Please refer to Section 2.12, Incomplete Registration.
Chapter 2
12
u-Pustaka User Manual
u-Pustaka Member Registration
2.6
Member’s Personal Information
1. Upon successful creation of User Account, Personal Information
Form will appear as shown in figure 2.19.
Figure 2.19: Personal Information Form
2. Member is only allowed to upload JPG images, GIF or PNG image
which sized less than 64KB.
3. Member is required to fill in at least one of the phone number either
Home Phone, Office Phone or Mobile Phone Number.
4. Member is required to complete the permanent address and mailing
address for interlending delivery purpose as shown in the diagram
below.
Chapter 2
13
u-Pustaka User Manual
u-Pustaka Member Registration
Tick
to
copy
Permanent
Address to Mailing
Address
Figure 2.20: Permanent Address and Mailing Address Fields
5. Member must fill in a valid Postcode with 5 digits, eg 93350. System
will auto fill in the Country, State and City to the coresponding
fields.
6. Click on "Continue" button to proceed to Additional Information
Forms.
Chapter 2
14
u-Pustaka User Manual
u-Pustaka Member Registration
2.7
Additional Information Page
1. Upon successful saving of member personal information, Additional
Information Form will appear as shown in figure 2.21.
Figure 2.21: Additional Information Form
2. If profession is “Others”, member is required to enter his/her exact
profession in the text field provided as shown in the image below.
Figure 2.22: Profession is “Others”
3. If the profession selected is student, member is required to fill in the
school name in the text field as shown in the image below.
Chapter 2
15
u-Pustaka User Manual
u-Pustaka Member Registration
Figure 2.23: Profession is "Student"
4. Member is required to fill in the mandatory fields under the
Employment Details section if he/she is employed in the government
service.
5. Member is required to specify his/her Educational Background and
Internet Connection such as registering from and the internet
connection speed as shown in figure 2.24.
Figure 2.24: Education Background and Internet Connection
6. If member has internet at home, member is required to specify the
connection speed as shown in the figure below.
Figure 2.25: Specify Home Internet Connection Speed
7. Click on "Continue" to proceed to next step.
Chapter 2
16
u-Pustaka User Manual
u-Pustaka Member Registration
2.8
Subscription to e-mail and SMS notification services
1. Members can subcribe to various email and SMS services provided
by u- Pustaka as shown in figure 2.26.
Figure 2.26: Services Subscription
2. Member can click on the Tick All check box at the top of sms or email
notification to subscribe all as highlighted in the above figure.
3. Click on the "Finish" button to complete the entire registration steps.
Chapter 2
17
u-Pustaka User Manual
u-Pustaka Member Registration
4. If member subscribes to any SMS services, a confirmation message
will be displayed as shown in Figure 2.27 below.
Figure 2.27: Confirmation on SMS Service Subscription
Chapter 2
18
u-Pustaka User Manual
u-Pustaka Member Registration
2.9
Successful Registration
1. Upon successful registration, the following message shall be
displayed as shown in figure 2.28. An email notification to activate
User Account will be sent.
Click to print
registration
receipt
Figure 2:28 Message on Completion of Registration
2. The final step for member is to activate the account by clicking on the
link provided in the account activation email.
Chapter 2
19
u-Pustaka User Manual
u-Pustaka Member Registration
2.10 Print Registration Receipt
1. Members has the option to print the registration receipt. To print, click
on the Print button as illustrated in figure 2.28. Registration receipt
will be printed as shown below.
2:30: Registration Receipt
Chapter 2
20
u-Pustaka User Manual
u-Pustaka Member Registration
2.11 Activation of User Account
1. Member will receive a notification email to activate the user account
as shown below.
Figure 2.31: Notification E-mail to activate account
2. Member must click on the link "Click here to activate your registration"
to activate the account.
3. Upon successful activation, a message will be displayed as shown in
the figure below.
Figure 2:32: Successful Account Activation
4. If the account has been activated or there is a problem to activate the
account, a message as shown in the figure below shall be displayed.
Chapter 2
21
u-Pustaka User Manual
u-Pustaka Member Registration
Figure 2:33: Message Notification Failed to Activate Account
Chapter 2
22
u-Pustaka User Manual
u-Pustaka Member Registration
2.12 Incomplete Registration
1. Member will receive an email notification upon successful creation of
the member’s account as shown in figure 2.34.
2. This allows member to log in again to the profile if the session expired
before the registration is completed.
Figure 2.34: Email Notification Upon Sucessful Account Registration
3. Member is required to click on "Click here to activate your
registration” link and Incomplete u-Pustaka Member Login Form will
appear as shown in figure 2.35 below.
Figure 2:35: Incomplete Registration Login Form
4. Member is required to enter User ID and Password as provided
during registration in order to continue completing the remaining
sections of the registration forms.
5. Upon successful login, member Personal Information Form will
appear as shown in figure 2.19. Please refer to section 2.6, Member’s
Personal Information.
Chapter 2
23
u-Pustaka User Manual
u-Pustaka Member Registration
6. If the member has already completed the registration, a message as
shown below will be displayed.
Figure 2:36: Message For Completed Registration
Chapter 2
24
u-Pustaka User Manual
u-Pustaka Member Registration
2.13 Forgot Password
1. If member forgot the password or ID, member may reset the
password by clicking on the "Forgot Password" link as shown below.
Figure 2:37: Forgot Password link on the Home screen of u-Pustaka Portal
2. Member must provide either a valid Identification Number or the user
ID as per registered in the system. Click on the submit button as
shown in the figure below.
Figure 2:38: Forgot Password Form
3. A message will be displayed as shown in figure 2.39.
Chapter 2
25
u-Pustaka User Manual
u-Pustaka Member Registration
Figure 2:39: Sucessful Password Reset Message
4. Member will receive an email notification upon successful reset of the
member’s password as shown in the figure below.
Figure 2:40: Notification email with your User ID and new password
Chapter 2
26
u-Pustaka User Manual
u-Pustaka Member Registration
3.
Manage Member’s Profile (Member
Dashboard)
3.1
Access My Profile
1. Log in to u- Pustaka Portal to access to the Member’s Dashboard
2. At the u-Pustaka Member Dashboard, click on the Edit Profile link
under My Profile link from the MY TRANSACTIONS menu.
Figure 2:41: Access Member’s Profile From Dashboard
Chapter 2
27
u-Pustaka User Manual
u-Pustaka Member Registration
3.2
Update of Personal Information
1. Members are allowed to update their personal information, upload
pictures, update phone numbers and addresses. Members can also
change the login password of their account at the Personal
Information Page as as shown below.
Enter fields to change
password
Figure 2:42: Personal Information Page
Chapter 2
28
u-Pustaka User Manual
u-Pustaka Member Registration
3.3
Additional Particulars Update
1. Members can also update their additional particulars such as
profession, subject of interest, educational background and speed of
Internet connections as shown below.
2. To update, change the value in any of the fields and click the Save
button at the bottom of the screen as shown in figure 2.43.
Chapter 2
29
u-Pustaka User Manual
u-Pustaka Member Registration
Figure 2:43: Additional Particulars Form
Chapter 2
30
u-Pustaka User Manual
u-Pustaka Member Registration
3.4
Updating the SMS or Email Notification Service
Subscription
1. Members can choose to subscribe or unsubscribe to any notification
services that u-Pustaka provided via the Service Subscription Page
shown below.
Figure 2:44: Services Subscription Form
Chapter 2
31
u-Pustaka User Manual
u-Pustaka Member Registration
3.5
Updating Personalized Settings
1. Members can change the dashboard theme or change the avatar from
time to time through the Personalise Settings Page as shown below.
Figure 2:45: Personalise Settings form
2. Click on the list of themes to choose the desired theme as shown in
the figure below.
Figure 2:46: Theme Setting
Chapter 2
32
u-Pustaka User Manual
u-Pustaka Member Registration
3. Click on the "Browse" button to browse for new image (format as per
displayed on the screen) from your local storage.
Figure 2:47: Setting Avatar
4. Click the "Save" button to save the settings.
Chapter 2
33