1
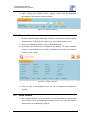
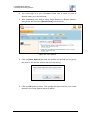
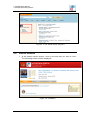
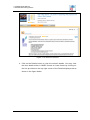
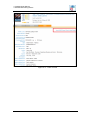
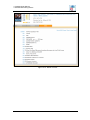
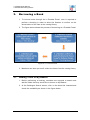
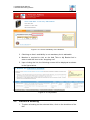
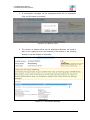
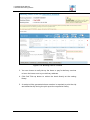
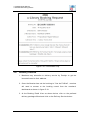
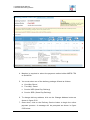
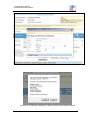
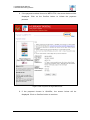
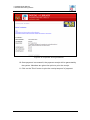
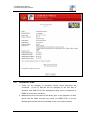
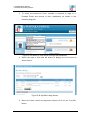
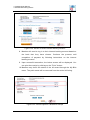
CHAPTER 5
Interlending Service- Borrowing
In this chapter you will learn how to perform catalogue search, make
bookings and arrange for pick up service through online payment.
CONTENT
Introduction
5–1
Catalogue Search
5–2
Borrowing book from u-Pustaka
5 – 10
u- Pustaka User Manual
u-Pustaka Borrowing Books
1.
Introduction
Inter-lending is a service that is extended by Consortium libraries to
u-Pustaka members who can borrow books in the lending
collection. Members can perform online bookings where they may
opt to self-collect the items or have it sent to their doorsteps via
delivery service that can be subscribed through online payment
using MEPS FPX or Quick2Go cards.
BAB 5
1
u- Pustaka User Manual
u-Pustaka Borrowing Books
2.
Catalogue Search
Catalogue Search is a library collection search engine that integrates
with Malaysia’s National Union Catalogue or Katalog Induk Kebangsaan
(KIK) as its source of catalogues. It allows everyone to search for titles
from all the u-Pustaka participating libraries. In addition, it provides the
item(s) availability information for these titles for u-Pustaka members to
reference especially when they would like to borrow using the u-Pustaka
Inter-Lending service
Two types of searches can be performed via the Catalogue Search
namely the Quick Search and Browse Search. Only u-Pustaka member
can perform a save on the search.
2.1
Quick Search
1. Quick Search can be performed based on “Tittle”, "Author", "Item",
"publisher", "ISBN", "ISSN", "Year" or "Any" search criteria . Please
refer to Figure 5.2 below.
Figure 5.1: Quick Search
2. Member is required to enter the search item in the text field provided
and select any of the search criteria listed under the dropdown list
before clicking on the Search button.
3. Click on the check boxes under the Specific Search if you wish to
search from specific libraries.
BAB 5
2
u- Pustaka User Manual
u-Pustaka Borrowing Books
4. Upon clicking the Search button, search results will be displayed
according to the search criteria entered.
Figure 5.3: Specific Search
2.2
Browse Search
1. Browse Search allows searching of library collections using a subject
selected from a list of given subjects as the search access point
2. From the Catalogue Seach, click on Browse Search.
3. By default, all libraries are included in the search. To restrict search
to one or few libraries only, check on checkbox for library you want to
include in the search.
Figure 5.4: Search Screen
4. Click on one of the subjects from the list of subjects to submit the
search.
2.3
Save Search
1. Save Search allows you to save any search value that has been used
for a search. Thus, eliminating the need for you to re-type the search
values when re-submitting a search
BAB 5
3
u- Pustaka User Manual
u-Pustaka Borrowing Books
2. You must sign in to the u-Pustaka Portal first in order to save a
search under your user account.
3. After submitting your search using Quick Search or Browse Search,
the system will show the [Save Search] link as below:
Figure 5.5: Save Search
4. Click on [Save Search] link and the system will prompt you to give a
title term to the current search that you are saving.
Figure 5.6: Insert Title
5. Click on OK button to save. The system will save and list your saved
search in the Save Search panel as below.
BAB 5
4
u- Pustaka User Manual
u-Pustaka Borrowing Books
Figure 5.7: The Saved Search Keyword
2.4
Search Results
1. At the search results screen, click on the title that you wish to view.
The following screen will be displayed.
Figure 5.8: Availability
BAB 5
5
u- Pustaka User Manual
u-Pustaka Borrowing Books
2. Click on the link 'Check availability', and the system will display the
availability status of the item from the owning library as shown in the
figure below.
Figure 5.9: Check Availability
3. To see the electronic review on the selected title, click on the EReview button. The following screen shall be displayed.
BAB 5
6
u- Pustaka User Manual
u-Pustaka Borrowing Books
Figure 5.10: Electronic Review
4. Click on the Details button to view the record’s details. You may view
the item details either in MARC format or linear format by clicking on
the link provided on the top right corner of the Details display area as
shown in the figure below.
BAB 5
7
u- Pustaka User Manual
u-Pustaka Borrowing Books
Figure 5.11: Linear Format
BAB 5
8
u- Pustaka User Manual
u-Pustaka Borrowing Books
Figure 5.12: MARC Format
BAB 5
9
u- Pustaka User Manual
u-Pustaka Borrowing Books
3.
Borrowing a Book
1. To borrow books through the u-Pustaka Portal, user is required to
perform a booking in order to allow the librarian to confirm on the
actual status of the item at the owning library.
2. The figure below shows the process of borrowing at u-Pustaka Portal:
Figure 5.13: Loan Process
3. Members can also opt to self collect the items from the owning library.
3.1
Adding Titles to My Basket
1. Before performing a booking, members are required to search and
add the tittles that they would like to borrow to My Basket.
2. At the Catalogue Search screen, click on the book title intended and
check the availability as shown in the figure below.
BAB 5
10
u- Pustaka User Manual
u-Pustaka Borrowing Books
Figure 5.14: Check Availability of the Material
3. Checking an item’s availability is not mandatory but is advisable.
4. Member is required to click on the Add Tittle to My Basket link in
order to add the item to the “shopping cart”
5. Upon clicking the link, the following screen will be displayed as shown
in the figure below.
Figure 5.15: My Basket
3.2
Perform a Booking
1. To place a booking on the selected titles, click on the checkbox of the
title.
BAB 5
11
u- Pustaka User Manual
u-Pustaka Borrowing Books
2. A confirmation message as per displayed below will be displayed.
Click on OK button to proceed.
Figure 5.16: Book a Tittle
3. The screen as shown below will be displayed. Member will need to
wait for the response from the librarian on the status of the booking
whether it can be fulfilled or otherwise.
Figure 5.17: Successful Booking
BAB 5
12
u- Pustaka User Manual
u-Pustaka Borrowing Books
3.3
Confirmation of Booking
1. Upon confirmation by the the librarian, an email notification will be
sent to the user and the can fulfill record will be displayed at the
Notification area of the member’s dashboard.
Figure 5.18: Notification book is available
2. Click on the link as shown above. The following screen will be
displayed.
BAB 5
13
u- Pustaka User Manual
u-Pustaka Borrowing Books
Figure 5.19: Booking Can be Fulfilled
3. You can choose to self pick-up the items or pay for delivery services
to have the items sent to your delivery address.
4. Click Self Pick-up button to collect the book directly at the owning
library.
5. A receipt will be generated where member is required to print the slip
and show the slip during the pick-up at the respective library.
BAB 5
14
u- Pustaka User Manual
u-Pustaka Borrowing Books
Figure 5.21: Confirmation Slip
3.4
Delivery Service
1. Members may subscribe to delivery service by PosLaju to get the
items delivered to their address.
2. Once the librarian has set the booking to “Can be Fulfilled” , member
will need to access to the booking record from the member’s
dashboard as shown in figure 5.18.
3. At the Booking Detail View as shown below, click on the prefered
delivery package offered and click on the Delivery Service button.
BAB 5
15
u- Pustaka User Manual
u-Pustaka Borrowing Books
Figure 5.22: Notification of the Book is Available
4. Member is required to select the payment method either MEPS FPX
or Quick2Go.
5. You must select one of the delivery package offered as follows:
a. One Way Parcel
b. Two Way Parcel
c. Courier NDD (Next Day Delivery)
d. Courier SDD (Same Day Delivery)
6. To change delivery address, click on the Change Address button as
shown in figure 5.22.
7. Once done, click on the Delivery Service button to begin the online
payment process. A message will be prompted as shown in figure
5.25 below.
BAB 5
16
u- Pustaka User Manual
u-Pustaka Borrowing Books
Figure 5.24: Change Address
Figure 5.25: Confirmation Message on Delivery and Payment Mode Selected
BAB 5
17
u- Pustaka User Manual
u-Pustaka Borrowing Books
8. If the payment method chosen is MEPS FPX, the screen below will be
displayed. Click on the Confirm button to initiate the payment
process.
Figure 5.26: Payment through MEPS FPX
9. If the payment chosen is Quik2Go, the screen below will be
displayed. Click on Confirm button to continue.
BAB 5
18
u- Pustaka User Manual
u-Pustaka Borrowing Books
Figure 5.27: Payments Through Quik2Go
10. Once payment is successful, the payment receipt will be generated by
the system. Members are given the option to print the receipt.
11. Click on the "Print" button to print the receipt as proof of payment.
BAB 5
19
u- Pustaka User Manual
u-Pustaka Borrowing Books
Figure 5.28: Receipt of Payment
3.5
Overdue Fines
1. Fines will be charged to members whose items borrowed are
overdued.
A fine of RM1.00 will be charged on the first day of
overdue, and RM0.10 for the subsequent days up to a maximum of
RM20 for each item overdued.
2. Materials must be returned to the library prior to the payment of fines
which can be made through the portal via MEPS FPX or at the
Multipurpose Kiosks that are available at the consortium libraries.
BAB 5
20
u- Pustaka User Manual
u-Pustaka Borrowing Books
3. To check the amount of fines, member is required to login to uPustaka Portal and access to their dashboard, as shown in the
following diagram:
Figure 5.29: Menu to view the bill through the dashboard
4. Select the type of bills and bill status to display the bill record as
shown below.
Figure 5.30: My Bills Listing Screen
5. Select the fines record and payment method. Click on the "Pay Bill"
button
BAB 5
21
u- Pustaka User Manual
u-Pustaka Borrowing Books
6. You will be prompted with payment details as shown in the screen
below. Continue payment as per instructions given on the screen.
7. Member is required to select the bank as shown in figure 5:32.
Figure 5.31: Payment of fines through the MEPS FPX
BAB 5
22
u- Pustaka User Manual
u-Pustaka Borrowing Books
Figure 5:32: Screen to Select Internet Banking Account
8. Member will need to log in to their internet banking account based on
the bank that they have chosen. Continue the process until
completion of payment by following instructions on the internet
banking screens.
9. Upon sucessful transaction, the below screen will be displayed. You
can print the receipt by clicking on the "Print" button.
10. Member may check the status of the bil record through the My Bills
menu. The paid record will be removed from the active bill lisitng.
Figure 5:33: Online Payment Transaction Receipt
BAB 5
23