1
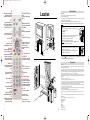
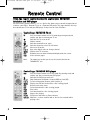
3573160A00 DHD4000 CVR2.qxd
11/02/2004
09:59
Page 1
Model
Contents
DHD 4000
T H O M S O N S a l e s U K L td
1
Introduction
19
Archiving Recordings
2
Safety Information
20
Buffering
3
Accessories
20
Changing your PIN
3
Remote Control Handset
21
Tuning your DVR
5
Connections
21
Favourite Channels
8
Basic Operation
22
Features Setup
Language selection
TV setup options
Other features
Turning on and off and changing channels
3 0 To w e r Vi e w - K i n g s H i l l
9
We s t M a l l i n g - K e n t M E 1 9 4 N Q
Using the Menus
England
10
Using the Quick Guide
25
Channel Listings
h t t p : / / w w w. t h o m s o n - e u r o p e . c o m
11
Using the 7-Day TV Guide
26
Troubleshooting
12
Making recordings
14
Using the Calendar
15
Working with Timers
Adding a new timer recording event manually
Removing a timer recording event
User Manual
16
Record History
Watching recordings
Deleting recordings
Searching for a scene within a recording
18
Technical information menu
Factory reset
Reception problems
General problems
29
Technical Specifications
29
Messages
29
Upgrading your DVR
30
Extra Information
Rear panel connections
Front panel indicators and buttons
Special remote control features
Making Space
Scheduling recordings for deletion
Reducing the size of a stored recording
31
Index
Dealer's address
DHD 4000
You can contact THOMSON by dialing : 01788 541970
(All calls are charged at Standard Rates)
3573160A00 © Copyright THOMSON 2003
i
STB
Sets the remote control unit to STB
mode and turns your DVR On,
enabling you to control your DVR.
DVD / TV
Sets the remote control unit to
DVD or TV mode, enabling you to
control some functions of your
Thomson DVD player or TV set.
09:59
Page 2
Turns your DVR (or TV/DVD) On
and Off.
Press twice for Thomson system
power Off.
c
MENU
Displays the DVR main menu.
EXIT
Removes menu or other
information displayed on screen.
ARROW KEYS
Move the select box around the
menus to highlight the option
you want.
Also allows viewing of schedule
information, use Up/Down to
choose the programme and
Left/Right to choose the time.
NUMBER KEYS
For selecting channel numbers
or entering information into
menus.
AV
Press to watch analogue
pictures from your TV set.
REV
Fast backward search.
PLAY
Play at normal speed.
REC
To make an instant recording
of the current channel.
REPLAY
To jump back 30 seconds in
the TV programme being watched.
LIVE
Immediately return to real time
if you have been watching
a time shifted programme.
Safety information
Mains connection
This receiver is suitable for use on A.C. mains supply, 220-240 V - 50 Hz only.
It must not be connected to D.C. mains.
Note: The mains lead of the receiver is fitted with a moulded plug. If the mains sockets are not compatible or if for any reason
the plug is removed please follow the directions below.
The moulded plug cannot be rewired and if removed must be disposed of safely. Remove the fuse to make it safer.
Do NOT under any circumstances plug the severed plug into any mains socket as this could result in an electric shock.
PR
Adjusts the current TV channel.
If favourites are programmed this
order is followed.
a
Turn on/off sound.
Location
B
GUIDE
Displays the TV programme guides.
Adjusts the TV sound level.
(Only on a Thomson TV set)
ii
11/02/2004
OK
Chooses the option you have
highlighted or confirms your
choice. Also activates
Quickfind for fast channel
selection.
TEXT
Enter / Exit teletext services.
Important!
If the plug is removed, rewire new plug as follows: The wires in the mains plug are coloured in
accordance with the following code:
BLUE - NEUTRAL
BROWN - LIVE
As the colours of the wires in the mains lead of this apparatus may not correspond with the
coloured markings identifying the terminals in your plug, proceed as follows:
BLUE wire to the terminal coded N (Neutral) or coloured black.
BROWN wire to the terminal coded L (Live) or coloured red.
Do NOT make any connection to the terminal in the plug which is marked by the letter E
or by the safety symbol l or coloured green and yellow.
7 cm
E
3A
L
N
BLUE
BROWN
T
I
G
L
I
D
10 cm
A
A fused plug must be fitted with a 3A fuse approved by ASTA or BSI to BS 1362 and fuse
covers must always be securely replaced.
If the fuse blows, check the mains cable for damage or call a qualified technician. Do not
try to bridge the fuse or increase its rating!
10 cm
3573160A00 DHD4000 CVR2.qxd
10 cm
COLOURED KEYS
Use to select the corresponding
colour option shown on screen.
!
3A
3A
The OFF button B on the remote control and the receiver does not completely disconnect the unit from the
mains supply, but switches operating power on and off.
Your guarantee
WIDE
Choose viewing mode for
widescreen programmes.
FWD
Fast forward search.
STOP
Stop recording or playback.
Dear Customer,
PAUSE / FRAME ADVANCE
Pause playback, or instant pause
for a live broadcast. 30 minutes
of time shifted recording available,
press PLAY to resume watching.
This guarantee does not apply to any of the following:
1. Damage caused by accidents including, but not limited to, lightning, fire, water;
2. Transport costs between the home and place of service and other costs and risks of transport relating directly or indirectly to this guarantee;
3. Damage to the product resulting from neglect, misuse, including but not limited to, failure to use, repair and/or install the product for its
normal domestic purposes and/or in accordance with the operating instructions on its proper installation and use;
4. Modifications, adaptations and alterations of the product to operate in a country other than that for which it was originally designed and
manufactured, or any damage resulting from such modifications;
These statements do not affect your statutory rights as a consumer under applicable national legislation in force, nor your consumer’s rights against
the dealer from whom you bought the product.
If you need service, whether or not under guarantee, please approach the dealer who sold you the product.
Thank you for purchasing this THOMSON product and for your confidence in our company. This product meets applicable safety requirements and has
undergone stringent testing during manufacture.
However, should there occur a defect, the product or its defective part(s) (excluding accessories and consumables) will be repaired free of charge
(labor and parts) or, at THOMSON discretion, exchanged for a similar item, provided that it has been returned within 12 (twelve) months from
the date of original purchase (date of receipt), is defective in materials and/or workmanship and has been bought in any of the following
countries: F, I, E, P, GB, IRL, D, CH, A, B, L, NL (Territory) or in a Duty-free shop in the named countries.
This guarantee will be granted only upon presentation of the original invoice or cash receipt, indicating the date of purchase and dealer’s name. The
benefits of this guarantee may be refused if the invoice, cash receipt or guarantee card has been altered in any way, deleted or made illegible after the
original purchase.
SUBTITLES
Turns on/off digital subtitles.
:
In your own interest we advise you to read the instruction booklet for your THOMSON product carefully before contacting your dealer or service
center.
Jump forwards to the
next scene in a recording.
9
Jump backwards to the
previous scene in a recording.
If you need service while in a country (within the named Territory) other than the one where you bought your product, please contact the nearest
THOMSON InfoCenter.
iii
Should you have any questions which your dealer is unable to answer, please contact:
THOMSON InfoCenter (UK,IRL)
THOMSON Sales UK Ltd.,
30 Tower View
Kings Hill
West Malling
Kent ME19 4NQ
tel. 44 (0) 173 252 0920
fax. 44 (0) 173 252 0921
http://www.thomson-europe.com
3573160A00 DHD4000 UM2.qxd
09/02/2004
13:16
Page 1
Getting started
Introduction
Congratulations on your choice of this state-of-the-art Free to View Digital Video
Recorder (DVR). We hope you will enjoy all the new features this technology brings to
your home for many years. Your DVR is going to revolutionise the way you watch TV.
You can interrupt the programme you are watching, for example while you answer
the phone (maximum pause time is 30mins) and then resume watching where you left
off. You can also pause two different channels at the same time (recording
permitting). Delayed viewing, fast-forward and rewind functions allow you to play
and replay the most interesting sequences without having to worry about the rest of
the programme which is still being recorded. These features could make you lose track
of time, but fortunately the L I V E key brings you back to the present instantly. You
can also go back to delayed viewing with the R E V key, as easily as if you were
rewinding a video cassette. As soon as you start watching TV, your DVR automatically
records everything you watch. It saves the last 30 minutes of the channel currently
being watched until it is switched off by pressing the B key.
Your dealer should have checked your postcode for reception, but the availability
of Digital Signals does depend on the transmitter(s) available to your receiving aerial.
If you have any doubt about this availability, please contact your dealer, or try one of
the following :• Text your postcode to 83331 (standard rates apply)
• Visit the websites www.freeview.co.uk or www.dtg.org.uk/consumer
• Call FREEVIEW on 08708 809980
If you experience reception problems, check page 27 for some suggestions
or contact our aerial helpline on 0800 5428265
L NupOdTaEtes: oTvheristhperoadiur.cTthise ambalenutfoacetvuorlevre,reasseravecsonthseeqruigehntcetoitpbroenceeefidtstofraonmy ssooffttwwaarree
update that it would consider appropriate in order to improve the functionality of
the product, without degrading the quality level. See page 29 for details.
1
3573160A00 DHD4000 UM2.qxd
09/02/2004
13:16
Page 2
Getting started
Safety information
In order that you may enjoy this product for a long time it is important that you
observe the following points when installing and operating your receiver
● This receiver is intended for the reception of TV picture and sound signals. Any
other application is expressly prohibited.
● Avoid the long-term display of static images, e.g. menus or audio only channels.
Use the Radio Blanking feature (see Features Setup on page 23)
● Do not expose the receiver to any moisture. The receiver is intended for use in dry
rooms. If you wish to operate it in the open air, make absolutely sure that it is
protected against moisture (rain, splashes, etc.).
● Do not place any object filled with water (vases or similar) on the receiver.
● Place the receiver on a flat and hard surface. Do not place any objects (e.g.
newspapers) on or under the receiver.
● If placed in an enclosed unit, the all-round distance between the receiver and the
sides of the unit must be at least 10cm. Do not allow the vent slots in the sides or
underneath to become obstructed.
● Do not place the receiver in the immediate vicinity of a heat source or in direct
sunlight as this would prevent appropriate cooling.
● During a thunderstorm it is recommended that you disconnect the receiver from
the mains and aerial to prevent damage from lightning strikes.
● Never open the receiver as this will invalidate your guarantee.
● Do not dispose of used batteries in normal waste. Please dispose of them at
appropriate collection points.
● If you are not using the receiver for a long time (e.g. Holidays), please switch it off
at the mains. This saves energy. Note that any software upgrades take place at
night.
● This product has been constructed with the environment in mind. There is a
minimum of plastic parts and the packaging is largely made from recycled paper.
It is also disassembly-friendly allowing for easy recycling at the end of its life.
CLEANING - Dust will collect on the unit and can be removed with dry clean cloth.
Do not spray any substance on the unit.
2
3573160A00 DHD4000 UM2.qxd
09/02/2004
13:16
Page 3
Getting started
Accessories
Y
User Manual
Quick Guide
Guarantee cards
Coaxial lead
2 x AAA
Batteries
Z
[
Mains
Lead
Scart lead
Remote
Control
Remote Control
Inserting the batteries
u
v
w
Insert the batteries into the handset. Check they are the right way around
(see picture). Point the remote control at the DVR and press the S T B button.
L
If you have a Thomson TV or DVD player, you can operate some of the
features of your TV/DVD by pointing the handset at the TV/DVD and
pressing the T V or D V D button. The handset will then work the TV or DVD
until you press the S T B button again.
Important information regarding the batteries
Do not mix different types of batteries or new and old batteries. Do not use rechargeable
batteries. Do not throw batteries into a fire, do not recharge them. Remove the batteries from
the remote control if you are not going to use it for several weeks. Immediately remove any
leaking batteries. Take care in doing this, as leaking batteries may cause burns to the skin or
other physical injury.
•
Please respect the environment and prevailing regulations. Before
you dispose of batteries ask your dealer whether they are subject to
special recycling and if they accept them back.
3
3573160A00 DHD4000 UM2.qxd
09/02/2004
13:17
Page 4
Getting Started
Remote Control
Using the remote control handset to control your THOMSON
television and DVD player
The DVR remote control handset is a 3 in 1 device that allows you to control the operation of
3 devices: your DVR, a Thomson TV set or a Thomson DVD player. This page describes the keys
that control your TV set and your DVD player if they have the same functions.
Controlling a THOMSON TV set
TV
B
a
c
PR +/AV
0 to 9
MENU
EXIT
TEXT
Note:
Sets the remote control unit in TV mode (by pressing once) and
enables you then to control your TV set.
Switches the TV set on or off
Volume control.
Switches sound off or on again.
Switches channel or selects an AV socket.
Selects an AV socket.
Keys enter digital values or change channel.
Displays main TV set menu.
Removes menu or other information displayed on the screen.
Access teletext pages.
The colour keys enable you to use the teletext function on
THOMSON TV sets.
Controlling a THOMSON DVD player
DVD
B
PR +/0 to 9
MENU
EXIT
REV
PLAY
FWD
STOP
PAUSE
REPLAY
4
Sets the remote control unit in DVD mode (by pressing once) and
enables you then to control your DVD player.
Switches the DVD player on or off
Skips forward or backward a chapter (DVD) or track (CD).
To enter information (chapter, track number,...).
Displays the DVD disc menu while a disc is being played.
Return to the main menu.
Fast backward whilst a disc is being played.
Plays a disc.
Fast forward whilst a disc is being played.
Stops a disc playing.
Still picture and frame by frame advance.
Skip back - to have another look at the last few seconds whilst
playing a disc.
3573160A00 DHD4000 UM2.qxd
09/02/2004
13:17
Page 5
Getting started
Connections
How to connect the aerial and scart cables
L
R E M E M B E R S A F E T Y F I R S T - A L W A Y S U N P L U G A L L YO U R E Q U I P M E N T F R O M
THE MAINS BEFORE MAKING CONNECTIONS
TV
Aerial
TV
OUT
AV1
EXT1
AUX1
VCR
AV1
EXT1
AUX1
IN
Aerial Leads
Scart Leads
u
w
v
OUT
VCR
Phono Leads
TV
Optical Lead
HI FI
IN
AUX
VIDEO
EXT
AUX IN
L
x
DIGITAL IN
R
Follow the steps below referring to the numbered parts on page 3 and the diagram above:X Unplug the antenna cable from your VCR and plug it into the A e r i a l I n socket of your DVR.
Y Using the long coaxial cable supplied, link the R F O u t socket on your DVR to the A e r i a l I n
socket of your VCR. Your DVR should now be linked first to your aerial, then to your VCR
and finally the VCR to the TV.
Z Using the scart lead supplied, link the T V S C A R T socket on your DVR to the
A V 1 / E X T 1 / A U X 1 socket of your TV.
[ Finally, connect the mains lead to the M a i n s I n p u t socket on your DVR and turn on your
TV.
After a few seconds, the lights on the front will come on and a menu will
appear on the TV screen. Please follow the on screen instructions
carefully and press O K when you are ready.
The DVR will now tune in all your available digital TV stations.
N O T E : The 7 day programme guide will not have information
immediately as this has to be received overnight.
5
3573160A00 DHD4000 UM2.qxd
09/02/2004
13:17
Page 6
Getting started
More Connections
The diagram on page 5 shows a connection method that includes a VCR and a Hi-Fi or
AV-Amplifier with an optical input.
The supplied connections allow rapid connections to the TV only, in order to get you going as
quickly as possible. But should you wish to adopt the more advanced connections shown in the
diagrams on page 7, please purchase additional leads as explained below.
1 - Archiving off the DVR onto a VCR or other recorder.
Use a scart lead to link the V C R S C A R T socket on your DVR to the
A V 1 / E X T 1 / A U X 1 socket of your VCR. This connection will allow you to
archive to a permanent media. If your VCR supports auto-start recording,
then the DVR will control the VCR automatically.
2 - Connection to a Hi-Fi system.
Use a pair of stereo coaxial phono leads to connect the L / R A U D I O O U T
socket on your DVR to the L / R A U D I O IN on your Hi-Fi unit. This will allow
you to hear higher quality sound through your Hi-Fi.
N O T E : Audio sockets are generally identified by colour. White for Left and Red for Right.
3 - Coaxial or Optical connection to an Audio Visual Amplifier.
To get even better sound from your DVR, use a digital audio phono lead to
connect from the D I G I T A L A U D I O O U T socket on your DVR to the
D I G I T A L A U D I O IN on your AV amplifier.
For the very best sound connection, use an optical “Toslink” cable to
connect from the D I G I T A L A U D I O O U T socket on your DVR to the
D I G I T A L A U D I O IN on your AV amplifier.
N O T E : In most cases these two types of connection give similar results; the only difference
lies in the type of cable being used. The coaxial cable is the cheaper of the two, but can suffer
from external interference from other household devices. The optical lead does not suffer from
this type of problem.
4 - S-Video connection to a TV, Plasma Display or Projector
The scart connection to a TV provides the best picture as RGB
(Red,Green,Blue separately), but some types of display device don’t have a
scart socket. In this case, either an adaptor should be purchased, or connect
an S-Video lead from the S - V I D E O O U T on your DVR to the
S - V I D E O I N on your TV, Plasma display or projector. This will also give a
high quality picture, but you must make a separate audio connection, as
the cable doesn’t carry sound.
6
3573160A00 DHD4000 UM2.qxd
09/02/2004
13:17
Page 7
Getting started
Advanced connections
Connections for a DVD & VCR with a TV with only one scart socket or one
RGB scart socket. VCR must have 2 sockets with RGB pass through.
TV
Aerial
TV
DVD
Aerial Leads
SCART
AV
EXT
AUX
OUT
VCR
Scart Leads
IN
Phono Leads
AV2
EXT2
DECODER
AV1
EXT1
AUX1
Optical Lead
VCR
OUT
TV
IN
AUX
VIDEO
EXT
AUX IN
L
DIGITAL IN
NOTE:
1. The PVR and the VCR must be in standby to
watch the DVD.
2. If your TV has 2 scart sockets with RGB input,
connect your DVD player directly to your TV.
R
AV AMPLIFIER
Connections for a DVD & VCR with a Plasma (or projector) display.
Digital audio connections are not required, but give the best result.
PLASMA DISPLAY
TV
Aerial
OUT
DVD
S-VIDEO
VCR
AV1
EXT1
AUX1
S-VIDEO
RGB IN
S-VIDEO
R
G
B
CVBS
Aerial Leads
Scart/SVHS Leads
IN
Phono Leads
Optical Lead
OUT
TV
IN
AUX
VIDEO
EXT
AUX IN
L
VCR
DIGITAL IN
R
AV AMPLIFIER
7
3573160A00 DHD4000 UM2.qxd
09/02/2004
13:17
Page 8
Getting started
Basic Operation
N T : Before you go any further, are you watching a digital TV picture?
L CREHMECEKDYPO: ICheck
that your TV aerial is plugged into the DVR A e r i a l I n and press the
O K button again. This will make the DVR try tuning again. If it fails again, you will
probably need to improve your aerial, please refer to the troubleshooting section on
page 26.
Turning On and Off
To turn on your DVR, press any number key, the S T B key or the
B key. The red standby indicator light will go green.
To turn off your DVR, press the B key. The standby light will turn
red again.
The DVR should be left in standby if you want to keep the
programme guide updated, but if you are not going to use the
DVR for long periods of time you should unplug it to save energy.
Changing channels
To change channel you press the P R + or P R - buttons. This will
step through the channel list one at a time.
You can also set a favourite channel list which will allow you to
skip between the channels you watch most often. How to set up
this list is explained on page 21.
Note that the channel numbers are not continuous. These are set
by the broadcaster and cannot be changed.
If you wish to search for your channel by name, use Quickfind.
1. Press the O K button.
2. Use the arrow keys to move the highlight around the
programme names, until the channel you wish to watch is
highlighted. (Only some channels are shown inside the box,
keep moving left or right to find the rest.) If favourite
channels are set, only those chosen will appear in the box.
3. Press the O K button again to change the channel.
If you know the channel number you are looking for, enter this
using the number keys. With digital TV there can be up to 3 digits
in the number.
A banner with information about the programme currently
showing will appear briefly each time the channel changes. For
more details on getting programme information, see page 10
Teletext and interactive services
If your chosen channel has Teletext (MHEG) features press the T E X T or coloured keys to access
them. To return to normal viewing press T E X T again. Some services offer interactive features,
details of these and how to use them will appear on screen as they occur.
8
3573160A00 DHD4000 UM2.qxd
09/02/2004
13:17
Page 9
Using your DVR
Using the Menus
To set up and work the other facilities of your DVR you will
need to get used to operating the menus.
Throughout this book, we will use B O L D text when referring to
remote control button presses, and I T A L I C text when referring
to a particular menu level.
You will be using the remote control buttons highlighted and
the coloured keys, take a moment to find them now.
To use these menus, you must first press the M E N U key
which will then display the main menu.
Now choose the item (called a sub menu) that you want
to look at.
You do this by using the U P arrow (U
U ), to move the
yellow box up the list and the D O W N arrow (V
V ) to move
it down the list.
Once you have highlighted your choice with the yellow
box, press the O K button to move to the new menu level.
If the DVR states that a PIN number is required (Personal
Identification Number), enter this now.
The default number is 0 0 0 0 you can find how to change this on
page 20.
As you learn to use the DVR you will find that the number buttons
can take you directly to sub menus without the need for using the
arrow buttons. e.g. Use 5 for the fifth item (s e t u p), 1 for the first
item (favourites), etc.
In each menu, look at the bottom lines of text for more
information on which buttons to press. This could be arrow
buttons (Y
Y or Z ) or the coloured buttons.
Finally, when you have finished making adjustments, use the
E X I T button to return to the TV picture.
You may need to press it more than once, depending on the
menu item.
L
9
3573160A00 DHD4000 UM2.qxd
09/02/2004
13:17
Page 10
Using your DVR
Using the Quick Guide
When you are watching TV you can find out what else is on other channels without interrupting
your viewing using the TV Quick Guide. This is the small banner that appears at the bottom of
the screen during channel changes or when you press an arrow key.
Shows the
current time
and date
Shows the
channel
name
Shows the
programme
duration
Shows the
programme
name and
start time
Shows short
details of the
programme
The box shows the channel condition:Green - Current, Yellow - Paused, Red - Recording
To change the view to show different times during the day use the
left and right arrows.
To see what’s on another channel use the up and down arrows.
If you see a programme you want to watch, press O K .
If the programme is on now the DVR will change to it immediately. If it is on later, the DVR will
automatically set a programme reminder for you.
L
10
N O T E : The 7 day programme guide receives it’s information overnight (about 3am) so if you
switch your DVR off overnight the Quick Guide will only show what is on Now or Next. We
recommend that you leave the DVR in standby overnight.
3573160A00 DHD4000 UM2.qxd
09/02/2004
13:17
Page 11
Using your DVR
Using the 7-Day TV Guide
Your DVR has a built in 7-Day programme guide which gives you a fast way of planning your
viewing and recording. To access this guide, press the G U I D E button.
The programme guide has two different formats. These display programmes by time for a
specified channel (as above left) or by channel for a specified time (as above right).
Press the G R E E N button to change between the two different modes.
Use the up and down arrows to move the box up and down the
programme list.
Use the left and right arrows to change the time you are looking
at or the channel you are looking through.
If you wish to limit the number of channels shown in the guide,
press the Y E L L O W button. This will then only show the channels
you have chosen as favourites. See page 21 for details on
favourites. Press Y E L L O W again to restore the full list.
When looking through the listings, the small picture does not change allowing you to continue
watching the current programme. If you wish to have a preview of a channel that you have
selected in the guide, press the P U R P L E button. Press E X I T to return to the current channel.
When you highlight a programme, after a few moments a description of the programme will
appear in the synopsis box to give you some idea of what the programme is about.
Once you have found a programme you wish to see, if it is on now press the O K button and
the DVR will change to the new channel immediately.
If you wish to be reminded about the programme later on, press the B L U E button. To cancel
the reminder, press the B L U E button again. Just before the programme starts, a message will
appear on the screen asking if you wish to view the programme, press G R E E N to confirm.
If you wish to record the programme, press the R E D button. The details of the recording will be
passed onto the recordings manager. See page 12 for details on recordings.
L
N O T E : Some programmes are marked in the guides with different coloured boxes. Red shows
a channel being recorded, Green shows the channel you are currently watching and Yellow
shows that a channel has been paused (see buffering on page 20).
11
3573160A00 DHD4000 UM2.qxd
09/02/2004
13:17
Page 12
Using your DVR
Making recordings
Your DVR has the ability to record two different programmes at the same time, whilst playing
back a third! To organise this and ensure you are not disappointed, the DVR has a recording list
that allows you to see what is going to be recorded. It also checks for programme clashes and
that there is enough room on the hard disc to record the programmes.
Making a recording from the 7-day programme guide
The following example shows how to add a programme to the record list using the calendar and
the 7-day guide.
1. Press M E N U , then 2 to display the calendar.
(See page 14 for more details on the
calendar function.)
2. Use the Y / Z keys to select the day of the
programme you wish to record. Note you
can only select white days. If there are no
white days, leave your DVR on overnight to
receive the listings.
3. Press O K to display the programme guide
for the day you have chosen.
N O T E : You can also open the programme guide
by simply pressing the G U I D E button while
watching TV. This will select today and now as
the starting point.
4. Using the arrow keys, select the programme
you wish to record. (See page 11 for details
on using the 7-day programme guide).
3. Press the R E D key. The menu opposite will
appear.
4. If you wish to change the start and finish
times suggested by the guide, then
i) Use the Y / Z keys to select the start or
end times.
ii) Use V / U to adjust the time, note you
can only make the recording longer.
12
3573160A00 DHD4000 UM2.qxd
09/02/2004
13:17
Page 13
Using your DVR
Making recordings cont’d
5. When you are happy with the times, press
the G R E E N key to add the new item to the
record list. (See opposite)
6. Press E X I T to return to the programme
guide.
7. Repeat steps 2 to 6 above until you have
scheduled all your desired recordings.
8. Press E X I T to return to TV viewing.
To view your recordings see the Record History
section on page 16.
If there is a programme clash or there is
insufficient space to complete a recording, a
warning message will be displayed. Adjust the
start/end times accordingly as in step 4 above,
or exit this menu and make space on the DVR to
allow more recording to take place. See page 18
for details on making space.
N O T E : You can also make an instant recording
by simply pressing the R E C button while watching TV. This will automatically take you to step 4
with the current programme selected for recording. On completion of the timer setting, the
recording will start immediately.
Notes on making recordings
•
•
•
•
•
L
•
The bar across the bottom of the recording list (see picture above) indicates how much space
is available on the hard disk. The dark blue part shows space that is occupied, the yellow part
shows space that has been reserved by a timer event and the light blue part shows how much
free space you have left.
When the hard disk is getting full you can delete, compress or archive recordings to tape. See
pages 16, 18 and 19 for details.
When two timer events are happening at the same time, if you try to change channel you will
see a warning message that the recording will be terminated. You can choose to cancel the
recording to make the channel change by pressing R E D .
You can view a stored recording or playback a VCR tape even if both timers are operating.
When recordings are happening a red light will illuminate on the front of the DVR and the
programme details in the programme guides will be marked with a red box.
As the TV guide is downloaded during the night, there is a chance that a timer recording may
interfere with this process. If this is likely, a warning message will appear. If you choose to
continue the recording, you will only lose one day’s information from the guide.
13
3573160A00 DHD4000 UM2.qxd
09/02/2004
13:17
Page 14
Using your DVR
Using the Calendar
Your DVR has a personal calendar that allows
you to manage your diary. You can view TV
recording events, enter birthdays, anniversaries
and appointments. At the appropriate times,
your DVR will display an on screen message to
remind you. The days covered by the 7-day
guide are shown in white. When you select a
day and press O K , you will see the programme
info for that day, if available, in the guide.
To view the calendar, press the M E N U button, and press 2 , to
select the calendar function.
• Use the R E D and G R E E N keys to move backwards and
forwards through the calendar a month at a time.
• Use the arrow keys to select a day in the month.
• Press the Y E L L O W key at any time to return to Today.
Any record events or reminders are shown on the calendar as coloured dots. A red dot
signifies recording events have been set and a blue dot signifies a reminder is set. Record
events are managed automatically in the calendar by the recording menus. See page 12.
To enter the reminder menu, press the B L U E key.
To edit an existing reminder for the chosen day press G R E E N .
If no reminders have been set, then enter a new reminder as below, else press Y E L L O W first.
1. Now choose the type of reminder using V / U , Yearly, Monthly, Weekly, Daily or single.
2. Enter a time using the number keys, 0 . . 9 . (24hr clock)
3. Now enter your message. This works the same way as a mobile phone text message by
using the number keys 2 to 9 (note the letters above each
handset key, e.g. press key 4 twice to get ‘H’).
Each time you pause the cursor will move on a step.
• To change caps press the Y E L L O W key.
• To delete a selected letter press the R E D key.
• To enter a space press the 0 key.
• To enter punctuation, press the 1 key.
• To enter numbers, press the appropriate key repeatedly.
• To move backwards and forwards in the text use Y / Z .
4. Once you are happy with the reminder text, press the O K key to store the text or B L U E
to cancel the whole reminder.
5. Press E X I T to return to the TV picture.
At the appropriate time, the text of your reminder will appear on the TV screen.
Press O K to clear the message off the calender or G R E E N to snooze the reminder for a short
time.
14
3573160A00 DHD4000 UM2.qxd
09/02/2004
13:17
Page 15
Using your DVR
Working with Timers
Adding a new timer recording event manually
1. Press M E N U then 3 to display the record
list.
2. Press the O K key to start entering a new
event.
3. Use the arrow keys, Y / Z , to choose the
programme that you wish to record.
4. Press V , then use the number keys, 0 . . 9 ,
to enter the programme name using the
same method as on page 14, step 3.
5. Press V , then use the arrow keys, Y / Z ,
to enter the date of the recording.
6. Press V , then use the arrow keys, Y / Z ,
to enter the start time for the recording.
7. Press V , then use the the arrow keys, Y / Z , to enter the stop time or duration of the
recording.
8. When all the details are correct, press the G R E E N key to save the event to the list.
9. Verify that the programme times are correct and that there is sufficient space. You have a
second chance to modify the start and end times if required.
10. Press the G R E E N key to add the programme to the record list.
11. Press E X I T to return to TV viewing.
L
If a mistake is made whilst setting a timer event, an error message will be displayed. This may
be because you have tried to set too many events to record at the same time or there is an error
in the times that you have chosen. There may simply not be enough space to fit the recording.
Use the arrow keys to correct the mistake or press E X I T to cancel the event.
Removing or changing a timer recording event
To
1.
2.
3.
4.
remove a previously stored event:Press M E N U then 3 to display the record list.
Use the arrow keys, U / V , to select the recording timer you wish to change/remove.
Press the R E D key. This will move the item into the top window.
If you wish to correct the times use the arrows keys as before. Then to add it back to the
record list press G R E E N .
5. If you wish to remove the timer event, skip step 4 above.
6. Press E X I T to return to TV viewing. The timer event is now changed/removed.
15
3573160A00 DHD4000 UM2.qxd
09/02/2004
13:17
Page 16
Using your DVR
Record History
With about 20 hours worth of recording space available, it is possible to record many
programmes. The record history shows a list of all your recordings and allows you to decide
what to do with them. You can watch them, delete them, or save them to tape (archiving).
Watching recordings
1. Open the record history menu by pressing M E N U then 4 .
Shows short details
of the recording
Shows scenes of the
recording. These allow you
to search through a
recording to watch certain
parts. A Snapshot is
normally taken every 5
minutes whilst recording.
Shows the list of
programmes that
you have recorded.
2. Since it takes time to retrieve the pictures of the scenes you may wish to skip this stage.
Press R E D to skip the process or G R E E N to get the pictures.
3. Use the arrow keys, U / V , to select the recording you wish to view.
4. To view the recording from the start press the O K key.
Once playback has started you can use the handset to control playback.
- Resume playback
- Fast backwards search
- Fast forwards search
- Pause playback
- Stop playback and return to history
- Jump backwards a scene
- Jump forwards a scene
O K - Create a new scene bookmark
Deleting recordings
When you have finished watching your programme, press S T O P to return to the record history
then follow the instructions below from step 3. Alternatively,
1. Open the record history menu by pressing M E N U then 4 .
2. Use the arrow keys, U / V , to select the recording you wish to delete.
3. Press the R E D key, then press the G R E E N key.
4. Press O K . The recording will be deleted immediately and the space made available for
recording again.
16
3573160A00 DHD4000 UM2.qxd
09/02/2004
13:17
Page 17
Using your DVR
Record History
Searching for a scene within a recording
Once you have selected the recording you wish to watch, you have the option to search through
the programme to find the ‘scene’ that you wish to view from. This is a kind of visual bookmark.
1. Use the arrow keys, Y / Z , to select the scene from which you wish to view. The length of
the programme is represented by the bar under the windows. If no bar is present then only
4 scene bookmarks are available. As you move through the bookmarks, the bar will move
giving you an indication where you are in the recording.
2. To view the recording from the selected scene press the O K key.
3. If you wish to delete the scene bookmark from the recording, press the R E D key, then press
the Y E L L O W key to delete the scene.
17
3573160A00 DHD4000 UM2.qxd
09/02/2004
13:17
Page 18
Using your DVR
Making Space
As the hard disc begins to fill up, you will need to make space in order to keep recording. You
can do this in a number of ways. Either reduce the size of the recording, or schedule it for
deletion or archiving later on.
Scheduling recordings for deletion
1. Open the schedules menu by pressing M E N U then 4 ., then B L U E
2. Use the arrow keys, U / V , to select the recording you wish to schedule.
3. Press the R E D key to schedule the recording to be deleted. ‘ [ d ] ’ will appear.
The recording is not deleted immediately, it is kept until the DVR needs room to make a new
recording, then deleted. You stop it being deleted by pressing the R E D key again.
N o t e : If you want to delete a recording immediately, see page 16.
Reducing the size of a stored recording
1. Open the schedules menu by pressing M E N U then 4 , then B L U E .
2. Use the arrow keys, U / V , to select the recording you wish to schedule.
3. Press the P U R P L E key to select ‘ [ l p ] ’ to allow the DVR to compress the recording to
make extra space. This will reduce the picture quality of the recording.
You can reduce the size of a recording made in ‘ s p ’ mode but this is a one-way process; once
compressed, the recording cannot be decompressed. You can cancel compression so long as the
brackets [ ] are still showing.
‘ s p ’ - High Quality, Largest space requirement. ~2Gb used per hour. (Max. 20hrs)
‘ l p ’ - Low Quality, Small space requirement. ~1.5Gb used per hour. (Max. 26hrs)
These times are only intended as a rough guide, as the actual space required varies with the
type of programme recorded. e.g. A soap can take less room than a football match over the
same time period. This ‘bitrate’ is determined by the TV broadcasters.
18
3573160A00 DHD4000 UM2.qxd
09/02/2004
13:17
Page 19
Using your DVR
Archiving Recordings
If you want to permanently save a recording, you can schedule it to be played out and recorded
on a VCR or another device connected to the VCR scart socket.
To archive recordings
1. Open the schedules menu by pressing
M E N U then 4 ., then B L U E
2. Use the arrow keys, U / V , to select the
recording you wish to archive.
3. Press the B L U E key to schedule the
recording for archiving; ‘ [ a ] ’ will appear.
4. Press the G R E E N key to select a r c h i v e
t i m e.
5. Use the arrow keys, Y / Z , to select the
date for the next archiving playout.
6. Use the arrow keys, U / V , to select
time.
7. Use Y / Z , to select the time for the next
archiving playout.
6. Press G R E E N to store the archiving event
or R E D to cancel.
L
N o t e : If your VCR or other recorder, supports automatic start, then at the archive time the
DVR will start the recorder. If not, you MUST set the timer in your VCR to start at the a r c h i v e
t i m e and run for the total length of all the recordings you have scheduled for playout.
The DVR will then playout all the recordings that you have scheduled, in the order you chose.
You can playout archive recordings whenever you like, but remember that you won’t be able to
view anything else on your TV. Recording events are unaffected.
19
3573160A00 DHD4000 UM2.qxd
09/02/2004
13:17
Page 20
Using your DVR
Buffering
When you are watching TV, the DVR automatically ‘buffers’ up to 30 minutes of the channel
you are currently watching. This provides for the ‘Live Pause’ features. As the DVR contains two
tuners, when there is no timer recording event set, the second tuner can be tuned to another
station and allow you to ‘buffer’ two channels at once.
1. Press P A U S E and the current programme will
stop. The bar shows how far behind Live TV
you are.
2. Choose another channel to watch. Use any of
the guides if you wish.
3. Press P A U S E to stop the new selection.
If you press 0 , the DVR will automatically ‘swap’
to the other channel and resume playback.
If you press 0 again, the DVR will place the
current ‘buffered’ channel back on pause and
‘swap’ to the other one, and so on.
You can use all the functions for rewind (R
R E V ), fast forward (FF W D ) and slow on either
channel.
When you want to return to live TV again, press the L I V E key.
If you wish to jump back 30 seconds in the programme press the R E P L AY button.
L
N o t e : You can also use this ‘swap’ feature with recordings. Simply place the current channel
on P A U S E then select a recording to watch (see page 16). Now you can ‘swap’ between the two
‘buffered’ TV channels and the recording.
Changing your PIN
Certain features of the DVR require the entry of a Personal Identification Number (PIN). The
default number for this is 0 0 0 0 . It is highly recommended that you change this number. To do
this follow the steps below.
1. Open the s e t p i n menu by pressing M E N U
then 5 , then 5 .
2. Use the number keys to enter the current
PIN.
3. Now, use the number keys to enter a new
PIN.
4. Finally, Confirm the new PIN by entering it
again.
Keep your PIN secret, but don’t lose it!
20
3573160A00 DHD4000 UM2.qxd
09/02/2004
13:17
Page 21
Setting up
Tuning your DVR
When you first plugged in your DVR, it will have tuned in all the available services
automatically. However, should you move house or wish to tune in new services as they appear
you may need to tune new services in again.
1. Make sure that all the connections have been
made as in the diagram on page 5.
2. Open the s c a n f o r c h a n n e l s menu by
pressing M E N U then 5 , then 8 .
3. Press the G R E E N key to start tuning.
The DVR will now tune in all the available services
for your area. All the channels will be stored in the
numerical order specified by the various
broadcasters. If the tuning process does not find
any channels, or only a few, you may need to
upgrade your TV aerial. Refer to troubleshooting on page 26.
4. Press the G R E E N key to start watching Digital TV.
Favourite Channels
After tuning, all the Free-to-View channels are automatically added to the favourites list. This
list determines the order in which channels are selected when pressing the P R + / P R - keys. In
the example below, when watching ITV1, pressing P R + would select BBC TWO.
You can change this list to your own viewing requirements. Channels included as favourites
have a tick in the check box.
1. Open the s e l e c t f a v o u r i t e s menu by
pressing M E N U then 5 , then 1 .
2. Use the arrow keys, U / V , to choose a
channel.
3. Press O K to change the check mark next to
the chosen channel. 9 = Favourite
4. Press B L U E to reorder the chosen channel.
5. Use the arrow keys, U / V , to choose the
new position for the chosen channel.
6. Press the B L U E key again to store the
channel in its new location.
7. Repeat steps 2 to 6 until the list is as required, then press E X I T .
If you wish to add all the channels to your favourite list press the G R E E N key.
To remove all the channels from the favourite list press the Y E L L O W key.
The channel order is now also reflected in the Quick and Programme Guides.
21
3573160A00 DHD4000 UM2.qxd
09/02/2004
13:17
Page 22
Setting up
Features Setup
Your DVR has many features that you can configure for your particular requirements. The
following pages will explain the various features and how to use them. The factory default
settings are shown underlined.
Language selection
1. Open the languages menu by pressing
M E N U then 5 and then 2 .
2. Use the arrow keys, U / V , to select
subtitle language or audio language
3. Use the arrow keys, Y / Z , to choose from
english, welsh or gaelic.
4. Repeat steps 2 and 3 for subtitles. Default
setting is on.
5. Press E X I T to return to TV viewing.
TV setup options
1. Open the tv setup menu by pressing
M E N U then 5 and then 4 .
2. Use the arrow keys, U / V , to select p i c t u r e
f o r m a t.
3. Use the arrow keys, Y / Z , to choose from
4:3 letterbox (black bars top and bottom),
4:3 Centre Cut-Out (full screen, but lost
picture on left and right),, 4:3 Full Screen (if
your 4:3 TV supports 16:9 switching, check
your TV manual) or 16:9 Widescreen (for
widescreen TVs).
4. Use the arrow keys, U / V , to select s c a r t
5. Use the arrow keys, Y / Z , to choose from RGB (for best pictures) or PAL for all other types.
See you TV manual for the best choice, it usually depends on which socket you connect to.
See page 24 for details on rf modulator adjustment.
22
3573160A00 DHD4000 UM2.qxd
09/02/2004
13:17
Page 23
Setting up
Features Setup
Other features
1. Open the features menu by pressing
M E N U then 5 and then 3 .
2. Use the arrow keys, U / V , to select s l e e p
timer
3. Use the arrow keys, Y / Z , to choose how
long the DVR will remain active before
automatically switching to standby.
4. Use the arrow keys, U / V , to select c h i l d
lock
5. Use the arrow keys, Y / Z , to choose on or
off. When the child lock is switched on, a pin
number will be requested before allowing a TV picture to be viewed, and will also not allow
access to some menu items.
6. Use the arrow keys, U / V , to select interactivity (MHEG)
7. Use the arrow keys, Y / Z , to turn this off if you do not wish the interactive (MHEG)
services to appear. The default setting is on.
8. Use the arrow keys, U / V , to select radio blanking
9. Use the arrow keys, Y / Z , to choose off (the radio channel splash/interactive screens are
displayed), Immediate (blank the screen immediately) or after 30 seconds (blank the screen
after 30 seconds). The screen blanking facility is useful to prevent the stationary splash
screens from causing permanent damage to Plasma or projection type displays.
10. Use the arrow keys, U / V , to select plasma blanking
11. Use the arrow keys, Y / Z , to choose off or a time before the menu will dim. The plasma
blanking facility should be used to prevent the stationary menu screens from causing
permanent damage to Plasma or projection type displays.
12. Use the arrow keys, U / V , to select front panel
13. Use the arrow keys, Y / Z , to choose Normal (the blue oval of lights is fully illuminated),
reduced (less lights are used in the display), off (the lights are switched off)
23
3573160A00 DHD4000 UM2.qxd
09/02/2004
13:17
Page 24
Setting up
Setting the RF Modulator
Your DVR is equipped with an RF (aerial) modulator. This feature allows you to watch pictures
on a TV set when only connected via the aerial lead. This can be useful if you wish to send
digital pictures to more than one TV in your house. Using the example method below, you can
also view the VCR on the 3 TVs; check the manual of your VCR for details on its RF modulator.
L
N o t e : It is strongly recommended that the
main TV is connected using the scart lead
provided as this will provide the best
possible pictures. These instructions assume
you are connected to the main TV with a
scart lead.
1. Open the r f m o d u l a t o r menu by
pressing M E N U then 5 , then 4 .
2. Make sure that all the aerial
connections have been made as in the
diagram below. You will need an aerial
distribution amplifier (splitter), this can
be purchased at most good dealers or DIY stores. Make sure you use good quality, double
screened coax aerial cables. (e.g. CT100)
TV
Aerial
TV KITCHEN
TV MAIN
OUT
IN
SPLITTER
TV BEDROOM
OUT
VCR
IN
OUT
IN
3. Referring to your TV user manual, tune your TVs into channel 22 (default) for the DVR.
4. If this picture is snowy or disrupted, you may need to change the modulator channel.
5. Use the arrow keys, U / V , to select rf modulator, then use Y / Z , to adjust the channel
number. Finally, retune the TV again.
6. Repeat steps 3 and 4 until you have clear pictures on all your TV sets.
7. If you do not wish to use the rf modulator then choose off.
8. Press E X I T to return to TV viewing.
24
3573160A00 DHD4000 UM2.qxd
09/02/2004
13:17
Page 25
Setting Up
Channel Listings
Below is a list of all the programmes you can currently receive through Freeview. Please note
that this list changes all the time as broadcasters add or change services. You should regularly
perform a re-tune (as explained on page 21) to keep up to date will all the services being
transmitted. Make changes to the table below for your own reference.
TV Stations
Radio Stations
1
2
3
4
70
71
72
73
74
75
76
77
78
79
80
81
82
83
84
85
86
87
88
89
5
6
7
8
9
10
11
12
13
16
18
19
20
21
23
24
BBC ONE
BBC TWO
ITV 1 / GMTV
Channel 4
S4C Digidol (Wales only)
five
ITV 2 / GMTV2
BBC THREE
Tele G (Scotland only)
Channel 4 (Wales only)
Teletext
BBC FOUR
Sky Travel
UK History
S4C~2 (Wales only)
QVC (Not available in Wales)
The Hits!
UK BrightIdeas
f tn
TMF The Music Factory
bid-up.tv / screenshop
price-drop.tv
30 CBBC
31 CBeebies
40
41
42
43
45
46
BBC News 24
ITV News Channel
Sky News
Sky Sports News
BBC Parliament
Community Channel
50
51
53
54
55
Four Text
BBCi
F2P Games
Teletext TV Guide
Teletext Holidays
BBC Radio 1
1Xtra BBC
BBC Radio 2
BBC Radio 3
BBC Radio 4
BBC Radio 5 Live
BBC Five Live Sports Extra
BBC 6 Music
BBC 7
BBC Asian Network
BBC World Service
The Hits Radio
Smash Hits!
Kiss 100
Heat Radio
Magic Radio
Q Radio
Oneword
Jazz FM
BBC Radio Scotland (Scotland only)
BBC Radio Wales (Wales only)
BBC Radio Ulster (Northern Ireland only)
90 BBC Radio Cymru (Wales only)
BBC Radio nan Gaidheal (Scotland only)
BBC Radio Foyle (Northern Ireland only)
91 Mojo Radio
92 Kerrang!
25
3573160A00 DHD4000 UM2.qxd
09/02/2004
13:18
Page 26
Setting up
Troubleshooting
Technical Information Menu
To assist in locating any problems you may experience, your DVR includes a Technical
Information menu that shows details such as software versions and signal strengths. For good
quality reception the quality bars should be green. For acceptable reception (some picture
disturbance may be experienced) the bars will be yellow. If the bars are red then the picture will
be unwatchable, and you should improve the signal to the DVR. The power bars show how much
signal is present at the tuner. Again, green is best, yellow is just acceptable and red is too poor
for digital reception. Adjust your aerial until all the bars are green.
1. Open the technical information menu by pressing M E N U then the R E D key.
2. Select the tuner that you wish to view by pressing the U / V arrows.
3. To change the service channel number, press the Y / Z arrows.
Factory Reset
If you ever need to return the unit to its original “out of box” condition, press the Y E L L O W key.
Then press G R E E N when prompted, or R E D if you have second thoughts.
Be very careful with this feature as it will clear out any old programmes, favourite lists and all
other adjustments that you have made.
Software Restore
If you should ever wish to return to an older version of software after a software upgrade, press
the B L U E key. Then press G R E E N when prompted, or R E D if you have second thoughts.
26
3573160A00 DHD4000 UM2.qxd
09/02/2004
13:18
Page 27
Setting up
Troubleshooting
Reception Problems
When you purchased your DVR, your dealer should have checked your postcode to ensure that
you can receive Digital TV. If you wish to check this yourself, please look on the internet
websites:- www.freeview.co.uk or www.dtg.org.uk/consumer.
Once you have established that your area should be able to receive digital TV, there are a few
reasons why you may be experiencing problems.
•
Your current aerial and cabling may not be able to receive all the digital channels
due to its age and condition. Now is the time to renew them. Thomson
recommends the use of CAI “Benchmarked” aerials. Look for the logo.
Always use good quality, double screened aerial cable. e.g. CT100 coaxial cable.
•
In your location the digital channels may be transmitted on different frequencies to your
existing analogue signals and you may need a different type of aerial to receive them.
Check the ‘group’ of your aerial, you may need a ‘wideband’ one.
•
The new digital channels may be transmitted from a new transmitter and if this is the case
the aerial would have to be re-aligned. Alternatively, add a second aerial to your system.
•
If you need to use a mast-head amplifier, make sure that it is a digitally compatible one and
that it is a close to the aerial as possible.
•
In some blocks of flats, filters may be in use that will interfere with digital signals. Consult
with your landlord if you have difficulties.
•
Indoor or window mounted aerials are not recommended, except in areas where the signal
is extremely strong.
•
Your aerial could be too high. Try adjusting the height of the aerial to avoid picking up
unwanted signals from other transmitters.
•
If you live near a road, the passing traffic may cause problems. Try pointing the aerial at an
upward angle over the road, this helps reduce engine interference picked up by the aerial.
•
If you get periodic picture losses, this could be due to electrical interference picked up in
your house. This could be from a central heating thermostat, a fridge/freezer, or any other
item with a motor. Try switching these appliances off temporarily to establish what is
causing the problem. Then replace the problem item.
•
If your aerial comes into your room via an aerial connection point (socket), replace it with
a good quality shielded one. This will help prevent electrical noise entering your aerial.
If you are still having difficulties, contact our Aerial Helpline on 0800 5428265.
27
3573160A00 DHD4000 UM2.qxd
09/02/2004
13:18
Page 28
Setting up
Troubleshooting
Not every picture or sound problem is caused by a defect in your DVR. Leads having been
accidentally pulled out or worn out batteries in the remote control can also cause impairment.
If your unit does something unexpected while you are using it, please unplug it, wait a few
seconds then plug it in again. If this fails to solve the problem or the following measures do not
bring about satisfactory results, please consult an authorised dealer.
FAULT
CAUSE/REMEDY
Receiver does not
respond to remote
control.
Press the STB button on the handset.
Point the remote control at directly at the receiver.
Remove all obstacles in the path of the remote control signal.
Check or replace the remote control batteries.
Reboot the DVR by briefly interrupting the mains power.
No Picture.
Disrupted Picture.
There is a humming
noise in the DVR.
DVR won’t change
channels.
Programme guide is
empty.
Check all connections at the rear of the unit.
Check the RF IN connection. Ensure cables to TV are inserted correctly.
Select AV channel on TV set.
Refer to reception problems on page 27.
Check all connections at rear of unit.
VCR sound is not available at the Digital audio output socket. Connect
VCR to your amplifier directly.
Check mains plug is inserted correctly and the power is switched on.
Check that the mains socket is operational. (Use a lamp to test it.)
Set your DVR to match your type of TV .
4:3 = conventional
See page 23 for instructions.
16:9 = widescreen
The hard disc is full. Clear some space to allow the DVR to record.
An archiving event is occurring, wait for it to finish.
Two record events are happening at the same time. Wait for the
recordings to stop.
The hard disc is full. Clear some space to allow the DVR to record.
This is the noise from the fan and the hard disc and is normal. It will
not generally be noticeable and is unavoidable.
Two record events are happening at once. Wait for the recordings to
stop.
You must leave the DVR plugged in overnight to allow it to receive the
programme information. This takes place at about 3am every day.
No or less than 20
services tuned.
Insufficient signal is getting to the receiver.
Refer to reception Problems on page 27.
Subtitles not
appearing.
Not all programmes have subtitles. Check with your broadcaster for
details on subtitled programmes.
No Sound.
No sound from VCR.
No Power or
indicators not lit.
Picture shape looks
wrong.
DVR won’t record
any more.
Live pause won’t
work.
You can contact THOMSON by dialing : 01788 541970
(All calls are charged at Standard Rates)
28
3573160A00 DHD4000 UM2.qxd
09/02/2004
13:18
Page 29
Information
Technical Specifications
This product fulfils the European directives 89/336/EEC, 73/23/EEC and 93/68/EEC. This device
conforms to the safety regulation EN 60065 and therefore the international safety regulation
IEC 60065.
You may not open the DVR. The manufacturer accepts no liability for damage resulting from
improper handling.
Mains voltage:
230V~, 50/60Hz
Power consumption:
Operating approx. 25W.
Operating temperature:
+10°C to 35°C
Audio Format:
Analogue : Stereo Sound
Digital : SPDIF Stereo Sound
Hard disk:
Capacity : 40Gb
Acoustics : <30dB
Dimensions and weight
Dimensions : W x H x D - 360 x 55 x 235mm
Weight : Approx. 2.5Kg
Messages
Your DVR can receive messages from the broadcaster. These can give you information on future
programmes, special offers/events, etc.
To read these messages:1. Open the m e s s a g e s menu by pressing M E N U then 5 and then 6
2. Use the arrow keys, U / V , to select the message you wish to view.
3. Press G R E E N to view the message.
4. Press R E D to delete the message.
Upgrading your DVR
From time to time new services are launched which may require your DVR to be upgraded with
new software before you can use them. Sometimes new features may be introduced to enhance
your DVR.
These updates take place during the night and will usually be proceeded by a message telling
you when the upgrade will be sent. During this time, the DVR should be left in standby to allow
the upgrade to take place.
If, for any reason, you wish to return to the previous version of software, refer to page 26.
It is strongly recommended that you keep your DVR up to date.
29
3573160A00 DHD4000 UM2.qxd
09/02/2004
13:18
Page 30
Information
Extra Information
Rear panel connections
Tuner 1
Output
Tuner 2
Input
Linked Together
Main Aerial
Connection
to Tuner 1
Tuner 2
output
to VCR
Optical Digital
Audio output
PCM (stereo) only
Digital audio
Output
PCM (stereo) only
VCR scart output
VCR pin 8 record control
RGB loop through for DVD
players & Digital recorders
Analogue
SVHS video
audio output
output
TV scart
output
Mains Input
RGB or CVBS
output
Front panel indicators and buttons
BPower status, Green On / Red Off
Recording
Remote Command
Playing
Message Waiting
Paused
Not used on this model
3 Blue Circlet shows playback / recording
speed and direction.
B - On/Off button
EXIT - Removes menus from the
screen
MENU - Displays on screen menu
Arrows - Moves the highlight around
the screen
OK - Chooses highlighted option
GUIDE - Displays the on screen
programme guide
Special Remote Control Features
Your remote control is also capable of operating your New Thomson TV, Thomson DVD player
and Thomson Home Cinema Amplifier.
When you press the B key twice, the TV, DVD and Amplifier will switch off.
When you press the S T B button, the DVR, TV and Amplifier will switch On and select the DVR.
If you own a programmable remote control, you can program it with two ‘discrete’ codes to
make system control easier.
To turn the DVR OFF from any mode, send 0x4F. To turn it ON from any mode, send 0x3F.
30
3573160A00 DHD4000 UM2.qxd
09/02/2004
13:18
Page 31
Index
Index
Adding
Favourite Channels. . . . . . . . . . . . . . . . . . . . . . . . . . .21
New Channels. . . . . . . . . . . . . . . . . . . . . . . . . . . . . . .21
Reminders. . . . . . . . . . . . . . . . . . . . . . . . . . . . . . . . . .14
Audio Language
Changing . . . . . . . . . . . . . . . . . . . . . . . . . . . . . . . . . .22
Banner
programme information . . . . . . . . . . . . . . . . . . . . . . .10
reminder . . . . . . . . . . . . . . . . . . . . . . . . . . . . . . . . . . .14
Batteries . . . . . . . . . . . . . . . . . . . . . . . . . . . . . . . . . . . . . . . .3
Bookmarks
finding. . . . . . . . . . . . . . . . . . . . . . . . . . . . . . . . . . . . .17
removing . . . . . . . . . . . . . . . . . . . . . . . . . . . . . . . . . . .17
Buffering. . . . . . . . . . . . . . . . . . . . . . . . . . . . . . . . . . . . . . . 20
Calendar . . . . . . . . . . . . . . . . . . . . . . . . . . . . . . . . . . . . . . .14
Changing
channel. . . . . . . . . . . . . . . . . . . . . . . . . . . . . . . . . . . .8
language. . . . . . . . . . . . . . . . . . . . . . . . . . . . . . . . . . .22
your PIN. . . . . . . . . . . . . . . . . . . . . . . . . . . . . . . . . . .20
Channels
adding new. . . . . . . . . . . . . . . . . . . . . . . . . . . . . . . . .21
changing. . . . . . . . . . . . . . . . . . . . . . . . . . . . . . . . . . .8
favourites. . . . . . . . . . . . . . . . . . . . . . . . . . . . . . . . . . 21
Child lock. . . . . . . . . . . . . . . . . . . . . . . . . . . . . . . . . . . . . . .23
Digital audio output. . . . . . . . . . . . . . . . . . . . . . . . . . . . .5,6,7
Digital text. . . . . . . . . . . . . . . . . . . . . . . . . . . . . . . . . . . . . .ii,8
Disk space management. . . . . . . . . . . . . . . . . . . . . . . . . .18,19
Favourite Channels
choosing. . . . . . . . . . . . . . . . . . . . . . . . . . . . . . . . . . . .21
using. . . . . . . . . . . . . . . . . . . . . . . . . . . . . . . . . . . . . .11,21
Front panel indicators. . . . . . . . . . . . . . . . . . . . . . . . . . . . .30
Getting started. . . . . . . . . . . . . . . . . . . . . . . . . . . . . . . . . . .8
Indicators - front panel. . . . . . . . . . . . . . . . . . . . . . . . . . . .30
Information
quick guide. . . . . . . . . . . . . . . . . . . . . . . . . . . . . . . . . .10
7-day guide. . . . . . . . . . . . . . . . . . . . . . . . . . . . . . . . . .11
Instant Replay. . . . . . . . . . . . . . . . . . . . . . . . . . . . . . . . . . . .ii,1
Interactive. . . . . . . . . . . . . . . . . . . . . . . . . . . . . . . . . . . . . . .ii,8
Language
changing. . . . . . . . . . . . . . . . . . . . . . . . . . . . . . . . . . . .22
Live Pause. . . . . . . . . . . . . . . . . . . . . . . . . . . . . . . . . . . . . . . .ii
Mains Plug. . . . . . . . . . . . . . . . . . . . . . . . . . . . . . . . . . . . . .33
Menus . . . . . . . . . . . . . . . . . . . . . . . . . . . . . . . . . . . . . . . . . .9
Messages . . . . . . . . . . . . . . . . . . . . . . . . . . . . . . . . . . . . . . .29
PIN. . . . . . . . . . . . . . . . . . . . . . . . . . . . . . . . . . . . . . . . . . . . .9,20
Playback
Choosing programme. . . . . . . . . . . . . . . . . . . . . . . . . .16,17
Problem Solving. . . . . . . . . . . . . . . . . . . . . . . . . . . . . . . . . . .26
Programme
finding . . . . . . . . . . . . . . . . . . . . . . . . . . . . . . . . . . . .8,10,11
information . . . . . . . . . . . . . . . . . . . . . . . . . . . . . . . . .10,11
Recording
currently-showing programmes . . . . . . . . . . . . . . . . . .13
future programmes using the 7 day guide. . . . . . .11-13
timer recordings . . . . . . . . . . . . . . . . . . . . . . . . . . . . . .15
history . . . . . . . . . . . . . . . . . . . . . . . . . . . . . . . . . . . .16,17
making space . . . . . . . . . . . . . . . . . . . . . . . . . . . . . . . .18
archiving . . . . . . . . . . . . . . . . . . . . . . . . . . . . . . . . . . . .19
Reminders . . . . . . . . . . . . . . . . . . . . . . . . . . . . . . . . . . . . . . .14
Remote control
replacing the batteries . . . . . . . . . . . . . . . . . . . . . . . . .3
operating your Thomson TV and DVD . . . . . . . . . . . . . .4
special operation . . . . . . . . . . . . . . . . . . . . . . . . . . . . . .30
Removing
favourite channels . . . . . . . . . . . . . . . . . . . . . . . . . . . . .21
viewing restrictions . . . . . . . . . . . . . . . . . . . . . . . . . . . .23
Replacing the batteries . . . . . . . . . . . . . . . . . . . . . . . . . . . . .3
Restrictions . . . . . . . . . . . . . . . . . . . . . . . . . . . . . . . . . . . . . .23
Safety information . . . . . . . . . . . . . . . . . . . . . . . . . . . . . . . . .2
Setup
connections . . . . . . . . . . . . . . . . . . . . . . . . . . . . . . . . .5,6,7
basic operation . . . . . . . . . . . . . . . . . . . . . . . . . . . . . . . .8
PIN . . . . . . . . . . . . . . . . . . . . . . . . . . . . . . . . . . . . . . . . .20
tuning . . . . . . . . . . . . . . . . . . . . . . . . . . . . . . . . . . . . . .21
languages . . . . . . . . . . . . . . . . . . . . . . . . . . . . . . . . . . .22
sleep timer . . . . . . . . . . . . . . . . . . . . . . . . . . . . . . . . . . .23
child lock . . . . . . . . . . . . . . . . . . . . . . . . . . . . . . . . . . . .23
picture settings . . . . . . . . . . . . . . . . . . . . . . . . . . . . . . .22
favourite channels . . . . . . . . . . . . . . . . . . . . . . . . . . . . .21
Solving Problems . . . . . . . . . . . . . . . . . . . . . . . . . . . . . . . . . .26
Specifications . . . . . . . . . . . . . . . . . . . . . . . . . . . . . . . . . . . . .29
Subtitles . . . . . . . . . . . . . . . . . . . . . . . . . . . . . . . . . . . . . . . .ii,22
System setup . . . . . . . . . . . . . . . . . . . . . . . . . . . . . . . . . . . .22,23
Teletext . . . . . . . . . . . . . . . . . . . . . . . . . . . . . . . . . . . . . . . . . .8
Timers . . . . . . . . . . . . . . . . . . . . . . . . . . . . . . . . . . . . . . . . . .15
Troubleshooting
General problems . . . . . . . . . . . . . . . . . . . . . . . . . . . . .28
Reception problems . . . . . . . . . . . . . . . . . . . . . . . . . .26,27
TV Guides
Quick Guide . . . . . . . . . . . . . . . . . . . . . . . . . . . . . . . . . .10
7-day planner . . . . . . . . . . . . . . . . . . . . . . . . . . . . . . . .11
Optical digital audio output. . . . . . . . . . . . . . . . . . . . . . . .5,6,7
Upgrades . . . . . . . . . . . . . . . . . . . . . . . . . . . . . . . . . . . . . . . .29
Parental control
changing your pin. . . . . . . . . . . . . . . . . . . . . . . . . . . .20
setting. . . . . . . . . . . . . . . . . . . . . . . . . . . . . . . . . . . . .23
Viewing restrictions . . . . . . . . . . . . . . . . . . . . . . . . . . . . . . .23
31