1
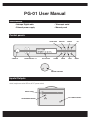
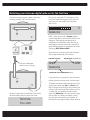
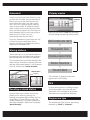
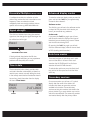
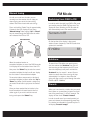
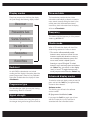
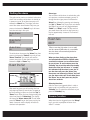
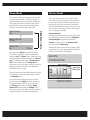
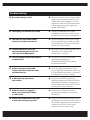
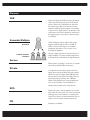
PG-01instruction manual
DIGITAL RADIO
fairbank house ashley road altrincham WA14 2DP united kingdom
t: +44 (0)161 924 0300
f: +44 (0)161 924 0319
e: [email protected]
www.intempodigital.com
PG-01 User Manual
Accessories
• Intempo Digital radio
• Telescopic aerial
• External power supply
• Warranty card
Control panels
AUTO TUNE
STAND BY
USER PRESETS 1-4
LCD DISPLAY
ALARM
DAB/FM
SLEEP
SELECT
INFO
UP
DOWN
VOLUME CONTROL
Inputs/Outputs
Aerial, headphone socket 3.5mm, & DC power socket.
AERIAL INPUT
DC POWER SOCKET
HEADPHONE SOCKET
Switching your Intempo-digital radio on for the first time
Connect the external power adapter to the radio
and plug the other end into mains outlet.
During scan mode the LCD will display a slide
bar that indicates the progress of the scan and
the amount of radio stations that have been
found so far.
11
Searching
DAB - unlike normal radio - Groups together
several radio stations and transmits them on one
frequency. These groups are referred to as
multiplexes and ensembles. Every time one of
these groups has been found the name of that
group will be displayed on the bottom half of the
display e.g. BBC National DAB.
Once the scan has finished the radio will select
the first alphanumerically found station.
PRESENT STATION
Extend the telescopic
aerial as far as it will go.
RADIO MODE (DAB OR FM)
1Xtra
Searching
DAB
SCROLLING TEXT INFORMATION (DLS)
If you can’t hear any sound then turn the volume
control clockwise until you reach a desired level.
As soon as the power is connected to the radio it
will automatically enter into auto tune mode.
Autotune
Full scan
To explore the stations that have been found you
need to press either the “Up” or “Down” keys.
Every time you press the up or down buttons you
will skip to the next found station. When you find
a station that you would like to listen to then
press the “Select key”. The radio will now switch
to that station and display the station name. If
you don’t press the select key the display will
revert back to the original station after 4 seconds.
Autoselect
Display modes
Instead of having to press the “Select” key after
you have found a station that you would like to
listen to you can set the radio so that as you
scroll through the stations you listen to each
one in turn. This is great for quickly checking
what’s on each station. To enable this feature
select a station in the normal manner but then
press and hold the “Select” key. The display will
show “Autoselect ON”, the next time you press
either the “Up” or “Down” key it will
automatically select the next station.
To turn the Autoselect off, press either the “Up”
or “Down” key, then quickly follow this by
pressing and holding the “Select” key until the
display shows “Autoselect OFF”.
INFO KEY
Every time you press the “Info” key the display
will cycle through the following display modes:-
DLS (scrolling text)
Programme Type
Storing stations
You can store up to 4 of your favourite stations to
the preset keys, this will enable you to get access
your favourite station at the touch of one button.
To store a preset you must first be listening to the
station that you would like to save, then press and
hold one of the presets labelled 1-4 for 2 seconds.
The LCD will then show “Preset # stored”.
PRESET KEYS
Ensemble (group name)
Signal Strength
Time and Date
1,2,3,& 4.
The information is displayed on the lower
segment of the LCD display.
DLS
Recalling a stored station
Once you have saved a station to one of the
presets you can recall it by pressing and
releasing the corresponding preset key e.g. if you
saved Radio1 to Preset 2 then just press the
number 2 preset key. If you press a preset that
hasn’t been allocated a station then it will display
“preset # empty”.
Dynamic label segment is a scrolling message
that the broadcaster may include with their
transmissions. This message usually includes
information such as programme details etc.
Programme type
This describes the “style” of music that is being
broadcast e.g. “Rock” or “Classical”.
Ensemble/Multiplex (Group name)
Advanced display modes
A multiplex/ensemble is a collection of radio
stations that are bundled and transmitted on one
frequency. There are national and local
multiplexes, local ones contain stations that are
specific to that area e.g. MXR West Midlands.
To enter the advanced display mode you need to
press and hold the “Info” key for approximately
3 seconds then release it.
Signal strength
The slide bar indicates how strong the received
signals are, the stronger the signal the longer the
bar will be from left to right.
Radio 1
DAB
Software version
The first thing you will see is the software version
number. You may be asked which version you
have if you encounter any problems.
Audio mode
If you press the “Info” key again you will now
see the audio mode, this displays what type of
broadcast you are receiving e.g. mono or stereo
and what bit rate is being used.
By pressing the “Info” key again you will exit
from the advanced display mode and revert back
to DLS (scrolling text information).
MINIMUM SIGNAL LEVEL
Auto tune modes
If the signal level drops below the fifth box
(minimum signal level) then you may experience
problems with the quality of the audio.
Time & date
The broadcaster (radio station) provides clock
and date information automatically so there’s no
need to mess around manually setting the clock.
In the unlikely event that the broadcaster doesn’t
transmit any clock information then the display
will show <Time/date>.
Radio 1
09.05
CLOCK
DAB
21-07-2003
DATE
There are two types of auto tune, one is quick
scan and the other is full scan. Quick scan
searches the UK DAB band III and full scan
searches all band III DAB channels.
To activate the quick scan press the “Auto tune”
key and for full scan press and hold the “Auto
tune” key.
Secondary services
On some occasions you will see a “>” symbol
directly after the name of the station, this
indicates that there are secondary services
available to that station. These secondary
services contain extra services that relate to the
primary station. E.g. a sports station may want to
add extra commentaries. The secondary services
are inserted directly after the primary station.
Manual tuning
FM Mode
As well as an auto tune function you can
manually tune the receiver, this can help you
when aligning your aerial or when adding
stations that were missed while auto tuning.
Press and hold the “Select” key for approximately
2 seconds, the LCD display will now show
“Manual tuning”. Now use the “Up” & “Down”
keys to move through the DAB channels which
are numbered from 5A to 13F.
Switching from DAB to FM
In order to switch the radio from DAB to FM mode
you need to press the “DAB/FM” key once. The
display will show “Switching to FM”, the radio will
then automatically tune to the nearest station.
Switching to FM
DAB CHANNELS
On the top line of the display is the current
station name or frequency if the RDS (radio data
system) isn’t available.
97.40MHz
5A
5B
13F
When the receiver locates an
ensemble/multiplex on one of the DAB channels
it will display this on the bottom line of the LCD.
Now press the “Select” key to enter the current
ensemble/multiplex, the top line will now display
the first station in the ensemble/multiplex.
To see what stations are present on the found
ensemble/multiplex just press either the “Up” or
“Down” key. When you’ve located a station that
you would like to listen to just press the “Select”
key.
Once you have reached the last station in the
found ensemble it will revert back to the first
station again. If you wish to exit the manual
tuning mode press the “Select” key.
FM
Autotune
To search for a FM station you need to press
and then release the “Autotune” key, this will
start scanning up the frequency band. To scan
down the frequency band press and hold the
“Autotune” key for around 1 second. Once a
station has been found the scanning will stop
automatically. If no station is found then the
tuning will stop once it’s cycled through the entire
FM band (87.5-108MHz).
Presets
When you have tuned to a station that you would
like to store as a preset then just press and hold
one of the preset keys (1-4) for 2 seconds. The
display will then show “Preset # stored”.
In order to recall one of your saved presets just
press and release the corresponding preset key.
If no station has allocated to a preset key then it
will display “Preset # empty”.
Display modes
Time and date
Every time you press the “Info” key the display
will cycle through the following display modes:-
The broadcaster provides clock and date
information automatically so there’s no need to
mess around manually setting the clock. In the
unlikely event that the broadcaster doesn’t
transmit any clock information then the display
will show <Time/date>.
Radiotext
Programme Type
Signal Strength
Frequency
This shows what the frequency is of the present
station e.g. 89.30MHZ.
*Audio mode
Time and Date
Frequency
Audio Mode
Radiotext
As with DAB, the broadcaster can include
scrolling text that displays information about the
present programme. If there isn’t any Radiotext
information available then the display will show
<Radiotext>.
Programme type
This describes the “style” of music that is being
broadcast e.g. “Rock” or “Classical”.
Signal strength
The slide bar indicates how strong the signal is,
the stronger the signal the longer the bar will be.
When in FM mode the display will show if the
station being received is in mono or stereo.
* The receiver will automatically switch
between stereo and mono mode. You can
however override this function so that you
can manually switch between stereo and
mono mode, which is helpful if you’re
listening to a poor FM signal. To switch
between mono and stereo press and release
the “Select” key, you will see on the display
“auto” or “mono”. To toggle between each
mode just press and release the “Select” key.
Advanced display modes
To enter the advanced display mode you need to
press and hold the “Info” key for approximately
3 seconds then release it.
Software version
The first thing you will see is the software
version number.
PI (programme identification) code
If you press the “Info” key again you will now
see the PI code, this is just a code that is
associated with the transmitted station.
Setting the alarm
The radio can be used as a standard “radio alarm
clock”. You can either set the alarm in standby or
in power on mode. To set the alarm press and
release the “Alarm” key. The display will show
one of the states shown below. Every time you
press and release the “Select” key it will move
onto the next step in the cycle.
Alarm Status
off
Alarm Type
BEEP
Alarm Time Set
00:00
Alarm Status
on
Alarm type
You can either set the alarm to activate the radio
or to produce a continuous beeping sound. To
change the alarm type press and release the
“Alarm” key, followed by pressing and releasing
the “Up” or “Down” key. If you push and release
the “Select” key you can now toggle between
“Radio” and “Beep” mode. Pick the one that
you would like to use and then don’t press any
key for approximately 4 seconds That mode is
now set.
00:00
To set the alarm time press the “Alarm” key, then
press and release the “Select” key until you see
“Alarm Time Set”. You should now see the
present alarm time. To alter the time press and
release the “Up” or “Down” key.
Alarm Time Set
00:01
*Please note that if the alarm is set to radio
and the wanted DAB station is not available
then the alarm will automatically default to
the beep mode.
When you have finally set the alarm time
and selected either BEEP or RADIO make
sure that the volume is at a sufficient level
for you to hear. To set the alarm press the
“Standby” key to put the radio into standby.
Next to the time you will see a “ ” symbol,
this indicates that the alarm is now set. To
turn the alarm off, press the “Alarm” key
then press and release the “Select” key until
you see alarm status off. To exit either press
the “Alarm” key or don’t press any key for
about four seconds.
*
SELECT KEY
UP
ALARM KEY
DOWN
After each key press you will see that the time
only steps up/down by one minute. To speed up
the clock setting just press and hold the “Up” or
“Down” keys. Once you have finished setting the
alarm time press the “Select key”. The display
will change to “Alarm status ON”. To exit, either
press the “Alarm” key or don’t press any key for
about 4 seconds and the display will return to
standard radio operation.
Silencing the alarm
After the alarm has triggered either in radio or
beep mode it will continue until you press the
“Standby” key. To switch the radio back on just
press the “Standby” key.
Snooze function
When the alarm has triggered press the “Sleep”
key if you wish to postpone the alarm for a
further 7 minutes.
Factory Reset
This function allows you to programme the radio
to switch itself off after a set period of time. To
activate the sleep function press the “Sleep” key.
The display will show one of the states shown
below. Every time you press the “Select” key it
will move onto the next step in the cycle.
There may be times when you need to reset
your receiver back to its original factory settings
i.e. when you move the radio to another part of
the country so that you can pick up the local &
national DAB stations in that area. If you don’t do
this then when you select a station on the radio it
may no longer be available.
Sleep Status
off
Sleep Timer Set
30 min
Sleep Timer
on
30 min
Sleep Menu Cycle
Sleep Mode
Now press the “Select” key until the “Sleep
Timer Set” is displayed. To alter the sleep time
press the “Up” or “Down” keys. When you have
finished setting the sleep time press the “Select
key”. The display will change to “Sleep status
ON”. To exit either press the “Sleep key” or
don’t press any key for about 4 seconds and the
display will return to standard radio operation.
The sleep time is now set.
Reset procedure
Unplug the power lead from the rear of the radio,
then reconnect it. Once you see the “Welcome
Intempo Digital” logo press and hold the
“Select” key. When you see "System reset”
then release the “Select key”.
Please note that once the reset has taken place
you will lose all of your stored presets both DAB
& FM, and the internal DAB registry.
Welcome
Intempo Digital
PRESS AND
HOLD THE
SELECT KEY
Once the sleep time has expired the radio will go
into standby. To switch the radio back on press
the “Standby” key.
If you have set the sleep time but you wish to
cancel it press the “Sleep” key. You will see on
the display “Sleep Timer On.” If you now press
the “Select” key once it will display “Sleep
Status OFF.” Press either the “Sleep” key or
don’t press any key for about 4 seconds and the
display will return to standard radio operation.
System reset
Troubleshooting
Q No power, display is not lit.
A Ensure that the lead from the external power
supply is securely attached to the DC input
and the other end is plugged into a mains
outlet that is switched on. If the fault remains
then try plugging the power adapter into
another mains socket.
Q The display is lit but there is no audio.
A Unplug any headphones that maybe
connected at the rear, then make sure that
the volume control is turned up (clockwise).
Q The radio has auto tuned in DAB
mode but no signals were found.
Q I’ve tried moving the aerial and
A Extend the telescopic aerial as far it will go,
then try repositioning the receiver e.g. move
it to another room or near to a window. Now
perform the auto tune again.
A Go to http://www.digitalradionow.com/ and
repositioning the receiver but I still
can’t receive any DAB signals.
check that you can receive DAB
transmissions in your area.
Q I’ve lost/broken my aerial, can I obtain
A Please call 0161 924 0318 or email
a replacement?
Q Whilst listening to certain DAB
stations the audio sometimes drops
out and breaks up.
Q In FM mode the audio hisses
and crackles.
Q When the alarm has triggered
[email protected].
Please note that there will be a charge
for replacement aerials.
A Check the signal strength level. If it’s low
then try extending the telescopic aerial as far
it will go. Reposition the radio or try moving it
to another room or near to a window.
A If you have a weak FM signal then try
switching the radio over to “Mono”. (See FM
Audio mode). FM needs a stronger signal in
order to decode the stereo part of the signal
than for just the mono component.
A Ensure that the volume level is set to
there is no sound either in beep
or radio mode.
your desired level before you put the unit
into standby.
Q Some of the stations that I find, such
A Some Channels are being used for sending
as NTL data, don't play any music.
data. Maybe in the future some of them will
start to offer services that you will be able to
receive on your PG-01, such as stock
market prices, news or even music.
Glossary
DAB
Stands for Digital Audio Broadcasting. Analogue
radio is transmitted by placing the audio onto a
carrier. If there is any interference or static with
the wanted signal then it will be heard on the
receiver’s speaker. Digital however is transmitted
in the form of a digital stream. The decoder in the
radio knows what data is needed to re-construct
the original signal, so any other unwanted signal
is discarded.
Ensemble/Multiplex
MULTIPLEX
PRIMARY SERVICES
(STATIONS)
Unlike analogue systems, digital radio groups
together separate signals from a number of
stations and transmits them as a complete,
interleaved data stream. This is known as an
Ensemble or Multiplex.
Up to ten digital services can be transmitted in a
single multiplex. This allows several programmes
or services to be transmitted on a single frequency.
Service
Radio stations e.g. Radio 1 are known as services
when talking about DAB transmissions.
Bit rate
In simple terms when talking about music the
higher the bit rate is the better the sound quality
will be. For near CD quality audio128Kbps (kilo
bits per second) will suffice. So stations that are
continually playing music etc use 128Kbps.
Stations that generally only transmit speech etc.
such as news stations can use 64Kbps as
speech doesn’t require such a high bit rate.
RDS
Radio data system. The broadcaster can include
data with their transmission. This data can then be
displayed on the user receiver in a scrolling text
format. The Data can include information such as
station name and traffic announcements etc.
FM
Frequency modulation