1
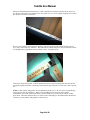
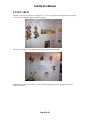
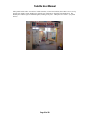
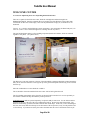
The Children's Museum of Memphis
Toolville
User Manual
Toolville User Manual
MUSEUM CONTACTS
3
EXHIBIT TEXT
4
EDUCATION AND PROGRAMMING
12
MARKETING MATERIALS
17
INSTALLATION MANUAL
18
De-installation
33
Paint/Finish Schedule
34
Crate List
36
Props Inventory
38
Maintenance Checklist
40
ADDITIONAL MATERIALS
CLASSROOM ACTIVITIES
CONDITION REPORT ARRIVAL
CONDITION REPORT DEPARTURE
MARKETING DISK
USER MANUAL AND EDUCATION DISK
Page 2 of 40
Toolville User Manual
TOOLVILLE is the property of
The Children’s Museum of Memphis
2525 Central Avenue
Memphis TN 38104 USA
(901) 458-2678
Fax (901) 458-4033
www.cmom.com
MUSEUM CONTACTS
Exhibit Installation/Education/Maintenance/Props
Jim Hyde
Exhibits Manager
(901) 458-2678 x244
(901) 338-9015
[email protected]
PR/Marketing
Randy McKeel
Director of Marketing
(901) 458-2678 x 231
[email protected]
Page 3 of 40
Toolville User Manual
EXHIBIT TEXT
SB = speech bubble (link to cartoon image listed in parenthesis). All speech bubble text in black
(Eng.) and gray (Span.)
ES = English / Spanish side by side (all other cases, English is on top of Spanish).
Sizes are written height x width.
Text background color in sections A, B, C, D, and F is PMS 4545 at 40%.
Text in section E is printed on black Sintra.
* Denotes optional text panels.
code
Text – English
Text – Spanish
font
style /
colors
A-1
I'M OLIVE.
ME LLAMO OLIVIA.
A-2
I'M HENRY.
ME LLAMO ENRIQUE.
comic
sans ms
(black,
gray)
comic
sans ms
A-3
A-3
<comic strip with 3 frames;
insert following text into each
frame as written>
WE'RE OTTERS.
CS-1,
frame 1
WE LIVE IN TOOLVILLE.
VIVIMOS EN
MECANOLANDIA.
WE LOVE TO PLAY AND
WORK.
NOS ENCANTA JUGAR Y
TRABAJAR.
AND EAT!
¡Y COMER!
FOLLOW US THROUGH
TOOLVILLE, AND WE'LL
SHOW YOU HOW
TOOLS HELP US!
A-3
CS –1,
frame 2
A-3
CS-1,
frame 3
A-4
Very few animals use tools, but
otters are tool users. This otter is
using a rock to crack open a
clamshell.
A-5
WELCOME TO TOOLVILLE
(entire sign 18 x 102)
SOMOS NUTRIAS.
comic
sans ms
size in
inches
(H x W)
12 x 15
12 x 15
18 x 48
(entire
strip)
18 x 16
SB, ES
SB
(O-1)
SB
(H-1)
SB
(O, H)
comic
sans ms
18 x 16
SB
(H, O)
¡SÍGUENOS A
MECANOLANDIA Y TE
ENSEÑAREMOS CÓMO
LAS HERRAMIENTAS NOS
AYUDAN!
Muy pocos animales usan
herramientas, pero las nutrias las
usan. Esta nutria usa una roca
para abrir una almeja.
comic
sans ms
18 x 16
SB (H)
informal,
5135 /
5145
18 x 18
BIENVENIDOS A MECANOLANDIA
(Spanish on 6 x 60, attached w/
Velcro)
informal,
032
sign 18x
102,
Span. on
6 x 60
Page 4 of 40
Toolville User Manual
code
Text – English
Text – Spanish
font
style /
colors
size in
inches
A-6
THE SIMPLE SIX
LOS SIMPLES SEIS
15 x 36
There are six simple tools.
Existen seis mecanismos simples
que se usan como herramientas.
informal,
5135 /
5145
A-7
Pulley
Polea
informal,
2592
6 x 12
A-8
Wedge
Cuña
informal,
347
6 x 12
A-9
Wheel
Rueda
informal,
032
6 x 12
A-10
Lever
Palanca
6 x 12
A-11
Inclined Plane
Plano Inclinado
informal,
reflex
blue
informal,
151
A-12
Screw
Tornillo
informal,
012
6 x 12
A-13
Toolville sponsored by
<insert home depot logo>
In-Kind support provided by
Black & Decker®
Radio Flyer®
and
Fabulous Fiddlestix Gearworks®
by Toys-N-Things
This exhibition was produced by
The Children's Museum of
Memphis for the members of the
Youth Museum Exhibit
Collaborative:
Mecanolandia auspiciado por
informal,
5135 /
5145
36 x 18
informal,
5135 /
5145
36 x 18
A-14
Bay Area Discovery Museum
Brooklyn Children’s Museum
Canadian Children’s Museum
Chicago Children’s Museum
The Children's Museum of
Houston
The Children's Museum of
Indianapolis
The Children's Museum of
Memphis
Minnesota Children’s Museum
Con el generoso apoyo de
Esta exhibición fue producida por
The Children's Museum of
Memphis para los miembros de la
Youth Museum Exhibit
Collaborative:
Bay Area Discovery Museum
Brooklyn Children’s Museum
Canadian Children’s Museum
Chicago Children’s Museum
The Children's Museum of Houston
The Children's Museum of
Indianapolis
The Children's Museum of
Memphis
Minnesota Children’s Museum
Page 5 of 40
(H x W)
6 x 12
SB, ES
Toolville User Manual
code
Text – English
Text – Spanish
font
style /
colors
size in
inches
CAC
moose,
5135 /
5145
informal,
5135 /
5145
9 x 15
informal,
5135 /
5145
CAC
moose,
5135 /
5145
informal,
5135 /
5145
3 x 18
informal,
5135 /
5145
CAC
moose,
5135 /
5145
informal,
5135 /
5145
9 x 30
12 x 42
ES
ES
(H x W)
B-1, B-4, B-7, B-10, B-16,
B-21 all in CAC Moose in
SAME font size
Wedge
Cuña
B-2
A wedge is a V-shaped object
that we use to split or pry things
apart.
Una cuña es un objecto en forma
de V que se usa para partir o para
abrir cosas.
B-3
Which part of the ax is a wedge?
¿Qué parte del hacha es una cuña?
B-4
WHEEL
RUEDA
B-5
We use wheels when we drive our
cars, roll out dough and skate!
¡Usamos ruedas cuando
manejamos nuestros automóviles,
cuando amasamos masa y cuando
patinamos!
B-6
Gears are one kind of wheel.
El engranaje es un tipo de rueda.
B-7
INCLINED PLANE
PLANO INCLINADO
B-8
An inclined plane is a flat
surface that is higher or thicker
on one end. We use inclined
planes to move something from
a lower level to a higher level or
from a higher level to a lower
level.
Un plano inclinado es una
superficie plana con un extremo
elevado o más grueso. Usamos
planos inclinados para mover
cosas desde un nivel bajo a un
nivel alto o de un nivel alto a un
nivel bajo.
B-9
Pull each wagon. Which one
feels lighter?
Tira de cada vagoneta. ¿Cuál se
siente más liviana?
informal,
5135 /
5145
6 x 27
B-10
LEVER
PALANCA
9 x 15
B-11
*
A lever helps you move things.
La palanca te ayuda a mover
cosas.
CAC
moose,
5135 /
5145
informal,
5135 /
5145
note
B-1
Page 6 of 40
SB, ES
6 x 18
9 x 15
18 x 9
9 x 24
12 x 36
Toolville User Manual
code
Text – English
Text – Spanish
font
style /
colors
size in
inches
B-12
σ A fulcrum is a point where
the lever turns.
σ Un fulcro es un punto donde la
palanca gira.
informal,
5135 /
5145
15 x 15
informal,
5135 /
5145
9 x 15
informal,
5135 /
5145
informal,
5135 /
5145
9 x 15
CAC
moose,
5135 /
5145
informal,
5135 /
5145
9 x 15
informal,
5135 /
5145
24 x 15
comic
sans ms,
black /
gray
12 x 15
SB
(H-2)
comic
sans ms
15 x 21
SB (O)
CAC
moose,
5135 /
5145
informal,
5135 /
5145
9 x 15
A force is a push or pull.
ν A load is the weight of the
object to be moved.
Fuerza es un empujón o un
ν Una carga es el peso de un
objeto a ser movido.
La pala es una palanca de 1ra
clase.
The shovel is a 1st class lever.
B-14
La carretilla de mano es una
palanca de 2da clase.
B-15
The wheelbarrow is a 2nd class
lever.
The broom is a 3rd class lever.
B-16
SCREW
TORNILLO
B-17
A screw is an inclined plane
wrapped around a cylinder or
cone shape. We use screws to
hold things together. When you
get home, see how many things
you can find that are held
together by screws.
This device is called
"Archimedes' screw." It can be
used to lift things.
WHO IS ARCHIMEDES
AND WHY IS THIS HIS
SCREW?
HE WAS THE ANCIENT
GREEK SCIENTIST SAID
TO HAVE INVENTED IT,
BUT SOME SAY THIS
TYPE OF SCREW WAS
AROUND BEFORE HIS
TIME.
La escoba es una palanca de 3ra
clase.
B-21
PULLEY
Un tornillo es un plano inclinado
enroscado alrededor de un cilindro
o un cono. Usamos tornillos para
armar cosas. Cuando vayas a casa,
mira a ver cuántas cosas puedes
encontrar que están ensambladas
con tornillos.
Este aparato se conoce como "el
tornillo de Arquímides." Puede ser
usado para levantar cosas.
¿QUIÉN ES ARQUÍMIDES
Y POR QUÉ ES ESTE SU
TORNILLO?
SE DICE QUE ÉL FUE UN
CIENTÍFICO DE LA
GRECIA ANTIGUA E
INVENTOR DE ESTE
TORNILLO, PERO OTROS
DICEN QUE ESTE TIPO DE
TORNILLO YA EXISTÍA
DESDE ANTES.
POLEA
B-22
*
Which one is easiest to lift?
¿Cuál es más fácil para levantar?
B-19
(H)
B-20
(O)
(H x W)
tirón.
B-13
B-18
SB, ES
Page 7 of 40
9 x 15
36 x 18
9 x 18
Toolville User Manual
code
Text – English
Text – Spanish
font
style /
colors
size in
inches
C-1
Toolville Toy Store
Juguetería de Mecanolandia
market,
187, 184
12 x 72
ES
C-2
Did you know tools can help you
play? There are tools in many of
our toys.
¿Sabías que las herramientas
nos ayudan a jugar? En nuestros
juguetes podemos encontrar
herramientas.
informal,
187, 184
9 x 54
ES
C-3
THINK OF TOYS YOU
HAVE AT HOME THAT
USE SIMPLE TOOLS.
PIENSA EN LOS
JUGUETES QUE TIENES
EN CASA QUE USAN
HERRAMIENTAS SIMPLES
Y QUE TE AYUDAN A
JUGAR.
comic
sans ms,
black /
gray
15 x 30
SB
(H-4)
C-4
Push and hold each button to
find the tools in these toys.
Oprime cada botón para
encontrar las herramientas en
estos juguetes.
informal,
187, 184
24 x 15
code
Text – English
Text – Spanish
font
style /
colors
size in
inches
D-1
Central Park
Parque Central
18 x 24
D-2
*
What happens when you try to
lift someone who is heavier than
you? Try using this simple tool to
do the job.
¿Qué pasa cuando tratas de
levantar a alguien que es más
pesado que tú? Trata de usar esta
herramienta simple para hacer el
trabajo.
market,
3425 /
3385
informal,
3425 /
3485
Page 8 of 40
SB, ES
(H x W)
SB, ES
(H x W)
24 x 24
(seesaw
graphic
at sign
bottom)
ES
Toolville User Manual
code
Text – English
Text – Spanish
font
style /
colors
size in
inches
E-1
Tools can help us work.
Las herramientas nos ayudan a
trabajar.
18 x 18
E-2
KEEP THE
CONSTRUCTION SITE
SAFE. PUT THINGS
BACK WHERE THEY
BELONG.
MANTENGAMOS SEGURO
EL LUGAR DE
CONSTRUCCIÓN.
PONGAMOS LAS COSAS
DE VUELTA EN SU LUGAR.
informal,
white /
gray on
black
Sintra
comic
sans ms,
black /
gray
15 x 27
SB
(O-8)
E-3
THERE ARE MANY JOBS
ON A CONSTRUCTION
SITE. YOU CAN BE AN
ARCHITECT,
CONSTRUCTION
WORKER, WELDER,
BACKHOE DRIVER OR
CONTRACTOR. CAN YOU
THINK OF SOME OTHER
CONSTRUCTION JOBS?
HAY MUCHOS EMPLEOS
EN UN LUGAR DE
CONSTRUCCIÓN. PUEDES
SER ARQUITECTO,
OBRERO/A,
SOLDADOR/A, CHOFER O
CONTRATISTA. ¿PUEDES
PENSAR EN OTROS
EMPLEOS DE LA
CONSTRUCCIÓN?
comic
sans ms,
black /
gray
24 x 30
SB
(H-6)
E-4
Always wear a hard-hat and
safety goggles when working.
Siempre utiliza casco y gafas
protectoras cuando trabajes.
12 x 24
E-5
Construction vehicles help the
crew do some very hard work
that they couldn't do without
tools.
Los vehículos de construcción
ayudan al equipo a hacer trabajos
arduos que no podrían hacer sin el
uso de herramientas.
informal,
white /
gray on
black
Sintra
informal,
white /
gray on
black
Sintra
18 x 24
ES
E-6
Olive Otter
Henry Otter
General Contractors
Olivia Nutria
Enrique Nutria
Contratistas Generales
architect,
white /
gray on
black
Sintra
12 x 18
ES
Page 9 of 40
SB, ES
(H x W)
Toolville User Manual
code
Text – English
E-7
Comic strip (CS-2), 4 frames,
insert text as directed.
E-7
A SIMPLE TOOL IS A
DEVICE THAT MAKES
WORK EASIER.
UNA HERRAMIENTA
SIMPLE ES UN ARTEFACTO
O MECANISMO QUE
FACILITA UN TRABAJO.
LIKE WHEN I MOVE A
PILE OF BRICKS, IT'S
EASIER WHEN I USE A
WHEELBARROW. IT'S
LESS WORK.
POR EJEMPLO, CUANDO
TENGO QUE MOVER UN
PILA DE LADRILLOS, ES
MÁS FÁCIL SI USO UNA
CARRETILLA. ES MENOS
TRABAJO.
WORK IS DONE WHEN
WE USE FORCE TO
MOVE SOMETHING.
UN TRABAJO SE HACE
CUANDO SE USA FUERZA
PARA MOVER ALGO.
SOUNDS LIKE A JEDI
MIND TRICK.
ESO SUENA COMO A UN
TRUCO MENTAL DE LOS
JEDI.
NO OLIVE, FORCE IS A
PUSH OR A PULL.
NO OLIVIA, FUERZA ES UN
EMPUJÓN O UN TIRÓN.
SO WHEN I USE A TOOL
TO MOVE SOMETHING,
I CAN USE LESS FORCE.
ASÍ QUE CUANDO USO
UNA HERRAMIENTA PARA
MOVER ALGO, PUEDO USAR
MENOS FUERZA.
EXACTLY! YOU DON'T
HAVE TO PUSH OR PULL
AS HARD WHEN YOU
USE A TOOL.
¡EXACTO! NO TIENES QUE
ESFORZARTE TANTO EN
EMPUJAR O TIRAR
CUANDO USAS UNA
HERRAMIENTA.
CS-2,
frame 1
E-7
CS-2,
frame 2
E-7
CS-2,
frame 3
E-7
CS-2,
frame 4
IN OTHER WORDS,
TOOLS HELP US!
Text – Spanish
EN OTRAS PALABRAS, ¡LAS
HERRAMIENTAS NOS
AYUDAN!
Page 10 of 40
font
style /
colors
comic
sans
ms,
black /
gray
size in
inches
SB, ES
(H x W)
12 x
48;
each
frame
12 x 12
12 x 12
SB
(H, O)
comic
sans
ms,
black /
gray
12 x 12
SB
(H, O)
comic
sans
ms,
black /
gray
12 x 12
SB
(H, O)
comic
sans
ms,
black /
gray
12 x 12
SB
(H, O)
Toolville User Manual
code
Text – English
Text – Spanish
font
style /
colors
size in
inches
F-1
PIER 6
MUELLE 6
market,
634 /
631
2 signs,
Eng:
6 x 18
Span:
6 x 24
F-2
I WANT A HALF-POUND
OF CLAMS. HENRY
WANTS ONE POUND.
QUIERO MEDIA LIBRA DE
ALMEJAS. ENRIQUE
QUIERE UNA LIBRA.
comic
sans ms,
black /
gray
12 x 15
SB
(O-9)
F-3
CAN YOU WEIGH OUT
ENOUGH FOR BOTH OF
US?
¿PUEDES PESAR UNA
CANTIDAD SUFICIENTE
PARA AMBOS?
comic
sans ms
12 x 15
SB
(H-7)
F-4
*
OTTERS NEED A LOT OF
FOOD BECAUSE WE ARE
ALWAYS SWIMMING
AND PLAYING. WE EACH
EAT ABOUT 10 TO 15
POUNDS OF FOOD
EVERY DAY.
NOSOTRAS LAS NUTRIAS
NECESITAMOS MUCHO
ALIMENTO PORQUE NOS
LA PASAMOS NADANDO Y
JUGANDO. CADA UNA DE
NOSOTRAS COME
ALREDEDOR DE 5 A 7
KILOGRAMOS DE
ALIMENTO CADA DÍA.
comic
sans ms
24 x 30
SB
(O-10)
Page 11 of 40
SB, ES
(H x W)
Toolville User Manual
EDUCATION AND PROGRAMMING
Classroom Activity Guide
A Toolville classroom guide for teachers and group leaders is found at the end of this manual (APPENDIX
A). Science experiments with low-cost or recycled materials and tool-related activities linked to other
curriculum areas are featured. National, state and local science curriculum standards are addressed in the
curriculum guide.
Programming Ideas
The following programming ideas were selected from the most successful Toolville programs offered
during the exhibit’s Memphis run.
Educator-led Program: Motion Commotion
Contains experiments demonstrating each of Newton’s 3 Laws of Motion
Experiment 1: Crash Test
Demonstrates Newton’s 1st Law of Motion: Without a force (push or pull), an object either stays still or
keeps moving in a straight line or at the same speed. (Remember, friction and gravity are forces.)
Materials needed:
• small wagon
• baseball
Instructions:
1. Start with the baseball in the wagon touching the back.
2. Ask the child: Why is the wagon not moving? How could you get it to move? (use a force: push, pull
or lift)
3. Pull the wagon then stop it suddenly. What happens to the baseball? (it keeps rolling) Why?
(something called inertia)
4. Ask: What happens when you're riding in a car and the driver suddenly brakes? Discuss the need for
seatbelts and/or airbags.
5. Explain Newton's 1st law of motion or have the child explain it to you.
Experiment 2: Catapult
Demonstrates Newton’s 2nd Law of Motion: A force on an object makes it move or changes how it moves.
The greater the force, the greater the movement or change in movement.
Materials needed:
• small “catapult” – this can be made with a paper towel roll as a fulcrum and a 12” ruler as a lever; tape
a bathroom-sized paper cup to the ruler to hold the ball
• ping-pong ball
Instructions:
1. Place the ping-pong ball in the cup of the catapult.
2. Ask the child: What would happen if I pushed down on the handle slowly? What if I pushed very hard
and fast?
3. Push the handle down first slowly, then quickly. Let the child try too. What happens to the ping-pong
ball? Why? (see Newton's 2nd law)
Page 12 of 40
Toolville User Manual
4.
5.
Ask: How does Mark McGuire or Sammy Sosa hit the baseball out of the ballpark? (the greater the
force the greater the movement)
To the child: They're coming at you ... and fast! Which would you rather stop: a ping-pong ball or a
bowling ball?
Experiment 3: Marbles in Motion
Demonstrates Newton’s 3rd Law of Motion: For every action, there is an equal and opposite reaction.
Materials needed:
• 8 marbles
• 2 flat pieces of track from a toy raceway
• a small box
Instructions:
1. Place one piece of track on a flat surface and other on the box so that one end of the track lines up with
the flat track (end to end). Place the marbles in the middle of the flat track. Place one marble at the top
of the ramp. Before letting it go, ask the child to predict what will happen to the marbles on the flat
track. Now let the marble go.
2. Ask your child: Why did only one marble move? (the action of the one dropped marble caused an
equal but opposite reaction in the marble that moved)
3. Ask: What would happen if I dropped two marbles? Try this and see if they were able to guess what
would happen.
4. Ask the child to think about a shuttle launch. How does the shuttle get off the ground? The engines
exert a huge force on the ground that makes the shuttle rise. The engines create an action that causes an
equal and opposite reaction.
Educator-led Program: Science Friction
Experiment 1: What is Friction?
Materials needed:
• rubber mat
• 2 jar lids
• 5 marbles
Instructions:
1. Ask the child to think about having cold hands. You can rub them together to warm them up. Get the
child to rub his/her hands together and feel the heat this generates. Tell the child that friction is caused
by two surfaces rubbing together, like your hands.
2. Friction creates heat. It can also stop or slow down a moving object. A rolling ball stops because of the
friction caused by the surface of the ball touching the ground.
3. Place the jar lids on the rubber mat, one directly on the mat, one with the marbles underneath. Tell the
child these objects aren’t heavy, but pretend they are furniture or some other heavy object. Ask the
child to push one, then the other across the mat’s surface. Why is one easier to push? The marbles act
like wheels or ball bearings to reduce the friction and make the work easier.
4. Wheels help overcome friction and make things easier to move. But how do we slow down a moving
object, like a bike or car? We use brakes to create friction!
Page 13 of 40
Toolville User Manual
Experiment 2: Friction 500
Materials needed:
• ramp (this can be a flat piece of wood)
• various materials such as fabric, carpet, wax paper, a rubber mat, etc.
• toy vehicle
• measuring tape
Instructions:
1. Place the vehicle at the top of the ramp.
2. Ask the child to make predictions about which material on which they think the vehicle will travel the
farthest distance, the shortest distance, etc.
3. Test one surface material at a time. Be careful to start the vehicle from the same spot each time and let
it go rather than pushing it down the ramp.
4. Measure the distance for each surface material and compare to the predictions.
5. Explain: Objects move easier when there is less friction. In fact, things could move along forever if
there was no friction. Once something gets moving, it gains momentum. It keeps moving unless it is
stopped by something else (Newton’s 1st law of motion). Because friction is what stops the momentum,
the surface that lets the vehicle to go the shortest distance would be the one with most friction.
Educator-led Program: Tools in Your Toys
Materials needed
• various small toys with simple machines in them {some suggestions are wagon (wheels), Viewmaster
(lever, wheel), spiral race track (inclined plane), etc.}
• bulletin board set or laminated cards with the 6 simple machines (or do this in the Entry Arch of
Toolville and use the “Simple Six” labels)
Procedures:
1. Start by introducing yourself and welcoming the visitors to the exhibit.
2. Ask if anyone knows the “Simple Six” or the 6 simple machines.
3. Use the exhibit labels or laminated cards to introduce each of the simple machines. Ask for examples
of each that the visitors may have seen or used themselves.
4. Ask the visitors: “Did you know that the “Simple Six” can help us play? Some of our toys have simple
machines in them.” (If in the exhibit you can point out examples from the Toy Store or Central Park)
5. Show the collection of small toys one at a time and get the visitors to find the simple machines within
them. After this is done, get them to look for simple machines in all areas of the exhibit.
Educator-led Program: Mechanical Advantage
(Can also use the seesaw in Central Park and the Pulley Demo in the Welcome Center to expand on this
demonstration)
Materials needed:
• wood or cardboard box about 12” in height
• wood plank, 3 feet long and approx. 8 – 10” wide
• small wagon
• 4 soda cans (or any weight that will fit in wagon’s bed)
• spring scale that goes up to 4 pounds
Page 14 of 40
Toolville User Manual
•
measuring tape
Procedures:
1. Have all the materials set out on a table in front of you.
2. Begin by showing the spring scale. Tell the visitors that this is an instrument used to measure weight.
Ask what it is (a scale). Tell them that it measures weight, but can also measure force. Pull on the scale
and show them that the harder you pull, the more force registers on the spring scale.
3. Weigh the wagon and the cans using the spring scale. Get the visitors to add the weights together to get
the total weight of wagon and cans. Tell them that to pick up the wagon and cans and put them on top
of the box, you will have to use ____ pounds of force. Put the wagon on top of the box, then place it
back on the table.
4. Ask if there is another way to get the wagon to the top of the box using less force. If you need to give a
hint, tell them they can use something that’s on the table. Someone will guess or know to use the wood
plank as a ramp. Ask what simple machine the ramp is (inclined plane).
5. Tell them that they’ve made a hypothesis, or a guess, that less force will be used and that now you will
test the hypothesis. Using the spring scale, slowly pull the wagon up the ramp, getting someone to
observe how much force is being used.
6. Say that using a simple machine makes it easier to lift the wagon, but there’s a catch. Measure the
distance from the tabletop to the top of the box (1 foot), and then measure the ramp’s length (3 feet).
Tell them that with the ramp you were able to use less force, but had to go a longer distance. This is a
“trade-off” called mechanical advantage. Making the distance longer made it easier to lift the wagon:
it required less force.
7. To sum up, mechanical advantage means, “longer is easier.” You can demonstrate this again using the
seesaw and moving the plank to change the fulcrum point or with the pulley demo.
Program: Tools in Your Toys
Materials needed
• various small toys with simple machines in them (can use the Toy Store shelf toys)
• bulletin board set or laminated cards with the 6 simple machines (or do this in the Entry Arch of
Toolville and use the “Simple Six” labels)
Procedures:
6. Start by introducing yourself and welcoming the visitors to the exhibit.
7. Ask if anyone knows the “Simple Six” or the 6 simple machines.
8. Use the exhibit labels or your own laminated cards to introduce each of the simple machines. Ask for
examples of each that the visitors may have seen or used themselves.
9. Ask the visitors: “Did you know that the ‘Simple Six’ can help us play? Some of our toys have simple
machines in them.” (If in the exhibit you can point out examples from the Toy Store or Central Park)
10. Show the collection of small toys one at a time and get the visitors to find the simple machines within
them. After this is done, get them to look for simple machines in all areas of the exhibit.
Program: Mechanical Advantage
(Can also use the seesaw in Central Park and the pulley demo in the Welcome Center to expand on this
demonstration)
Materials Needed
• wood or cardboard box about 12” in height
• wood plank, 3 feet long and approx. 8 – 10” wide
• small wagon
• 4 soda cans (or any weight that will fit in wagon’s bed)
Page 15 of 40
Toolville User Manual
•
•
spring scale that goes up to 4 pounds
measuring tape
Procedures:
8. Have all the materials set out on a table in front of you.
9. Begin by showing the spring scale. Tell the visitors that this is an instrument used to measure weight.
Ask what it is (a scale). Tell them that it measures weight, but can also measure force. Pull on the scale
and show them that the harder you pull, the more force registers on the spring scale.
10. Weigh the wagon and the cans using the spring scale. Get the visitors to add the weights together to get
the total weight of wagon and cans. Tell them that to pick up the wagon and cans and put them on top
of the box, you will have to use ____ pounds of force. Put the wagon on top of the box, then place it
back on the table.
11. Ask if there is another way to get the wagon to the top of the box using less force. If you need to give a
hint, tell them they can use something that’s on the table. Someone will guess or know to use the wood
plank as a ramp. Ask what simple machine the ramp is (inclined plane).
12. Tell them that they’ve made a hypothesis, or a guess, that less force will be used and that now you will
test the hypothesis. Using the spring scale, slowly pull the wagon up the ramp, getting someone to
observe how much force is being used.
13. Say that using a simple machine makes it easier to lift the wagon, but there’s a catch. Measure the
distance from the tabletop to the top of the box (1 foot), and then measure the ramp’s length (3 feet).
Tell them that with the ramp you were able to use less force, but had to go a longer distance. This is a
“trade-off” called mechanical advantage. Making the distance longer made it easier to lift the wagon:
it required less force.
14. To sum up, mechanical advantage means, “longer is easier.” You can demonstrate this again using the
seesaw and moving the plank to change the fulcrum point or with the pulley demo.
Page 16 of 40
Toolville User Manual
MARKETING MATERIALS
A marketing disk can be found in Additional Materials section at the end of this manual. It includes
sample media releases, exhibit photos, and other files that will be helpful in marketing the exhibit locally.
Page 17 of 40
Toolville User Manual
INSTALLATION MANUAL
NOTE: As crates are unpacked, please save all packing materials and reuse.
Please complete “condition report – arrival” (Additional Materials) as the exhibit is unpacked and
installed.
GENERAL NOTES
Bolts, screws, and any other attaching devices for exhibit components are either already inserted into their
proper location in one of the pieces to be attached, or are in plastic bags attached to the component.
Five electrical plugs are needed for exhibit components: four in the Toy Store and one in the Construction
Site.
CRATES
There are 31 crates. There is no Crate 23, so crates number through 32. Each crate is marked with orange
dots; these dots show the bolts that are to be removed to open the crate; no other bolts should be removed.
All crates should be opened with the skids on the bottom.
PANELS
Panels in the Toolville exhibit serve to help create a “town” look by delineating areas of the town and
depicting scenes; they also provide structures for securing some components and provide space for display
of copy and graphics.
Toolville consists of six areas: Entry Arch, Welcome Center, Toolville Toy Store, Central Park,
Construction Site, and Pier Six. Use the ground plan to do preliminary planning of where you will place
each of the areas in your space and which of the optional configurations of panels you will use. Each of the
6 areas can stand alone, and therefore can be placed as best fits your space, although of course the Entry
Arch and Welcome Center need to be at an entry spot. Also, if you want to attach the saw bench to the
back of the ax panel for mutual stability (attachment explained later), the Welcome Center and Central Park
need to be adjacent to each other.
Panels are joined with cam locks; male/female hardware pieces are in the same place on each panel. To
allow for varying configurations of space in YMEC museums, some panels can be placed in varying
configurations. Some panels can be left out if desired, or placed perpendicular to other panels rather than
flat with them. In areas where this is an option, this manual so indicates, and the panels and trim pieces are
labeled accordingly. End caps are provided so that “walls” can be finished even if configured other than as
they were at CMOM. In Central Park and Pier Six, scenery is painted so that panels can be deleted without
disrupting the scene.
When you are ready to set up the exhibit, unpack the panels first, which are in Crates 1 - 7 and Crate 32.
Panels that are in each of these crates are noted in the attachment to the crate list. Panel numbers are on top
of each panel and correspond to the numbering on the ground plan and the elevation drawings. Trim in
each of the four areas Welcome Center, Toy Store, Central Park, and Pier Six has a different color of stain
on the top and bottom trim of the panels:
Area A: Entry Arch – No colored trim
Area B: Welcome Center – Purple
Area C: Toy Store – Pink
Area D: Central Park – Green
Area E: Construction Site – No colored trim
Area F: Pier Six – Blue
Page 18 of 40
Toolville User Manual
Panels are lettered/numbered consecutively, so that if all panels are used, the first panel on the left as you
face the area will be Panel A-1 and Panel A-2 will connect to it, etc. As an example, the photo below shows
how panel D-5 connects to panel D-6.
However, start with two corner panels for stability. Place the bottom trim first (labeled inside; top trim
says “Top”; bottom trim says “Bottom”). Horizontal arrows indicate that pieces are to be placed in an endto-end application; perpendicular arrows indicate a corner. (see photo below)
Trim pieces do not lock together. After the bottom trim pieces are placed, insert panels into the trim and
lock panels together with Allen wrench (provided--taped to edge of panels in several crates). Place top trim
last.
NOTE: Labels, photos, and graphics are also identified with the A, B, C, D, E, F letters corresponding to
their respective areas as listed above. When you are installing panels, ignore the letter-number
combinations on the front of panels that show you where labels, etc. go, until you get ready to actually
place labels. Then these notations show you exactly where each label goes, but until then the notations are
extraneous. Labels, photos, and graphics are all in Crate 8.
Page 19 of 40
Toolville User Manual
ENTRY ARCH
The Entry Arch consists of Panels A-1 through A-7. Two 4’x8’ panels will be installed on the left, making
an 8’ wide wall, holding the Otter Introduction graphics.
The same configuration on the right holds the Simple Six Introduction graphics.
Perpendicular to these walls are the 2’x8’ panels, with one displaying sponsor signs and the other, the
YMEC credit panel.
Page 20 of 40
Toolville User Manual
Place panels in this order: A-2 and A-3 in their location, A-5 and A-6 in theirs, then connect A-3 to A-5 by
placing A-4 which is an 88” header piece with the 103” Welcome to Toolville sign attached to it. The
header piece and the sign are attached together, making it one piece. Then place A-1 and A-7. (see photo
below)
Page 21 of 40
Toolville User Manual
WELCOME CENTER
As crates are unpacked, please save all packing materials and reuse.
There are 12 panels for the Welcome Center, Panels B-1 through B-6 and D-9 through D-14.
IMPORTANT NOTE: Panels D-9 through D-14 are actually part of the Welcome Center rather than
Central Park as their letter would imply. Also note the panel that the wedge (ax) is attached to is not
numbered.
Crates 9, 10, 11, and 12 contain Welcome Center components. One component, the directional pole, is in
Crate 26. (Crate 11 also contains the light boxes which go into the Toy Store.)
The gear/inclined plane station is a free-standing component (Panels B-5 and B-6, which are attached
together as one panel). (See photos below)
The Welcome Center arch connects to the top of the unit and this component should be oriented toward the
Entry Arch. Place the Welcome Center sign on top of the gear/inclined plane station using screws inserted
from the top.
Place the Archimedes screw near Panels B-1 and B-2.
The ax should be oriented toward the Welcome Center with its back against the wall.
The free-standing components can be placed in varying positions but need to be in as close proximity to
one another as feasible to help show that they make up one area.
Archimedes screw: Balls are packed separately, in a plastic caddy in same crate. Use an Allen wrench to
open the acrylic box at the top of the screw and drop the balls in. Do not insert more than 4 balls. The
balls will occasionally get stuck somewhere and lose their round shape. In this case, remove the damaged
ball. You can access them from the top box or the bottom of the acrylic tube, but try if at all possible to do
so from the top. If you must access the place where the balls enter the screw at the bottom of the acrylic
Page 22 of 40
Toolville User Manual
tube, do so carefully. We tried using a larger number of balls many times, but they got stuck much more
often; 4 is the optimum number though not as much fun.
Pulley comparison: Will not be disassembled for shipping; it will lie flat in its crate, which will unlock
from around it so that the unit can be stood up and put in place. It is very heavy and may require 4 people
to move it. In Memphis we placed the unit in front of Panels D-10, 11, and 12. An L-bracket should attach
the top of the pulley comparison unit to a panel. We attached it to Panel D-11. During the run of the
exhibit, periodically check and tighten all cable connections.
Gears: To attach gear box to panel, bring hinged piece perpendicular to back of gear box. Attach left and
right wall brackets to left and right ends of gear box using 2” coarse sheet rock screws. Attach entire unit
to panel using 6 screws, which are on the hinged piece.
Inclined plane station: No assembly required.
Ax: No assembly required.
Levers: Attach the three lever examples (shovel, wheelbarrow, and broom) to Panels B-3 and B-4 using
aircraft cable and eye-bolts. Screw in eye-bolts,and place the shovel tether first on the left using the hole
that is approximately 2’ from the bottom trim, the wheelbarrow tether in the middle approximately 1” from
bottom trim, and the broom tether third approximately 2’ from bottom trim.)
Flag pole: Attach to panel D-14. Put the two long sections of the flag pole together; put the two brackets
on the panel. Put top endcap on, lift pole and put bottom endcap on (rope will give enough for endcap to
go in place).
Directional sign post: Place in Welcome Center area wherever there is space to do so. Note that the signs
themselves insert into slots in the nail-shaped dowels which can be placed in varying holes so that the
directions can be correct wherever you place the different areas of Toolville.
Page 23 of 40
Toolville User Manual
TOOLVILLE TOY STORE
As crates are unpacked, please save all packing materials and reuse.
This area needs four 110 v grounded plugs, to accommodate the light boxes and the viewmaster.
The Toy Store has Panels C-1 through C-10. Crates 13, 14, 15, and 16 contain Toy Store components.
After the panels are set up, install the baseball bat light box on Panel C-2, the fire truck light box on Panels
C-3 and C-4, and the spinning top and viewmaster light box on Panel C-4 . Remove the wood strip from
the panel, slide the light box onto the bracket, and reattach the wood strip.
The train track light box goes on Panel C-8 and attaches differently: attach to panel with toggle bolts. The
fire truck should be positioned on the floor near the corresponding light box, being sure to leave at least 32”
so that the push buttons on the light boxes are wheelchair accessible. Use the same principle with the
Viewmaster and the train track.
The train track is turned upside down inside its table. Remove it, turn it upright, and place it on the table.
The train track pieces that are left together are glued together. Loose parts are in the plastic bin in the same
crate.
Page 24 of 40
Toolville User Manual
Open the back of the large Viewmaster piece to access the electrical cord and the light bulbs (key attached
to back for shipping). Light bulbs are F8T5 flourescent bulbs. You do not access the Viewmasters
themselves from the back. If you need to change out viewmasters (two extras in
Crate 13) or Viewmaster reels (extras taped inside back of large Viewmaster piece), remove round acrylicand-white-PVC piece from the plywood piece. DO NOT REMOVE ACRYLIC FROM PVC.
Attach the two shelves to the lower part of Panel C-10. Place the toys (animal-binoculars, xylophone, pullalong toy, bus, and pony carousel) on the shelves.
Page 25 of 40
Toolville User Manual
CENTRAL PARK
As crates are unpacked, please save all packing materials and reuse.
Panels D-0 through D-8 are available for use in Central Park. This is an area where optional alternate
configuring can be done with the panels. If you want to separate Areas C and D, there is an endcap for
Panel D-0. If you would like to shorten the space, you may leave out Panel D-4 and attach D-3 to D-5 at a
right angle. If you want to separate Area D and E, there is an endcap for D-8.
Climbing structure/slide:
The “steps” that make up the climbing structure are separated for shipping; even the tops of the steps are
disassembled.
For these instructions, the seven steps that make up the climbing structure will be called step bases, lettered
A through G smallest to largest. Each side of a step base where attachments are made are lettered, and step
bases attach in sequence. To assemble the climbing structure, start by attaching G-Left post-and-rail to the
angle iron, which stays on slide/bolt unit.
Next, place Step Base G (the tallest one) against slide/bolt unit underneath the entrance to the slide. One
person must go inside Step Base G and attach Step Base G to slide using 3 carriage bolts.
To attach G-Right rail, one person should place bolts through the post, the angle iron, and the step base.
Another person inside Step Base G tightens the nuts.
Attach Step Base F to Step Base G. Attach post-and-rail A to Step Base F. Remaining step bases should
be attached next, in backward alphabetic order (E, D, C etc.), but do not place step tops yet.
Next, attach Post-and-Rail E to Step Base E, Post &
Rail-C to Step Base C, and Rail D to Post C and Post E.
Attach Post E to Post G-Left using L-bracket. Attach
Post A to Post G-Right in same manner.
Put tops of step bases on last, beginning with A.
Corners of step bases are numbered 1, 2, and 3 and correspond to numbers inside tops.
Page 26 of 40
Toolville User Manual
Screws needed for fastening tops to step bases (1 ½” course sheetrock screws) are taped inside their
respective step bases. The final step is to place the yellow acrylic bolt top on top of the slide enclosure
unit.
The spiral slide assembly attaches to Step Base G as shown.
Page 27 of 40
Toolville User Manual
The completed slide:
Close-up:
Seesaw: Place the plywood base, then the seesaw, then the 4 rubber flooring pieces at the base.
Saw bench: Remove from crate and set in place.
Sit-n-Spin: Remove from crate and set in place.
Hammer bench: Remove from crate and set in place.
Page 28 of 40
Toolville User Manual
CONSTRUCTION SITE
As crates are unpacked, please save all packing materials and reuse.
The panels of the Construction Site, E-1 through E-8, are made of brick Masonite at the top and T-111 at
the bottom.
They attach by cam locks, in the same way and sequence as all other panels.
Crates 26, 27, and 28 contain components for this area, which are the building frame, the crane, the
elevator, the shelf with dress-up items, and the container with tools, building pieces, and construction
figures. The crane and the elevator attach to the building frame. Plastic “Briks,” construction hats, and
construction vehicles were placed inside the building for shipping. Remove the “Briks” while you have the
acrylic end pieces off for installing the crane (see below).
Remove the other items and place the hats on the wooden shelf and the construction vehicles and “Briks”
near the site.
Set the building frame in place first. The part where there is a gap in the acrylic is the back of the building,
opposite is the front, and the other two sides are the ends. Set the vertical part of the crane at the gap in the
acrylic.
Page 29 of 40
Toolville User Manual
Remove the two end pieces of acrylic to get access inside but do not remove any other acrylic. Bolt the
crane to the back of the building.
Set the boom of the crane (horizontal part) on top of the cab (the mustard-colored box). Attach using 6
bolts, which are in their proper location in the crane.
Remove the bolts that are in the counterbalance weight, slide the weight into its slot, and bolt the weight in
using the threaded inserts.
Connect the cable to the hook and tighten the turnbuckle. Reattach the acrylic side pieces of the building.
The electrical cord powering the boom is inside the cab and is accessed from the top. Jib control (for
changing the speed of panning) is also inside cab.
The winch is inoperable.
Page 30 of 40
Toolville User Manual
Set the elevator beside the building at the rear corner.
Attach the top horizontal flange and the bottom vertical flange to the building (bolt is welded inside at blue
circle).
Attach the shelf with hooks to Panel E-1.
Place the container for holding building pieces, tools, and construction figures where it best fits into your
space.
Page 31 of 40
Toolville User Manual
PIER SIX
As crates are unpacked, please save all packing materials and reuse.
Panels F-1 through F-10 are available for Pier Six. If you wish to shorten the area, any 2 of Panels F-5, F6, F-7, and F-8 can be removed. Also, you may use F-10 however you wish; there are endcaps for both
corners of that panel.
Components for Pier Six are in Crates 29, 30, and 31. The Pier Six wheelbarrow is in Crate 9. You may
place components in whatever configuration best fits your space. Pier flooring pieces may be placed in a
perimeter configuration, on two sides, or other. Pier pilings are numbered on their bottom to be bolted at
the corresponding numbers on the flooring.
Place the clam mover (conveyor) so that there is room for the clam box at the exit end of the machine and
so that the wheel is accessible. Place the bucket inside the clam box.
Place the black table, put the scale and weights on it, and put the otters around the area.
As crates are unpacked, please save all packing materials and reuse.
Page 32 of 40
Toolville User Manual
De-installation
Please take the following actions:
1.
Complete “Condition Report – Departure” (Additional Materials).
2.
Clean exhibit parts thoroughly.
3.
Touch up chipped paint if possible.
4.
Pack labels, photos, and graphics in Crate 8.
5.
Follow Installation Manual backward.
6.
For each area, place items that arrived in plastic caddies back into their caddies. Each caddy is labeled
with what goes inside. In the Construction Site, hard hats and construction vehicles may be placed on
top of the building structure for shipping.
7.
Either re-insert bolts, screws, and other attaching devices into their proper locations in one of the
attached pieces, or place them in plastic bags and attach to the component.
8.
After panels are disassembled make sure Allen wrenches are replaced into the toolbox.
9.
Bubble-wrap trim pieces; they do not have crates.
Page 33 of 40
Toolville User Manual
Paint/Finish Schedule
The six simple tools components of the exhibit are color-coded as follows:
Wheels
red
ICI DULUX
8371A H
Wedges
green
“
“
L8094A H
Levers
blue
“
“
Reflex blue
Screws
yellow
“
“
45005A K
Pulleys
purple
“
“
43020A H
Inclined planes
orange
“
“
N3915HN W
Panels in the exhibit are finished with Porter Hi-Hide™ interior oil satin in Pinto White. Use 129 light
base.Formula is 9J 1½K 5T 2YV
Panel trim is finished with Sherwin Williams Wood Classics™ stains as follows:
Welcome Center trim
Toy Store trim
Central Park trim
Pier 6 trim
Candied Violet
Precious Pink
Jamboree Jade
Aquarius
SW 3137-K
SW 3136-K
SW 3139-K
SW 3138-K
Scenic panels (Toy Store, Central Park, Pier 6) and T-111 panels (Construction Site) are coated with
Breakthrough™ “Clear Advantage™ 55-0,” satin finish (Vanex, Inc. Mt. Vernon, IL).
Paint schedule by component:
Component
Color
Color #
Manufacturer
Candied Violet
SW 3137-K
blue
Reflex blue
Sherwin Williams Wood
Classics™ stain
ICI DULUX
green
L8094A H
ICI DULUX
orange
red
N3915HN W
8371A H
ICI DULUX
ICI DULUX
Welcome Center
Welcome Center panel
trim
ax handle, shovel
handle, wheelbarrow
handles, broom handle
ax head, shovel scoop,
wheelbarrow body
inclined plane box
wheelbarrow wheel,
wagon wheels
auger in Archimedes’
screw
Toy Store
Toy Store panel trim
yellow
45005A H
ICI DULUX
Precious Pink
SW 3136-K
Sherwin Williams Wood
Classics™ stain
Central Park
Central Park trim
Jamboree Jade
SW 3139-K
center wheel: sit & spin
seesaw
red
blue
8371A H
Reflex blue
Sherwin Williams Wood
Classics™ stain
ICI DULUX
ICI DULUX
Page 34 of 40
Toolville User Manual
Component
Color
Color #
Manufacturer
Construction Site
elevator pulleys
elevator wheel & crank
Pier 6
purple
red
43020A H
8371A H
ICI DULUX
ICI DULUX
Pier 6 panel trim
Aquarius
SW 3138-K
pier flooring, pier
pilings
Pinto White
clam machine wheel
clam machine top
(inclined plane)
balance scale
red
orange
Use 129 light base
Formula is 9J 1½K 5T
2YV
8371A H
N3915HN W
Sherwin Williams Wood
Classics™ stain
Porter Paints
blue
Reflex blue
Page 35 of 40
ICI DULUX
ICI DULUX
ICI DULUX
Toolville User Manual
Crate List
NOTE: As crates are unpacked, please save all packing materials and reuse.
Crate Number
Contents
1- 4
Wall panels
crate #1: F1-F10
crate #2: C7, C8, C10, D2 - D8, D11
crate #3: B1 - B4, D9, D10, D12, D13, D14, F10
crate #4: E1- E8
Wall panels
crate #5: A1, A2, A3, A5, A6, A7
crate #6: not noted
crate #7: A4
Graphic/label signage
Archimedes screw and base, flag pole, flag
Ax and attached panel
Wooden gears, inclined plane & box, toy
shovel/wheelbarrow/broom, light boxes
Pulley comparison unit
Viewmaster unit
Slide pieces
Train set and table, loose scenery pieces, toys
Fire truck
See-saw
2 benches (“hammer bench” and “saw bench”)
Sit-n-spin
Steps of climbing structure
There is no crate 23
Rails
Slide pieces
Crane, elevator, directional pole
Steel building frame, toy bricks
2 bins, miscellaneous toys
Pier flooring pieces, 4 pilings
Table, scale, toy clams, toy otters, miscellaneous toys
Conveyor, clam box
Panels
5-7
8
9
10
11
12
13
14
15
16
17
18
19
20-22
23
24
25
26
27
28
29
30
31
32
Page 36 of 40
Dimensions
WxLxH
3’ x 3’6” x 8’
2’ x 4’6” x 8’6”
2’ x 4’ x 2’6”
3’ x 4’ x 6’
1’6” x 4’ x 7’6”
3’ x 5’ x 6’6”
2’6” x 4’ x 7’
2’6” x 5’6” x 6’6”
52” x 104” x 45”
2’x3’ x 4’6”
2’ x 2’6” x 4’
2’6” x 3”6” x 7’6”
2’ x 3’6” x 6’
2’6” x 3’6” x 3’6”
3’ x 4’6” x 5’6”
2’ x 3’6” x 8’6”
47” x 83” x 46”
3’ x 3’ x 9’
3’6” x 4’6” x 5’
4’ x 4’ x 2’6”
3’6” x 3’6” x 8’
2’ x 3’ x 6’6”
2’ x 3’ x 8’
2’ x 4’6” x 7’
Toolville User Manual
Crate list, continued
Crate #
Panels
1
2
3
4
5
6
7
32
F1-F10
C7, C8, C10, D2 - D8, D11
B1 - B4, D9, D10, D12, D13, D14, F10
E1- E8
A1, A2, A3, A5, A6, A7
Not noted
A4
Not noted
Page 37 of 40
Toolville User Manual
Props Inventory
Please record the number of props when receiving the exhibit and before
shipping it out.
Fax to Jim Hyde at (901) 458-4033
WELCOME CENTER PROPS
ITEM
COMPONENT
# USED IN
EXHIBIT
# OF
BACKUPS
# UPON
RECEIPT
/SHIPPING OF
EXHIBIT
SHIPPED IN
CRATE #
balls
Archimedes screw
4
8
9
wagons
inclined plane demo
2
2
11
gears &
accessories
wheel / gear demo
12
11
broom
lever demo
1
1 gear of each
size; 4 yellow
pegs; 1
handle
1
11
wheelbarrw
lever demo
1
1
11
shovel
flagpole
flag
cord for flag
flag
flag
flag
1
1
1
1
1
0
0
1
11
9
9
9
TOY STORE PROPS
ITEM
COMPONENT
# USED IN
EXHIBIT
# OF
BACKUPS
spiral twister
display set
table base
hand car
cargo train
peoples express
auto train
xylophone
phonics bus
Marco jack-in-thebox
spider push toy
carousel
animal binoculars
Viewmaster
viewers
Viewmaster reels
train set
1
0
15
train set
train set
train set
train set
train set
toy shelves
toy shelves
toy shelves
1
1
1
1
1
1
1
1
0
0
0
0
0
0
0
0
15
15
15
15
15
15
15
15
toy shelves
toy shelves
toy shelves
oversized
Viewmaster
oversized
Viewmaster
Fire Engine
1
1
1
2
0
0
1
4
15
15
15
15
2
2
13
1
0
16
Fire Engine
Page 38 of 40
# UPON
RECEIPT OF
EXHIBIT
SHIPPED IN
CRATE #
Toolville User Manual
CONSTRUCTION SITE PROPS
ITEM
COMPONENT
# USED IN
EXHIBIT
# OF
BACKUPS
# UPON
RECEIPT OF
EXHIBIT
SHIPPED IN
CRATE #
Briks ®
hard hats
safety vests
gloves
safety glasses
9/16” wrenches
bolts
nuts w/welded
flange
toy measuring
tapes
toy construction
vehicles
front loader
cement mixer
backhoe
dump truck
building
building
building
building
building
building
building
building
60
4
4
6 pr.
5
4
88
30
0
4
4
3 pr.
5
0
0
0
27
27
27
27
27
28
28
28
building
2
2
28
1
0
all in 27
1
0
1
1
0
0
1
1
all in 28
1
1
1
6
18
1
1
1
6
0
27
28
building
note: use 2 vehicles
at a time in exhibit,
use other 2 for
replacement
Bendos
construction men:
Bulldozer w/
Scoop
Jack
Gruff
Digger
building
work aprons
brick Masonite
pieces
building
building
PIER 6 PROPS
ITEM
COMPONENT
# USED IN
EXHIBIT
# OF
BACKUPS
clams (filled w/
rubber)
acrylic counter
weights
pier
100
80
30
balance scale
4
0
30
bucket, gray
bucket, clear
plastic w/ color rim
shovel, 21”
scoop, 8 ¼”
pail set
wheelbarrow
clam grabbers
(pooper scoops)
plush otters
clam machine
pier
2
1
1
0
30
30
pier
pier
pier
pier
pier
1
1
1
1
1
1
1
1
0
1
30
30
30
9
30
pier
5
0
30
VENUE:_______________________________
DATE: _____________
# UPON
RECEIPT OF
EXHIBIT
SHIPPED IN
CRATE #
____ INCOMING ____ OUTGOING
PERSON COMPLETING THIS REPORT: _____________
Page 39 of 40
Toolville User Manual
Maintenance Checklist
WELCOME CENTER
Archimedes Screw
• Daily: Turn wheel to ensure that the screw is operating properly.
• Daily: Perform a visual check of balls and, if any are dented, replace them by opening the top acrylic
box using a 4mm Allen wrench.
• Frequently: Clean acrylic with “Brillianize” or other cleaner formulated for acrylic.
Pulley Comparison
• Daily: Be sure the unit remains attached to wall panel. NOTE: Although we do not believe that the
unit could move at all if it were freestanding, for extra protection, please be sure the attachment to the
wall panel remains secure. Children are prone to take extreme measures in pulling on the ropes, such
as putting their feet against the bottom of the unit, teaming up with other children to pull, etc.
• Weekly: Check and tighten all cable connections. (Remove acrylic front piece to access cables.)
TOOLVILLE TOY STORE
Viewmaster
• Daily: Check reels in both viewmasters, and reposition or replace if necessary.
• To access viewmasters, remove round acrylic-and-white-PVC piece from the plywood piece. DO
NOT REMOVE ACRYLIC FROM PVC. If otter reels and backup otter reels become unusable, you
may use any Viewmaster reels (purchase at toy store). Please send damaged reels back to CMOM.
Train Set
• Daily: Check mountain track piece (the steepest piece of track) to be sure it has not become
unattached from its support block; if it has, re-glue it using Liquid Nails or similar adhesive.
CENTRAL PARK
Sit n Spin
• Weekly: Check underside for wear, or loose casters.
Bolt Slide
• Frequently: Clean acrylic with Brillianize or similar cleaner.
CONSTRUCTION SITE
Building Frame
• As often as possible: Remove “brick” siding pieces that visitors have attached to building so that
others can repeat the activity.
Elevator
• Monthly: Lubricate with machine oil at all moving parts along threaded shaft.
Page 40 of 40