1
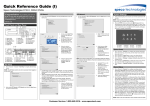
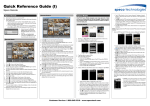
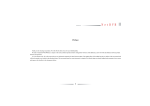
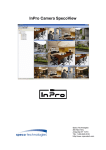
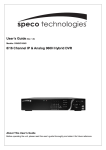
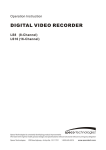
Quick Reference Guide (I) Speco Technologies D16CX DVR Congratulations on purchasing your new CX 2. Set the system Date/Time and select the date/time Format. 3. Set the Time Zone. It can be selected on the map. 4. Set the system to use Daylight Saving Time. DVR. We hope that this Quick Reference Guide will help you quickly setup and configure your new Speco Technologies DVR. Thanks you! Front Panel and Rear Panel Menu Button Play/Stop Button Play/Pause Button USB Port Copy Button Camera Buttons HDD LED 5. Select the desired recording mode from: Motion Event Record, Continuous & Motion Event Record, and Continuous Record. Record Setup 1. Go to <Record> <Record Settings> to configure recording settings. 2. Highlighting Recycle and pressing the button toggles between On and Off. In the Recycle mode, the DVR records over the oldest video data once all available storage space has been used. When Recycle is turned off, the DVR stops recording once all available storage space has been used. 3. Highlight Use Panic Recording and press the button to toggle between On and Off. When setting to On, set the length of time of the duration, images per second, quality and resolution for panic recording. Recording Schedule HVQPP (High Video Quality Priority Profile, Very High (D1/960H) Resolution): 30.00 ips @ D1/960H for Time Record and Post-Event Record. SRP (Standard Recording Profile, High (2CIF/H960H) Resolution): 5.00 ips @ 2CIF/H960H for Time Record and 30.00 ips @ D1/960H for Post-Event Record. LRTPP (Longer Recording Time Priority Profile, Standard (CIF/Q960H) Resolution): 3.00 ips @ CIF/Q960H for Time Record and 5.00 ips @ 2CIF/H960H for Post-Event Record. 7. Select the Finish button to finish the EZ Record and select the Go to EZ Network button to start the EZ Network. EZ Setup 1. Go to <System> <General EZ Setup> to display the EZ Setup screen. 2. Select either EZ Record or EZ Network and select the Next button to start the selected setup. 5. Set the DVR to use the DVRNS service. 6. Enter the DVR name to be registered on the DVRNS server. 7. Select the Test box to check whether or not the DVR Name you entered can be used. 8. Select the Finish button to finish the EZ Network. 6. Go to <System> <Storage> to display information about the DVR’s storage devices. 7. Go to <System> <Capacity Estimator> to calculate the recordable time. 8. Go to <System> <System Event> to configure System Event settings. NOTE: The network configuration you set should be tested by selecting Test, otherwise the Next button will cannot be selected, and you cannot move to the next step. 6. Select the desired video quality profile from: HVQPP, SRP and LRTPP. Esc Button Arrow Buttons Power LED Video Input Audio In/Out Alarm In/Out Factory Reset Switch Video Out Network Port RS232 Port RS485 Port Power Cord Connector 3. Select between Auto Configuration and Manual Configuration for network configuration. 4. Select the Test button to test the network configuration you selected. 1. Go to <Record> <Schedule> to set up the recording schedule. 2. Highlight Schedule On and press the button to toggle between On and Off. In the Schedule On mode, the DVR records video based on the schedule established in the Schedule screen. When turning Schedule recording Off, you will be asked to confirm your decision. Panic recording will function even when Schedule is turned off. System Setup 1. After connecting the power cord, the unit will be operational in 50 seconds. NOTE: There is no record button on the unit. Please refer to the Record Setup section for the proper record settings. 2. Press the MENU button and then select (Setup) in the Live Monitoring menu, enter the password then press the button. There is no default password when logging in the admin user for the first time. To assure the secure management of the system, setting up a password is strongly recommended. 3. Select the schedule mode between Simple Mode and Advanced Mode first. Highlight the + and press the button to add a schedule item, and highlight the box under the heading and press the button to delete the recording settings. EZ Network 1. If you selected the Go to EZ Network, select the Next button to start the EZ Network. NOTE: Refer to the User’s Manual for each schedule mode for details. Pre-Event Recording EZ Record 1. If you selected the EZ Record, selecting the Next button starts the EZ Record. 2. Select whether or not your DVR is connected to the Internet. 3. Go to <System> <General> to configure the general information, show the system log, clear all data, run the setup wizard, and shut down the system. 4. Go to <System> <Date/Time> to enter a new date and time, set up the time synchronization between the DVR and the time server, and set up holidays. 5. Go to <System> <User> to add and delete groups and users. Customer Service: 1.800.645.5516 • www.specotech.com 1. Go to <Record> <PreEvent> to set up pre-event recording. 2. You can turn individual cameras On or Off for preevent recording and set the image speed, image quality, resolution and the amount of time to record prior to the event (dwell). NOTE: When the DVR is in the Time or Time & Event mode, it ignores the pre-event settings and follows the time settings. Quick Reference Guide (II) Speco Technologies D16CX DVR Camera Setup Display Setup 1. Go to <Display> <OSD, Main Monitor > to select what information will be displayed on the monitor and set up the main monitor. 1. Go to <Camera> <General, PTZ > to turn On or Off each camera, assign camera titles, hide the video of covert cameras, and select the width resolution, and set up PTZ cameras. 2. Press the MENU button while in the Search mode to display the Search Menu. Select the type of search using the arrow buttons and press the button. ① ② ③ ④ ⑤ ⑥ ⑦ ⑧ ⑨ ⑩ ⑪ ⑫ ⑬ ⑭ Event Action Settings Device Setup 1. Go to <Device> <Audio> to select which camera you want associated with what audio input and enable audio out. 2. Go to <Device> <Digital Deterrent> to set up the DVR to sound when events are detected. 3. Go to <Device> <Alarm-Out> to establish a schedule and set titles for each alarm output from the DVR. 4. Go to <Device> <Remote Control> to select a port and make correct settings for a remote control device. 5. Go to <Device> <Alarm-Out> to establish a schedule and set titles for each alarm output from the DVR. 6. Go to <Device> <Remote Control> to select a port and make correct settings for a remote control device. 1. Go to <Event> <Motion, Alarm-In, Video Loss, Video Blind, Text-In> to configure the event action settings. 2. In each Event screen, you can set the actions (Record, Alarm-Out, Notify, PTZ and Digital Deterrent) the DVR will take whenever it detects motion, senses alarm input, detects loses video, detects video blind and senses text input. 3. Go to <System> <System Event> to configure the system event action settings. 4. In the System Event screen, you can set the actions (Alarm-Out and Notify) the DVR will take when it detects system events. Network Setup 1. Go to <Network> <Network> to set the transfer speed and remote quality to limit bandwidth used to the remote site. Search Go To Bookmark Display Previous Group Next Group Alarm Digital Deterrent Panic Camera Menu Export Status Data Source Exit Event Search 1. Go to <Search Menu> <Search Event Log Search, Motion Search, Text-In Search>. The event log list will be shown on the screen. Highlight the event you would like to see and press the button. For more specific search conditions, select <Option> and enter search parameters then select <Search>. The search results will be displayed in each screen. 2. Pressing the button will start playing the “event” video segment. Press the PLAY/STOP button to return to live monitoring. Compact View Standard View 2. Selecting the and icon located at the bottom switches to other view modes. 3. Selecting displays eight or 12 hours (1-minute based), and selecting displays 24 hours (3-minute based) at once. 4. Selecting located at the bottom displays the Calendar Search screen. 5. Selecting in the top-right corner displays the Search menu. Expanded View Go To Search 1. Go to <Search Menu> <Go to>. Selecting <Go to the First> displays the first recorded image, selecting <Go to the Last> displays the last recorded image, and selecting <Go to the Date/Time> displays the Go to the Date/Time screen. 2. Enter a specific date and time and select OK by pressing the button. The button and arrow buttons to review the video. EZ Search Go to <Search Menu> <Search EZ Search>. When entering the EZ Search mode for the first time, the DVR will play video in 4x4 display format starting with the first recorded image using the Day precision (default). NOTE: When There are there precision levels: Day, Hour and Minute. SNS Notification The DVR can be set up to post a message via SNS (Social Network Service) when an event occurs. Go to <Notification> <SNS> to add and edit the SNS account. The SNS account can be turned On or Off by highlighting the boxes under the No. heading and pressing the button. Clip-Copy The Clip-Copy screen can be used to copy video to an external USB hard disk or flash drives. The clip copy can be simply done by pressing the COPY button 2. Go to <Network> <LAN> to select the type of network configuration first then set up LAN parameters for the selected network configuration. 3. Go to <Network> < DVRNS, RTSP, Speco Remote, VNC> to configure DVRNS, RTSP, Speco Remote and VNC service settings. 1. To add an SNS account, highlight the + and press the button. 2. Highlight the box beside Type and press the button. Select Twitter from the Type allows you to post a tweet on Twitter when an event occurs. 3. Highlight the box beside User Name/Password and press the button. NOTE: The Clip Copy feature requires the camera title or number along with the date and time of the recorded images to be copied. To view the copied images, remove the USB device from the DVR and install it to any PC with a USB port. On the PC access the USB drive device and select the image file name. The executable Clip Player software program will open automatically displaying playback controls for viewing the video clip. Search and Playback 1. Press the PLAY/STOP button to enter the Playback mode. If a user who has Search authority logs into the system, the user can view recorded images. Record Table Search 1. Go to <Search Menu> <Search Record Table Search>. Recording information about video images currently displayed on the screen displays on the recording status bar. 4. Go to <Notification> <Schedule> to add and edit notification schedules. Highlight the + and press the button to add a schedule. V1.0 Customer Service: 1.800.645.5516 • www.specotech.com