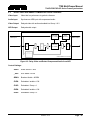
1
7700 MultiFrame Manual 7746FS/FSE/FSE-GPI Series Frame Synchronizer TABLE OF CONTENTS 1. OVERVIEW ....................................................................................................................................... 1 2. INSTALLATION ................................................................................................................................. 4 2.1. HD AND SDI VIDEO INPUTS AND OUTPUTS ......................................................................... 4 2.2. GENLOCK REFERENCE ......................................................................................................... 5 2.3. AES AUDIO CONNECTIONS (7746FS-EAES4-HD VERSION ONLY) ..................................... 5 2.4. GENERAL PURPOSE INPUT (GPI) AND GENERAL PURPOSE OUTPUT (GPO) TERMINAL CONNECTIONS (7746FSE-GPI-HD VERSION ONLY) ......................................... 5 2.4.1. GPI and GPO Configuration ............................................................................................ 6 2.4.2. GPI, GPO and Pin Assignment ....................................................................................... 7 3. SPECIFICATIONS ............................................................................................................................. 8 3.1. SERIAL VIDEO INPUT ............................................................................................................. 8 3.2. SERIAL VIDEO OUTPUT.......................................................................................................... 8 3.3. GENLOCK INPUT..................................................................................................................... 8 3.4. AES AUDIO INPUTS AND OUTPUTS (-EAES4 VERSIONS ONLY) ........................................ 8 3.5. GENERAL PURPOSE INTERFACE INPUTS/OUTPUTS .......................................................... 9 3.6. PROCESSING FUNCTIONS ..................................................................................................... 9 3.7. INPUT TO OUTPUT PROCESSING DELAY............................................................................. 9 3.7.1. Video Processing Delay .................................................................................................. 9 3.7.2. Audio Processing Delay ................................................................................................ 10 3.8. DATA LOGGING SERIAL PORT ............................................................................................ 10 3.9. ELECTRICAL.......................................................................................................................... 11 3.10. PHYSICAL .............................................................................................................................. 11 4. STATUS LEDS ................................................................................................................................ 12 4.1. MODULE STATUS LEDS ....................................................................................................... 12 4.2. AUDIO CHANNEL LEDS ........................................................................................................ 12 4.3. AUDIO CHANNEL AND SUB-BOARD STATUS LEDS (7746FSE-GPI-HD VERSION ONLY)..................................................................................................................................... 13 4.4. SUB-BOARD STATUS LED ................................................................................................... 13 5. CARD EDGE CONTROLS .............................................................................................................. 14 5.1. ENABLING VISTALINK® CONTROL OF THE FRAME SYNCHRONIZER ............................. 14 Revision 1.6.3 Page - i 7700 MultiFrame Manual 7746FS/FSE/FSE-GPI Series Frame Synchronizer 5.2. SELECTING THE DOT MATRIX DISPLAY ORIENTATION ................................................... 15 5.3. SELECTING THE VIDEO FORMAT........................................................................................ 15 6. CARD EDGE MENU SYSTEM ........................................................................................................ 16 6.1. NAVIGATING THE MENU SYSTEM ....................................................................................... 16 6.2. TOP LEVEL MENU STRUCTURE .......................................................................................... 17 6.3. DISPLAYING THE MODULE STATUS ................................................................................... 18 6.4. CONFIGURING THE VIDEO PARAMETERS ......................................................................... 20 6.4.1. Adjusting the Output Video Phase ................................................................................ 20 6.4.2. Setting Additional Frames of Synchronizer Delay for the Video .................................... 22 6.4.3. Setting the Action on Loss of Video (Freeze Mode) ...................................................... 22 6.5. CONFIGURING THE VIDEO PROCESSING FUNCTIONS .................................................... 23 6.5.1. Setting the Video Black Level (Brightness) ................................................................... 23 6.5.2. Setting the Video Luminance Level (Contrast) .............................................................. 24 6.5.3. Setting the Video Chroma Level (Saturation) ................................................................ 24 6.5.4. Setting the Video Hue (SD Video Only)......................................................................... 24 6.6. CONFIGURING THE FRAME LOCK PARAMETERS (SD VIDEO ONLY) .............................. 24 6.6.1. Setting the Frame Lock Mode ....................................................................................... 24 6.6.2. Setting the V Bit Transition Line .................................................................................... 25 6.7. CONFIGURING THE ACTIVE FORMAT DESCRIPTION (AFD) PARAMETERS .................... 25 6.7.1. Setting the Active Format Description Mode ................................................................. 25 6.7.2. Setting the Active Format Embed Line .......................................................................... 25 6.7.3. Setting the Active Format Control Code ........................................................................ 26 6.7.4. Setting the Active Format Description Aspect Ratio ...................................................... 28 6.7.5. Setting the Active Format Description Bar Type ............................................................ 28 6.7.6. Setting the Active Format Description Bar Size ............................................................. 28 6.8. CONFIGURING THE AUDIO PARAMETERS ......................................................................... 28 6.8.1. Setting the Audio Sample Rate Converter Mode (not available on 7746FS-HD version) ......................................................................................................................... 28 6.8.2. Setting the Audio Breakout Mode (7746FS-EAES4-HD version only) ........................... 29 6.8.3. Selecting the Audio Groups That Will Be De-embedded ............................................... 29 6.8.4. Selecting The Audio Groups That Will Be Embedded ................................................... 29 6.8.5. Setting Additional Frames of Synchronizer Delay for the Audio .................................... 30 6.8.6. Adjusting Synchronizer Delay for the Audio .................................................................. 30 6.8.7. Selecting the Audio Source (7746FS-EAES4-HD version only)..................................... 31 6.9. CONFIGURING THE AUDIO PROCESSING FUNCTIONS .................................................... 31 6.9.1. Re-mapping the Audio Channels .................................................................................. 32 6.9.2. Setting the Audio Levels ............................................................................................... 32 6.10. CONFIGURING THE VIDEO THUMBNAIL FUNCTIONS ....................................................... 33 6.11. CONFIGURING THE LINE BLANKING CONTROLS ............................................................. 33 7. EVENT LOGGING ........................................................................................................................... 34 8. JUMPERS ....................................................................................................................................... 35 Page - ii Revision 1.6.3 7700 MultiFrame Manual 7746FS/FSE/FSE-GPI Series Frame Synchronizer 8.1. SELECTING WHETHER LOCAL FAULTS WILL BE MONITORED BY THE GLOBAL FRAME STATUS .................................................................................................................... 35 8.2. CONFIGURING THE MODULE FOR FIRMWARE UPGRADES ............................................. 36 8.3. SELECTING WHETHER THE GENLOCK REFERENCE INPUT IS TERMINATED ................ 36 8.4. SELECTING WHETHER THE DARS REFERENCE INPUT IS TERMINATED (7746FS-EAES4-HD ONLY) ................................................................................................... 36 8.5. RESETTING THE MODULE TO ITS FACTORY DEFAULT CONDITION ............................... 37 9. TYPICAL CONFIGURATIONS ........................................................................................................ 39 9.1. SYNCHRONIZE VIDEO WITH EMBEDDED AUDIO (UNCOMPRESSED) ............................. 39 9.2. SYNCHRONIZE VIDEO WITH SEPARATE AES AUDIO ........................................................ 40 9.3. DELAY VIDEO AND EMBED COMPRESSED AUDIO FROM AES ........................................ 41 9.4. SYNCHRONIZE VIDEO WITH EMBEDDED COMPRESSED AUDIO, OUTPUT THE AUDIO TO EXTERNAL DECOMPRESSOR AND THEN SYNCHRONIZE AND EMBED THE UNCOMPRESSED AUDIO ............................................................................... 42 9.5. DELAY VIDEO WITH EMBEDDED UNCOMPRESSED AUDIO, OUTPUT THE AUDIO TO EXTERNAL COMPRESSOR AND THEN EMBED THE COMPRESSED AUDIO .................................................................................................................................... 43 9.6. SYNCHRONIZE VIDEO AND DEMUX AUDIO TO AES OUTPUTS, AND EMBED NEW AUDIO FROM AES INPUTS.......................................................................................... 45 10. VISTALINK® REMOTE MONITORING/CONTROL .......................................................................... 46 10.1. WHAT IS VISTALINK®? .......................................................................................................... 46 10.2. VISTALINK® MONITORED PARAMETERS ............................................................................ 47 10.3. VISTALINK® CONTROLLED PARAMETERS ......................................................................... 48 10.4. VISTALINK® TRAPS ............................................................................................................... 54 10.5. INTELLIGAIN® CONFIGURATION (7746FSE-IG-HD AND 7746FS-EAES4-IG-HD VERSIONS ONLY) ................................................................................................................. 54 11. DIP SWITCH QUICK REFERENCE ................................................................................................ 55 Revision 1.6.3 Page - iii 7700 MultiFrame Manual 7746FS/FSE/FSE-GPI Series Frame Synchronizer Figures Figure 1-1: Frame Synchronizer Block Diagram ................................................................................................... 3 Figure 2-1: Module Rear Panels............................................................................................................................ 4 Figure 2-2: GPI Input Circuitry ............................................................................................................................... 6 Figure 2-3: GPI Output Circuitry ............................................................................................................................ 6 Figure 2-4: GPI and GPO Connections ................................................................................................................. 7 Figure 4-1: Audio Channel and Sub-Board Status LEDs .................................................................................... 13 Figure 6-1: Tri-Level Reference Timing .............................................................................................................. 21 Figure 6-2: Bi-Level Reference Timing................................................................................................................ 21 Figure 6-3: AFD Control Codes ........................................................................................................................... 27 Figure 6-4: VistaLINK® PRO - Line Blank Controls ............................................................................................. 33 Figure 8-1: Location of Jumpers on 7746FS-HD ................................................................................................ 35 Figure 8-2: Location of Jumpers on 7746FSE, 7746FSE-HD and 7746FS-EAES4-HD ..................................... 35 Figure 9-1: Synchronize Video with Embedded Audio (Uncompressed) ............................................................ 39 Figure 9-2: Synchronize Video with Separate AES Audio ................................................................................... 40 Figure 9-3: Delay Video and Embed Compressed Audio from AES ................................................................... 41 Figure 9-4: Synchronize Video with Embedded Compressed Audio, Output the Audio to External Decompressor and then Synchronize and Embed the Uncompressed Audio .................................. 42 Figure 9-5: Delay Video with Embedded Uncompressed Audio, Output the Audio to External Compressor and then Embed the Compressed Audio ..................................................................... 43 Figure 9-6: Synchronize Video and De-embed Audio to AES Outputs, and Embed New Audio from AES Inputs ................................................................................................................................ 45 Figure 10-1: VistaLINK® 7746FSE-GPI-HD+SCTE104 Configuration View........................................................ 54 Tables Table 3-1: Audio Processing Delay ..................................................................................................................... 10 Table 4-1: Measured Level and Approximate Colour .......................................................................................... 13 Table 5-1: DIP Switch Functions ......................................................................................................................... 14 Table 5-2: VistaLINK® Control Switch Settings ................................................................................................... 14 Table 5-3: Display Mode Switch Settings ............................................................................................................ 15 Table 5-4: Video Standard Switch Settings ......................................................................................................... 15 Table 6-1: Valid Standard and Genlock Combinations ....................................................................................... 20 Table 6-2: Freeze Mode Settings ........................................................................................................................ 22 Table 6-3: AFD Mode Selection .......................................................................................................................... 25 Table 6-4: AFD Embed Line ................................................................................................................................ 25 Table 6-5: AFD Aspect Ratio ............................................................................................................................... 28 Table 6-6: AFD Bar Type..................................................................................................................................... 28 Table 6-7: Sample Rate Converter Settings ........................................................................................................ 28 Table 6-9: Audio De-Embedder Group Settings.................................................................................................. 29 Table 6-10: Audio De-Embedder Group Settings................................................................................................ 30 Table 6-11: Audio Embedder Group Settings ..................................................................................................... 30 Table 6-12: Audio Delay Settings ........................................................................................................................ 30 Table 6-13: Audio Delay Settings ........................................................................................................................ 31 Table 6-14: Audio Source Settings ...................................................................................................................... 31 Table 6-15: Output Audio Channel Source Selection .......................................................................................... 32 Table 7-1: Common Logged Event Messages .................................................................................................... 34 Table 7-2: Logged Event Messages only on EAES4 version .............................................................................. 34 Table 10-1: VistaLINK® Monitored Parameters ................................................................................................... 47 Table 10-2: VistaLINK® Controlled Parameters .................................................................................................. 53 Table 10-3: VistaLINK® Traps .............................................................................................................................. 54 Page - iv Revision 1.6.3 7700 MultiFrame Manual 7746FS/FSE/FSE-GPI Series Frame Synchronizer REVISION HISTORY DESCRIPTION REVISION DATE 1.0 First Release Apr 2004 1.1 Updated for firmware release 2v0 build 3 Aug 2004 1.2 Updated to include new product versions: 7746FSE and 7746FSE-HD Mar 2005 1.3 Updated Figure 5 and 6 to show AES LEDs. Updated DIP instructions for piano key DIP switch, corrected menu text. May 2005 1.4 Added documentation for –GPI and SCTE104 Option Feb 2008 1.5 Added SCTE 104 VistaLINK® controlled parameters Feb 2008 1.6 Added documentation for AFD and line blanking. Updated rear plate drawings. Apr 2008 1.6.1 Added note about jumper location on the (c)7700-AES4-3 sub-module Aug 2008 1.6.2 Updated step 9 for the “Reset Procedure” (section 8.5). General cleanup. Jan 2009 1.6.3 Added product version: 7746FS-EAES4-IG-HD Dec 2012 Information contained in this manual is believed to be accurate and reliable. However, Evertz assumes no responsibility for the use thereof nor for the rights of third parties, which may be affected in any way by the use thereof. Any representations in this document concerning performance of Evertz products are for informational use only and are not warranties of future performance, either expressed or implied. The only warranty offered by Evertz in relation to this product is the Evertz standard limited warranty, stated in the sales contract or order confirmation form. Although every attempt has been made to accurately describe the features, installation and operation of this product in this manual, no warranty is granted nor liability assumed in relation to any errors or omissions unless specifically undertaken in the Evertz sales contract or order confirmation. Information contained in this manual is periodically updated and changes will be incorporated into subsequent editions. If you encounter an error, please notify Evertz Customer Service department. Evertz reserves the right, without notice or liability, to make changes in equipment design or specifications. Revision 1.6.3 Page - v 7700 MultiFrame Manual 7746FS/FSE/FSE-GPI Series Frame Synchronizer This page left intentionally blank Page - vi Revision 1.6.3 7700 MultiFrame Manual 7746FS/FSE/FSE-GPI Series Frame Synchronizer 1. OVERVIEW The 7746FS-HD and 7746FSE-HD series HDTV Frame Synchronizers are designed to retime HD or SD video conforming to SMPTE 259M (525i/59.94 or 625i/50) or SMPTE 292M (1080i/60, 1080i/59.94, 1080i/50, 1080p/24sF, 1080p/23.98sF, 720p/60, 720p/59.94 or 480p/59.94) to a local reference tri-level or composite sync signal. The 7746FSE standard definition Frame Synchronizer is designed to retime only SD video conforming to SMPTE 259M (525i/59.94 or 625i/50) to a local reference tri-level or composite sync signal. When necessary, frames are repeated or dropped to maintain synchronization. During the synchronizing process the video delay varies from 3 lines through to 1 frame plus 3 lines. Additional delay can be added to the synchronizing process in 1 frame increments. The frame synchronizers are currently available in five versions to suit various application requirements. The five versions are also available in SD only configurations. Throughout this manual the term “7746FS-HD series” is used to refer to all versions. When features apply only to specific versions the versions will be listed explicitly (e.g. “7746FSE-HD version” or “7746FS-EAES4 version”). Model Video 7746FS-HD (Discontinued – replaced by 7746FSE-HD) HD/SDI 7746FSE-HD HD/SDI 7746FSE-IG-HD HD/SDI 7746FSE-GPI-HD HD/SDI 7746FS-EAES4-HD HD/SDI 7746FS-EAES4-IG-HD HD/SDI Synchronizes Embedded Audio Demux and mux 2 groups, (No sample rate conversion) Demux and mux 2 groups Demux and mux 2 groups Demux and mux 2 groups Demux and mux 2 groups Demux and mux 2 groups AES Audio AES Audio Inputs Outputs No -- -- No -- -- No -- -- No -- -- 4 4 4 4 4 4 On all versions the video and any embedded audio present is synchronized. (There are no audio sample rate converters on the 7746FS-HD version). On the 7746FS-EAES4-HD version, the user can choose to have either 2 groups from the upstream embedded audio or audio from the 4 AES inputs embedded on the output video and output as AES. All five versions can also pass all VANC data after the switch lines. When the input video is lost, it will pass the input AES or mute if embedded audio is selected for synchronizing. The frame synchronizers also have the ability to set the audio delay independently from the video delay. The frame synchronizers have the ability to adjust video parameters (such as brightness, contrast and saturation) and audio parameters (such as gain, mixing stereo pairs into monaural and reassignment of audio channels within the groups). The card functions can be controlled from the card edge or through the VistaLINK® interface. Revision 1.6.3 Page - 1 7700 MultiFrame Manual 7746FS/FSE/FSE-GPI Series Frame Synchronizer Features: • Synchronizes 1080i/60, 1080i/59.94, 1080i/50, 1080p/24sF, 1080p/23.98sF, 720p/60, 720p/59.94, 480p/59.94, 525i/59.94 or 625i/50 (7746FSE synchronizes only 525i/59.94 or 625i/50) • Minimum video input to output delay - 3 lines • Maximum video input to output delay - 1 frame plus 3 lines • 12 additional frames of delay can be added for interlaced video formats, 24 frames for progressive formats. • Program Video output bypass relay protected on power loss • Programmable output phase with respect to reference input • Freeze on last good frame, or field, go to black on loss of video or pass input • Synchronizes 2 groups of embedded audio and re-embeds 2 groups • Front panel LEDs indicate: module fault, video and audio present • Serial remote data logging • Adjustable video black level (brightness), Y level (contrast) and chroma level (saturation) • Hue control available for SD video formats • Maximum audio input to output delay – equivalent to additional frames of video delay • Synchronizes VANC data starting after switch line • Synchronizes RP188 time codes • Separate control of video and audio delay • Audio Sample Rate Converters can be disabled (no sample rate converters on 7746FS-HD) • Independently adjustable audio levels on all channels • Ability to combine stereo pairs to monaural • Reassignment of audio channels within the embedded groups • VistaLINK® - enabled offering remote control and configuration capabilities via SNMP (using VistaLINK® PRO or 9000NCP Network Control Panel) is available when modules are used with the 3RU 7700FR-C frame and a 7700FC VistaLINK® Frame Controller module in slot 1 of the frame Additional Features for EAES4 Version: • Synchronizes four external AES signals • Synchronized audio is output as 4 AES signals • AES outputs bypass relay protected on power loss Additional Features for GPI Version: • GPI triggering of SCTE104 Packet Insertion (+SCTE104 Option) Additional Features for IntelliGain® Audio and Loudness Processor (IG) Version: • IntelliGain® Audio and Loudness Processor • Consistent audio loudness levels within a channel and/or program • Automatic detection and level adjust for loud commercials • Gain control within a program interval to preserve audio dynamic range • Artifact-free transitions between program and commercials • Elimination of drastic volume changes during commercials and interstitials Page - 2 Revision 1.6.3 7700 MultiFrame Manual 7746FS/FSE/FSE-GPI Series Frame Synchronizer Serial Input (SMPTE 259M, 292M for "-HD" versions 259M only for SD versions) Reference Video Input DARS Input Equalizer Video Processing S/P Output Timing Generator Input Timing Extractor Reference Input Audio Embedder Video Memory DeEmbedder 4 unbalanced AES Inputs Bypass Relays AES DeFormatter VistaLINK® Interface P/S Serial Outputs (SMPTE 259M, 292M for "-HD" versions 259M only for SD versions) Cable Driver Cable Driver Only on EAES4 versions Audio Source Mux Audio Processing Audio Memory & Synchronization AES Formatter & Cable Drivers Bypass Relays 4 unbalanced AES Outputs Control Audio Genlock Module Video Status Present Present Present Card Edge Figure 1-1: Frame Synchronizer Block Diagram Revision 1.6.3 Page - 3 7700 MultiFrame Manual 7746FS/FSE/FSE-GPI Series Frame Synchronizer 2. INSTALLATION The 7746FS-HD, 7746FSE-HD and versions come with a companion rear plate that has 4 BNC connectors and occupies one slot in the 3RU 7700FR frame. The 7746FS-EAES4-HD version comes with a companion rear plate that has 13 BNC connectors and occupies two slots in the 3RU 7700FR frame. The –GPI versions come with a 2x3 terminal block for General Purpose Inputs and Outputs. For information on mounting the rear plate and inserting the module into the frame see section 3 of the 7700FR chapter. Figure 2-1: Module Rear Panels 2.1. HD AND SDI VIDEO INPUTS AND OUTPUTS HD/SDI INPUT: Input BNC connector for 10-bit serial digital video signals compatible with the SMPTE 292M (-HD versions) or SMPTE 259M-C standard. The video standard must be set to match the input video format. See section 5.3. HD/SDI OUTPUTS: Two output BNC connectors with serial component video in the same format as the input video. These outputs contain the input video synchronized to the GENLOCK input video or to the free running internal oscillator if Genlock is not present. The top output is protected by a bypass relay, which will activate in the event of power loss to the module. There is a second identical output that is not bypass protected. Page - 4 Revision 1.6.3 7700 MultiFrame Manual 7746FS/FSE/FSE-GPI Series Frame Synchronizer 2.2. GENLOCK REFERENCE For proper synchronization of the output video, the frame synchronizer must be locked to a genlock signal. GENLOCK: There is an input BNC for connecting an analog Genlock reference. The genlock signal may be tri-level sync (on –HD versions), NTSC or PAL, and is auto-detected by the module. The 7746FS-HD version jumper J2 on the 7700REF sub-module selects whether the reference input is terminated to 75 ohms or high impedance. (See section 8.3) On the 7746FS-EAES4-HD, 7746FSE-HD and 7746FSE versions jumper J3 on the 7700-AES4 sub-module selects whether the reference input is terminated to 75 ohms or high impedance (default). (See section 8.3) DARS: On the 7746FS-EAES4-HD version there is an input BNC for connecting a DARS reference. Jumper J5 on the 7700-AES4 sub-module selects whether the reference input is terminated to 75 ohms or high impedance (default). (See section 8.4) The DARS input is currently not supported. 2.3. AES AUDIO CONNECTIONS (7746FS-EAES4-HD VERSION ONLY) On the 7746FS-EAES4-HD version, four unbalanced AES inputs and outputs are provided on BNC connectors. These inputs and outputs are for unbalanced AES signals conforming to SMPTE 276M. The user can select whether audio from the four channels of AES audio input, or from 2 groups of embedded audio is synchronized and the output is embedded on the output video. The synchronized audio is also output as four AES channels. The AES outputs are protected by bypass relays, which will activate in the event of power loss to the module. See Table 3-1 for information about possible minimum and maximum audio delays. 2.4. GENERAL PURPOSE INPUT (GPI) AND GENERAL PURPOSE OUTPUT (GPO) TERMINAL CONNECTIONS (7746FSE-GPI-HD VERSION ONLY) Four pins on the (2x3) terminal block connector are used for two general purpose inputs (GPI) and two general purpose outputs (GPO). Currently the GPIs are designed to work in conjunction with the SCTE104 option. An SCTE104 insertion module is an option available for the 7746FSE-GPI-HD. At the present moment this feature allows for the triggering of a SCTE104 packet insertion on a specific line to be triggered by either a GPI1 or GPI2 closure. Control of the SCTE104 option is only available through VistaLINK®. Card edge control of this option is not available. See Table 10-2 for more information on configuring the SCTE104 functions. The GPIs are active low with an active pull up to +5V. The user can activate GPIs simply by connecting the GPI input pins to ground. This can be done with a button, switch, relay or an open collector transistor. Each GPO output can be used as normally open and normally closed relay contact pair. They can be used to pass simple contact closure information along with the video signal. Revision 1.6.3 Page - 5 7700 MultiFrame Manual 7746FS/FSE/FSE-GPI Series Frame Synchronizer 2.4.1. GPI and GPO Configuration The GPI’s are active low with internal pull up resistors (2k Ohms) to +5V. To make an input active, lower the signal to near ground potential (i.e. connect to shell or chassis ground). This can be done with a switch, relay, TTL drive, GPO output or other similar method. Figure 2-2 shows the input circuit for the general purpose inputs. The GPO is active low with internal pull up (10k Ohm) resistors to +5V. When the output goes low it is able to sink up to 10mA. When high, the signal will go high (+5V). Do not draw more than 100µA from the output. Figure 2-3 shows the circuit for the general purpose output. + 5 Volts 2 kΩ To Internal Circuit GPI GND Figure 2-2: GPI Input Circuitry + 5 Volts 10k Ω 10 Ω From Internal Circuit GPO GND Figure 2-3: GPI Output Circuitry Page - 6 Revision 1.6.3 7700 MultiFrame Manual 7746FS/FSE/FSE-GPI Series Frame Synchronizer 2.4.2. GPI, GPO and Pin Assignment PIN# Assignment 1 GPI1 2 GND 3 GPO1 4 GPI2 5 GND 6 GPO2 4 5 6 1 2 3 Figure 2-4: GPI and GPO Connections NOTE: Identical pin assignments will apply to the 7746FSE-GPI-HD version. Revision 1.6.3 Page - 7 7700 MultiFrame Manual 7746FS/FSE/FSE-GPI Series Frame Synchronizer 3. SPECIFICATIONS 3.1. SERIAL VIDEO INPUT Standard: -HD versions: All versions: Connector: Input Equalization: SD: HD: Return Loss: SD: HD: 3.2. >15 dB up to 270 MHz >13 dB up to 1.5 GHz 2 (1 output is bypass relay protected) BNC per IEC 61169-8 Annex A 800mV nominal 0V ±0.5V 900ps nominal 200ps nominal <10% of amplitude < 0.10 UI < 0.16 UI GENLOCK INPUT Type: Connector: Termination: 3.4. Automatic to 300m @ 270Mb/s with Belden 1694 or equivalent cable. Automatic to 115m @ 1.5Gb/s with Belden 1694 or equivalent cable. SERIAL VIDEO OUTPUT Number of Outputs: Connectors: Signal Level: DC Offset: Rise and Fall Time: SD HD Overshoot: Wide Band Jitter: SD HD 3.3. DIP switch selectable 1.485 Gb/sec SMPTE 292M -SMPTE 274M, SMPTE 296M, SMPTE 349M 270 Mb/sec SMPTE 259M-C 525i/59.94 or 625i/50 (See Table 5-4 for supported video Standards) BNC per IEC 61169-8 Annex A HD Tri-level Sync, (See Table 6-1) NTSC or PAL Colour Black 1 V p-p, or Composite bi-level sync (525i/59.94 or 625i/50) 300 mV BNC per IEC 61169-8 Annex A 75 ohm (jumper selectable) AES AUDIO INPUTS AND OUTPUTS (-EAES4 VERSIONS ONLY) Number of Inputs: Number of Outputs: Standard: Connectors: Resolution: Sampling Rate: Impedance: Signal Level: Page - 8 4 4 SMPTE 276M, single ended synchronous or asynchronous AES BNC per IEC 61169-8 Annex A 24 bits 48 kHz 75 Ohms unbalanced 1 V p-p nominal Revision 1.6.3 7700 MultiFrame Manual 7746FS/FSE/FSE-GPI Series Frame Synchronizer 3.5. GENERAL PURPOSE INTERFACE INPUTS/OUTPUTS Number of Inputs: Number of Outputs: Type: Connector: Signal Level: 3.6. PROCESSING FUNCTIONS Video: Black Level: Luminance Gain: Chrominance Gain: Hue Audio Gain: Re-mapping: 3.7. 2 2 Opto-isolated, active low, +5V supplied voltage Weidmuller Terminal Block (2x3) +5V +/- 7% +/- 6dB +/- 6dB +/- 20 degrees (SD) +/- 24dB any input or mono mix of any L/R pair to any output INPUT TO OUTPUT PROCESSING DELAY 3.7.1. Video Processing Delay Minimum Delay Mode: 3 lines to 1 frame plus 3 lines Additional Delay Mode: Up to 12 frames for interlaced formats (28 frames for progressive formats) of additional delay (1 frame increments) Revision 1.6.3 Page - 9 7700 MultiFrame Manual 7746FS/FSE/FSE-GPI Series Frame Synchronizer 3.7.2. Audio Processing Delay Video Standard 1080i/60 1080i/59.94 1080i/50 1080p/24sF 1080p/23.98sF 720p/60 720p/59.94 480p/59.94 525i/59.94 625i/50 Video Standard 1080i/60 1080i/59.94 1080i/50 1080p/24sF 1080p/23.98sF 720p/60 720p/59.94 480p/59.94 525i/59.94 625i/50 Selected Video Delay < 69 lines < 69 lines < 57 lines < 55 lines < 55 lines < 92 lines < 92 lines < 69 lines < 69 lines < 69 lines Selected Video Delay > 69 lines > 69 lines > 57 lines > 55 lines > 55 lines > 92 lines > 42 lines > 69 lines < 69 lines < 69 lines Min Audio Delay 98 samples 98 samples 98 samples 90 samples 90 samples 98 samples 98 samples 98 samples 98 samples 98 samples Audio Delay Video (Audio*) Delay plus 98 samples Video (Audio*) Delay plus 98 samples Video (Audio*) Delay plus 98 samples Video (Audio*) Delay plus 98 samples Video (Audio*) Delay plus 98 samples Video (Audio*) Delay plus 98 samples Video (Audio*) Delay plus 98 samples Video (Audio*) Delay plus 98 samples Video (Audio*) Delay plus 98 samples Video (Audio*) Delay plus 98 samples Table 3-1: Audio Processing Delay * The audio delay can be set to follow the video delay, which is set independently. 3.8. DATA LOGGING SERIAL PORT Standard: Connector: Baud Rate: Format: Page - 10 RS 232 Software upgrade cable female DB-9 57600 8 bits, no parity, and 2 stop bits Revision 1.6.3 7700 MultiFrame Manual 7746FS/FSE/FSE-GPI Series Frame Synchronizer 3.9. ELECTRICAL Voltage: + 12VDC Power: 7746FS-HD: 12 Watts 7746FS-EAES4-HD: 15.5 Watts 7746FS-EAES4-IG-HD: 15.5 Watts 7746FSE-HD: 13.5 Watts 7746FSE-IG-HD: 13.5 Watts EMI/RFI: Complies with FCC regulations for class A devices Complies with EU EMC directive 3.10. PHYSICAL 7700 frame mounting: Number of slots: 7701 frame mounting: Number of slots: 1 for 7746FS-HD, 7746FSE-HD, and 7746FSE 2 for 7746FS-EAES4-HD 1 for all versions Revision 1.6.3 Page - 11 7700 MultiFrame Manual 7746FS/FSE/FSE-GPI Series Frame Synchronizer 4. STATUS LEDS 4.1. MODULE STATUS LEDS There are 5 LED status indicators at the front card edge as shown in Figure 8-1. MODULE OK: This Green LED will be ON when the module is operating properly. LOCAL FAULT: This Red LED makes it easy to identify one module in a frame that is missing an essential input or has another fault. The LED will blink ON and OFF if the microprocessor is not running. The LED will be on solid when input video or genlock input is missing or there is a fault in the module power supply. VIDEO PRESENT: This Green LED will be ON when there is a valid video signal present at the module input. AUDIO PRESENT: This green LED indicates the presence of audio. On the 7746FS-HD and 7746FSE-HD versions, the LED will be On when there is valid audio in one of the groups selected for de-embedding. This LED will be Off when there is no video input or the above conditions are not met. On the 7746FS-EAES4-HD version, the LED will be On when there is a valid AES audio signal present at one of the AES inputs and the audio source is set to AES. The LED will also be On when there is valid audio in one of the groups selected for de-embedding and the audio source is set to the de-embedders. This LED will be Off when there is no video input or the above conditions are not met. 4.2. AUDIO CHANNEL LEDS There are four small LEDs located on the lower half (opposite side of the dot matrix display). These LEDs indicate which audio channels are present. If the AES inputs are selected as the source, the LED is on when the corresponding AES pair is present (LED 1 will be ON when AES1 is present). If the Audio de-embedder is selected as a source, the LEDs will be ON when a selected group is present. If De-embedder 1’s selected group is present, LED 1 & 2 will be ON. If De-embedder 2’s selected group is present, LED 3 & 4 will be ON. See Figure 8-1 and Figure 8-2 for details. Page - 12 Revision 1.6.3 7700 MultiFrame Manual 7746FS/FSE/FSE-GPI Series Frame Synchronizer 4.3. AUDIO CHANNEL AND SUB-BOARD STATUS LEDS (7746FSE-GPI-HD VERSION ONLY) AES Levels 1 2 MODULE OK VIDEO PRESENT toggle 3 Status 4 push button switch 7746FSE-GPIHD+SCTE104 LOCAL FAULT GENLOCK 1 2 3 4 Audio Channel Figure 4-1: Audio Channel and Sub-Board Status LEDs The four “left most” LEDs on the sub-board give a rough indication of the peak audio levels of the given channel pair. LED 1 shows the level for Channel 1 & 2, LED 2 shows the level for Channel 3 & 4, LED 3 shows the level for Channel 5 & 6, and LED 4 shows the level for Channel 7 & 8. Table 4-1 indicates the measured level and the approximate colour. Level < -80 dBFS > 80 dBFS >20 dBFS >6 dBFS non-PCM* SCTE 104 Insertion LED Colour off green yellow red blue* Purple (+SCTE014) option only Table 4-1: Measured Level and Approximate Colour (*) non-PCM data including Dolby-E or Dolby AC-3 (detection currently not implemented) 4.4. SUB-BOARD STATUS LED The following colours indicate the status of the audio sub-board: Green = Correct Operation Off = Not Configured Red = Error Revision 1.6.3 Page - 13 7700 MultiFrame Manual 7746FS/FSE/FSE-GPI Series Frame Synchronizer 5. CARD EDGE CONTROLS The frame synchronizers are equipped with an 8 position DIP switch, toggle switch, pushbutton and a 4 character dot matrix display to allow the user to select various functions. The DIP switch provides basic configuration functions that will normally be set only once, such as video standard selection, dot matrix display orientation, and VistaLINK® remote control selection. All other card functions are available through a menu system controlled by the toggle switch and pushbutton and displayed on the 4 character dot matrix display. (See section 6) DIP switch 1 is located at the top of the DIP switch (farthest from to the card ejector). Table 5-1 gives an overview of the DIP switch functions. Sections 5.1 to 5.3 give a detailed description of each of the DIP switch functions. There are two types of DIP switches possible on the frame synchronizers. For slide switches the On (closed) position is farthest from the front edge of the printed circuit board. For ‘piano key’ switches the On (closed) position is down or closest to the printed circuit board. DIP Switch Function 1 2 3 4 5 6 7 8 VistaLINK® or local control selection Dot Matrix display orientation Reserved – set to Off Video Standard Select Table 5-1: DIP Switch Functions 5.1. ENABLING VISTALINK® CONTROL OF THE FRAME SYNCHRONIZER The frame synchronizer can be controlled using the card edge DIP switches and menu system or remotely via SNMP (using VistaLINK® PRO or the model 9000NCP Network Control Panel). When DIP switch 1 is set to the Off position the module will be controlled using the DIP switch and menu items described elsewhere in sections 5 and 6. When DIP switch 1 is set to the On position the module will be controlled remotely through SNMP. See section 10 for a full description of the parameters that can be monitored or controlled using VistaLINK®. VistaLINK® control is only available when the card is installed in the 3RU 7700FR-C frame and a 7700FC VistaLINK® Frame Controller card is installed in slot 1 of the frame. DIP 1 FUNCTION DESCRIPTION Off On Local Control VistaLINK® Card is controlled through card edge controls Card is controlled through VistaLINK® Table 5-2: VistaLINK® Control Switch Settings Page - 14 Revision 1.6.3 7700 MultiFrame Manual 7746FS/FSE/FSE-GPI Series Frame Synchronizer 5.2. SELECTING THE DOT MATRIX DISPLAY ORIENTATION DIP switch 2 selects between horizontal and vertical orientation of the dot matrix display. DIP 2 FUNCTION DESCRIPTION Off On Horizontal Vertical Characters on dot matrix display are horizontal Characters on dot matrix display are vertical Table 5-3: Display Mode Switch Settings 5.3. SELECTING THE VIDEO FORMAT DIP switches 5 to 8 are used to select the video format in use. The selections written in italics are not available for 7746FSE version. DIP 5 DIP 6 DIP 7 DIP 8 DESCRIPTION Off Off Off Off Off On Off On Off Off On On Off Off Off Off Off Off Off On Off Off Off On On On On Off On Off Off On Off On On Off Off On On On On Off On On 1080p/23.98sF 1080p/24sF Future Use 1080i/50 1080i/59.94 480p/59.94 (SMPTE 349M) 1080i/60 720p/59.94 720p/60 525i/59.94 625i/50 Auto detect Table 5-4: Video Standard Switch Settings Other switch combinations are reserved for future use. When DIP switch 1 is ON, the video format is set using VistaLINK® control. Revision 1.6.3 Page - 15 7700 MultiFrame Manual 7746FS/FSE/FSE-GPI Series Frame Synchronizer 6. CARD EDGE MENU SYSTEM The frame synchronizers are equipped with a toggle switch, pushbutton, and a 4 character dot matrix display to control various functions on the card. The toggle switch and pushbutton are used to navigate through a menu system to set various parameters for the module. When not in the menu system the toggle switch and pushbutton are used to display status messages on the serial port. (See section 6.3) 6.1. NAVIGATING THE MENU SYSTEM You can use the toggle switch to move up and down the list of available parameters to adjust. (See section 6.2) To adjust any parameter, use the toggle switch to move up or down to the desired parameter and press the pushbutton. If the parameter is a numerical value, the number will increase if you lift the toggle switch and decrease if you push down on the toggle switch. If the parameter contains a list of options, you can cycle through the list by pressing the toggle switch in either direction. The parameter values are changed as you cycle through the list. When you have stopped at the desired value, depress the pushbutton. This will return you to the parameter, select the menu item that you are setting (the display shows the parameter name you were setting). To change another parameter, use the toggle switch to select other parameters. If neither the toggle switch nor pushbutton is operated for several seconds the card edge control will exit the menu system and return to an idle state. Throughout the descriptions of the Menu items, default values are shown with shaded text. Page - 16 Revision 1.6.3 7700 MultiFrame Manual 7746FS/FSE/FSE-GPI Series Frame Synchronizer 6.2. TOP LEVEL MENU STRUCTURE The following is a brief description of the top level of the menu tree that appears when you enter the ON screen menu. Selecting one of these items will take you down into the next menu level to set the value of that parameter. The details of each of the menu items are described in sections 6.4 to 6.9. VDLY Sets vertical phase offset from genlock reference HDLY Sets horizontal phase offset from genlock reference FDLY Sets additional video delay LOVM Selects action on loss of input video BLVL Sets black level Y_GN Sets Luminance gain C_GN Sets Chrominance gain HUE Sets the Hue (SD video signals only) LOCK Sets line locking mode (SD video signals only) F0V0 Sets the V bit transition line in field 1 (525i/59.94 only) F1V0 Sets the V bit transition line in field 2 (525i/59.94 only) AFDM AFD mode control AFDL AFD embed line AFDC AFD control code AFDA AFD aspect ratio AFDB AFD bar type AFD1 AFD bar 1 size AFD2 AFD bar 2 size CBIT AES C bit control D1GP De-embedder 1 group select D2GP De-embedder 2 group select E1EN Embedder 1 enable E1GP Embedder 1 group select E2EN Embedder 2 enable E2GP Embedder 2 group select ADLY Sets additional audio delay – in video frames ASDL Adjusts audio delay – in samples SCH1 to SCH8 Audio channel 1 to channel 8 source select GCH1 to GCH8 Audio channel 1 to channel 8 gain control ASRC Selects audio source to de-embedder or AES (EAES4 version only) INV1 to INV8 Audio channel 1 to channel 8 inversion control _SRC Sets sample rate converter bypass mode (not available on 7746FS-HD version) BRKA Sets breakout audio mode (EAES4 version only) Revision 1.6.3 Page - 17 7700 MultiFrame Manual 7746FS/FSE/FSE-GPI Series Frame Synchronizer 6.3. DISPLAYING THE MODULE STATUS When you are not in the menu system, the toggle switch is used to send a small help menu and module status report to the serial port accessible from the Card Edge Upgrade header J24 using the standard 7700 upgrade cable. You can use any standard terminal program such as HyperTerminal to monitor the output on the serial port. See the Upgrading Firmware chapter in the front of the manual binder for information on connecting your computer to the module using the upgrade cable. The required port settings are 115200 baud, No parity, 8 data bits, 2 stop bits, and no flow control. To initiate the status display, press the pushbutton when you are not in the menu system. The card edge display will show HELP. Messages shown in italics are not available on the 7746FSE version. Messages highlighted in gray may be displayed only on 7746FS-EAES4-HD version. Pressing the toggle switch once displays DIP on the dot matrix display, and outputs the following DIP switch help message on the serial port: The list of messages shown below is a sample only – messages displayed may differ. ========================================== DIP switch settings UP=off=0 DOWN=on=1 -----------------------------------------1-2-3-4-5-6-7-8 1 . . . . . . . - VistaLINK Control . 1 . . . . . . - Edge Display Orientation . . . . 0 0 0 0 - 1080p/23.98sF . . . . 0 0 0 1 - 1080i/59.94 . . . . 0 0 1 1 - 720p/59.94 . . . . 0 1 0 0 - 1080p/24sF . . . . 0 1 0 1 - 1080i/60 . . . . 0 1 1 0 - 1080i/50 . . . . 0 1 1 1 - 720p/60 . . . . 1 0 0 0 – 525i/59.94 . . . . 1 0 0 1 - 625i/50 . . . . 1 1 1 1 – Auto detect 1-2-3-4-5-6-7-8 Pressing the toggle switch an additional time will display STAT on the dot matrix display, and the status message on the serial port: Current Status: H/W : build 1 S/W : v1.2 build 3 Video Delay (approximate) = 100 ms Configured Video standard : 1080i/59.94, spal:1920, sptl:2200, tlpf:1125 Detected Video standard - : 1080i/59.94 (supported) Genlock present - - - - - : 1080i/59.94 tri-level sync detected. Audio Delay (approximate) = 100 ms Audio Demux status: DMX1 : group 1 not detected DMX2 : group 2 not detected Pressing the toggle switch an additional time will display SET on the dot matrix display, and will display the following list of settings on the serial port: Page - 18 Revision 1.6.3 7700 MultiFrame Manual 7746FS/FSE/FSE-GPI Series Frame Synchronizer Current Settings: V phase (10 lines) H phase (0 samples) Additional Video Delay (7 frames) Freeze Mode (freeze to field 1) Black level = 0.00 %IRE Luma Gain = 0.00 dB Chroma Gain = 0.00 dB Fast Lock disabled. Fast Lock Vbit transition line (for 525/59.94) set to 20 (283). SRC Bypass (SRCs are enabled) Breakout Audio Enable (normal audio mode) Demux 1 Group Select (group 1) Demux 2 Group Select (group 2) Embedder 1 Enable (enabled) Embedder 1 Group Select (group 1) Embedder 2 Enable (disabled) Embedder 2 Group Select (group 2) Audio Ch1 source = 1+2 Audio Ch2 source = 2 Audio Ch3 source = 3 Audio Ch4 source = MUTE Audio Ch5 source = 5 Audio Ch6 source = 6 Audio Ch7 source = 7 Audio Ch8 source = 8 Pressing the toggle switch an additional time will display EDGE on the dot matrix display, and will display the following Card Edge Control help message on the serial port: ---------------------------------------------------VDLY = vertical (line) delay HDLY = horizontal (pixel) delay FDLY = frame delay LOVM = loss of video (freeze) mode _BLK = black _FRM = frame FLD1 = field 1 FLD2 = field 2 BLVL = Black Level adjust Y_GN = Luminance Gain adjust C_GN = Chromanance Gain adjust LOCK = Video Fast Lock mode adjust F0V0 = 525/59.94 V-Bit transition line field 0 F1V0 = 525/59.94 V-Bit transition line field 1 D1GP = audio demux group selection D2GP = audio demux group selection E1EN = audio embedder enable E1GP = audio embedder group selection E2EN = audio embedder enable E2GP = audio embedder group selection ADLY = audio delay control FDLY = same as FDLY setting # = number of video frames _SRC = sample rate converter bypass control __ON BYPS BRKA = breakout audio mode NORM = normal audio routing _BRA = breakout audio direct from audio demux ASRC = audio source selection _AES = AES inputs _DMX = audio demux as inputs SCHx = channel x source selection 1, 2, 3, 4, 5, 6, 7, 8, 1+2, 3+4, 5+6, 7+8, mute GCHx = channel x gain selection Use Push button & toggle switch to set behavior Revision 1.6.3 Page - 19 7700 MultiFrame Manual 7746FS/FSE/FSE-GPI Series Frame Synchronizer 6.4. CONFIGURING THE VIDEO PARAMETERS 6.4.1. Adjusting the Output Video Phase The frame synchronizers can be genlocked to either a composite or tri-level (on -HD versions) sync. The modules will auto-detect the presence and format of the genlock signal. Valid video standard and input sync combinations are listed in Table 6-1. When the VDLY or HDLY menu items are selected, the toggle switch is used to set the V phase (VDLY) or H phase (HDLY) of the output video relative to the Genlock reference. Pressing the toggle switch UP increments the value and pressing it DOWN will decrement the value. The V phase and H phase values are shown on the dot matrix display while they are being adjusted. The V phase adjustment provides a coarse adjustment of timing and sets the number of lines that the out is delayed with respect to genlock input. The H phase adjustment provides fine adjustment of timing and sets the number of samples that the output is delayed with respect to the input genlock. Video Standard 625i/50 √ 525i/59.94 1080i/50 √ 1080i/59.94 1080i/60 720p/59.94 720p/60 1080p/23.98sF 1080p/24sF √ √ √ 1035i/60 1035i/59.94 √ √ √ √ √ √ √ √ 1080p/30 √ √ √ 1080p/29.97 1080p/25 1080p/24sF 1080p/23.98sF 720p60 720p/59.94 1080i/60 1080i/59.94 1080i/50 1080p/24 1080p/23.98 NTSC-M PAL-B Genlock Standard √ √ √ √ √ √ √ √ √ √ √ √ √ √ Table 6-1: Valid Standard and Genlock Combinations Figure 6-1 and Figure 6-2 shows the relationship of the analog tri-level and bi-level inputs to the digital line structure when there is no horizontal phase delay between the genlock and the output video. This alignment is specified in SMPTE 274M and 296M. To aid in setting the Genlock phasing, the lines and samples of delay are logged to the serial port and are accessible from the Card Edge Upgrade header J24 using the standard 7700 upgrade cable. You can use any standard terminal program such as HyperTerminal to monitor the output on the serial port. The required port settings are 57600 baud, No parity, 8 data bits, 2 stop bits, and no flow control. When DIP switch 1 is ON the V phase and H phase are set using VistaLINK® control. Page - 20 Revision 1.6.3 7700 MultiFrame Manual 7746FS/FSE/FSE-GPI Series Frame Synchronizer Line 1 0H Analog Tri-Level Sync Pixel 0 Digital Timing Reference Sync VIDEO DATA SAV H BLANKING EAV EAV Start of Frame of Genlock Reference Figure 6-1: Tri-Level Reference Timing Line 4 (NTSC) Line 1 (PAL) 0H Analog Bi-Level Sync Pixel 0 Digital Timing Reference Sync EAV H BLANKING SAV VIDEO DATA EAV Start of Frame of Genlock Reference Figure 6-2: Bi-Level Reference Timing Revision 1.6.3 Page - 21 7700 MultiFrame Manual 7746FS/FSE/FSE-GPI Series Frame Synchronizer Example: To delay the output video 2 lines and 2 samples with respect to the input Genlock, first select the VDLY menu item. This will set the module into V phase adjust mode. Use the toggle switch to adjust the V phase until the dot matrix display shows 0002 and the logged message on the terminal reads: V=0002 H=xxx Every time the output phase delay is changed a new message will be logged to the screen. Next select the HDLY menu item. This will set the module into H phase adjust mode. Use the toggle switch to adjust the H phase until the dot matrix display shows 0002 logged message on the terminal reads: V=0002 H=0002 Press the pushbutton to return to the top level of the menu. This setting will be saved to non-volatile memory approximately 30 seconds after the last change has been made. The factory default is to align the EAV of Line 1 of the output video with the beginning of the reference frame. 6.4.2. Setting Additional Frames of Synchronizer Delay for the Video The frame synchronizers can add additional frames of video delay to the minimum delay required in order to synchronize the video. The delay added to the audio can be set to be equal to the video delay or can be independently set. (See section 6.8.5 for information on setting the audio delay.) The FDLY menu item is used to select how much additional delay will be added to the video. Pressing the toggle up or down changes the delay value that will be indicated on the dot matrix display. When DIP switch 1 is On, the amount of additional delay added to the video is set using VistaLINK® control. 6.4.3. Setting the Action on Loss of Video (Freeze Mode) The LOVM menu item is used to select the action on loss of the input video. This menu item determines whether the synchronizer will display black or the last full frame, field 1 or field 2 of the video when there is no video input. Pressing the toggle up or down changes the freeze mode that will be indicated on the dot matrix display DISPLAY BLK FRM FLD1 FLD2 PASS FREEZE MODE Black Last Frame Last Field 1 Last Field 2 Pass Input Signal Table 6-2: Freeze Mode Settings When DIP switch 1 is ON the action on loss of input video is set using VistaLINK® control. Page - 22 Revision 1.6.3 7700 MultiFrame Manual 7746FS/FSE/FSE-GPI Series Frame Synchronizer Black Freeze Mode: When the video carrier is lost, video standard is mismatched, or incompatible video standard detected, the output will go to black. Frame Freeze Mode: When the video carrier is lost, video standard is mismatched, or incompatible video standard detected, the output will freeze to the last known good frame. Field 1 Freeze Mode: When the video carrier is lost, video standard is mismatched, or incompatible video standard detected, the output will freeze to field 1 of the last known good frame. Field 2 Freeze Mode: When the video carrier is lost, video standard is mismatched, or incompatible video standard detected, the output will freeze to field 2 of the last known good frame. Pass Mode: This mode is the most tolerant of video format errors. Please note that if the data is sufficiently corrupted or the video standard is mismatched, significant frame tearing or drops/repeats may occur with this mode. When the video standard is set to automatic detection, the frame sync will output the incoming data as the last successfully detected video standard regardless of the condition or format of the incoming video data. When the video standard is fixed, the output will be forced to the set video standard and will output the video data regardless of the condition or format of the incoming video data. When the video carrier is lost, the output will freeze to the last known frame. Due to the nature of this mode, the frame may not be completely free of visual errors. 6.5. CONFIGURING THE VIDEO PROCESSING FUNCTIONS The Video Processing controls are used to configure parameters associated with the component video processing. 6.5.1. Setting the Video Black Level (Brightness) The BLVL menu item is used to set the black level (DC offset of the Y channel). For no offset of the black level, set this control to 0. The adjustment range is +/- 7 IRE with ½ IRE resolution. It is better to set/calibrate this black level control before the video level control is adjusted. If the video level is adjusted first, and you need to adjust this black level control, you will have to go back and correct the video level slightly. Revision 1.6.3 Page - 23 7700 MultiFrame Manual 7746FS/FSE/FSE-GPI Series Frame Synchronizer 6.5.2. Setting the Video Luminance Level (Contrast) The Y_GN menu item is used to set the gain of the luminance channel of the video (contrast). For unity gain, set this value to 0. The adjustment range is +/- 6dB. It is better to calibrate the black level control before setting this control. 6.5.3. Setting the Video Chroma Level (Saturation) The C_GN menu item is used to set the gain on the Cb and Cr channels of the video (saturation). For unity gain, set this value to 0. The adjustment range is +/- 6dB. 6.5.4. Setting the Video Hue (SD Video Only) The HUE menu item is used to set the hue of the output signal. For unity gain, set this value to 0. You have greater than +/- 20 deg. range with this control. 6.6. CONFIGURING THE FRAME LOCK PARAMETERS (SD VIDEO ONLY) The Frame Lock controls are used to configure the input phase locking algorithm of the frame synchronizer for standard definition video. There are three menu items used to configure the frame locking parameters. These menu items are not used for high definition video signals. 6.6.1. Setting the Frame Lock Mode Due to the nature of the standard definition timing reference signals (TRS), there are only a few positions where you can determine the exact picture position in the raster. These are the F-bit and Vbit transitions in the video data. Two of the most useful are the transitions that occur a few lines before and a few lines after the video switch line. The LOCK menu item is used to set the frame locking mode (Normal or Fast). In Normal locking, the F-bit transition at the beginning of the frame is used to align the video frame. This is suitable for most situations. Unfortunately, if the frame synchronizer is in zero delay mode (additional video frame of delay is set to zero) a picture shift may occur if the sources of video being switched are out of phase. In this situation the Fast lock algorithm can be used. In this locking mode, the V-bit transitions are also used for additional information about the picture position. Even after a switch at the switch line, the picture position is maintained even if the sources of video are out of phase by several lines. Page - 24 Revision 1.6.3 7700 MultiFrame Manual 7746FS/FSE/FSE-GPI Series Frame Synchronizer 6.6.2. Setting the V Bit Transition Line The 1 to 0 transition of the V-bit must be in the same line position between the sources of video. This is always true for 625i/50 video, but with some legacy 525i/59.94 equipment this may not be true. According to the SMPTE 125M standard, the V bit 1 to 0 transition (signaling the end of the vertical blanking interval) occurs at line 20 for field 1 and line 283 for field 2. The standard also allows for the V bit transition to occur anywhere between lines 10 and 20. For the frame synchronizer to perform a Fast lock, the location of the V bit transition must be known. The F0V0 and F1V0 menu items are used to set the V bit transition line for field 1 (F bit = 0) and field 2 (F bit = 1) respectively. These two menu items are not used for 625i/50 or high definition video signals. 6.7. CONFIGURING THE ACTIVE FORMAT DESCRIPTION (AFD) PARAMETERS Active Format Description (AFD) is a method for telling downstream equipment the optimal way to display the associated video content. It is implemented as an embedded packet within the video stream. This packet contains information such as the aspect ratio formatting of the original material, how the material is currently formatted and the primary and secondary ways that the video is best displayed. This information determines whether the video should be letterboxed, pillarboxed, 4:3 or 16:9. 6.7.1. Setting the Active Format Description Mode The AFDM menu item is used to select whether the active format description is enabled or not. Pressing the toggle up or down enables, deletes all or disables the active format description packets as indicated on the dot matrix display. DISPLAY OFF DEL ENBL ACTIVE FORMAT DESCRIPTION MODE No Active Format Description packets are embedded. No Active Format Description packets are embedded, and any existing packets in the stream are deleted. Active Format Packets are embedded. Table 6-3: AFD Mode Selection 6.7.2. Setting the Active Format Embed Line The AFDL menu item is used to select which line the AFD information will be embedded on. Pressing the toggle up or down selects the line number as indicated on the dot matrix display. This value can be set between line 10 and line 20, with the default value being line 12. DISPLAY 10 11 12 … 20 AFD EMBED LINE Line 10 Line 11 Line 12 Line 20 Table 6-4: AFD Embed Line Revision 1.6.3 Page - 25 7700 MultiFrame Manual 7746FS/FSE/FSE-GPI Series Frame Synchronizer 6.7.3. Setting the Active Format Control Code Active Format Description works by using a control code, which is encoded to describe what the original source format is, and the primary and secondary ways in which it is best displayed. The AFDC menu item is used to set the AFD encoding. Available options as well as descriptions are shown in Figure 6-3. Pressing the toggle up or down selects between the different control codes as indicated on the dot matrix display. Page - 26 Revision 1.6.3 7700 MultiFrame Manual 7746FS/FSE/FSE-GPI Series Frame Synchronizer Figure 6-3: AFD Control Codes Revision 1.6.3 Page - 27 7700 MultiFrame Manual 7746FS/FSE/FSE-GPI Series Frame Synchronizer 6.7.4. Setting the Active Format Description Aspect Ratio The AFDA menu item is used to select the aspect ratio of the source video. This selection affects which encoded scenario is done in conjunction with the AFD control code. Pressing the toggle up or down selects between 16:9 and 4:3 as indicated on the dot matrix display. DISPLAY 16.9 _4.3 AFD ASPECT RATIO Original frame is 16:9 encoded Original frame is 4:3 encoded Table 6-5: AFD Aspect Ratio 6.7.5. Setting the Active Format Description Bar Type The AFDB menu item selects which type of bars will be created when in manual bar mode (control code 0000). Pressing the toggle up or down selects between letterbox (bars on top and bottom) and pillarbox (bars on left and right) as indicated on the dot matrix display. The size of the bars is set by the line 1 and line 2 bar size controls. DISPLAY LETR PILL AFD BAR TYPE Custom bars will be letterboxed Custom bars will be pillarboxed Table 6-6: AFD Bar Type 6.7.6. Setting the Active Format Description Bar Size The AFD1 and AFD2 menu items select the line size of bar 1 and bar 2 respectively. The values available for this menu item is dependent on the current operating video standard and the bar type selection value. Pressing the toggle up or down selects the line size as indicated on the dot matrix display. 6.8. CONFIGURING THE AUDIO PARAMETERS 6.8.1. Setting the Audio Sample Rate Converter Mode (not available on 7746FS-HD version) The _SRC menu item is used to select whether sample rate conversion is enabled or not. Pressing the toggle up or down enables or disables the sample rate converters as indicated on the dot matrix display. DISPLAY ON BYPS SAMPLE RATE CONVERTER MODE Audio is sample rate converted at 48 kHz that is synchronous to the input video. Audio can be either synchronous or asynchronous to the video source. The content of the audio is preserved without any loss, and directly embedded into the input video. Audio must be synchronous to the video source. This setting is required for Dolby E. Table 6-7: Sample Rate Converter Settings When DIP switch 1 is On the audio sample rate converter mode is set using VistaLINK® control. Page - 28 Revision 1.6.3 7700 MultiFrame Manual 7746FS/FSE/FSE-GPI Series Frame Synchronizer 6.8.2. Setting the Audio Breakout Mode (7746FS-EAES4-HD version only) The BRKA menu item is used to select the audio breakout mode. Pressing the toggle up or down enables or disables audio breakout mode as indicated on the dot matrix display. When “Audio Breakout” mode is enabled, the audio de-embedder’s outputs are routed directly to the AES outputs, bypassing any rate conversion or synchronization. When audio breakout mode is disabled, the synchronized audio input is presented to the AES outputs. Regardless of whether the Audio breakout mode is enabled or not, the audio input for synchronization is always selected by the ASRC menu item, and the audio embedder always receives the synchronized audio input. (See section 6.8.6 for information on selecting the audio source). DISPLAY NORM BRA AUDIO BREAKOUT MODE Audio breakout mode disabled. Audio breakout mode enabled. Table 6-8: Audio Breakout Mode Settings When DIP switch 1 is ON, the audio breakout mode is set using VistaLINK® control. 6.8.3. Selecting the Audio Groups That Will Be De-embedded The SMPTE 299M and SMPTE 272M standards permit up to 4 groups of 4 audio channels to be embedded into the video bitstream. The frame synchronizer de-embeds two groups of audio that can be selected as the source for synchronization and embedding on the output video. (See section 6.8.6 for information on selecting the audio source). The D1GP and D2GP menu items are used to set the group for de-embedder 1 (D1GP) or de-embedder 2 (D2GP). Pressing the toggle up or down changes the group as indicated on the dot matrix display. DISPLAY DE-EMBEDDER AUDIO GROUP 1 2 3 4 1 (Default for de-embedder 1) 2 (Default for de-embedder 2) 3 4 Table 6-9: Audio De-Embedder Group Settings When DIP switch 1 is ON, the audio de-embedder groups are set using VistaLINK® control. 6.8.4. Selecting The Audio Groups That Will Be Embedded The SMPTE 299M and SMPTE 272M standards permit up to 4 groups of 4 audio channels to be embedded into the video bitstream. The frame synchronizer has two embedders that each embed one group of audio from the source selected for synchronization. (See section 6.8.6 for information on selecting the audio source). The E1EN and E2EN menu items are used to enable or disable embedder 1 (E1EN) or embedder 2 (E2EN). Pressing the toggle up or down enables or disables respective audio embedder as indicated on the dot matrix display. Revision 1.6.3 Page - 29 7700 MultiFrame Manual 7746FS/FSE/FSE-GPI Series Frame Synchronizer DISPLAY OFF ON EMBEDDER MODE Embedder Disabled Embedder Enabled. Table 6-10: Audio De-Embedder Group Settings The E1GP and E2GP menu items are used to set the group where audio will be placed for embedder 1 (E1GP) or embedder 2 (E2GP). Pressing the toggle up or down changes the group as indicated on the dot matrix display. DISPLAY 1 2 3 4 EMBEDDER AUDIO GROUP 1 (Default for embedder 1) 2 (Default for embedder 2) 3 4 Table 6-11: Audio Embedder Group Settings When DIP switch 1 is On the audio embedder groups are set using VistaLINK® control. The audio embedders are also enabled or disabled using VistaLINK® control. 6.8.5. Setting Additional Frames of Synchronizer Delay for the Audio The frame synchronizer can add up to 12 additional frames of delay to the audio for interlaced video formats and up to 28 frames for progressive video formats. The audio delay can be set to follow the video delay setting or it can be independently set. The ADLY menu item is used to select how much additional audio delay will be added. Pressing the toggle up or down changes the delay value that will be indicated on the dot matrix display. DISPLAY 0 1 2 … VDLY ADDITIONAL DELAY 0 frames 1 frames 2 frames Same as Video Delay setting Table 6-12: Audio Delay Settings When DIP switch 1 is ON, the additional audio delay is set using VistaLINK® control. 6.8.6. Adjusting Synchronizer Delay for the Audio The ASDL menu item allows the audio to be advanced or delayed from audio frame delay (set by the ADLY menu item) over a range of -999 to 999 audio samples (approximately -20.8ms to 20.8 ms). If the audio frame delay of the card (set by the ADLY menu item) is set to 0 frames of delay, the lower limit of the delay range is adjusted to 0 samples, instead of -999. Page - 30 Revision 1.6.3 7700 MultiFrame Manual 7746FS/FSE/FSE-GPI Series Frame Synchronizer An example for the use of this control would be to advance Dolby-E if it has undergone an accumulated delay pushing it out of frame alignment. DISPLAY -999 -2 -1 0 1 2 … 999 DELAY ADJUSTMENT FROM NOMINAL (ADLY) DELAY 999 samples less delay 2 samples less delay 1 sample less delay 0 samples 1 sample additional delay 2 sample additional delay 999 samples additional delay Table 6-13: Audio Delay Settings When DIP switch 1 is ON, the additional audio delay is set using VistaLINK® control. 6.8.7. Selecting the Audio Source (7746FS-EAES4-HD version only) The ASRC menu item is used to select whether the audio for synchronization will be taken from the AES inputs or the de-embedders. When the de-embedders are selected as the source, the audio group must be selected using the D1GP and D2GP menu items. (See section 6.8.3 for information on selecting the de-embedder groups.) The embedders can be individually enabled or disabled and the user can select the embedding group for each of the embedders. (See section 6.8.4 for information on controlling the embedders.) Normally the audio selected as the source is synchronized along with the video, re-embedded on the outputs and output as AES. When Audio Breakout mode is enabled, audio from the de-embedders bypasses the synchronization and is output without delay on the AES outputs. (See section 6.8.2 for information about audio breakout mode.) DISPLAY AES DMX SOURCE FOR Embedder 1 & AES 1 and Embedder 2 & AES 3 and AES 2 Outputs AES 4 Outputs AES 1, AES 2 Inputs AES 3, AES 4 Inputs De-embedder 1 group De-embedder 2 group Table 6-14: Audio Source Settings When DIP switch 1 is ON, the audio embedder sources are set using VistaLINK® control. 6.9. CONFIGURING THE AUDIO PROCESSING FUNCTIONS The Audio Processing controls are used to configure parameters associated with the manipulation of the audio content. There are similar control items to adjust the routing and processing of each of the 8 audio channels. For simplicity only the control items for channel 1 will be shown in the manual. Revision 1.6.3 Page - 31 7700 MultiFrame Manual 7746FS/FSE/FSE-GPI Series Frame Synchronizer 6.9.1. Re-mapping the Audio Channels The Channel mapping controls (SCH1 to SCH8) permit basic audio channel routing and manipulation. Pressing the toggle up or down changes the source for the respective output audio channel as indicated on the dot matrix display. Any single input channel can be routed to any output channel. The default is to route the input channel corresponding to the output (e.g. input channel 1 to output channel 1). A mono mix of any L/R input pair can also be output on any channel (e.g. a mono mix of input channels 1 and 2 to output channel 1). Output channels can also be muted. DISPLAY 1 2 3 4 5 6 7 8 1+2 3+4 5+6 7+8 MUTE CHANNEL SOURCE Select channel 1 (Default for Channel 1) Select channel 2 (Default for Channel 2) Select channel 3 (Default for Channel 3) Select channel 4 (Default for Channel 4) Select channel 5 (Default for Channel 5) Select channel 6 (Default for Channel 6) Select channel 7 (Default for Channel 7) Select channel 8 (Default for Channel 8) Mono mix of channel 1 & 2 Mono mix of channel 3 & 4 Mono mix of channel 5 & 6 Mono mix of channel 7 & 8 Mute output channel Table 6-15: Output Audio Channel Source Selection 6.9.2. Setting the Audio Levels The audio gain controls (GCH1 to GCH8) are used to adjust the level of the respective output audio channel. The gain controls have a range of +/-24 dB with 1/10 dB resolution. The displayed value is the amount of gain (+ve), or attenuation (-ve), in decibels, where 0dB corresponds to unity gain. Page - 32 Whenever +ve gain is configured, there is the possibility of distortion due to clipping. If the input audio level is increased to greater than 0dB FS, by adding gain, then the output audio will be limited at 0dB FS. Revision 1.6.3 7700 MultiFrame Manual 7746FS/FSE/FSE-GPI Series Frame Synchronizer 6.10. CONFIGURING THE VIDEO THUMBNAIL FUNCTIONS When DIP switch 1 is On, the Video Thumbnail controls used to configure parameters associated with capturing and sending thumbnail video images over Ethernet can be controlled and monitored using VistaLINK®. These controls allow the user to enable thumbnails, set their size and the IP address where they will be sent. 6.11. CONFIGURING THE LINE BLANKING CONTROLS When DIP switch 1 is On, the Line Blank controls are used to selectively blank lines 6-29 in both field 1 and field 2, and they are controlled and monitored using VistaLINK®. These controls allow the user to enable or disable each line in both fields individually. Figure 6-4: VistaLINK® PRO - Line Blank Controls Revision 1.6.3 Page - 33 7700 MultiFrame Manual 7746FS/FSE/FSE-GPI Series Frame Synchronizer 7. EVENT LOGGING To assist in system verification, events are logged by the frame synchronizer to the serial port accessible from the Card Edge Upgrade header J24 using the standard 7700 upgrade cable. You can use any standard terminal program such as HyperTerminal to monitor the output on the serial port. See the Upgrading Firmware chapter in the front of the manual binder for information on connecting your computer to the module using the upgrade cable. The required port settings are No parity, 8 data bits, 2 stop bits, and no flow control. The baud rate is 57600 baud for the 7746FS-HD and 115200 Baud for the 7746FSE-HD and 7746FS-EAES4-HD models. Table 7-1 and Table 7-2 list the messages that are logged by the frame synchronizer under normal operation. Some messages are not supported in all versions of the synchronizer. Messages generated by control parameter changes are not shown. Logged Message Event Description Genlock present: (detected type) Output video is genlocked, detected type is reported Genlock Free running: (status) Output video is free running – reason given Genlock invalid: (reason) Genlock signal is present but incompatible with video standard Input Switch Change in input video phase detected Video Present Input video is present Loss of Video Input video is lost Repeat Video frame was repeated Drop Video frame was dropped Video standard Autodetect: (type) Valid input video standard auto-detected – standard reported Video standard Set: (type) Video standard that the module is set to Audio Jam synced Audio delay has been adjusted (not available on 7746-FSHD version - occurs in SRC bypass mode only) Table 7-1: Common Logged Event Messages Logged Message AES1 unlocked AES1 locked AES2 unlocked AES2 locked AES3 unlocked AES3 present AES4 unlocked AES4 present Event Description AES1 input not present or invalid AES1 input present AES2 input not present or invalid AES2 input present AES 3 input not present or invalid AES 3 input present AES 4 input not present or invalid AES 4 input present Table 7-2: Logged Event Messages only on EAES4 version Page - 34 Revision 1.6.3 7700 MultiFrame Manual 7746FS/FSE/FSE-GPI Series Frame Synchronizer 8. JUMPERS J18 J17 TERM UNTERM A7700REF MODULE STATUS SIGNAL PRESENT AUDIO J24 Run AES 1 J16 EVERTZ (A) 7700PH4 Upgrade AES 2 AES 3 AES 4 FRAME STATUS ON OFF SFF POWER GND +12V J22 Figure 8-1: Location of Jumpers on 7746FS-HD J18 J17 MODULE STATUS SIGNAL PRESENT AUDIO J24 Run AES 1 J16 EVERTZ (A) 7700PH4 Upgrade AES 2 AES 3 GENLOCK LOOP AES 4 FRAME STATUS ON OFF J22 SFF POWER GND +12V Figure 8-2: Location of Jumpers on 7746FSE, 7746FSE-HD and 7746FS-EAES4-HD 8.1. SELECTING WHETHER LOCAL FAULTS WILL BE MONITORED BY THE GLOBAL FRAME STATUS FRAME STATUS: The FRAME STATUS jumper located at the front of the module determines whether local faults (as shown by the Local Fault indicator) will be connected to the 7700FR frame's global status bus. To monitor faults on this module with the frame status indicators (on the PS FRAME STATUS LED's and on the Frame's Fault Tally output) install this jumper in the ON position. (Default) When this jumper is installed in the OFF position, local faults on this module will not be monitored. Revision 1.6.3 Page - 35 7700 MultiFrame Manual 7746FS/FSE/FSE-GPI Series Frame Synchronizer 8.2. CONFIGURING THE MODULE FOR FIRMWARE UPGRADES UPGRADE: The UPGRADE jumper J16 located at the front of the module is used when firmware upgrades are being done to the module. For normal operation it should be installed in the RUN position. See the Upgrading Firmware section of this manual for more information. To upgrade the firmware in the module unit pull it out of the frame. Move Jumper J16 into the UPGRADE position. Install the Upgrade cable provided (located in the vinyl pouch in the front of this manual) onto header J24 at the card edge. Re-install the module into the frame. Run the upgrade as described in the Upgrading Firmware section of this manual. Once the upgrade is complete, remove the module from the frame, move J16 into the RUN position, remove the upgrade cable and re-install the module. The module is now ready for normal operation. 8.3. SELECTING WHETHER THE GENLOCK REFERENCE INPUT IS TERMINATED TERM/UNTERM: The GENLOCK TERM/UNTERM jumper is used to terminate the genlock input. When it is in the TERM position a 75 ohm terminating resistor will connect the input to ground. When it is in the UNTERM position the genlock input will be high impedance. The jumper is located in different places depending on the version of the frame synchronizer. On the 7746FS-HD version, jumper J2 located on the A7700REF genlock submodule is used to terminate the genlock input. On the 7746FSE-HD and 7746FS-EAES4-HD versions, jumper J3 located on the A7700-AES4-2 sub-module is used to terminate the genlock input. 8.4. Please note that on the newer version of the board, (c)7700-AES4-3 sub-module, Jumper J4 is used to terminate the genlock input. SELECTING WHETHER THE DARS REFERENCE INPUT IS TERMINATED (7746FS-EAES4-HD ONLY) DARS: Page - 36 The DARS jumper J5 located on the A7700-AES4-2 sub-module is used to terminate the DARS input. When it is in the TERM position a 75 ohm terminating resistor will connect the DARS input to ground. When it is in the UNTERM position the DARS input will be high impedance. The DARS input is currently not supported. Revision 1.6.3 7700 MultiFrame Manual 7746FS/FSE/FSE-GPI Series Frame Synchronizer 8.5. RESETTING THE MODULE TO ITS FACTORY DEFAULT CONDITION This operation will completely reset the module and all user settings will be erased. Make sure you want to reset the module before you proceed. Occasionally users want to reset the module to its factory default condition. The following procedure allows you to erase all user settings and restore the factory settings. You will need the following equipment in order to reset the card to its factory defaults: • PC with available communications port. • Terminal program that is capable of Xmodem file transfer protocol (such as HyperTerminal). • Special Serial Upgrade cable supplied with the 7700FR-C frame. This cable is normally in the vinyl pouch at the front of this manual. (Evertz part #WA-76). A “Straight-thru” serial extension cable (DB9 female to DB9 male) may be required if you need to extend the length of the WA-S76 serial upgrade cable. Reset Procedure: 1. Remove the module from the frame. 2. Move the UPGRADE jumper into the UPGRADE position. 3. Connect the 7700PB Serial Upgrade cable to the 2 row x 3 pin header labelled J24. Install the cable with the ribbon cable towards the front of the board. 4. Connect the 9 pin connector on the end of the Serial Update cable to the PCs’ RS-232 communications port. 5. Start the terminal program. 6. Configure the port settings of the terminal program as follows: Model 7746FS-HD 7746FS-EAES4-HD 7746FSE 7746FSE-HD Baud 57600 115200 Parity no no Data bits 8 8 Stop bits 2 2 None None Flow Control 7. Install the module into the frame. After the module powers up, a banner with the boot code version information should appear in the terminal window. Revision 1.6.3 Page - 37 7700 MultiFrame Manual 7746FS/FSE/FSE-GPI Series Frame Synchronizer For example: EVERTZ MFC5407 MONITOR 2.1.3 COPYRIGHT 1997, 1998, 1999, 2000, 2001, 2002 EVERTZ MICROSYSTEMS LTD. UPGRADE JUMPER INSTALLED UPLOAD FILE NOW, CONTROL-X TO CANCEL 8. The following is a list of possible reasons for failed communications: • • • Defective Evertz Serial Upgrade cable. Wrong communications port selected in the terminal program. Improper port settings in the terminal program. (Refer to step 6 for settings). 9. Press the <CTRL> and <X> keys 5 times quickly to break out of the load prompt, then press the <CTRL> and <X> keys one more time. This will bring you to the boot prompt. 10. Type the word “reset”, without quotes, and hit the <ENTER> key once. The boot code will ask Are you sure? Type "y", without quotes. 11. Wait one minute, power down the module. Remove the module from the frame and disconnect the Serial Upgrade cable from the module. Restore the UPGRADE jumper to the RUN position. Reinsert the module into the frame. 12. You can now close the terminal program and disconnect the RS-232 serial cable from the PC. The module is now set to factory defaults. Page - 38 Revision 1.6.3 7700 MultiFrame Manual 7746FS/FSE/FSE-GPI Series Frame Synchronizer 9. TYPICAL CONFIGURATIONS 9.1. SYNCHRONIZE VIDEO WITH EMBEDDED AUDIO (UNCOMPRESSED) 7746FS-EAES4-HD Video Frame Sync & Delay Video Input AES Rx Audio SRC Audio Frame Sync & Delay Audio Embedder Video Output AES Tx AES Output Audio De-embedder Genlock Reference not shown Figure 9-1: Synchronize Video with Embedded Audio (Uncompressed) Video Input: Video with embedded audio (uncompressed PCM) in Group 1 & 2. Video Output: Synchronized video with synchronized audio re-embedded into Group 1 & 2. AES Output: Synchronized audio from embedded group 1 & 2. Control Settings: ASRC: Audio Source = DMX _SRC: SRC Mode = ON BRKA: Breakout Audio = NORM D1GP: De-embedder 1 Group = 1 D2GP: De-embedder 2 Group = 2 E1EN: Embedder1 enable = ON E1GP: Embedder1 Group = 1 E2EN: Embedder2 enable = ON E2GP: Embedder2 Group = 2 Revision 1.6.3 Page - 39 7700 MultiFrame Manual 7746FS/FSE/FSE-GPI Series Frame Synchronizer 9.2. SYNCHRONIZE VIDEO WITH SEPARATE AES AUDIO 7746FS-EAES4-HD Video Frame Sync & Delay Video Input AES Rx AES Input Audio SRC Audio Frame Sync & Delay Audio Embedder AES Tx Video Output AES Output Audio De-embedder Genlock Reference not shown Figure 9-2: Synchronize Video with Separate AES Audio Video Input: Video with embedded audio (uncompressed PCM) in Group 1 & 2. Audio Input: 4 AES. Video Output: Synchronized video with synchronized audio from AES inputs into Group 1 & 2. AES Output: Synchronized audio from AES inputs. Embedded audio from Video input is discarded. Control Settings: ASRC: Audio Source = AES _SRC: SRC Mode = ON BRKA: Breakout Audio = NORM E1EN: Embedder1 enable = ON E1GP: Embedder1 Group = 1 E2EN: Embedder2 enable = ON E2GP: Embedder2 Group = 2 Page - 40 Revision 1.6.3 7700 MultiFrame Manual 7746FS/FSE/FSE-GPI Series Frame Synchronizer 9.3. DELAY VIDEO AND EMBED COMPRESSED AUDIO FROM AES Video Input: Video that is synchronous to genlock reference. Audio Input: Synchronous AES input with compressed audio. Video Output: Delayed video with audio embedded into Group 1 & 2. AES Output: Delayed audio output. 7746FS-EAES4-HD Video Frame Sync & Delay Video Input AES Rx Audio Input Audio SRC Audio Frame Sync & Delay Audio Embedder AES Tx Video Output AES Output Audio De-embedder Genlock Reference not shown Figure 9-3: Delay Video and Embed Compressed Audio from AES Control Settings: ASRC: Audio Source = AES _SRC: SRC Mode = BYPS BRKA: Breakout Audio = NORM E1EN: Embedder1 enable = ON E1GP: Embedder1 Group = 1 E2EN: Embedder2 enable = ON E2GP: Embedder2 Group = 2 Revision 1.6.3 Page - 41 7700 MultiFrame Manual 7746FS/FSE/FSE-GPI Series Frame Synchronizer 9.4. SYNCHRONIZE VIDEO WITH EMBEDDED COMPRESSED AUDIO, OUTPUT THE AUDIO TO EXTERNAL DECOMPRESSOR AND THEN SYNCHRONIZE AND EMBED THE UNCOMPRESSED AUDIO 7746FS-EAES4-HD+DLY Video Frame Sync & Delay Video Input AES Rx Audio SRC Audio Frame Sync & Delay Audio Embedder Video Output AES Tx Audio De-embedder Genlock Reference not shown External Audio Decompressor (for example lets say has 1 video frame of delay) Figure 9-4: Synchronize Video with Embedded Compressed Audio, Output the Audio to External Decompressor and then Synchronize and Embed the Uncompressed Audio Video Input: Video with compressed embedded audio. Audio Input: From an external audio decompressor. Video Output: Synchronized video with embedded and synchronized uncompressed audio. AES Output: Compressed audio. Page - 42 Revision 1.6.3 7700 MultiFrame Manual 7746FS/FSE/FSE-GPI Series Frame Synchronizer Control Settings: 9.5. ASRC: Audio Source = AES FDLY: Extra video delay = +1 frames _SRC: SRC Mode = ON BRKA: Breakout Audio = BRA D1GP: De-embedder 1 Group = 1 D2GP: De-embedder 2 Group = 2 E1EN: Embedder1 enable = ON E1GP: Embedder1 Group = 1 E2EN: Embedder2 enable = ON E2GP: Embedder2 Group = 2 ADLY: Extra audio delay = 0 frames DELAY VIDEO WITH EMBEDDED UNCOMPRESSED AUDIO, OUTPUT THE AUDIO TO EXTERNAL COMPRESSOR AND THEN EMBED THE COMPRESSED AUDIO 7746FS-EAES4-HD+DLY Video Frame Sync & Delay Video Input AES Rx Audio SRC Audio Frame Sync & Delay Audio Embedder Video Output AES Tx Audio De-embedder Genlock Reference not shown External Audio Compressor (for example lets say has 2 video frame of delay) Figure 9-5: Delay Video with Embedded Uncompressed Audio, Output the Audio to External Compressor and then Embed the Compressed Audio Revision 1.6.3 Page - 43 7700 MultiFrame Manual 7746FS/FSE/FSE-GPI Series Frame Synchronizer Video Input: Video with uncompressed embedded audio. Audio Input: From an external audio compressor. Video Output: Synchronized video with embedded and synchronized compressed audio. AES Output: Uncompressed audio. Control Settings: ASRC: Audio Source = AES FDLY: Extra video delay = +2 frames _SRC: SRC Mode = ON BRKA: Breakout Audio = BRA D1GP: De-embedder 1 Group = 1 D2GP: De-embedder 2 Group = 2 E1EN: Embedder1 enable = ON E1GP: Embedder1 Group = 1 E2EN: Embedder2 enable = ON E2GP: Embedder2 Group = 2 ADLY: Extra audio delay = 0 frames Page - 44 Revision 1.6.3 7700 MultiFrame Manual 7746FS/FSE/FSE-GPI Series Frame Synchronizer 9.6. SYNCHRONIZE VIDEO AND DEMUX AUDIO TO AES OUTPUTS, AND EMBED NEW AUDIO FROM AES INPUTS 7746FS-EAES4-HD Video Frame Sync & Delay Video Input AES Rx Audio Input Audio SRC Audio Frame Sync & Delay Audio Embedder AES Tx Video Output Audio Output Audio De-embedder Genlock Reference Not Shown Figure 9-6: Synchronize Video and De-embed Audio to AES Outputs, and Embed New Audio from AES Inputs Video Input: Video with embedded audio. Audio Input: From an external audio source. Video Output: Synchronized video with embedded and synchronized external AES. AES Output: De-embedded audio from input video. Control Settings: ASRC: Audio Source = AES _SRC: SRC Mode = ON BRKA: Breakout Audio = BRA D1GP: De-embedder 1 Group = 1 D2GP: De-embedder 2 Group = 2 E1EN: Embedder1 enable = ON E1GP: Embedder1 Group = 1 E2EN: Embedder2 enable = ON E2GP: Embedder2 Group = 2 Revision 1.6.3 Page - 45 7700 MultiFrame Manual 7746FS/FSE/FSE-GPI Series Frame Synchronizer 10. VistaLINK® REMOTE MONITORING/CONTROL 10.1. WHAT IS VISTALINK®? VistaLINK® is Evertz’s remote monitoring and configuration platform which operates over an Ethernet network using Simple Network Management Protocol (SNMP). SNMP is a standard computer network protocol that enables different devices sharing the same network to communicate with each other. VistaLINK® provides centralized alarm management, which monitors, reports, and logs all incoming alarm events and dispatches alerts to all the VLPro Clients connected to the server. Card configuration through VistaLINK® PRO can be performed on an individual or multi-card basis using simple copy and paste routines, which reduces the time to configure each module separately. Finally, VistaLINK® enables the user to configure devices in the network from a central station and receive feedback that the configuration has been carried out. There are 3 components of SNMP: 1. An SNMP manager, also known as a Network Management System (NMS), is a computer running special software that communicates with the devices in the network. Evertz VistaLINK® Pro Manager graphical user interface (GUI), third party or custom manager software may be used to monitor and control Evertz VistaLINK® enabled products. 2. Managed devices (such as the frame synchronizers), each with a unique address (OID), communicate with the NMS through an SNMP Agent. Evertz VistaLINK® enabled 7700 series modules reside in the 3RU 7700FR-C MultiFrame and communicate with the manager via the 7700FC VistaLINK® frame controller module, which serves as the Agent. 3. A virtual database known as the Management Information Base (MIB) lists all the variables being monitored, which both the Manager and Agent understand. Please contact Evertz for further information about obtaining a copy of the MIB for interfacing to a third party Manager/NMS. For more information on connecting and configuring the VistaLINK® network, see the 7700FC Frame Controller chapter. Page - 46 Revision 1.6.3 7700 MultiFrame Manual 7746FS/FSE/FSE-GPI Series Frame Synchronizer 10.2. VISTALINK® MONITORED PARAMETERS The following parameters can be remotely monitored through the VistaLINK® interface: Parameter Description Card Type Indicates version of the Frame Synchronizer Master Jumper Indicates whether the card is in Remote or Local Mode Input Video Not Present Indicates the presence of a valid video input signal (the state of the VIDEO PRESENT LED) Video Input Fail Indicates interrupting of the input video Input Video Standard Indicates video format of input signal Genlock Not Present Indicates the presence of a valid video genlock reference signal AES 1 Not Present Indicates that AES 1 audio is not present (EAES4 version only) AES 2 Not Present Indicates that AES 2 audio is not present (EAES4 version only) AES 3 Not Present Indicates that AES 3 audio is not present (EAES4 version only) AES 4 Not Present Indicates that AES 4 audio is not present (EAES4 version only) Demux 1 Group Not Present Demux 2 Group Not Present Indicates that Demux 1 group audio is not present Indicates that Demux 2 group audio is not present Table 10-1: VistaLINK® Monitored Parameters Revision 1.6.3 Page - 47 7700 MultiFrame Manual 7746FS/FSE/FSE-GPI Series Frame Synchronizer 10.3. VISTALINK® CONTROLLED PARAMETERS Parameter Video Standard V Phase H Phase Additional Video Delay Video Freeze Mode Lock Type V Bit Transition Line – Field 1 V Bit Transition Line – Field 2 Sample Rate Converter Enable Audio Source Audio Breakout Mode Audio De-embedder 1 Source Audio De-embedder 2 Source Audio Embedder 1 Group Audio Embedder 2 Group Additional Audio Delay Video Black Level Video Luminance Gain Video Chroma Gain Video Hue Audio Ch1 Processing Audio Ch2 Processing Audio Ch3 Processing Audio Ch4 Processing Audio Ch5 Processing Audio Ch6 Processing Audio Ch7 Processing Audio Ch8 Processing Audio Ch1 Gain Audio Ch2 Gain Audio Ch3 Gain Audio Ch4 Gain Audio Ch5 Gain Audio Ch6 Gain Audio Ch7 Gain Audio Ch8 Gain Thumbnail Enable Thumbnail Size Thumbnail Destination Page - 48 Description Sets the video standard Sets the vertical phase with respect to the genlock reference Sets the horizontal phase with respect to the genlock reference Sets additional Video Delay Sets action on loss of input video Sets the line locking mode (SD Video Only) Sets the V Bit Transition line in field 1 (525/59.94 signals only) Sets the V Bit Transition line in field 2 (525/59.94 signals only) Enables and disables the sample rate converters (not available on 7746FS-HD version) Selects audio source to de-embedded or AES (EAES4 version only) Enables and disables audio breakout mode (EAES4 version only) Sets source group for de-embedder 1 Sets source group for de-embedder 2 Sets destination group for embedder 1 or disable embedder 1 Sets destination group for embedder 2 or disable embedder 2 Sets additional audio delay Sets the black level (DC Offset) of the video Sets the luminance gain of the video Sets the chroma gain of the video Sets the hue of the video (SD video only) Sets what audio will be output on channel 1 Sets what audio will be output on channel 2 Sets what audio will be output on channel 3 Sets what audio will be output on channel 4 Sets what audio will be output on channel 5 Sets what audio will be output on channel 6 Sets what audio will be output on channel 7 Sets what audio will be output on channel 8 Sets the gain of Audio channel 1 Sets the gain of Audio channel 2 Sets the gain of Audio channel 3 Sets the gain of Audio channel 4 Sets the gain of Audio channel 5 Sets the gain of Audio channel 6 Sets the gain of Audio channel 7 Sets the gain of Audio channel 8 Enable thumbnail images to be sent via Ethernet Sets the size of the thumbnail image Sets the IP address location that the thumbnail is sent to Revision 1.6.3 7700 MultiFrame Manual 7746FS/FSE/FSE-GPI Series Frame Synchronizer AFD Embed Mode AFD Embed Line AFD Bar Type AFD Bar Size 1 AFD Bar Size 2 AFD Code Selection GPI Triggering DPI Filtering Line Select Line Blanking Turns AFD packets on or off Sets the line that the AFD packets are embedded on Sets the AFD bar type for manual bars Sets the line size of AFD bar 1 Sets the line size of AFD bar 2 Sets AFD encoding for either 4:3 or 16:9 source video Sets which GPI will trigger the SCTE104 module Disable = Disables GPI triggering of the SCTE104 module GPI1 = Sets triggering of the SCTE104 module with GPI1 GPI2 = Sets triggering of the SCTE104 module with GPI2 Enable = Enables SCTE104 packet embedding at the moment Disable = Disables SCTE104 packet embedding at the moment Selects the VANC line to embed SCTE104 packet Enables or disables line blanking for lines 6-29 in both field 1 and field 2 of the video. SCTE 104 Settings Reserved messsageSize protocol_version AS_Index message_number DPI_PID_index This parameter is a fixed value and cannot be modified. The reserved parameter is two-byte field and is fixed to a value of 0xFFFF. It will be inserted as the first word in the SCTE 104 packet. The messageSize parameter defines the size of the entire single_operation_message() structure in bytes. This parameter is a read-only parameter and the 7746FSE-GPI-HD+SCTE104 generates its value internally and dynamically. The protocol_version is an 8-bit unsigned integer field whose function is to allow, in the future, this message type to carry parameters that may be structured differently than those defined in the current SCTE 104 protocol. It shall be zero (0x00). Nonzero values of protocol_version may be used by future versions of the SCTE 104 standard to indicate structurally different messages. This parameter is a fixed value and cannot be modified. The AS_index uniquely identifies the source of the message (since it is possible to have several automation systems active at once). The number ranges from 0 to 255 and shall be zero if this index is not required. If non-zero, AS_index shall be unique within a single digital compression system. The message_number can be any number in the range 0 to 255 and must be unique for the life of a message. The message_number is used to identify an individual request. This parameter is a read-only parameter and the 7746FSE-GPIHD+SCTE104 generates its value internally and dynamically. Each time a new message is injected, the message number will increment. The DPI_PID_index specifies the index to the DPI PID, which will carry the splice_info_sections. The number ranges from 0 to 65535. DPI_PID_index shall be zero if not required by the system architecture. This two-byte control is defined as a text entry box with a maximum possible value of 65535. Revision 1.6.3 Page - 49 7700 MultiFrame Manual 7746FS/FSE/FSE-GPI Series Frame Synchronizer SCTE35_protocol_version Timestamp num_ops opID Data_length GPI Mode Upstream Pass Mode Upstream Line Remap Page - 50 An 8-bit unsigned integer field whose function is to allow, in the future, this message type to carry parameters that may be structured differently than those defined in the current protocol. It shall be zero (0x00). Non-zero values of protocol_version may be used by a future version of the SCTE 104 standard to indicate structurally different messages. This parameter is a fixed value and cannot be modified. This field delivers the exact time to process all of the requests in the injected message. The time_type field may be zero, indicating the messages are processed immediately. The 7746FSE-GPI-HD+SCTE104 injects a fixed value of 0x00, thereby instructing immediate processing. This field defines an integer value that indicates the number of requests contained within the data packet. This parameter has a fixed value of 0x01, indicating a single data table embedded in the packet. This data table is the Splice Request Data table. The opID is an integer value that indicates what request is being sent. This parameter is fixed to a value of 0x0101, indicating that the splice_request_data() table is transmitted. This value is fixed and cannot be modified. The data_length is the size of the data() field being sent in bytes. This parameter is a read-only parameter and the 7746FSE-GPIHD+SCTE104 generates its value internally and dynamically. The GPI mode defines what state the GPI will be considered active when triggered. This parameter has two states: Active Low and Active High. When set to Active Low, the 7746FSE-GPIHD+SCTE104 will consider a GPI triggered when the voltage level drops from the internal +5V to ground. When set to Active High, the 7746FSE-GPI-HD+SCTE104 will consider a GPI triggered when the voltage level transitions from ground to +5V. This parameter defines the behaviour of the 7746FSE-GPIHD+SCTE104 if SCTE 104 packets detected on the input. This parameter has two states: Pass Through and Pass Remap. If the value is set to Pass Through and a SCTE 104 packet is detected on the input, they are directly passed to the output on the same detected line. If the value is set to Pass Remap, then the original detected packets are marked for deletion as per SMPTE 291M and re-inserted onto a new line defined by the Upstream Line Remap Control. This parameter defines which line to re-insert detected SCTE 104 packets. This parameter is only used when the Upstream Pass Mode parameter is set to a value of Pass Remap and has a valid range from lines 6 to 29 for both SD-SDI and HD-SDI type signals. Revision 1.6.3 7700 MultiFrame Manual 7746FS/FSE/FSE-GPI Series Frame Synchronizer GPI Triggering DPI Filter Line Select Manual DPI Insert This parameter enables and disables the GPI processor. There are 3 possible values; disable, GPI 1, and GPI 2. To completely disengage the GPI processor set the value of this parameter to disable. When set to disable, any GPI triggering activity will be ignored. To use GPI 1 as the SCTE 104 insertion trigger, set this parameter to a value of GPI 1, and to use GPI 2 as the SCTE 104 insertion trigger, set this parameter to a value of GPI 2. Upon each successful SCTE 104 insertion the 7746FSE-GPIHD+SCTE104 will send an SNMP trap alarm and also illuminate the card edge LED’s for a period of approximately 5 seconds. This parameter is used to disable or enable upstream DPI filtering. To filter out any detected upstream SCTE 104 messages set this value to enable. To allow upstream SCTE 104 message to pass through the 7746FSE-GPI-HD+SCTE104 module, then set this value to disable. When set to disable the Upstream Pass Mode will be used to define the pass through behaviour. When inserting SCTE 104 messages, this parameter is used to define the insertion line and has a valid range from lines 6 to 29 for both SD-SDI and HD-SDI type signals. This parameter is used primarily as a test and debug control. When set to a value of enable, the 7746FSE-GPI-HD+SCTE104 will insert a SCTE 104 message once every 10 seconds. Upon each successful insertion the 7746FSE-GPI-HD+SCTE104 will send an SNMP trap alarm and also illuminate the card edge LED’s for a period of approximately 5 seconds. Revision 1.6.3 Page - 51 7700 MultiFrame Manual 7746FS/FSE/FSE-GPI Series Frame Synchronizer The splice_insert_type parameter is an 8-bit unsigned integer defining the type of insertion operation desired. This parameter has 5 possible states: spliceStart_normal, spliceStart_immediate, spliceEnd_normal, sliceEnd_immediate, and splice_cancel. Please refer to SCTE 104 for clarification of the inferred values. spliceStart_normal section(s) occur at least once before a splice point. This interval should match the requirements of SCTE 35 and serve to set up the actual insertion. It is recommended that if sufficient pre-roll time is given by the AS, the Injector sends several succeeding SCTE 35 splice_info_section() sections (per SCTE 35 and SCTE 67) in response to a single splice_request message with a spliceStart_normal splice_insert_type splice_insert_type value. spliceStart_immediate sections may come once at the splice point’s exact location. The Injector shall set the splice_immediate_flag to 1 and the out_of_network_indicator to 1 in the resulting SCTE 35 splice_info_section() section. Usage of “immediate mode” signaling is not recommended by SCTE 35 and may result in inaccurate splices. spliceEnd_normal sections come to terminate a splice done without a duration specified. splice_event_source Page - 52 They may also be sent to ensure a splice has terminated on schedule. The Injector sets the out_of_network_indicator to 0. If they are to terminate a spliceStart_normal with no duration specified, they should be sent prior to the minimum interval before the return point and carry a value for pre_roll_time, especially if terminating a long form insertion. spliceEnd_immediate sections come to terminate a current splice before the splice point, or a splice in process earlier than expected. The Injector sets the out_of_network_indicator to 0 and the splice_immediate_flag to 1. The value of pre_roll_time is ignored. splice_cancel sections come to cancel a recently sent spliceStart_normal section. The AS must supply the correct value of splice_event_id for the section to be cancelled. The Injector shall set the splice_event_cancel_indicator to 1. The splice_event_source is a user assigned number for the source of a cue message. There are four possible values: 0, 4, 8 and 12. A value of 0 indicates that the source of the cue message is a cue embedded in the original source material. A value of 4 indicates a cue created by automation system switching. A value of 8 defines a cue created by a live event trigger system, and a value of 12 indicates a cue created by a local content replacement system. The splice_event_source and the splice_event_number together define the splice_event_id parameter that is inserted into the SCTE 104 message. Revision 1.6.3 7700 MultiFrame Manual 7746FS/FSE/FSE-GPI Series Frame Synchronizer splice_event_number unique_program_id pre_roll_time (ms) break_duration (tenths) avail_num avails_expected auto_return_flag The splice_event_number is the number chosen by the event source to identify an instance of the cue message. Its value is automatically calculated by the 7746FSE-GPI-HD+SCTE104 and makes up the lower 28 bits of the splice_event_id. This parameter is defined as a two-byte parameter and has a possible range of 0 to 65535. According to SCTE 104, the use of this field by servers and splicers is unknown at this time. The pre_roll_time parameter is a 16-bit field giving the time to the insertion point in milliseconds. This parameter has a possible range of 0 to 65535. This field is ignored for splice_insert_type values other than spliceStart_normal and spliceEnd_normal. The break_duration parameter is a 16-bit field giving the duration of the insertion in tenths of seconds. This parameter has a possible range of 0 to 65535. This field is ignored for splice_insert_type values other than spliceStart_normal and spliceStart_immediate. This parameter is an 8-bit field giving identification for a specific avail within the current unique_program_id. The value follows the semantics specified in SCTE 35 for this field. It may be zero to indicate its non-usage. This parameter has a possible range of 0 to 255. This parameter is an 8-bit field giving a count of the expected number of individual avails within the current viewing event. If zero, it indicates that avail_num has no meaning. This parameter has a possible range of 0 to 255. If this field is non-zero and a non-zero value of break_duration is present, then the auto_return field in the resulting SCTE 35 section will be set to one. This field is ignored for splice_insert_type values other than spliceStart_normal and spliceStart_immediate. Within this implementation this field is fixed to 0x00 and cannot be modified. Table 10-2: VistaLINK® Controlled Parameters Revision 1.6.3 Page - 53 7700 MultiFrame Manual 7746FS/FSE/FSE-GPI Series Frame Synchronizer Figure 10-1: VistaLINK® 7746FSE-GPI-HD+SCTE104 Configuration View 10.4. VISTALINK® TRAPS Trap Video Not Present Video Input Fail Genlock Not Present AES 1 Not Present AES 2 Not Present AES 3 Not Present AES 4 Not Present Demux 1 Group Not Present Demux 2 Group Not Present SCTE104 Trap Description Triggers when video is present/missing Triggers when video is interrupted Triggers when genlock is present/missing Triggers when AES 1 audio is missing (EAES4 version only) Triggers when AES 2 audio is missing (EAES4 version only) Triggers when AES 3 audio is missing (EAES4 version only) Triggers when AES 4 audio is missing (EAES4 version only) Triggers when the Demux 1 group audio is present/missing Triggers when the Demux 2 group audio is present/missing Triggers when a SCTE 104 DPI message is inserted Table 10-3: VistaLINK® Traps 10.5. INTELLIGAIN® CONFIGURATION (7746FSE-IG-HD AND 7746FS-EAES4-IG-HD VERSIONS ONLY) Please refer to the IntelliGain® User Manual for instructions on configuring IntelliGain®. Page - 54 Revision 1.6.3 7700 MultiFrame Manual 7746FS/FSE/FSE-GPI Series Frame Synchronizer 11. DIP SWITCH QUICK REFERENCE Selections written in italics are not available on 7746FSE version. ON OFF 1 2 3 4 5 6 7 8 DIP 5 Off Off Off Off DIP 6 Off On Off On DIP 7 Off Off On On DIP 8 Off Off Off Off Video Format 1080p/23.98sF 1080p/24sF Future Use 1080i/50 1080i/59.94 or 480p/59.94 1080i/60 720p/59.94 720p/60 525i/59.94 625i/50 Auto detect Off Off Off On Off Off Off On On On On Off On Off Off On Off On On Off Off On On On On Off On On DIP 3 Off DIP 4 Off DIP 2 Off On Card Edge Display Mode Horizontal Vertical DIP 1 Off On Control Mode Local control VistaLINK® control enabled Reserved (set to Off) Revision 1.6.3 Page - 55 7700 MultiFrame Manual 7746FS/FSE/FSE-GPI Series Frame Synchronizer This page left intentionally blank Page - 56 Revision 1.6.3