1
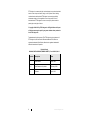
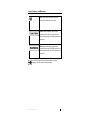
Double Knife Edge (DKE) Recessed Channel Mechanism (RCM) Door Maintenance Guide ETS-Lindgren Inc. reserves the right to make changes to any product described herein in order to improve function, design, or for any other reason. Nothing contained herein shall constitute ETS-Lindgren Inc. assuming any liability whatsoever arising out of the application or use of any product or circuit described herein. ETS-Lindgren Inc. does not convey any license under its patent rights or the rights of others. © Copyright 1994–2013 by ETS-Lindgren Inc. All Rights Reserved. No part of this document may be copied by any means without written permission from ETS-Lindgren Inc. Trademarks used in this document: The ETS-Lindgren logo is a trademark of ETS-Lindgren Inc; 3M and Scotch‑Brite are trademarks of 3M; Rulon is a registered trademark of Saint-Gobain; Masonite is a registered trademark of Masonite International Corporation. Revision Record MANUAL,DKE DOOR MAINT,W/MSDS SHEETS | Part #100514, Rev. D ii Revision Description Date A Initial Release June, 1994 B–C Initial Release; edit; updates February, 2003 D Rebrand April, 2013 www.ets-lindgren.com Table of Contents Notes, Cautions, and Warnings ................................................ v 1.0 Introduction .......................................................................... 7 ETS-Lindgren Product Information Bulletin ................................................. 7 2.0 About Maintenance .............................................................. 9 Replacement Parts ..................................................................................... 9 Service Procedures .................................................................................. 10 3.0 Regular Maintenance Schedule ........................................ 11 Required Tools and Supplies (Not Included) ............................................. 11 For Weekly Maintenance .................................................................. 11 For Monthly Maintenance.................................................................. 11 For Six-Month Maintenance .............................................................. 11 For Annual Maintenance ................................................................... 11 Weekly: Door Leaf Knife Blades................................................................ 12 Monthly: Receiver Channels ..................................................................... 12 Every Six Months: Contact Fingers, Hinges/Latch Bar .............................. 13 Contact Fingers ................................................................................ 13 Hinges/Latch Bar .............................................................................. 14 Annually: Finger Stock, Door Handle, Latch Bar ....................................... 15 4.0 Finger Stock Replacement ................................................ 17 Required Tools and Supplies (Not Included) ............................................. 17 Replacement Steps .................................................................................. 18 5.0 Door Handle/Spindle Assembly Maintenance ................ 21 Required Tools and Supplies (Not Included) ............................................. 21 Maintenance Steps ................................................................................... 22 Steps to Clean .................................................................................. 22 Steps to Adjust.................................................................................. 23 6.0 Latch Bar Maintenance...................................................... 25 Required Tools and Supplies (Not Included) ............................................. 25 Maintenance Steps ................................................................................... 25 7.0 Hinge Adjustment and Door Alignment ........................... 27 Required Tools and Supplies (Not Included) ............................................. 27 www.ets-lindgren.com iii Adjustment/Alignment Steps ..................................................................... 28 Appendix A: Warranty ............................................................. 29 iv www.ets-lindgren.com Notes, Cautions, and Warnings Note: Denotes helpful information intended to provide tips for better use of the product. Caution: Denotes a hazard. Failure to follow instructions could result in minor personal injury and/or property damage. Included text gives proper procedures. Warning: Denotes a hazard. Failure to follow instructions could result in SEVERE personal injury and/or property damage. Included text gives proper procedures. See the ETS-Lindgren Product Information Bulletin for safety, regulatory, and other product marking information. www.ets-lindgren.com v This page intentionally left blank. vi www.ets-lindgren.com 1.0 Introduction Each ETS-Lindgren Double Knife Edge (DKE) Recessed Channel Mechanism (RCM) Door is manufactured to precise standards and tolerances and is designed for high performance and durability. This guide provides the steps to perform periodic maintenance that is intended to prevent a problem from occurring in the future, eliminate the need for costly repairs, and to avoid costly down time. ETS-Lindgren Product Information Bulletin See the ETS-Lindgren Product Information Bulletin included with your shipment for the following: Warranty information Safety, regulatory, and other product marking information Steps to receive your shipment Steps to return a component for service ETS-Lindgren calibration service ETS-Lindgren contact information www.ets-lindgren.com Introduction 7 This page intentionally left blank. 8 Introduction www.ets-lindgren.com 2.0 About Maintenance Before performing any maintenance, follow the safety information in the ETS-Lindgren Product Information Bulletin included with your shipment. WARRANTY Maintenance of the DKE RCM Door is limited to the components described in this guide. Warranty may be void if the instructions in this maintenance guide are not followed. If you have any questions concerning maintenance, contact ETS-Lindgren Customer Service. Replacement Parts ETS-Lindgren may substitute a similar part or new part number with the same functionality for another part/part number. Contact ETS-Lindgren for questions about part numbers and ordering parts. Following are the part numbers for ordering replacement parts for the ETS-Lindgren Double Knife Edge RCM Door. Part Description Part Number DKE Door Maintenance Kit 206656 www.ets-lindgren.com About Maintenance 9 Service Procedures For the steps to return a system or system component to ETS-Lindgren for service, see the Product Information Bulletin included with your shipment. 10 About Maintenance www.ets-lindgren.com 3.0 Regular Maintenance Schedule Before performing maintenance, follow the safety information in the ETS-Lindgren Product Information Bulletin included with your shipment. When working with solvents, always use eye protection and protective clothing, and make sure there is proper ventilation. Required Tools and Supplies (Not Included) FOR WEEKLY MAINTENANCE Clean, soft cloths Scour pads (for example, a 3M™ Scotch-Brite™ pad) Acetone or similar solvent FOR MONTHLY M AINTENANCE Clean, soft cloths 3-inch putty knife Acetone or similar solvent FOR SIX-MONTH M AINTENANCE Clean, soft cloths Emery cloth sandpaper, 320 grit 3-inch putty knife Acetone or similar solvent 1/8-inch tempered Masonite® or 3-inch x 6-inch piece of plastic sheet Light machine oil Lightweight grease FOR ANNUAL M AINTENANCE See maintenance procedures on page 17, page 21 and page 25. www.ets-lindgren.com Regular Maintenance Schedule 11 Weekly: Door Leaf Knife Blades 1. Use a scour pad to remove residue and clean the inner and outer double knife blades on the door leaf. 2. Clean the blades with a soft cloth soaked with acetone or similar solvent. Monthly: Receiver Channels Do not slide putty knife and cloth across finger stock when performing these steps. Do not use an excessive amount of solvent. The contact fingers on the door are attached with adhesive. Any over-application of solvent other than as described in the following steps may disrupt the adhesive and cause the contact fingers to fall off. If a source of clean, dry, oil-free air is available, it may be applied to speed drying time. 1. Lightly dampen a clean, soft cloth with solvent. 2. Completely cover the blade portion of a 3-in putty knife. 3. To remove built-up dirt from the contact fingers, start at the top center of the door: 4. 12 For the upper and lower horizontal receiver channels—Insert the putty knife with cloth into the receiver channel and work it towards a corner with an in-and-out motion; repeat in the opposite direction. For the vertical receiver channels—Insert the putty knife with cloth into the top of the channel and work down to the bottom; repeat for the opposite channel. Allow the solvent to evaporate, and then repeat the entire procedure. Regular Maintenance Schedule www.ets-lindgren.com Every Six Months: Contact Fingers, Hinges/Latch Bar Do not move the sanding assembly side-to-side or up-and-down. The edges of the sanding paper will snag and damage the contact fingers. CONTACT FINGERS 1. Fold a piece of 320 grit emery cloth over a section of 1/8-in tempered Masonite or a 3-in x 6-in piece of plastic sheet with the sanding surfaces facing out. 2. Slide the sanding assembly straight into and between the rows of contact fingers located in the double knife edge receiver. With two or three strokes, burnish the surfaces of the contact fingers. 3. Move to the next section, and with a 1/2-in overlap, repeat this procedure around the entire perimeter of the double knife edge receiver. Be sure to burnish both rows of finger stock. 4. Remove the residue with a soft cloth soaked with solvent and wrapped around a 3-in putty knife, as described in the monthly maintenance steps on page 12. www.ets-lindgren.com Regular Maintenance Schedule 13 HINGES/LATCH BAR Do not lubricate hinges on door models manufactured after January, 1989; these hinges have self-lubricating Rulon® bearings and require no additional lubricant. The steps in this section apply only to door models manufactured prior to January, 1989. Do not lubricate the door handle shaft assembly on any door model. 14 Lubricate hinges with a few drops of light machine oil. Wipe off any excess oil. Remove the latching mechanism protective cover from the door leaf and lubricate the nine bearings on the latch bar assembly with one drop of light machine oil. Wipe off any excess oil. Apply an ample amount of lightweight grease to the two latch bar guide blocks. Check periodically for any loose bolts and any wear or play on the door handle/spindle assembly. See page 15 for disassembly, assembly, and adjustment procedures. Regular Maintenance Schedule www.ets-lindgren.com Annually: Finger Stock, Door Handle, Latch Bar The necessity to replace finger stock varies, depending on environmental conditions and door use. For optimum RF performance, replace finger stock every one to two years. (Optional) Replace the finger stock around the entire perimeter of the recessed contact mechanism (RCM). See page 17 for the steps to replace finger stock. Disassemble and clean the door handle/spindle assembly following the steps on page 21. Disassemble and lubricate the latch bar assembly following the steps on page 25. www.ets-lindgren.com Regular Maintenance Schedule 15 This page intentionally left blank. 16 Regular Maintenance Schedule www.ets-lindgren.com 4.0 Finger Stock Replacement Before performing maintenance, follow the safety information in the ETS-Lindgren Product Information Bulletin included with your shipment. When working with solvents, always use eye protection and protective clothing, and make sure there is proper ventilation. The necessity to replace finger stock depends on environmental conditions and door use. For optimum RF performance, replace finger stock every one to two years. Required Tools and Supplies (Not Included) Hex key Clean, soft cloths Scour pads (for example, a 3M™ Scotch-Brite™ pad) Acetone or similar solvent Emery cloth sandpaper, 320 grit Cotton or surgical gloves Wide blade putty knife Heat gun www.ets-lindgren.com Finger Stock Replacement 17 Replacement Steps 1. Use a hex key to remove the cap head screws (approximately 80) from the removable brass center bars located in the center of the recessed channel mechanism (RCM). Mark the center bars left, right, top and bottom for replacement. 2. Strip away the contact fingers from each brass center bar; strip the finger stock from both sides of the RCM receiver channel. The width of the bronze channel allows ample space to achieve this task. Discard the used finger stock. Do not reuse. 3. Remove any adhesive residue with solvent. Clean the exposed surfaces of the brass center bar and the RCM channel with a scour pad. 4. Use a 320 grit emery cloth to etch the surfaces of the brass and bronze components where the new finger stock will be installed, and then clean the surfaces with solvent. Because fingerprints will prematurely etch the material and reduce the effective performance, always wear cotton or surgical gloves to handle finger stock. 5. 18 Replace the finger stock with ETS-Lindgren finger stock (part number 204701). Beginning in one corner, strip away the protective paper backing from the two-foot length of finger stock and attach the adhesive-backed strip to the side of the bronze RCM channel. Make sure that the end of the finger stock material compresses into the RCM, and that each strip is in a straight line. Align the edge of each strip with the leading top edge of the RCM channel. Position the two rows of replacement finger stock around the perimeter of the RCM channel. Use a wide blade putty knife to apply pressure to each section of material to make sure the adhesive is uniformly attached to the bronze surface. Finger Stock Replacement www.ets-lindgren.com Attach finger stock to each side of the removable brass bar and then reinstall. With the RCM reassembled and in proper alignment, use a heat gun to apply hot air, taking care to not overheat. Apply sufficient heat to bring the adhesive backing to a semisoft state, allowing the adhesive to grip and set into the previously-etched surface. Allow ample time for the heated metal to return to room temperature before engaging the door leaf. www.ets-lindgren.com Finger Stock Replacement 19 This page intentionally left blank. 20 Finger Stock Replacement www.ets-lindgren.com 5.0 Door Handle/Spindle Assembly Maintenance Before performing maintenance, follow the safety information in the ETS-Lindgren Product Information Bulletin included with your shipment. When working with solvents, always use eye protection and protective clothing, and make sure there is proper ventilation. Required Tools and Supplies (Not Included) Hex key Screwdriver(s) Clean, soft cloths Acetone or similar solvent Scour pads (for example, a 3M™ Scotch-Brite™ pad) Fine sandpaper (if required) Lightweight grease #7 drill (if required) www.ets-lindgren.com Door Handle/Spindle Assembly Maintenance 21 Maintenance Steps STEPS TO CLEAN 1. Use a hex key to remove the cap head screw and lock washer from the front door handle center. 2. Remove the eight screws that secure the latch bar protective cover to the door leaf. Remove the cover and set it aside. 3. Loosen the hex drive set screw in the rear door handle. For door models manufactured after January, 1989, remove the cap head bolt and lock washer, and then the rear door handle. 4. From the rear side of the door leaf, remove the thrust bearing, two hardened ground washers, and the RF mesh gasket from the 1-in steel door shaft. 5. Push the door drive shaft to the front of the door leaf and remove the remaining assembly, which consists of the steel drive shaft, drive gear and a thrust bearing, and two hardened ground washers. The ball bearing race is press-fit into the brass bearing retainer and should only be replaced if excessive wear is apparent. 6. 7. If necessary, remove the 4-in brass bearing retainers by removing the four center-bored cap head screws on each side. Before removal, mark the position of each retainer assembly on both sides. Soak the bearing retainer assemblies in solvent to remove all traces of lubricant. Reassembly requires the use of the door drive center shaft for alignment. Clean all components with solvent and polish the surfaces with a scour pad. Clean the interior of the 2-in bronze center bushing mounted in the door leaf panel and burnish with fine sandpaper, if needed. 22 Door Handle/Spindle Assembly Maintenance www.ets-lindgren.com 8. Reassemble by following these steps in reverse order. 9. Realign the drive gear and the gear rack on the latch bar with the indexing marks on both components for the proper door handle indexing arc. 10. Lubricate the gear teeth with grease. STEPS TO ADJUST 1. Adjust the tension on the door handle spindle assembly by tightening the cap head bolt on the rear handle to a point where the RF gasket is compressed for RF integrity; the handle will have a slight drag. 2. For door models manufactured after January, 1989: Tighten the locking set screw on the door handle. If the door handle does not have a set screw feature, it can be retrofitted by drilling with a #7 drill and tapping the hole with a 1/4–20 tap for a 1/4–20 set screw. The set screw will prevent the door handle from working loose. www.ets-lindgren.com Door Handle/Spindle Assembly Maintenance 23 This page intentionally left blank. 24 Door Handle/Spindle Assembly Maintenance www.ets-lindgren.com 6.0 Latch Bar Maintenance Before performing maintenance, follow the safety information in the ETS-Lindgren Product Information Bulletin included with your shipment. Required Tools and Supplies (Not Included) Hex key Screwdriver(s) Clean, soft cloths Lightweight grease Grease gun Maintenance Steps 1. Use a hex key to remove the cap head screw and lock washer from the front door handle center. 2. Remove the eight screws that secure the latch bar protective cover to the door leaf. Remove the cover and set it aside. 3. Remove the covers of the latch bar guide blocks and lubricate with lightweight grease. 4. Repack the ball bearing race on each center bearing with grease; these are mounted on the crossbars of the latch bar at three locations. 5. For door models manufactured after January, 1989: Loosen the locking set screws, retaining the ball bearing cam followers at six locations on the crossbars of the latch bar assembly. With a straight slot screwdriver or a hex key, remove the six cam followers. Apply grease with a grease gun to the threaded stud end until new lubricant appears at the bearing end. Reassemble the cam followers and lock down the set screws. www.ets-lindgren.com Latch Bar Maintenance 25 This page intentionally left blank. 26 Latch Bar Maintenance www.ets-lindgren.com 7.0 Hinge Adjustment and Door Alignment Before performing maintenance, follow the safety information in the ETS-Lindgren Product Information Bulletin included with your shipment. Under normal shipping and operating conditions, the door frame and leaf assembly should never become misaligned. However, if unusual or extreme conditions occur, consult ETS-Lindgren prior to attempting any corrective action. Required Tools and Supplies (Not Included) Wrenches Blocks Pipe clamps Hex key (if required) Screwdrivers Drift pin www.ets-lindgren.com Hinge Adjustment and Door Alignment 27 Adjustment/Alignment Steps The door frame and leaf are factory-aligned with precision jigs. The bolts securing these components together (grade 8) with the heavy duty hinges are torqued to 80–100 in-lb. The holes in the door leaf are bored oversize to allow the door leaf to move approximately 1/16 inch to the left, right, up, and down. 1. 2. 3. With the door in the closed position, loosen three of the four bolts securing the hinge plate to the door leaf. With blocks and pipe clamps, move the door leaf edge in the required direction. With the door leaf repositioned, retighten the three hinge plate bolts. For door models manufactured after January, 1989: The Rulon™ hinge thrust bearings have an anticipated life of five to ten years under normal conditions. If it becomes necessary to replace the bearings, work on one hinge at a time to maintain the proper alignment of the door frame and leaf. With the door in the closed position and the handle in the locked position, remove the hinge plate from one of the hinge assemblies by removing the eight cap head bolts. Release the two locking set screws at the rear of each hinge arm and remove the hinge arms and the hinge pin from the hinge base. With a small flat blade screwdriver, remove the Rulon bearings from the hinge base. Replace with new bearings and discard the old bearings. Reassemble the hinge assembly by following these steps in reverse order. Older steel hinge assemblies (black): These assemblies have two ball bearing sets in each hinge. With the door in the closed and locked position, remove one hinge assembly entirely from the door frame and leaf. The ball bearing races are press-fit into the steel hinge barrel; drive the bearing free with a drift pin, and then replace. 28 Repack the bearing with grease and reassemble. Hinge Adjustment and Door Alignment www.ets-lindgren.com Appendix A: Warranty See the Product Information Bulletin included with your shipment for the complete ETS-Lindgren warranty for your DKE RCM Door. DURATION OF WARRANTIES FOR DKE RCM DOOR All product warranties, except the warranty of title, and all remedies for warranty failures are limited to one year. Product Warranted Duration of Warranty Period Double Knife Edge (DKE) Recessed Channel Mechanism (RCM) Door 1 Year www.ets-lindgren.com Warranty 29