1
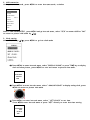
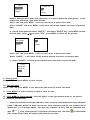
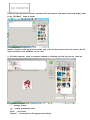
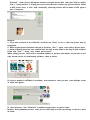
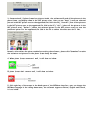
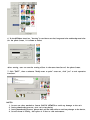
English ALARM-CLOCK / RADIO DIGITAL PHOTO FRAME Ref.: CPNR2.0 - OPERATION MANUAL- TECHNICAL DATA 1. Display screen: 1.5” CSTN LCD 2. Memory: 1MB Nor flash 3. Maximum picture quantity: 58 pieces 4. Picture pixels: 128x128 5. USB interface version: USB1.1 6. PC operation system: Windows 2000, XP, vista Accessories included : - USB Cable x 1 PC - Manual x 1 PC FUNCTIONS AND FEATURES 1. View pictures: support to display digital pictures & photos of JPG, BMP and GIF (static) formats. 2. Auto shut off function 3. Picture play in slide show 4. Time display: support date (2000-2099) and time setting. 5. Alarm: choice for open and close 6. LCD contrast adjustable: 6 grades 7. Backlight adjustable: 21 grades 8. Input and connect: copy the worked pictures in the computer to the digital photo frame by outside Mini USB cable connecting with PC. 9. FM radio, the frequency range: 88MHz~108 MHz. POWER 1) The power for photo frame and electronic calendar is separate. 2) 2 pieces AAA battery supply power for FM radio, please install and change it if necessary. 3) Photo frame part is powered by built-in rechargeable lithium battery or USB cable connection with PC 4) It can be powered and recharge built-in lithium battery by connecting the unit with PC through mini USB cable or adaptor with output voltage 5V. If disconnecting with PC, it is powered by built-in lithium battery. The recharging time is about 4-6 hours, if fully recharged, it will stop recharging auto. 5) Three grade battery voltage detecting, when display picture, battery volume mark will appear and show for 1 second. KEYS INTRODUCTION MENU 1. When DPF is closed, press it for 2 seconds to open DPF, enter into picture model 2. Under picture display mode, press it to enter into “menu” mode 3. Under menu mode, press it to enter into current choice setting and confirm it UP 1. Under photo display mode, press it to view previous picture 2. Under time setting mode, press it to adjust setting upwards 3. Under menu mode, press it to choose menu upwards DOWN 1. Under photo display mode, press it to view next picture 2. Under time setting mode, press it to adjust setting downwards 3. Under menu mode, press it to choose menu downwards TIME Under any mode, press it to enter into time setting SET 1. Under time mode, press it for 2 seconds to enter into time setting mode, under time setting mode, press it to confirm the setting choice 2. Under alarm mode, press it to entering into alarm setting. Under alarm setting mode, press it to confirm the setting choice. RESET Under any mode, press it to reset the unit ON/OFF 1. FM radio switch on or off 2. FM radio volume adjust SCAN - FM radio auto scan, press it one time, it will search the signal for one time. - Reset: Press it one time, it will restart to search signal from 88MHz. PHOTO VIEWER OPERATIONS 1. Press reset key and open key MENU Press reset key or open key MENU; LCD will display the appointed picture for 2 seconds, as below picture, then enter into picture view mode Check battery volume, if battery voltage is below 3.4V, photo frame can’t be opened. If no power, it will appear “LOW POWER” and shut off auto. 2. USB connection Under picture view mode, press MENU to enter into menu mode, as below: MAIN MENU USB CONNECTED CLOCK SLIDE SHOW AUTO SHUT DOWN CONTRAST BACKLIGHT DELETE OFF Select “USB CONNECTED”, press MENU and go into sub-menu, select “YES” to connect USB or “NO” to return to picture view mode by /. 3. Clock setting Select “CLOCK” by /, press MENU to go into clock mode ⑴. Press MENU to enter into sub-menu, select “DISPLAY CLOCK” or press TIME key to display clock as below picture, press MENU to exit and return to picture view mode. 03-08-2008 09:42:31 TUE ⑵. Press MENU to enter into sub-menu, select “ ANALOG CLOCK” to display analog clock, press MENU to return to picture view mode ⑶. Press MENU to enter into sub-menu, select “ SET CLOCK” to set time. Press MENU enter into sub-menu or press “SET” directly to enter into time setting. 03-08-2008 09:42:31 TUE Press MENU to adjust “year / moth / date / time” by /, press MENU to confirm the current setting and return to picture view mode, week will change auto as per the date changing. ⑷. Press MENU to enter into sub-menu, select “Alarm clock”. sub-menu, select “ON” to open alarm, enter into next menu Press “ MENU” to go into ALARM CLOCK ON OFF CANCEL Press MENU to change “hour/minute”, adjust them by and return to picture view mode. / , press MENU to save the setting When the unit is open or close, alarm arrives to the set time, alarm will sound to remind, press MENU to return to picture view mode. Remark: when alarm arrives to the set time, it will sound to remind, and it will exit alarm auto after 15 seconds, and return to picture view mode. ⑸. Select “CANCEL” to cancel, press MENU to exit clock menu and return to previous menu. 4. Picture play mode Select “Slide Show” by /, press MENU to enter into sub-menu as below: SLIDE SHOW ON OFF CANCEL ⑴.SELECT“ON” BY / TO OPEN SLIDE SHOW TIME, GO INTO NEXT MENU: SLIDE SHOW 05 Select slide show time by /, the choice can be “01~15 second”, press MENU to save the setting and return to picture view mode. ⑵. Select “OFF” and press MENU to close slide show function, press MENU again to exit and return to picture view mode. ⑶. Select “CANCEL” and press MENU to exit picture play setting menu and return to previous menu. 5. Auto Shut off Select “AUTO SHUT DOWN”, press MENU to go into sub-menu as below: AUTOSHUT DOWN ON OFF CANCEL ⑴. Press / to set auto shut off time, the choice can be “01~30 minute”, press MENU to save the setting and return to picture view mode. ⑵. Select “OFF” and press MENU to close auto shut off setting, press MENU again to return to picture view mode. ⑶. Select “CANCEL” and press MENU to close setting menu and return to previous menu. 6. LCD contrast adjust Select “CONTRAST”, press MENU to enter into sub-menu as below: CONTRAST 02 Press / to set contrast, the choice can be “01~06 grade”, press MENU to return to picture view mode 7. LCD backlight adjust Select “BACKLIGHT”, press MENU to enter into sub-menu as below: BACKLIGHT 18 Press / to set backlight, the choice can be “01~21 grade”, press MENU to return to picture view mode. 8. Delete pictures Select “DELETE”, press MENU to enter into sub-menu ⑴. First select the picture user want to delete, press MENU to enter into main menu, press / to select “DELETE”. Press / to select “DELETE ONE”to delete one picture, press MENU to enter into sub-menu, press / to select “YES”, press MENU to delete and return to picture view mode DELETE DELETE ONE DELETE ONE YES DELETE ALL NO CANCEL CANCEL Remark: when picture is under slide show mode, it is easy to delete the wrong picture, so user should close slide show, then make deletion. Select “NO” and press MENU, it will exit and return to picture view mode. Select “CANCEL” and press MENU, it will cancel one picture deletion and return to previous menu. Use the above method to select “DELETE ”, then select “DELETE ALL”, press MENU to enter into sub-menu, press / to select “YES”, press MENU to delete all the pictures. (2). DELETE DELETE ALL DELETE ONE YES DELETE ALL NO CANCEL CANCEL Select “NO” and press MENU, it will exit and return to picture view mode. Select “CANCEL”, it will cancel all the pictures deletion and return to previous menu. (3). Select “CANCEL” to cancel picture deletion menu and return to previous menu: DELETE DELETE ONE DELETE ALL CANCEL 9. Close by hand Select “OFF” and press MENU to close the unit 10. Exit main menu Select “Exit” and press MENU to exit main menu and return to picture view mode 11. Press MENU for several seconds to open or close the unit. 12. Press / for several seconds, clock will appear at the right bottom corner of the picture. PC connection and download: 1. Connect PC with the unit through USB cable, enter into picture view mode and recharge the photo frame, USB power will be the power for the unit. After connection with PC, the software will be opened auto, ( if no dialogue appear, then open “my computer” directly, find the removable disk, open ), after connection well, PC will detect the device auto. And show take column. Photo frame will display USB connected as below: in the windows If photo frame has pictures inside, software will read pictures from photo frame and display them in the “DPFMate”, same as below: Remark: if photo frame has pictures inside, only after all the pictures have been read to the PC, other functions in the DPFMate can be used. 2. Click My Computer, same as sequence showed as following and find the picture, then use “+” : enlarge picture “—“ : reduce previewed picture “Clear” : cut picture “RotateL” : rotate picture 90 degree anticlockwise “RotateR” : rotate picture 90 degree clockwise to adjust picture well, then click “Add” or double click it, finally pictures in cutting area of preview album or suitable size pictures will be added to DPF picture area, if click “Add” continually, selected pictures will be added to DPF picture area in sequence. Remarks: 1- If picture resolution is not 128x128, and don’t use “Clear” to cut it, then the picture may be lengthened. 2- When original picture has been enlarged to the most, click “+” again, can’t enlarge picture more. 3- When original picture has been reduced with the long or wide same as the long or wide of photo frame LCD, click “-“ again, can’t reduce picture more. When adding pictures, there will be maximum number of pictures and number of pictures at the right bottom corner of downloading software, show as below: If pictures number in DPFMate is maximum, and continue to select picture, then dialogue frame as follow will appear: If select pictures, click “Download” to download new picture to photo frame. Remark: during download process, don’t pull out USB cable to avoid any damage to the unit, show as below: 3. Connected well, if photo frame has pictures inside, the software will read all the pictures in the photo frame, and display them in the DPF picture area. User can use “Save” ( save one selected picture in the DPF picture area to the appointed file fold in the PC), “SaveAll” ( save all the pictures in the DPF picture area to the appointed file fold in the PC), “ALL” ( select all the pictures in the DPF picture area), “Delete” ( delete the selected picture in the DPF picture area) to save the preferred picture to the appointed file fold in the PC or delete the ones user don't’ like. Remark: after delete the picture and before exiting the software, please click “Download” to make the software and pictures in the photo frame keep the same. 4. When photo frame connected well, it will show as below: If photo frame don’t connect well, it will show as below: 5. Click right key of the mouse in the blank space of the DPFMate interface, user can change the DPFMate language in the rolling-down menu, the software supports Chinese, English and French, it is as below: 6. In the DPFMate interface, “Setting” is used be to set the foreground color and background color for the photo frame, it is shown as below. After setting, user can see the setting effect in the menu interface of the photo frame. 7. Click “EXIT”, then a submenu “Really want to quite” come out, click “yes” to exit operation interface. NOTES: 1. Do not use other method to format PHOTO VIEWER to avoid any damage to the unit 2. During downloading process, user can’t view photos. 3. During downloading process, please don’t pull out USB cable to avoid any damage to the device. 4. Do not throw it heavily, don’t place it in hot or cold environment. FM RADIO 1. Please install 2 pieces AAA battery correctly (separate power, only for FM radio, when the radio 2. 3. 4. 5. 6. effect or sound quality goes down; please change the battery in time.) Rotate “On/Off” key until you hear “DI” sound, it means FM radio is turned on, continue to rotate it and adjust a suitable volume. Press “Scan” key to search station, when get a station, it will lock the station frequency, and tune in it. If press “Scan” key again, it will search next station. Press “Reset” key, FM radio will search station again from 88MHz. When user listens to the radio, if operate photo frame, perhaps it will bring bad effect for radio When using radio, please don’t connect photo frame with PC through USB cable, otherwise it will disturb radio.