1
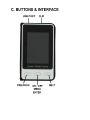
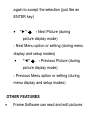
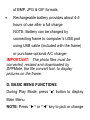
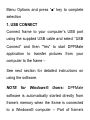
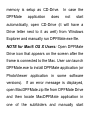
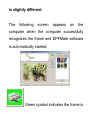
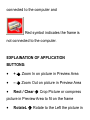
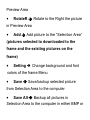
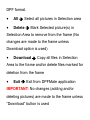
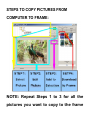
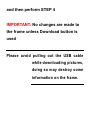
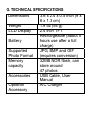
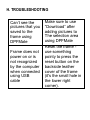
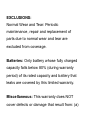
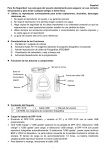
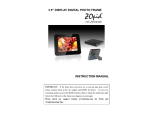
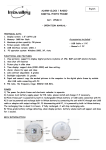
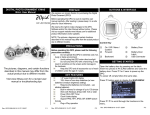
2.4” Mini Photo Frame HF-ZP024W USER MANUAL NOTE: This user manual is also available on www.hittusa.com to download or print A. PREFACE We express our sincere thanks for purchasing this Mini Photo Frame (MPF)! Before operating this MPF, be sure to read this user manual carefully. After reading it, please keep it in a safe place for future reference. We reserve the right to make changes to this MPF, Software and/or this User Manual without notice. Please visit our company’s website listed on the product packaging for additional product information and/or updates. NOTE: The pictures, diagrams and certain functions described in this manual may differ from the actual product due to different models. B. PRECAUTIONS Before operating this MPF, please read the following precautions carefully: Do not operate this MPF in extremely cold, hot, dusty or damp environment Avoid putting this MPF under direct sunlight Do not scrub this MPF with a hard thing; it may result in scratches on the screen and/or damage to the hardware Keep this MPF and all accessories out of reach of children under the age of 3 years. C. BUTTONS & INTERFACE USB Port: Use USB Cable to connect frame to the computer to download pictures and charge built-in rechargeable battery. NOTE: Frame can be used to display pictures while it’s being charged using computer’s USB port CLIP: Use Clip to make frame stand in landscape mode (as shown in the picture on the cover page of this manual.) “■” ON/OFF – MENU - ENTER: o Press & Hold “■” button Turn power ON or OFF o During play mode press this button to bring up the menu and press this button again to accept the selection (just like an ENTER key) “►” - Next Picture (during picture display mode) - Next Menu option or setting (during menu display and setup modes) “◄” - Previous Picture (during picture display mode) - Previous Menu option or setting (during menu display and setup modes) OTHER FEATURES Frame Software can read and edit pictures of BMP, JPG & GIF formats Rechargeable battery provides about 4-5 hours of use after a full charge NOTE: Battery can be charged by connecting frame to computer’s USB port using USB cable (included with the frame) or purchase optional A/C charger IMPORTANT: The photo files must be converted, resized and downloaded by DPFMate, the file convert tool, to display pictures on the frame. D. BASIC MENU FUNCTIONS During Play Mode, press “■” button to display Main Menu NOTE: Press “►’’ or “◄” key to pick or change Menu Options and press “■” key to complete selection 1. USB CONNECT Connect frame to your computer’s USB port using the supplied USB cable and select “USB Connect” and then “Yes” to start DPFMate application to transfer pictures from your computer to the frame – See next section for detailed instructions on using the software. NOTE for Windows® Users: DPFMate software is automatically started directly from frame’s memory when the frame is connected to a Windows® computer – Part of frame’s memory is setup as CD-Drive. DPFMate application does In case the not start automatically, open CD-Drive (it will have a Drive letter next to it as well) from Windows Explorer and manually run DPFMate.exe file. NOTE for Mac® OS X Users: Open DPFMate Drive icon that appears on the screen after the frame is connected to the Mac. User can launch DPFMate.exe to install DPFMate application (or PhotoViewer application in some software versions). If an error message is displayed, open MacDPFMate.zip file from DPFMate Drive and then locate MacDPFMate application in one of the subfolders and manually start installation process IMPORTANT: If you have virus protection software installed on your computer, you might have to disable it to install the software successfully or if the virus software displays warning messages, during installation process, please select “allow program to make changes” option. 2. CLOCK Use “►” or “◄” key to make a selection and confirm every selection using “■” key. Use this menu option to do the following: - Display Clock – selecting this option displays Date and Time. Press “■” key to exit - Calendar – selecting this option displays monthly calendar. Use “►” or “◄” key to display next or previous month respectively. Press “■” key to exit. - Analog Clock – Displays analog clock and date. Press “■” key to exit. - Set Clock - Use “►” or “◄” key to pick right date and time, and confirm every selection using “■” key. When done press “■” key to confirm and exit. - Alarm Clock - Use “►” or “◄” key to set hour and minute, confirm each selection using “■” key. When done press “■” key to confirm and exit. - Cancel – Exit from Clock menu option 3. SLIDE SHOW Use this menu option to change slide transition time, use “►” or “◄” key to adjust the time – transition time between pictures can be set from 1 to 15 seconds. Press “■” to confirm and exit. 4. AUTO OFF Use this menu option to enable or disable Auto OFF feature and set the time to automatically turn OFF the power. Use “►” or “◄” key to adjust the time – power off time can be set from 1 to 30 minutes. Press “■” to confirm and exit. 5. POWER OFF Select this option and then “Yes” to turn power “OFF’ 6. BACKLIGHT Select this option to adjust picture brightness – the brightness level can be set from 01 to 21. Press “■” to confirm and exit. 7. DELETE Select this option to delete pictures from the frame. Select “One” to delete the picture that was being displayed when you pressed “■” key, or select “All” to delete all pictures on the frame. 8. EXIT Press “►” or “◄” button to choose “Exit”, and then Press “■” key to exit from the menu. E. CONNECTING FRAME TO THE COMPUTER (to charge battery, download pictures and to display pictures without using rechargeable battery) Plug smaller end of the USB Cable into USB Port on the frame and the larger end of the cable into USB port on the computer. NOTE: Optional A/C charger can also be used to supply power and charge built-in battery Charge Battery and supply power from computer’s USB port: When the USB cable is properly connected, a battery symbol appears in the upper right corner of the frame display. It can take up to 8 hours to fully charge the battery. Downloading pictures from a computer: Make sure the USB cable is properly connected, press “■” key to display menu, select “USB Connect” and then “Yes” to start DPFMate application to transfer pictures from your computer to the frame NOTE for Windows® Users: DPFMate software is automatically started directly from frame’s memory when the frame is connected to a Windows® computer – Part of frame’s memory is setup as CD-Drive. DPFMate application does In case the not start automatically, open CD-Drive (it will have a Drive letter next to it as well) from Windows Explorer and manually run DPFMate.exe file. NOTE for Mac® OS X Users: Open DPFMate Drive icon that appears on the screen after the frame is connected to the Mac. User can launch DPFMate.exe to install DPFMate application (or PhotoViewer application in some software versions). If an error message is displayed, open MacDPFMate.zip file from DPFMate Drive and then locate MacDPFMate application in one of the subfolders and manually start installation process IMPORTANT: If there is virus protection software installed on the computer and it displays warning message, when the frame is connected to the computer using USB cable or when DPFMate application is run, please select “allow program to make changes” option. F. USING DPFMate (Picture convert and copy tool) NOTE: This tool can read and convert pictures of JPG, BMP and GIF formats. DPFMate or MacDPFMate 3 is used to do the following: Select pictures stored on the computer Preview the pictures before download Edit pictures (zoom in, zoom out, crop and rotate), before saving it to the frame Choose one or more pictures for deletion Download/Save pictures to the frame Backup/Save one or all the pictures from the frame to your PC NOTE for Mac Users: The following section describes the picture conversion tool using PC version of the software, the user interface for Mac version of this application MacDPFMate or PhotoViewer is slightly different. The following screen appears on the computer when the computer successfully recognizes the frame and DPFMate software is automatically started: Green symbol indicates the frame is connected to the computer and Red symbol indicates the frame is not connected to the computer. EXPLAINATION OF APPLICATION BUTTONS: + Zoom In on picture in Preview Area – Zoom Out on picture in Preview Area Rect / Clear Crop Picture or compress picture in Preview Area to fit on the frame RotateL Rotate to the Left the picture in Preview Area RotateR Rotate to the Right the picture in Preview Area Add Add picture to the “Selection Area” (pictures selected to downloaded to the frame and the existing pictures on the frame) Setting Change background and font colors of the frame Menu Save Save/backup selected picture from Selection Area to the computer Save All Backup all pictures in Selection Area to the computer in either BMP or DPF format. All Select all pictures in Selection area Delete Mark Selected picture(s) in Selection Area to remove from the frame (No changes are made to the frame unless Download option is used) Download Copy all files in Selection Area to the frame and/or delete files marked for deletion from the frame Exit Exit from DPFMate application IMPORTANT: No changes (adding and/or deleting pictures) are made to the frame unless “Download” button is used STEPS TO COPY PICTURES FROM COMPUTER TO FRAME: NOTE: Repeat Steps 1 to 3 for all the pictures you want to copy to the frame and then perform STEP 4 IMPORTANT: No changes are made to the frame unless Download button is used Please avoid pulling out the USB cable while downloading pictures, doing so may destroy some information on the frame. G. TECHNICAL SPECIFICATIONS Dimensions 3.6 x 2.4 x 0.5 inch (9 x 6 x 1.3 cm) Weight 1.9 oz (54 g) LCD Display 2.4 inch TFT Rechargeable (about 5 Battery hours use after a full charge) Supported JPG, BMP and GIF Photo Format (requires conversion) Memory 32MB NOR flash, can capacity store around 47 photos Accessories USB Cable, User Manual Optional A/C Charger Accessory H. TROUBLESHOOTING Can’t see the pictures that you saved to the frame using DPFMate Frame does not power on or is not recognized by the computer when connected using USB cable Make sure to use “Download” after adding pictures to The selection area using DPFMate Reset the frame use something pointy to press the reset button on the backside leather cover of the frame (it's the small hole in the lower right corner). LIMITED 90-DAY WARRANTY Coverage: Hi-Tech Trading (USA), Inc. (“HiTT”) warrants this product (“product”) against defects in materials and workmanship under normal consumer use for 90 days from the date of purchase. HiTT, at its option, will at no charge repair, replace or refund the purchase price of this product should it not conform to this warranty. This limited warranty is a consumer’s exclusive remedy, extends only to the first consumer purchaser, is not transferable and is valid only on products purchased by consumers in the United States or Canada. EXCLUSIONS: Normal Wear and Tear: Periodic maintenance, repair and replacement of parts due to normal wear and tear are excluded from coverage. Batteries: Only battery whose fully charged capacity falls below 80% (during warranty period) of its rated capacity and battery that leaks are covered by this limited warranty. Miscellaneous: This warranty does NOT cover defects or damage that result from: (a) improper operation, storage, misuse or abuse, accident or neglect, such as physical damage (cracks, scratches, etc.) to the surface of the Product resulting from misuse; (b) contact with liquid, water, rain, extreme humidity or heavy perspiration, sand, dirt or the like, extreme heat, or food; (c) use of the Product for commercial purposes or subjecting the Product to abnormal usage or conditions; (d) service, installation, alteration, or modification in any way by someone other than HiTT and, (e) other acts which are not the fault of HiTT. Obtaining Service: To obtain service or information, please send email to [email protected]. You will receive instructions on how to ship the product, at your expense, to a HiTT Service Center. To obtain service, you must include a copy of your receipt, receipt is not required if you registered your product on our website www.hittusa.com within 30 days of purchase date. HF-ZP024W COMPANY & CONTACT INFORMATION Hi-Tech Trading USA Inc P.O. Box 179 Woodbury, NY 11797 U.S.A. Web: www.hittusa.com Email: [email protected] ZOpid and the Stylized Logo are registered in the US Patent & Trademark Office. All other product or service names are the property of their respective owners. © 2010 Hi-Tech Trading USA Inc The information contained in this User Manual is believed to be correct at the time of printing. HiTT reserves the right to change or modify any information or specifications without notice. The contents of this User Manual are provided “as is.” Except as required by applicable law, no warranties of any kind, either express or implied, including, but not limited to, the implied warranties of merchantability and fitness for a particular purpose, are made in relation to the accuracy, reliability, or contents of this guide