1
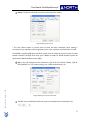
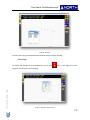
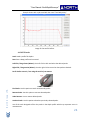
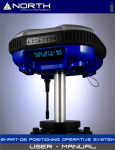
“Manual NorthDepthSurveyor” North Surveying LTD. It‘s time to go North. “User Manual- NorthDepthSurveyor” Index. 1. Initial information. .................................................................................................................. 3 1.1 Purpose of the manual .............................................................................................................. 3 1.2 About NorthDepthSurveyor. ..................................................................................................... 3 2 NorthDepthSurveyor. ............................................................................................................. 3 2.1 Starting program. ...................................................................................................................... 3 2.2 Knowing the program................................................................................................................ 4 2.2.1 Knowing icons..................................................................................................................... 5 3 Begin use a “NorthDepthSurveyor”...................................................................................... 5 3.1 First measurement .................................................................................................................... 5 3.2 Configuration............................................................................................................................. 6 4 3.3 Activating “The automatic measurement” ............................................................... 13 3.4 Manual measurement. .................................................................................................. 15 3.5 Establisher WPT. ........................................................................................................... 17 3.6 Average. ........................................................................................................................... 20 3.7 Information..................................................................................................................... 21 3.8 Using the rule ................................................................................................................. 21 Data correction.......................................................................................................................... 23 4.1 DEPTH tools: ........................................................................................................................ 24 5 Export data. ............................................................................................................................... 26 6 Recognition of satellite coverage. ............................................................................................. 29 7 Upload files “*.shp”. .................................................................................................................. 32 North Group LTD. 7.1 Converter file. ...................................................................................................................... 32 7.2 Open file “*.shp”. ................................................................................................................. 33 2 “User Manual- NorthDepthSurveyor” 1. Initial information. 1.1 Purpose of the manual The purpose of the following manual is to provide the assistance required to use the program without any problem, and the easiest way. Just as it is reiterated carefully read the following manual for its proper understanding. The manual is written in a practical and illustrative for easy understanding. As can be noticed; this document specifies the characteristics of the program, its operation and the key points which the user can use in their specialized work and to achieve quick and ideals. 1.2 About NorthDepthSurveyor. NorthDepthSurveyor is a software company's own North Group LTD. So how same, the program comes with a license for use in "Sounder North Naviger S". The echosounder software was written with the needs of hikers, surveyors, etc.. The following software referred to us in real time samples containing as visualization tools for probing. And contains the correction tool probe peaks among other options. 2 NorthDepthSurveyor. North Group LTD. 2.1 Starting program. To start Navigation works start the program, "NorthDepthSurveyor" by double clicking on the icon: 3 “User Manual- NorthDepthSurveyor” 2.2 Knowing the program. The first thing displayed is the main program interface: Image 1.- Initial Viewing NorthDepthSurveyor. In the upper part are the following: Image 2. Section Option. North Group LTD. By clicking the "File" option displays a window like the following: Image 3. File menu subsequently explained in detail what happened in the "Options" "Open." - Use this option for open a previously saved measurement. "New."-Allows us to start a new measurement and in which case save that is or was in process. 4 “User Manual- NorthDepthSurveyor” "Save." - Saves the first measurement, on the measurement process, or for open/modify a file in the future. "Save as ..." We can first save a file or to save a file and saved elsewhere or under another name. "Export." – Use this option for export the final result. "Language” Select your preferred language (still not available). "Exit." - Exit the program. 2.2.1 Knowing icons. Open Job. New Job. Save Job/ Save changes. Export Data. Options. 3 Begin use a “NorthDepthSurveyor”. North Group LTD. 3.1 First measurement Before any recording, first proceed to save a file bearing the name of the work, the following is an example of an easier way: Press the bottom to save (or from the menu: File >> Save, File >> Save As ...) the current file with a specific name, then name the work (example described, name: Test Bathymetry). Then press option . 5 “User Manual- NorthDepthSurveyor” Image 4. Save the first measurement. 3.2 Configuration. Before the configuration, make sure that the sounder program (Hydrosounder) is sending data to the corresponding port communication, as well as the GPS is ready and connected. For configuration press (or from the menu: File -> Options): North Group LTD. Capture. In this option, set the data collection interval, either by time or distance: Image 5. Adjusting the capture mode. 6 “User Manual- NorthDepthSurveyor” Coord. Coordinate tab allows you to choose the type of projection, either geographic, UTM *, or other projections (recommended for experienced users): Image 6. Adjusting the coordinates formats. * The Coordinate System Universal Transverse Mercator (English Universal Transverse Mercator, UTM) is a coordinate system based on the Transverse Mercator map projection, which is constructed as the projection of Mercatornormal, but rather to make it tangent to Ecuador, the tangent at one meridian ago. North Group LTD. Unlike the geographic coordinate system, expressed in longitude and latitude, the magnitudes in the UTM system are expressed in meters only at sea level which is the basis of the projection of the reference ellipsoid. Image 7. Section UTM from México. 7 “User Manual- NorthDepthSurveyor” Datum.- The datum tab allow us to work on the ellipsoid is chosen: Image 8. Adjusting the datum*. * The term datum applies in several areas of study and work specifically when making a connection to any important reference geometry, be it a line, a plane or a surface (flat or curved). The WGS84 is a global geographic coordinate system that can locate any point on Earth (no need another reference) through three units given. WGS84 is stands for World Geodetic System 84 (which means World Geodetic System 1984). North Group LTD. GPS. In this tab configure the GPS connection, type 2D GPS (L1, Beacon, WAAS), Type 3D GPS (DGPS RTK L1 + L2), antenna height, port / baud communication, etc.: Image 9.Adjusting the communication GPS. The GPS receiver $ GPGGA data format, these are reception by the selected port Ex.: . 8 “User Manual- NorthDepthSurveyor” $ GPGGA format is detailed GPS position is represented as follows: $ GPGGA, hhmmss.ss, DDMM.MMMMM, K, DDDMM.MMMMM, L, N, QQ, pp.p, AAAA.AA, M, XX.XX ±, M,SSS, AAAA * CC <CR> <LF> North Group LTD. Where: Component Message Descriptions Hhmmss.ss UTC time in hours, minutes and seconds of the position DDMM.MMMMM Latitude in degrees, minutes and tenths of minutes. K Indicator latitude value is N (latitude North) or S (south latitude) DDDMM.MMMMM Longitude in degrees, minutes and decimal minutes L Length indicator value is E (longitude East) or W (West longitude) N Quality indicator value is: • 0 = no position • 1 = corrected position (autonomous) • 2 = corrected position (SBAS, DGPS.) • 4 = RTK Fix (Crescent RTK, Eclipse RTK) service band high precision. • 5 = RTK float, band precision service. QQ Number of satellites used in the position solution PP Horizontal dilution of precision (HDOP) AA Antenna altitude in meters, re: mean sea level (geoid) M Antenna height units (M = meters) GG Geoid separation (in meters) M Geoid separation units (M = meters) SSS Age of differential corrections in seconds RRRR Diferencial ID de la estación de referencia * CC Checksum <CR> (Carriage return). <LF> (line feed). Ej.: $GPGGA,001038.00,3334.2313457,N,11211,0576940,W,2,04,5.4,354.682,M,26.574,M,7.0,0138*79. Echosounder. This tab configures the software connection in order to get the Depth data, remember to choose the same type of format in which you are exporting from Hydrosounder. 9 “User Manual- NorthDepthSurveyor” Image 10. Setting port, baud rate, format and depth. Note: In the end, you click on the option to save all changes and like to close the window, and can start communication between the teams. In the section you can choose the format: 1. SDDPT.- This type of format refers to the depth of water in relation to the transducer, displacement transducer depth, and the maximum depth that the probe may detect a seabed (all in meters only). $SDDPT, DATA_METRES, OFFSET_METRES, MAXIMUM_METRES * hh <0D> <0A> Example: 1. Precision standard, except checksum: North Group LTD. $ XxDPT, 76.1,0.0,100, <0D> <0A>; 76,1 meters, depth offsets, 100 meters maximum depth range. 2. Standard Accuracy with checksum: $ SDDPT, 2.4, 7F, * <0D> <0A>; 2.4 meters in depth, without compensation or maximum depth range output (When the depth of displacement and maximum values are unknown depth probe). 2. SDDBT.- Water depth refers to the position of the transducer. Depth value expressed in meters and feet, fathoms. Format: $ XxDBT, DATA_FEET, f, DATA_METRES, M,DATA_FATHOMS, F * hh <0D> <0A> 10 “User Manual- NorthDepthSurveyor” Examples 1. Precision standard, except checksum: $ SDDBT, 6.6, f, 2.0,M, 1.1, F <0D> <0A> 6.6 feet / 2.0 meter / 1.1 Fathoms North Group LTD. 2. Precision standard, whit checksum: $ SDDBT, 8.1, f, 2.4,M,1.3,F*0B <0D> <0A> 8.1 feet /2.4 meter /1.3 Fathoms. 11 “User Manual- NorthDepthSurveyor” Having configured the program please perform communication between devices pressing the button . Image 11. Viewing the connection between devices. North Group LTD. You can press the button shown, to center the image GPS, as shown in the picture, this will help us get the same location and observe how it moves through the GPS moves from one place: 12 “User Manual- NorthDepthSurveyor” image 12. GPS receiver centered image.. 3.3 Activating “The automatic measurement” North Group LTD. To start making the automatic measurement, press and a popup window will appear immediately. The advantage of this option is to record the movement of the GPS receiver in order to mark the route to be traveled. It helps us to have a continuous record so you can be browsing and searching at the same time. 13 “User Manual- NorthDepthSurveyor” Image 13. Active the “AP”. Note: In the previous window you will need to assign a name to the measurement, and press the button . And if you do not assign a name and not saved, the "Echosounder" activate North Group LTD. "automatic measurement" but without saving any data. Then appears the program: Image 14. “AP” Active. 14 “User Manual- NorthDepthSurveyor” To finish making the automatic measurement, press then the will disappear. Image 14. “AP” Off 3.4 Manual measurement. Manual measurement is activated by the icon . North Group LTD. Pressing once the program began to record the progress, and progress to show when the user pressed again "The Measurement Manual": 15 “User Manual- NorthDepthSurveyor” Image 15. Pressing the manual measurement. North Group LTD. Note: Do not mark any route until it is pressed a second time Image 16. Viewing manual medition. As can be seen recording the route marked, and continues moving GPS signal continue registering. 16 “User Manual- NorthDepthSurveyor” 3.5 Establisher WPT. The icon is used for establish the WPT when pressed for the first time we see something similar as shown in the following image: North Group LTD. Imagen 17. Active the WPT. 17 “User Manual- NorthDepthSurveyor” You can see the dial WPT and to check off several we have something similar: Image 18. Marking WPT’s. North Group LTD. At the top by clicking on the "WPT >> List" we can get the following: Image 19. Options WPT. 18 “User Manual- NorthDepthSurveyor” Imagen 20. Viewing a list WPT. You can see that we get a detailed list of the location of each WPT, you can assign names to customize them. North Group LTD. Another option that allows the WPT, is able to measure the distance between each. Demonstrated shortly mentioned. Image 21. Option “Wpt >> Distances” 19 “User Manual- NorthDepthSurveyor” Image 22. Distances. From the menu can get thrown distances between points you want to know. 3.6 Average. North Group LTD. To display the average of the measurement, we can click program, then throws us the following: that is in the right part of our Imagen 23.Average of measurament. 20 “User Manual- NorthDepthSurveyor” 3.7 Information. In the right section of our program have the information icon same position where we give click So how can we know the Image 24.- Using the icon “information” 3.8 Using the rule by clicking, we note that at North Group LTD. We observe that in the right part of our program icon have the top of our program, we see the following: 21 “User Manual- NorthDepthSurveyor” Image 25. Utilizing the rule First by clicking anywhere in the browser will register as "Point A" can be changed as often as necessary before switching to "Point B" which will now give us the measure. To switch to "Point B" North Group LTD. we click the button and then give us the measure point to point. Image 26. Distance measure. 22 “User Manual- NorthDepthSurveyor” 4 Data correction. The following procedure will correct what peaks the survey, for which go to the menu: "Process >> Correct Depths". Subsequently emerge from the application interface "DEPTH". Imagen 27. Menú “File Correction”. North Group LTD. To load the log depth profiles, press the LOAD button and then locate the file "*. TX0" with the name of his work: Image 28.Open archive. 23 “User Manual- NorthDepthSurveyor” Example shown with a job saved with the name "Test Bathymetry" Image 29. Correct file before. 4.1 DEPTH tools: Load: Loads a profile file depths. Save: Save a deep profile and corrected. Left Click / drag-closure (Mouse). Use Left Click to lock and select the desired peaks. Right Click / drag-motion (Mouse). Use the right click to move the chart peaks as desired. North Group LTD. Scroll. Realize zoom in / out using the scroll of your mouse: Find Peaks. Use this option to search automatically peaks. Remove Peaks. Use this option to remove selected peaks. Undo Remove. Use to restore deleted peaks. Unselect Peaks. Use this option to deselect previously selected peaks. Use all the tools designed to filter the peaks in the depth profile which may represent errors in measurement. 24 “User Manual- NorthDepthSurveyor” After removing all the errors, it is very important to keep the result with the SAVE option, the file will be saved in a format "*. TX1" North Group LTD. Image 30. Corrected file. Image 31. Save file. After saving the edited file, you can close the application Depth. 25 “User Manual- NorthDepthSurveyor” 5 Export data. The final step to obtain the results listed below: Push the next bottom for export file . Then emerge the Data Export window, where press find file to locate the file "*. TX1" for peak correction performed. Image 32. Data Exporting North Group LTD. Select archive and push Open. Image 33. Choosing export file. 26 “User Manual- NorthDepthSurveyor” After selecting the file, continue choosing the export format. It is noteworthy that the GEO and UTM formats are TXT files. Image 34. Exporting file format UTM. In the particular case of UTM format or request confirmation of TIME ZONE UTM and the DATUM, confirm as appropriate. North Group LTD. Image 35.indicate that area UTM 27 “User Manual- NorthDepthSurveyor” Finally save the file with the desired name: Image 36. Exporting. North Group LTD. Finally the process is complete, you can now close the program. You can locate the end, where you saved it and open it, the data are separated by tabs. Image 37. Data obtained. 28 “User Manual- NorthDepthSurveyor” 6 Recognition of satellite coverage. With the extensive applications that have the program, allows us to visualize the type of signal it receives, it is represented similarly to the image. Image 38. Recognition of Satellite coverage It can be seen that says "GPS Fix", later shown in a table of signal types can receive the echosounder. The following types of signals: 0: Fix not valid. No coverage. 1: Gps Fix. GPS L1 * * The GPS L1 are single frequency receivers can be affected by ionospheric effects. Referring to the code "1: GPS Fix" indicates that established a fixed GPS signal from satellites Navstar. 2: DGPS. L1 GPS + DGPS * * GPS signal reception more accurate, thanks to DGPS. Referring to the code "2: DGPS" us that is an improvement of global positioning system that provides improved accuracy of location, from the nominal 15meter accuracy GPS to about 10 cm in the case of the best implementations. North Group LTD. No signal. 29 “User Manual- NorthDepthSurveyor” GPS L1 + L2 multiconstellation (GNSS) * * This type of coverage ranges from single and dual frequency (L2) that eliminate same ionospheric effects. Besides the GNSS (Global Navigation Satellite System) allows the exact location without errors because the satellite signal is sent to a control room and returned to the satellite signal to the user to send the corrected position with GPS . Referring to the code "4: RTK Fixed" refers us to his means in Spanish "Real Time Kinematic" (for its acronym in English Real Time Kinematic). It uses a radio data link to transmit satellite data from the reference to the mobile. This allows calculation of the coordinates and display them in real time while carrying out the survey. 5: RTK Float. GPS L1 + L2 multiconstellation (GNSS). Referring to the code "4: RTK Float" refers us to his means in Spanish exists when the connection degrades or loses its effect with UHF radio, and the measurement is no longer as accurate as an RTK Fixed. Eg Fixed RTK can be accurate to 1cm, and can degrade Float RTK 20cm accuracy. North Group LTD. 4: RTK Fixed. 30 “User Manual- NorthDepthSurveyor” ¿Did you know…? The GPS signal L1 refers to the U.S. satellite constellation (Navstar). This refers to the GPS receiver receives a signal with a frequency channel, usually there is some margin of error compared with other signal. The L1 GPS + DGPS signal refers to the union of the Navstar with SBAS (Satellite Based Augmentation System). This will mean that the GPS receiver will receive a signal with a correction before reaching its destination, it would improve the accuracy of location. North Group LTD. The GPS signal L1 + L2 multiconstellation GNSS (Global Navigation Satellite System) referred us to a snap of a satellite multiconstellation addition to benefiting L2 complement to eliminate ionospheric effects, in conclusion follows that this type of signal is the most accurate and almost error-free and with an accuracy of for example 1 cm. 31 “User Manual- NorthDepthSurveyor” 7 Upload files “*.shp”. 7.1 Converter file. The program can open files of type "*. Shp" that could serve as a reference when navigating or start making a measurement. To carry out this task, we go to the tools section: "Area >> List" But before it is clear that the file type "*. Shp" is not very common, so it will have to use an external program to convert the file mentioned above. The program to convert is called "DXF2SHP". Viewing the program can get something like: Image 39. Introducing files for conversion. In which we ask the path where our file is saved. "Dxf" include converting the file to get the program "Autocad". Then select the name of the output file, remember where you save the file to then be located by the "NorthDepthSurveyor". North Group LTD. The type of output file will be "Polyline". Having done this, we conclude with clicking on . 32 “User Manual- NorthDepthSurveyor” 7.2 Open file “*.shp”. To open our file, you must click on the tools section, "Area >> List". North Group LTD. Image 40. Open file. 33 “User Manual- NorthDepthSurveyor” A popup window will appear as illustrated, in which we click the option Then we will get a box like this: to select our. Image 41. Select file. We select you click the option "Type >> ESRI Shapefile (*. shp)" and then appear as our previously saved project. Now we click on . We see a window like this, we click on the option refers wing UTM Zone where we are working. and we ask the "Time" and this North Group LTD. Note: It should be noted that it is important to mention exactly where UTM Zone are working, in order to obtain accurate measurements. 34 “User Manual- NorthDepthSurveyor” North Group LTD. The example shown was measured in the state of Veracruz, with reference to our UTM zone, and therefore belongs to the zone 14. After selecting the workspace, you click on the button following: and then we see the 35 “User Manual- NorthDepthSurveyor” Image 42. Project view. Now you can view your project in NorthDepthSurveyor, knowing we can navigate that part and we have exactly the place where we are sailing. North Group LTD. The great advantage of this option is to be accurate based on the place where they are doing navigations and this improvement we have an excellent work. 36 “User Manual- NorthDepthSurveyor” Information/Sales: [email protected] Support: North Group LTD. [email protected] Copyright 2007-2012 North. © 2007 North Group LTD. All rights Reserved. 37