1
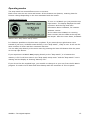
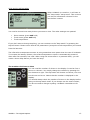
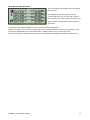
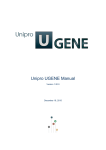
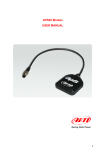
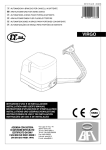
Users Guide
UniWatch
Version 1.02
Go faster faster
UNIPRO ApS
VIBORG HOVEDVEJ 24
DK-7100 VEJLE
DENMARK
Tel.: +45 75 85 11 82
Fax: +45 75 85 17 82
www.uniprolaptimer.com
[email protected]
Introduction.............................................................................................................................3
Overview..................................................................................................................................4
QuickGuide to the basic functions........................................................................................5
Turning UniWatch on...................................................................................................
Choose the number of drivers.......................................................................................
Taking lap times and split times....................................................................................
Analyse mode ............................................................................................................
5
5
5
5
Introduction to the advanced features..................................................................................5
Uniwatch stores your sessions seperately ....................................................................... 6
Measuring track temperature and saving it with the session.............................................. 6
Measuring tire temperature and saving it with the session ................................................ 6
Measuring tire or track temperature with no reference to a session .................................... 6
Temperature menu ..................................................................................................... 7
Other advanced features.............................................................................................. 7
Icon description ......................................................................................................................8
Reference Manual .................................................................................................................11
Basic information ...............................................................................................................................11
Infrared temperature sensor .......................................................................................11
USB connector ..........................................................................................................11
IrDA transceiver ........................................................................................................11
enviroment Temperature sensor ..................................................................................11
Operating modes ...............................................................................................................................12
Turning UniWatch on..................................................................................................12
Stop watch setup menu ..............................................................................................13
Stop watch ...............................................................................................................15
Analyse menu ...........................................................................................................18
Stop Watch Analyse ...................................................................................................19
Info .........................................................................................................................20
Main menu ...............................................................................................................21
Temperature menu ....................................................................................................22
Setup menu ..............................................................................................................23
Contrast setup ..........................................................................................................23
Language setup.........................................................................................................23
Clock setup...............................................................................................................24
Driver name setup .....................................................................................................24
Track name setup ......................................................................................................24
Edit name and length .................................................................................................25
Setup more menu......................................................................................................25
Auto power-down setup..............................................................................................25
Print menu ...............................................................................................................26
PC transfer ...............................................................................................................26
Tire temperature .......................................................................................................26
Battery change..........................................................................................................28
UNIPRO – The original Laptimer
2
Introduction
Thank you for trusting us to deliver the most advanced stop watch on the market.
The UniWatch has several unique features and will very quickly become an indispensable tool.
Even with all the advanced features, the stop watch is very easy to use. With just a few clicks
you are ready to take lap times for up to 4 drivers at the same time. You can easily take split
times as well (up to 9 splits per lap).
When your driver returns to the pit, you can take the temperature of all 4 tires, and save them
in the stop watch. The temperature function can also be used for measuring the track
temperature.
The large graphical display makes it very easy to see and analyze the times and temperatures
saved in the stop watch.
UniWatch speaks your language too
The user interface comes in many different languages, and is preinstalled with English,
German, Italian and French. Other languages can be downloaded from our website.
If you have any problems or questions regarding your UniWatch we will make sure to give you
the necessary support.
Please e-mail your questions to [email protected] or contact your local dealer.
Good luck on the tracks!
UNIPRO ApS
Viborg Hovedvej 24
DK-7100 Vejle
Denmark
Web: www.uniprolaptimer.com
E-mail: [email protected]
UNIPRO – The original Laptimer
3
Overview
We have put a lot of effort into making UniWatch very fast and easy to operate. The feedback
we get from drivers and teams using UniWatch tells us that we have succeeded. Here you can
get an overview over the functions in UniWatch.
IrDA
Wireless
connection to a
portable printer.
ICONS
One icon for
each button.
Easy and fast to
understand.
LEDS
Bright LEDs for
fast feedback.
BEEPER
Built-in in
beeper for key
click, warnings
and status
sounds.
BUTTONS
Each button has its
own icon showing
the function at a
specific time. No
icon means no
function.
INFRARED
TEMPERATURE
Fast wireless
temperature
sensor for track
and tire temp.
USB
Fast connection
to PC for setup
and analysis of
data.
RUBBER GRIP
Secure grip
with rubber on
the sides.
TEMPERATURE
BUTON
The fastest way to
measure
temperatures.
DISPLAY
Large graphical
display, with multiple
languages.
ENVIRONMENT
TEMPERATURE
Built-in sensor
for environment
temperature
measurement.
Please notice that the four buttons at each side is associated with four icons. The top icon is
associated with the top button. The next icon is associated with the second button from the
top. The buttons are placed that way to give a good ergonomic use with the thumbs.
The following section will explain more about the different hardware features in UniWatch.
UNIPRO – The original Laptimer
4
Quick Guide to the basic functions
This chapter describes how to get started with using the UniWatch just for the basic functions:
taking lap times and split times for up to 4 drivers at the same time.
TURNING UNIWATCH ON
Press the upper right button to turn the stop watch on. UniWatch starts by showing the startup
screen for a few seconds. After that you will be in the stop watch setup menu.
CHOOSE THE NUMBER OF DRIVERS
In the setup menu, the only thing you have to set before you can start taking lap times is the
number of drivers. You chose between one and four drivers by pressing one of the four buttons
on the right side. Just press the buttons with a short push and you will see the number of
drivers change on the screen.
When you have set the number of drivers, press the top right button to go enter the stop
watch.
TAKING LAP TIMES AND SPLIT TIMES
You will see driver icons numbered from 1-4 in the right side of the display. Press the top right
button shortly to start the stop watch for driver number 1. Driver number 2 is button number 2
and so on. Each time you press the “driver 1 button” you will save a lap time for driver number
1 – and the same for the other buttons / drivers.
If you want to take split times, just press and hold the top left button down while you are
pressing the driver buttons on the right side. You can save up to 8 split times per lap.
When you are finished with the race / training session, you can press the big checkered flag at
the lower left. This will bring you to analyse mode.
ANALYSE MODE
From this screen you can analyse the times you have just measured. The screen is almost the
same as before, but now you can scroll through the different laps and splits. You select by
pressing and holding down the driver buttons one at a time. Then you use the buttons to the
left to select the lap or split you want to analyse.
That’s how easy it is – if you are ready for some more advanced features, then read the
next pages.
Introduction to the advanced features
When you are familiar with the basic functions of UniWatch, you should start to take
advantage of some of the advanced features. This chapter will give you a quick guide to the
most important features. Please read the Reference Manual with detailed information about the
functions.
UNIPRO – The original Laptimer
5
UNIWATCH STORES YOUR SESSIONS SEPERATELY
First of all it is important to understand that UniWatch can store up to 20 sessions. Each
session can contain information about lap- and split times of the drivers, environment
temperature, tire temperatures from each driver in the session, track name and length, driver
names, average speed (calculated from the track length).
MEASURING TRACK TEMPERATURE AND SAVING IT WITH THE SESSION
You can measure and save the track temperature with each session if you press the “Track
temperature button” from the “Stop watch setup” menu when you start the session.
When UniWatch is turned on, it will start in
the “Stop watch” setup menu. Just point
the temperature sensor towards the track
(don’t hit your shoes) and press button
number 3 from the top at the left side, and
the track temperature is shown and saves
with the session. If you hold the sensor 20
cm from the track, it will measure the
temperature of a circle with a diameter on 20 cm. If you hold it 10 cm away, the diameter of
the measured circle will be 10 cm and so on.
The infrared tire temperature sensor is using somewhat more power than the rest of UniWatch.
To increase the battery lifetime, the infrared temperature sensor is automatically powered
down after 30 seconds if not used. When using the sensor after it is powered down, you will
notice a short delay before you hear the beep.
MEASURING TIRE TEMPERATURE AND SAVING IT WITH THE SESSION
If you want to store the tire temperature for one or all drivers in a session, you must do it
after you have stopped the session by pushing the large checkered flag on the bottom left.
Press the tire temperature button from analyse mode to go to the tire temperature screen with
driver one chosen.
On the right you will see the same number
of buttons as you have drivers in the
session.
To measure a tire temperature, press either
the big temperature button at the bottom
or the top left button. Just press once when
pointing towards the tire. When you hear
the beep and see the LEDs flashes, go to the next tire and so on. The sequence is always the
same. UniWatch expect you to measure the tires in the following sequence:
1. Front left tire – 2. Front right tire – 3. Rear right tire – 4. Rear left tire
MEASURING TIRE OR TRACK TEMPERATURE WITH NO REFERENCE TO A SESSION
If you want to use UniWatch for measuring temperatures with no reference to specific
sessions, just turn UniWatch on and press the temperature button in the bottom center to go
to the temperature menu.
UNIPRO – The original Laptimer
6
TEMPERATURE MENU
Just press the temperature button once and wait until you
hear a beep, then the temperature is measured and saved on
the screen.
The tire temperature will drop very quickly after the kart is
stopped. Therefore we have made the temperature sensor so
it saves the temperatures on the screen, enabling you to go
quickly around the kart and taking all 4 tire temperatures
before you look at them.
The current measured temperature is shown in bold at the top
line in the display. When you measure another temperature,
the previous is moved down on the screen indicating it is
getting older and older.
You can see up to 11 temperatures on the screen. 1 new and
10 older ones. If you measure more than 11 temperatures,
the oldest ones are erased.
You can also use this function if you want to measure the
temperature on different places on the same tire (you need to
measure at least 1 cm away from the tire).
OTHER ADVANCED FEATURES
In the reference manual you will find detailed information about the stop watch and all the
features. The advanced features we have left out of the short introduction are:
•
•
•
•
•
•
•
•
•
•
•
Setting of starting date and time
Multistart (all stop watches start at once)
Calculation of theoretical best lap time and average speed per lap
Setting of driver names
Setting of track names and lengths
Connection to a PC and transferring the data from the stop watch to the PC
Setting of language
Setting of clock, display contrast, “power off time”, speed in KMH or MPH,
Temperature in Celsius or Fahrenheit
Time in 24 hours or 12 hours (am/pm)
Use of the led lamps to indicate if a lap or split is better, the same or slower as the best
UNIPRO – The original Laptimer
7
Icon description
UniWatch use a lot of icons for the different buttons. This is an overview of all the used icons,
what the shows and what they do.
Icon
Icon shows
Function
Thermometer
Measure temperatures
Wrench
UniWatch setup
Odometer
Different kind of counters and odometers
Power
Turns UniWatch off
Stop watch setup
Setup of stop watch and drivers
Stop watch analyse
Analyse times
Print
Print times
Stop watch
Start the stop watch
Track setup
Choose the track
Track temperature
Measure the track temperature
Home
Home menu
Driver 1, one driver
Setup driver 1 and choose one driver stop watch
Driver 2, two drivers
Setup driver 2 and choose two drivers stop watch
Driver 3, three drivers
Setup driver 3 and choose three drivers stop watch
Driver 4, four drivers
Setup driver 4 and choose four drivers stop watch
Up
Increase value
Down
Decrease value
Left
Previous value
Right
Next value
Reset odometer
Reset the drivers odometer
Split time
Press and hold to measure split times
UNIPRO – The original Laptimer
8
Split for driver 1
Split time for driver 1
Split for driver 2
Split time for driver 2
Split for driver 3
Split time for driver 3
Split for driver 4
Split time for driver 4
Lap for driver 1
Lap time for driver 1
Lap for driver 2
Lap time for driver 2
Lap for driver 3
Lap time for driver 3
Lap for driver 4
Lap time for driver 4
End session
End stop watch session
Info
Info on latest driver
Delete all
Delete all sessions
Contrast
Setup contrast
Multistart on or off
Single start or multi start of stop watches
Language
Setup language
Clock
Setup time and date
Driver name
Setup driver names
Track name
Setup track names and length
UniWatch
More UniWatch setup options
Change between KMH
or MPH
Speed in KMH or MPH
Temperature in Celsius
or Fahrenheit
Temperature readout in Celsius
12 or 24 hours clock
12 (am/pm) or 24 hour clock
Back
Back to previous menu
Power off time
Time before UniWatch auto turn-off
Beeper on
Key click sound on
Tire temperature
Measure tire temperature
UNIPRO – The original Laptimer
9
Ok
Confirm operation
Cancel
Cancel operation
Edit
Edit selected name
New
New driver or track name
Track length
Setup track length
Battery warning
Soon time to change batteries
UNIPRO – The original Laptimer
10
Reference Manual
In the following chapters you can find detailed information about all the functions of UniWatch.
Basic information
INFRARED TEMPERATURE SENSOR
It is important to learn how the built-in infrared temperature sensor works. There is some
basic information needed to operate it correctly.
Emission factor:
Different material reflects infrared heat in a different amount. The emission factor is telling
how much heat is reflected from a specific material. For UniWatch the most important
materials are the tires (rubber) and the asphalt. Luckily they have almost the same emission
factor 0.94. The infrared sensor is using this emission factor as a standard, and if you are
using other materials, you should not always trust the reading 100%. The worst
measurements are from metals with a shining surface, like gold.
Distance to surface:
The rule on how far from the tire and track is quite easy. The sensor is measuring the
temperature of a cone, or in a circle. The diameter of that circle is the same as the distance to
the surface. So if you are 10 cm away from the track, you are measuring the temperature of a
circle being 10 cm in diameter. If you want to measure a spot on a tire, you could go as close
as 1 cm, giving you the temperature in a 1 cm circle on the tire.
USB CONNECTOR
The USB connection is compatible to USB version 2.0 full-speed. That is what you typically find
in your PC. You have to notice, that UniWatch acts as a device (or slave) so you will not be
able to connect it to a USB printer. You should also notice, that a special Unipro USB driver is
needed on the PC. Please install this driver before UniWatch is connected the first time! The
driver is supplied on the CDROM included in the box. The USB cable is an optional accessory.
IRDA TRANSCEIVER
An IrDA transceiver is used to communicate with other equipment using infrared light.
Typically you will find IrDA on mobile phones, PDAs, Laptops and other kind of portable
equipment. The software involved in making IrDA communication is very big, and UniWatch is
only implementing the necessary parts to support a portable printer. The first printer that will
be supported is the Seiko Instrument DPU-3445 that can also be used with the Unipro Data
Analyser.
ENVIROMENT TEMPERATURE SENSOR
To be able to analyse the environment temperature, UniWatch has a built-in temperature
sensor in the box. Sometimes the environment temperature plays an important role in the
total evaluation of a race and the setup before it. The temperature is measured inside the
UniWatch box with a resolution of 0.1 ºC.
UNIPRO – The original Laptimer
11
Operating modes
The stop watch has some different menu or screens.
Each screen uses its own icons and button. All the buttons are dynamic, meaning that the
function change depending on the icon associated with the button.
TURNING UNIWATCH ON
To turn on UniWatch you just press the top
right button. The display displays the startup screen with the logo and more
information about UniWatch, for instance
software version.
At the same time UniWatch is counting
down to start with the LEDs at the top and
the beeper. After the count down, UniWatch
starts in the “Stop watch setup menu”.
It is however possible to skip this start-up phase. If you press the top right button twice
instead of just once, UniWatch starts directly in the “Stop watch”, ready to use. It will use the
same number of driver and their names as last time.
You can also jump directly to the main menu by pressing the lower left button after the press
on the top right button.
If you experience UniWatch not jumping directly to the “Stop watch”, it is because the
memory is full. It will then start in the “Stop watch setup menu” and the “Stop watch” icon is
missing and the display is showing “Memory full!”
If you do not like the supplied logo, you are able to change it to your own from the PC Watch
program. It needs to be a black and white bitmap with the resolution of 56 x 64 pixels.
UNIPRO – The original Laptimer
12
STOP WATCH SETUP MENU
When UniWatch is turned on, it will start in
the “Stop watch” setup menu. This is where
you set the information relevant for the
race before it starts.
You need to choose how many drivers you want to time. The other settings are optional:
•
•
•
Driver names (press and hold)
Track name (press and hold)
Track temperature
If you don’t want to change anything, you can continue to the “Stop watch” by pressing the
top left button. Please notice that all the parameters (except the track temperature) are stored
from the last time.
The infrared tire temperature sensor is using somewhat more power than the rest of UniWatch.
To increase the battery lifetime, the infrared temperature sensor is automatically powered
down after 30 seconds if not used. When using the sensor after it is powered down, you will
notice a short delay before you hear the beep.
The number of drivers to time
You can read the number of drivers in the display. It can be from 1
driver to 4 drivers. You simply change the number by pressing the
four buttons to right. The top button will choose one driver, the next
two drivers and so on. Notice that the number is displayed in the
display.
You should always check the number of drivers in the display before
going to the stop watch itself. If you always use the same number,
you do not need to change anything. UniWatch remembers it for
you.
UNIPRO – The original Laptimer
13
The driver names
Perhaps you noticed the display changed
when pressing the buttons to the right?
This is because the buttons have two
functions. If you press the button with a
short press you chose the number of
drivers, but if you press and hold the
button down, you will set the name of that
driver. When pressing and holding the
driver’s button, you will see the display change. Here you can choose another driver name with
the arrow buttons to the left and you can reset or clear the odometer (distance counter) for
that driver. When you have chosen the name you want, you release the driver’s button again.
Please notice, that you may have to set the right number of drivers afterwards!
The track name
When you press and hold the track setup
button to the left, you will see the display
change. From this new screen you will be
able to choose the right track using the
arrow buttons to the right. When you have
chosen the right track, you release the
track setup button again and the track is
selected. Just for information, the track
length is shown on the same screen. If this is 0, UniWatch cannot calculate the average speed
and the distance counters will not work!
The track temperature
An important piece of information is the track
temperature. Simply point UniWatch towards the asphalt
and press either the track temperature button the left or
the big temperature button at the bottom. Point UniWatch
towards the asphalt until you hear a short beep. Please
notice that you do not have to press the button until you
hear the beep! Just a short press will do the job.
UNIPRO – The original Laptimer
14
STOP WATCH
The stop watch screen is the most
important screen on UniWatch! It is here
the timing of the drivers is done.
Depending on the number of drivers set on
the stop watch setup menu, you will see
different layouts of the screen. If you are
only timing one driver, you will see more
information than if you are timing four
drivers!
When you want to start the stop watch, you will see the icons with a checkered flag and a
number to the right. This is indicating the finish line for the corresponding driver. Depending
on the number of drivers, you will see different number of icons. One icon and button for each
driver. Simply start the stop watch by pressing the driver’s checkered flag. You will see the
corresponding stop watch running in the display. Notice, that if you set UniWatch to use
“multistart”, all drivers will start at the same time.
To take split times, you use the same buttons. One for each driver, except this time you press
and hold the top left button with the partial (1/x) track icon. As long you are holding down the
split button, you will take split times on the drivers and when you release the button you are
taking lap times. Please notice the display change to show the split button for each driver
instead of the checkered flag. The basic idea is you always use the same button for each
driver.
When either a new lap or new split is measured it is compared to the best and visual feedback
is given with the 6 LEDs at the top. If the time is better, the light is green and if the time is
worse the light is red. A time very close to the best is shown with yellow light. The lights are
used as described below.
Time
Time
Time
Time
Time
Time
<
<
>
<
<
>
+0:05 sec. right yellow LED
+0:15 sec. one red LED
+0:15 sec. two red LEDs
-0:05 sec. left yellow LED
-0:15 sec. one green LED
-0:15 sec. two green LEDs
The visual feedback can be turned off in the “Setup UniWatch more” menu.
If you want to see more information on the selected driver you can use the info button. The
selected driver is the last driver you took lap or split times on. The info screen is explained
here.
When the race is finished, you can press the big checkered flag at the lower left button. Notice,
that this button shows the main menu icon until the stop watch is started. Only when the stop
watch is running, a new session will be stored.
When the finish button is pressed, you will go directly to the analyse menu.
Stop watch with 1 driver
UNIPRO – The original Laptimer
15
As seen on the example to the left, you
have a lot of information in the display.
The lap time is the current running lap
time. It is showing the running time of the
current lap. You can see the current lap
number to right, next to the lap time.
The last lap time is shown on the line
below.
It will be shown from lap 2 and forwards, and the last lap number is shown to the right. When
a last lap time is displayed, you can see the time difference compared to the best lap time. It
is shown on the middle of the screen. If the number is negative, you got a faster lap time, and
if it is positive, you got a slower lap time.
The split time is the current split time if you pressed the split button to get a split time. The
split number is shown in front of the split time, and you can see the best split time for the
same split number to the right. If you see “Split L”, it is the split time from the last split point
to the finish line. This is shown when you finish the lap by pressing the lap button.
The Speed is the average speed for the last lap. This is only calculated if the track has a length
associated with it.
Stop watch with 2 drivers
The display shows the current lap time, the
current lap number, the best lap time, the
best lap number, the split number, the split
time and the best split time. Everything is
shown for each driver. You can change the
driver shown by pressing the driver
number.
Sometimes the display differs from the just described information:
When you start on a new lap, the last lap time is shown instead of the current lap time. This
lap time is displayed for 15 seconds before changing back to the current lap time.
If no split times are measured on a lap, the last lap time is displayed instead of split times.
Stop watch with 3 drivers
The display shows for each driver the
current lap time, the current lap number,
the best lap time, the best lap number, the
split number, the split time and the best
split time.
Sometimes the display differs from the just
described information.
When you start on a new lap, the last lap time is shown instead of the current lap time. This
lap time is displayed for 15 seconds before changing back to the current lap time.
If no split times are measured on a lap, the last lap time is displayed instead of split times.
UNIPRO – The original Laptimer
16
Stop watch with 4 drivers
This is showing the display when timing all
four drivers.
The display shows for each driver the
current lap time, the current lap number,
the best lap time, the best lap number, the
split number, the split time and the best
split time.
Sometimes the display differs from the just described information.
When you start on a new lap, the last lap time is shown instead of the current lap time. This
lap time is displayed for 15 seconds before changing back to the current lap time.
If no split times are measured on a lap, the last lap time is displayed instead of split times.
UNIPRO – The original Laptimer
17
ANALYSE MENU
All data are stored in what we call a
session. Every time you start timing a race,
you automatically start a new session.
A session contains the following information.
•
•
•
•
•
•
•
•
•
Number of drivers
Driver names
Track name
Track length
Starting date
Starting time
Track temperature
All laps and split times
All four tire temperatures for each driver
The newest session is always number 1. When you make a new session, the previous one is
then called number 2. There is room for up to 20 sessions.
From the Analyse menu you can select the session you want to analyse. It always starts by
displaying the newest one (number 1). Information about the number of drivers, the track
name and the starting time and date helps you to identify each session. You can scroll through
the session using the arrow buttons. Please notice, that this is the only place you can read the
track temperature of a previous session. Otherwise you have to transfer the data to a PC using
the USB cable.
When you found the correct session, you can go to the analyse menu by pressing the top right
button.
If you want to clear all data in UniWatch, you press the lower right button. The display will ask
you if you are sure and you have to confirm by pressing the OK button. Clearing the data will
not affect the setup of UniWatch, only the sessions.
Warning. When you confirm the delete all function, you cannot bring the data back!
UNIPRO – The original Laptimer
18
STOP WATCH ANALYSE
The Stop Watch Analyse menu is for looking at the lap and split times for the session you
chose. If you just finished the session, it will always show the times you just measured.
To the right you will see the same number
of drivers as used in the session, e.g. 1 to
4.
The stop watch analyse screen will
automatically start with the best lap for
each driver.
If no split times have been recorded, the
corresponding line will be empty.
You can adjust the drivers lap number or
split number by pressing and holding down
the driver’s button. When you do that, you
will see the buttons change and you will
now be able to scroll through the laps by
using the arrow buttons and toggle through
the splits with the split button.
If you want more information about a specific driver, you can press the driver’s button to
select him and then afterwards press and hold the info button. This will show the info screen
as described in “Info” as long as you hold the button down.
You will find the tire temperature button in the menu to the left. If you press this (or the big
temperature button at the bottom) you will go to the “Tire temperature” mode. This is only
possible if it is the newest session! It makes no sense to try to store tire temperatures for an
old session so this function will be disabled.
UNIPRO – The original Laptimer
19
INFO
During the race or afterwards in analyse
mode, you can get more information on the
last selected driver.
The information screen will show the following information.
•
•
•
•
•
•
•
Driver’s name and the driver number
Last lap time (when the stop watch is running)
The lap time (if in analyse mode)
Average speed (if lap length > 0 meters)
Theoretical best lap time
The first 6 split times and the last split time for the best lap
The first 6 split times and the last split time for the three or four last laps
This screen gives you a very fast overview of current selected driver.
When you release the info button again, UniWatch returns to either the “Stop Watch Analyse”
or the “Stop Watch” screen.
The theoretical lap time is the best lap time calculated using the best split times.
If the lap length is zero, the speed is removed and UniWatch is showing an extra line of splits.
The information shown is different when using “Info” from analyse mode. Here you can see the
current lap time instead of the last lap’s time. There is also a hidden feature enabling you to
scroll through the laps with the two upper buttons on the right.
When using “Info” from stop watch you will be able to select the driver with the four buttons to
the right.
UNIPRO – The original Laptimer
20
MAIN MENU
From the main menu you can go to the
different menus or turn UniWatch off.
On the screen you will see the current time
and date and the environment temperature.
The environment temperature is measured
inside UniWatch and sometimes you will see
a higher temperature because you are
warming the box with your hands.
From the main menu you will be able to do the following.
•
•
•
•
•
•
Go to Stop watch setup menu
Go to Analyse menu
Print data on the portable printer
Setup menu
Measure temperatures
Turn UniWatch off
If you want to turn UniWatch off, you press the lower left button. Please notice, that you need
to press this button a little longer than normal. This is to prevent turning off UniWatch by
accident.
You are are able to change the text a the bottom of the screen. Normally you will put in your
name to identify the owner.
Please remember that you can set the auto power-off time from the Setup more menu.
UNIPRO – The original Laptimer
21
TEMPERATURE MENU
From all the different menus, except a few, it is possible to
press the big temperature button at the bottom. This will bring
you to the general temperature screen. From this screen, you
can measure up to 11 temperatures using the infrared
temperature sensor.
The screen is turned for landscape to portrait mode to ease
the operation. The idea is to hold UniWatch in you right hand
and the use your right thumb on the big temperature button
or the top four buttons.
Just press the temperature button once and wait until you
hear a beep. You do not need to look at the display are the
same time. All six LEDs give a small flash at the same time as
the beep. The measured temperature is shown in bold at the
top line in the display. When you measure another
temperature, the previous is moved down on the screen
indicating it is getting older and older.
You can see up to 11 temperatures on the screen. 1 new and
10 older ones. If you measure more than 11 temperatures,
the oldest ones are erased.
This menu is good for measuring a tire temperature in several
spots. Please remember that you need to get close to measure
in a spot for instance 1 cm away for the tire,
Using the two buttons, you can delete all temperatures or return to the previous menu.
The infrared tire temperature sensor is using somewhat more power than the rest of UniWatch.
To increase the battery lifetime, the infrared temperature sensor is automatically powered
down after 30 seconds if not used. When using the sensor after it is powered down, you will
notice a short delay before you hear the beep.
The 11 temperatures are stored, even when UniWatch is turned off.
UNIPRO – The original Laptimer
22
SETUP MENU
Some basic settings are in the setup menu.
From this menu, you can do the following:
•
•
•
•
•
•
Display contrast (press and hold)
Current language (press and hold)
Time and date
Driver names
Track name and length
More UniWatch settings
When you are finished you can return to the main menu by pressing the lower left button.
All settings are stored and will not be cleared if you remove the batteries.
CONTRAST SETUP
The contrast of the display is the light
difference between the dots that are turned
on and dots that are turned off.
You can manually adjust the contrast
setting by pressing and holding down the
contrast button and then use the arrow
buttons. You will see the contrast change at
the same time.
LANGUAGE SETUP
To be able to support a lot of different
languages, UniWatch is limited to 4
languages at the same time. When
delivered, it contains English, German,
Italian and French. If you want another
language, you have to run the UniWatch
Update program found on
www.uniprolaptimer.com.
When you have the languages you want in UniWatch, you are able to select them from the
setup menu. Just press and hold the neutral flag and use the arrow buttons to the right until
you see the language you want.
As soon you release the button again, UniWatch will be change to use the other language.
UNIPRO – The original Laptimer
23
CLOCK SETUP
UniWatch includes a real-time clock running
even when UniWatch is off.
You can set the clock in two ways.
The easiest way is to connect UniWatch to
the PC software called PC Watch. Every
time you connect UniWatch to the PC using
the USB cable, the clock will be
synchronized with the clock in the PC. That way you always update the clock UniWatch to keep
it accurate.
The other way is to use the clock setup screen shown on the picture. You simply move around
the screen with the left and right arrows and adjust the corresponding number with the up and
down arrow. The selected number is shown with bold digits. To set the clock, press the okay
button and to cancel the changes, press the cancel button.
DRIVER NAME SETUP
The easiest way to change driver names in
UniWatch is using the PC Watch software
and a USB cable.
It is however possible to change the driver
names directly on UniWatch.
Use the arrow buttons to select the text
you want to change.
To edit the text, press the top left button. If
you want to add another name, press the new button. It is possible to delete the text you have
selected by pressing the delete button. When deleting the name, you have to confirm the
action.
TRACK NAME SETUP
The easiest way to change the track name
and length is using the PC Watch software
and a USB cable!
It is however possible to change the track
name and the track length directly on
UniWatch.
Use the arrow buttons to select the track
you want to change.
To edit the text, press the top left button. If you want to add another name, press the new
button. The track length can be changed with the lower right button. It is possible to delete the
text you have selected by pressing the delete button. When deleting the track, you have to
confirm the action.
UNIPRO – The original Laptimer
24
EDIT NAME AND LENGTH
This example is showing the editing of a
drivers name. You can move the cursor
with the left and right buttons and change
the value with the up and down arrow.
At the bottom you are seeing the font used
for the text. The character in the rectangle
is the current selected one from the text.
You can see what 5 characters are before
and after in the font. That way it is easier to scroll the right way in the font.
It is possible to delete the character with the delete button and you can add characters to the
text by moving the cursor to the right of the text. Any “spaces” to the right of the text will be
deleted when storing the text.
You can accept the new text by pressing the okay button or discard the changes by pressing
the cancel button.
SETUP MORE MENU
From this menu, you can change the
following:
•
•
•
•
•
•
•
Speed in KMH or MPH
Temperature in Celsius or
Fahrenheit
Time in 24 hours or 12 hours
(am/pm)
Auto power-off time (press and hold)
Beeper on or off
Multistart (all stop watches start at once)
LED feedback on or off
When you are finished you can return to the setup menu by pressing the lower left button.
All settings are stored and will not be cleared if you remove the batteries.
AUTO POWER-DOWN SETUP
UniWatch will automatically turn itself off if
it is not used. To save batteries, you want
it to turn off as fast as possible, but on the
other hand it should not affect the daily
work.
You can adjust the auto power-off time
between 1 and 30 minutes by pressing and
holding down the auto power-off button
and then use the arrow buttons.
UNIPRO – The original Laptimer
25
PRINT MENU
If you are the lucky owner of a Seiko Instrument DPU-3445 portable printer, you will be able
to print you data wireless using IrDA. Please remember to disconnect the cable from the
printer before turning it on! Otherwise it cannot communicate using IrDA.
From this menu you are able to do the following.
•
•
•
Print the session data
Print the lap and split times
Print the 11 temperatures
This feature may require that you update your UniWatch software. Check uniprolaptimer.com.
PC TRANSFER
UniWatch automatically change to PC mode
when a USB cable is inserted. You can’t
enter PC mode manually.
You will see the transfer status and
progress on the screen. A progress bar
goes from 0% to 100% indicating the data
transfer.
The PC program has full control over UniWatch when the USB cable is in. It can transfer data
either ways, change settings or update the firmware (program) in UniWatch.
UniWatch leaves PC mode and returns to the main menu as soon as the USB cable is removed
again.
Please notice, that UniWatch cannot see if the USB driver is installed correctly on the
connected PC. It can only detect the cable. You need to make sure that the Unipro USB driver
is installed correctly to be able to transfer data.
TIRE TEMPERATURE
When the drivers are coming back to the
pit area it is time to measure the tire
temperatures. You can measure all tires on
all drivers, but you are not forced to do so.
When analysing the stop watch times, you
can press the tire temperature button to
get to the tire temperature menu. By
default driver 1 is selected.
On the right you will see the same number of buttons as you have drivers in the session.
To measure a tire temperature, press either the big temperature button at the bottom or the
top left button. Just press once when pointing towards the tire. When you hear the beep and
see the LEDs flashes, go to the next tire and so on. The sequence is always the same.
UNIPRO – The original Laptimer
26
UniWatch expect you to measure the tires in the following sequence:
1.
2.
3.
4.
Front left tire
Front right tire
Rear right tire
Rear left tire
If you only want to measure one tire you can do so. If you want to measure tire temperatures
on another driver, you press the driver’s button to the right.
Please be aware, that if you choose a driver where you already did measure the tire
temperatures, UniWatch will start by overwriting the values. That way, you can always repeat
the sequence by pressing the same driver again. You however cannot measure for instance
only the rear right tire alone.
It will always start from the front left tire!
The infrared tire temperature sensor is using somewhat more power than the rest of UniWatch.
To increase the battery lifetime, the infrared temperature sensor is automatically powered
down after 30 seconds if not used. When using the sensor after it is powered down, you will
notice a short delay before you hear the beep.
UNIPRO – The original Laptimer
27
BATTERY CHANGE
When it is time to change the batteries a small battery symbol is shown
in the menu line. This does not mean that the UniWatch will stop
functioning. The first sign of really low battery voltage is when the realtime clock is corrupted. The battery icon is shown when the battery
voltage is around 2.0V.
Please do not dispose the batteries in the nature. Use the official return
channels for them!
The batteries are located inside the box. Put UniWatch on the table with the backside up.
Unscrew the four screws and remove the lower part of the box. Here you will see a battery
holder with two standard Alkaline 1.5V AAA batteries. Please replace them with two new ones
of high quality. Be careful to put them in with the right polarity. If you should by accident put
them in the opposite direction, you will not hurt either UniWatch or the batteries.
UNIPRO – The original Laptimer
28