1
Stage
Eindwerk
Studiegebied
Bachelor
Afstudeerrichting
Academiejaar
Student
Handelswetenschappen en Bedrijfskunde
Toegepaste Informatica
2007-2008
Dennis Vermaut
Servers en clusters
Beheer en gebruik van een Linux Cluster
Linux High Availability Cluster met PHP/MySQL webapplicaties
Stageplaats
Polytechnic Stadia
Helsinki (Finland)
Woord vooraf Dit eindwerk is tot stand gekomen als verslag voor mijn stage in het laatste semester van mijn opleiding Bachelor Toegepaste Informatica. Mijn stageplaats was Polytechnic Stadia Helsinki te Finland. In deze stage moet de student zijn kunnen tonen in een echte werkomgeving, alsook zijn kunnen uitbreiden. Dit verslag zal beschrijven wat mijn taken waren te Polytechnic Stadia Helsinki en hoe ik deze aangepakt heb. In de bijlagen zullen handleidingen en documentatie vervat zijn die als onderdeel van deze taken tot stand zijn gekomen en/of onmisbaar zijn bij de taken. Dit verslag is bedoeld voor opvolging van de gedane taken of om informatie te winnen rond de taken en hoe er verder aan te werken en/of de draad op te nemen bij de gedane taken. Ik wil ook even de tijd nemen om een aantal mensen te bedanken die mij bij mijn stage geholpen, begeleid en/of bijgestaan hebben. Eerst en vooral wil ik uitdrukkelijk mijn ouders bedanken, omdat zij mij altijd gesteund hebben, zowel moreel als financieel, in mijn keuze voor een buitenlandse stage. Ook mijn andere familieleden en vriendin wil ik via deze weg bedanken voor hun vele berichten en steun. Daarnaast wil ik ook zeker Kirsi Paaso en Anneli Luoto bedanken. Als hoofd van internationalisering voor Polytechnic Stadia Helsinki hebben zij er in heel korte tijd voor gezorgd dat de stageplaats, stagepapieren en verblijfplaats in orde was, ook al was ik extreem laat met mijn aanvragen. Samen met hen moet ik ook Kari Björn bedanken. Hij is het hoofd van de afdeling informatica voor Polytechnic Stadia Helsinki en was tevens mijn mentor. Hij heeft ervoor gezorgd dat ik een degelijke opdracht kon uitwerken en een goede kans kreeg veel bij te leren tijdens mijn stage. Daarna moet ik ook zeker Hamok bedanken. Hamok is de vereniging opgezet door Polytechnic Stadia Helsinki en bestaat uit studenten. Deze studenten (tutors genaamd) zorgen er voor dat internationale studenten opgevangen worden bij hun aankomst en van de nodige papieren en informatie voorzien worden. Verder organiseren zij ook activiteiten voor de Erasmus studenten. Bij deze gaat mijn dank dan ook speciaal uit naar de aan mij toegewezen tutor: Ana Barrionuevo Korkeill. Zij is tevens ook de hoofdtutor (international representative) van Hamok te Helsinki. Ook wens ik Nick Deboo, Jonas Pypen en Wouter Cosyns te bedanken. Nick is een West‐Vlaming die al in Helsinki verbleef als student sinds september en die me veel info verschaft heeft. Nick volgt ook zijn studies aan Howest. Jonas is een Oost‐Vlaming en was mijn werkpartner gedurende het eerste deel van mijn taken. Jonas en Nick moesten aan applicatieontwikkeling en synchronisatie doen op de Nokia N810. Wouter, tevens Oost‐Vlaming, is er na mij toegekomen en had als opdracht met een Cisco box aan de slag te gaan rond VOIP (Voice Over Internet Protocol) en SIP (Session Initiation Protocol). Samen met hen zat ik op het zelfde lab, waardoor er regelmatig wat afgelachen werd en we elkaar om hulp konden vragen in onze moedertaal, wat altijd gemakkelijker is en sneller gaat. Verder gaat mijn dank ook uit naar Corneel Theben‐Tervile, mijn lector Java. Dankzij hem is de papiermolen alsnog in beweging getreden. Ik wens ook mevrouw Isabel Uitdebroeck en mevrouw Siska Wielfaert te bedanken om alle papieren te helpen vervolledigen en door te sturen. Nog eens een extra dank gaat uit naar mevrouw Siska Wielfaert, omdat zij ook tijdens mijn verblijf in Helsinki verder bleef informeren en verder keek om een beurs te regelen voor me. Ik wens ook mevrouw Kristien Roels te bedanken, mijn stagebegeleidster. Zij heeft altijd gecontroleerd of mijn werkopvolging in orde was. Dennis Vermaut Helsinki 21/05/2008 Preface This thesis has been made as a report for my practical training in my last semester of my studies as Bachelor in Applied Computer Sciences. My placement was Polytechnic Stadia Helsinki, in Finland. During this practical training the student has to prove his knowledge and know‐how in a real‐world environment and also expand his knowledge and know‐how. This report will describe my tasks at Polytechnic Stadia Helsinki and how I took care of these tasks. In the attachments there will be manuals and documentation included which were made as part for my tasks and/or cannot be missed to perform the tasks or operating the accomplished tasks. This report is meant for follow‐up on the done tasks or to gain more information about the tasks and how to continue working on them. I would also like to take some time to say thanks to a few people who have helped my getting my practical training, guided me and/or helped me during the training. First and for all I would like to explicitly thank my parents, because they have always supported me in my choice to go abroad, both in a moral way as in the financial way. I would also like to thank the rest of my family and my girlfriend for their many messages and support I received. Next to them I definitely want to thank Kirsi Paaso and Anneli Luoto. As chiefs of internationalization for Polytechnic Stadia Helsinki they made sure all the papers, the placement and my residence were okay and that in very short notice. Together with them I also have to thank Kari Björn a lot. He is the head of the IT department for Polytechnic Stadia Helsinki and was my mentor as well. He made sure I had decent tasks to perform and gave me a very good opportunity to learn a lot of things during my practical training. Then, I would also like to thank Hamok. Hamok is the association created by Polytechnic Stadia Helsinki and is made out of students. These students (so called tutors) make sure the international students are taken care off when they arrive and provide them with the needed papers and information. Furthermore they organize many activities, which can be attended not only by the exchange students. Among them I especially have to thank my tutor: Ana Barrionuevo Korkeill. She is also the international representative of Hamok in Helsinki. I would also like to thank Nick Deboo, Jonas Pypen en Wouter Cosyns. Nick is from West‐Flanders and has been staying in Helsinki since September and provided me with a lot of information. Nick is also a student at Howest. Jonas is from East‐Flanders and was my colleague during my first assignment. Jonas and Nick had to work on application development and synchronization for the Nokia N810. Wouter, also from East‐Flanders, arrived after me and was assigned to work with a Cisco Box and dealing with VOIP (Voice Over Internet Protocol) and SIP (Session Initiation Protocol). Together with them I was working in the same lab, which resulted in good and fun times and also we could help each other in our native tongue, which is always faster and easier. Furthermore, I would like to thank Corneel Theben‐Tervile, my teacher Java. Thanks to him the paperwork finally got a move. I also wish to thank miss Isabel Uitdebroeck and miss Siska Wielfaert for helping me completing the papers and sending them. I give an extra thanks to miss Siska Wielfaert as she kept in touch with me during my practical training and made sure I got my Erasmus scholarship. I’d also like to thank miss Kristien Roels, my practical training councilor. She always checked if my progress papers were in order and up to date. Dennis Vermaut Helsinki 21/05/2008 Samenvatting In dit eindwerk wordt ten eerste de installatie van een Linux High Availability Cluster uit de doeken gedaan. Dit houdt eerst de installatie zelf in en vervolgens alle software voor de cluster configureren. Ook het configureren van de Exim4 mail server software voor het gebruik van een externe mail server is hier in omvat. Een tweede deel gaat over monitoring van servers/clusters vanuit Linux aan de hand van Ganglia. Dit specifiek van op een USB stick. In detail beslaat dit dus het plaatsen van een Linux Operating System op een USB stick en vervolgens de research hoe het monitoring pakket op het systeem te krijgen. Een derde luik draait om de Global Invoicing web applicatie. Deze applicatie maakt het mogelijk facturen op te stellen, bewerken, archiveren en uniform te printen. De facturen kunnen van om het even welke databank bron of rechtstreekse input komen. De applicatie is meerdertalig in een manier die op iedere PHP/MySQL website toegepast kan worden. Ook kan het systeem overweg met meerdere templates om de gemaakte facturen af te beelden. Een laatste onderwerp omvat de revisie en uitbreiding van PR Consulting, een web shop. Het onderhoud moest vereenvoudigd worden, alsook moest het systeem efficiënt meerdertalig gemaakt worden. Hiervoor werd de techniek van de Global Invoicing applicatie ingezet. Ook moest er een conversie gebeuren van PHP4 naar PHP5. Summary In this thesis the installation of a Linux High Availability Cluster will be described as first. This includes first the installation itself and next the configuration of all the necessary software for the cluster. Also the configuration of the Exim4 mail server software for the usage with an external mail server is included. A second part is about monitoring servers/clusters from within a Linux environment with Ganglia. And this from a pen drive. In detail this includes installing a Linux Operating System on a pen drive and after that the research how to place the monitoring software on the system. A third part is all about the Global Invoicing web application. This application makes it possible to create invoices, edit them, archive them and print them in an uniform manner. The invoices can come from any database source or from direct input. The application supports multilanguage in a fashion that can be adapted to any PHP/MySQL website. The system is also able to deal with multiple templates to show the created invoices. The last subject includes the revision and extension of the PC Consulting web shop. The maintenance had to be simplified and the system had to be made multilanguage in an efficient manner. To achieve this last requirement, the technique from the Global Invoicing application was used. Also there had to be done a small conversion from PHP4 to PHP5. Verklarende woordenlijst •
•
•
•
•
•
•
•
•
•
•
•
•
•
•
•
AJAX COW CSS DSL HA HAC HPC HTML LAMP PHP RDBMS SIP SLAX SRP SQL VOIP – – – – – – – – – – – – – – – – Asynchronous JavaScript And XML Cluster of Workstations Cascading Style Sheet Damn Small Linux High Availability High Availability Cluster High Performance Computing HyperText Markup Language Linux Apache MySQL PHP PHP: Hypertext Preprocessor Relational DataBase Management System Session Initiation Protocol Slackware LinuX Single Responsibility Principle Structured Query Language Voice Over Internet Protocol Vocabulary •
•
•
•
•
•
•
•
•
•
•
•
•
•
•
•
AJAX COW CSS DSL HA HAC HPC HTML LAMP PHP RDBMS SIP SLAX SRP SQL VOIP – – – – – – – – – – – – – – – – Asynchronous JavaScript And XML Cluster of Workstations Cascading Style Sheet Damn Small Linux High Availability High Availability Cluster High Performance Computing HyperText Markup Language Linux Apache MySQL PHP PHP: Hypertext Preprocessor Relational DataBase Management System Session Initiation Protocol Slackware LinuX Single Responsibility Principle Structured Query Language Voice Over Internet Protocol Table of contents Woord vooraf .......................................................................................................................................... 1 Preface ..................................................................................................................................................... 3 Samenvatting ........................................................................................................................................... 5 Summary ................................................................................................................................................. 6 Verklarende woordenlijst ........................................................................................................................ 8 Vocabulary ............................................................................................................................................... 9 Table of contents ................................................................................................................................... 11 About Polytechnic Stadia Helsinki ......................................................................................................... 14 Assignments .......................................................................................................................................... 15 Introduction ....................................................................................................................................... 15 Linux HA cluster ................................................................................................................................. 16 Introduction ................................................................................................................................... 16 General description ....................................................................................................................... 16 Software ........................................................................................................................................ 16 Apache ....................................................................................................................................... 16 MySQL ....................................................................................................................................... 17 Linux High Availability project ................................................................................................... 17 MON .......................................................................................................................................... 17 Csync2 ........................................................................................................................................ 17 Technical setup of the cluster ....................................................................................................... 18 Work done on second cluster ....................................................................................................... 19 Critical reflection ........................................................................................................................... 19 Linux/Ganglia on an USB stick ........................................................................................................... 20 Introduction ................................................................................................................................... 20 History ........................................................................................................................................... 20 Issues ............................................................................................................................................. 21 Critical reflection ........................................................................................................................... 21 Global invoicing web application ...................................................................................................... 22 Introduction ................................................................................................................................... 22 Multilanguage ................................................................................................................................ 22 Database ........................................................................................................................................ 24 Problems and things to keep in mind ............................................................................................ 26 11 Dropped functionality ................................................................................................................... 27 Critical reflection ........................................................................................................................... 28 Features of the invoicing system ................................................................................................... 29 PR Consulting revision and extension ............................................................................................... 30 Introduction ................................................................................................................................... 30 Conversion to PHP5 ....................................................................................................................... 30 Application issues .......................................................................................................................... 30 Multi‐language .............................................................................................................................. 31 Critical reflection ........................................................................................................................... 33 Critical reflection about the training ..................................................................................................... 34 Attachments .......................................................................................................................................... 35 Debian Cluster Manual ...................................................................................................................... 35 Linux/Ganglia on a Stick .................................................................................................................... 35 Global Invoicing Manual .................................................................................................................... 35 Remark about PR Consulting ............................................................................................................. 35 12 13 About Polytechnic Stadia Helsinki My work placement took place in a department of Polytechnic Stadia Helsinki. A polytechnic is similar that we know in Belgium as a “Hogeschool” or in English as an “university college”. Polytechnic Stadia has only been in existence for a rather short period. Until 1996 there were 8 institutes that were managed by the city of Helsinki. Each institute had its own responsibilities, but some of these responsibilities were the same than those of another institute. To end this, it was decided to merge all the institutes into ‘one’. On 1 January 1999 the merging was completed: Polytechnic Stadia was a fact. Since that time a few more institutes were added to the large Polytechnic. EVTEK and Polytechnic Stadia Helsinki will be merging into a new higher education institute called ‘Helsinki Metropolia University of Applied Sciences’, which will begin operations on 1 August 2008. One of the supervisors of this merge is Kari Björn. Kari Björn is the head of the faculty of technology and he was also my mentor during the work placement. He gave me the assignments and provided me with everything I needed. My office was the labs at the fifth floor of the faculty of technology. 14 Assignments Introduction During my stay in Helsinki I was given more than one assignment to take care off. All these tasks are described in this section. A short overview of the tasks given to me: •
•
•
•
Finish setting up second Linux HA cluster and correct the manual Linux/Ganglia monitoring on a pen drive Global invoicing web application Web shop revision and extension The tasks are split up in two blocks as the first part was the technical part of the practical training where I could (learn how to) work with Linux and clusters. After I finished these projects, I got to develop web applications for the cluster. The revision and extension for the web shop contained making the application multilanguage and converting it to PHP5. A time overview: •
•
•
•
Linux HA cluster: 1 month Linux/Ganglia monitoring on a pen drive: 2 weeks Global Invoicing: 1 month and a half Web shop revision and extension: one week and a half All of these task had to be taken care of and carefully documented. Documentation differed from project to project. For the Linux HA cluster we had a manual with technical background provided, but we had to revise it, adapt it, extend it … For the Linux and Ganglia monitoring on a stick I had to start from scratch. All research had to be done and what was actually used for the final project had to be documented. Documentation for a project is more than just a ‘HOW‐TO’. You also have to provide some technical background about the used utilities etcetera. For the Global Invoicing everything had to be written from zero as well. Both the research, the database analysis, requirement analysis as the manuals to use the application and to write templates and plug‐ins. Most of this had to been done after debugging and testing the application as I had to do this project completely by myself. For the web shop revision a very complete user manual and technical background was written by my predecessors: Johnny Vantorre and Tuur Swimberghe. As nothing I did to the application had serious affects on their documents, I didn’t have to adapt it. The changed database scheme will be included in this thesis and the usage for the new administration part for the language management is similar to the language management used for the Global Invoicing application. 15 Linux HA cluster Introduction My first tasks was to help Jonas Pypen with finishing setting up the second Linux HA cluster and reviewing the provided manual. These clusters are so called High Availability clusters, which means they work as one cluster and they take tasks over in case of failures. Jonas’ job with me ended after we configured the main High Availability items (Apache, MySQL, Heartbeat, UPS, basic Ganglia) successfully and we could alter the manual correctly. Furthermore, at the end of my practical training the first cluster had serious issues and had to be completely reinstalled. As Jonas had already left back to Belgium, I had to do this on my own. This was a good time to fully test the manual and to edit the parts that weren’t clear yet. Also I noticed that some steps were missing in the manual. Apparently not everything was noted perfectly while we were revising the manual. It was a less good timing from the servers, as I still had to finish my global invoicing project and this gave me quite some time pressure. Also I had to configure Exim4, a mail server package, so that each mail sent by the PHP parser would be redirected to the mail server for the school: ns2.stadia.fi. This required both configuration changes from the cluster side as from the mail server side. General description The goal of High Availability (HA) is to make sure that if the primary node fails, the second node of the cluster takes over all the resources and notifying an administrator the primary node is down. By doing so the cluster can provide full uptime. The next step in this process is if the primary server is back online, the resources should not be automatically transferred back to the primary server, this to prevent the jumping back and forth of resources between both servers. Also the databases should automatically replicate, so no data will be lost at all. Luckily MySQL provides good support and options for this by providing us with NDB Management and the NDB Cluster Engine. Software To achieve the High Availability we’re going to rely on four main programs. These are Apache and MySQL to run the web applications and MySQL especially to provide the High Availability of the MySQL data. Next to that we are also going to use the High Availability project and MON to provide us the further high availability features. Off course all these programs have to be configured specifically to our setup and to work with each other as well. Apache needs virtual addresses for this, MySQL uses NDB, Mon checks if MySQL and Apache are running and provides triggers in case they aren’t and Heartbeat monitors the up state of the nodes and fires up the necessary scripts in case of failure. Apache Apache is the most popular web server in the world. It is an open source web server that is continuously under development. Apache is fast, scalable, extendable and secure. One of the goals is that the websites are available through the same address, disregarding what server is serving. Virtual Hosts is the feature of Apache who will enable this. 16 MySQL MySQL is an open source relational database management system (RDBMS) that use Structured Query Language (SQL) to manage the data in the database. MySQL is fast and reliable and also continuously under development. Also MySQL is free of charge in many cases. A built‐in functionality is MySQL clustering, cluster management and cluster engine, so MySQL is by default perfectly equipped for clustering. While working with this clustering we encountered a bottleneck to the NDB Engine used for clustering. Its specification allows less attributes (columns etc.) then for example MyISAM. Due to this specification one of the available websites can’t be automatically replicated (Moodle) as it has too much attributes. The first attribute limitation can be changed in the configuration file, but even the maximum supported value for the NDB Engine isn’t enough for Moodle. Linux High Availability project This project is an open source application for servers. The application makes the main server send signals (the heartbeat) over a shared connection (the direct link between the nodes) to indicate that it is alive. When there isn’t a heartbeat found, the resources should be taken over. Heartbeat shuts down according to a script and executes all tasks defined in that script (for example starting the services on the second node). MON Mon is a general purpose scheduler and alert management tool used for monitoring service availability and triggering alerts upon failure detection. MON is required to achieve the goal of this project, because it monitors the programs running on the main server. Should one of the programs (Apache or MySQL) on the mail server fail, then MON will execute an alert script that will shutdown the heartbeat process. By having done this, the other server will detect that the primary node is down, and start to transfer the resources. Csync2 Csync2 is a cluster configuration tool. It can be used to keep files on multiple hosts in a cluster in sync. Csync2 can handle complex setups with much more than just 2 hosts, handle file deletions and can detect conflicts. It is expedient for HA‐clusters, HPC‐clusters, COWs and server farms. To do this syncing Csync2 uses the Sqlite2 library. For conflicts a younger/older test is performed. This program allows us to keep the files on both servers in sync. As for websites the files don’t change that much, live clustering isn’t needed, so this tool is just the right thing. Also this program can exclude directories and/or files from the syncing. Using this ability, we can use a single file to keep specific server related Apache2 settings without being synced. You never know why a certain node may need different settings! 17 Technical setup of the cluster The servers used in this manual are Intel Pentium 3 servers, each with 2 hard disks of 60GB – which we will use in RAID configuration – and 2 Ethernet interfaces. These Ethernet interfaces are both needed. As shown in the picture below one interface is used for direct communication in the cluster (between the nodes). This interface will also be used for the heartbeat. The other interface is used to connect to the switch and to the global network of the school. In this picture only the cluster related network cables are shown. Also connected to the switch trough an Ethernet interface is our UPS which uses UTP to send/query the status. Also note that the cable connecting the 2 nodes to each other has to be a cross cable. If you want to link up more than 2 nodes, they can be connected to each other through a switch or hub with a normal straight cable. Also note that since version 2 of Heartbeat, it is possible to use the same interface for the uplink and the communication within the cluster. 18 Work done on second cluster When I arrived, Jonas had just finished installing the operating system, the web server and the database service. A lot of adjustments and tweaks still had to be done. Also Jonas had already found out that the provided manual was far from complete and correct, so we also had to correct this manual. During the further installation we found out that a lot was wrong and/or incomplete. We even had to reinstall the web server and database service and reconfigure them completely. This was good for me, because that way I didn’t really miss a thing and I could get to know Linux very good and that was what I wanted. Next to this default configuration I had to set up the servers to be power failure safe, using an UPS. This was a Dell PowerWare and the software still had to be installed on all servers. Everybody was of the idea that just plugging it in was sufficient, until I actually pulled out the main electricity plug and everything went down, as both Jonas and I expected. Next to this, Ganglia still needed to be installed on the second cluster, the same for PHPSysInfo. Next to these installations and configurations I had to expand all the servers with the free statistic tool AWStats. After all the programs had been installed and configured I was notified that all mailing done by the websites should go through an external mail server: ns2.stadia.fi. Configuring this is really easy in a Windows server. In the php.ini file you just set the SMTP directive to this server. This directive however is only valid for Windows. In Linux there’s more that has to be done, so I had to figure out how to configure Exim4, PHP5 and Apache2 to do this. A full installation and configuration manual on the Debian HA Cluster is included in this thesis as the first attachment. Critical reflection Working with Linux and getting a hang of it was one of the goals I still wanted to achieve will being a student as Linux is a very often used operating system on web servers etcetera. Furthermore working with a non graphical interface you have to edit the configuration files directly and thus you get to know more about how an operating system works and how much little things are involved and depend on it. Linux is far from a perfect operating system, as there are too many distributions to have a very decent support on the internet, but if I want to continue in the web designing business and manage my own servers, I will have to be able to manage these servers. This assignment was perfect for this goal as I learned how to work with Linux with as key feature web application support and clustering them. I learned how to configure Linux in a complex hard drive set up, including RAID for direct back‐up. I also learned how to configure Apache en MySQL more deeply to work with a cluster so you even have a redundant server working. My interest is even more awaken now and I’m able to manage a Linux server in quite a decent way. 19 Linux/Ganglia on an USB stick Introduction Kari Björn mentioned me about a research a student had done to put this monitoring on an USB stick so you could monitor the cluster from anywhere you want. Unfortunately the project was never finished and got lost, but the idea was very good, so I decided with Kari Björn to see what I could do. Linux on an USB stick wasn’t new for me in that way I had already heard of it and I knew it could be done. Several distributions had found their way to the internet, so that shouldn’t be so much of a problem. But it is Linux … History As Linux has bootable discs for quite a while, creating a bootable system without write rights wasn’t so hard to find out for the community. A few people of this community also started projects to get an Operating System as small as possible, but still provided with the essential software. Damn Small Linux was one of the first projects to do this and actually capable of creating a disc image of about 50MB. Damn Small Linux was derived from a Debian distribution. This image was made for a CD, but they took it a bit further as changing it so that it could also be used from an pen drive. Pen drives at that time were 64MB or 128MB, but larger didn’t exist yet. So this 50MB image was perfect for these pen drives. After Damn Small Linux a lot of projects followed the idea and most of the projects are based on Damn Small Linux. As the storage capabilities of the pen drives rose, the projects could manifest themselves by adding more software that is packed in the image and/or more graphical goodies for the user. Damn Small Linux however still exists and tries to be less than 60MB. A few popular other pen drive distributions are SLAX, Flash Linux, Feather Linux, Puppy Linux … 20 Issues I was still working with Jonas when I started to research this project and he followed every step of the installation of Linux on a stick and kept note of the procedure, because my laptop was out of order and I couldn’t do so. He helped me keeping notes until the end of the basic installation. My laptop was fixed by then. Finding distributions wasn’t a problem, but installing proved to be a serious problem without a lot of trouble to overcome. After trying a lot of possible solutions and looking for them we overcame the installation problem, but we got introduced to a whole set of new problems, mainly due to old software available on the distribution. Also making an USB stick bootable seemed not as easy as the manuals on the internet describe as this fails most of the times. All steps required to installing the software successfully and why we couldn’t setup the entire monitoring system are provided in the second attachment of this thesis. Critical reflection Linux on a pen drive caught my attention quite a while ago as it was quite a popular project in the days of small pen drives (64 – 128 MB). Even now this pops up quite a lot as some computer magazines offer HOW TO’s and manuals on their website or even in their magazines on how to do this. However the reality isn’t as easy as following those manuals and you have to try out a lot before you get the result you want. Due to the many issues we had, I was able to understand more the issues that the different distributions bring along with their different setups in handling applications and configurations. It was an interesting project as I really got faced with all the dependencies a system has when you’re not using a simple packet manager like aptitude etcetera. 21 Global invoicing web application Introduction As next assignment Kari Björn wanted me to build a multilanguage web application that could deal with invoicing for several websites. The invoices had to be legally formatted (to Finnish norms) and could come from any website. This last requirement made me to decide to work with a plug‐in system. That way for each new website that needs invoicing (or for each new way of invoicing for a website), you just need to write a plug‐in, but the system itself never changes. It would also be nice if the template for the invoice could be altered, or multiple templates would be available. That way the application can be very widely used and is easy extensible. The application had to be PHP 5/MySQL. As I also wanted to implement something new in this task and something I couldn’t do yet in PHP, I chose to work with classes. PHP allows you to work with classes in quite a decent way, but I had never done this before, so this was a challenge I’ve put on myself. Classes in PHP aren’t used like classes are used in normal programming languages, like C++ and C#. Where in the other languages a class should only exist for one reason (SRP – Single Responsibility Principle), PHP can do this too, but most of the times it is used to gather related tasks in one class and to hide the complexity of these tasks from the main pages. The application had to be multilanguage in a way you don’t have to write code if you change/add/remove a language. Due to this requirement and as a matter of speed I chose to save the language information in the database. Also this language system (database managed) could be useful for my next assignment, the altering of PR Consulting. Not only for these projects this could come in handy, but this can come in handy in the future for any multilanguage system I want to design. In one the projects I had already done for my courses I had provided a similar system, but that one wasn’t optimal yet. Keeping the remarks for this system in the back of my head I designed a new system which can be used on every database, even an existing one, with very few changes. The plug‐ins the default system would come with are plug‐ins for Moodle. This website is a project of another Erasmus student from Spain, Antonio . A second plug‐in will come from the next assignment I’ll be working on: PR Consulting. The full manual and theoretical background for this invoicing application is provided as the third attachment to this thesis. Multilanguage As mentioned before the system has to support multiple languages, but in a way that adding or changing a language doesn’t need any knowledge of programming. Off course switching languages also has to be quite fast and it would also be nice if it is possible to transfer this system to other systems. All this combined makes the choice for storing the languages and the translations in the database pretty clear. A database is an extremely easy way of storing information (text‐data) and gives back data in a very fast way. 22 The schema for just the language system looks like this: This system is based upon the fact that each field (column field in the database) needs to be translated is stored in the translate_field table and is referenced by the translate_field_id. So the translate_field keeps an id to refer to and an unique name to identify the field. The translate_field_id is an integer generated by MySQL itself by the auto increment setting. This ID will be used in each column that needs translation. This means the fields have to be created before they can be used in other tables as the foreign key reference would fail otherwise. Languages are stored in the language table. Each language has its own id, so it can be easily referred to. It also has a language code so that the database administrator easily can recognize the id’s. The translate_field_id puts a reference to translate_field, because each language itself has a value for each other language, for example: Dutch in Dutch is ‘Nederlands’, but Dutch in Dutch is ‘Dutch’. This language table can also be expanded by other columns that are unique to the language, for example a field that keeps track where the image for the language is stored (this is used in PR Consulting for example). As last table we have the translation table which stores all translations. It keeps track of what field is translated in what language and what the translation is (stored in column ‘value’). So getting a translation is quite a long query, but using joins you don’t notice any speed issues and once you have written the query once, you can use it over and over again using variables. For each field that becomes translated there is a new arrow (foreign key reference) arriving to the translate_field table. 23 Database The final database structure for the invoice application looks like this: 24 This database scheme is quite easy to comprehend, but it is capable of storing all data needed for creating invoices for all sorts of systems and companies. The data only becomes stored using the web application, not by the plug‐ins. The plug‐ins only provide the data to be processed and give back that data in the correct way using the functions provided in the super class (Plugin). Only discount has translations available as custom discounts may be applied to invoices from remote systems. If a certain discount can’t be created directly, a custom discount may be of use with translations. Items don’t become translated as normally all items come from the remote systems and are only available in one language. Note that the user table keeps the users for the system (to log in and maintain the system). The client table stores all the clients for the invoices, so they are not users. For an user, the username is off course unique (by constraint). You may also notice the three variable fields in company. Normally this is a bad solution. You should work with a new table referencing to the company. That way you can create an infinite and non‐fixed amount of variable fields. This is not done, nor was it needed as the application uses anchors to fill out the template. This means there is a fixed number of variables to use and place in the template. So the template creator doesn’t have to check the number of variable fields and doesn’t need to check the database. He just needs to know what anchors there are and to place them. More detailed information about this scheme can be found in the data dictionary. This is included in the attachment with the full manual for the Global Invoicing application. 25 Problems and things to keep in mind Creating this application seemed very easy at the beginning, but showed a lot of difficulties and things to keep in mind while I was at it. First and for all I had to program the major part of the application with no data. There was no website or data I could use to test my system with, there were no examples to use as main idea. This means the first part of the programming (creating the classes etc.) was a very abstract thing as the functionality only existed in my head and in the classes, but nothing could be tested. So I had to think of every possible exception or usage and keep that in mind and implement it. You have to keep the big picture of all your parts in your head or you will lose track of everything you have done. Due to the abstractness and complexity of the classes, it’s also more difficult to keep the system user friendly. Not only the interface, but also ways to expand the system, for example the plug‐ins. Off course a programmer is needed to create the plug‐ins, but it shouldn’t be necessary for that programmer to know the entire system. A small manual on the plug‐in writing and an example should be more than enough. So we have to provide easy anchors in the complex classes for the plug‐in writers. The interface should be as keen as possible, but very strong and capable of altering a lot. The complexity of the classes makes the full altering of the data through an interface possible. Not only plug‐ins should be able to be created, but also different templates for invoice lay‐outs. This way an invoice can be printed in many styles: default, company custom. To even enhance the possibilities, the templates are filled with anchors. This means a company (with logo) can easily use the template of another company, because the anchor field for the logo will be replaced. Off course if fixed image tags are used instead of anchors, it’s better to keep the template for the specific company. The user management should be effective as well. There are only two types of users, so this isn’t difficult. On one hand you have the viewers, who can create, check and alter invoices and alter their own profile. On the other hand you have the administrators, who can change settings for the site, do user management etc. On top of these two types, the username and password identifies the user. An user can also change his username, so he can easily remember it for himself. I found this necessary, because there is no registration form for this application. It is simply not needed. The administrator(s) create the accounts and choose the profile data. Once logged in, the user can change the data. Checking if the username is free is done by AJAX (Asynchronous JavaScript And XML). AJAX makes it possible to refresh only parts of a webpage or do server actions without refreshing the entire page. JavaScript is also used to check for valid mail addresses by using regular expressions. Another problem I had to deal with is the way invoices are stored in foreign databases. If the foreign database wasn’t designed for invoicing purposes, then there might not be an unique integer based ID for an ‘invoice’. So the plug‐in system should both support systems that have these ID types and systems that don’t support an unique ID for an invoice. If it is possible to get an unique ID we also have to store this ID in a way that we can store it for each plug‐in without altering the internal database structure. So for each plug‐in we store the name of the plug‐in (which should be unique!), the ID for the invoice in the foreign database, the date and time when we put it in the invoicing application and what invoice it is locally. As key for this table we take the name of the plug‐in and the ID in the foreign database. 26 Another problem is a problem every web designer has to keep in mind: differences in the HTML parsers in different browsers. Even though web standards are set, websites do tend to look different on different browsers. This is due to how the standards are interpreted or in what order. Each designer should at least try to make his/her application look/work the same on both Internet Explorer and Mozilla Firefox (or another browser that uses the Gecko rendering machine). One of the issues typically for this application was the preview and print version for invoices. Due to major differences in pixel usage and print options in the browsers, it was quite a deal to get print‐out look as similar as possible. Again due to these pixel interpretations and differences in supporting the CSS they cannot look totally the same, but the biggest problem was to get them to use an A4 paper fully for printing purposes. The footer should be on the right place and the data should take the entire width of the page, not more and not less. This is why there is a difference in previewing invoices in Mozilla Firefox and Internet Explorer. The widths are different for the browsers to get the optimal results when printing. The printing has been tested on multiple resolutions and has proven to be solid now. As this web application will be used as an accounting application, it is not advised and not wanted that data in the application becomes published on search engines. The application should only be used for internal purposes. So to prevent search robots to search through the site every directory was provided with a robots.txt file which says that nothing should be checked. User‐agent: * Disallow: / Dropped functionality A print to PDF functionality has also been researched and there are many classes and functions available on the internet that can help in this task, but almost every single possibility that is free for use has too much limitations or takes too much altering to be practical for this application. Providing a good printable page is the best solution as this can both be used to print to normal paper or to print to PDF (for example CutePDFWriter). So there is a print functionality provided, but it’s not offered as a PDF file. 27 Critical reflection The project was very interesting for me as I got to deal with some PHP related stuff I never worked with before: plug‐in systems, templates, classes, robot files … What started as a relative small project soon developed to a very solid and big application. It also tested my ability to think abstract as I had to develop most of the program without being able to test what I just created. Furthermore this project was a good project to get to know the importance of gathering requirements as none were given at the start. If I hadn’t asked the questions at the start and early in the development stage, I would have had real trouble. The only thing that is a bit of a shame is the lack of time. I had too few time to complete this project in all the ways I wanted. There was still some functionality I wanted to add and I also wanted to give the application a better design, but I was short in time due to the fact I was the only one working on this project and I had to take care of the old cluster that suddenly crashed. 28 Features of the invoicing system A short overview of the key‐features of this application: •
•
•
•
•
•
•
•
•
•
•
•
•
•
•
•
•
AJAX powered check for usernames Altering invoices and data in invoices with ‘as new’ option o Changing data for an item can be automatically processed to all invoices depending on it or the change can be saved just for this invoice item Anchor‐based invoice templates o Templates can easily be made, independent of the information they get Automatic copyright notice adjustments o This improves maintenance a little bit and is often a forgotten thing to adjust Cookie based log‐in ‘remember me’ function Created invoices are stored in own database system o Checking archives o Editing invoices without touching the remote database o Faster and independent processing o Printing the invoice over and over again using any template Database management o Independent back‐up functionality o Clean up to keep the internal database as small as possible Easy extendable template system o All templates are automatically processed from its directory o Create as many templates as you want E‐mail addresses are checked for valid structure with JavaScript Regular Expressions Multi‐language support o Adding/editing/removing languages in a fast and easy way o Incomplete translations are caught with default translations Plug‐in system for invoice systems o Multiple plug‐ins can be created for all sorts of systems, even remote systems o Plug‐ins are put in directories/sub‐directories and automatically processed Prevention on search robots like Google and Yahoo Previewing invoices in all available languages o Independent on the language used for the application Strong class based framework o Strong and complex class usage with a lot of different easy‐to‐use functionalities provided Strong discounting possibilities o Low limits for price o On total amount o Percentage or value Support and optimized for the most used browser engines o Tested on Internet Explorer and Mozilla Firefox on multiple resolutions Query localization o All queries are stored in a single purpose class, so all queries for the entire system can be easily located and altered and/or expanded if necessary 29 PR Consulting revision and extension Introduction Johnny Vantorre en Tuur Swimberghe, two students from my department in Belgium, who had been to Polytechnic Stadia Helsinki four years before me, had created a web shop application in PHP. This website supported multiple languages, but each language was stored in a, so updates to the application had to be done in several places and maintenance was became a disaster. This led off course to many different version for one website! My task was to improve maintenance for the language system by making it into a single working system and the language stored separately, just like the invoicing system. The structure related to the language are thus the same. After that I had to create a plug‐in for my invoicing web application. This plug‐in was also the first plug‐in made, so became my test object to test and finalize the invoicing application. Conversion to PHP5 First and for all I had to convert to application to PHP5. Everything was still written in PHP4 and not in a very good way. To start the conversion, I first set the error reporting level to the highest so I could get an output of as many possible mistakes as possible. <?php error_reporting(E_ALL); ?> Also this reporting level is my default reporting level to program as it forces you into programming in quite a perfect way and neat way. The conversion itself didn’t take that long. Application issues After the conversion some other issues had to be fixed. One of these issues was dealing with ë and ä etcetera. The Finnish languages uses a lot of letters with umlauts and these were stored correctly in the database, but not printed correctly. This had something to do with different character settings on the server and the database engine. I could not change them, because that might have affected other databases. Luckily I had dealt with this problem before and knew how to fix it. The trick is to set the names correctly right after the connect. Luckily most programmers put the connection in a separate file, so you only have to implement it once. 30 <?php mysql_connect($db_hostname,$db_username,$db_password,true) or die("Could not connect to the database."); mysql_select_db($db_database) or die("Unable to select database."); mysql_query("SET NAMES 'utf8'"); ?> All items coming from the database were displayed correct by doing this, but some normal data from the files still had this problem. I changed altering some settings on the servers a bit (Apache settings mainly), but nothing worked. After some other tests I suddenly remembered that these are so called HTML Entities and you need to enter a HTML code for them, instead of their normal character. So I was able to fix this too after replacing them by the correct entities. An overview of HTML Entities can be found at http://www.w3schools.com/tags/ref_entities.asp. One of the changes that took quite some time was changing how it was originally programmed to go back to a certain page after processing a POST of a form. In the original version the PHP function header() was used to change the header data and thus send the browser to another page. This function can now only be used correctly before anything else has been outputted. So to keep this functionality I had to change the way the resending took place. The change was done by using a little piece of JavaScript that you echo at the point where you want to change the page. This basically does the same as changing the header, but changes it after the header has been committed. <script type='text/javascript'> document.location=page.php '; </script> One other problem was a problem that only occurred in Windows. This had to do with a PHP function that relies on strfmon() (part of C library). Windows does not have this, so the function cannot be used in Windows. This is very strange for a PHP function and I don’t like it for a function not to work on all Operating Systems. On the Internet I found a Windows version of the function and added that function to PR Consulting, just in case and to be able to test PR Consulting on my local machine. The function is surrounded by an if‐tag that checks if the function is defined or not. In Windows environments it is not, so then it defines this new function. On Linux computers the function is defined, so nothing happens. The function is stored in /moneyformat.php. Multilanguage The database for PR Consulting hasn’t changed that much, as only the language system has been implemented. Implementing the system took most of the time, because to alter this application every file had to be checked and modified to use the multilanguage system. In addition to the Global Invoicing, the language table was extended with a language_icon field. This field stores the location 31 of the image used to represent this language. As the icon is language sensitive, but translation insensitive (the icon is the same for each translation of the language), the language table is the place where you should store this. As you can see, the translation table are not linked to any other table. This is because only the interface had to be made multilanguage and not the contents of the catalogues. 32 Critical reflection Converting the web shop from PHP4 to PHP5 was a very small task which I thought would have been more difficult. I already had experience with both versions, so the most problematic issues I already knew. Luckily the application was built quite solid and easy, so there weren’t many things that needed to be changed. Also putting the error reporting level to the maximum notifies you of a lot of possible problems. Preparing all the text fields for the multilanguage purpose and putting everything in the database however, is a very time greedy job. This took about two times the time I thought it would take. A critical reflection is hard to give for this project as I didn’t have a lot to do. I can only say that my predecessors made a very big mistake concerning the multiple languages when they created the application. They made a subdirectory for each language and all the code files were implemented for each language. This was a huge maintenance nightmare! 33 Critical reflection about the training My critical reflection about the entire practical training is a very positive reflection. The decision to actually continue for a masters degree was set to depend on my practical training and the decision is made to continue. I received a lot of opportunities from my mentor, Kari Björn, to work in the fields I was interested in. He gave me, and all the students, complete freedom in how and where and when. This means he gives you the tasks and that’s it. You have to choose what task you do first. Furthermore it’s up to you to get the information about the projects and the details. He knows them, but you have to make the step to ask them. This is a subtle way to make you learn how to gather requirements and if you don’t you will realize soon enough what big trouble you are in and you will never forget. Also the time didn’t matter to him, in that way he didn’t care when you did show up at the placement or if you even showed up. You can also work at home if you prefer that. You are not obliged to work in the lab. He was always interested and pleased to see you were there, but that wasn’t important. You just make sure your tasks are done by the deadline and they are done in a decent way. He also likes to test what you have in the process, so it’s entirely your own responsibility to get the project done on time and to show him progress. If you don’t, no complaint will be received as long as the project is done. This way of working is very different of the way we receive our projects in Belgium where we have our smaller deadlines in short intervals. You learn very quickly how to do time management efficiently and yet you still have the freedom to enjoy yourself and create a very good time schedule. Not everybody was able to deal with this quick switch of mentality. A Spanish guy who had to create a plug‐in for my global invoicing application got the door smacked in his face and had to stay 3 more weeks than originally planned due to his lack in time management. In the end I can only conclude this was the practical training I needed as it gave me a lot of freedom and a lot of experience. It gave me the freedom to also enjoy my time and get a time off from regular school so now I’m revitalized to continue for my masters degree. Also the Erasmus period is a period never to forget and something I can only advice everybody to do as it is a once in a lifetime experience! 34 Attachments Attached to this thesis are the following documents: Debian Cluster Manual This first attachment will deal with the full installation and setup and configuration on how to set up a Debian based cluster with High Availability. Linux/Ganglia on a Stick This second attachment will deal with all needed background and installation steps on how to put Linux on an USB device. Also it provides a manual how to use the tool. Global Invoicing Manual The third attachment contains the entire theoretical background of the Global Invoicing application as well as the manual how to use the system and how to write plug‐ins and/or templates for the system. Remark about PR Consulting A full manual for the PR Consulting will not be attached to this thesis as basically nothing changed to the parts written for the application. The way of operating remained exactly the way it was, only the code was optimized to PHP5 and made multilanguage. The database structure remained the same, except for three extra added tables, which aren’t linked to the other tables. The new scheme can be found in this thesis. Managing the languages is exactly the same as for the Global Invoicing Application and can be found in the attachment for that application. 35 Linux High Availability Cluster Installation, Configuration and Maintenance Manual Jan Milants Helsinki Polytechnic Stadia 7/2/2007 Revised edition: Jonas Pypen – Dennis Vermaut Helsinki Polytechnic Stadia 17/03/2008 This manual can serve as a guide to installing a Debian based Linux High Availability Cluster. It provides you with an overview of all the required steps during installation and configuration of the cluster. Linux High Availability Cluster 1
Manual 1 Table of Contents Table of Contents........................................................................................................................ 2 2 Table of Figures ........................................................................................................................... 5 3 Technical Overview .................................................................................................................... 6 3.1 Servers: ................................................................................................................................. 6 3.2 Software ............................................................................................................................... 6 3.3 Configuration ...................................................................................................................... 6 3.3.1 Network Configuration................................................................................................... 6 3.3.1.1 IP Addressing ........................................................................................................... 6 3.3.1.2 General ..................................................................................................................... 7 3.3.2 Passwords ........................................................................................................................ 7 3.3.3 Partitioning ...................................................................................................................... 7 4 3.3.3.1 Physical Layout ........................................................................................................ 7 3.3.3.2 Logical Layout ......................................................................................................... 8 Installation .................................................................................................................................. 9 4.1 Hardware ............................................................................................................................. 9 4.2 Installing the Nodes ........................................................................................................... 10 4.2.1 Introduction ................................................................................................................... 10 4.2.2 Installing the OS ........................................................................................................ 10 4.2.2.1 Beginning the installation ..................................................................................... 10 4.2.2.2 Localization ............................................................................................................. 11 4.2.2.3 Keyboard Selection ................................................................................................ 12 4.2.2.4 Network Configuration .......................................................................................... 12 4.2.2.5 Partition Disks ........................................................................................................ 14 4.2.2.6 Setting up users and passwords ............................................................................ 19 4.2.2.7 Configuring the package manager ........................................................................ 19 4.2.3 Setting up the OS .......................................................................................................... 20 4.3 4.2.3.1 Booting in command line ..................................................................................... 20 4.2.3.2 Configuring Network Interfaces ........................................................................... 21 4.2.3.3 Configuring apt ...................................................................................................... 21 4.2.3.4 Installing and Configuring SSH ............................................................................ 22 4.2.3.5 Installing the Web Server ...................................................................................... 23 Installing the Cluster ......................................................................................................... 25 4.3.1 Introduction ................................................................................................................... 25 Page 2 of 53 Jan Milants Jonas Pypen – Dennis Vermaut 2/07/2007 20/02/2008 Linux High Availability Cluster Manual 4.3.2 General OS settings ....................................................................................................... 25 4.3.2.1 NTP.......................................................................................................................... 25 4.3.3 Heartbeat ........................................................................................................................ 25 4.3.3.1 Introduction ........................................................................................................... 25 4.3.3.2 Installation .............................................................................................................. 25 4.3.3.3 Configuration ........................................................................................................ 26 4.3.3.4 Starting and stopping heartbeat .......................................................................... 29 4.3.4 csync2 ......................................................................................................................... 29 4.3.4.1 Introduction .......................................................................................................... 29 4.3.4.2 Installation ............................................................................................................. 29 4.3.4.3 Configuration ........................................................................................................ 29 4.3.4.4 Running csync2 ...................................................................................................... 31 4.3.5 Apache Web Server ........................................................................................................ 31 4.3.5.1 Installation .............................................................................................................. 31 4.3.5.2 Configuration ......................................................................................................... 31 4.3.6 MySQL Server ............................................................................................................. 32 4.3.6.1 Introduction ........................................................................................................... 32 4.3.6.2 Installation .............................................................................................................. 33 4.3.6.3 Configuration ......................................................................................................... 33 4.3.6.4 Starting the MySQL Cluster .................................................................................. 35 4.3.6.5 4.4 Remarks ................................................................................................................. 36 Verifying Installation ......................................................................................................... 37 4.4.1 Introduction ................................................................................................................... 37 4.4.2 5 Heartbeat .................................................................................................................... 37 Monitoring ................................................................................................................................ 38 5.1 Introduction ...................................................................................................................... 38 5.2 Heartbeat ........................................................................................................................... 38 5.3 Ganglia ............................................................................................................................... 38 5.3.1 Introduction .................................................................................................................. 38 5.3.2 Installation ..................................................................................................................... 38 5.3.3 Configuration ................................................................................................................ 40 5.4 PHPSysInfo ........................................................................................................................ 44 5.4.1 Introduction .................................................................................................................. 44 5.4.2 Installation ................................................................................................................. 44 Page 3 of 53 Jan Milants Jonas Pypen – Dennis Vermaut 2/07/2007 20/02/2008 Linux High Availability Cluster Manual 5.4.3 Example ......................................................................................................................... 44 5.5 AWStats ............................................................................................................................. 45 5.5.1 Introduction .................................................................................................................. 45 5.5.2 Installation and configuration ..................................................................................... 45 Maintenance ..................................................................................................................................... 47 6 7 5.6 Introduction ...................................................................................................................... 47 5.7 Updating/upgrading the system ...................................................................................... 47 5.8 IP‐Addresses ...................................................................................................................... 47 Installation of a Powerware 5115 UPS for a High Availability Cluster ................................... 48 6.1 Introduction ...................................................................................................................... 48 6.2 Installation of the software .............................................................................................. 48 6.3 Configure the shutdown‐script ......................................................................................... 51 6.4 Automatically starting the MySQL management server after power failure ................ 52 Configuring SMTP mail service ................................................................................................ 53 7.1 Installing exim .................................................................................................................... 53 7.2 Configuration ..................................................................................................................... 53 Page 4 of 53 Jan Milants Jonas Pypen – Dennis Vermaut 2/07/2007 20/02/2008 Linux High Availability Cluster 2
Manual Table of Figures Figure 4.1 ‐ Scheme Cluster Hardware .............................................................................................. 9 Figure 4.2 ‐ Debian Installer Boot Screen ........................................................................................ 10 Figure 4.3 ‐ Language Selection ......................................................................................................... 11 Figure 4.4 ‐ Localization Options ..................................................................................................... 12 Figure 4.5 ‐ Network Interface Selection ......................................................................................... 13 Figure 4.6 ‐ Domain name configuration ........................................................................................ 14 Figure 4.7 – Partitioner view with empty table ............................................................................... 15 Figure 4.8 ‐ Partitioner with RAID partitions configured .............................................................. 16 Figure 4.9 ‐ Partitioner after configuring RAID replication ........................................................... 17 Figure 4.10 ‐ Overview LVM configuration ...................................................................................... 18 Figure 4.11 ‐ Layout final partitioning table ..................................................................................... 19 Page 5 of 53 Jan Milants Jonas Pypen – Dennis Vermaut 2/07/2007 20/02/2008 Linux High Availability Cluster 3
Manual Technical Overview 3.1
Servers: In this manual we use 2 Intel ISP‐1100 servers. Technical details: •
•
•
CPU Storage Memory Intel Pentium 3 2 x 60GB (Used in Software RAID1) 256MB 3.2 Software Operating System Debian 4.0 “etch” using Linux Kernel v. 2.6.18 Web Server Apache 2.2.3 + PHP 5.2.0 Database Server MySQL 5.0.32 Cluster Software Heartbeat 2.0.7 (Latest version supplied by Debian; latest: 2.0.8) csync2 1.33‐2 3.3
3.3.1
Configuration Network Configuration 3.3.1.1 IP Addressing Since we also use an UPS failover system, the UPS also needs an IP address. The one used in the Stadia lab is 192.168.182.20. Make sure you don’t use the IP address from the UPS as an IP address for the cluster! You are free to choose the IP‐addressing for the cluster within the range of free IP addresses provided by Stadia. In the lab we can chose anything between 192.168.182.1 and 192.168.182.19! Primary Interfaces 1st cluster: Cluster Node 1 Node 2 Subnet mask Gateway 192.168.182.10 192.168.182.11 192.168.182.12 255.255.255.0 192.168.182.254 Secondary Interfaces 1st cluster: Node 1 Node 2 192.168.254.1 192.168.254.2 Subnet mask 255.255.255.0 1
Redundant Array of Independent Disks Page 6 of 53 Jan Milants Jonas Pypen – Dennis Vermaut 2/07/2007 20/02/2008 Linux High Availability Cluster Manual Primary Interfaces 2nd cluster (if used): Cluster Node 1 Node 2 Subnet mask Gateway 192.168.182.15 192.168.182.16 192.168.182.17 255.255.255.0 192.168.182.254 Secondary Interfaces 2nd cluster (if used): Node 1 Node 2 192.168.254.1 192.168.254.2 Subnet mask 255.255.255.0 3.3.1.2 General Proxy Server 2 www‐cache.stadia.fi:8080 3.3.2 Passwords root viper stadia viper 3.3.3 Partitioning LVM3 storage running on a PV4 composed of 2 partitions in software RAID setup. A separate non‐LVM partition – still using RAID – is used for booting 3.3.3.1 Physical Layout ¾ IDE1 (hda) 61.5GB • /dev/hda1 • /dev/hda2 ¾ IDE2 (hdb) 61.5GB • /dev/hdb1 • /dev/hdb2 ¾ Software RAID • /dev/md0 • /dev/md1 500MB 61GB Linux RAID Linux RAID 500MB 61GB Linux RAID Linux RAID 500MB 61GB ‘/boot’‐partition LVM Partition 2
Only use proxy configuration if required on your network. Logical Volume Management / Logical Volume Manager 4
Physical Volume 3
Page 7 of 53 Jan Milants Jonas Pypen – Dennis Vermaut 2/07/2007 20/02/2008 Linux High Availability Cluster 3.3.3.2 Logical Layout ¾ vg00 • /dev/dm‐0 • /dev/dm‐1 • /dev/dm‐2 • /dev/dm‐3 16.1GB 26.6GB 16.1GB 2.1GB Manual ‘/home’ ‘/’ ‘/srv’ ‘/swap’ Page 8 of 53 Jan Milants Jonas Pypen – Dennis Vermaut 2/07/2007 20/02/2008 Linux High Availability Cluster 4
4.1
Manual Installation Hardware The servers used in this manual are Intel Pentium 3 servers, each with 2 hard disks of 60GB – which we will use in RAID configuration – and 2 Ethernet interfaces. Figure 4.1 shows the basic hardware setup of our Linux Cluster. Only the cluster related cabling is shown here. The power supply may be connected to a UPS unit; instructions on setting up UPS will be given further in this manual. Input and output may be connected directly – permanently or just for installation purposes – or can be connected to a KVM system. Figure 4.1 ‐ Scheme Cluster Hardware In our example the eth0 interface is the lower most interface of the device and the second Ethernet interface will be named eth1 by the OS. Check the technical manual of the servers to verify th4.at cables are plugged in correctly on your devices. Also note that the cable connecting the 2 nodes to each other has to be a cross cable. If you want to link up more than 2 nodes, they can be connected to each other through a switch or hub with a normal straight cable. Also note that since version 2 of Heartbeat, it is possible to use the same interface for the uplink and the communication within the cluster. Page 9 of 53 Jan Milants Jonas Pypen – Dennis Vermaut 2/07/2007 20/02/2008 Linux High Availability Cluster Manual 4.2 Installing the Nodes 4.2.1 Introduction This chapter will guide you through the installation of the Debian OS on the servers and has to be performed separately for each node in the cluster. So in our case you will have to perform the installation twice. When console commands are given, a new line is equal to pressing break. 4.2.2 Installing the OS During our installation will be using a minimal bootable CD and download all required packages from the internet as the installation progresses. The Debian installer supports both a text mode and a graphical user interface; both have an identical guided install with similar options. In this manual we will use the GUI which allows us to take screenshots of our progress; you can however opt to use the text mode installer. The installation process is identical, only the layouts of the screen will slightly differ. Download a minimal bootable CD image from the Debian homepage (www.debian.org) and write it to a CD using a modern CD burning tool which allows you to write bootable CDs based on an ISO image. 4.2.2.1 Beginning the installation Start the server an insert the CD before the system starts looking for a bootable device. If necessary you may need to reset the system in case the CD is not loaded before this time. Figure 4.2 ‐ Debian Installer Boot Screen Page 10 of 53 Jan Milants Jonas Pypen – Dennis Vermaut 2/07/2007 20/02/2008 Linux High Availability Cluster Manual In case the system does not check your CD drive for a bootable device you will have to change the configuration settings in your BIOS to make the system boot from CD. Refer to the technical documentation of your server for details on how to do this. Once the system has booted the CD you should get a screen as shown in Figure4.2. Now you can choose between the text mode installer and the graphical installer. For GUI installation: installgui For text mode installation: <CR> 4.2.2.2 Localization When the installer finishes loading, you will be shown the language selection screen. After selecting the language of your choice, press continue. Figure 4.3 ‐ Language Selection Next you will be asked to select your country – you may have to select other if your country is not in the shortlist (this is based on language selection). If you selected a less common combination of the language and location, there may be several localization options in which case the installer will ask you which one you wish to choose. If this is the case, simply use the default one ‐ the one already selected, for example en_US.UTF‐8. Page 11 of 53 Jan Milants Jonas Pypen – Dennis Vermaut 2/07/2007 20/02/2008 Linux High Availability Cluster Manual Figure 4.4 ‐ Localization Options Finally, you may – and I say ‘may’ because for some reason the installer is not consistent in offering this – be given the chance to install additional languages. The names are made up as follows: “language_country”. It is possible there is a code behind that like .UTF‐8 or @euro, in which case the .UTF‐8 is preferable. Simply select the ones you want to install, if any, and press ‘Continue’. 4.2.2.3 Keyboard Selection Next you have to select your keyboard layout. This can be changed later, however do keep in mind that if you do not select the correct layout for your keyboard – for example an azerty keyboard instead of a qwerty keyboard – what you type may not match the keys your press. Especially keep this in mind when filling in the passwords further on into the installation. 4.2.2.4 Network Configuration After the installer finishes mounting the CD and loading the installer components you will have to select your primary network interface – at least if your server is equipped with multiple interfaces, which should be the case for this setup. Note that this interface must be connected to a network with access to the internet to be able to continue the installation. Page 12 of 53 Jan Milants Jonas Pypen – Dennis Vermaut 2/07/2007 20/02/2008 Linux High Availability Cluster Manual Figure 4.5 ‐ Network Interface Selection Next it will ask you whether you want to configure your server through DHCP. In our example, we use ‘yes’ and will assign the permanent IP for the server after the installation is completed successfully. Make sure the interface is connected before pressing continue. Next you will be asked to enter a hostname for your server. (Note: In the example figure we used ‘LHC‐C1N1’ whereas in our setup we use HAC‐C1N1). Then you will be asked for the domain name and if you used DHCP earlier, you should be fine using the default value (ciscolab.stadia.fi). Page 13 of 53 Jan Milants Jonas Pypen – Dennis Vermaut 2/07/2007 20/02/2008 Linux High Availability Cluster Manual Figure 4.6 ‐ Domain name configuration 4.2.2.5 Partition Disks We will install our 2 60GB drives in a RAID 1 configuration with our partitions managed by LVM. After the partitioner has been loaded, you will be asked how you want to continue. Since our setup cannot be configured automatically by the guide, we will have to configure it manually. If there are already partitions listed on the hard disks, select the hard drive and press ‘Continue’. You will then be asked whether you want to create a new empty partition table on the device; select ‘yes’ and continue. Do this for both hard disks listed; after which the table should look similar to the one shown in Figure 4.7. Page 14 of 53 Jan Milants Jonas Pypen – Dennis Vermaut 2/07/2007 20/02/2008 Linux High Availability Cluster Manual Figure 4.7 – Partitioner view with empty table Next we have to create 2 new physical partitions: one for booting the system, another to be used by LVM. Both of these have to be configured to be used in RAID. Select the free space on the first device – in our case ‘hda’ – and continue. Then chose ‘Create a new partition’ and when asked to enter the size, enter ‘500MB’, which should be sufficient for a boot partition. The type of the partition should be ‘Primary’ and it should be placed in the beginning of the hard drive. The partitioner will then show you final partition settings; here you will have to change the ‘Use as’ option to ‘physical volume for RAID’. Now finish setting up the partition. Next, select the free space again and create another new primary partition on it using all of the remaining available space. This process is identical to setting up the first partition. Repeat the above paragraph for the second device and when finished check that both devices have identical partitions. When finished the table should look similar to the one in Figure 4.8. Page 15 of 53 Jan Milants Jonas Pypen – Dennis Vermaut 2/07/2007 20/02/2008 Linux High Availability Cluster Manual Figure 4.8 ‐ Partitioner with RAID partitions configured Once this is complete, we can move on to configuring the software RAID (the top option). If it asks you whether you want to write the changes to the storage devices, select ‘yes’ and continue. Create an MD5 device with device type RAID 1 and the number of active devices in the array 2.Unless your system has another extra drive, there are 0 space devices. When asked to select the RAID1 devices (in these cases partitions), select /dev/hda1 and /dev/hdb1 – supposing your hard disks were labelled hda and hdb – and continue. These are the 2 boot partitions. Repeat above paragraph for the remaining 2 devices (in these cases partitions, select /dev/hda2 and /dev/hdb2) and finish Multidisk Configuration. You should now be back on the ‘Partition Disks’ screen where 2 RAID1 devices – one boot device of 5OOMB and one 61GB device to be used for LVM – should have been added to the devices list. We can then continue by configuring the LVM. Select the largest RAID1 device and configure it to be used as ‘physical volume for LVM’. When this is done, the table should look similar to the one in Figure 4.9. 5
Multidisk Page 16 of 53 Jan Milants Jonas Pypen – Dennis Vermaut 2/07/2007 20/02/2008 Linux High Availability Cluster Manual Figure 4.9 ‐ Partitioner after configuring RAID replication Now a new option labelled ‘Configure the Logical Volume Manager’ should appear above the device list; select it and continue. When asked whether you want to keep the current partition layout and configure LVM, select ‘yes’ and continue. Next select ‘Create volume group’ and continue. When asked for a name, we filled in ‘vg00’ and when you have to select the devices for the volume group, select /dev/md1 – this is the RAID1 partition – and continue. A new option labelled ‘Create logical volume’ should have now appeared in the LVM configuration menu; select it and continue. When asked on which VG you want to create the logical volume, select the earlier created volume – vg00 in our example. When prompted for a name, enter swap and use a size of at least twice – preferably more – the size of the systems’ RAM. In our example we used 2GB. Repeat above paragraph for the volumes labelled ‘srv’, ‘home’ and ‘root’ with respective sizes of – in our example – 15GB, 15GB and – all remaining place – 26GB. When you have allocated all partitions, you may want to use the ‘Display configuration details’ to verify the configuration as shown in Figure 4.10. Page 17 of 53 Jan Milants Jonas Pypen – Dennis Vermaut 2/07/2007 20/02/2008 Linux High Availability Cluster Manual Figure 4.10 ‐ Overview LVM configuration When finished, press ‘Continue’. Now all that still needs to be done is creating partitions on the newly created LVs and assign the –still unused – RAID boot partition. Select the only remaining unassigned RAID1 partition and change the ‘Use as’ setting to ‘Ext3 journaling file system’. You should then get a few more options in the partition settings menu; change the ‘Mount point’ option to ‘/boot ‐static files of the boot loader’ and finish setting up the partition. Next select the LV ‘swap’ on the ‘LVM VG vg00’ device and change its ‘Use as’ option to ‘swap area’. Now go through the remaining LVM VG devices, change their file system option to ‘Ext3 journaling file system’ and change the mount point to what there label implies. In our example that means LV ‘home’ will be mounted as ‘/home’, ‘srv’ as ‘/srv’ and ‘root’ as ‘/’. You are now finished partitioning the disks so after going through the partition and device list, you can select ‘Finish partitioning and write changes to disk’ and continue. If prompted whether you want to write the changes to disk, select ‘yes’ and continue. Figure 4.11 below illustrates how the partition table should look after going through the entire process. Of course sizes may vary, and additional VG devices may have been defined. This is just a sample configuration, which should be sufficient for most setups however. Page 18 of 53 Jan Milants Jonas Pypen – Dennis Vermaut 2/07/2007 20/02/2008 Linux High Availability Cluster Manual Figure 4.11 ‐ Layout final partitioning table 4.2.2.6 Setting up users and passwords After the installer finishes creating the partitions, you will be asked to enter the root‐password for the system. Please remember that this password should be hard to guess and not found in any dictionaries. If anyone else has or manages to guess the password, he will have full access to the system! Next you will be asked to enter the user data for another user account which should be used for non‐administrative activities. 4.2.2.7 Configuring the package manager After the installer finishes installing the base system you will be asked whether you want to use a network mirror. Since we have used a netinst CD which only installed the minimal base system, we will have to download all packages we want installed from a network mirror. Select ‘yes’ and continue by selecting the country you are in, or at least from where you want to download the packages. You may also be asked what protocol you want to use to download the packages. In most cases either will work fine, if you are behind an http proxy server however, you should chose ‘http’. If you can’t choose what protocol to use, choose ‘go back’ and choose ‘configure the package manager’ and continue. As a proxy we use ‘http://root:stadia@www‐
cache.stadia.fi:8080’. You might also be asked to select which packages to install – just install the standard system package and the Desktop environment. We will download the rest of the packages through the command line later. By doing it that way, we will only install the packages we need for setting up the cluster. Installing this will take quite some time. Page 19 of 53 Jan Milants Jonas Pypen – Dennis Vermaut 2/07/2007 20/02/2008 Linux High Availability Cluster Manual After the installation completed, you have to set up the XServer configuration. Choose the following video modes: 1280x1024, 1024x768, 800x600 and 640x480. Next we install the GRUB boot loader on the system to the Master Boot Record. This will give us a menu when we boot the system from which we can choose what OS/kernel to boot. Now the installation is complete. Remove the disc and continue. The system will automatically reboot. After the reboot don’t install any updates whatsoever! 4.2.3 Setting up the OS This part is similar for each node in the cluster, however the settings may vary. This manual will give the installation instructions for node 1, to configure node 2, simply replace the node 1 specific configuration directives with those for node 2. We will be doing everything through command line so having a desktop environment installed is no requirement to use this guide. If you have followed this manual, you will probably boot in a Desktop environment, so we need to open a command line first. To do this, click ‘Applications’ in the task bar and choose ‘Accessories Î Root Terminal’. 4.2.3.1 Booting in command line If you chose to install the GNOME graphical desktop environment, Debian will boot into this by default and since the gdm6 loads at most init levels by default in Debian, the links to the startup scripts will have to be changed. We change the rc.d links so that gdm is only started in init level 5. Enter following command as root in a console terminal: # update‐rc.d –f gdm remove # update‐rc.d –f gdm start 20 5 . stop 20 0 1 2 3 4 6 . If you also installed KDE, also enter following command: # update‐rc.d –f kdm remove # update‐rc.d –f kdm start 20 5 . stop 20 0 1 2 3 4 6 . After you have completed this, reboot your computer to test if the changes were succesfull. # reboot Now the system should boot only in command line. To switch to the GUI, you first have to start Gnome: # gdm If you are not automatically switched to the GUI: hit [CTRL] + [ALT] + [F7]. To switch back hit the same combination, but with [F1] to [F6] instead of [F7]. 6
GNOME Display Manager Page 20 of 53 Jan Milants Jonas Pypen – Dennis Vermaut 2/07/2007 20/02/2008 Linux High Availability Cluster Manual 4.2.3.2 Configuring Network Interfaces We will now configure the IPs we will be using for the different nodes in the server. Open /etc/network/interfaces in your favourite text editor (VI/VIM/nano/…) and edit it to look like this: # vi /etc/network/interfaces Note: You also might want to use the <tab> button. It is an easy way to perform the commands faster. Simply type the first couple of letters of the word and then press <tab>. The command line interface will solve the word for you. At that way you do not need to type the whole word over and over again. # This file describes the network interfaces available on your system
# and how to activate them. For more information, see interfaces(5).
# The loopback network interface
auto lo
iface lo inet loopback
# The primary network interface
#allow-hotplug eth0
auto eth0
iface eth0 inet static
address 192.168.182.11
netmask 255.255.255.0
network 192.168.182.0
broadcast 192.168.182.255
gateway 192.168.182.254
# The secondary network interface
auto eth1
iface eth1 inet static
address 192.168.254.1
netmask 255.255.255.0
Then issue this command to restart the network interfaces to apply the changes: # /etc/init.d/networking restart 4.2.3.3 Configuring apt After installing the OS, Debian will when installing new packages still look on the CD‐rom before checking sources on the internet, to disable this behaviour – which is recommended for use on a remotely managed server – follow these instructions: Open /etc/apt/sources.list (with vi or nano or …) and comment out7 the line beginning with deb cdrom:…
7
Commenting out a line in a configuration file can be done by adding ‘#’ in front of that line. Page 21 of 53 Jan Milants Jonas Pypen – Dennis Vermaut 2/07/2007 20/02/2008 Linux High Availability Cluster Manual We also have to change the host file a bit. Because we are using a proxy, we have to add the IP‐
address of this proxy to our host file. # vi /etc/hosts Add the following lines to the file: 193.167.197.35 www‐cache.stadia.fi 192.168.182.11 HAC‐C1N1.ciscolab.stadia.fi HAC‐C1N1 192.168.182.12 HAC‐C1N2.ciscolab.stadia.fi HAC‐C1N2 192.168.254.1 HAC‐C1N1.ciscolab.stadia.fi HAC‐C1N1 192.168.254.2 HAC‐C1N2.ciscolab.stadia.fi HAC‐C1N2 192.168.182.10 HAC‐C1 Next, we check if our resolve file is correct. Open ‘/etc/resolv.conf’: # vi /etc/resolv.conf It should look like this: search ciscolab.stadia.fi nameserver 10.20.16.25 nameserver 10.20.160.252 And then reboot the system. # reboot 4.2.3.4 Installing and Configuring SSH Depending on which packages you selected ssh and sshd8 may not have been installed during the installation. If they have already been installing, no harm is done. If they haven’t been installed yet, they will be downloaded and setup with default configuration. To install ssh client and ssh daemon, type following command: # aptitude install ssh It will ask you whether you want to download and install 2 packages; answer ‘Y’. When the installation is complete, the ssh daemon will have been started and is configured to automatically start during boot. 8
This is the ssh deamon, allowing remote clients to login to the machine through ssh Page 22 of 53 Jan Milants Jonas Pypen – Dennis Vermaut 2/07/2007 20/02/2008 Linux High Availability Cluster Manual By default, Debian will not allow X and agent forwarding, to enable this, open /etc/ssh/ssh_config and uncomment the directives ForwardAgent and ForwardX11 and change them so the end result should look like: Host *
ForwardAgent yes
ForwardX11 yes
Then restart the sshd: # /etc/init.d/ssh restart 4.2.3.5 Installing the Web Server We will be using the apache 2.2.3‐4 web server – which is the latest release for Debian at time of writing. Depending on which packages you selected during install, apache may or may not have been installed. To verify whether it is already installed type following command and look at the “State:” line in the package description. If it says “installed” then you can skip the installation. # aptitude show apache2 | pager Press ‘Q’ to exit the pager. If it is not yet installed – even if installed, this shouldn’t hurt, but it unnecessary – run following command to install the package: # aptitude install apache2 Next we will be adding php5 to this installation: # aptitude install php5 When the installer is finished Apache will be running and configured to automatically start when the system is booted. We also need to set up a second virtual IP address besides loopback. That might be interesting for the Apache web servers. When the web server receives an incoming request, it can direct the request to one of the servers, but it won’t matter which one it is to the user. To do so, we have to give apache the virtual IP‐address. Issue the following commands on both nodes! Open: # vi /etc/apache2/sites‐available/default You have to change some settings so they look like this: Page 23 of 53 Jan Milants Jonas Pypen – Dennis Vermaut 2/07/2007 20/02/2008 Linux High Availability Cluster Manual NameVirtualHost 192.168.182.10 <VirtualHost 192.168.182.10> Afterwards, restart apache2: # /etc/init.d/apache2 restart Then, we have to look how we can automatically add the virtual IP when the system is booted. We will do this by making a file # vi /etc/init.d/local In this file we place the following content: # !/bin/sh /sbin/ifconfig eth0:0 192.168.182.10 Afterwards, we execute the following commands to give the created file more sense: # chmod 755 /etc/init.d/local # update‐rc.d local start 1 2 3 4 5 6 . # mkdir /etc/rc.d/ # ln –s /etc/init.d/local /etc/rc.d/rc.local To let the configuration work, we have to manually restart the nodes. Issue following command: # reboot Page 24 of 53 Jan Milants Jonas Pypen – Dennis Vermaut 2/07/2007 20/02/2008 Linux High Availability Cluster Manual 4.3 Installing the Cluster 4.3.1 Introduction We will first be installing the programs used to keep track of the availability of the resources in the cluster. 4.3.2
General OS settings 4.3.2.1 NTP To keep the time on our server synced to UTC9 we will use the Network Time Protocol (NTP) through a client that syncs the time on boot and after that does regular small corrections if needed. To install the NTP client, execute following command: # aptitude install ntp ntpdate The program will automatically run, but since large corrections are only made during boot – to prevent interfering with other system services – it is recommended to reboot after executing this command. If you want to use a specific NTP server, open ‘/etc/ntp.conf’ and add the following: server my-server.domain.ext prefer
4.3.3
Heartbeat 4.3.3.1 Introduction Heartbeat is a cluster management program that allows servers to be joined into a cluster relatively easily and share one common virtual IP. Since the release of version 2, heartbeat also supports an unlimited amount of nodes in each cluster, resource monitoring and policy‐ and time‐based resource management. The version supplied by Debian may not be the latest version supplied by the Heartbeat development crew, but to keep installation and updating as easy as possible, we will use the Debian Package Manager to install the software and manage the updates as they are released. 4.3.3.2 Installation To install the heartbeat program issue following command: # aptitude install heartbeat‐2 This needs to be done on both servers! 9
UTC: Coordinated Universal Time Page 25 of 53 Jan Milants Jonas Pypen – Dennis Vermaut 2/07/2007 20/02/2008 Linux High Availability Cluster Manual It is normal to see an error at the end like the one below, because we haven't yet configured heartbeat: Setting up heartbeat-2 (2.0.3-2) ...
Heartbeat not configured: /etc/ha.d/ha.cf not found.
Heartbeat failure [rc=1]. Failed.
Finally, copy the example configuration files from the documentation directory to the configuration directory by issuing following sequence of commands: # cd /usr/share/doc/heartbeat‐2/ # cp ha_logd.cf /etc/logd.cf # cp authkeys /etc/ha.d # gzip –d ha.cf.gz # cp ha.cf /etc/ha.d This only needs to be done on one server – the one we will be creating the configuration files on – and will then be copied to the second one after configuration is complete. 4.3.3.3 Configuration We need to edit 3 files to setup a working heartbeat configuration. We will begin with making an “authkeys” file which is used to verify nodes are actually part of the cluster. Therefore the file must always be unreadable to everyone but administrators. If someone gains access to this file, he can setup a server to break into the cluster. We will start with the authorization file. Open /etc/ha.d/authkeys. You will see the following near the end of the file. #auth 1
#1 crc
#2 sha1 HI!
#3 md5 Hello!
Simply uncomment the lines containing ‘auth’ & ‘sha1’ and change the sha1 key ‘HI!’ to a randomly chosen string. Change the auth value to the chosen security. You can also opt to use the ‘md5’ authentication method, or, but not recommended, the ‘crc’ method which does not add security, only packet corruption checking. auth 2
#1 crc
2 sha1 No one should ever get his hands on this file or string!
#3 md5 Hello!
Next make sure the authkeys‐file is unreadable for other users: # chmod 600 /etc/ha.d/authkeys Page 26 of 53 Jan Milants Jonas Pypen – Dennis Vermaut 2/07/2007 20/02/2008 Linux High Availability Cluster Manual Next, open /etc/ha.d/ha.cf and make sure following directives are configured as shown: use_logd yes
crm on
deadtime 10
warntime 5
initdead 120
bcast eth1
auto_failback off
node HAC-C1N1 HAC-C1N2
Directive overview: •
•
•
•
•
•
•
•
‘use_logd’ sets whether or not to enable heartbeat logging daemon ‘crm’ refers to Cluster Resource Management and tells heartbeat we will be using a configuration file made for version 2. ‘deatime’ after how much time without a response is a node considered dead. ‘warntime’ after how much time do we write a notice in the logs ‘initdead’ how long after start‐up should we wait before acting on seemingly dead servers. This is required because the network doesn’t always go up right away. ‘bcast’ sets the interface to broadcast heartbeat packets on. In our setup this is the second interface, however if the server has only one network interface, this can be eth0. ‘node’ is used to list all servers in the cluster. ‘auto_failback’ determines whether we automatically switch back to the primary server when it comes back online. Check that the directives have also been uncommented! There will be many more directives in the sample configuration file, but you can leave them on their default value. Read through them if you want to personalise your setup further. Finally, open /etc/logd.cf and modify it so that the ‘logfacility’ directive is uncommented and set to ‘daemon’. logfacility daemon
This will make sure the heartbeat log messages are written to the normal place for your system; this is typically /var/log/messages. Now we have configured the first node, we simply have to copy the configuration from the first node to the second one. Issue following commands – you may have to replace the hostname: # cd /etc # scp logd.cf root@HAC‐C1N2:/etc # scp ha.d/authkeys ha.d/ha.cf root@HAC‐C1N2:/etc/ha.d Page 27 of 53 Jan Milants Jonas Pypen – Dennis Vermaut 2/07/2007 20/02/2008 Linux High Availability Cluster Manual If the system ask to store the fingerprint, confirm with ‘yes’ (without ‘). After configuring the node, we have to configure the cluster resources we want heartbeat to monitor. The only resource we will instruct heartbeat to monitor in our setup is the clusters’ IP address. All other resources (Apache, MySQL …) will be running continuously on both nodes. This will decrease the time required for the failover, and also allow us to use the services (for example apache) without the high availability provisions. Since we have configured heartbeat to use CRM, we have to use the complicated version 2 structure configuration file. The easiest way to create this without using the graphical client is creating a version 1 configuration file and converting it to a version 2 file using a script provided by the heartbeat package. Note that we have to do these steps on both nodes! Create a file called “/tmp/haresources.temp” (using vi, nano, …) and configure it similar to the following (this is the same on both nodes!): hac-c1n1 192.168.182.10/24/eth0
This instructs heartbeat to monitor the IP resource ‘192.168.182.10/24’ on eth0 and sets HAC‐
C1N1 as its default node. Now convert this file to the version 2 configuration file with following command: # python /usr/lib/heartbeat/haresources2cib.py /tmp/haresources.temp Now the configuration file should have been generated, but we still have to change a few options. Open the CRM configuration file of heartbeat which is located at ‘/var/lib/heartbeat/crm/cib.xml’. Open the file and make sure following lines are present and set to their appropriate values: <nvpair id=”cib-bootstrap-options-default_resource_stickiness”
name=”default_resource_stickiness” value=”0” />
Legend: •
‘default_resource_stickiness’: determines whether the resources will automatically fail back the original (or any other better node) when it becomes available. In the above sample the IDs are shown as they are generated by the configuration file generator, however ‐ if preferred ‐ the IDs can be renamed to something shorter on the condition they remain unique. Page 28 of 53 Jan Milants Jonas Pypen – Dennis Vermaut 2/07/2007 20/02/2008 Linux High Availability Cluster Manual 4.3.3.4 Starting and stopping heartbeat While heartbeat will usually start automatically when the servers start‐up, it may be necessary to shut them down or (re)start then manually, for example during updates and now after changing the configuration. To start heartbeat: # /etc/init.d/heartbeat start To stop heartbeat: # /etc/init.d/heartbeat stop 4.3.4
csync2 4.3.4.1 Introduction This is a tool which makes use of the rsync‐algorithm to synchronize files and directories in a cluster. It uses asynchronous synchronization so is not particularly suited for systems where the contents changes continuously, however the use of a database to store information about the file systems does limit the time needed to synchronize the servers significantly. 4.3.4.2 Installation Execute following command on both nodes: # aptitude install csync2 For the secured connections between the csync2 nodes, we will need a local SSL certificate. To generate one, execute following commands on both nodes: # openssl genrsa ‐out /etc/csync2_ssl_key.pem 1024 # openssl req ‐batch ‐new ‐key /etc/csync2_ssl_key.pem ‐out /etc/csync2_ssl_cert.csr # openssl x509 ‐req ‐days 600 ‐in /etc/csync2_ssl_cert.csr ‐signkey /etc/csync2_ssl_key.pem ‐out /etc/csync2_ssl_cert.pem 4.3.4.3 Configuration First we have to generate a key that will be used by the resource group for authentication and copy it to all other servers in the cluster – in our case just one. To do this, enter following commands: # csync2 –k /etc/csync2.key.linuxCluster # scp /etc/csync2.key.linuxCluster root@HAC‐C1N2:/etc Page 29 of 53 Jan Milants Jonas Pypen – Dennis Vermaut 2/07/2007 20/02/2008 Linux High Availability Cluster Manual Now we have to define which resources are parts of the group. In our case we will synchronize the home directories and the apache configuration between node 1 and 2. Open the /etc/csync2.cfg file and add the following (EXACTLY!): group linuxCluster
{
host hac-c1n1 hac-c1n2;
key /etc/csync2.key.linuxCluster;
include
include
include
exclude
include
exclude
/home;
/var/www;
/srv;
/srv/mysql-cluster;
/etc/apache2;
/etc/apache2/local.conf;
action
{
pattern /etc/apache2/*;
exec "/usr/sbin/apache2ctl graceful";
logfile "/var/log/csync2.actions.log";
do-local;
}
auto younger;
} Note that if you want to use partially different configuration settings for apache on one of the nodes, it is recommended to make these changes in a separate file, for example “local.conf”, and include this file into the apache configuration with the following statement: Include /etc/apache2/local.conf
So now we will create this file (empty) and include it. To include the open ‘/etc/apache2/apache2.conf’ and add the above include statement at the bottom of the file. This file is in the example configuration already excluded from being synchronized by csync2 through the following directive in csync2.cfg: exclude /etc/apache2/local.conf
If you want to use an entirely different web server configuration, simply remove the include statement for apache, as well as the action statement. Finally, copy the configurations file to the second node with following command: # scp /etc/csync2.cfg root@HAC‐C1N2:/etc # scp /etc/apache2/apache2.conf root@HAC‐C1N2:/etc/apache2 # scp /etc/apache2/local.conf root@HAC‐C1N2:/etc/apache2 Page 30 of 53 Jan Milants Jonas Pypen – Dennis Vermaut 2/07/2007 20/02/2008 Linux High Availability Cluster Manual Once you have done this, you will also have to restart Apache and Inetd on both nodes: # /etc/init.d/openbsd‐inetd restart # /etc/init.d/apache2 restart 4.3.4.4 Running csync2 To manually trigger synchronization of remote systems to the local one, execute following command: # csync2 ‐xv Note that when executed for the first time, it has to create the database of all files; this may take a while depending of the number of files. To automatically run csync2 at a certain interval, we will add it to crontab. Execute following command to open the crontab editor. # crontab ‐e Then add following statement to the file and save and exit: * 3 * * * /usr/sbin/csync2 -x
Do this on all nodes in the cluster. 4.3.5
Apache Web Server 4.3.5.1 Installation To install the apache web server on your system, type following command: # aptitude install apache2 # aptitude install libapache2‐mod‐perl2 Type in ‘yes’ (without ‘) to allow not trusted packages if necessary. 4.3.5.2 Configuration The configuration of the Apache web server does not differ from the configuration of a normal installation and will not be handled here since this is not directly related to the cluster and differs greatly upon the purpose of your setup. You should however add the Perl extension to the handler: # vi /etc/apache2/apache2.conf Add the end of the file add ‘AddHandler cgi‐script .pl .cgi’ (without ‘) and save the file. Page 31 of 53 Jan Milants Jonas Pypen – Dennis Vermaut 2/07/2007 20/02/2008 Linux High Availability Cluster Manual Also note that for each website you want to enable Perl support for you have to add this lines to the file: <Directory /directory/to/site> Options +ExecCGI AddHandler cgi‐script .cgi .pl </Directory> Next restart Apache: # /etc/init.d/apache2 restart Note that node specific configurations of the web server should be made in ‘local.conf’ since all other files in the configuration directory are automatically being synchronized by csync2. 4.3.6
MySQL Server 4.3.6.1 Introduction We will be using a MySQL Cluster with 2 nodes. The number of nodes can be changed depending on your setup, but a recommended minimum is 3. For logistical reasons, this manual will be using a setup with only 2 machines, however if you have a third machine available, it is highly recommended to use it! The MySQL cluster has 3 main parts: •
•
•
First is the NDB Management Server. This should ideally run on a separate server and can theoretically be shut down as soon as the server is started. This is however not recommended since it will have to be restarted each time you want to administer the cluster. The second part is NDB. This is a data node that stores the database in memory. In our cluster, both servers will be running an NDB node. The third part is the MySQL node, this is a regular MySQL server configured to process the clients’ queries which will on its turn query the NDB nodes that keep the entire database in memory. Note that because of that last part, the RAM available in the servers should be checked to make sure it s sufficient. The following formula can be used to determine the amount of memory required by the SQL storage nodes: (DB size * Number of Replicas * 1.1) / Number of Storage Nodes
In this formula the ‘DB size’ is the total size of the MySQL database, the ‘Number of Replicas’ refers to the amount of copies you want to store of a specific piece of data and ‘Number of Storage Nodes’ refers to the number of NDBs you have on your setup. We use 2, however the Page 32 of 53 Jan Milants Jonas Pypen – Dennis Vermaut 2/07/2007 20/02/2008 Linux High Availability Cluster Manual more, the better. It is however recommended to increment the number of Storage Nodes in steps of 2. 4.3.6.2 Installation When installing the MySQL Server through the Debian packaging system, all required components are automatically installed. If you are compiling it yourself, you should use the ‘Full’ package. To install the MySQL Server type: # aptitude install mysql‐server‐5.0 This has to be done on all servers, including the one running the NDB Management Server. Now we will set a default password for the root user. Issue following command: # mysql > use mysql; > update user set Password = PASSWORD(‘stadia’) where User=’root’; > exit; This should alter 2 rows. 4.3.6.3 Configuration Before beginning with the confirmation, make sure MySQL is not running on either of the nodes. Execute following commands if you are not sure: # /etc/init.d/mysql stop # /etc/init.d/mysql‐ndb stop # /etc/init.d/mysql‐ndb‐mgm stop First we will configure the Management Server (first node). Make the directory /usr/local/mysql/cluster # cd /usr/local # mkdir mysql # cd mysql # mkdir cluster and put a cluster.cnf file in it # vi /usr/local/mysql/cluster/cluster.cnf Page 33 of 53 Jan Milants Jonas Pypen – Dennis Vermaut 2/07/2007 20/02/2008 Linux High Availability Cluster Manual Make the configuration similar to the following: # Management Node
[NDB_MGMD]
Id=1
HostName=192.168.254.1
DataDir=/usr/local/mysql/cluster/
# Data Nodes, Defaults
[NDBD DEFAULT]
NoOfReplicas=2
DataMemory=256MB
IndexMemory=128MB
DataDir=/usr/local/mysql/cluster/
# Data Node #1
[NDBD]
Id=2
HostName=192.168.254.1
# Data Node #2
[NDBD]
Id=3
HostName=192.168.254.2
# MySQL Daemon Nodes (one tag per server)
[MYSQLD]
Id=4
HostName=192.168.254.1
[MYSQLD]
Id=5
HostName=192.168.252.2
We will have to make the exact copy of the cluster.cnf file. We do this by making the same directories on the second cluster (see above) and by copying the cluster.cnf file from the first to the second node. Issue the following command: # scp /usr/local/mysql/cluster/cluster.cnf root@HAC‐
C2N2:/usr/local/mysql/cluster/ Next we will configure the NDB Storage Nodes. It will make your MySQL daemon enable the cluster storage engine, tell the management node where to find the configuration file and let all other nodes know where to find the management node. Open ‘/etc/mysql/my.cnf’: # vi /etc/mysql/my.cnf Make sure the directives in the configuration match the following (do this on both nodes): Page 34 of 53 Jan Milants Jonas Pypen – Dennis Vermaut 2/07/2007 20/02/2008 Linux High Availability Cluster Manual [mysqld]
…
ndbcluster
ndb-connectstring=192.168.254.1
default-storage-engine = NDBCLUSTER # only if you want ndb as default!
…
bind-address
= 0.0.0.0
…
[mysql_cluster]
ndb-connectstring
= 192.168.254.1
[ndb_mgmd]
config-file=/usr/local/mysql/cluster/cluster.cnf
The IPs in above directives are the IPs of the NDB Management Server, change them if required. Also make sure that the directives are uncommented and that you may have to add some. Directives not listed here do not need to be changed. Some directives may not be present in the configuration file, if this is the case add them. It is a good idea to reboot the first node now and shutdown the second. # reboot # shutdown –h now 4.3.6.4 Starting the MySQL Cluster First, we reboot the first cluster and start the management server, on the 1st server only. # ndb_mgmd This will give a warning, but that’s okay. The management server is now running and waits for other nodes to connect. So right now, we boot the second server as well and we will start the data nodes (both nodes). Since we set up the cluster the very first time, we must use the ‐‐
initial option. If you later on start a data node, you can omit this option. Keep in mind that we configured two data nodes, so we have to execute the ndbd program twice, once on both nodes: # /etc/init.d/mysql‐ndb start # ndbd ‐‐initial # /etc/init.d/mysql start Now, we have to run the management client to see what‘s going on. Run the SHOW command here now once in a while to get a status report: Page 35 of 53 Jan Milants Jonas Pypen – Dennis Vermaut 2/07/2007 20/02/2008 Linux High Availability Cluster Manual # ndb_mgm ndb_mgm> show; This will show the configuration and status of the resources configured in the MySQL cluster and should look similar to this: Connected to Management Server at: 192.168.254.1:1186
Cluster Configuration
--------------------[ndbd(NDB)]
2 node(s)
id=2
@192.168.254.1 (Version: 5.0.32, Nodegroup: 0, Master)
id=3
@192.168.254.2 (Version: 5.0.32, Nodegroup: 0)
[ndb_mgmd(MGM)] 1 node(s)
id=1
@192.168.254.1 (Version: 5.0.32)
[mysqld(API)]
2 node(s)
id=4
@192.168.254.1 (Version: 5.0.32)
id=5
@192.168.254.2 (Version: 5.0.32)
You might want to wait a while before issuing the ‘show’ command. It takes a while to register everything correctly! If nothing shows up, you might want to restart the servers. First the first one completely, then the second one. To exit the ndb command line, type: ndb_mgm> exit; 4.3.6.5 Remarks For a database to be available on the different MySQLd, it has to be ‐ manually ‐ created on each node. It is possible to write a script that automatically synchronizes the existing databases, but since the problem of rights regarding that database will still exist, it may be recommended to do this manually. It is also important to remember that only databases which use the ‘NDB’ engine can be distributed throughout the cluster. The NDB engine is more performant and has more features then the MyISAM database engine, but still lacks some features available in the InnoDB engine. Page 36 of 53 Jan Milants Jonas Pypen – Dennis Vermaut 2/07/2007 20/02/2008 Linux High Availability Cluster Manual 4.4 Verifying Installation 4.4.1 Introduction The following chapters will provide you with a few ways to verify your installation and configuration was successful. The given example outputs may differ from what you get on several points, depending on your setup, however it should still provide you with a general idea about your systems’ status. 4.4.2 Heartbeat To verify the operation of heartbeat, execute following command: # crm_mon –i5 Use Control + ‘C’ to exit… This will show the status of all heartbeat resources and in our – simple – setup should look like this: Refresh in 5s...
============
Last updated: Mon Jun 11 15:35:24 2007
Current DC: hac-c1n2 (0b826c02-0ba5-421d-b8d4-47d74b3c8b0e)
2 Nodes configured.
1 Resources configured.
============
Node: hac-c1n1 (08c75e00-af78-4b37-a68c-81607bcf5dd3): online
Node: hac-c1n2 (0b826c02-0ba5-421d-b8d4-47d74b3c8b0e): online
IPaddr_192_168_182_10
c1n1
(heartbeat::ocf:IPaddr):
Started hac-
Page 37 of 53 Jan Milants Jonas Pypen – Dennis Vermaut 2/07/2007 20/02/2008 Linux High Availability Cluster 5
5.1
Manual Monitoring Introduction There are several tools available to monitor the cluster. Though the cluster will run fully automatically, it may be useful to ‐ under certain circumstances – be able to verify where which resources are running. 5.2 Heartbeat To view the status of the Heartbeat resources in the cluster, execute following command: # crm_mon –i5 5.3
Ganglia 5.3.1 Introduction Ganglia is a scalable distributed monitoring system for high‐performance computing systems such as clusters and Grids. It is based on a hierarchical design targeted at federations of clusters. It leverages widely used technologies such as XML for data representation, XDR for compact, portable data transport, and RRDtool for data storage and visualization. It uses carefully engineered data structures and algorithms to achieve very low per‐node overheads and high concurrency. The implementation is robust, has been ported to an extensive set of operating systems and processor architectures, and is currently in use on thousands of clusters around the world. It has been used to link clusters across university campuses and around the world and can scale to handle clusters with 2000 nodes. Ganglia is an open‐source project that grew out of the University of California. 5.3.2 Installation This installation will be done on the 2nd cluster, since this is an update of the documentation. Of course you can do exactly the same on the 1st cluster, but change the IP’s then! Download the .tar file from the internet (http://ganglia.sourceforge.net). There, we have a problem in the lab. The private network within the Stadia‐environment only allows us to download ftp, unless we set up a proxy. So, there we have to come up with another solution. We have to download the file to an USB stick on another PC which has regular access to the internet (or wireless). Afterwards, plug the USB stick into the first server. Wait until the server recognises the USB stick. Debian will tell you what device it is (/dev/sd..) Make a directory where we can mount the USB device: # mkdir /tmp/usb Next, we have to mount the USB device to that folder. Issue the following command: # mount /dev/sda1 /tmp/usb Paste the contents of the USB device to the ganglia folder. Issue following command to make the ganglia folder (do this on both nodes): Page 38 of 53 Jan Milants 2/07/2007 Jonas Pypen – Dennis Vermaut 20/02/2008 Linux High Availability Cluster Manual # mkdir /tmp/ganglia and now paste the contents to it: # scp –r /tmp/usb/ganglia‐3.0.6.tar.gz /tmp/ganglia Unmount the USB device. Issue the following command: # umount /dev/sda1 You can now safely remove the USB device. Next copy the file to the second device: # scp –r /tmp/ganglia root@HAC‐C1N2:/tmp/ganglia Now we have to download some programs used for compiling the software and to be able to run ganglia, issue the following commands on both nodes: # aptitude install make # aptitude install gcc # aptitude install g++ # aptitude install gmetad # aptitude install rrdtool Make sure you are in the folder /tmp/ganglia! Now we have to unzip the package on both nodes: # tar xzvf ganglia‐3.0.6.tar.gz # cd ganglia‐3.0.6 Afterwards, we compile the installation package on both nodes: # ./configure # make # make install Issue the following commands to setup the default configuration file and to test the file and the daemon. # gmond ‐‐default_config > /etc/gmond.conf # gmond To test the configuration, you can issue the following command. If everything was properly installed, you should receive an XML file/output: # telnet localhost 8649 Page 39 of 53 Jan Milants Jonas Pypen – Dennis Vermaut 2/07/2007 20/02/2008 Linux High Availability Cluster Manual To be able to start gmond on startup, we have to place an init file in /etc/init.d/ Issue following command: # cp /etc/init.d/gmetad /etc/init.d/gmond We still have to edit this file, so that it would work with gmond. # vi /etc/init.d/gmond In this file, change the initial variables like the ones showed below: DAEMON = /usr/sbin/gmond NAME = GMOND DESC= “Ganglia” and save the file! To ensure start‐up at boot time, issue the next command: # update‐rc.d gmond defaults 5.3.3 Configuration We will set up Ganglia in the way that the first server will monitor and the second server will be like a client. Watch out! Both servers will be monitored, but we will only ask the first server to give out information... Note that the automatically generated configuration for gmond uses multicast. We will provide sample documentation for the unicast configuration. We will only provide a partial configuration, including only what had to be changed. First make the default configuration file by issuing this command: # gmond ‐‐default_config > /etc/gmond.conf. For the nodes being monitored: globals { daemonize = yes setuid = yes user = ganglia debug_level = 0 max_udp_msg_len = 1472 mute = no deaf = no host_dmax = 0 /*secs */ cleanup_threshold = 300 /*secs */ gexec = yes } Page 40 of 53 Jan Milants Jonas Pypen – Dennis Vermaut 2/07/2007 20/02/2008 Linux High Availability Cluster Manual cluster { name = "HAC‐C2" owner = "Stadia" } host { location = "ServerRoom5fl" } udp_send_channel { mcast_join=239.2.11.71 port = 8649 ttl = 1 } udp_recv_channel { mcast_join=239.2.11.71 port = 8649 bind= 239.2.11.71 } tcp_accept_channel { port = 8649 } /* continues .... */ For the hosts collecting the information (not being monitored in this case): globals { daemonize = yes setuid = yes user = ganglia debug_level = 0 max_udp_msg_len = 9600 mute = no deaf = no host_dmax = 3600 /*secs */ cleanup_threshold = 300 /*secs */ gexec = yes } cluster { name = "HAC‐C2" owner = "Stadia" } Page 41 of 53 Jan Milants Jonas Pypen – Dennis Vermaut 2/07/2007 20/02/2008 Linux High Availability Cluster Manual /* The host section describes attributes of the host, like the location */ host { location = " ServerRoom5fl " } /* We are not sending this information to other hosts.*/ udp_send_channel { mcast_join=239.2.11.71 port = 8649 ttl = 1 } udp_recv_channel { mcast_join=239.2.11.71 port = 8649 bind= 239.2.11.71 } /* You can specify as many tcp_accept_channels as you like to share an xml description of the state of the cluster */ tcp_accept_channel { port = 8649 } /* continues .... */ Please restart the Ganglia services by issuing the following commands on both nodes: # /etc/init.d/ganglia restart Next, we have to change a little setting to gmetad. To edit the file issue following command: # vi /etc/gmetad.conf Find the line defining data_source and change it to this: data_source “HAC‐C2” 192.168.182.16 192.168.182.17 Save this settings and restart gmetad by issuing the following command: # /etc/init.d/gmetad restart To test the configuration, enter the following URL on a desktop pc within the same network: http://192.168.182.15/ganglia The output should look similar to the following: Page 42 of 53 Jan Milants Jonas Pypen – Dennis Vermaut 2/07/2007 20/02/2008 Linux High Availability Cluster Manual Figure 5‐1 ‐ General view Ganglia Figure 5‐2 ‐ Detail view Ganglia Page 43 of 53 Jan Milants Jonas Pypen – Dennis Vermaut 2/07/2007 20/02/2008 Linux High Availability Cluster Manual 5.4 PHPSysInfo 5.4.1 Introduction PHPSysInfo is a customizable PHP Script that parses /proc, and formats information nicely. It will display information about system facts like Uptime, CPU, Memory, PCI devices, SCSI devices, IDE devices, Network adapters, Disk usage, and more. 5.4.2 Installation Installing this script is real easy. Just issue following command: # aptitude install phpsysinfo Aptitude will setup everything for you the way it should. You now have a new ‘website’ available onder /var/www as well. It’s called ‘phpsysinfo’. 5.4.3 Example In this next image you can see what PHPSysInfo tells us about one of the servers in the second cluster. Figuur 5‐3 ‐ PHPSysInfo Page 44 of 53 Jan Milants Jonas Pypen – Dennis Vermaut 2/07/2007 20/02/2008 Linux High Availability Cluster Manual 5.5 AWStats 5.5.1 Introduction AWStats is a free powerful and featureful tool that generates advanced web, streaming, ftp or mail server statistics, graphically. This log analyzer works as a CGI or from command line and shows you all possible information your log contains, in few graphical web pages. It uses a partial information file to be able to process large log files, often and quickly. It can analyze log files from all major server tools like Apache log files (NCSA combined/XLF/ELF log format or common/CLF log format), WebStar, IIS (W3C log format) and a lot of other web, proxy, wap, streaming servers, mail servers and some ftp servers. 5.5.2 Installation and configuration We start the process by installing the package itself. We do this by issuing following command: # aptitude install awstats Next we have to set up the package for each domain we want to monitor: # cd /usr/share/doc/awstats/examples # mkdir wwwroot # cd wwwroot # mkdir cgi‐bin # cd ../ # gunzip awstats.model.conf.gz # mv awstats.model.conf wwwroot/cgi‐bin # perl awstats_configure.pl Confirm with [y] and fill in all required questions and know what your website root is. This should be /etc/apache2/httpd.conf. Remember what domain name you chose! For overall statistics: choose localhost. This setup should have altered your /etc/apache2/httpd.conf. Open it with: # vi /etc/apache2/httpd.conf Extend it so it looks like this: Alias /awstats‐icon/ /usr/share/awstats/icon/ <Directory /usr/share/awstats/icon> Options None AllowOverride None Order allow,deny Allow from all </Directory> Now we have to restart Apache: # /etc/init.d/apache2 restart Page 45 of 53 Jan Milants Jonas Pypen – Dennis Vermaut 2/07/2007 20/02/2008 Linux High Availability Cluster Manual Edit the configuration file you just created to have LogFormat=1. Subsitute chosendomainname with your chosen name: # vi /etc/awstats/awstasts.chosendomainname.conf We make AWStats read Apache logs: # chmod o+r /var/log/apache2/access.log We start the monitoring by issuing the following command (don’t forget to substitute again): # /usr/lib/cgi‐bin/awstats.pl –config=awstats.chosendomainname.conf If you have issues starting up, check /etc/awstats/awstats.conf for SiteDomain and LogFile if they are correct! Next we set up a cron job for AWStats: # crontab –e Add the following line to the file: 3,33 * * * * www‐data [ ‐x /usr/lib/cgi‐bin/awstats.pl ‐a ‐f /etc/awstats/awstats.conf ‐
a ‐r /var/log/apache2/access.log ] && /usr/lib/cgi‐bin/awstats.pl ‐config=full‐
domain‐name ‐update >/dev/null Save this and your all set. You can get the information by browsing to http://chosendomainname/cgi‐bin/awstats.pl?config=chosendomainname. This should look something like this: Figure 5.4 ‐ AWStats Page 46 of 53 Jan Milants Jonas Pypen – Dennis Vermaut 2/07/2007 20/02/2008 Linux High Availability Cluster Manual Maintenance 5.6 Introduction This setup has been designed to be easily maintainable, even for people with little experience with Linux and clusters in general. Because we have used the Debian Package Management system, there should never be a need to manually install and compile new versions of individual packages or keep track of their dependencies. If a server goes offline and is restarted later, the system is designed to automatically synchronize the directories and switch resources back to the original node. Since the MySQL databases that use the NDB engine run on the cluster, the newly started server will immediately replicate all changes that have been made to the databases. 5.7 Updating/upgrading the system To keep the system updated, execute following commands when logged in as root: # aptitude update # aptitude upgrade This will perform a so called ‘safe’ update which means that existing packages will be updated if updates are available, but not packages will ever be installed or uninstalled. To perform an upgrade of the entire distribution, execute following commands: # aptitude update # aptitude dist‐upgrade If ‘aptitude’ is executed without any parameters, it will enter the interactive mode which provides an overview of all available packages. 5.8 IP‐Addresses When moving the servers to a new IP range the IPs configured on both nodes need to be changed on a few places. The cluster IP only needs to be changed on 2 places on each node: in the ‘/etc/hosts’ file and in the heartbeat CRM configuration file ‘/var/lib/heartbeat/crm/cib.xml’. The nodes’ IP addresses only need to be changed in ‘/etc/hosts’ which is automatically adopted by the rest of the system. And of course the node also needs to be told to listen on another IP in the network interface configuration ‘/etc/network/interfaces’. Since the direct connection between the 2 nodes is a direct link, there should never be the need to change their addressing scheme. Page 47 of 53 Jan Milants Jonas Pypen – Dennis Vermaut 2/07/2007 20/02/2008 Linux High Availability Cluster Manual 6 Installation of a Powerware 5115 UPS for a High Availability Cluster 6.1
Introduction To make sure that the servers can shutdown in a proper way during a power failure, you can use an Interruptible Power Supply (UPS). This device delivers for a limited amount of time enough power to make sure that both servers can shutdown. This instruction manual is specifically for the setup of a Powerware 5115 – UPS. 6.2 Installation of the software To make the servers connect to the X‐slot Web/SNMP Card, you need to install a SNMP client on both servers. This client checks on a regular basis the status of the UPS. When there is a power failure, the client waits a configured amount of time, and then triggers a shutdown‐
script. This installation should be done on all servers that are physically connected to the UPS. To install this software, you can download it from the website from Powerware (http://www.powerware.com) Change the working directory to the temporary directory and make a working directory (e.g. Netwatch). Do this on both nodes! # cd /tmp # mkdir netwatch Next, download the tar file from the internet. There, we have a problem in the lab. The private network within the Stadia‐environment only allows us to download ftp. So, there we have to come up with another solution. We have to download the file to a USB stick on another PC which has regular access to the internet. Afterwards, plug the USB stick into the first server. Wait until the server recognises the USB stick. Debian will tell you what device it is (/dev/sd..) While issuing the following commands, make sure you’re in the /tmp/netwatch directory! Make a directory where we can mount the USB device: # mkdir tmp/usb Next, we have to mount the USB device to that folder. Issue following command: # mount /dev/sda1 /tmp/usb Paste the contents of the USB device to the netwatch folder. Issue following command: # scp –r /tmp/usb /tmp/netwatch Page 48 of 53 Jan Milants Jonas Pypen – Dennis Vermaut 2/07/2007 20/02/2008 Linux High Availability Cluster Manual Unmount the USB device by issuing the following command: # umount /dev/sda1 In order to make our UPS work correctly, we have to copy the software of the 1st server to the 2nd server: Issue the following command: # scp –r /tmp/netwatch root@HAC‐C1N2:/tmp/netwatch Unzip the file, using the tar command (do this on both nodes): # tar –xvf NetWatch_411_unix.tar Rename the tar file to lower case (do this on both nodes): # mv NetWatch_411_unix.tar netwatch_411_unix.tar Start the installation of the netwatch‐client (do this on both nodes): # ./install.sh Confirm the installation (do this on both nodes): [y], [Enter] Confirm automatic start up (do this on both nodes): [y], [Enter] Confirm the parameters (do this on both nodes): [y], [Enter] Now, the software is installed. You can go on with the configuration (do this on both nodes). This is started automatically. Go to the network settings: [2], [Enter] Enter the correct IP‐address of the X‐slot Web/SNMP Card: 192.168.182.20, [Enter] The service is now detecting the X‐slot Web/SNMP Card information Page 49 of 53 Jan Milants Jonas Pypen – Dennis Vermaut 2/07/2007 20/02/2008 Linux High Availability Cluster Manual Type the number of the load‐segment to which your server is connected. You can determine this on the backside of the server. The left two connectors are in the 1st segment, the two connectors on the right‐hand side are in the 2nd segment. The backside of the UPS [1] or [2] (depending on your load segment), [Enter] Make sure all parameters are correct! Change the shutdown‐type to ‘Time on battery’ Go to the shutdown‐type setting [1], [Enter] Change it to time on Battery. By default it waits five minutes to shutdown. This should be enough. [1], [Enter] When everything is correct, save the information and exit. [5], [Enter] [y], [Enter] [0], [Enter] The service will be started automatically. When you want to access the configuration, you can start the configuration utility: # /usr/Powerware/NetWatch/netwatch ‐i Page 50 of 53 Jan Milants Jonas Pypen – Dennis Vermaut 2/07/2007 20/02/2008 Linux High Availability Cluster Manual 6.3 Configure the shutdown‐script In order to avoid problems with the replication and the handover‐system, you need to change the shutdown‐script of the NetWatch‐client on both servers. On HAC‐C1N1: Edit the NetWatch‐client shutdown script: # vi /usr/Powerware/NetWatch/shutdown.sh Search for the Linux section that looks like this: )linux echo $message | /usr/bin/wall cd / /sbin/shutdown –h now </dev/console shutdownstatus=$? ;; Insert the following lines between the ‘cd /’ and the ‘/sbin/shutdown –h now </dev/console’ lines: /etc/init.d/mon stop /etc/init.d/heartbeat stop Save the file and exit. On HAC‐C1N2: Edit the same shutdown script, scroll to the Linux section and add the following line between the cd / and the /sbin/shutdown –h now </dev/console: /etc/init.d/heartbeat stop Save the file and exit ! Page 51 of 53 Jan Milants Jonas Pypen – Dennis Vermaut 2/07/2007 20/02/2008 Linux High Availability Cluster Manual 6.4 Automatically starting the MySQL management server after power failure After a power failure has occurred, every mysql service should start working again by itself. Although, the management server does not start up automatically after power failure. That’s why we have to tell him to start up automatically. We can do this by issuing the following commands: # echo ndb_mgmd ‐f /usr/local/mysql/cluster/cluster.cnf > /etc/init.d/ndb_mgmd # chmod 755 /etc/init.d/ndb_mgmd # update‐rc.d ndb_mgmd defaults Now the servers are configured to shutdown properly in case of a power failure. Page 52 of 53 Jan Milants Jonas Pypen – Dennis Vermaut 2/07/2007 20/02/2008 Linux High Availability Cluster 7
Manual Configuring SMTP mail service In order for our cluster to use the mailing services in PHP correctly (using a remote mail server) we have to do some adjustments. 7.1
Installing exim Exim is an open source mail transfer agent, which is commonly used on Linux/Unix systems. It is freely available under the terms of the GNU General Public License. It is very flexible in the way mail can be routed. Furthermore exim can be used as a replacement for the common used sendmail. The next steps have to be done on each server in the cluster! To install exim: # aptitude install exim Make sure you confirm the installation and when asked, choose ‘Satellite system’. Use the default name and mails will be read from ns2.stadia.fi in our case. The satellite is also ns2.stadia.fi. Enter ‘none’ (without ‘) for system administrator mail. Choose [y] to replace the aliases file. Save this configuration with [y]. 7.2 Configuration Now we have to make sure our PHP settings point to this service, so the service directs everything to our SMTP server. To do this open the php.ini file: # vi /etc/php5/apache2/php.ini Find the setting ‘sendmail_path’ and set it to: /usr/sbin/sendmail –t –i Next, we have to make a symbolic link so that PHP automatically will use the exim library when looking for the sendmail library. # ln –s /usr/sbin/exim /usr/sbin/sendmail We continue setting up exim. Open the configuration file: # vi /etc/exim/exim.conf Search for the ‘local_domains’ setting and make sure it is empty. Next, restart the service: # /etc/init.d/exim restart Next, we restart Apache to make sure the php.ini file gets reloaded: # /etc/init.d/apache2 restart And this should be it. You can now start sending mail from the websites. Page 53 of 53 Jan Milants Jonas Pypen – Dennis Vermaut 2/07/2007 20/02/2008 Linux/Ganglia on a Stick Installation, Configuration and Usage Manual Dennis Vermaut 17 – 03 – 2008 Table of contents Table of contents ..................................................................................................................................... 1 Introduction ............................................................................................................................................. 2 Summary ............................................................................................................................................. 2 About DSL ................................................................................................................................................ 3 About Feather Linux ............................................................................................................................... 4 Damn Small Linux or Feather Linux ......................................................................................................... 5 About Ganglia .......................................................................................................................................... 6 About PHPSysInfo .................................................................................................................................... 7 Installation and Configuration of Damn Small Linux ............................................................................... 8 Requirements ...................................................................................................................................... 8 Creating a stick .................................................................................................................................... 8 Preparing the live‐cd ....................................................................................................................... 8 Setting up the stick .......................................................................................................................... 9 Booting from the stick ......................................................................................................................... 9 Creating a boot floppy ......................................................................................................................... 9 Booting from the floppy .................................................................................................................... 10 Finalizing the stick ................................................................................................................................. 10 Updating ............................................................................................................................................ 10 Preparation ........................................................................................................................................ 10 Monitoring links ................................................................................................................................ 11 Compilers for foreign packages ......................................................................................................... 12 Ganglia & PHPSysInfo ........................................................................................................................ 12 How to use the tool ............................................................................................................................... 12 Preparing to boot from USB .............................................................................................................. 12 Monitoring ......................................................................................................................................... 13 1 Introduction If you want to be able to monitor the cluster anywhere in the network, it would be convenient you can just carry or save the test‐tool to a compact device. This way you don’t need a computer with everything installed on it. You just plug in the device and can check it. The device we could use for that nowadays is an Universal Serial Bus device, also known as USB stick. They are very compact and sizes go from small to very big (compared to its physical size). As our monitoring tool (Ganglia) runs on Linux, we should have everything on the stick needed to run from Linux. But: this means you still need Linux on the computer you want to use. So we go a step further: we place an entire Linux distribution on an USB stick, provided with the software we need. This way we can also provide manuals, a graphical interface and a complete monitoring suite. As extra bonus to this set up we can also use this tool to monitor the computer we are working on with the tool. That way you can have a quick check on every computer you want. Summary This manual will deal with the full installation of all the software and requirements for Linux/Ganglia on a stick and how to use it. The first part of this manual will guide you step by step through the steps needed to set up a similar system. This means creating a bootable USB stick with Damn Small Linux on it, a bootable floppy disk in case USB boot isn’t supported for the computer and all software (Ganglia) needed in Damn Small Linux to be able to monitor the cluster. The second part of this manual will provide instructions on how to use this monitoring tool. How to start the system (both USB and floppy wise) and how to get the monitoring information. 2 About DSL Damn Small Linux or DSL is a free Linux distribution for the X86 family of personal computers. It was designed to run graphical applications on older PC hardware, for example: machines with 486/early Pentium processors and very little memory. Damn Small Linux used to be a LiveCD with a size of 50 MB. What originally started as an experiment to see how much software could fit in 50 MB eventually became a full‐fledged Linux distribution. It can be installed on storage media with small capacities, like bootable business cards, USB flash drives, various memory cards, and Zip drives. Damn Small Linux was derived from Knoppix, which itself is derived from Debian. DSL can be used as base to install a full Debian environment. Next to that DSL has become frequently used in other ‘Linux on USB device’ projects, like Feather Linux. It matured in many ways and had a lot of people testing it, using it and improving it in many ways. Thus Damn Small Linux became a very solid operating system. For this distribution a 64 MB should be more than enough, but if you think about installing the monitor tools and add some documentation you should take a device which has at least 128 MB of space available. 3 About Feather Linux Feather Linux is one of the matured abbreviations of Damn Small Linux. This distribution is a bit bigger, more stable and offers a beautiful user‐interface. Its requirements for space are still below 128MB! Included software in this distribution are for example: Firefox, gaim, prozilla, nano, fireftp, abiword and so on. As Window‐Manager Fluxbox is used, which is a neat and light Window Manager. Feather Linux is based on DSL, so this means it has a very firm and well tested base. More information about Feather Linux can be found at http://featherlinux.berlios.de/. To make sure we have enough space for swap, documentations and our software, we have to choose an USB stick which has at least 256MB. 4 Damn Small Linux or Feather Linux At first our decision was quite quickly made: we were going to use Feather Linux. Feather Linux is more user friendly and has more capabilities than Damn Small Linux. Off course this is a tradeoff, because Damn Small Linux wants to keep everything below 60 MB of space. Feather Linux doubles this space, but provides us with more possibilities to extend. Unfortunately, we weren’t able to use Feather Linux. The space wasn’t the problem, because we received a 4GB Kingston USB device. The problem was getting Feather Linux to work. We tried many methods to get it working the way it should, but it just never did. We got the stick booting, but once it started booting we got errors from the boot from Feather Linux. A few people on the internet seemed to have the same problem, but a solution was never given nor found. So we had to change to Damn Small Linux. After trying a few methods as well, both with success and failures, we chose to use the easiest installation method. This will give you a working distribution for sure, but requires one more extra step/requirement to be completed: a blank disc. You can also choose to make an embedded version. This makes it possible to run your Linux environment in an already running environment (Windows or Linux doesn’t matter!). This sounds very good and promising and takes away the problem with boot support, but you need to have a working a distribution! If you create a fully bootable system, you can also use this monitoring tool to check why a certain distribution won’t work! 5 About Ganglia Ganglia is a complete suite which offers scalable distributed server monitoring. The monitoring is done by Linux daemons and supplied through XML files. Luckily, we don’t have to analyze these XML‐
files, because Ganglia also comes with a web‐interface. This web‐interface is PHP based, so it needs an webserver to run on. Next to that, RRDTools is used for the data storage and the creation of images. The installation of Ganglia is at first quite difficult on systems you don’t know yet and if you’re fairly new to Linux, but we’re going to provide the full steps to install Ganglia successfully on the stick so everything will be pretty straight forward. More information about Ganglia can be found at http://ganglia.sourceforge.net/. 6 About PHPSysInfo PHPSysInfo is a PHP script that displays information about the host being accessed. It will displays things like Uptime, CPU, Memory, SCSI, IDE, PCI, Ethernet, Floppy, and Video Information. This information can be displayed in multiple languages and in different lay‐outs. PHPSysInfo is an open‐source project and can be found at http://phpsysinfo.sourceforge.net/. 7 Installation and Configuration of Damn Small Linux This part will show you what to do to install DSL successfully on your USB stick. We have tried several ways to install a fully working environment on a USB stick, but the one we will explain is the fastest and easiest and assures you it will work. Its only downside is that you need to burn a bootable cd/dvd first. Requirements Before we can start we have some requirements we must meet. Checklist: •
•
•
•
•
Computer running Linux (this may be a Live CD) USB stick; 256MB of size or more; formatted DSL (CD ISO) empty (rewritable ) cd/dvd Floppy Disk; 1,55MB; formatted (in case USB boot isn’t supported by the BIOS) The Linux distribution and the floppy boot image are available from the DSL website (http://damnsmalllinux.org). You can download all the software to your local computer. Creating a stick Preparing the livecd First we format our stick as FAT32. This isn’t really needed, but that way, you are sure you can throw everything away that’s on it. In Linux you use this command: # mkfs.vfat /dev/sda1 Don’t forget to substitute your sda1 to your drive! If the command fails, you might need to install dosfstools and/or mtools. In Ubuntu you can do this by issuing: # sudo apt‐get install dosfstools # sudo apt‐get install mtools Next, we will burn the .iso to our blank disk. In Ubunu, you can simply right‐click the .iso file and choose the option to burn the image. Once the image is burned, shutdown your computer. 8 Setting up the stick Start up your computer with the disc inserted and the USB stick detached! When you see the bootscreen, insert the stick and hit [enter]. Wait until DSL is fully booted. Right‐click on your desktop and go to Apps Î tools ÎUSB‐HDD Pendrive install Hit [y] and then type # install Hit [enter] again to keep the English keyboard lay‐out. Press [y] and [enter] to start. Note that once this operation is completed, the terminal window will be closed without confirmation. This is not an error, it means that the operation was successful. Hit DSL in the left‐corner and choose exit Î exit options. Choose ‘shutdown’ without backup. The system will reboot and you will have to remove your disc. Booting from the stick Make sure USB‐boot is primary boot (BIOS), and your stick is plugged in. If your computer cannot boot from USB devices, go on to the next part If everything is ok, you will get a GRUB‐bootloader with as only option mentioned ‘DSL’. Choose this one and here you go. Shutdown the system again, but now you can enable the backup option. Creating a boot floppy In case the computer you want to monitor on doesn’t support boot from USB device, we will provide a boot floppy which will let you boot the USB device from the floppy. This is a little workaround, but works fine. Get the floppy bootimage (.img) from http://www.damnsmallinux.org and get it on a Linux computer. Make sure you have version >2.2, because older versions don’t support the fromusb option. In our example we save the image to /tmp/img. Insert the floppy disk and format it using the following command: # sudo mkfs.vfat /dev/fd0 Once formatted, it is time to prepare the floppy for boot. We do this by issuing the following commands: # cd /tmp/img # sudo dd if=bootfloppy.img of=/dev/fd0 bs=36b This might take a while to complete. Just sit back and relax. Take out the floppy once the task is finished and prepare for a test. 9 Booting from the floppy Take the floppy disk and the USB device to a computer that doesn’t support USB boot or where USB boot is defined after floppy boot. Insert the floppy and the USB device and boot up the computer. You should get a beautiful boot screen provided by Damn Small Linux. Insert your USB device and type the following command to boot your stick: # dsl fromusb Now everything runs like you would boot from the stick directly. Shutdown the system again and you can enable the backup option now. Finalizing the stick Now, we will set up everything in a way that our DSL is fully capable of dealing with monitoring. This requires some installations and adaptations. Make sure a network cable is attached and then startup your Damn Small Linux. Updating We are going to make sure our packages etc. are the newest available. First we have to enable ‘apt‐
get’. That way we can easily install and update packages and software for our system. Make sure you have a network connection with internet! To do this right click on your desktop and choose “Apps Î Tools Î Enable Apt”. This will start downloading a few packages and you have to hit [enter] when it’s done. To do the update/upgrade issue these two commands: #sudo apt‐get update #sudo apt‐get upgrade You will have to choose some settings for PC cards. Choose ‘always’ to stop the support on upgrading and make sure not to start the support on reboot. You can do this if needed later, but then you would have to edit some configuration files. After this you’ll get the question to overwrite a file. Confirm with [y]. Restart your system afterwards. To do this hit the ‘DSL’ in the left lower corner, choose ‘Exit Î Exit options’. Make sure you enable backup! Preparation The first step is to put the keyboard settings to Finnish as all systems this tool will run on will have Finnish keyboards. Right click your desktop and choose “Setup Î X Setup”. Choose Xvesa xserver. Choose ‘No’ for USB mouse . You should choose an IMPS/2 mouse. As resolution choose 1024x768 pixel. Color depth is 32 bit. Don’t choose your own DPI. For keyboard go down and choose the option “fi”. It is best if you restart your system now. Don’t forget to enable the back‐up option! You can test the new settings after the restart by opening a terminal window for example and typing some regular text. We also put the time(zone) right for the system in case it isn’t configured correctly. Right click your desktop and choose “Setup Î Date Time Setup Î Via Internet Time Server”. Nothing visible will 10 happen. Reboot the system. This option together with your localization settings should give you the right time. In case this isn’t so right click your desktop and choose “Setup Î Date Time Setup Î Manually Enter via GUI” and change the settings there. Next up we’re going to install PHP on our system. Right click your desktop and choose “MyDSL Î MyDSL Browser”. Click “System”. We’re going to install php‐4‐monkey, because the webserver for our system is Monkey. Click the package and choose “Download”. Everything should go automatically. Restart your system to enable the changes. Don’t forget to keep backup enabled! The next step is to edit a little configuration file for our Monkey webserver. Due to some updates we have version 0.9.2, but the configuration file points to a 0.9.1 directory. So right click your desktop and choose “XShell Î Transparent”. Issue following command: # sudo nano /opt/monkey‐0.9.2/conf/monkey.conf Find the line defining the server root and alter the directory to the correct version. You exit this editor with [CTRL] + [x]. Hit [y] and [enter] to confirm the changes. Now exit your shell. Right click your desktop and choose “System Î Daemons Î Monkey Web Server Î monkey restart”. You can test the result of this by opening the browser (most right icon in the taskbar) and enter http://127.0.0.1 as URL. If you get this nice intro page your webserver is working. To test our PHP parser, we’re going to create a little script. We’re going to say ‘Hello’ to ourselves through a PHP script served by Monkey. Right click your desktop and choose “XShell Î Transparent”. Type in the following command to create our file: # sudo nano /opt/monkey‐0.9.2/htdocs/hello.php Give the file this contents: <?php echo “Hello!”; ?> No we’re going to actually test this script. In the ‘task bar’ fire up the browser (most right icon). And surf to http://127.0.0.1/hello.php. The result should be a perfectly blank screen with only the text ‘Hello!’, so now tags should be visible! Now that everything is running fine, it is almost time to proceed to the monitoring part. Reboot your system and backup all changes. Monitoring links Next we will extend our browser a bit with links to our monitoring software on the cluster. To do this, first we have to fire up our browser, off course. To do this, click the Red/Blue icon in the task bar. At the top of the browser, under your navigation bar, there are a few icons. Right click them and choose ‘Delete’. Now we will add our own links. Browse to http://192.168.182.15/ganglia and drag and drop the page icon (in front of the URL) to the bar where you previously removed the links. Right click the new Item and hit ‘Properties’. Give it a name that tells you clearly what it is, for example: Cluster Monitoring. 11 Repeat this step both for http://192.168.182.15/phpsysinfo and http://192.168.182.15/cgi‐
bin/awstats.pl?config=localhost. Compilers for foreign packages To be able to compile packages from scratch (using make and make install), we have to install a C(++) compiler. To do this right click your desktop and choose “MyDSL Î MyDSL Browser”. Click ‘UNC’ and scroll down and choose gcc‐2.95.unc. Hit ‘Download’. Also download the ‘gcc1‐with‐libs.unc’. Once the downloads have been completed, reboot the system and everything is ready for compiling packages. Ganglia & PHPSysInfo Installing Ganglia and PHPSysInfo has been proved to be impossible for now. I tried more than one way to install these packages, even dependency by dependency. None of this works, due to outdated packages that are part of DSL. Not all of these packages can be updated, not even by compiling from source, due to the drastic changes made in the lay‐out and functionality of Damn Small Linux. Maybe in the future when new packages arrive or become updated, installation may become possible. How to use the tool This final part will provide all needed instructions on how to use this tool for monitoring the cluster and/or the hardware for the computer you’re working on. Preparing to boot from USB Insert your USB stick in the computer, make sure a network cable is attached and start up your computer. On the first screen you see (Splash screen or POST test) hit the key needed to enter your BIOS setup. Most of the times this is F1, F2, F10 or Del. Check the boot screen or the manual for the motherboard in case this doesn’t work. Find the section that deals with boot sequence/start up order. Make sure USB HDD or something similar (not USB CD) is primary boot device! Save these changes and exit (most BIOS’s use F10 for this). If your computer doesn’t provide functionality to boot from USB, but it has a floppy drive then there’s nothing to worry about. You can still boot from the USB. Shutdown your computer and also insert the floppy disk. Check your BIOS (same way like described above) if your floppy device is primary boot device. Your computer will now boot from the floppy and will show you a nice screen showing you the DSL logo. Mind that you have to type in a command to start from the USB stick and you have to do this within 30 seconds or the default boot will start and fail. The command you need to issue to boot from the stick is: # dsl fromusb Now you can wait until the boot process is complete. If you used a floppy, the floppy has to initialize first and this takes a little while and thus booting from a floppy is a bit slower. 12 Monitoring To monitor the clusters right click your desktop and choose “Apps Î Net Î Browsers Î Firefox”. Below the navigation bar you will find some bookmarks provided for the monitoring. Hit any of them to open the web application. 13 Global Invoicing Theoretical background and Usage Manual Dennis Vermaut 13 – 05 – 2008 Preface This manual includes all information about the Global Invoicing web application. The Global Invoicing web application is an PHP5/MySQL5 based application running on a Debian cluster. The main purpose of the application is to invoice data from multiple systems in one central application and store them. The manual includes a theoretical background of the application. This will include statement of requirements, database schema’s, SQL queries, use case and an overview of the features in the final product. The next included part will be the user manual for this application. How to use the application, how to manage. As last part of the user manual will be guidelines on how to design templates and/or plug‐ins for the application. 1 Table of contents Preface ..................................................................................................................................................... 1 Table of contents ..................................................................................................................................... 2 Theoretical background ........................................................................................................................... 6 Introduction ......................................................................................................................................... 6 Gathering requirements ...................................................................................................................... 7 Introduction ..................................................................................................................................... 7 MOSCOW ......................................................................................................................................... 7 Must ............................................................................................................................................ 7 Should .......................................................................................................................................... 7 Could ............................................................................................................................................ 7 Won’t ........................................................................................................................................... 7 Database .............................................................................................................................................. 8 Introduction ..................................................................................................................................... 8 Multilanguage .................................................................................................................................. 8 Full scheme .................................................................................................................................... 10 Data dictionary .............................................................................................................................. 11 language .................................................................................................................................... 11 translate_field ........................................................................................................................... 11 translation ................................................................................................................................. 11 order_detail ............................................................................................................................... 11 order_discount .......................................................................................................................... 12 discount ..................................................................................................................................... 12 item ........................................................................................................................................... 12 order .......................................................................................................................................... 13 user ............................................................................................................................................ 13 company .................................................................................................................................... 14 last_done_order ........................................................................................................................ 14 client .......................................................................................................................................... 15 Remarks about the database scheme ........................................................................................... 15 Code ............................................................................................................................................... 16 Structure .................................................................................................................................... 16 Data ........................................................................................................................................... 18 2 Theoretical usage .................................................................................................................................. 25 Introduction ....................................................................................................................................... 25 Type of users ..................................................................................................................................... 25 Administrators ............................................................................................................................... 25 Viewers .......................................................................................................................................... 25 Use case diagram ............................................................................................................................... 26 Introduction ................................................................................................................................... 26 Diagram ......................................................................................................................................... 26 Use cases ........................................................................................................................................... 27 Introduction ................................................................................................................................... 27 Log in ............................................................................................................................................. 27 Edit profile ..................................................................................................................................... 28 Create a blank invoice ................................................................................................................... 29 Create an invoice from a plug‐in ................................................................................................... 30 View archive .................................................................................................................................. 31 Create a new company .................................................................................................................. 32 View templates .............................................................................................................................. 33 View plug‐ins ................................................................................................................................. 34 Edit configuration settings ............................................................................................................ 35 Add user ........................................................................................................................................ 36 Edit user ......................................................................................................................................... 37 Delete user .................................................................................................................................... 38 Add client ....................................................................................................................................... 39 Edit client ....................................................................................................................................... 40 Delete client .................................................................................................................................. 41 Edit company ................................................................................................................................. 42 Delete company ............................................................................................................................ 43 Add language ................................................................................................................................. 44 Edit language ................................................................................................................................. 45 Delete language ............................................................................................................................. 46 Add global ...................................................................................................................................... 47 Clean up database ......................................................................................................................... 48 Back up database........................................................................................................................... 49 Log out ........................................................................................................................................... 50 3 Change language ........................................................................................................................... 51 Class diagram ..................................................................................................................................... 52 Legend ........................................................................................................................................... 52 Plugin ............................................................................................................................................. 52 MySQL ........................................................................................................................................... 55 Language ....................................................................................................................................... 56 Invoice ........................................................................................................................................... 57 Auth ............................................................................................................................................... 58 QueryList ....................................................................................................................................... 59 Relations in the classes .................................................................................................................. 62 Writing a plug‐in .................................................................................................................................... 63 Introduction ....................................................................................................................................... 63 How To .............................................................................................................................................. 63 Creating a template ............................................................................................................................... 67 Introduction ....................................................................................................................................... 67 How To .............................................................................................................................................. 67 Practical manual .................................................................................................................................... 71 Introduction ....................................................................................................................................... 71 Key Features .................................................................................................................................. 72 Default security ................................................................................................................................. 73 Introduction ................................................................................................................................... 73 Log in ............................................................................................................................................. 73 Log out ........................................................................................................................................... 73 Changing language ............................................................................................................................ 74 Profile ................................................................................................................................................ 74 Create invoice .................................................................................................................................... 75 Blank invoice .................................................................................................................................. 75 Plug‐in ............................................................................................................................................ 75 Archive ............................................................................................................................................... 76 Create company ................................................................................................................................ 77 View templates .................................................................................................................................. 77 View plug‐ins ..................................................................................................................................... 77 Admin panel ...................................................................................................................................... 77 Introduction ................................................................................................................................... 77 4 Configuration settings ................................................................................................................... 78 User management ......................................................................................................................... 78 Add ............................................................................................................................................ 78 Edit ............................................................................................................................................. 78 Delete ........................................................................................................................................ 78 Client management ....................................................................................................................... 78 Add ............................................................................................................................................ 78 Edit ............................................................................................................................................. 79 Delete ........................................................................................................................................ 79 Company management ................................................................................................................. 79 Add ............................................................................................................................................ 79 Edit ............................................................................................................................................. 79 Delete ........................................................................................................................................ 79 Language management ................................................................................................................. 80 Add ............................................................................................................................................ 80 Edit ............................................................................................................................................. 80 Delete ........................................................................................................................................ 80 Add global .................................................................................................................................. 80 Clean up database ......................................................................................................................... 80 Back up database........................................................................................................................... 81 5 Theoretical background Introduction The Global Invoicing application is a web based application that has as main purpose to gather invoice data from any other database related system and store it locally. The application is PHP5/MySQL5 and had as extra requirement that it need to have multilanguage support in a way that keeps maintenance as easy as possible. The project uses classes to keep the very abstract functionality apart from the rest of the application. The multilanguage data is stored in the database to enhance speed and maintenance. These classes also deal with the aspect of getting data from multiple systems. One must note however that classes in PHP are commonly used to collect related tasks in a single file and not only single functionalities. The Single Responsibility Principle (SRP) used for creating classes in C#, C++ … is not applied for PHP. As the application has to get data from multiple system, it would be very nice new systems can be added without having to change the application itself. That way the maintenance is improved by far. The project was started with very few requirements available, but once the application and the classes started to get shape, more and more subtle and less subtle features popped up. 6 Gathering requirements Introduction For each project you make you have to gather the requirements for that project, otherwise you’ll end up with an incomplete project or a project that is totally not what the client had in mind. As the initial requirements were very few, there were a lot of options open, but this could also mean the client wants all the options. Asking questions to the client and showing interim results completes and/or perfects there requirements. MOSCOW One of the ways to note down the requirements is the so called MoSCoW method. This means you note down the requirements in a few categories: •
•
•
•
M – Must have this S – Should have this if possible (something like this or similar) C – Could have this if it doesn’t affect anything else (or if there is sufficient time) W – Won’t have this, but would like in the future For this project this resulted in the overview listed below. Must •
•
•
•
•
•
•
•
•
Archive and print invoices Catch empty translations Dealing with discounts Get data from multiple MySQL databases Good price calculating functionality Multilanguage with very good and easy language management Maintenance must be kept as simple as possible Security should be good and the data shouldn’t be public available Use as less resources (memory) as possible, due to low RAM‐amount in the servers Should • Ability to edit invoices • Graphical interface for language management, preferably with comparing options • Invoice lay‐out can be different for each system/company • User management • View invoices in the available languages, independent of the application’s language Could • Database clean‐up • Fully edit saved invoices • Neat, yet functional lay‐out Won’t • Support for other database systems than MySQL 7 Database Introduction All the data used for the Global Invoicing system and stored by it are stored in a MySQL5 database. In our specific case it is stored in a MySQL cluster, using the NDB Cluster Engine. The database schema is compact enough to have no problems at all with the clustering. The system itself never uses the remote databases. The only code that accesses remote databases are in the plug‐ins and all the plug‐
ins should do is read data from these databases. This way the administrator can easily create an extra account, especially for this plug‐in, who has only read permissions. This improves security. The plug‐
in never writes anything. The writing is only done in the local Global Invoicing database and the writing is done by the classes, so everything is checked. The main database of the Global Invoicing system is actually empty. The database has to be designed to store invoice data and everything related to that. As the default system doesn’t have any invoices stored yet, everything is empty. The database doesn’t deliver ‘dynamic content’ to the website for users. It only stores the invoices. In addition there are three tables used for the language management and that’s it. The functionality fully relies on the classes. More about the language system further on. Multilanguage As mentioned before the system had to be multilanguage and this was in fact one of the biggest requirements, as the client had experience with multilanguage applications that were a big mess to maintain. Changing code, if for example you want to add new functionalities to the website, should only be done in a single place and not for every language. A graphical interface to enter or edit languages would be very much appreciated and in addition to this an interface where you can compare the languages to each other. Taking these requirements I decided to store the language information in the database. The database can store a lot of information and is capable of delivering the required information very quickly by using decent queries. Furthermore the queries only have to be designed once, independent of the number of languages. This is also an improvement in maintenance. 8 This system is based upon the fact that each field (column in the database) needs to be translated is stored in the translate_field table and is referenced by the translate_field_id. So the translate_field keeps an id to refer to and an unique name to identify the field. The translate_field_id is an integer that is automatically generated by MySQL using the auto increment property (set to increase by 1). Languages are stored in the language table. Each language has its own id, so it can be easily referred to. It also has a language code so that the database administrator easily can recognize the id’s. The translate_field_id puts a reference to translate_field, because each language itself has a value for each other language, for example: Dutch in Dutch is ‘Nederlands’, Dutch in English is ‘Dutch’. This language table can also be expanded by other columns that are unique to the language, for example a field that keeps track where the image for the language is stored (this is used in PR Consulting for example). As last table we have the translation table which stores all translations. It keeps track of what field is translated in what language and what the translation is. So getting a translation is quite a long query, but using joins you don’t notice any speed issues and once you have written the query once, you can use it over and over again using variables. For each field that becomes translated there is a new arrow arriving to the translate_field table. Also the tables can be extended with some extra information. For example if you want to use an icon for a language, you can add an extra field for the icon location. As the icon has no translations and is unique for the language, it has to be put in the language table. To have optimal performance between load balancing and memory all the translations are loaded at the same time in the memory. As this gives a simple text array, this doesn’t use a lot of memory. Only the language of the application becomes loaded off course. 9 Full scheme The full database scheme looks like this. The data dictionary with basic information is provided after the scheme. 10 Data dictionary The database in words with all the information needed is called the data dictionary. This is the data dictionary for the Global Invoicing web application. Some extra remarks about the scheme are listed after the data dictionary. language Name column language_id language_code Type of column integer varchar(10) translate_field_id integer translate_field Name column translate_field_id Type of column integer name varchar(50) Description Primary Key for language The language code to identify the language for database administrators What field is this in the language structure for translation purposes References to Required X X translate_field by Foreign Key X Description References to Primary Key for translate_field The name of the field, used to build up the array for display Required X X translation Name column language_id Type of column integer translate_field_id integer value varchar(255) Description In what language is the translation provided What field will be translated What is the translation References to Required
language by X Foreign Key translate_field X by Foreign Key X Description Primary Key, for what order are we giving details (ordered items) Primary Key, what item was ordered in this order How many times is this item ordered in this order References to order by Foreign Key order_detail Name column order_id Type of column integer item_id integer quantity integer item by Foreign Key required X X X 11 order_discount Name column order_id Type of column integer discount_id integer Description Primary Key, for what order are we giving discount Primary Key, what discount are we giving to this order References to Required
order by X Foreign Key Description Primary Key for discount What amount of discount will we give What field is this in the translation table Is the value given a percentage or is it an amount, default ‘J’ Is the discount on the total price or only on the previous item, default ‘N’ Is there a low deck from what price the discount starts, default 0 References to Required
X X discount by Foreign Key X discount Name column discount_id value Type of column integer double translate_field_id integer is_percentage char(1) on_total char(1) low_limit double translate_field by Foreign Key X X X item Name column item_id description Type of column integer varchar(255) Description Primary Key for item What item is this, the description is not translated price_no_vat double vat_percentage double What is the price of this item, VAT excluded How much VAT is on this item References to Required
X X The description used in the foreign database X X 12 order Name column order_id date Type of column integer datetime requested datetime system varchar(50) payed char(1) company_id integer user_id integer client_id integer template varchar(50) Description Primary Key for order On what date is this invoice been made On what date was the order set up From what website is this order, not through FK, due to plug‐ins that may be removed, but archive must still exist Has this invoice been payed yet, default ‘N’ For what company is this invoice What user made this invoice For what client is this invoice What template was used for this invoice, not through FK, due to templates are just files which may be removed. If a template is empty or doesn’t exist, the default template will be used References to Required
X X X Name of the system where we get the invoice from (php plugin file) X company by Foreign Key user by Foreign Key client by Foreign Key The used template file (php template file) X X X X user Name column user_id username Description References to Primary Key for user What username will the user use to login, unique password char(32) The password for the user to log in, MD5 firstname varchar(50) The first name of the user lastname varchar(50) The last name of the user email varchar(50) The e‐mail address of the user admin char(1) Does this user have rights to use the admin panel, default ‘N’ * An user is anybody who logs in to the system to use the web application Type of column integer varchar(50) required X X X X X X X 13 company Name column company_id name Type of column integer varchar(70) address varchar(255) email varchar(50) website varchar(50) telephone varchar(50) fax varchar(50) bank varchar(100) var1 varchar(255) var2 varchar(255) var3 varchar(255) logo varchar(100) Description Primary Key of company The name of the company The address information of the company The primary email address of the company The website of the company Telephone information of the company Fax information of the company Bank information for the company Various information field for the company Various information field for the company Various information field for the company Location of the logo image References to Required
X X Description Primary Key of last_done_order References to Required
X The name of the plugin/site for the order (php plugin file) X Primary Key of an order in a foreign database X X X last_done_order Column name Type of column plugin varchar(50) id integer The id of the order identification in the foreign database datetime datetime When was this invoice made 14 client Column name client_id firstname lastname address Type of column integer varchar(50) varchar(50) varchar(255) Description References to Required
Primary Key of client X First name of the client X Last name of the client X Address information for X the client telephone varchar(20) Telephone number of the client fax varchar(20) Fax number of the client email varchar(50) The email address of the client bank varchar(255) Bank information for the client vat_number varchar(20) Personal VAT number * A client is a person stored in the database and linked to an invoice, so client to the invoice. Remarks about the database scheme Only discount has translations available as custom discounts may be applied to invoices from remote systems. If a certain discount can’t be created directly, a custom discount may be of use with translations. Items don’t become translated as normally all items come from the remote systems and are only available in one language. Note that the user table keeps the users for the system (to log in and maintain the system). The client table stores all the clients for the invoices, so they are not users. For an user, the username is off course unique (by constraint). You may also notice the three variable fields in company. Normally this is a bad solution. You should work with a new table referencing to the company. That way you can create an infinite and non‐fixed amount of variable fields. This is not done, nor was it needed as the application uses anchors to fill out the template. This means there is a fixed number of variables to use and place in the template. So the template creator doesn’t have to check the number of variable fields and doesn’t need to check the database. He just needs to know what anchors there are and to place them. 15 Code Last, but not least, is the MySQL code for the database. The database is called ‘invoice’ and no table prefixes are used. The code is separated in two parts: a structure part, which builds the database tables and columns with the necessary relations, and a data part which enters the translation data for the lay‐out for the application in two default languages (English and Dutch) and two basic users (admin – admin and viewer – viewer). All queries were designed by hand. Especially for the data (inserts) this was necessary as while creating the application new translate fields popped up frequently and needed to be implemented immediately. The administration panel wasn’t available yet at that time. Structure create database if not exists invoice;
use invoice;
/*Table structure for translate_field*/
DROP TABLE IF EXISTS translate_field;
CREATE TABLE translate_field (
translate_field_id int(11) NOT NULL auto_increment,
name varchar(50) NOT NULL,
CONSTRAINT TransLateFieldUniqueKey UNIQUE (name),
PRIMARY KEY (translate_field_id)
) ENGINE=NDBCLUSTER TYPE=NDB AUTO_INCREMENT=1 DEFAULT CHARSET=UTF8 COLLATE=utf8_unicode_ci;
/*Table structure for language*/
DROP TABLE IF EXISTS language;
CREATE TABLE language (
language_id int(11) NOT NULL auto_increment,
language_code varchar(10) NOT NULL,
translate_field_id int(11) NOT NULL,
PRIMARY KEY (language_id)
) ENGINE=NDBCLUSTER TYPE=NDB AUTO_INCREMENT=1 DEFAULT CHARSET=UTF8 COLLATE=utf8_unicode_ci;
ALTER TABLE language ADD Foreign Key (translate_field_id) REFERENCES
translate_field(translate_field_id) ON DELETE CASCADE;
/*Table structure for translation*/
DROP TABLE IF EXISTS translation;
CREATE TABLE translation (
language_id int(11) NOT NULL,
translate_field_id int(11) NOT NULL,
value varchar(255) NOT NULL,
PRIMARY KEY (language_id, translate_field_id)
) ENGINE=NDBCLUSTER TYPE=NDB AUTO_INCREMENT=1 DEFAULT CHARSET=UTF8 COLLATE=utf8_unicode_ci;
ALTER TABLE translation ADD Foreign Key (translate_field_id) REFERENCES
translate_field(translate_field_id) ON DELETE CASCADE;
ALTER TABLE translation ADD Foreign Key (language_id) REFERENCES language(language_id) ON
DELETE CASCADE;
/*Table structure for item*/
DROP TABLE IF EXISTS item;
CREATE TABLE item (
item_id int(11) NOT NULL auto_increment,
name varchar(50) NOT NULL,
description varchar(255) NOT NULL,
price_no_vat double NOT NULL,
vat_percentage double NOT NULL,
PRIMARY KEY (item_id)
) ENGINE=NDBCLUSTER TYPE=NDB AUTO_INCREMENT=1 DEFAULT CHARSET=UTF8 COLLATE=utf8_unicode_ci;
16 /*Table structure for discount*/
DROP TABLE IF EXISTS discount;
CREATE TABLE discount (
discount_id int(11) NOT NULL auto_increment,
value double NOT NULL,
translate_field_id int(11) NOT NULL,
is_percentage char(1) NOT NULL DEFAULT 'Y',
on_total char(1) NOT NULL DEFAULT 'N',
low_limit double DEFAULT 0,
item_id int,
PRIMARY KEY (discount_id)
) ENGINE=NDBCLUSTER TYPE=NDB AUTO_INCREMENT=1 DEFAULT CHARSET=UTF8 COLLATE=utf8_unicode_ci;
ALTER TABLE discount ADD Foreign Key (translate_field_id) REFERENCES
translate_field(translate_field_id) ON DELETE CASCADE;
ALTER TABLE discount ADD Foreign Key (item_id) REFERENCES item(item_id) ON DELETE CASCADE;
/*Table structure for last_done_order*/
DROP TABLE IF EXISTS last_done_order;
CREATE TABLE last_done_order (
plugin varchar(50) NOT NULL,
foreign_id int(11) NOT NULL,
datetime datetime NOT NULL,
order_id int(11) NOT NULL,
PRIMARY KEY (plugin, foreign_id)
) ENGINE=NDBCLUSTER TYPE=NDB AUTO_INCREMENT=1 DEFAULT CHARSET=UTF8 COLLATE=utf8_unicode_ci;
ALTER TABLE last_done_order ADD Foreign Key (order_id) REFERENCES `order(order_id)` ON DELETE
CASCADE;
/*Table structure for user*/
DROP TABLE IF EXISTS user;
CREATE TABLE user (
user_id int(11) NOT NULL auto_increment,
username varchar(50) NOT NULL,
password char(32) NOT NULL,
firstname varchar(50) NOT NULL,
lastname varchar(50) NOT NULL,
email varchar(50) NOT NULL,
admin char(1) NOT NULL DEFAULT 'N',
CONSTRAINT UsernameUniqueKey UNIQUE (username),
PRIMARY KEY (user_id)
) ENGINE=NDBCLUSTER TYPE=NDB AUTO_INCREMENT=1 DEFAULT CHARSET=UTF8 COLLATE=utf8_unicode_ci;
/*Table structure for company*/
DROP TABLE IF EXISTS company;
CREATE TABLE company (
company_id int(11) NOT NULL auto_increment,
name varchar(70) NOT NULL,
address varchar(255) NOT NULL,
email varchar(50) NOT NULL,
website varchar(50),
telephone varchar(50),
fax varchar(50),
bank varchar(100),
var1 varchar(255),
var2 varchar(255),
var3 varchar(255),
logo varchar(100),
PRIMARY KEY (company_id)
) ENGINE=NDBCLUSTER TYPE=NDB AUTO_INCREMENT=1 DEFAULT CHARSET=UTF8 COLLATE=utf8_unicode_ci;
/*Table structure for client*/
DROP TABLE IF EXISTS client;
CREATE TABLE client (
client_id int(11) NOT NULL auto_increment,
17 firstname varchar(50) NOT NULL,
lastname varchar(50) NOT NULL,
address varchar(255) NOT NULL,
telephone varchar(20),
fax varchar(20),
email varchar(50),
bank varchar(255),
vat_number varchar(20),
PRIMARY KEY (client_id)
) ENGINE=NDBCLUSTER TYPE=NDB AUTO_INCREMENT=1 DEFAULT CHARSET=UTF8 COLLATE=utf8_unicode_ci;
/*Table structure for order*/
DROP TABLE IF EXISTS `order`;
CREATE TABLE `order` (
order_id int(11) NOT NULL auto_increment,
date datetime NOT NULL,
requested datetime NOT NULL,
system varchar(50) NOT NULL,
payed char(1) NOT NULL DEFAULT 'N',
company_id int(11) NOT NULL,
user_id int(11) NOT NULL,
client_id int(11) NOT NULL,
template varchar(50),
PRIMARY KEY (order_id)
) ENGINE=NDBCLUSTER TYPE=NDB AUTO_INCREMENT=1 DEFAULT CHARSET=UTF8 COLLATE=utf8_unicode_ci;
ALTER TABLE `order` ADD Foreign Key (user_id) REFERENCES user(user_id);
ALTER TABLE `order` ADD Foreign Key (company_id) REFERENCES company(company_id) ON DELETE
CASCADE;
ALTER TABLE `order` ADD Foreign Key (client_id) REFERENCES client(client_id);
/*Table structure for order_detail*/
DROP TABLE IF EXISTS order_detail;
CREATE TABLE order_detail (
order_id int(11) NOT NULL,
item_id int(11) NOT NULL,
quantity int(11) NOT NULL,
PRIMARY KEY (order_id, item_id)
) ENGINE=NDBCLUSTER TYPE=NDB AUTO_INCREMENT=1 DEFAULT CHARSET=UTF8 COLLATE=utf8_unicode_ci;
ALTER TABLE order_detail ADD Foreign Key (order_id) REFERENCES `order(order_id)` ON DELETE
CASCADE;
ALTER TABLE order_detail ADD Foreign Key (item_id) REFERENCES item(item_id) ON DELETE CASCADE;
/*Table structure for order_discount*/
DROP TABLE IF EXISTS order_discount;
CREATE TABLE order_discount (
order_id int(11) NOT NULL,
discount_id int(11) NOT NULL,
PRIMARY KEY (order_id, discount_id)
) ENGINE=NDBCLUSTER TYPE=NDB AUTO_INCREMENT=1 DEFAULT CHARSET=UTF8 COLLATE=utf8_unicode_ci;
ALTER TABLE order_discount ADD Foreign Key (order_id) REFERENCES `order(order_id)` ON DELETE
CASCADE;
ALTER TABLE order_discount ADD Foreign Key (discount_id) REFERENCES discount(discount_id) ON
DELETE CASCADE;
Data /*Default data for the invoice system*/
use invoice;
/*Languages for the system*/
insert into translate_field (name) values ('English');
insert into translate_field (name) values ('Dutch');
insert into language (language_code, translate_field_id) values ('EN',1);
insert into language (language_code, translate_field_id) values ('NL',2);
insert into translation values (1,1,'English');
18 insert into translation values (2,1,'Engels');
insert into translation values (1,2,'Dutch');
insert into translation values (2,2,'Nederlands');
/*Fields needed for the contents of the website*/
insert into translate_field (name) values ('language');
insert into translate_field (name) values ('username');
insert into translate_field (name) values ('password');
insert into translate_field (name) values ('remember_me');
insert into translate_field (name) values ('yes');
insert into translate_field (name) values ('site_title');
insert into translate_field (name) values ('log_in');
insert into translate_field (name) values ('reset');
insert into translate_field (name) values ('menu');
insert into translate_field (name) values ('home_page');
insert into translate_field (name) values ('welcome');
insert into translate_field (name) values ('logout');
insert into translate_field (name) values ('profile');
insert into translate_field (name) values ('choose_action');
insert into translate_field (name) values ('create_invoice');
insert into translate_field (name) values ('archive');
insert into translate_field (name) values ('admin_panel');
insert into translate_field (name) values ('create_company');
insert into translate_field (name) values ('view_templates');
insert into translate_field (name) values ('view_plugins');
insert into translate_field (name) values ('new_password');
insert into translate_field (name) values ('new_password_repeat');
insert into translate_field (name) values ('firstname');
insert into translate_field (name) values ('lastname');
insert into translate_field (name) values ('emailaddress');
insert into translate_field (name) values ('save');
insert into translate_field (name) values ('pass_required_profile');
insert into translate_field (name) values ('identical_new_pass');
insert into translate_field (name) values ('username_taken');
insert into translate_field (name) values ('wrong_email');
insert into translate_field (name) values ('enter_password');
insert into translate_field (name) values ('succeeded');
insert into translate_field (name) values ('failed');
insert into translate_field (name) values ('wrong_pass');
insert into translate_field (name) values ('username_not_found');
insert into translate_field (name) values ('detail_info');
insert into translate_field (name) values ('support_unique');
insert into translate_field (name) values ('server');
insert into translate_field (name) values ('database');
insert into translate_field (name) values ('choose_invoice');
insert into translate_field (name) values ('invoice_unique_notice');
insert into translate_field (name) values ('order');
insert into translate_field (name) values ('items');
insert into translate_field (name) values ('discounts');
insert into translate_field (name) values ('ordered_on');
insert into translate_field (name) values ('by');
insert into translate_field (name) values ('for');
insert into translate_field (name) values ('no_invoices');
insert into translate_field (name) values ('no_plugins');
insert into translate_field (name) values ('no_templates');
insert into translate_field (name) values ('invoice');
insert into translate_field (name) values ('invoice_date');
insert into translate_field (name) values ('date');
insert into translate_field (name) values ('invoice_number');
insert into translate_field (name) values ('client_number');
insert into translate_field (name) values ('company_info');
insert into translate_field (name) values ('client_info');
insert into translate_field (name) values ('telephone_short');
insert into translate_field (name) values ('fax_short');
insert into translate_field (name) values ('email');
insert into translate_field (name) values ('bank_info');
insert into translate_field (name) values ('description');
insert into translate_field (name) values ('vat');
insert into translate_field (name) values ('quantity');
insert into translate_field (name) values ('unit_no_vat');
insert into translate_field (name) values ('unit_vat');
insert into translate_field (name) values ('total_vat');
insert into translate_field (name) values ('choose_invoice_lang');
insert into translate_field (name) values ('print_friendly');
insert into translate_field (name) values ('example_discount');
insert into translate_field (name) values ('on_total');
insert into translate_field (name) values ('on');
19 insert
insert
insert
insert
insert
insert
insert
insert
insert
insert
insert
insert
insert
insert
insert
insert
insert
insert
insert
insert
insert
insert
insert
insert
insert
insert
insert
insert
insert
insert
insert
insert
insert
insert
insert
insert
insert
insert
insert
insert
insert
insert
insert
insert
insert
insert
insert
insert
insert
insert
insert
insert
insert
insert
into
into
into
into
into
into
into
into
into
into
into
into
into
into
into
into
into
into
into
into
into
into
into
into
into
into
into
into
into
into
into
into
into
into
into
into
into
into
into
into
into
into
into
into
into
into
into
into
into
into
into
into
into
into
translate_field
translate_field
translate_field
translate_field
translate_field
translate_field
translate_field
translate_field
translate_field
translate_field
translate_field
translate_field
translate_field
translate_field
translate_field
translate_field
translate_field
translate_field
translate_field
translate_field
translate_field
translate_field
translate_field
translate_field
translate_field
translate_field
translate_field
translate_field
translate_field
translate_field
translate_field
translate_field
translate_field
translate_field
translate_field
translate_field
translate_field
translate_field
translate_field
translate_field
translate_field
translate_field
translate_field
translate_field
translate_field
translate_field
translate_field
translate_field
translate_field
translate_field
translate_field
translate_field
translate_field
translate_field
(name)
(name)
(name)
(name)
(name)
(name)
(name)
(name)
(name)
(name)
(name)
(name)
(name)
(name)
(name)
(name)
(name)
(name)
(name)
(name)
(name)
(name)
(name)
(name)
(name)
(name)
(name)
(name)
(name)
(name)
(name)
(name)
(name)
(name)
(name)
(name)
(name)
(name)
(name)
(name)
(name)
(name)
(name)
(name)
(name)
(name)
(name)
(name)
(name)
(name)
(name)
(name)
(name)
(name)
values
values
values
values
values
values
values
values
values
values
values
values
values
values
values
values
values
values
values
values
values
values
values
values
values
values
values
values
values
values
values
values
values
values
values
values
values
values
values
values
values
values
values
values
values
values
values
values
values
values
values
values
values
values
('choose_system');
('name');
('address');
('website');
('telephone');
('fax');
('variable_field');
('logo');
('config_settings');
('user_mgm');
('client_mgm');
('company_mgm');
('language_mgm');
('clean_db');
('back_db');
('add');
('edit');
('delete');
('no_admin');
('switch_admin');
('admin');
('new_account_subject');
('no_company');
('current_logo');
('remove_current_logo');
('no');
('are_you_sure');
('continu');
('lang_compare');
('lang_code');
('global_name');
('lang_own_lang');
('val_new_lang');
('select_edit');
('clean_year');
('global_value');
('no_clients');
('choose_template');
('date_order');
('save_archive');
('price_no_vat');
('name_in_english');
('value_is_percentage');
('discount_total');
('low_limit');
('no_item_attached');
('value');
('item');
('not_listed_item');
('divert_print');
('invoice_payed');
('create_empty');
('self_made');
('save_as_new');
/*Translations for the fields*/
insert
insert
insert
insert
insert
insert
insert
insert
insert
insert
insert
insert
insert
insert
insert
insert
insert
insert
insert
insert
into
into
into
into
into
into
into
into
into
into
into
into
into
into
into
into
into
into
into
into
translation
translation
translation
translation
translation
translation
translation
translation
translation
translation
translation
translation
translation
translation
translation
translation
translation
translation
translation
translation
values
values
values
values
values
values
values
values
values
values
values
values
values
values
values
values
values
values
values
values
(1,3,'language');
(2,3,'taal');
(1,4,'username');
(2,4,'gebruikersnaam');
(1,5,'password');
(2,5,'wachtwoord');
(1,6,'remember me');
(2,6,'onthou mij');
(1,7,'yes');
(2,7,'ja');
(1,8,'Global Invoicing');
(2,8,'Globale Facturatie');
(1,9,'log in');
(2,9,'log in');
(1,10,'reset');
(2,10,'herbeginnen');
(1,11,'menu');
(2,11,'menu');
(1,12,'home');
(2,12,'start');
20 insert into translation values (1,13,'welcome');
insert into translation values (2,13,'welkom');
insert into translation values (1,14,'log out');
insert into translation values (2,14,'uitloggen');
insert into translation values (1,15,'profile');
insert into translation values (2,15,'profiel');
insert into translation values (1,16,'choose an action');
insert into translation values (2,16,'kies een actie');
insert into translation values (1,17,'create a new invoice');
insert into translation values (2,17,'maak een nieuwe factuur');
insert into translation values (1,18,'archive');
insert into translation values (2,18,'archief');
insert into translation values (1,19,'admin panel');
insert into translation values (2,19,'administratiepaneel');
insert into translation values (1,20,'create a new company');
insert into translation values (2,20,'maak een nieuw bedrijf');
insert into translation values (1,21,'view templates');
insert into translation values (2,21,'bekijk de templates');
insert into translation values (1,22,'view plugins');
insert into translation values (2,22,'bekijk de plugins');
insert into translation values (1,23,'new password');
insert into translation values (2,23,'nieuw wachtwoord');
insert into translation values (1,24,'repeat the new password');
insert into translation values (2,24,'herhaal het nieuw wachtwoord');
insert into translation values (1,25,'first name');
insert into translation values (2,25,'voornaam');
insert into translation values (1,26,'last name');
insert into translation values (2,26,'familienaam');
insert into translation values (1,27,'e-mail address');
insert into translation values (2,27,'e-mail adres');
insert into translation values (1,28,'save');
insert into translation values (2,28,'bewaar');
insert into translation values (1,29,'You have to enter your password to make changes to your
profile!');
insert into translation values (2,29,'Je moet je wachtwoord ingeven om je profiel aan te
passen!');
insert into translation values (1,30,'You have to confirm your new password correctly!');
insert into translation values (2,30,'Je moet je nieuw wachtwoord correct bevestigen!');
insert into translation values (1,31,'This username is already in use!');
insert into translation values (2,31,'Deze gebruikersnaam wordt al gebruikt!');
insert into translation values (1,32,'This e-mail address is not valid!');
insert into translation values (2,32,'Dit e-mail adres is ongeldig!');
insert into translation values (1,33,'You must enter your password!');
insert into translation values (2,33,'Je moet je wachtwoord opgeven!');
insert into translation values (1,34,'succeeded!');
insert into translation values (2,34,'geslaagd!');
insert into translation values (1,35,'failed!');
insert into translation values (2,35,'mislukt!');
insert into translation values (1,36,'wrong password!');
insert into translation values (2,36,'verkeerd wachtwoord!');
insert into translation values (1,37,'this user does not exist!');
insert into translation values (2,37,'deze gebruiker bestaat niet!');
insert into translation values (1,38,'detailed information');
insert into translation values (2,38,'gedetailleerde informatie');
insert into translation values (1,39,'support for checking last entries');
insert into translation values (2,39,'ondersteuning voor controle op laatste toevoegingen');
insert into translation values (1,40,'server');
insert into translation values (2,40,'server');
insert into translation values (1,41,'database');
insert into translation values (2,41,'databank');
insert into translation values (1,42,'choose an invoice to create for');
insert into translation values (2,42,'kies een factuur die u wenst te maken voor');
insert into translation values (1,43,'if the checking option is enabled only not created
invoices are listed, otherwise all available invoices are listed');
insert into translation values (2,43,'als de controle ondersteuning aan staat worden enkel
niet-gemaakte facturen getoond, anders worden ze allemaal getoond');
insert into translation values (1,44,'order');
insert into translation values (2,44,'bestelling');
insert into translation values (1,45,'items');
insert into translation values (2,45,'artikelen');
insert into translation values (1,46,'discounts');
insert into translation values (2,46,'kortingen');
insert into translation values (1,47,'ordered on');
insert into translation values (2,47,'besteld op');
insert into translation values (1,48,'by');
insert into translation values (2,48,'door');
insert into translation values (1,49,'for');
21 insert
insert
insert
insert
insert
insert
insert
insert
insert
insert
insert
insert
insert
insert
insert
insert
insert
insert
insert
insert
insert
insert
insert
insert
insert
insert
insert
insert
insert
insert
insert
insert
insert
insert
insert
insert
insert
insert
insert
insert
insert
insert
insert
insert
insert
insert
insert
insert
insert
insert
insert
insert
insert
insert
insert
insert
insert
insert
insert
insert
insert
insert
insert
insert
insert
insert
insert
insert
insert
insert
insert
insert
insert
insert
insert
insert
insert
into
into
into
into
into
into
into
into
into
into
into
into
into
into
into
into
into
into
into
into
into
into
into
into
into
into
into
into
into
into
into
into
into
into
into
into
into
into
into
into
into
into
into
into
into
into
into
into
into
into
into
into
into
into
into
into
into
into
into
into
into
into
into
into
into
into
into
into
into
into
into
into
into
into
into
into
into
translation
translation
translation
translation
translation
translation
translation
translation
translation
translation
translation
translation
translation
translation
translation
translation
translation
translation
translation
translation
translation
translation
translation
translation
translation
translation
translation
translation
translation
translation
translation
translation
translation
translation
translation
translation
translation
translation
translation
translation
translation
translation
translation
translation
translation
translation
translation
translation
translation
translation
translation
translation
translation
translation
translation
translation
translation
translation
translation
translation
translation
translation
translation
translation
translation
translation
translation
translation
translation
translation
translation
translation
translation
translation
translation
translation
translation
values
values
values
values
values
values
values
values
values
values
values
values
values
values
values
values
values
values
values
values
values
values
values
values
values
values
values
values
values
values
values
values
values
values
values
values
values
values
values
values
values
values
values
values
values
values
values
values
values
values
values
values
values
values
values
values
values
values
values
values
values
values
values
values
values
values
values
values
values
values
values
values
values
values
values
values
values
(2,49,'voor');
(1,50,'there are no invoices available');
(2,50,'er zijn geen facturen beschikbaar');
(1,51,'there are no plug-ins available');
(2,51,'er zijn geen plug-ins beschikbaar');
(1,52,'there are no templates available');
(2,52,'er zijn geen templates beschikbaar');
(1,53,'invoice');
(2,53,'factuur');
(1,54,'invoice date');
(2,54,'facturatiedatum');
(1,55,'date');
(2,55,'datum');
(1,56,'invoice number');
(2,56,'factuurnummer');
(1,57,'client number');
(2,57,'klantnummer');
(1,58,'company info');
(2,58,'bedrijfsgegevens');
(1,59,'client info');
(2,59,'klantgegegevens');
(1,60,'phone');
(2,60,'tel.');
(1,61,'fax');
(2,61,'fax');
(1,62,'e-mail');
(2,62,'e-mail');
(1,63,'bank information');
(2,63,'bankgegevens');
(1,64,'description');
(2,64,'beschrijving');
(1,65,'VAT');
(2,65,'BTW');
(1,66,'quantity');
(2,66,'hoeveelheid');
(1,67,'unit price (no VAT)');
(2,67,'eenheidsprijs (excl. BTW)');
(1,68,'unit price (with VAT)');
(2,68,'eenheidsprijs (incl. BTW)');
(1,69,'total price (with VAT)');
(2,69,'totaal bedrag (incl. BTW)');
(1,70,'choose the language for the invoice');
(2,70,'kies de taal voor de factuur');
(1,71,'print friendly version');
(2,71,'printervriendelijke versie');
(1,72,'discount example');
(2,72,'korting voorbeeld');
(1,73,'on total price');
(2,73,'op totaal bedrag');
(1,74,'on');
(2,74,'op');
(1,75,'choose a system');
(2,75,'kies een systeem');
(1,76,'name');
(2,76,'naam');
(1,77,'address');
(2,77,'adres');
(1,78,'website');
(2,78,'website');
(1,79,'telephone');
(2,79,'telefoon');
(1,80,'fax');
(2,80,'fax');
(1,81,'variable field');
(2,81,'variabel veld');
(1,82,'logo');
(2,82,'logo');
(1,83,'configuration settings');
(2,83,'congiratie instellingen');
(1,84,'user management');
(2,84,'gebruikers beheer');
(1,85,'client management');
(2,85,'klant beheer');
(1,86,'company management');
(2,86,'bedrijf beheer');
(1,87,'language management');
(2,87,'taal beheer');
22 insert into translation
insert into translation
insert into translation
insert into translation
insert into translation
insert into translation
insert into translation
insert into translation
insert into translation
insert into translation
insert into translation
insert into translation
insert into translation
insert into translation
insert into translation
insert into translation
insert into translation
insert into translation
insert into translation
insert into translation
insert into translation
insert into translation
insert into translation
insert into translation
insert into translation
insert into translation
insert into translation
insert into translation
insert into translation
insert into translation
insert into translation
insert into translation
insert into translation
insert into translation
insert into translation
insert into translation
insert into translation
insert into translation
insert into translation
insert into translation
insert into translation
insert into translation
insert into translation
insert into translation
alles er voor');
insert into translation
insert into translation
insert into translation
insert into translation
insert into translation
insert into translation
insert into translation
insert into translation
insert into translation
insert into translation
insert into translation
insert into translation
insert into translation
insert into translation
insert into translation
insert into translation
insert into translation
item)?');
insert into translation
artikel)?');
insert into translation
insert into translation
insert into translation
insert into translation
insert into translation
insert into translation
insert into translation
insert into translation
insert into translation
insert into translation
insert into translation
seconds!');
values
values
values
values
values
values
values
values
values
values
values
values
values
values
values
values
values
values
values
values
values
values
values
values
values
values
values
values
values
values
values
values
values
values
values
values
values
values
values
values
values
values
values
values
(1,88,'clean up database');
(2,88,'ruim databank op');
(1,89,'back up database');
(2,89,'back up databank');
(1,90,'add');
(2,90,'toevoegen');
(1,91,'edit');
(2,91,'aanpassen');
(1,92,'delete');
(2,92,'verwijderen');
(1,93,'you are not an administrator');
(2,93,'u bent geen administrator');
(1,94,'switch user to or from administrator');
(2,94,'verwissel gebruiker van of naar administrator');
(1,95,'administrator');
(2,95,'administrator');
(1,96,'new account for the Global Invoicing application');
(2,96,'nieuwe account voor het Globale Facturatie systeem');
(1,97,'there are no companies');
(2,97,'er zijn geen bedrijven');
(1,98,'current logo');
(2,98,'huidig logo');
(1,99,'remove current logo');
(2,99,'verwijder huidig logo');
(1,100,'no');
(2,100,'nee');
(1,101,'are you sure');
(2,101,'bent u zeker');
(1,102,'continue');
(2,102,'ga verder');
(1,103,'compare to what languages');
(2,103,'vergelijk met welke talen');
(1,104,'language code');
(2,104,'taalcode');
(1,105,'global name');
(2,105,'global naam');
(1,106,'language name in its own language');
(2,106,'naam van de taal in die taal');
(1,107,'translation for the global in the new language');
(2,107,'vertaling voor de global in de nieuwe taal');
(1,108,'select a language to edit');
(2,108,'kies een taal om aan te passen');
(1,109,'the data will be removed for this year and before');
(2,109,'de gegevens zullen verwijderd worden voor dit jaar en
values
values
values
values
values
values
values
values
values
values
values
values
values
values
values
values
values
(1,110,'global value in');
(2,110,'global waarde in');
(1,111,'there are no clients');
(2,111,'er zijn geen klanten');
(1,112,'choose a template');
(2,112,'kies een template');
(1,113,'date of the order');
(2,113,'datum van de bestelling');
(1,114,'save in archive');
(2,114,'opslaan in het archief');
(1,115,'price without VAT');
(2,115,'prijs zonder BTW');
(1,116,'name in English');
(2,116,'naam in het Engels');
(1,117,'is the value a percentage?');
(2,117,'is de waarde een percentage?');
(1,118,'is the discount on the total amount (or just on this
values (2,118,'is de korting op het totale bedrag (of enkel op dit
values
values
values
values
values
values
values
values
values
values
values
(1,119,'low limit for discount');
(2,119,'ondergrens voor de korting');
(1,120,'no items attached to the discount');
(2,120,'er zijn geen artikelen gekoppeld aan de korting');
(1,121,'value');
(2,121,'waarde');
(1,122,'item');
(2,122,'artikel');
(1,123,'not listed item');
(2,123,'niet getoond artikel');
(1,124,'you will be diverted to the stored invoice in 5
23 insert into translation
5 seconden!');
insert into translation
insert into translation
insert into translation
insert into translation
insert into translation
insert into translation
insert into translation
insert into translation
values (2,124,'u zal omgeleid worden naar de opgeslagen factuur binnen
values
values
values
values
values
values
values
values
(1,125,'is this invoice already paid');
(2,125,'is deze factuur al betaald');
(1,126,'create a new empty invoice');
(2,126,'maak een nieuwe lege factuur');
(1,127,'self made');
(2,127,'zelf gemaakt');
(1,128,'save as new invoice');
(2,128,'sla op als nieuwe factuur');
/*Default preview Item*/
insert into item values (1,'Test Item','This is testitem','20,23','21');
/*Default administration user (username: admin, password: admin)*/
insert into user (username,password,firstname,lastname,email,admin) values
('admin','21232f297a57a5a743894a0e4a801fc3','Dennis','Vermaut','[email protected]'
,'Y');
/*Default non-administration user (username: viewer, password: viewer)*/
insert into user (username,password,firstname,lastname,email,admin) values
('viewer','4b2a1529867b8d697685b1722ccd0149','Dennis','Vermaut','[email protected]
','N');
24 Theoretical usage Introduction This theoretical usage will show how the system works in theory and how everything is related. To do this use cases are used. After the theoretical show case, the practical manual will follow. Type of users For the Global Invoicing web application I have designed the user management with two types of users. The two types are the so called administrators and the viewers. The application can only be used after being logged in as one of these types of users. All users have a profile in which they can change their personal settings. Administrators Administrators are the users with all rights on the system. They can use the application without limitation. This includes changing configuration settings, language management, creating users, changing permissions and of course create and print invoices and manage companies. To the user management and the language management there are some limitations to make sure the system doesn’t become unusable. This means that you will never be able to delete (or change the permissions) all the administrators. There will always be one administrator available. Without this limitation the system could become restricted to only viewers and the management would be unavailable. The language management limitation includes that you can’t delete the language you are currently working in, nor can you delete what is set as default language. This is because the default language is used to fill up missing translations in other languages. Viewers The viewers are any other staff that can use the system. Their actions allowed are limited to creating invoices and companies. That way the part of creating invoices can be distributed among secretaries and trainees or whatsoever without having the risk that important changes are made to the system. 25 Use case diagram Introduction A use case diagram is a type of behavioral diagram defined by the Unified Modeling Language (UML) created from an Use‐case analysis (see next topic). Its purpose is to present a graphical overview of the functionality provided by a system in terms of actors, their goals—represented as use cases—and any dependencies between those use cases. Diagram 26 Use cases Introduction An use case is a description of a system's behavior as it responds to a request that originates from outside of that system. Also these use cases can point out more requirements than what you had in mind at first or limitations you have to take not off. Due to these use cases I was able to implement the limitations to the user and language management without having to experience the problem first. The first use cases will be the main use case which all others extend. Log in Purpose: To authenticate and check authorization for the user Short description: The application cannot be used without being logged in. The log in checks whether you can use the system and in what level Actors: Everybody Frequency: Average Scalability: Low Criticality: Very high Indirect demands: the user should exist in the database (added by administrator) before he/she is able to log in Preconditions: the user exists Post conditions: the user is logged in and has the sufficient rights Primary way: • User browses to the web application • Enters username • Enters password • Chooses to store log in information or not • Hits log in Use cases related to primary way: none Alternatives: The user is automatically logged in due to past login and he/she chose to save the information Use cases related to alternatives: / Exceptions: If the password is changed the alternative way cannot be used, the primary way must be used Use cases related to exceptions: Log in Remarks: For the automatic log in feature the browser must support cookies 27 Edit profile Purpose: edit personal information and log in information Short description: By editing the profile the user can sets its own data and log in information Actors: Administrator, Viewer Frequency: Low Scalability: Low Criticality: High Indirect demands: the password must be entered to save the edited profile Preconditions: The user must be logged in Post conditions: The changes are saved Primary way: • User chooses ‘profile’ from the menu • User enters information and password • User hits save Use cases related to primary way: • Log in Alternatives: / Use cases related to alternatives: / Exceptions: If the password is not entered, the changes will not be saved Use cases related to exceptions: Remarks: if changing the username Î check if username is available 28 Create a blank invoice Purpose: To create a new invoice from scratch Short description: The user wants to create a new invoice from an empty form Actors: Administrator, Viewer Frequency: Average Scalability: Average Criticality: Average Indirect demands: / Preconditions: The user must be logged in Post conditions: The invoice should be stored in the local archive Primary way: • User chooses ‘create a new invoice’ from the menu • User chooses a blank invoice • User fills in the necessary fields • User hits ‘save in archive’ Use cases related to primary way: • Log in Alternatives: The user creates an invoice from a plug‐in Use cases related to alternatives: • Create an invoice from a plug‐in Exceptions: Use cases related to exceptions: Remarks: 29 Create an invoice from a plugin Purpose: To create a new invoice from a plug‐in Short description: The user wants to create a new invoice listed from a plug‐in Actors: Administrator, Viewer Frequency: High Scalability: Average Criticality: Average Indirect demands: There should be plug‐ins in the system and the plug‐in should have unsaved invoices available Preconditions: The user must be logged in Post conditions: The invoice should be stored in the local archive Primary way: • User chooses ‘create a new invoice’ from the menu • User chooses a plug‐in • User chooses an invoice • User checks the necessary fields and may edit them • User hits ‘save in archive’ Use cases related to primary way: • Log in Alternatives: The user creates an invoice from scratch Use cases related to alternatives: • Create a blank invoice Exceptions: Use cases related to exceptions: Remarks: 30 View archive Purpose: View stored invoices Short description: In the archive the invoices are stored for all the plug‐ins and empty invoices. The invoices are archived by plug‐in name or under the own‐mode flag. Actors: Administrators, Viewers Frequency: Average Scalability: Low Criticality: Low Indirect demands: There have to be stored invoices to view them Preconditions: User must be logged in Post conditions: a chosen invoice is showed and can be printed Primary way: • User chooses ‘archive’ • User selects the group • User selects the invoice Use cases related to primary way: / Alternatives: / Use cases related to alternatives: / Exceptions: If there are no invoices, nothing will be showed but a warning. Use cases related to exceptions: / Remarks: / 31 Create a new company Purpose: To create a new company in the database Short description: The user wants to create a new company in the database Actors: Administrator, Viewer Frequency: Low Scalability: Low Criticality: Average Indirect demands: / Preconditions: The user must be logged in Post conditions: The company should be stored in the local database Primary way: • User chooses ‘create a new company’ from the menu • User fills in the necessary fields • User hits ‘save’ Use cases related to primary way: • Log in Alternatives: this alternative can only be done as an administrator • User chooses ‘admin panel’ • User chooses ‘company management’ • User chooses ‘add’ • User edits fields • User hits ‘save’ Use cases related to alternatives: / Exceptions: If the company already exists, data may be updated Use cases related to exceptions: none Remarks: 32 View templates Purpose: To view the available templates and to preview them Short description: The user gets a list of available templates in the system and can get a preview with random data. The preview can be viewed in all the languages. Furthermore this preview can be printed. Actors: Administrator, Viewer Frequency: Average Scalability: Low Criticality: Low Indirect demands: there must be templates available to view Preconditions: The user must be logged in Post conditions: The template should be filled with random data and shown to the user Primary way: • User chooses ‘view templates’ from the menu • Users chooses a template • User can switch the language and print the invoice Use cases related to primary way: • Log in Alternatives: / Use cases related to alternatives: / Exceptions: / Use cases related to exceptions: / Remarks: 33 View plugins Purpose: To view the available plug‐ins and their properties Short description: The user gets a list of available plug‐ins, listed in recursive groups based upon directories. For each plug‐in some data is shown. Actors: Administrator, Viewer Frequency: Low Scalability: Low Criticality: Low Indirect demands: there must be plug‐ins to view Preconditions: The user must be logged in Post conditions: The available plug‐ins should be listed recursively Primary way: • User chooses ‘view plug‐ins’ from the menu Use cases related to primary way: • Log in Alternatives: / Use cases related to alternatives: / Exceptions: / Use cases related to exceptions: / Remarks: 34 Edit configuration settings Purpose: To change the settings in the configuration file Short description: The user gets an overview of the current settings and can change them. Actors: Administrator Frequency: Low Scalability: Low Criticality: High Indirect demands: Preconditions: The user must be logged in and must be administrator Post conditions: The configuration settings should be changed Primary way: • User chooses ‘admin panel’ from the menu • User chooses ‘configuration settings’ • User edits fields • User hits ‘save’ Use cases related to primary way: • Log in Alternatives: / Use cases related to alternatives: / Exceptions: / Use cases related to exceptions: / Remarks: 35 Add user Purpose: To add an user to the system Short description: The user gets a form to complete and can add users to the system Actors: Administrator Frequency: Average Scalability: Low Criticality: High Indirect demands: Preconditions: The user must be logged in and must be administrator Post conditions: The user should be added Primary way: • User chooses ‘admin panel’ from the menu • User chooses ‘user management’ • User chooses ‘add’ • User edits fields • User hits ‘save’ Use cases related to primary way: • Log in Alternatives: / Use cases related to alternatives: / Exceptions: / Use cases related to exceptions: / Remarks: 36 Edit user Purpose: To change the role of an user Short description: The user can be switched from viewer to administrator or the other way around Actors: Administrator Frequency: Low Scalability: Low Criticality: High Indirect demands: Preconditions: The user must be logged in and must be administrator Post conditions: The role for the user should be changed Primary way: • User chooses ‘admin panel’ from the menu • User chooses ‘user management’ • User chooses ‘edit’ • User chooses an user Use cases related to primary way: • Log in Alternatives: / Use cases related to alternatives: / Exceptions: / Use cases related to exceptions: / Remarks: There should always be one administrator left to do the administration! The system should take notice of this. 37 Delete user Purpose: To delete an user from the system Short description: The administrator removes an user from the system Actors: Administrator Frequency: Low Scalability: Low Criticality: High Indirect demands: Preconditions: The user must be logged in and must be administrator Post conditions: The user should be removed Primary way: • User chooses ‘admin panel’ from the menu • User chooses ‘user management’ • User chooses ‘delete’ • User chooses an user Use cases related to primary way: • Log in Alternatives: / Use cases related to alternatives: / Exceptions: / Use cases related to exceptions: / Remarks: There should always be one administrator left to do the administration! The system should take notice of this. 38 Add client Purpose: To add a client to the system Short description: The administrator adds a client to the system Actors: Administrator Frequency: Low Scalability: Low Criticality: Average Indirect demands: Preconditions: The user must be logged in and must be administrator Post conditions: The client should be added Primary way: • User chooses ‘admin panel’ from the menu • User chooses ‘client management’ • User chooses ‘add’ • User edits the fields • User hits ‘save’ Use cases related to primary way: • Log in Alternatives: / Use cases related to alternatives: / Exceptions: / Use cases related to exceptions: / Remarks: / 39 Edit client Purpose: To edit a client in the system Short description: The administrator edits a client in the system Actors: Administrator Frequency: Low Scalability: Low Criticality: Average Indirect demands: Preconditions: The user must be logged in and must be administrator Post conditions: The client should be edited Primary way: • User chooses ‘admin panel’ from the menu • User chooses ‘client management’ • User chooses ‘edit’ • User chooses a client • User hits ‘save’ Use cases related to primary way: • Log in Alternatives: / Use cases related to alternatives: / Exceptions: / Use cases related to exceptions: / Remarks: / 40 Delete client Purpose: To remove a client from the system Short description: The administrator removes a client from the system Actors: Administrator Frequency: Low Scalability: Low Criticality: Average Indirect demands: Preconditions: The user must be logged in and must be administrator Post conditions: The client should be edited Primary way: • User chooses ‘admin panel’ from the menu • User chooses ‘client management’ • User chooses ‘delete’ • User chooses a client Use cases related to primary way: • Log in Alternatives: / Use cases related to alternatives: / Exceptions: / Use cases related to exceptions: / Remarks: / 41 Edit company Purpose: To edit a company in the system Short description: The administrator edits a company Actors: Administrator Frequency: Low Scalability: Low Criticality: Average Indirect demands: Preconditions: The user must be logged in and must be administrator Post conditions: The company should be edited Primary way: • User chooses ‘admin panel’ from the menu • User chooses ‘company management’ • User chooses ‘edit’ • User chooses a company • User hits ‘save’ Use cases related to primary way: • Log in Alternatives: / Use cases related to alternatives: / Exceptions: / Use cases related to exceptions: / Remarks: / 42 Delete company Purpose: To delete a company from the system Short description: The administrator deletes a company Actors: Administrator Frequency: Low Scalability: Low Criticality: High Indirect demands: Preconditions: The user must be logged in and must be administrator Post conditions: The company should be removed and all invoices attached to it Primary way: • User chooses ‘admin panel’ from the menu • User chooses ‘company management’ • User chooses ‘delete’ • User chooses a company Use cases related to primary way: • Log in Alternatives: / Use cases related to alternatives: / Exceptions: / Use cases related to exceptions: / Remarks: / 43 Add language Purpose: To add a language to the system Short description: The administrator adds a language Actors: Administrator Frequency: Low Scalability: Low Criticality: High Indirect demands: Preconditions: The user must be logged in and must be administrator Post conditions: The language should be added with the translations Primary way: • User chooses ‘admin panel’ from the menu • User chooses ‘language management’ • User chooses ‘add’ • User chooses languages to compare with • User fills in the fields • User hits ‘save’ Use cases related to primary way: • Log in Alternatives: / Use cases related to alternatives: / Exceptions: / Use cases related to exceptions: / Remarks: / 44 Edit language Purpose: To edit a language in the system Short description: The administrator edits a language Actors: Administrator Frequency: Low Scalability: Low Criticality: High Indirect demands: Preconditions: The user must be logged in and must be administrator Post conditions: The language and the translations should be edited Primary way: • User chooses ‘admin panel’ from the menu • User chooses ‘language management’ • User chooses ‘edit’ • User chooses languages to compare with • User fills in the fields • User hits ‘save’ Use cases related to primary way: • Log in Alternatives: / Use cases related to alternatives: / Exceptions: / Use cases related to exceptions: / Remarks: / 45 Delete language Purpose: To delete a language in the system Short description: The administrator edits a language Actors: Administrator Frequency: Low Scalability: Low Criticality: High Indirect demands: Preconditions: The user must be logged in and must be administrator Post conditions: The language and the translations should be deleted Primary way: • User chooses ‘admin panel’ from the menu • User chooses ‘language management’ • User chooses ‘delete’ • User chooses the language Use cases related to primary way: • Log in Alternatives: / Use cases related to alternatives: / Exceptions: / Use cases related to exceptions: / Remarks: The current language and the default language shouldn’t be able to be deleted! The default language is also used to fill up missing translations! 46 Add global Purpose: To edit a global to the system Short description: The administrator adds a global Actors: Administrator Frequency: Low Scalability: Low Criticality: Average Indirect demands: Preconditions: The user must be logged in and must be administrator Post conditions: The global should be added to the system Primary way: • User chooses ‘admin panel’ from the menu • User chooses ‘language management’ • User chooses ‘add global’ • User fills in the fields • User hits ‘save’ Use cases related to primary way: • Log in Alternatives: / Use cases related to alternatives: / Exceptions: / Use cases related to exceptions: / Remarks: / 47 Clean up database Purpose: To remove all old invoices from the system Short description: The administrator can choose to remove all old invoices (more than a year old) from the system to keep the database as light as possible Actors: Administrator Frequency: Low Scalability: Low Criticality: High Indirect demands: Preconditions: The user must be logged in and must be administrator Post conditions: The old invoices should be removed Primary way: • User chooses ‘admin panel’ from the menu • User chooses ‘clean up database’ • User chooses ‘continue’ Use cases related to primary way: • Log in Alternatives: / Use cases related to alternatives: / Exceptions: / Use cases related to exceptions: / Remarks: / 48 Back up database Purpose: To get a copy of all the data in the database Short description: The administrator gets the entire script to back up the database the way it is Actors: Administrator Frequency: Low Scalability: Low Criticality: Low Indirect demands: Preconditions: The user must be logged in and must be administrator Post conditions: The old invoices should be removed Primary way: • User chooses ‘admin panel’ from the menu • User chooses ‘back up database’ • User copies the data in the text field and stores it wherever he wants Use cases related to primary way: • Log in Alternatives: / Use cases related to alternatives: / Exceptions: / Use cases related to exceptions: / Remarks: / 49 Log out Purpose: To log out from the system Short description: The user gets logged out of the system and can choose to log in again Actors: Administrator, Viewer Frequency: Average Scalability: Average Criticality: Average Indirect demands: Preconditions: The user must be logged in Post conditions: The user must be logged out Primary way: • Uses chooses ‘log out’ from the menu Use cases related to primary way: • Log in Alternatives: The user closes his browser. If the ‘save log in information’ option wasn’t checked, the user is logged out Use cases related to alternatives: / Exceptions: / Use cases related to exceptions: / Remarks: / 50 Change language Purpose: To change the language of the system for the user Short description: The user can change the language of the interface Actors: Administrator, Viewer Frequency: High Scalability: Average Criticality: Average Indirect demands: Preconditions: The user must be logged in Post conditions: The interface should be in the chosen language Primary way: • User chooses a language from the selection Use cases related to primary way: • Log in Alternatives: / Use cases related to alternatives: / Exceptions: / Use cases related to exceptions: / Remarks: / 51 Class diagram This diagram will show how the PHP classes are related to each other and how they are used in general. Legend o
•
Private Public Protected Plugin This class deals with getting all invoice information from foreign databases (read‐only) without writing anything. Plugin o
o
o
o
o
o
o
o
o
o
o
o
o
o
o
o
o
o
o
•
•
o
o
•
•
•
•
•
plugin_name: String plugin_has_unique_key: Bool db_server: String db_username: String db_password: String db_database: String unique_key_table: String unique_key_column: String db_foreign_connection: MySQL db_local_connection: MySQL items_array: Array company_info: Array client_info: Array discounts_array: Array discount_language_array: Array item_array_inserted: Array discount_array_inserted: Array company_id: Integer invoice_id: Integer unique_value: Integer date_foreign: String id_foreign: Integer client_id: Integer template_name: String invoices_array: Array __construct() Connect() NewConnection(): MySQL getServer(): String getUser(): String getPassword(): String getDatabase(): String 52 •
•
•
•
•
•
o
o
o
•
•
o
•
•
•
•
o
•
•
•
•
•
•
•
•
•
setTemplate(template_name: String) getTemplate(): String getPluginName(): String setPluginName(plugin_name: String) setUnique(bool: Bool) setDBServer(server: String) setDBUsername(username: String) setDBPassword(password: String) setDBDatabase(database: String) setUniqueKeyTable(table: String) setUniqueKeyColumn(column: String) hasUniqueKey(): Bool CreateInvoice(): Bool ClearInvoicesArray() SetupCompany(): Bool SetupInvoice(date: String, requested: String, system: String, payed: Bool, company_id: Integer, user_id: Integer, client_id: Integer, template: String): Bool setInvoice(id: Integer) setCompany(id: Integer) getCompany(): Integer SetupClient(): Bool getForeignConnectionObject(): MySQL setClient(client_id: Integer) getClient(): Integer SetupDiscounts(): Bool SetupItems(): Bool setInvoiceId(id: Integer) setForeignDate(unixtimestamp: Integer) SetupLast(): Bool setUniqueValue(id: Integer) ClearItems() getItems(): Array FillClient(firstname: String, lastname: String, address: String, telephone: String, fax: String, email: String, bank: String, vat_number: String) getFilledClient(key: String): String ClearClient() FillItems(name: String, description: String, price: Double, vat: Double, amount: Integer) ClearDiscounts() FillDiscounts(value: Double, translations_array: Array, is_percentage_bool: Bool, on_total_bool: Bool, low_limit: Double, item_id: Integer) ClearDiscountTranslations() FillDiscountTranslation(language_id: Integer, value: String) FillCompanyInfo(name: String, address: String, email: String, website: String, telephone: String, fax: String, bank: String, var1: String, var2: String, var3: String, logo_url: String) getFilledCompany(key: String): String ClearCompanyInfo() 53
o
•
•
•
•
•
getDiscountLanguageArray(): Array getObject(): Plugin AddInvoice(class_object: Plugin) getLastUniqueIds(): Array GetStringNotId(id_array: Array, column_name: String): String getCompanyInfo(): Array getClientInfo(): Array getOrder(): Array getDiscount(): Array OverviewToCreateList(): String getSingleInvoice(key: Integer): Plugin __clone() __destruct() 54 MySQL This class does all the MySQL related work. o
o
o
o
o
o
o
o
o
•
•
•
•
•
•
•
•
•
o
•
•
MySQL db: Resource dbResult: Resource dbNrResults: Integer dbAffected: Integer dbInsertedId: Integer dbServer: String dbUser: String dbPass: String dbDatabase: String __construct(foreign_setup: Bool) Connect(dbserver: String, dbuser: String, dbpass: String) setDatabase(dbname: String) doQuery(query: String): Resource NumRows(): Integer NumAffected(): Integer InsertedId(): Integer GetObject(): Resource SelectNext(): Array() Error(): String Close() __destruct() 55 Language This class deals with getting the languages, changing them and storing the information in cookies. Also getting the interface values is the task for this class. o
o
o
o
•
•
•
o
•
•
•
•
•
•
•
Language dbobject: MySQL queryobj: QueryList CurrentLanguageId: Integer globalArray: Array __construct() getCurrentLanguage(): Integer getGlobals(): Array Globals() getGlobal(name: String): String getGlobalSilent(name: String): String setCurrentLanguage(lang_id: Integer) setDatabaseObject(dbobject: MySQL) getLanguageSelect(): String getLanguageSelect2(): String __destruct() 56 Invoice This class gets all the invoices and their information from the local database. o
o
o
o
o
o
o
o
o
•
•
•
•
•
•
•
o
o
o
•
o
•
•
•
o
•
o
•
•
•
•
•
•
•
•
•
•
•
•
Invoice company: Array client: Array items: Array order: Array discounts: Array language_id: Integer globals: Array langobj: Language dbobj: MySQL __construct() FillAllOfOrder(order_id: Integer) getGlobals(): Array GetSetTemplate(): String setOrderField(key: String, value: String) setClientField(key: String, value: String) setCompanyField(key: String, value: String) FillDiscounts(order_id: Integer) FillItems(order_id: Integer) FillCompany(order_id: Integer) getFilledCompany(key: String): String FillClient(order_id: Integer) getFilledClient(key: String): String FillOrder(order_id: Integer) GetFilledOrder(key: String): String FillGlobals() setLanguage(lang_id: Integer) AlterDiscountsTranslation() SaveCompany() SaveClient() SaveOrder() SaveOrderAsNew(): Integer getAnchors(): Array TotalPrice(): Double PluginToInvoice(): Integer getItems(): Array ClearItems() ClearDiscounts() getDiscount(): Array __destruct() 57 Auth This class deals with logging in, logging out, storing auto login cookie, authorization and profile/user management. o
o
o
o
o
o
•
•
•
•
•
•
•
•
•
•
•
•
•
•
Auth dbobj: MySQL loggedin: Bool isadmin: Bool queryobj: QueryList profileError: String anchor_logfailure: String __construct() AutoLogin(): Boolean SessionLogin() Login(username: String, password: String, remember_boolean: Bool, hashed: Bool): Bool getLoginAnchor(): String getUserFullName(): String Logout() IsAuth(): Bool getProfileError(): String getOwnProfile(): String SaveOwnProfile(POST) CreateUser(username: String, admin_boolean: Bool, firstname: String, lastname: String, email: String, password: String, passwordconfirm: String): Array IsAdmin(): Bool __destruct() 58 QueryList This class only deals with storing all the queries in one single location, like a query enumerator. o
•
•
•
•
•
•
•
•
•
•
•
•
•
•
•
•
•
•
•
•
•
•
•
•
•
QueryList No members AddTranslation(language_id: Integer, translate_field_id: Integer, value: String): String AllLanguages(): String ChangePayed(invoice: Integer, payed_y_n: Char): String CheckExistingClient(firstname: String,lastname: String,address: String,telephone: String,fax: String,email: String,bank: String,vat_number: String) : String CheckExistingCompany(name: String,address: String,email: String,website: String,telephone: String,fax: String,bank: String,var1: String,var2: String,var3: String) : String CheckExistingDiscount(value: String,is_percentage: Char,on_total: Char,low_limit: Double,translation_english: String,item_id: Integer) : String CheckExistItem(name: String,description: String,price_no_vat: Double,vat_percentage: Double) : String CheckFreeUsername(username: String) : String CheckOrderDiscount(order_id: Integer,discount_id: Integer) : String CheckOrderItem(order_id: Integer,item_id: Integer) : String CheckPayed(invoice: Integer) : String CheckTranslateField(field_name: String) : String CheckUsername(username: String) : String CleanLasts(date: String) : String CleanOrder(date: String) : String ConnectItemDiscount(item_id: Integer,discount_id: Integer) : String CopyOrder(order_id: Integer) : String CreateClient(firstname: String,lastname: String,address: String,telephone: String,fax: String,email: String,bank: String,vat_number: String) : String CreateCompany(name: String,address: String,email: String,website: String,telephone: String,fax: String,bank: String,var1: String,var2: String,var3: String,logo: String) : String CreateDiscount(value: String,translate_field_id: Integer,is_percentage: Char,on_total: Char,low_limit: Double,item_id: Integer) : String CreateInvoice(date: String,requested: String,system: String,payed: Char,company_id: Integer,user_id: Integer,client_id: Integer,template: String) : String CreateItem(name: String,description: String,price_no_vat: Double,vat_percentage: Double) : String CreateLanguage(lang_code: String,translate_field_id: Integer) : String CreateTranslateField(name_description: String) : String CreateTranslation(language_id: Integer,translate_field_id: 59 •
•
•
•
•
•
•
•
•
•
•
•
•
•
•
•
•
•
•
•
•
•
•
•
•
•
•
•
•
•
•
•
•
•
•
•
•
•
•
•
•
•
Integer,value: String) : String CreateUser(username: String,password_hash: String,firstname: String,lastname: String,email: String,admin_boolean: Bool) : String DeleteUser(user_id: Integer) : String ExistLanguage(language_id: Integer) : String GetAllTranslations(name: String) : String GetAmountItemsOrder(order_id: Integer,item_id: Integer) : String GetClient(client_id: Integer) : String GetClients(): String GetCompanies(): String GetCompany(company_id: Integer) : String GetCompanyLogo(company_id: Integer) : String GetDiscountTranslation(language_id: Integer,discount_id: Integer) : String GetGlobalFiller(global_name: String) : String GetGlobalLang(name: String,language_id: Integer) : String getGlobalsQuery(lang_id: Integer) : String GetItem(item_id: Integer) : String getItems(): String getLangSelectQuery(): String GetLanguageTranslateField(language_id: Integer) : String getLoginQuery(username: String, password_hashed: String) : String GetOrderClientInfo(order_id: Integer) : String GetOrderCompanyInfo(order_id: Integer) : String GetOrderDiscounts(order_id: Integer) : String GetOrderInfo(order_id: Integer) : String GetOrderItems(order_id: Integer) : String GetTables(): String GlobalFields(): String InsertInDiscount(order_id: Integer,discount_id: Integer) : String InsertInOrder(order_id: Integer,item_id: Integer,quantity: Integer) : String InsertLast(plugin_name: String,id: Integer) : String LanguageCode(language_id: Integer) : String LanguageValue(language_id: Integer) : String LastUniqueId(plugin_name: String) : String OrderAmount(order_id: Integer,item_id: Integer) : String OrderExists(order_id: Integer,item_id: Integer) : String OrderUpdate(order_id: Integer,item_id: Integer,quantity: Integer) : String OrdersInAllSystems(): String OrdersInSystem(system: String) : String RemoveClient(client_id: Integer) : String RemoveCompany(company_id: Integer) : String RemoveCompanyLogo(company_id: Integer) : String RemoveLanguage(language_id: Integer) : String RemoveTranslateField(translate_field_id: Integer) : String 60 •
•
•
•
•
•
•
•
•
•
•
•
•
•
RemoveTranslations(language_id: Integer,translate_field_id: Integer) : String SaveForeignId(plugin_name: String,foreign_id: Integer,local_order_id: Integer) : String SetCompanyLogo(company_id: Integer,logo_url: String) : String SwitchAdmin(user_id: Integer,admin_Y_N: Char) : String Translate(language_id: Integer, translate_field_id: Integer) : String UpdateClient(id: Integer,firstname: String,lastname: String,address: String,telephone: String,fax: String,email: String,bank: String,vat_number: String) : String UpdateCompany(id: Integer,name: String,address: String,email: String,website: String,telephone: String,fax: String,bank: String,var1: String,var2: String,var3: String,logo: String) : String UpdateLanguage(language_id: Integer,lang_code: String) : String UpdateOrderClient(order_id: Integer,client_id: Integer) : String UpdateOrderCompany(order_id: Integer,company_id: Integer) : String UpdateTemplateRequested(order_id: Integer,template: String,requested: String) : String UpdateTranslation(language_id: Integer,translate_field_id: Integer,value: String) : String UpdateUser(user_id: Integer,username: String,firstname: String,lastname: String,email: String,password: String,new_password: String) : String UserList(): String 61 Relations in the classes A little note about this scheme: the arrows represent which classes uses what type of data member or what type a function of the class returns. Invoice
MySQL
Plugin
System
QueryList
Language
62 Writing a plug‐in Introduction Writing a plug‐in is something which has to be done by a PHP programmer. The provided classes are made like this that the programmer doesn’t need to know the entire class, nor the entire system. Here are some guidelines and the functions he should need. Also the empty plug‐in should be of great value to him. This empty plug‐in can be found at /plug‐ins/template_empty.php. I will discuss how to write a plug‐in based on this empty template and add some comments How To First and for all note that the plug‐ins should never have a the filename template_empty.php as this will be neglected. Furthermore the name of the file (and thus of the plug‐in) should be unique all over the Global Invoicing Application! Check with the administrator to view the already used plug‐in names. If you write multiple plug‐ins for a system, put them in a directory named to your system. The Global Invoicing application can handle directory structures. All code listed is PHP5 code. Code blocks are marked with a border around it. The basic declaration is simple if you know that every plug‐in is an extension of the Plugin class and uses the PluginInterface. For example: class Template_Empty extends Plugin implements PluginInterface{ As you may notice now: the class name is the filename with capitals! This is required! Spaces aren’t allowed, use underscores instead. 63 Next you will setup the configuration for your plug‐in by calling the private function Configure(). private function Configure(){ $this‐>setPluginName("Template plugin"); // This name also has to be unique! $this‐>setUnique(true);//is this plug‐in able to check new entries on foreign id //Next are the variables for the ‘foreign’ database connection $this‐>setDBServer("127.0.0.1"); $this‐>setDBUsername("pluginuser"); $this‐>setDBPassword("pluginpassword"); $this‐>setDBDatabase("plugindatabase"); //These variables determine where to check for new entries if the system //has an unique id for each invoice $this‐>setUniqueKeyTable("plugin_table");//in what table can we check $this‐>setUniqueKeyColumn("plugin_table_column");//what column in that table }/*Configure*/ After this function you can define your own functions and code you might need. Then you have to use the main function that does all the processing. That is the function ReadForFillEnglish(). The name means you only read from the ‘foreign’ database all the data needed to fill an invoice and if possible, take English descriptions. The functions first has to call the clearing methods. These make sure everything is empty in the object. Also the Connect() method has to be called to create the foreign connection. $this‐>ClearClient(); $this‐>ClearCompanyInfo(); $this‐>ClearDiscountTranslations(); $this‐>ClearDiscounts(); $this‐>ClearItems(); $this‐>Connect(); $this‐>ClearInvoicesArray(); Then we have to fill the object with all the invoices available in the foreign system. You will probably have to do a query for that. To do a query, do this: If you haven’t done this yet, connect to the foreign database: $this‐>Connect(); 64 Then type in your query and store it in for example the variable $sql. Your query might look something like this: $sql="SELECT * FROM orders WHERE ".$this‐>GetStringNotId($this‐
>getLastUniqueIds(),"id")." ORDER BY id"; Note: the GetStringNotId() and getLastUniqueIds() functions provide the information to create a much smaller result. The getLastUniqueIds() functions returns an array with all the ID’s (integers) that have already been processed for this plug‐in. If the plug‐in doesn’t support the unique option, it will return an empty array. The GetStringNotId() function takes an array of integers and a column name. Then it will create a string that can be used in the WHERE part of your query. The string created will be like WHERE column_name!=id1 AND … . The WHERE isn’t put in the string but you get a string back that you can place after the WHERE. It makes sure you get results back where the ID is not in the array. To execute this query and loop through the result: $this‐>db_foreign_connection‐>doQuery($sql); while($resultrow=$this‐>db_foreign_connection‐>SelectNext()){ //Your actions } This will execute the query in a good way with error catching if necessary and everything. Please, only use this way of talking to the database as this way is the most secure way for the application. There’s also a lot of chance you will do other queries while processing the result. To create an extra connection object to do this you have to call the NewConnection() function and store the result in an variable to use as connection resource. In this example the variable is $connectionobj. $connectionobj=$this‐>NewConnection(); For every invoice available in the loop, clear the subparts before processing: $this‐>ClearClient(); $this‐>ClearCompanyInfo(); $this‐>ClearDiscountTranslations(); $this‐>ClearDiscounts(); $this‐>ClearItems(); In this loop we then fill everything up correctly, using these functions: $this‐>FillClient(); $this‐>FillCompanyInfo(); $this‐>FillDiscounts(); //has to be done for each discount in the current invoice this‐>FillItems(); //has to be done for each item in the current invoice 65 These functions take the following arguments: •
•
•
•
FillClient($firstname,$lastname,$address,$telephone,$fax,$email,$bank,$vat_number) FillCompanyInfo($name,$address,$email,$website,$telephone,$fax,$bank,$var1,$var2, $var3,$logo_url) FillDiscounts($value,$translations_array,$is_percentage_bool,$on_total_bool,$low_limit, $item_id=0) FillItems($name,$description,$price,$vat,$amount) After you have processed a single invoice add it in the overall object: $this‐>AddInvoice($this‐>getObject()); The last thing your plug‐in should definitely have, is the construct function which has to look like this: public function __construct(){ $this‐>Configure(); Plugin::__construct(); }/*__construct*/ 66 Creating a template Introduction The Global Invoicing application can automatically read all templates in the /templates/invoice folder and use them. To create a template you should only have a minor knowledge of PHP and HTML/CSS. How To The template system is based upon anchors (PHP variables). These contain all the information obtained from an invoice. You can simply design the lay‐out and put them in it. You can also edit them and modify them according to your needs. Each template should use all of the anchors. These two anchors determine the width and height of your invoice so that it would look perfect when printed. These have to be implemented in theHTML‐ tag that surrounds your complete invoice data. •
•
$ianchor_width $ianchor_height Other anchors: •
•
•
•
•
•
•
•
•
•
•
•
•
•
•
•
•
•
•
•
•
•
•
$ianchor_company_telephone $ianchor_company_fax $ianchor_company_email $ianchor_company_website $ianchor_company_bank $ianchor_company_var1 $ianchor_company_var2 $ianchor_company_var3 $ianchor_company_name $ianchor_company_address $ianchor_company_logo //This one is optional $ianchor_client_firstname $ianchor_client_lastname $ianchor_client_address $ianchor_client_telephone $ianchor_client_fax $ianchor_client_email $ianchor_client_bank $ianchor_client_vat_number $ianchor_order_requested $ianchor_order_date $ianchor_discounts $ianchor_items 67 Each template has to implement the anchors in the FillTemplate() function. So each template file uses this function. The anchors $ianchor_items and $ianchor_discounts have to be processed manually through DesignItems() and DesignDiscounts(). These Design functions you have to implement yourself. Before calling the Design functions set the error_reporting level to E_ERROR. error_reporting(E_ERROR); The items and discounts information are stored in arrays which are passed in the anchors. You can freely choose how to make them look in your invoice. The $ianchor_items array can be looped through like this: foreach($ianchor_items as $item){ } Where $item is another array with the information in the following fields: •
•
•
•
•
$item["name"] $item["description"] $item["price_no_vat"] $item["vat_percentage"] $item["amount"] The $ianchor_discounts array can be looped through like this: foreach($ianchor_discounts as $discount){ } Where $discount is another array with the information in the following fields: •
•
•
•
•
•
$discount["value"] $discount["translation"] $discount["is_percentage"] $discount["on_total"] $discount["low_limit"] $discount["item_id"] Note: as the system is multi‐language: field names should be multi‐language as well. This can easily be done. All globals, these are placeholders which have translations in the database, are passed along to the FillTemplate() function. To use one of these place holders type in $ianchor_global_ and then the name of the global, for example: $ianchor_global_email. To view a list of all the available anchors, browse to /globals.php of the Global Invoicing application. If you need more anchors you can ask an administrator. 68 So your template file should look like this: function FillTemplate($order_id, $array=""){ if($array==""){ $invoiceobj=new Invoice(); $invoiceobj‐>FillAllOfOrder($order_id); $anchorarray=$invoiceobj‐>getAnchors(); EXTRACT($anchorarray); }else{ EXTRACT($array); } error_reporting(E_ERROR); $itemrows=DesignItems($ianchor_items); error_reporting(E_ERROR); $discountrows=DesignDiscounts($ianchor_discounts,$ianchor_global_discounts, $ianchor_global_on_total,$ianchor_global_on); // //OWN INDEPENDENT PREPARATIONS // $invoice=<<<INVOICE <!‐‐ In this area you can type your style sheet and your HTML template. You can use the anchors just by typing their variables names, like $ianchor_global_email. There’s no need to escape them ‐‐> INVOICE; return $invoice; }/*FillTemplate*/ function DesignItems($ianchor_items){ // //Your own preparations // }/*DesignItems*/ function DesignDiscounts($ianchor_discounts, $ianchor_global_discount, $ianchor_global_on_total,$ianchor_global_on){ // //Your own preparations // }/*DesignDiscounts*/ 69 Note: The Design functions aren’t inherited or whatsoever, so you can call them what you want and pass all the variables you want. If you want you can also use static images in the template to make more specific templates. Normally the logo for a company shouldn’t be used as a static image, as the location for the image should be passed in the appropriate anchor. Images are stored in /images, but you will have to agree with the administrator where to save them. Know that the images always need to called from the root of the application and not from the location of the template. You don’t have to use ../ to go to the root. Everything is executed from the root directory, even though it is stored in subdirectories. 70 Practical manual Introduction In this part of the manual the overall use of the web application and anything related to it will be explained and shown. First we will start off with an overview of the key features. For the rest of this manual all items listed in the menu will be explained in the way they appear in the menu (administrators menu). This way it is easier and more effective to read the manual as for each step we can drop the ‘click there, there and there to get here’ part. 71 Key Features •
•
•
•
•
•
•
•
•
•
•
•
•
•
•
•
•
AJAX powered check for usernames Altering invoices and data in invoices with ‘as new’ option o Changing data for an item can be automatically processed to all invoices depending on it or the change can be saved just for this invoice item Anchor‐based invoice templates o Templates can easily be made, independent of the information they get Automatic copyright notice adjustments o This improves maintenance a little bit and is often a forgotten thing to adjust Cookie based log‐in ‘remember me’ function Created invoices are stored in own database system o Checking archives o Editing invoices without touching the remote database o Faster and independent processing o Printing the invoice over and over again using any template Database management o Independent back‐up functionality o Clean up to keep the internal database as small as possible Easy extendable template system o All templates are automatically processed from its directory o Create as many templates as you want E‐mail addresses are checked for valid structure with JavaScript Regular Expressions Multi‐language support o Adding/editing/removing languages in a fast and easy way o Incomplete translations are caught with default translations Plug‐in system for invoice systems o Multiple plug‐ins can be created for all sorts of systems, even remote systems o Plug‐ins are put in directories/sub‐directories and automatically processed Prevention on search robots like Google and Yahoo Previewing invoices in all available languages o Independent on the language used for the application Strong class based framework o Strong and complex class usage with a lot of different easy‐to‐use functionalities provided Strong discounting possibilities o Low limits for price o On total amount o Percentage or value Support and optimized for the most used browser engines o Tested on Internet Explorer and Mozilla Firefox on multiple resolutions Query localization o All queries are stored in a single purpose class, so all queries for the entire system can be easily located and altered and/or expanded if necessary 72 Default security Introduction As this web application will be used as an application and not really as a website, the access should be limited somehow as the server is reachable for the public. This means we use the server as an application server and web server in one. To use our website like an application we deny access to all users. To gain entry to the system an user has to log in using his or her credentials. As mentioned before there are two types of users: administrators and viewers. Viewers can only create companies and invoices, where administrators can also manage the settings, users, clients and languages. Log in The log in system uses the Auth class. This class will handle everything related to the authentication or management of a particular user. The class is capable of dealing with automated log ins. This means that a user can choose the log in information. This is done by a cookie, so the browser of the user has to support cookies, otherwise he will have to log in on each visit. Once logged in, the log in is passed into the SESSION of PHP and the Auth class keeps working with the SESSION. To log in the class checks for the combination of username and password. The password is stored as an MD5 hash. As the user logs in he can also choose what language he wishes to work in. The choice is stored both in the SESSION as in a cookie. That way, if the browser of the user supports cookies, upon next visit this chosen language will be automatically set. Log out To log out of the system you simple have to close the browser as this will terminate the SESSION. If you have the cookie stored, you will be automatically logged in again. If you use the log out function of the website, the cookie becomes deleted and automatic log in will be disabled until it is checked again. Also the SESSION becomes deleted and you will be kicked back to the log in screen. For both the log in cookie and the language cookie the settings are set to keep the cookie alive for a month. Upon each visit, this month becomes renewed. If you haven’t used the application within a month, the cookie expires and cannot be used. 73 Changing language Changing languages can be done very easy. In the log‐in screen you can already choose what language to use. Once logged in you can still switch the language using the drop down box in the left hand menu. Once clicked, the language will automatically be loaded. Translations for the chosen language are retrieved from the database and stored in the SESSION. This is the best tradeoff between speed and performance and memory usage. The chosen language is stored in a SESSION, so changing pages doesn’t change the language. Also, if the browser supports it, the choice is stored in a cookie. This cookie never gets deleted, not even when you log out. Profile Each user can edit his or her profile. To improve flexibility to the user and less maintenance to the administrators, each user can change his or her credentials. To change anything to the profile the password has to be given, to keep this flexibility as safe as possible. If the user is changing the username, the chosen username becomes automatically checked using AJAX (Asynchronous JavaScript and XML). The profile is also retrieved from the Auth class. To change the password the user has to enter the old password and enter the new one and confirm the new one. This will make sure no accidents happen. All changes will be applied and checked when hitting the ‘Save’ button at the bottom of the form. 74 Create invoice Creating invoices is the main purpose of this application. To make this as general as possible, the underlying structure and classes are very complex. Creating complex classes is a job that anybody can do if they want, but the trick is to add functions to these classes to make the use as easy as possible. That way you can easily plug an user‐friendly interface into these classes using the provided general functions. For advanced options, the high‐level functions can be used. This mix also makes it a lot easier for people that will write plug‐ins for the application as they don’t need to know/study the entire class structure. Only the general points they need. First step in creating an invoice is choosing whether you want to create an invoice using just an empty form or using one of the plug‐ins that will deliver filled in forms. Blank invoice If you chose to create an invoice using an empty form you will get … an empty form. You can enter all the fields of the form. Also you can easily add or remove items and discounts to the invoice. This is done using JavaScript. Hitting the ‘edit’ button will save the changes in the SESSION, but not yet in the archive (local database). To save everything in the database, hit the ‘save in the archive’ button. After you saved the invoice in the archive, you will be automatically diverted to the archive and thus see the printable invoice you just created. Note: if you want to link a discount to an item and the item isn’t available in the dropdown list yet, then the invoice has to be stored in the archive first! The classes will automatically check all the entered information. It will check if the company and/or client doesn’t exist yet. If so this existing company/client will be used. If a logo is entered for a company and the company exists, the logo will be overwritten. In case the company/client doesn’t exist it, it will be created. This will make sure the data in the database isn’t redundant. For discounts there are a few options. You can first choose if the value given for the discount is a percentage value or just a plain value. You can also choose whether the value is a discount on the total amount for the invoice or not. This is certainly needed with percentages as this makes a lot of difference. If you don’t put a percentage on the total price you will have to attach it to an item. If the item isn’t available yet in the dropdown list, you will have to wait to do the attachment until you saved everything in the archive. Plugin If you chose to create an invoice from a plug‐in there you will first get a list of available invoices left for the plug‐in. As most plug‐ins support checking for last entries, the plug‐ins will mostly only show the invoices that haven’t been stored yet. That way the list is as short as possible and makes creating invoices a lot faster. Once you chose an invoice, the same form as above will be shown, but now with the fields already filled in with information. You can change all the fields and again add/remove items and discounts. Note: if you want to link a discount to an item and the item isn’t available in the dropdown list yet, then the invoice has to be stored in the archive first! After you saved the invoice in the archive, you will be automatically diverted to the archive and thus see the printable invoice you just created. 75 Archive The archive is where all stored invoices are kept. These are the invoices in the local database. First you will have to choose for what system you want to see an invoice. The system is the used plug‐in. The splitting up in categories is to keep the pages easy to browse as after a while a lot of invoices will be stored and scrolling for hours isn’t something people like. Invoices made from an empty form are stored in a separate ‘system’. Once you clicked on the wanted invoice, the invoice is shown with the template that was set while creating the invoice. If the template is for some reason no longer available, the default template will be used. You can switch the language for the invoice and even the template. This will not affect the interface of the application, nor will it be stored in the database. If you want to change data to the invoice or link discounts to items, you simply have to click the ‘edit’ button on top of the invoice. This will take you to a similar form like used to create invoices. Also from this page you can print the invoice. You do this by clicking the printer icon on the top right of the invoice. A new window will open and the print dialog will automatically pop‐up. Note that the result you see in the archive is different in Mozilla Firefox and Internet Explorer. This has to do with differences is parsing pixels to printer resolutions. Therefore the sizes in Mozilla Firefox are a lot bigger. Once printed the results should look basically the same, although it is preferable to print the invoices always using the same browser. Internet Explorer has the advantage that everything can be shown in a 1024x768 resolution, whereas Mozilla Firefox needs more space for the invoice for it to be printed correctly. 76 Create company To create a new company in the database (so the logo is added upon first use and can be used in the templates) there’s not much to do. Simply fill out all the fields, choose a logo if desired. Note: the classes are made like that that a logo may be the URL of the image. It just receives the location string which is directly used in the ‘src’ part of the image tag. When finished filling out the fields, just hit ‘save’. View templates This functionality allows you to have an overview of the available templates for the system. Furthermore you can get a preview of this template filled with random data. This preview can also be viewed in all the available languages and can be printed too, using the same print button on the top right of the invoice. The default template should never be deleted as this would cause fatal errors. The application is designed that way that the default template will kick in if the set template could not be loaded. The default template however may be changed off course (HTML code). Note that the random data is not an invoice object filled with random data. It is just an array of random data, that is why the total price can’t be calculated. Instead just X’s are shown. View plugins Here you can check all the available plug‐ins recursively. This means all directories and subdirectories (etc.) from /plugins are processed. Each directory name is listed as a header for the plug‐ins in that directory. The directory structure is also maintained in the tree structure you receive. For all the plug‐ins some basic information is given: if it can save what invoices have been done, what server the data is stored on, with what username you have to reach the database and what database is used on that server. If you click the name of the invoice you will be automatically send to the page to create invoices for this plug‐in. Admin panel Introduction For the administration panel there are a few options available which will be explained in the according subsections. Note: the administration part and all options related to it are only available to the users with the administrator role. 77 Configuration settings In this panel you can change the settings that are defined in the /config/config.php file. This shouldn’t be touched too much though as it is quite sensitive to changes. It defines the MySQL settings for the local database (invoice) and some other variables related to the site. You can set for example the default language for the site. This however is saved as an integer, which refers to the language_id in the language table. Also you might want to set the ‘site url’ variable correct as this will improve security. User management This panel is used to manage the users. The panel has three sub‐items: add, edit and delete. Add Here you can add new users to the system. You fill in the fields and hit the ‘save’ button. While typing in the username it is automatically checked whether this username is available/valid or not. This is done with AJAX. Also you can immediately set if the new user should have the administrator role or not. If not, the default role is viewer. You can use any username and password as the user can alter this himself/herself in the profile. The user is notified by e‐mail of his newly created account and the log‐in data. Edit Here you can switch the role assigned to the user. This means you can make an administrator viewer or a viewer administrator. To do so simply click the user in the list. The system does have a limitation that you can’t switch roles of the last administrator available as you would otherwise lock down the entire system. The profile can’t be changed here as we leave this to the users their selves. Furthermore this is not needed very much as the profiles aren’t public. Delete You can also remove users from the system. This works in the same way like editing an user. You choose an user from the list and he’s gone. Here too there is the limitation that you can’t remove the last administrator for the system, this for the same reason. Client management This panel allows you to add, edit or delete clients from the system. This can be done to enhance the speed of the plug‐ins as the plug‐in doesn’t have to enter them itself. This way the number of database connections are somewhat limited. Deleting clients shouldn’t be done, as the linked invoices to it, will be deleted as well! It may be necessary, that is why it is available anyway. Add Adding a client to the system is a plain form that has to be filled out. After entering all the information you simply hit the ‘save’ button and the data will be stored. The system will automatically check if the client already exists or not. 78 Edit In this panel you can edit the saved information for a client. If you do this, the client data for the invoices linked to this client will also change! If you create a new client with the add option this won’t happen. As long as one field differs a new client will be created. So think carefully what you wish before you edit. If you wish to edit a client, you first have to select the client you wish to edit from the list of available clients. After that you get a plain form again with the current data already entered. You edit what you want to change and hit the ‘save’ button. Delete You can also delete a client, but as mentioned before this isn’t advisable. To delete a client, simply click on the client from the presented list. You will be asked to confirm this choice. Company management In this panel you can add, edit or delete companies. However you shouldn’t delete companies as the linked invoices will also be deleted. The function is provided anyway just in case. Add To add a company fill out the fields and choose a picture if you want to add a logo. The company will be stored in the system by hitting the ‘save’ button. The system will automatically check if the company already exists or not. All fields are checked, but the image field. If the company already exists, the picture will be updated. If not, the company will be added. One field that is different is enough to create a new company. Note: this page is also available to users from the viewer role. Edit To edit a company you first have to select a company from the list. Next you will be presented with the filled out form. For the picture you have some options. If there is a picture set, you will see the current picture and you can choose to remove it or not. That way you can completely remove the logo. If you browse for a picture on your computer, the logo will be removed and overwritten anyway. You save the changes by hitting the ‘save’ button. Delete To delete a company from the system, you select it from the list. You will be asked to confirm your choice as this results in removing all linked invoices. 79 Language management This is one of the main parts for the language system and was specifically requested. On this panel you can add languages and the translations for the site, edit languages and the translations or delete them. You can also add new globals. These are fields that can be used all over the site and the globals are to be translated in the other add and edit form. Add The first step in adding a language is choosing what languages you will compare to create this new language. The translations for the globals will be shown then next to the globals while adding the translations for this new language. You can select as much languages as you want or none at all. In the next step you set up some basic language information and the translation for the global fields. If you have chosen languages to compare to, they will be shown next to the global. If you leave a translation for a global blank, it will be caught by the translation in the default language for the website. This means the translation stays empty, but while browsing it will be replaced by the default language. Fill out all the fields and hit the ‘save’ button. Edit This is pretty similar to adding a language, but now you also have to choose what language you want to edit. You can once again compare with as much languages as you want or none at all. The form with settings and translations is the same, but filled out with the provided values. To save the changes hit the ‘save’ button. Delete You can also delete languages and their translation from the system. There are some limitations here. First and for all you can’t delete the default language as this one is used to catch missing translations. Furthermore you can’t delete the language you are currently working in. The combination of this also prevents deleting all the languages, even if the setting for the default language is not existing. Before you delete the language, you will be asked to confirm your choice. Add global Adding globals can be very handy to create new fields to use for example in the templates. There is a public page available with all the globals and all their translations. That way people who write templates and/or plug‐ins can easily see if there is a global they can use or they can request to add one. The page is /globals.php. To add a global you fill in the name of the global and the translations for it. You finish by hitting the ‘save’ button. Clean up database This allows you to keep the database as small and performant as possible. This will remove all invoices that are too ‘old’. If the current month is above or equals July, then it will remove everything from the past year and before. If the month is before July, it will delete everything from two year before or more. Before actually deleting the invoices you will be shown for what years invoices will be deleted. You confirm the deletion by hitting ‘continue’. 80 Back up database This panel helps you to back up all the data in the database. It will show a big textarea‐tag with the necessary queries to restore the database the way it is at the moment. You can copy everything and save it the way you want it. Or you can simply hit the ‘save’ button at the top which will automatically push the .sql file of this output. This .sql file is generated on the fly and is not stored on the server. The back‐up queries are delivered by a PHP function and doesn’t rely on any library or application (like MySQLDump) delivered with the system, so it can be used on any PHP/MySQL server. The function can be checked at /functions/getdb.php. 81


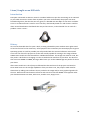


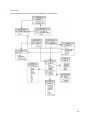


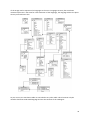


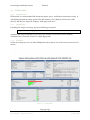

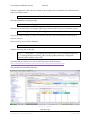
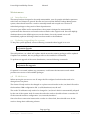


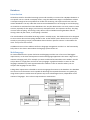


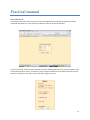


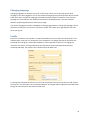
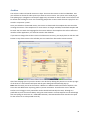


![[ Página intencionalmente en blanco ]](http://vs1.manualzilla.com/store/data/005979389_1-1ee088f8906d2dba9f81cb338c9eb94e-150x150.png)