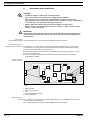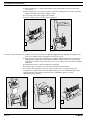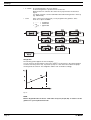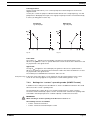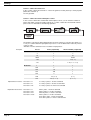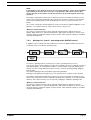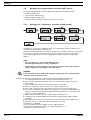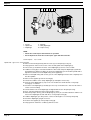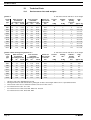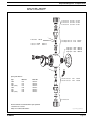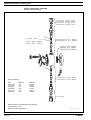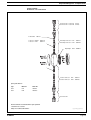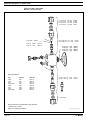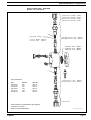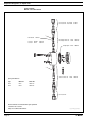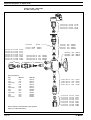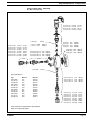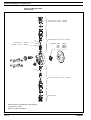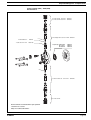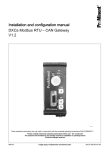
1
ProMinent
®
Operating Instructions Manual
ProMinent® gamma/ L
Solenoid Metering Pump
GALA
___ ___ ___ ___ ___ ___ ___ ___ ___ ___ ___ ___ ___
Please enter ident code of the device here
Please read the operating instructions through completely before commissioning this equipment! Do not discard!
Any part which has been subject to misuse is excluded from the warranty!
Part No. 987604
ProMinent Dosiertechnik GmbH · 69123 Heidelberg · Germany
BA G 024 04/05 GB
Printing
Printing:
Operating Instructions ProMinent® gamma/ L
© ProMinent Dosiertechnik GmbH, 1999
Address:
ProMinent Dosiertechnik GmbH
Im Schuhmachergewann 5-11
69123 Heidelberg
Germany
[email protected]
www.prominent.com
Subject to technical alteration.
Please fold out this page!
Page 2
ProMinent
®
Control elements and key functions
Control elements: overview
&
' !
"
%
#
$
1
2
3
4
5
6
7
8
9
10
LCD display
Stroke length adjusting knob
UP key
P key
DOWN key
STOP/START key
i key
Fault indicator (red)
Warning indicator (yellow)
Operating indicator (green)
11 “Dosing monitor” terminal
12 “External control” terminal
13 “Float switch” terminal
!
Key functions
In continuous display mode
(operating)
In settings mode
(settings)
Stop pump,
start pump
Stop pump,
start pump
Press briefly
Start batch (in “batch” operating mode only),
Cancel error
Confirm entry- jump to next menu
option or continuous display
Press for 2 s
Press for 3 s
Press for 10 s
Press for 15 s
Change to settings mode
--Display software version
Load factory settings (calibration)
--Jump to continuous display
-----
Press x1
Toggle between continuous displays
Toggle between “change individual digits”
and change a figure”
Press x2
---
For “change individual digits”:
jumps to first digit
Press x1
(until “Set” appears)
Change directly alterable values
Select other settings,
change individual digit or figure
Press simultaneously
Prime
---
STOP/START key
STOP
START
Press briefly
P key
P
Touche i
i
Arrow keys UP and DOWN
ProMinent
®
Page 3
p. 32
p. 11
p. 18
p. 12
Page 4
ProMinent
®
p. 14
p. 16
p. 16
p. 17
p. 18
p. 18
ProMinent
p. 19
®
Page 5
Page 6
ProMinent
®
Table of Contents
Table of Contents
Identcode ............................................................................................................................. 9
General User Guidelines ...................................................................................................... 10
1 About This Pump ................................................................................................................ 11
2 Safety .................................................................................................................................. 11
3 Storage, Transport and Unpacking .................................................................................. 12
4 Device Overview and Control elements ........................................................................... 12
4.1
Device overview .......................................................................................................... 12
4.2
Control elements ......................................................................................................... 13
5 Function Description ......................................................................................................... 13
6 Assembly and Installation ................................................................................................. 16
6.1
Retrofitting relays ........................................................................................................ 19
7 Settings ............................................................................................................................... 21
7.1
Check adjustable values ............................................................................................. 22
7.2
Change to settings mode ............................................................................................ 22
7.3
Select operating mode (MODE menu) ........................................................................ 23
7.4
Settings for operating mode (SET menu) .................................................................... 23
7.5
7.4.1
Settings for “manual” operating mode ........................................................... 23
7.4.2
Settings for “analogue” operating mode (ANALG menu) ............................... 23
7.4.3
Settings for “contact” operating mode (CONTCT menu) ............................... 25
7.4.4
Settings for “batch” operating mode (BATCH menu) ..................................... 27
Settings for programmable functions (SET menu) ...................................................... 28
7.5.1
Settings for “calibration” function (CALIB menu) ........................................... 28
7.5.2
Settings for the “pressure levels” function (PRESS menu) ............................. 29
7.5.3
Settings for “auxiliary frequency” function (AUX menu) ................................. 29
7.5.4
Settings for the “flow” function (FLOW menu) ............................................... 30
7.6
Setting code (CODE menu) ......................................................................................... 30
7.7
Cancel total stroke number or total litres (CLEAR window) ........................................ 30
8 Operating ............................................................................................................................ 31
8.1
Manual operation ........................................................................................................ 31
9 Maintenance ....................................................................................................................... 33
10 Repairs ................................................................................................................................ 33
11 Troubleshooting ................................................................................................................. 38
Error Messages .................................................................................................................... 38
Fault Signals ......................................................................................................................... 39
12 Decommissioning and Disposal ....................................................................................... 39
ProMinent
®
Page 7
Table of Contents
13 Technical Data .................................................................................................................... 40
13.1 Performance data and weights ................................................................................... 40
13.2 Dosing reproducibility ................................................................................................. 41
13.3 Viscosity ...................................................................................................................... 41
13.4 Materials Data Liquid ends ......................................................................................... 41
13.5 Electrical Data ............................................................................................................. 41
13.6 Ambient conditions ..................................................................................................... 42
13.7 Enclosure rating and safety class ............................................................................... 42
13.8 Compatibility ............................................................................................................... 42
Annexe ................................................................................................................................ 43
gamma/ L Dimensions ......................................................................................................... 43
Exploded diagrams of liquid ends ....................................................................................... 47
Feed rate settings diagrams ................................................................................................ 67
EC-Declaration of Conformity .............................................................................................. 70
Page 8
ProMinent
®
Identcode
Identcode
Please enter the identity code on the device label into the grey box below
GALA
GALA Series gamma/ L, version a
Type
1000
1601
1602
1005
0708
0413
0220
1605
1008
0713
0420
0232
Capacity
bar
l/h
10
0.74
16
1,1
16
2.1
10
4.4
7
7.1
4
12.3
2
19.0
16
4.1
10
6.8
7
11.0
4
17.1
2
32.0
PPE
PPB
NPE
NPB
PVT
TTT
SST
Solenoid Ø 70/M70
Solenoid Ø 85/M85
Material version:
Polypropylene/EPDM
Polypropylene/FPM
Acrylic glass/EPDM
Acrylic glass/FPM
PVDF/PTFE
PTFE/PTFE
Stainless steel 1.4571/PTFE
0
1
2
3
4
9
Liquid end version:
Non-bleed, no valve spring, for NP, TT and SS only
Non-bleed, with valve spring, for NP, TT and SS only
Bleed function, no valve spring for PP, NP, PV, not type 0232
Bleed function, no valve spring for PP, NP, PV, not type 0232
No-vent with valve springs for highly viscous media
Self bleed function, for PP, NP, not for type 1000 and 0232
0
5
9
Hydraulic connection:
Standard connector as indicated in technical data
12/6 hose connector, pressure side only
10/4 hose connector, pressure side only
0
Version:
With ProMinent® logo
U
M
N
P
Power supply:
100 - 230 V, ±10 %, 50/60 Hz
12...24 V DC (only M 70)
24 V DC (only M 85)
24 V AC
A
B
C
D
1
Cable and plug:
2 m Euro
2 m Swiss
2 m Australian
2 m USA
2 m open end
0
1
3
4
5
Relay:
No relay
Fault indicating relay, (N/C) changeover relay
Fault indicating relay, (N/O) changeover relay
As 1 + pacing relay, (1 input each)
As 3 + pacing relay, (1 input each)
0
1
2
3
Accessories:
No accessories
Foot and dosing valve,, 2 m PVC suction tube,
5 m PE discharge tubing, PP, PC, and NP only
As 0 + calibrating cylinder
As 1 + calibrating cylinder
0
1
2
3
4
5
P
Control variants:
Manual + external 1:1
Manual + external with pulse control
Manual + external 1:1 with analogue current
Manual + external with pulse control + analogue current
as 0 + timer
as 3 + timer
as 3 + Profibus®
0
1
Access code:
No access code
Access code
0
1
Dosing monitoring:
Pulse input
Input for continuous contact
0
Pause/level:
Pause N/C level N/C
FPM = Fluorkautschuk
GALA
ProMinent
––––
®
––
––
––
––
––
––
––
––
––
––
––
––
Page 9
General User Guidelines
General User Guidelines
Please read through the following user Guidelines. Familiarity with these points ensures optimum
use of the operating instructions.
On the fold-out page after the title page you will find the overviews “control elements and key
functions” and “operating/settings diagrams”.
You will find it useful to open out the “control elements and key functions” overview as you read
this instruction manual.
Key points in the text are indicated as follows:
• Enumerated points
왘 Hints
Working Guidelines:
NOTE
Guidelines are intended to make your work easier.
Safety Guidelines:
WARNING
Describes a potentially dangerous situation.
Could result in loss of life or serious injury if preventative measures are not taken.
CAUTION
Describes a potentially dangerous situation.
Could result in lesser injuries or damage to property if preventative measures are not taken.
IMPORTANT
Describes a potentially threatening situation.
Could result in damage to property if preventative measures are not taken.
The name plate affixed to the title page is identical to that on the gamma/ L pump supplied.
This facilitates matching the correct operating instructions manual to the correct pump.
Please quote the identity code and the serial number, which you will find on the name plate,
in any subsequent correspondence or when ordering spare parts. This will ensure accurate
identification of the pump type and material version.
Page 10
ProMinent
®
About this pump / Safety
1
About This Pump
The pumps in the ProMinent® gamma/ L pump series are microprocessor controlled solenoid
dosing pumps with the following special features:
•
•
•
•
•
•
The feed rate can be displayed in l/h and/or gal/h (calibrated), or in strokes/min.
The stroke rate is continuously adjustable and is displayed in the LCD display.
Stroke rate adjustment is digitally accurate and is displayed in the LCD display.
The rated pressure of the gamma/ L can be adapted to individual systems.
Two pumps can be controlled in different ways via the same standard signal.
Large, illuminated LCD display
The hydraulic parts of the gamma/ L are identical to those of the Beta®.
2
Safety
Correct use The gamma/ L must be used for liquids only!
The gamma/ L may be used only in compliance with the technical data and specifications given
in the operating instructions!
It is forbidden to use the gamma/ L for any other purpose, or to modify it in any way!
The gamma/ L is not suitable for dosing gases or solids!
The gamma/ L must be used by trained and authorised personnel only!
Safety Guidelines
WARNING
• As soon as the gamma/ L is connected to the electricity supply it may commence
pumping!
Avoid leakage of hazardous chemicals in this case!
If this should occur, then press the STOP/START key or disconnect the gamma/ L from
the power supply immediately!
• The gamma/ L cannot be switched to a current-free status! In the event of an electrical
accident, disconnect cable from the mains power supply!
• Disconnect cable from the mains power supply before commencing work on the
gamma/ L!
• Always depressurise liquid end before commencing work on the gamma/ L!
• Empty and rinse out the liquid end before commencing work on the gamma/ L after use
with hazardous or unknown chemicals!
• Pumps for radioactive materials may not be returned to ProMinent after use!
CAUTION
• It is not permitted to assemble and install ProMinent® dosing pumps with non-original
parts unless these have been checked and recommended by ProMinent. It can result in
harm to persons and property for which no liability will be accepted!
• When dosing aggressive materials, check the resistance of the pump materials
(see ProMinent® resistance list in the product catalogue!)
• If another liquid end size is installed the pump must be reprogrammed on factory
premises!
• Observe applicable national directives during installation!
Sound intensity level The sound intensity level is < 70 dB (A) at maximum stroke, maximum stroke rate, maximum
back pressure (water) in accordance with:
DIN EN 12639 (Metering Pump Noise Measurement)
ProMinent
®
Page 11
Storage, Transport and Unpacking / Device Overview and Control elements
3
Storage, Transport and Unpacking
Transport and store the gamma/ L in the original packaging!
Protect the packed gamma/ L from moisture and the effects of chemicals!
Environmental conditions for storage and transport:
Storage and transport temperature: -10 bis +50 °C
Humidity:
< 92 % relative humidity
Check that the delivery is complete:
Delivery range • Dosing pump with mains lead
• Operating instructions manual with EU conformity declaration
• Accessories if applicablesecteur
4
Device Overview and Control elements
When reading this section it is helpful to fold out the overview “Control elements and key
functions”!
4.1
Device overview
1
2
3
1
2
3
Control unit
Power end
Liquid end
a
b
c
d
e
f
g
Backplate
Liquid end
Suction valve
Discharge valve
Bleed valve
Coarse/fine bleed valve
Bypass hose nozzle
Fig. 01
3.1
3.2
a
a
d
e
b
b
f
d
g
c
c
Fig. 02
Page 12
Fig. 03
ProMinent
®
Device Overview and Control elements / Function Description
4.2
Control elements
Please acquaint yourself with the gamma/ L control elements with the help of the “control
elements and key functions” overview!
Indicators The LCD display supports the operation and setting of the gamma/ L with a range of indicators:
Stop Aux Pause Error
Mem
Calib
Flow
Set
The indicators are interpreted as follows:
Symbol for P key:
The gamma/ L is in settings mode.
Close symbol:
In a continuous display: lock (if code has been set).
In settings mode: indicates access to code menu.
Stop:
The gamma/ L has been stopped using the STOP/START key.
Aux:
The gamma/ L is pumping at the auxiliary frequency. In AUX menu:
the gamma/ L is in the AUX menu.
Pause:
The gamma/ L has been stopped using the “pause” function (external).
Error:
A fault has occurred and the pump has been stopped.
Auto:
The gamma/ L is in “Auto” operating mode. Depending on the Identcode
this means that the gamma/ L can be controlled using PROFIBUS® or the
timer (as a comparison see the relevant supplementary instructions).
Mem:
An additional “memory” function has been set in the “contact” and
“batch” operating modes. In CNTCT or BATCH menus (“mem” flashes):
the memory function can be set
Calib:
The gamma/ L is in the CALIB menu.
In a continuous display (“calib” flashes”): Deviation in stroke length of
more than 10 degrees (e.g. a stroke length of 40 % when set at less than
30 % or greater than 50 %) from the value at the time of calibration.
Flow:
The gamma/ L is in the FLOW menu.
Set:
The gamma/ L is in the SET menu.
Command symbol:
The number of strokes reached is above the maximum value (99999)
that can be shown in the LCD display
NOTE
The pump gamma/ L only displays the metering output in l or l/h or in gal or gal/h when
calibrated.
5
Function Description
Function principle Dosing takes place as follows: the dosing diaphragm is forced into the liquid end; the pressure in
the liquid end causes the suction valve to close and the chemical flows out of the liquid end
through the discharge valve. The dosing diaphragm is then forced back out of the liquid end. The
vacuum in the liquid end causes the discharge valve to close and fresh chemical flows into the
suction valve in the liquid end. This concludes one operating cycle.
The dosing diaphragm is driven by an electronically controlled electrical solenoid.
Feed rate The feed rate is determined by the stroke length and the stroke rate.
The stroke length is set between 0 - 100 % using the stroke length adjusting knob.
Optimum dosing reproducibility is achieved by setting the stroke length to between 30 - 100 %
(SEK type: 50 - 100 %)!
The stroke rate is set using the arrow keys (not in “analogue” operating mode) to between
0 - 180 strokes/min.
Self-bleed function Pumps with self-bleed function (= SEK types) can operate a prime action even when the
discharge tubing is closed, discharging existing air through a bypass valve. These pumps can
release gas even during operation, irrespective of the actual operating pressure.
An in-built pressure maintenance valve allows accurate dosing even in depressurised states.
Operating modes Operating modes are selected using the MODE menu (depending upon identity code, some
operating modes may be absent).
ProMinent
®
Page 13
Function Description
“Analog” operating mode: (Identity code, control variant: analogue current)
The stroke rate is controlled via an analogue electrical signal via the “external control” terminal.
Signal processing is pre-selected at the controller.
“Manual” operating mode: (Identity code, control variant: manual, standard function)
The stroke rate is controlled manually via the controller.
“Contact” operating mode:
(Identity code, control variant: external 1:1 / external with pulse control)
This operating mode offers the opportunity to make fine adjustments with small increase/
decrease factors. Dosing can be activated by a pulse via the “external control” terminal or by a
semiconductor element. With the “pulse control” option it is possible to pre-set a feed quantity
(batch) or number of strokes (factor 0.01 to 99.99) via the control unit.
“Batch” operating function:
(Identity code, control variant, external 1:1 / external with pulse control)
This operating mode offers the option of working with larger transfer factors (up to 65535).
Metering can be triggered by pressing the P key or a pulse from the “external control” terminal
via a contact or semiconductor element.
A batching quantity or number of strokes can be pre-selected via the control unit.
Operating mode “PROFIBUS®”: (Identcode, control variant: profibus®)
This operating mode offers the possibility to control the pump via PROFIBUS® (see “supplemental instructions for ProMinent gamma/ L and ProMinent Sigma versions with “PROFIBUS®”).
Functions The following functions can be selected using the SET menu:
“Calibrate” function:
The gamma/ L can be operated in all operating modes including in calibrating mode.
The corresponding continuous displays can show the actual feed quantity or the feed rate.
Calibration is maintained within the stroke frequency range 0 - 180 strokes/min.
Calibration is also maintained when a stroke frequency is altered up to ±10 %.
“Pressure level” function:
It is possible to set different pressure levels.
“Auxiliary frequency” function:
It is possible to set a stroke rate in the SET menu, which may be activated via the “external
control” terminal. This auxiliary frequency overrides all other pre-set stroke rate frequencies.
“Flow” function:
Stops the gamma/ L when the flow is insufficient.
In the SET menu, the number of failed strokes is entered after which the pump will be turned off.
The following functions are available as standard:
“Float switch” function:
Information on the liquid level in the feed chemical container is transmitted to the gamma/ L.
This option requires the installation of a 2-stage float switch. This is connected to the “float
switch” terminal.
“Pause” function:
The gamma/ L can be stopped by remote control via the “external control” terminal.
The “pause” function operates only via the “external control” terminal.
The following functions are activated by keystrokes:
“Stop” function:
The gamma/ L can be stopped by pressing the STOP/START key without disconnecting from the
mains power supply.
“Prime” function:
Priming (short term feed at maximum frequency) is activated by pressing both arrow keys at the
same time (in “Stroke rate” permanent display).
Page 14
ProMinent
®
Function Description
Optional relay The gamma/ L has two connection options.de deux options :
“Fault indicating relay” option:
In the event of fault signals, warning signals or float switch activation signals, connects an electrical circuit to trigger alarm sirens etc. The relay is retrofitted via an aperture in the power end.
“Fault indicating and pacing relay” option:
Along with the fault indicating relay, the pacing relay produces a contact for every stroke.
The relay is retrofitted via an aperture in the power end.
Function and error
indicators The operating and error status is shown via the three LEDs and the “error” indicator on the LCD
(see also section 11):
LCD indicator If a fault occurs “error” will appear along with an additional fault warning.
LED indicator Operating indicator (green)
This indicator is lit as long as the gamma/ L is operating correctly.
It stops briefly with each stroke.
Warning indicator (yellow)
This warning light appears if the gamma/ L electronics detect a situation that could lead to a
fault, e.g. “liquid levels low 1st stage”.
Warning indicator (red)
This warning light appears if a fault occurs, e.g. “liquid levels low 2nd stage”.
Hierarchy of operating modes, functions and fault statuses
The different operating modes, functions and fault statuses each have a differing effect on
whether and how the gamma/ L functions. These effects are given below:
1. Prime
2. Fault, stop, pause
3. Auxiliary frequency
4. Manual, analogue, contact, batch
to:
1. “Prime” can take place in the permanent “Stoke rate” display in any pump mode (as long as it
is operational).
2. “Fault”, “stop” and “pause” stop all system parts up to “prime”.
3. The stroke frequency of the “auxiliary frequency” always has precedence over the stroke
frequency, which is set by an operating mode listed under 4.
ProMinent
®
Page 15
Assembly and Installation
6
Assembly and Installation
WARNING
• Installation must be carried out by a trained engineer!
• Disconnect gamma/ L from mains power supply during installation!
• Risk of electric shock – This pump is supplied with a grounding conductor and
grounding-type attachment plug. To reduce the risk of electric shock, be certain that it is
connected only to a properly grounding-type receptacle.
• Observe applicable national directives when installing the dosing pumps!
• When connecting with parallel inductive power consumers a switch contact must be
fitted, e.g. relay or contactor!
IMPORTANT
The universal signal cable, the external/connecting cable and the liquid level monitoring
cable should never be shortened to less than 1.20 m, otherwise the cable identification
system will fail.
Connection
to mains power supply Connect the gamma/ L to the mains power supply using the mains lead
Parallel connection to
inductive power consumers If the gamma/ L is connected to the mains in parallel with inductive power consumers (e.g.
solenoid valve, motor) they must be electrically isolated. This will avoid damage caused by
induction and voltage surges when switching off.
왘 Fit individual contacts for the gamma/ L and supply power via auxiliary contactor or relay.
If this is not possible, then:
왘 Connect a varistor in parallel (order number 710912) or an RC circuit, 0.22 µF/220 Ω
(order number 710802).
Power element
(in base of pump)
4
3
1
2
5
N
L1
PE
Fig. 04
1
2
3
4
5
Mains terminal
Relay circuit terminal
Fuse
Solenoid earth lead terminal
Solenoid terminal
“External control”
terminal The “external control” terminal is a five pin in-built terminal. It is compatible with the two and
four core cables used previously.
The “auxiliary frequency” function is only available with a five core cable.
Page 16
ProMinent
®
Assembly and Installation
gamma/ L configuration Electrical interface for “external contact” - “pause” - “auxiliary frequency”:
• tension contacts ouverts :
• Voltage when contacts open:
env. 5 V
approx. 5 V
• Input resistance:
10 kΩ
• Control:
or:
voltage free contact (load: 0.5 mA at 5 V),
Semiconductor switch (residual voltage < 0.7 V)
• Maximum pulse frequency:
25 pulses/s
• Required pulse duration:
≥ 20 ms
Electrical interface for “external analogue”:
• Input load resistance:
approx. 120 Ω
• Maximum current at input:
50 mA
gamma/ L configuration
!
"
#
Pin
Function
2 core cable
4 core cable
5 core cable
Pin 1
Pause
Jumped at pin 4
Brown
Brown
Pin 2
External contact
Brown
White
White
Pin 3
External analogue
–
Blue
Blue
Pin 4
Earth
White
Black
Black
Pin 5
Auxiliary frequency
–
–
Grey
Fig. 05
Plug configuration
“Pause” function
The gamma/ L is not operating when
• The cable is connected and pins 1 and 4 are free.
!
#
The gamma/ L is operating when
• The cable is connected and pins 1 and 4 are connected.
• There is no cable connected (pin 1 is free).
"
Fig. 06
“Contact” and “Batch” operating modes
One or more discharge strokes are triggered when pin 2 and pin 4 are connected to one another
for at least 20 ms.
Otherwise, pin 1 and pin 4 must be connected.
“Analogue” operating mode
The stroke frequency of the gamma/ L is controlled via an electrical signal. The electrical signal is
applied between pins 3 and 4.
Otherwise, pin 1 and pin 4 must be connected.
“Auxiliary frequency” function
The gamma/ L runs at a pre-set stroke rate when pin 5 and pin 4 are connected to one another.
Otherwise, pin 1 and pin 4 must be connected.
The factory setting for this function is 180 strokes.
NOTE
For function and operating mode hierarchy, see section 5!
ProMinent
®
Page 17
Assembly and Installation
Connecting two gamma/ L pumps in series
Connect two gamma/ L pumps in series as follows if you wish to control both via one electrical
signal in the “analog” operating mode (see section 7.4.2):
+
–
Fig. 07
“Float switch” terminal Optional fitting of a 2-stage float switch with prior warning and limit switch capacity.
gamma/ L configuration
Electrical interface:
3
1
2
• Voltage when contacts open:
approx. +5 V
• Input resistance:
10 kΩ
• Controller:
or:
voltage free contact (load: 0.5 mA at + 5V),
semiconductor switch (residual voltage < 0.7 V)
Fig. 08
Plug configuration
Function
!
3 core cable
Pin 1
Earth
black
Pin 2
Minimum prior warning
blue
Pin 3
Minimum limit switch
brown
Fig. 09
“Dosing monitor” terminal Optional connection of dosing monitor.
gamma/ L configuration
Electrical interface:
!
"
• Voltage when contacts open:
approx. +5 V
• Input resistance:
10 kΩ
• Controller:
voltage free contact (load: 0.5 mA at +5 V)
Fig. 10
Plug configuration
Function
"
Page 18
!
4 core cable
Pin 1
Power supply (5V)
brown
Pin 2
Encoding
white
Pin 3
Response
blue
Pin 4
Earth
black
Fig. 11
ProMinent
®
Assembly and Installation
Relay
“Fault indicating relay”
output A fault indicating relay may be ordered optionally. It is used as the signal output when a pump
fault has been detected and to indicate the prior warning signal “liquid level low, stage 1” and the
fault signal “liquid level low, stage 2”.
Allocation of signal types to “N/O” and “N/C” relay states is selected on the basis of the identity
code descriptors.
The relay can be retrofitted and is ready to operate after inserting the relay component
(see section 6.2).
The gamma/ L is delivered ex works with default settings for a N/C relay. If an alternative switch
function is required the gamma/ L can be reprogrammed at ProMinent.
Electrical interface •
•
Contact load:
Operating life:
250 V/2 A 50/60 Hz
> 200.000 switch cycles
“Fault indicating relay and
pacing relay” output A fault indicating relay and pacing relay output may be ordered optionally. The pacing relay
output is electrically isolated via an optical coupler with a semiconductor switch. The second
switch is a relay as for the “fault indicating relay” variant.
The fault indicating / pacing relay can be retrofitted (see section 6.2).
The gamma/ L is delivered ex works with default settings for a N/C fault indicating relay and a
N/O pacing relay. If an alternative switch function is required the gamma/ L can be
reprogrammed at ProMinent.
Electrical interface For semiconductor switch
•
•
•
•
For relay output
Residual voltage:
Maximum voltage:
Maximum current:
Pacing relay pulse duration:
< 0,4 Volt at IC = 1 mA
< 100 mA
24 V/DC
approx. 100 ms
• Contact load:
24 V/100 mA 50/60 Hz
• Operating life:
> 200.000 switch cycles
Relay cable contact configuration
“Fault indicating relay” option
“Fault indicating relay
and pacing relay” option
VDE cable
CSA cable
Contact
white
white
NO (normally open)
green
red
NC (normally closed)
brown
black
C (common)
VDE cable
Contact
Relay
yellow NO (normally open)
Fault indicating relay
green C (common)
Fault indicating relay
white
NO (normally open)
brown C (common)
6.1
Pacing relay
Pacing relay
Retrofitting relays
Delivery range:
1 relay circuit set with 2 screw fasteners
1 relay cable set with socket
1 seal
Press-out relay opening
WARNING
Disconnect gamma/ L from the mains power supply and rinse liquid end before
commencing work (see section 12)!
IMPORTANT
When preparing the opening, ensure that the punch is not forced through the entire
pump base!
Pump circuits may become damaged.
ProMinent
®
Page 19
Assembly and Installation
왘 Place the gamma/ L on a firm surface with the relay opening press-out section at the top
(see fig. 12:a)
왘 Place a punch (dia. 8-15 mm) in the centre of the relay opening press-out section, and strike
briefly and sharply with a hammer (approx. 250 g)
왘 If necessary clean up the edges of the opening
왘 Remove the pressed out section from the gamma/ L
=
=
Fig. 12
Fig. 13
Inserting the relay component 왘 Hold the relay component with your right hand gripping the left and right hand edges of the
relay cover, and tilt the front end slightly to the left (see fig. 14)
왘 Push the relay component through the relay opening, holding the upper corner of the lower
edge against the guide rail on the pump base, until the contact of the relay component has
reached the controller contact. (See fig. 15: test: can you still move the end of the circuit back
and forth?)
왘 Gently push the relay component right into the opening.
왘 Screw the relay cover firmly onto the housing using the screws provided.
왘 Insert the relay cable plug seal into the relay cover and screw on the plug (see fig. 16)
The gamma/ L is delivered ex works with default settings for a N/C fault indicating relay and a
N/O pacing relay. If an alternative switch function is required the gamma/ L can be
reprogrammed at ProMinent.
>
Fig. 14
Page 20
Fig. 15
Fig. 16
ProMinent
®
Settings
7
Settings
NOTE
• Open out the fold-out page following the title page fully! There you will find the
overviews “control elements and key functions” and “operating/settings diagram”.
• If no keys are pressed within a period of 1 minute, the gamma/ L will return to a
continuous display.
Basic information for setting up the gamma/ L
Confirm entries Press the P key briefly;
you will automatically move to the next menu option or to a continuous display.
Exit menu option
without confirming Press the P key for 3 s:
The entry is cancelled and you will return to a continuous display.
Incremental change
Iof a value Press the i key 1x;
you can toggle between altering the digits of a value (“change individual digits” = standard) or
incremental alteration of a value (“change a figure”).
Change adjustable values Press UP or DOWN arrow key;
The flashing digit or figure will start to increase or decrease incrementally.
Confirm adjustable values For “change individual digits”: confirm each digit using the P key. When the last digit has been
confirmed you will automatically move to the next menu option or to a continuous display.
For “change a figure”; press the P key 1x; you will simultaneously move to the next menu option
or to a continuous display.
Correct wrongly set digits Press the i key 2x;
you will go back to the first digit.
ProMinent
®
Page 21
Settings
7.1
Check adjustable values
Before setting up the gamma/ L you can check the current settings of adjustable values.
Press the i key (“i” as in “info”) when the gamma/ L is in continuous display mode
(There is no P key symbol in the LCD display):
Each time you press the i key you will see a different continuous display. The number of
continuous displays depends upon the identcode, the selected operating mode and the
connected accessories (see overview “continuous displays”).
7.2
Change to settings mode
If you hold down the P key for 2 seconds in any continuous display, the gamma/ L will change to
the settings mode.
If CODE 1 is set, the code must be entered after pressing the P key.
The following menu options appear first in the settings mode (see also overview “operating/
settings diagram”):
•
•
•
•
MODE menu
CODE menu (optional)
SET menu
CLEAR window
In order to adapt the gamma/ L to your process requirements you must:
1.
MODE
menu
CODE
menu
Continuous
display
1. Select the operating mode in the
MODE menu
2. Adjust settings to this operating
mode in the SET menu
2s
P
2.
SET
menu
CLEAR
window
Page 22
ProMinent
®
Settings
7.3
Select operating mode (MODE menu)
The following operating modes are selected via the MODE menu (depending upon identcode,
some operating modes may be absent):
• Manual: for operation by hand
(Identcode, control variant: manual, standard option)
• Analogue: for electronic control
(Identcode, control variant: analogue current)
• Contact: for contact operation
(Identcode, control variant: external 1:1 / external with pulse control)
• Batch: for batch operation
(Identcode, control variant: external with pulse control)
7.4
Settings for operating mode (SET menu)
In the SET menu you can adjust various settings depending upon the selected operating mode.
The following programmable function settings menus appear in all operating modes:
• Calibrate (CALIB menu)
• Pressure levels (PRESS menu)
• Auxiliary frequency (AUX menu)
• Flow (FLOW menu, available only if flow monitor is connected)
See also section 7.5!
Further settings menus depend upon the selected operating mode.
7.4.1
Settings for “manual” operating mode
There are no other settings menus in the overall SET menu for the “manual” operating mode
apart from those described in 7.5.
7.4.2
Settings for “analogue” operating mode (ANALG menu)
In addition to those settings menus described in 7.5, there is an additional ANALG menu in the
overall SET menu for the “analogue” operating mode.
The stroke rate is controlled by an analogue electrical signal via the “external control” terminal.
You can select three signal-processing methods:
• 0 - 20 mA: at 0 mA the gamma/ L does not operate
at 20 mA the gamma/ L operates at max. stroke rate
Between these two extremes the stroke rate is proportional to the electrical
signal.
ProMinent
®
Page 23
Settings
• 4 - 20 mA: at 4 mA the gamma/ L does not operate
at 20 mA the gamma/ L operates at max. stroke rate
Between these two extremes the stroke rate is proportional to the electrical
signal.
For signals of below 3.8 mA a fault will be detected and the gamma/ L will stop
(e.g. cable break).
• Curve:
In the “curve” processing mode you can programme the gamma/ L ratios.
There are 3 options available:
•
= straight line
•
= lower band
•
= upper band
Straight line:
The following symbol appears in the LCD display:
.
You can enter any stroke frequency ratio for the gamma/ L in proportion to the electrical signal.
You must enter two points P1 (I1, F1) and P2 (I2, F2). F1 is the stroke rate at which the pump
should operate at current I1: the straight line and the ratio are fixed accordingly:
Fmáx
P2
F2
P1
F1
0
I 1
I 2
20
I [mA]
Fig. 17
NOTE
Draw a diagram like the one above - with values for (I1, F1) and (I2, F2) - in order to set the
gamma/ L to your required stroke rate!
Page 24
ProMinent
®
Settings
Lower/upper band:
This processing mode allows you to control a pump via an electrical signal as shown in the
diagrams below.
You may also control two pumps for different feed chemicals from a single signal (e.g. one acid
pump and one alkali pump from a pH sensor signal). The pumps must be connected electrically
in series (see wiring plan in section 6.1).
Lower band
Upper band
e.g. Alkali pump
e.g. acid pump
Fmáx
Fmáx
P1
P2
F2
F1
P2
F2
P1
F1
0
I 1
I 2
20
Fig. 18
I [mA]
0
I 1
I 2
20
I [mA]
Fig. 19
Lower band:
The symbol
appears in the LCD display. The gamma/ L will operate below I1 at F1.
Above I2, the gamma/ L ceases to operate. Between I1 and I2 the stroke rate is between F1 and
F2, proportional to the signal current.
Upper band:
The signal
appears in the LCD display. The gamma/ L will cease to operate below I1.
Above I2, the gamma/ L will operate at F2. Between I1 and I2 the stroke rate between is F1 and
F2, proportional to the signal current.
The smallest processable difference between I1 and I2 is 4 mA.
Error processing In the “ER” (error) menu option you can activate an error processing function for the “curve”
mode. An error message appears for signals below 3.8 mA and the gamma/ L stops.
7.4.3
Settings for “contact” operating mode (CONTCT menu)
In addition to those settings menus described in 7.5, there is an additional CONTCT in the overall
SET menu for the “contact” operating mode.
The operating mode “contact” allows you to activate a single stroke or a series of strokes.
The strokes can be activated by a pulse or via the “external control” terminal. This operating mode
is intended to transfer input pulses into a reduction (break) or small increase in strokes.
IMPORTANT
When switching to another operating mode the factor is reset to “1”.
The following versions are available:
• Contact - identcode: external 1:1
• Contact - identcode: external with pulse control
ProMinent
®
Page 25
Settings
Contact – identcode: external 1:1
In the “contact - identcode: external 1:1” version the gamma/ L makes precisely 1 stroke per pulse
(identcode: external 1:1).
No entry possible.
Contact – identcode: external with pulse control
In the “contact - identcode: external with external pulse control” you can enter the number of
pulses after which a stroke should be carried out. “Contact - identcode: external with external
pulse control” is intended for small dosing quantities.
The number of strokes per pulse depends upon the factor, which you can enter. This allows you
to vary to a certain extent the input pulses by a factor of 1.01 to 99.99 and/or reduce by a factor
of 0.01 to 0.99:
“Number of strokes activated = factor x number of input pulses”
Examples
Factor
Increase
Reduction
Explanation of increase At a factor of 1
At a factor of 2
At a factor of 25
Explanation of decrease At a factor of 1
At a factor of 0.5
At a factor of 0.1
At a factor of 0.75
Page 26
Pulse (sequential)
Stroke number (sequential)
1
1
1
2
1
2
25
1
25
99.99
1
99.99
1.50
1
1.5 (1 / 2)
1.25
1
1.25 (1 / 1 / 1 / 2)
1
1
1
0.50
2
1
0.10
10
1
0.01
100
1
0.25
4
1
0.40
2.5 (3 / 2)
(1 / 1)
0.75
1.33 (2 / 1 / 1)
(1 / 1 / 1)
For every 1 pulse, 1 stroke is activated
For every 1 pulse, 2 strokes are activated
For every 1 pulse, 25 strokes are activated
After 1 pulse, 1 stroke is activated
After 2 pulses, 1 stroke is activated
After 10 pulses, 1 stroke is activated
After 2 pulses, 1 stroke is activated,
then after 1 pulse, 1 stroke is activated,
then after 2 pulses, 1 stroke is activated etc.
ProMinent
®
Settings
NOTE
If a remainder occurs when the factor is processed, the gamma/ L counts up the remainder
values. When the sum reaches or exceeds “1” the gamma/ L will activate a stroke. This
ensures that the stroke number corresponds exactly to the factor throughout the dosing
operation.
The number of input pulses which have not been processed are stored by the gamma/ L in the
stroke memory. When the STOP/START key is pressed or the “pause” function is activated, the
stroke memory is deleted (this can be avoided using the “memory” extension function, see
below).
The “contact - identcode: external with pulse control” version allows optimum adaptation of the
gamma/ L, in conjunction with e.g. water contact meters, to any process.
“Memory” extension function
The “memory” extension function can be optionally activated (“mem” appears in the LCD
display). When “Memory“ is activated, the gamma/ L adds up the unused excess strokes, up to
the stroke memory’s maximum capacity of 65535 strokes. If the maximum capacity is exceeded
the pump will malfunction.
7.4.4
Settings for “batch” operating mode (BATCH menu)
In addition to those settings menus described in 7.5, there is an additional BATCH menu in the
overall SET menu for the “batch” operating mode.
The “batch” operating mode is a variant of the “contact” operating mode (see 7.4.3).
You can pre-select a stroke number (no breaks, whole numbers only from 1 to 65535) as well as a
feed quantity (batch). To switch between entries for “stroke number” and “feed quantity” press
the i key 1x in the corresponding menu option (see also overview “operating/settings diagram”,
fold-out page).
The “batch” operating mode is intended for large dosing quantities.
Metering is activated by pressing the P key or via a pulse from the "external control" terminal.
The number of input pulses which have not been processed are stored by the gamma/ L in the
stroke memory. The stroke memory is limited to the batch size if “Memory“ is not activated (with
“Memory“ this is 65535 strokes). You can clear it by changing to a different operating mode.
“Memory” extension function
The “memory” extension function can be optionally activated (“mem” appears in the LCD
display). When “Memory“ is activated, the gamma/ L adds up the unused excess strokes, up to
the stroke memory’s maximum capacity of 65535 strokes. If the maximum capacity is exceeded
the pump will malfunction.
ProMinent
®
Page 27
Settings
7.5
Settings for programmable functions (SET menu)
The following programmable function settings menus appear in all operating modes:
• Calibrate (CALIB menu)
• Pressure levels (PRESS menu)
• Auxiliary frequency (AUX menu)
• Flow (FLOW menu, available only if flow monitor is connected)
7.5.1
Settings for “calibration” function (CALIB menu)
The gamma/ L can also run in calibration mode. The corresponding continuous displays show
the current dosing quantities or the feed rate.
Calibration is maintained when a stroke rate is altered up to ±10 degrees (where the stroke length
is set at 40 %, the range is 30-50 %). If the stroke rate is altered more than ±10 degrees the
yellow warning light is lit, the continuous display flashes and the flashing message “calib”
appears.
NOTE
• Do not go below 30 % stroke length (SEK type: 50 %).
This will significantly affect accuracy of calibration.
• Calibration becomes increasingly accurate the more strokes made by the gamma/ L
during calibration (recommended: at least 200 strokes).
WARNING
If using a hazardous feed chemical, the following setting instructions ensure adequate
safety precautions have been taken!
Calibration 왘 Insert the suction tube into a measuring cylinder containing the feed chemical the discharge tubing must also be correctly installed (operating pressure, …!)
왘 Suck up the feed chemical (press both arrow keys at the same time) when the suction
tube is empty
왘 Note the liquid level in the measuring cylinder and the stroke length
왘 Select the CALIB menu and go to the first menu option using the P key
왘 Select “ON” using an arrow key and change to the next menu option using the P key
왘 To commence calibration, press the P key. The gamma/ L starts to pump and displays the
number of strokes (“STOP” appears at regular intervals) (the gamma/ L works at the stroke
frequency set under “MANUAL“ ).
왘 After a sufficient number of strokes, stop the gamma/ L with the P key
왘 Calculate the dosed quantity (difference between the original quantity and the quantity
remaining)
왘 Enter this quantity in the next menu and then go to the next menu option using the P key
왘 Select the unit (“L” or “gal”) in the “UNIT” menu with an arrow key
The gamma/ L is calibrated.
The corresponding continuous displays show the calibrated values.
The total stroke number and total litres are set during calibration to “0”.
The gamma/ L is in the STOP state.
Page 28
ProMinent
®
Settings
7.5.2
Settings for the “pressure levels” function (PRESS menu)
The programmable function “pressure levels” is used to reduce the rated pressure of the
gamma/ L.
CAUTION
• The rated pressure can be considerably exceeded at stroke lengths of below 100 %!
The rated pressure relates to a stroke length of 100 %.
• If another liquid end size is installed the pump must be reprogrammed on factory
premises!
• Select as large a rated pressure as required and as small as possible!
This will increase system safety (reduces the risk of the tubing bursting when blocked)!
This also protects the diaphragm and saves electricity.
NOTE
If installing another liquid end size the pump must be reprogrammed on factory premises.
The following rated pressures can be selected for these liquid end sizes (rated pressure in bar):
Liquid end size
1601, 1602, 1605
Pressure level 1 Pressure level 2 Pressure level 3 Pressure level 4
4
7
10
10
1000, 1005, 1008
4
7
0708, 0713
4
7
16
No adjustments can be made for pump types 0413, 0420, 0220, 0232.
7.5.3
Settings for “auxiliary frequency” function (AUX menu)
The programmable function “auxiliary frequency” allows switching to a different stroke frequency,
which can be set in the AUX menu. It can be activated via the “external control” terminal. When
the auxiliary frequency is activated, “aux” appears in the LCD display.
This auxiliary frequency overrides the current stroke frequency set for the selected operating
mode.
ProMinent
®
Page 29
Settings
7.5.4
Settings for the “flow” function (FLOW menu)
The flow menu only appears when a dosing monitor is connected to the “dosing monitor”
terminal. This dosing monitor registers each discharge stroke of the gamma/ L at the discharge
connector and transmits it back to the gamma/ L. If this response transmission is serially omitted
for a period set in the FLOW menu (due to failure or below-minimum dosing) the gamma/ L stops.
7.6
Setting code (CODE menu)
The code menu is used to select whether you want to prevent access to parts of the settings
options.
In the first menu option you can choose CODE 1 or CODE 2 (both use the same number).
• Select CODE 1 to prevent access to the settings mode ( in the overview “operating/
settings diagram”, fold-out page). In the next menu option, enter the number you wish
to use as the code.
• Select CODE 2 to prevent access to the settings options for directly alterable values in
the continuous displays ( in the overview “operating/settings diagram”, fold-out page).
In the next menu option, enter the number you wish to use as the code.
• Select NONE to remove a pre-set security lock.
7.7
Cancel total stroke number or total litres (CLEAR window)
In the CLEAR window you can delete the stored total stroke number and simultaneously the
total litres (= set to “0”). You may then press the P key briefly to exit this window.
The values displayed are counted incrementally from the point of commissioning the pump,
or from the last delete action.
Page 30
ProMinent
®
Operating
8
Operating
This section describes all operating options available to you when the gamma/ L is in continuous
display mode (no P key symbol in the LCD display).
NOTE
• Open out the fold-out page following the title page fully! There you will find the
overviews “control elements and key functions” and “operating/settings diagram”.
• Look at the overview “continuous displays”. This page shows you which displays
are available in which operating mode, and which values are directly alterable in the
corresponding continuous displays.
8.1
Manual operation
Set stroke length Stroke length is continually adjustable within a range of 0 - 100 %.
The recommended stroke length range, which will practically guarantee technical reproducibility,
is 30 - 100 % (SEK type: 50 - 100 %).
The following operating options are available via the different keys
(see also figure on the next page):
Stop/Start gamma/ L To stop gamma/ L: press STOP/START key.
To start gamma/ L: press STOP/START key.
Start batch Press the P key briefly in “batch” operating mode.
Load factory settings Press the P key for 15 s only if you wish to load factory calibration settings!
Current settings will be deleted.
Change to settings mode When you press the P key for 2 s in any continuous display the gamma/ L will change to settings
mode (see section 7).
If CODE 1 is set, the code must be entered after pressing the P key.
Check adjustable values Each time you press the i key you will see a different continuous display.
The number of continuous displays depends upon the identity code, the selected operating
mode and the connected accessories.
Change directly
alterable values To change a value (see below) directly in the corresponding continuous display, press one of the
arrow keys until “set” appears in the LCD display. The delay has been programmed in to prevent
inadvertent changing of values.
If CODE 2 has been set, this code must be entered after pressing the arrow key.
Directly alterable values are as follows:
Stroke rate In “manual”, “contact” and “batch” operating modes:
The stroke rate can be altered in the “stroke rate” display.
Feed rate In “manual” operating mode
The feed rate can be altered in the “feed rate” display.
Factor The factor is the number of strokes activated by an external pulse or a press of the P key
(in “batch” mode only).
In “batch” operating mode:
You can alter the factor from the “remaining strokes” display.
The gamma/ L returns to the original continuous display a few seconds after the factor has been
reset.
Batch size In “batch” operating mode:
The batch size can by changed from the “batch size/remaining litres” display.
The gamma/ L returns to the original continuous display a few seconds after the batch size has
been reset.
Priming The “priming” function is activated by pressing both arrow keys at the same time in “Stroke rate”
permanent display.
ProMinent
®
Page 31
Operating
Cancel error Error messages are cancelled by pressing the P key briefly.
Display programme
versions Press on the P key for 10 seconds to display the programme versions.
Example: “V 1052“ + X 1010“.
Release the key on “LOAD 3“ immediately.
Continuous
display
STOP
Stopp/start pump
START
2
Change directly alterable values
Prime
P
P
i
P
Start batch (in "batch" operating mode only)
Cancel error
Check adjustable values
2s
1
1 = Security lock (CODE 1)
Settings
mode
8.2
2 = Security lock (CODE 2)
Remote control
It is possible to control the gamma/ L remotely via a signal cable or Profibus® (see section 6.1
and section 7, “Supplementary Instructions for ProMinent® gamma/ L and ProMinent®
Sigma versions with Profibus®” and plant documentation).
Page 32
ProMinent
®
Maintenance / Repairs
9
Maintenance
Maintenance intervals • Every quarter, when subject to normal usage (continuous operation - approx. 30 % )
• Shorter intervals when subject to heavier usage (e.g. continuous operation)
Maintenance actions Standard liquid ends:
왘 Check the diaphragm for damage (see section 10)
왘 Check chemical seepage at vent hole
왘 Check that the discharge tubing is connected firmly to the liquid end
왘 Check that discharge and suction valves are firmly fixed
왘 Check that the liquid end is generally watertight (especially vent hole! See fig. 20)
왘 Check for correct feed: run the gamma/ L run for a short period
(press both arrow keys together)
왘 Check electrical connections for wear
왘 Check that liquid end screws are fastened tightly
(on coarse/fine bleeding versions, first remove knob and cover)
Screw fastening torque: 4,5 to 5 Nm
NOTE
• For PP liquid end, check fastening torque every quarter!
Additionally, for liquid ends with coarse/fine bleed function and SEK type:
• Check that the bypass tubing is connected firmly to the liquid end
• Check that the bleed valve is firmly fixed in place
• Examine the discharge and bypass tubing for kinks
• Check that the coarse/fine bleed function is working correctly
Fig. 20
10
Vent hole
Repairs
NOTE
Repair work may be carried out by authorised personnel only, or on factory premises:
• Replacement of damaged mains cables
• Replacement of fuses and electronic controller.
Please contact your nearest ProMinent branch or representative!
When sending the pump for repair make sure it is clean and that the liquid end has been
thoroughly rinsed out (see section 12)! If, despite careful emptying and cleaning, safety
precautions are still required for handling the gamma/ L, the necessary information must
be entered in the safety declaration!
The safety declaration is a component of the inspection/repair order.
An inspection or repair can only be carried out when a safety declaration has been
correctly and completely filled out by an authorised and qualified member of staff from the
company operating the pump.
A form is included in the appendix.
ProMinent
®
Page 33
Repairs
WARNING
Pumps used for radioactive materials cannot be returned to ProMinent after use!
They will not be accepted by ProMinent!
Repairs:
These should only be carried out by qualified personnel
(in accordance with Safety section):
• Cleaning the valve
• Changing the diaphragm
WARNING
• Always take suitable precautions when using hazardous chemicals!
• Ensure equipment is de-pressurised
NOTE
Take the explosion drawings annexed t the help.
Cleaning the discharge valve (PP, NP) for types 1000, 1005, 1605, 1601, 1602
NOTE
• Discharge and suction valves are different! Dismantle one after the other to avoid
confusion.
• Only use new parts, which fit your valve (in shape and chemical resistance)!
• The pump must be reset after replacing a valve.
• Insert an Allen key or similar into the smaller hole of the pressure connector and push
out the valve inserts.
Cleaning the sucction valve (PP, NP) for types 1000, 1005, 1605, 1601, 1602
Dismantling, cleaning and reassembly of the suction valve is practically the same as for a
discharge valve.
Notice however that:
• both valve inserts are actually identical
• an additional spacer is found under the valve inserts
• in the liquid end a shaped seal is used instead of an O-ring
• the flow direction of the suction connection is reversed as for the pressure connector.
Cleaning the discharge valve (PP, NP) for types 0708, 1008, 0220, 0420, 0413, 0713, 0232
NOTE
• Discharge and suction valves are different! Dismantle one after the other to avoid
confusion!
• Only use new parts, which fit your valve (in shape and chemical resistance)!
• The pump must be reset after replacing a valve.
• Insert an Allen key or similar into the smaller hole of the pressure connector and push
out the valve inserts.
Cleaning the suction valve (PP, NP) for types 0708, 1008, 0220, 0420, 0413, 0713, 0232
Dismantling, cleaning and reassembly of the suction valve is practically the same as for a
discharge valve.
Notice however that:
• an additional spacer is found under the valve inserts
• in the liquid end the O-ring is used, not the shaped seal
• the flow direction of the suction connection is reversed as for the pressure connector.
Page 34
ProMinent
®
Repairs
Change diaphragm
WARNING
• Always take suitable precautions when using hazardous chemicals!
• Ensure that the equipment is de-pressurised!
왘 Empty the liquid end (turn the unit upside down and let the feed chemical run out, rinse with a
suitable material: rinse the liquid end thoroughly after use with hazardous materials!).
왘 When gamma/ L is running set the stroke length to 0 % (the drive axis is then set).
왘 Switch off the gamma/ L.
왘 Unscrew the hydraulic connectors from the discharge and suction side.
왘 For versions with coarse/fine bleed function: firstly pull out the coarse/fine bleed (knob), then
lift off the cover from the liquid end using a screwdriver.
왘 Remove the screws (1).
For pump types 0220, 0232 and 0420 see the following page (4 holes on the diaphragm rim)!
Supply unit types,
except 0220, 0232
and 0420 왘 Loosen the liquid end (2) and the top plate (4) from the pump housing (6) (loosen only!).
왘 Hold the housing (6) in one hand and with the other, clamp the diaphragm (3) between the
liquid end (2) and the top plate (4); release the diaphragm (3) from the drive spindle with a light
anticlockwise turn of the liquid end (2) and top plate (4).
왘 Unscrew the diaphragm (3) completely from the drive spindle.
왘 Remove the top plate (4) from the housing (6).
왘 Check the condition of the safety diaphragm (5) and replace if necessary.
왘 Push the safety diaphragm (5) only as far onto the drive axis until it lies flat on the pump
housing (6) – no further!
왘 Screw the new diaphragm (3) carefully up to the stop on the drive axis – this must be exact to
ensure correct metering!
왘 Screw the diaphragm (3) tight once more.
왘 Position the top plate (4) on the pump housing (6).
IMPORTANT
• The leakage hole must point downwards when the pump is fully assembled (see fig. 20).
• Position the top plate (4) correctly on the pump housing (6). Do not distort the top plate
on the pump housing, otherwise the safety diaphragm (5) will not fit.
왘 Lay the diaphragm (3) into the top plate (4).
왘 Hold the top plate (4) and screw the diaphragm (3) in a clockwise direction until it is firmly in
position (you will feel the resistance of the return spring).
IMPORTANT
• Do not overtighten the diaphragm (3) (particularly on type 1601).
• The top plate (4) must remain in position to prevent the safety diaphragm (5) from
distorting.
왘 Place the liquid end (2) with the screws (1) on the diaphragm (3) and the top plate (4) (the
priming connector must point downwards once the pump is fully assembled).
왘 Screw on screws (1) lightly and tighten (starting torque, see below).
왘 For versions with coarse/fine bleed function, ensure that the liquid end cover engages in the
liquid end, then push the coarse/fine bleed vent (knob) into the liquid end.
ProMinent
®
Page 35
Repairs
1
2
3
4
5
6
Fig. 21
1 Screws
2 Liquid end
3 Diaphragm
4 Top plate
5 Safety diaphragm
6 Pump housing
NOTE
• Check the screw torques after 24 hours in operation
• For PP liquid ends check the screw torques again after three months.
Screw torques:
4,5 to 5 Nm
Liquid ends - types 0220, 0232 and 0420
왘 Remove the metering head (2) with the screw (1) from the pump (see fig. 22).
왘 Only type 0232: Remove the screws of the set disk (4) below the diaphragm (3).
왘 The screws (1) should fit in the holes of the diaphragm (3), but not on the set disk.
왘 Hold the housing (6) in one hand and with the other hand, clamp the diaphragm (3) between
the liquid end (2) and the top plate (4); release the diaphragm (3) from the drive spindle with a
light anti-clockwise turn of the liquid end (2) and top plate (4).
왘 Remove the liquid end (2) with screws (1) from of the diaphragm and unscrew completely from
the drive spindle.
왘 Remove the top plate (4) from the housing (6).
왘 Check the condition of the safety diaphragm (5) and replace it necessary.
왘 Push the safety diaphragm (5) only as far onto the drive axis until it lies flat on the pump
housing (6) – no further!
왘 Screw the new diaphragm (3) carefully up to the stop on the drive axis – this must be exact to
ensure correct metering!
왘 Check that the holes in the diaphragm are aligned with those in the pump housing.
왘 If not, start the pump and set the stroke length to 100 %.
왘 When the pump is running, turn the diaphragm (3) slowly in a clockwise direction until the four
holes in the diaphragm are flush with those on the pump housing (6).
왘 Hold the diaphragm (3) in this position, set the stroke length to 0 % and stop the pump.
왘 Screw the diaphragm (3) tight once more.
왘 Position the top plate (4) on the pump housing (6).
왘 Only type 0232: Mount the set disk (4) with the screws.
Page 36
ProMinent
®
Repairs
IMPORTANT
• The leakage hole must point downwards when the pump is fully assembled (see fig. 20).
• Position the top plate (4) correctly on the pump housing (6). Do not distort the top plate
on the pump housing, otherwise the safety diaphragm (5) will not fit.
왘 Lay the diaphragm (3) into the top plate (4).
왘 Hold the top plate and screw the diaphragm (3) in a clockwise direction until it is firmly in
position (you will feel the resistance of the return spring).
IMPORTANT
• Do not overtighten the diaphragm (3).
• The top plate (4) must remain in position to prevent the safety diaphragm (5) from
distorting.
왘 Position the liquid end (2) with the screws (1) on the diaphragm (3) and the top plate (4)
(the priming connector must point downwards once the pump is fully assembled).
왘 Screw on screws (1) lightly and tighten (starting torque, see above).
왘 For coarse/fine bleed versions: ensure the liquid end cover engages in the liquid end, then
push the coarse/fine bleed (knob) into the liquid end.
1
2
3
4
5
6
Fig. 22
1 Screws
2 Liquid end
3 Diaphragm
4 Top plate
5 Safety diaphragm
6 Pump housing
NOTE
• Check the screw torque after 24 hours in operation!
• For PP liquid ends recheck the screw torque after three months!
ProMinent
®
Page 37
Troubleshooting
11
Troubleshooting
WARNING
• Always take suitable precautions when using hazardous chemicals!
• Ensure the equipment is de-pressurised before working on the pump!
gamma/ L does not prime despite full stroke and bleed function
Cause Crystalline deposits on the ball seat because valves have dried out
Remedy 왘 Remove the suction sleeve from the chemical supply container and rinse out the liquid end
thoroughly
왘 If still unsuccessful, dismantle valves and clean (see section 9)
Fluid is seeping from the top plate
Cause The liquid end is not sealed against the pump diaphragm
Remedy 왘 Tighten screws in the liquid end (see section 9)
왘 If unsuccessful, replace the diaphragm (see section 10)
Green LED indicator (operating display) is not lit
Cause Incorrect or no mains voltage
Remedy 왘 Use the recommended mains voltage as given in the voltage specification on the nameplate
Error Messages
Red LED display is lit, “Error” appears and “MINIM” flashes in the display
Cause Fluid level in the chemical storage tank has reached “liquid level low, stage 2”
Remedy 왘 Fill the chemical supply container
Red LED display is lit, “Error” appears and “ANALG” flashes in the display
Cause gamma/ L is in “analogue” operating mode, a fault routine has been programmed in the ANALG
menu and the operating current has fallen below 3.8 mA
Remedy 왘 Remedy low operating current
왘 Switch fault routine “OFF” (see Section 7.4.2.)
Red LED display is lit, “Error” appears and “CNTCT” flashes in the display
Cause gamma/ L is in “contact” or “batch” operating mode and the extended function “memory” has
been set.
In addition a very large factor has been entered, too many contacts have been input or the P-key
has been pressed too often, resulting in an overflow of the stroke memory.
Remedy 왘 Press the P-key, saved data will be deleted
왘 Change gamma/ L set up
Red LED display is lit, “Error” appears and “FLOW” flashes in the display
Cause Dosing monitor not properly connected
Remedy 왘 Connect dosing monitor properly
왘 Press P-key
Cause Dosing monitor has reported more defective strokes than have been set in the FLOW menu
Remedy 왘 Press P-key
왘 Investigate the cause and remedy
Red LED display is lit, “Error” appears and “Mem” flashes in the display
Cause Stroke memory full
Remedy 왘 Remove cause
왘 Press P-key (Consider the consequences this will have on your process)
All other Errors
Please contact your ProMinent branch or representative!
Page 38
ProMinent
®
Troubleshooting / Decommissioning and Disposal
Fault Signals
Yellow LED display is lit
Cause Liquid level in chemical storage tank has reached “liquid level low, stage 1”
Remedy 왘 Fill chemical storage tank
Yellow LED Display is lit and “calib” flashes
Cause The pump is calibrated and the stroke length deviates by more than ±10 % from the value at the
time of calibration.
Remedy 왘 Reset the stroke length or calibrate the pump again to the desired stroke length
12
Decommissioning and Disposal
Decommissioning
WARNING
• When decommissioning the gamma/ L the housing and, in particular, the
liquid end must be thoroughly cleaned to remove chemicals and dirt!
• Always take suitable precautions when using hazardous chemicals!
• Ensure that the equipment is de-pressurised!
왘 Disconnect the gamma/ L from the power supply
왘 Empty the liquid end by turning the gamma/ L upside down and allow the feed chemical to
pour out
왘 Rinse the liquid end with a suitable material, thoroughly rinse the liquid end after use with
hazardous materials!
If decommissioning is only temporary, maintain the correct storage conditions:
Storage temperature:
-10 to +50 °C
Air humidity:
< 92 % relative humidity
Disposal
IMPORTANT
Electronic waste is classified as special waste!
Please observe all locally applicable directives!
ProMinent
®
Page 39
Technical Data
13
Technical Data
13.1
Performance data and weights
gamma/ L
Liquid
end
type
at 180 strokes/minute and 100 % stroke length
Max. feed rate
at maximum
operating pressure
bar
l/h
ml/str.
max. feed rate
Connector
at medium
size outer Ø
operating pressure
x inner Ø
bar
l/h
ml/str.
mm
m Wg
m Wg
Admmis.
priming
pressure
bar
1000
10
0.74
0.09
5
0.82
0.076
6x4
6
1.8
8
2.9 / 3.6
1601
16
1.1
0.10
8
1.4
0.13
6x4
6
2
8
2.9 / 3.6
1602
16
2.1
0.19
8
2.5
0.24
6x4
6
2
5.5
2.9 / 3.6
1005
10
4.4
0.41
5
5.0
0.46
8x5****
5
3
3
3.1 / 4.5
0708
7
7.1
0.66
3.5
8.4
0.78
8x5
6
2
2
3.1 / 4.5
0413
4
12.3
1.14
2
14.2
1.31
8x5
3
2
1.5
3.1 / 4.5
0220
2
19.0
1.76
1
20.9
1.94
12x9
2
2
1
3.1 / 4.5
1605
16
4.1
0.38
8
4.9
0.45
8x5****
4
3
3
4.5 / 5.9
1008
10
6.8
0.63
5
8.3
0.76
8x5
3
3
2
4.5 / 5.9
0713
7
11.0
1.02
3.5
13.1
1.21
8x5
3
3
1.5
4.5 / 5.9
0420
4
17.1
1.58
2
19.1
1.77
12x9
3
3
1
5.5 / 8.6
0232
2
32.0
2.96
1
36.2
3.35
12x9
2
2
0.8
5.5 / 8.6
gamma/ L with self-degassing liquid end ***
Liquid
end
type
1601
2
16
0.59
0.055
0.78
Ship.
Wt1
approx. kg
at 180 strokes/minute and 100 % stroke length
max. feed rate
Connector
at medium
size outer Ø
operating pressure
x inner Ø
bar
l/h
ml/str.
mm
8
Priminglift**
0.072
6x4
Suctionlift*
Priminglift**
m Wg
Admmis.
priming
pressure
bar
m Wg
–
Ship.
Wt1
approx. kg
1.8
0.5
2.9
1602
16
1.4
0.13
8
1.74
0.16
6x4
–
2.1
0.5
2.9
1005
10
3.6
0.33
5
4.0
0.37
8x5
–
2.7
0.5
3.1
0708
7
6.6
0.61
3.5
7.5
0.69
8x5
–
2
0.5
3.1
0413
4
10.8
1.00
2
12.6
1.17
8x5
–
2.5
0.5
3.1
0220
2
16.3
0.31
8
3.8
0.35
8x5
–
3.0
0.5
4.5
1008
10
6.3
0.58
5
7.5
0.69
8x5
–
3.0
0.5
4.5
0713
7
10.5
0.97
3.5
12.3
1.14
8x5
–
2.5
0.5
4.5
0420
4
15.6
1.44
2
17.4
1.61
12x9
–
2.5
0.5
4.5
*
**
***
****
1
Max. feed rate
at maximum
operating pressure
bar
l/h
ml/str.
Suctionlift*
Lift when suction line and liquid end are full
Priming lift with clean and wetted valves, priming lift at 100% stroke length and free flow or opened bleed valve
The feed rate values are for minimum feed rates, based on water at 20° C
For material versions SST : 6 x 4 mm
For material versions PPE, PPB, NPE, NPB, PVT, TTT/SST
For material versions PPE, PPB, NPE, NPB
Page 40
ProMinent
®
Technical Data
13.2
Dosing reproducibility
Standard Liquid ends
Dosing precision -5 to +10 % at max. stroke length and max. operating pressure for all materials.
Reproducibility ±2 % at constant conditions and minimum 30 % stroke length.
Self-degassing liquid ends
Since self-degassing liquid ends are filled with air bubbles when in contact with gaseous
chemicals and when in operation, no dosing reproducibility values can be given.
The recommended minimum stroke length with self-degassing liquid ends is 50 %.
13.3
Viscosity
The liquid ends are designed for liquids up to a maximum viscosity of
• 200 mPas
for standard liquid ends
• 500 mPas
for valves with springs
•
for self-degassing liquid ends
50 mPas
13.4
Materials Data
Liquid ends
Version
Liquid end
Valves
Seals
Balls
PPE
PPB
PP
PP
PP
PP
EPDM
FPM
Ceramic
Ceramic
NPE
NPE
Acrylic glass
Acrylic glass
PVC
PVC
EPDM
FPM
Ceramic
Ceramic
PVT
PVDF
PTFE with carbon
PTFE
Ceramic
TTT
PTFE with carbon
PTFE with carbon
PTFE
Ceramic
SST
Stainless steel
1.4571
Stainless steel
1.4571
PTFE
Ceramic
FPM = Fluorine Rubber
Pump
Housing
Polyphenylene ether (PPE with glass fibre)
Cover
Polycarbonate
Electronics
Electronic components
13.5
Electrical Data
Version: 100 - 230 V ±10 %, 50/60 Hz
Varants 100 - 230 V/AC
gamma/ L M70
gamma/ L M85
Power rating
17 W
22 W
Rated current
0.7 A
1A
Switch on peak current
15 A (for approx. 1 ms)
15 A (for approx. 1 ms)
Fuse
0.8 AT
0.8 AT
Note Fuses must display VDE, UL and CSA certification, e.g. type 19195 from Wickmann in
accordance with IEC publication 127 - 2/3
ProMinent
®
Page 41
Technical Data
13.6
Ambient conditions
Temperatures Storage and transport temperatures:
-10 to +50 °C
Feed chemical temperature:
-10 to +35 °C
Ambient temperature when in operation:
-10 to +45 °C (drive and control)
Maximum ambient temperatures for liquid ends depending on material type:
max. ambient temperature
Long-term at max. operating
pressure
Short term (max. 15 min)
at max. 2 bar
PPE, PPB
NPE, NPB
PVT
TTT
SST
50 °C
45 °C
50 °C
50 °C
50 °C
100 °C
60 °C
120 °C
120 °C
120 °C
* Under extreme conditions such as maximum dosing temperatures, maximum stroke frequency
and maximum operating pressure, leakage can occur on the liquid end at an ambient
temperature of 35 °C.
Climate Permissible air humidity:
92 % relative humidity, not condensing
Moist and fluctuating air conditions: FW 24 in accordance with DIN 50016
13.7
Enclosure rating and safety class
Enclosure Rating Contact and moisture enclosure rating:
IP 65 in accordance with IEC 529, EN 60529, DIN VDE 0470 Part 1
Safety Requirements Safety Class 1 - Mains connection with earth lead
13.8
Compatibility
The hydraulic parts of the gamma/ L are identical to those of the Beta®.
The following components and accessories for pumps from the product ranges Beta®,
CONCEPT, gamma-Classic and gamma are all compatible:
•
•
•
•
•
•
•
•
•
Page 42
gamma/Vario signal cable; 2-, 4- and 5 core for “external” function
2 stage float switch (gamma/Vario)
Discharge tubing diameters
Standard gamma connector set
gamma wall bracket
Chemical feed containers and mounting plates
Total height (distance between suction and discharge connector)
Distance between the connectors and locating holes on the pumps
Accessories such as pressure back pressure valve, multifunctional valve, dosing monitor and
rinsing equipment
ProMinent
®
Annexe
gamma/ L Dimensions
PPE, PPB material versions
M
E
101
160
F
Pr
oM
in
en
t®
12 (not for 0232)
15
80
36
102
96
K
147
Fig. 23
L
Dimensions in mm
gamma/ L M70
1000 - 1602
1005
0708 - 0413
gamma/ L M85
1605
1008 - 0713
0220
0420
0232
E
23
13
15
15
13
15
15
5
F
186
193
191
191
193
191
191
197
K
71
71
74
76
71
74
76
76
L
106
105
108
110
105
108
110
91
M
Ø 70
Ø 90
Ø 90
Ø 90
Ø 90
Ø 90
Ø 90
Ø 110
101
160
F
ProMinent®
M
NPE, NPB material versions (non bleed)
E
15
36
80
96
102
K
L
147
Fig. 24
Dimensions in mm
gamma/ L M70
1000 - 1601
1602
1005
0708
0413 - 0220
gamma/ L M85
1605
1008 - 0713
0420
0232
E
25
23
16
15
15
16
15
15
5
F
177
179
188
189
189
188
189
189
199
K
77
77
74
74
76
74
74
76
76
L
92
92
89
89
91
89
89
91
91
M
62 (Ø 70)
66 (Ø 70)
Ø 90
Ø 90
Ø 90
Ø 90
Ø 90
Ø 90
Ø 110
ProMinent
®
Page 43
gamma/ L Dimensions
NPE, NPB material versions (with bleed function)
M
13,8
101
160
F
ProMinent®
E
15
36
80
K
96
102
147
L
Fig. 25
Dimensions in mm
gamma/ L M70
1000 - 1601
1602
1005
0708
gamma/ L M85
1605
1008
0413 - 0220
0713 - 0420
0232
E
25
23
16
13
15
16
13
15
5
F
177
179
188
189
189
188
189
189
199
K
77
77
74
74
76
74
74
76
76
L
105
105
102
102
104
102
102
104
105
M
62 (Ø 70)
66 (Ø 70)
Ø 90
Ø 90
Ø 90
Ø 90
Ø 90
Ø 90
Ø 110
26,5
PPE, PPB, NPE, NPB, SEK material versions
E
101
160
F
M
3
44
15
80
36
102
96
K
L
147
Fig. 26
Dimensions in mm
gamma/ L M70
1601
1602
1005
0708
0413 - 0220
gamma/ L M85
1605
1008 - 0713
0420
E
25
23
16
15
15
16
15
15
F
177
179
188
189
189
188
189
189
K
77
77
74
74
76
74
74
76
L
92
92
89
89
91
89
89
91
M
62 (Ø 60)
66 (Ø 70)
Ø 90
Ø 90
Ø 90
Ø 90
Ø 90
Ø 90
Page 44
ProMinent
®
gamma/ L Dimensions
E
101
160
F
M
PVDF material version
15
80
96
36
102
K
147
Fig. 27
L
Dimensions in mm
gamma/ L M70
1000-1602
1005
0708-0413
0220
gamma/ L M85
1605
0408-0713
0420
0232
E
25
14
14
14
14
14
14
4
F
185
191
191
191
191
191
191
198
K
71
71
73
75
71
73
75
76
L
84
88
90
92
88
90
92
93
M
Ø 70
Ø 90
Ø 90
Ø 90
Ø 90
Ø 90
Ø 90
Ø 110
E
101
160
ProMinent®
M
F
TTT material version
15
80
36
102
96
K
147
Fig. 28
L
Dimensions in mm
gamma/ L M70
1000 - 1601
1602
1005
0708 - 0220
gamma/ L M85
1605
1008 - 0420
0232
E
32
25
23
-7
23
-7
-15
F
170
178
179
209
179
209
217
K
78
72
75
77
75
77
78
L
91
87
90
95
90
95
97
M
51 (Ø 60)
66 (Ø 70)
68 (Ø 80)
81 (Ø 85)
68 (Ø 80)
81 (Ø 85)
96 (Ø 100)
ProMinent
®
Page 45
gamma/ L Dimensions
101
160
F
ProMinent®
M
SST material version
E
15
36
80
96
102
K
147
L
Fig. 29
Dimensions in mm
gamma/ L M70
1000 - 1601
1602
0708 - 0413
0220
gamma/ L M85
1605
1008 - 0713
0420
0232
E
40
33
31
-2
-3
31
-2
-3
-10
F
162
170
171
203
204
171
203
204
212
K
78
72
75
77
77
75
77
77
78
L
89
85
88
93
93
88
93
93
95
M
51 (Ø 60)
66 (Ø 70)
68 (Ø 80)
81 (Ø 85)
81 (Ø 85)
81 (Ø 80)
81 (Ø 85)
81 (Ø 85)
96 (Ø 100
Page 46
1005
ProMinent
®
Exploded diagrams of liquid ends
Liquid end 1000 - 1005 (1605)
PP with coarse/fine bleed
Connector kit
Connector kit
Connector kit
Connector kit
6/4 PPE
8/5 PPE
6/4 PPB
8/5 PPB
817150
817153
817166
817167
*
4 valve balls
1 seal set
1 seal set
404201
EPDM
FPM
Discharge valve set
Discharge valve set
PPE
PPB
740350
740351
1000
1601
1602
1005
1000244
1000245
1000246
1000247
1001775
1001773
Diaphragm
Diaphragm
Diaphragm
Diaphragm
*
Spare parts kits for:
Type
Material
Order No.
1000
1601
1602
1005 (1605)
PPE
PPE
PPE
PPE
1001644
1001645
1001646
1001647
1000
1601
1602
1005 (1605)
PPB
PPB
PPB
PPB
1001652
1001653
1001654
1001655
Suction valve set
Suction valve set
PPE
PPB
792644
792646
Connector kit
The listed items are included in the spare parts kit.
* Customer accessories
Subject to technical alterations.
ProMinent
®
60_07-104_00_18-04_2
Page 47
Exploded diagrams of liquid ends
Liquid end 0708 (1008) - 0220 (0420)
PP with coarse/fine bleed
Connector kit 8/5 PPE
Connector kit 12/9 PPE
Connector kit 8/5 PPB
Connector kit 12/9 PPB
817153
817151
817167
817168
*
4 valve balls
1 seal set
1 seal set
404281
EPDM
FPM
Discharge valve set PPE
Discharge valve set PPB
1001441
1001440
1001776
1001774
Diaphragm 0708 1000248
Diaphragm 0413 1000249
Diaphragm 0220 1000250
*
Suction valve set
Suction valve set
Spare parts kits for:
Type
Material
Order No.
0708 (1008)
0413 (0713)
0220 (0420)
PPE
PPE
PPE
1001648
1001649
1001650
0708 (1008)
0413 (0713)
0220 (0420)
PPB
PPB
PPB
1001656
1001657
1001658
PPE
PPB
1001437
1001436
Connector kit
The listed items are included in the spare parts kit.
* Customer accessories
Subject to technical alterations.
Page 48
60_07-104_00_19-04_2
ProMinent
®
Exploded diagrams of liquid ends
Liquid end 0232
PP without coarse/fine bleed
Connector kit
Connector kit
4 valve balls
1 seal set
1 seal set
12/9 PPE
12/9 PPB
817151
817168
404281
EPDM
FPM
1001776
1001774
Discharge valve set
Discharge valve set
PPE
PPB
1001441
1001440
*
Diaphragm 0232 1000251
*
Suction valve set
Suction valve set
PPE
PPB
1001437
1001436
Spare parts kits for:
Type
Material
Order No.
0232
PPE
1001651
0232
PPB
1001659
Connector kit
The listed items are included in the spare parts kit.
* Customer accessories
Subject to technical alterations.
ProMinent
®
60_07-104_00_40-04_2
Page 49
Exploded diagrams of liquid ends
Liquid end 1000 - 1005 (1605)
NP with coarse/fine bleed
Connector kit
Connector kit
Connector kit
Connector kit
6/4 PCE
8/5 PCE
6/4 PCB
8/5 PCB
817060
817048
817050
817053
*
4 valve balls
1 seal set
1 seal set
Discharge valve set
Discharge valve set
404201
EPDM
FPM
PCE
PCB
740349
740348
1001775
1001773
Diaphragm
Diaphragm
Diaphragm
Diaphragm
1000
1601
1602
1005
1000244
1000245
1000246
1000247
Suction valve set
Suction valve set
PCE
PCB
792119
792026
*
Spare parts kits for:
Type
Material
Order No.
1000
1601
1602
1005 (1605)
NPE
NPE
NPE
NPE
1001713
1001714
1001715
1001716
1000
1601
1602
1005 (1605)
NPB
NPB
NPB
NPB
1001721
1001722
1001723
1001724
Connector kit
The listed items are included in the spare parts kit.
* Customer accessories
Subject to technical alterations.
Page 50
60_07-104_00_23-04_2
ProMinent
®
Exploded diagrams of liquid ends
Liquid end 0708 (1008) - 0220 (0420)
NP with coarse/fine bleed
Connector kit 8/5 PCE
Connector kit 12/9 PCE
Connector kit 8/5 PCB
Connector kit 12/9 PCB
817048
817049
817053
817051
*
4 valve balls
1 seal set
1 seal set
404281
EPDM
FPM
Discharge valve set
Discharge valve set
PCE
PCB
1001439
1001438
1001776
1001774
Diaphragm 0708 1000248
Diaphragm 0413 1000249
Diaphragm 0220 1000250
*
Spare parts kits for:
Type
Material
Order No.
0708 (1008)
0413 (0713)
0220 (0420)
NPE
NPE
NPE
1001716
1001717
1001718
0708 (1008)
0413 (0713)
0220 (0420)
NPB
NPB
NPB
1001725
1001726
1001727
Suction valve set
Suction valve set
PCE
PCB
1001435
1001434
Connector kit
The listed items are included in the spare parts kit.
* Customer accessories
Subject to technical alterations.
ProMinent
®
60_07-104_00_24-04_2
Page 51
Exploded diagrams of liquid ends
Liquid end 0232
NP with coarse/fine bleed
Connector kit 12/9 PCE
Connector kit 12/9 PCB
817049
817051
*
4 valve balls
1 seal set
1 seal set
404281
EPDM
FPM
Discharge valve set
Discharge valve set
1001776
1001774
PCE
PCB
1001439
1001438
Diaphragm 0232 1000251
*
Suction valve set
Suction valve set
Spare parts kits for:
Type
Material
0232
NPE
1001719
0232
NPB
1001728
PCE
PCB
1001435
1001434
Order No.
Connector kit
The listed items are included in the spare parts kit.
* Customer accessories
Subject to technical alterations.
Page 52
60_07-104_00_34-04_2
ProMinent
®
Exploded diagrams of liquid ends
Liquid end 1000 - 1005 (1605)
NP without coarse/fine bleed
Connector kit
Connector kit
Connector kit
Connector kit
4 valve balls
1 seal set
1 seal set
6/4 PCE
8/5 PCE
6/4 PCB
8/5 PCB
817060
817048
817050
817053
404201
EPDM
FPM
Discharge valve set PCE
Discharge valve set PCB
1001775
1001773
Diaphragm
Diaphragm
Diaphragm
Diaphragm
*
740349
740348
1000
1601
1602
1005
1000244
1000245
1000246
1000247
PCE
PCB
792119
792026
*
Spare parts kits for:
Type
Material
Order No.
1000
1601
1602
1005 (1605)
PCE / NPE
PCE / NPE
PCE / NPE
PCE / NPE
1001713
1001714
1001715
1001716
1000
1601
1602
1005 (1605)
PCB / NPB
PCB / NPB
PCB / NPB
PCB / NPB
1001721
1001722
1001723
1001724
Suction valve set
Suction valve set
Connector kit
The listed items are included in the spare parts kit.
* Customer accessories
Subject to technical alterations.
ProMinent
®
60_07-104_00_21-04_2
Page 53
Exploded diagrams of liquid ends
Liquid end 0708 (1008) - 0220 (0420)
NP without coarse/fine bleed
Connector kit 8/5 PCE
Connector kit 12/9 PCE
Connector kit 8/5 PCB
Connector kit 12/9 PCB
4 valve balls
1 seal set
1 seal set
817048
817049
817053
817051
404281
EPDM
FPM
Discharge valve set
Discharge valve set
1001776
1001774
PCE
PCB
1001439
1001438
*
Diaphragm 0708 1000248
Diaphragm 0413 1000249
Diaphragm 0220 1000250
*
Suction valve set
Suction valve set
PCE
PCB
1001435
1001434
Spare parts kits for:
Type
Material
Order No.
0708 (1008)
0413 (0713)
0220 (0420)
NPE
NPE
NPE
1001716
1001717
1001718
0708 (1008)
0413 (0713)
0220 (0420)
NPB
NPB
NPB
1001725
1001726
1001727
Connector kit
The listed items are included in the spare parts kit.
* Customer accessories
Subject to technical alterations.
Page 54
60_07-104_00_22-04_2
ProMinent
®
Exploded diagrams of liquid ends
Liquid end 0232
NP without coarse/fine bleed
Connector kit 12/9 PCE
Connector kit 12/9 PCB
4 valve balls
1 seal set
1 seal set
817049
817051
404281
EPDM
FPM
Discharge valve set
Discharge valve set
1001776
1001774
PCE
PCB
1001439
1001438
*
Diaphragm 0232 1000251
*
Suction valve set
Suction valve set
PCE
PCB
1001435
1001434
Spare parts kits for:
Type
Material
Order No.
0232
NPE
1001719
0232
NPB
1001728
Connector kit
The listed items are included in the spare parts kit.
* Customer accessories
Subject to technical alterations.
ProMinent
®
60_07-104_00_20-04_2
Page 55
Exploded diagrams of liquid ends
Liquid end 1601 - 1005 (1605)
PP / NP self-degassing
Connector kit
Connector kit
Connector kit
Connector kit
4 valve balls
1 seal set
1 seal set
Connector kit
Connector kit
Connector kit
Connector kit
Connector kit
Connector kit
Connector kit
Connector kit
6/4 PPE
8/5 PPE
6/4 PPB
8/5 PPB
6/4 PCE
8/5 PCE
6/4 PCB
8/5 PCB
817160
817161
817173
817174
791161
792058
817065
817066
EPDM
FPM
404201
Vent valve
Vent valve
Vent valve
Vent valve
1001674
1001672
Discharge valve set
Discharge valve set
Discharge valve set
Discharge valve set
PPE
PPB
PCE
PCB
1001067
1001066
1001065
1001064
6/4 PPE
6/4 PPB
6/4 PCE
6/4 PCB
PPE
PPB
PCE
PCB
817160
817173
791161
817065
1001063
1001062
1001061
1001060
Diaphragm 1601 1000245
Diaphragm 1602 1000246
Diaphragm 1005 1000247
Spare parts kits for:
Type
Material
Order No.
1601
1602
1005 (1605)
PPE
PPE
PPE
1001756
1001757
1001758
1601
1602
1005 (1605)
PPB
PPB
PPB
1001762
1001763
1001764
1601
1602
1005 (1605)
NPE
NPE
NPE
1001660
1001661
1001662
1601
1602
1005 (1605)
NPB
NPB
NPB
1001666
1001667
1001668
The listed items are included in the spare parts kit.
Suction valve set
Suction valve set
Suction valve set
Suction valve set
Connector kit
Connector kit
Connector kit
Connector kit
Connector kit
Connector kit
Connector kit
Connector kit
PPE
PPB
PCE
PCB
6/4 PPE
8/5 PPE
6/4 PPB
8/5 PPB
6/4 PCE
8/5 PCE
6/4 PCB
8/5 PCB
792644
792646
792119
792026
817160
817161
817173
817174
791161
792058
817065
817066
Subject to technical alterations.
Page 56
ProMinent
®
Exploded diagrams of liquid ends
Liquid end 0708 (1008) - 0220 (0420)
PP / NP self-degassing
Connector kit
Connector kit
Connector kit
Connector kit
1 valve ball
Connector kit
Connector kit
Connector kit
Connector kit
Connector kit
Connector kit
Connector kit
Connector kit
8/5 PPE
12/9 PPE
8/5 PPB
12/9 PPB
8/5 PCE
12/9 PCE
8/5 PCB
12/9 PCB
817161
817162
817174
817175
792058
790577
817066
817067
1 seal set
1 seal set
6/4 PPE
6/4 PPB
6/4 PCE
6/4 PCB
817160
817173
791161
817065
404201
EPDM
FPM
1001675
1001673
Discharge valve set
Discharge valve set
Discharge valve set
Discharge valve set
3 valve balls
PPE
PPB
PCE
PCB
1001071
1001070
1001069
1001068
Vent valve
Vent valve
Vent valve
Vent valve
PPE
PPB
PCE
PCB
1001063
1001062
1001061
1001060
Diaphragm 0708 1000248
Diaphragm 0413 1000249
Diaphragm 0220 1000250
404281
Spare parts kits for:
Type
Material
Order No.
0708 (1008)
0413 (0713)
0220 (0420)
PPE
PPE
PPE
1001759
1001760
1001761
0708 (1008)
0413 (0713)
0220 (0420)
PPB
PPB
PPB
1001765
1001766
1001767
0708 (1008)
0413 (0713)
0220 (0420)
NPE
NPE
NPE
1001663
1001664
1001665
0708 (1008)
0413 (0713)
0220 (0420)
NPB
NPB
NPB
1001669
1001670
1001671
Suction valve set
Suction valve set
Suction valve set
Suction valve set
Connector kit
Connector kit
Connector kit
Connector kit
Connector kit
Connector kit
Connector kit
Connector kit
PPE
PPB
PCE
PCB
8/5 PPE
12/9 PPE
8/5 PPB
12/9 PPB
8/5 PCE
12/9 PCE
8/5 PCB
12/9 PCB
1001437
1001436
1001435
1001434
817161
817162
817174
817175
792058
790577
817066
817067
The listed items are included in the spare parts kit.
Subject to technical alterations.
ProMinent
®
Page 57
Exploded diagrams of liquid ends
Liquid end 1000-1005 (1605)
PVT with bleed
Connector kit
Connector kit
*
4 valve balls 4.7
404281
1 seal set 4.7-2 PVT
1023130
6/4 PVT
8/5 PVT
1023246
1023247
Discharge valve set 9.2-2 PVT 1023247
Diaphragm 1000
Membran 1601
Membran 1602
Membran 1005
1000244
1000245
1000246
1000247
*
Suction valve set 9.2-2 PVT
1023126
Connector kit
The listed items are included in the spare parts kit.
* Customer accessories
Subject to technical alterations.
Page 58
ProMinent
®
Exploded diagrams of liquid ends
Liquid end 0708 (1008) - 0220 (0420)
PVT with bleed
Connector kit 18/5 PVT
Connector kit 12/9 PVT
Discharge valve set 9.2-2 PVT 1023247
*
4 valve balls 9.2
404281
1 seal set 9.2-2 PVT
1023130
1023247
1023248
Diaphragm 0708/1008
Membran 0413/0713
Membran 0220/0420
1000248
1000249
1000250
*
Suction valve set 9.2-2 PVT
1023126
Connector kit
The listed items are included in the spare parts kit.
* Customer accessories
Subject to technical alterations.
ProMinent
®
Page 59
Exploded diagrams of liquid ends
Liquid end 0232
PVT without bleed
Connector kit 8/5 PVT
Connector kit 12/9 PVT
*
4 valve balls 9.2
404281
1 seal set 9.2-2 PVT
1023129
1023247
1023248
Discharge valve set 9.2-2 PVT 1023125
Diaphragm 0232 1000251
*
Suction valve set 9.2-2 PVT
1023126
Connector kit
The listed items are included in the spare parts kit.
* Customer accessories
Subject to technical alterations.
Page 60
ProMinent
®
Exploded diagrams of liquid ends
Liquid end 1000 - 1005 (1605)
TT
Connector kit 6/4 TTT 817201
Connector kit 8/5 TTT 817204
4 valve balls
11 seals
404201
Discharge valve set
PTFE 483907
*
TTT
Diaphragm
Diaphragm
Diaphragm
Diaphragm
1000
1601
1602
1005
809406
1000244
1000245
1000246
1000247
*
Spare parts kits for:
Suction valve set TTT
Type
Material
Order No.
1000
1601
1602
1005 (1605)
TTT
TTT
TTT
TTT
1001737
1001738
1001739
1001740
809407
Connector kit
The listed items are included in the spare parts kit.
* Customer accessories
Subject to technical alterations.
ProMinent
®
60_07-104_00_29-04_2
Page 61
Exploded diagrams of liquid ends
Liquid end 0708 (1008) - 0220 (0420)
TT
Connector kit 8/5 TTT
Connector kit 12/9 TTT
4 valve balls
404281
Discharge valve set TTT
12 seals
817204
817202
PTFE
809444
483975
*
Diaphragm 0708 1000248
Diaphragm 0413 1000249
Diaphragm 0220 1000250
*
Spare parts kits for:
Type
Material
Order No.
0708 (1008)
0413 (0713)
0220 (0420)
TTT
TTT
TTT
1001741
1001742
1001754
Suction valve set TTT
809445
Connector kit
The listed items are included in the spare parts kit.
* Customer accessories
Subject to technical alterations.
Page 62
60_07-104_00_30-04_2
ProMinent
®
Exploded diagrams of liquid ends
Liquid end 0232
TT
Connector kit 12/9 TTT
4 valve balls
12 seals
817202
404281
PTFE
Discharge valve set TTT
483975
809444
*
Diaphragm 0232 1000251
*
Suction valve set
TTT
809445
Spare parts kits for:
Type
Material
Order No.
0232
TTT
1001755
Connector kit
The listed items are included in the spare parts kit.
* Customer accessories
Subject to technical alterations.
ProMinent
®
60_07-104_00_35-04_2
Page 63
Exploded diagrams of liquid ends
Liquid end 1000 - 1005 (1605)
SS
Connector kit 6 mm SS 104233
4 valve balls
404201
Discharge valve set
12 seals
PTFE
6 mm SST
809418
483907
*
Diaphragm
Diaphragm
Diaphragm
Diaphragm
1000
1601
1602
1005
1000244
1000245
1000246
1000247
*
Suction valve set 6 mm SST
809419
Spare parts kits for:
Type
Material
Order No.
1000
1601
1602
1005 (1605)
SST
SST
SST
SST
1001729
1001730
1001731
1001732
Connector kit
The listed items are included in the spare parts kit.
* Customer accessories
Subject to technical alterations.
Page 64
ProMinent
®
Exploded diagrams of liquid ends
Liquid end 0708 (1008) - 0220 (0420)
SS
Connector kit
Connector kit
4 valve balls
12 seals
404281
PTFE
8 mm SS
12 mm SS
104237
104245
Discharge valve set 8 mm SST
Discharge valve set 12 mm SST
809494
809446
483975
*
Diaphragm 0708 1000248
Diaphragm 0413 1000249
Diaphragm 0220 1000250
*
Spare parts kits for:
Type
Material
Order No.
0708 (1008)
0413 (0713)
0220 (0420)
SST
SST
SST
1001733
1001734
1001735
The listed items are included in the spare parts kit.
* Customer accessories
Subject to technical alterations.
ProMinent
®
Suction valve set
8 mm SST
Suction valve set 12 mm SST
809495
809447
Connector kit
60_07-104_00_26-04_2
Page 65
Exploded diagrams of liquid ends
Liquid end 0232
SS
Connector kit
4 valve balls
12 mm SS
104245
404281
Discharge valve set 12 mm SST
12 seals
PTFE
809446
483975
*
Diaphragm 0232 1000251
*
Suction valve set 12 mm SST
809447
Spare parts kits for:
Type
Material
Order No.
0232
SST
1001736
Connector kit
The listed items are included in the spare parts kit.
* Customer accessories
Subject to technical alterations.
Page 66
60_07-104_00_36-04_2
ProMinent
®
Feed rate settings diagrams
Feed rate
[l/h]
Stroke rate
[%]
GALa 1000 at medium operating pressure
Feed rate
[l/h]
Stroke rate
[%]
GALa 1601 at medium operating pressure
1,6
0,9
100
0,8
1,4
180 strokes/min
162 strokes/min
162 strokes/min
144 strokes/min
0,7
126 strokes/min
80
108 strokes/min
108 strokes/min
90 strokes/min
80
90 strokes/min
70
72 strokes/min
72 strokes/min
1
70
54 strokes/min
54 strokes/min
36 strokes/min
0,5
90
144 strokes/min
1,2
126 strokes/min
0,6
100
180 strokes/min
90
36 strokes/min
60
18 strokes/min
60
18 strokes/min
0,8
50
0,4
50
40
0,6
40
0,3
30
30
0,4
0,2
20
20
0,2
0,1
10
10
0
0
0%
10%
20%
30%
40%
50%
60%
70%
80%
90%
0%
100%
10%
20%
30%
40%
50%
60%
70%
80%
90%
100%
Stroke length
Stroke length
Correction factor
Correction factor
1,5
1,6
1,4
1,2
1
0,8
0,6
0,4
0,2
0
1
0,5
0
1
2
4
5
6
8
1
10
2
4
6
Feed rate
[l/h]
8
11
13
16
Operating pressure
Operating pressure
Stroke rate
[%]
GALa 1602 at medium operating pressure
Feed rate
[l/h]
Stroke rate
[%]
GALa 1005 at medium operating pressure
6
3
180 strokes/min
180 strokes/min
2,5
100
162 strokes/min
5
144 strokes/min
126 strokes/min
90
126 strokes/min
90 strokes/min
80
90 strokes/min
4
72 strokes/min
72 strokes/min
54 strokes/min
54 strokes/min
70
80
70
36 strokes/min
36 strokes/min
18 strokes/min
18 strokes/min
1,5
90
108 strokes/min
108 strokes/min
2
100
162 strokes/min
144 strokes/min
60
3
60
50
50
1
40
2
40
30
30
0,5
20
1
20
10
10
0
0
0%
10%
20%
30%
40%
50%
60%
70%
80%
90%
0%
100%
10%
20%
30%
40%
50%
60%
70%
80%
90%
100%
Stroke length
Stroke length
Correction factor
Correction factor
1,5
1,2
1
0,8
1
0,6
0,4
0,5
0,2
0
0
1
2
4
6
8
Operating pressure
ProMinent
®
11
13
16
1
2
4
5
8
10
Operating pressure
Page 67
Feed rate settings diagrams
Feed rate
[l/h]
Stroke rate
[%]
GALa 0708 at medium operating pressure
Feed rate
[l/h]
Stroke rate
[%]
GALa 0413 at medium operating pressure
16
9
100
8
14
180 strokes/min
162 strokes/min
162 strokes/min
126 strokes/min
80
126 strokes/min
12
108 strokes/min
108 strokes/min
90 strokes/min
6
80
90 strokes/min
70
72 strokes/min
72 strokes/min
10
36 strokes/min
70
54 strokes/min
54 strokes/min
5
90
144 strokes/min
144 strokes/min
7
100
180 strokes/min
90
36 strokes/min
60
60
18 strokes/min
18 strokes/min
8
50
4
50
40
6
40
3
30
30
4
2
20
20
2
1
10
0
0%
10%
20%
30%
40%
50%
60%
70%
80%
90%
100%
10
0
0%
10%
20%
30%
40%
Stroke length
50%
60%
70%
80%
90%
100%
Stroke length
Correction factor
Correction factor
1,2
1,2
1
1
0,8
0,8
0,6
0,6
0,4
0,4
0,2
0,2
0
1
2
3,5
4
6
0
7
1
1,5
2
Feed rate
[l/h]
3
4
Operating pressure
Operating pressure
Stroke rate
[%]
GALa 0220 at medium operating pressure
Feed rate
[l/h]
Stroke rate
[%]
GALa 1605 at medium operating pressure
6
25
180 strokes/min
180 strokes/min
162 strokes/min
100
5
162 strokes/min
144 strokes/min
20
126 strokes/min
90
108 strokes/min
108 strokes/min
90 strokes/min
90 strokes/min
80
4
72 strokes/min
90
80
72 strokes/min
54 strokes/min
15
100
144 strokes/min
126 strokes/min
54 strokes/min
70
36 strokes/min
70
36 strokes/min
18 strokes/min
18 strokes/min
60
3
60
50
50
10
40
2
40
30
30
5
20
1
20
10
10
0
0
0%
10%
20%
30%
40%
50%
60%
70%
80%
90%
100%
0%
10%
20%
30%
40%
Stroke length
50%
60%
70%
80%
90%
100%
Stroke length
Correction factor
Correction factor
1,05
2
1
1,5
0,95
1
0,9
0,5
0,85
0
0,8
0,5
1
1,5
Operating pressure
Page 68
2
1
2
4
6
8
11
13
16
Operating pressure
ProMinent
®
Feed rate settings diagrams
Feed rate
[l/h]
Stroke rate
[%]
GALa 1008 at medium operating pressure
Feed rate
[l/h]
Stroke rate
[%]
GALa 0713 at medium operating pressure
14
9
100
100
8
180 strokes/min
180 strokes/min
12
162 strokes/min
144 strokes/min
144 strokes/min
7
126 strokes/min
126 strokes/min
80
108 strokes/min
90 strokes/min
70
72 strokes/min
70
72 strokes/min
54 strokes/min
54 strokes/min
36 strokes/min
5
80
108 strokes/min
10
90 strokes/min
6
90
162 strokes/min
90
8
60
36 strokes/min
18 strokes/min
60
18 strokes/min
50
50
4
6
40
40
3
4
30
30
2
20
20
2
1
10
10
0
0
0%
10%
20%
30%
40%
50%
60%
70%
80%
90%
0%
100%
10%
20%
30%
40%
50%
60%
70%
80%
90%
100%
Stroke length
Stroke length
Correction factor
Correction factor
1,2
1,4
1,2
1
0,8
0,6
0,4
0,2
0
1
0,8
0,6
0,4
0,2
0
1
2
3,5
5
6
10
1
2
3,5
Operating pressure
Feed rate
[l/h]
4
6
7
Operating pressure
Stroke rate
[%]
GALa 0420 at medium operating pressure
25
Feed rate
[l/h]
Stroke rate
[%]
GALa 0232 at medium operating pressure
40
100
35
180 strokes/min
180 strokes/min
162 strokes/min
20
162 strokes/min
144 strokes/min
126 strokes/min
30
108 strokes/min
80
108 strokes/min
90
90 strokes/min
72 strokes/min
80
54 strokes/min
15
90
144 strokes/min
100
126 strokes/min
90 strokes/min
72 strokes/min
25
70
54 strokes/min
36 strokes/min
36 strokes/min
70
18 strokes/min
60
18 strokes/min
20
60
10
50
50
15
40
40
30
10
30
5
20
20
5
10
10
0
0
0%
10%
20%
30%
40%
50%
60%
70%
80%
90%
100%
0%
10%
20%
30%
40%
50%
60%
70%
80%
90%
100%
Stroke length
Stroke length
Correction factor
Correction factor
1,2
1,2
1
1
0,8
0,8
0,6
0,6
0,4
0,4
0,2
0,2
0
0
1
1,5
2
Operating pressure
ProMinent
®
3
4
0,5
1
1,5
2
Operating pressure
Page 69
EC-Declaration of Conformity
Page 70
ProMinent
®