1
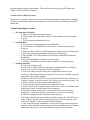
 Microfluidic Facility, Harvard Medical School Suss MJB3 Mask Aligner User Manual
Important Notes
1. Don’t turn off the lamp power.
2. Don’t turn off the machine power (it will shut off the N2 to the lamp house therefore
damage the lamp).
3. Do not use any type of tapes to cover the vacuum holes on substrate chuck.
4. Exposure dosage may vary from one machine to another.
5. Contact staff immediately if anything unusual happens.
General Perspective
Channel Selection (on Lamp Power Supply):
CI-1: 15 mW/cm2 constant intensity, controlled at 365 nm wavelength only
CI-2: 25 mW/cm2 constant intensity, controlled at 405 nm wavelength only
CP: Don’t use (no intensity control)
Wafer Chuck Selection:
3” Chuck: For 3”, round samples only
2” Chuck: For 2” to 3” samples, round or square
1” Chuck: For 5 mm to 1” samples, any shape
Exposure Mode Selection:
Soft Contact:
In this mode, the vacuum that holds the substrate to the chuck is kept on during exposure,
leaving an air gap between the mask and substrate. This mode may result in lower resolution
comparing to other exposure modes but less damage to the mask. This mode is selected by
pressing ST and then SOFT CONT buttons (both buttons should be illuminated).
Hard Contact (Standard Mode):
In this mode, the vacuum holding the substrate to the chuck is switched off and positive nitrogen
pressure is used to press the substrate against the mask. This mode results in better resolution
than soft contact but more mask damage. This mode is selected by pressing ST button only
(SOFT CONT should be deselected).
Vacuum Contact (High Precision):
In this mode, a vacuum is drawn between the mask and the substrate during exposure, resulting
in highest resolution but potential mask damage as well. This mode is selected by pressing HP
button only.
Typical Operating Procedure
1. Pre-Operation Checking
o A. Make sure the exposure lamp is light up.
o B. The nitrogen and compressed air meters on the Manometer Box are reading
correctly.
o C. The vacuum on the mask holder is on.
2. Loading Mask
o A. Loose the two Clamping Knobs on the Maskholder.
o B. Carefully place the Maskholder on a flat surface with the vacuum groove
facing up.
o C. Make sure the MASK VACUUM button on the control panel is in off position.
o D. Place the mask on the Maskholder with pattern side facing up.
o E. Press MASK VACUUM and make sure the mask is held firmly against the
Maskholder.
o F. Invert the Maskholder and reinsert it into the stage.
o G. Clamp the Maskholder securely in place using the two clamping knobs.
3. Loading Substrate
o A. Select the exposure mode.
o B. Unlock the Variable Thickness Adjustment (z-height) knob by rotating the
Locker on its top to the up-position (counterclockwise).
o C. Lower the sample stage by turning the z-height knob clockwise. One
revolution of the adjustment knob corresponds to 150 micron variation in spacing
between the mask and the substrate.
o D. Make sure that the CONTACT lever on the left-hand side of the machine is at
“Release” position. Otherwise rotate it 180° clockwise (toward the operator). The
CONTACT indicator on the control panel should be off.
o E. Gently slide the chuck transporter to the right until it stops.
o F. Select a chuck. If the Vacuum Contact mode is to be used, a chuck fitted with a
gasket must be used. Load the chuck to the transporter.
o G. Place the substrate on the chuck, ensuring that all the vacuum holes are
completely covered. Note: Do not use any tapes to cover the vacuum holes.
o H. Slide the transporter to the left until it reaches the stop.
o I. Bring the substrate into contact with the mask by rotating the CONTACT lever
to the “Contact” position (180° counterclockwise away from the operator). The
CONTACT indicator on the front panel should illuminate.
o J. Turn on the Microscope illuminator. Focus the microscope onto the mask and
substrate. If the mask and substrate can not be focused simultaneously or shadows
of the mask edges can be seen on the substrate, air gap exists between the
4.
5.
6.
7.
8.
substrate and mask. Gently turn the z-height knob counterclockwise until the
shadow disappears.
o K. Lock the z-height knob by rotating the Locker to the down-position
(clockwise).
Aligning Substrate to Mask
o A. Pull the SEPARATION lever on the left side of the machine toward the front
of the machine until it reaches the stop. The CONTACT indicator should go out
and the SEPARATION indicator should illuminate.
o B. Align the substrate to the mask using X, Y, and Theta micrometers. Note: One
or both of the two buttons located on the manipulator handle, which controls the
movement of the microscope over the alignment stage, has to be depressed in
order for the microscope to be scanned in either the X or Y direction exclusively
or in both directions simultaneously.
o C. When satisfactory alignment is obtained, move the substrate back into contact
with the mask by pushing the SEPARATION lever all the way to its rearmost
position.
The SEPARATION light will go out and the CONTCT light will illuminate.
Exposure
o A. Select exposure channel (CI1 or CI2)
o B. Set the exposure time.
The exposure timer is located on the right side of the front panel. The time is
determined by two control knobs: the inner knob, marked with “s”, “10s”, and
“m”, is to set the multiplier, and the outer knob is used to move the pointer in the
timer. The exposure time is determined by multiplying the number pointed by the
pointer with the multiplier.
o C. Press the EXPOSURE button.
Unloading Substrate
o A. Rotate the CONTACT lever 180° clockwise (to the “Release” position).
o B. Slide the chuck transporter to the right and carefully remove the substrate.
Unloading Mask
o A. Loose the two Clamping Knobs on the Maskholder.
o B. Slide the Maskholder out of the stage.
o C. Carefully place the Maskholder on a flat surface with the mask facing up.
o D. Press MASK VACUUM to turn off the chuck vacuum.
o E. Remove the mask from the Maskholder. F. Place the blank glass on the
Maskholder.
o G. Press VACUUM on the front control panel.
o H. Insert the Maskholder back to the stage.
Finishing
o A. Turn off the microscope power.
o B. Fill out the log sheet.