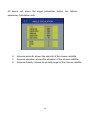
1
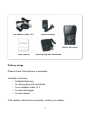
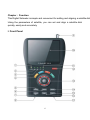
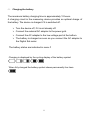
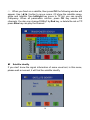
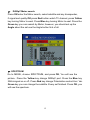
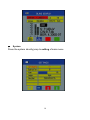
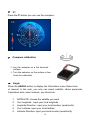
Clarke-tech
C-Tech SFP 2010
User manual
Digital Satellite Meter
C-Tech SFP 2010
Preface
Please read this manual carefully before using your Digital Satmeter
for the first time.
This operating manual will help you in the
• appropriate,
• safe
• favorable
The technical specifications and operating methods included in this manual
are subject to changes without notice. In case of any inquires after a period
of usage, please contact the manufacturer.
2
+ Safety instructions
Please read the safety instructions carefully before operating the device.
Please follow all warnings and instructions on the equipment and in the
operating manual.
4
Safety of persons
Ensure that nobody can be hurt by falling tools or parts of the satellite
antenna during the adjustment and installation of the antenna. For your
own security use a rope on sloping roofs.
Attention for adapter
The devise should only be operated with the supplied AC adapter at the
mains. Do not open the meter or the included AC adapter. There is danger
of life through electric shock! Wrong usage of the ports can lead to the
destruction of the measuring device.
4
4
Proceed carefully with the measuring device:
• Avoid low temperatures (below 0 °C) or to high humidity.
• The TFT display can be damaged by mechanical impacts.
• Avoid excessive input voltages. Please refer to the technical data
4 Do not operate with the device:
• If it has visible damage,
• If there are loose parts in the device,
• If the device was located outdoors or in damp rooms a extended period of
time.
3
Delivery range
Please check if the delivery is complete.
Included in delivery:
• 1x Digital Satmeter
• 1x carrying bag with sunshade
• 1x car adapter cable 12 V
• 1x external charger
• 1x user manual
If the delivery should be incomplete, contact your dealer.
4
TABLE OF CONTENTS
Preface..........................................................................................
Safety instructions…………………………………………………..
Delivery range……………………………………………………...…
2
3
4
Chapter: Function
I. Front Panel and Battery......................................................
6
II. Detailed operation Guide....................................................
9
1)TP search..........................................................................
9
2)Satellite identify.................................................................
10
3)Packet control...................................................................
11
4)DiSEqC search.................................................................
12
5)DiSEqC Motor search…………………………………….…
12
6)SPECTRUM.....................................................................
12
7)Watch TV..........................................................................
13
8)SETTING..........................................................................
14
9)Software UPDATE
............................................................................
14
Chapter: Quick operation
1. FIND
............................................................................ 17
2. Scan
............................................................................ 17
3. System ............................................................................ 18
4. Angle
............................................................................
5
19
Chapter : Function
This Digital Satmeter is simple and convenient for setting and aligning a satellite dish
Using the parameters of satellite, you can set and align a satellite dish
quickly, easily and accurately.
I. Front Panel
6
Nr.
1
2
3-11
4
5
6
7
8
9
10
11-3
Item
LED Power
LED Lock
LED 13V / 18V / 22kHz
Key [F1] [F2] [F3] [F4]
Key [System]
Key [Scan]
Key [Angle]
Charge port
IF signal input
Display
LED 13V / 18V / 22kHz
12
Key [Power]
13
Key Navigations and [OK]
14
Key [Menu]
15
Key [Exit]
16
Key [Find]
17
USB Port
1
Function
Indicates the power status.
Yellow: device out ,power adapter connected
Orange: device on , power adapter connected
Red: device on , power adapter not connected
This light will be on when signal is locked.
Indicate the 22K/13V/18V
Made of 4 keys, F1 -- F4
To set all system parameters.
Go to auto scan menu and scan channels
Go to the AZ , EL and Polarity calculation
menu
To connect with the charger cord.
Satellite signal input port,
Screen shows MENU and Programs clearly
Indicate the 22K/13V/18V
To turn the meter on/off, press and hold for 2
seconds to power on the meter.
Use the Arrow key to select the right item, OK
key to confirm.
To enter the main menu
To exit from the present menu and move to the
previous
menu
Go to the easy satellite find menu, can set and
align a
satellite dish quickly.
Connect USB storage device to upgrade
Start of operation
Battery
Before the first operation with the measuring device charge the battery
completely.
Load the accumulator during the first loading procedure at least 5hours.
The maximum battery charging time is approximately 12 hours.
7
1 Charging the battery
The maximum battery charging time is approximately 12 hours..
A charging circuit in the measuring device provides an optimal charge of
the battery. The device is charged if it is switched off.
Ø Turn the device off, if it is not already off.
Ø Connect the external AC adapter to the power grid.
Ø Connect the AC adapter to the low-voltage port at the bottom.
Ø The battery is charged as soon as you connect the AC adapter to
the Digital Sat meter
The battery status are indicated in menu !!
Charging is displayed by the cycling display of the battery symbol:
When fully charged the battery symbol shows permanently four bars.
8
II. Detailed operation Guide
1) Turn on the device. Press and hold POWER button for 2 seconds
to turn on the satellite meter,press the MENU key ,enter the main
menu.
E TP search
Press OK enter the TP search, first, you should select satellite, in this
picture, you also can delete, move, rename the satellite.
9
1 When you fixed on a satellite, then press OK the following window will
appear. Use [◄][►] button to move cursor, it’ll show the satellite name,
angle and location. Use left/right key move to TP list, you can modify
Frequency. When all parameters confirm, press OK key search the
channels. You also can change DiSEqC by Red key, or delete the sat or TP.
press Blue key can play the channel.
E
Satellite identify
If you don’t know the signal information of some usual sat, in this menu,
please wait a moment, it will find the satellite identify
10
E Packet control
Press OK enter the packet control menu, in this view, it will display the
TP’s S or Q under the satellite.
E
DiSEqC search
Press OK enter the DiSEqC search,in this menu, connect the DiSEqC
port, the view will be display the sat which can connect, then you can
search the channel by DiSEqC. Press Green button change LNB type
Press the Blue button to go DiSEqC1.1
11
E
DiSEqC Motor search
Press OK enter the Motor search, select satellite and any transponder,
if signal and quality OK press Red button watch TV channel, press Yellow
key turning Motor to west. Press Blue key turning Motor to east. Press the
Green key you can search by Motor; however, you should set up the
Angle about the sat use the Angle button first of all.
E S PECTRUM
Go to MENU, choose SPECTRUM, and press OK, You will see the
picture,Press the Yellow key change DiSEqC port. Press the Blue key
22khz signal on or off,Press Red key change Polarization control Hor / Ver.
Green key you can change the satellite. Every set finished. Press OK, you
will see the spectrum.
12
E
Watch TV
Press OK enter the Watch TV menu, in this menu, you can press the
Yellow key select any satellite or press the Blue key enter the Channel/
Radio menu, press the up/down key jump to next/previous channel
Press the Red button to watch Full Screen
13
E SETTING
Press OK enter the setting menu, in this menu, you can set OSD
Transparency /signal Audio tone / TV Screen Format/ volume/ language
adjust display currently. Factory Reset:Erase all channels and restore the
factory default settings.
E
PC UPDATE
Press OK enter PC UPDATE, in this menu, press the Yellow button,
You can check the current information about your satellite finder such as
S/W(software) version,Model ID.
14
E
USB
Press the Blue key enter the USB menu, you can play stream, movie,
music picture, and so on.
USB tool: Press the Blue key, you can rename &delete&move&create
folder disk info or format the disk.
Help: press the red key you can find some info and operation about USB
A-1 : Play Movie
OK: View play list / Play the selected file in play list
F1: PAUSE
F2: Play the file
F3: Backward
F4: Forward
[UP]:JUMP [DOWN]:HIDE
[MENU]:INFO
[EXIT]:EXIT
EXIT: Exit play list menu / Exit playing state and return to file list menu
15
A-2 :
Play MP3
OK: View play list / Play the selected file in play list
F1: PAUSE
F2: Stop playing file
F3: backward
F4: forward
EXIT: Exit play list menu / Exit playing state and return to file list menu
16
Chapter III . Quickly operation guide
When you exit the main menu, you can see this picture, in this view,
press buttons mapped to onscreen color, such as Yellow button, enter the
compass function, sound elimination by Blue button, the channel
information will display by red button, press the Green button, you can
connect the USB for record the channel.
E
FIND
Press the FIND button to display the signal finding menu,jump to
Satellite identify menu, rest operation same as above
E
Scan
Press the Scan button enter this view, select the satellite name
TP&LNB type, then you can blind search or sat search.
17
E
System
Press the system directly jump to setting of main menu.
18
E F1
Press the F1 button you can use the compass。
E Compass calibration
Ö Lay the satmeter on a flat horiontal
surface.
Ö Turn the satmeter on the surface a few
times for calibration
E
Angle
Press the ANGLE button to display the Calculation menu Select auto
or manual. In the auto, you only can select satellite, others parameter
Calculation auto, select manual, you should do:
1.
2.
3.
4.
5.
SATELLITE: choose the satellite you want
Your longitude : input your local longitude
longitude Direction : input your local location (west/north)
Your Latitude: input your local latitude
Latitude Direction: input your local location (west/north)
19
All above set, press the angel calculation button, the fellow’s
parameter Calculation auto
6.
7.
8.
Antenna azimuth: shows the azimuth of the chosen satellite.
Antenna elevation: shows the elevation of the chosen satellite.
Antenna Polarity: shows the polarity angel of the chosen satellite
20
4 Trouble shooting
Fault
phenomenon
Device does not
react.
Bad picture , block
defect
Probability reasons
Solutions
The battery is empty.
Charge the battery.
The antenna is not
adjusted to the satellite.
Adjust the antenna.
The LNB is defect
No or only fait
signal.
No picture, no
sound.
Display/ Sounds turned off
Replace the LNB.
Please check all cable
connections.
Adjust the antenna.
Turn on the display by
Pushing the F1 button.
Turn on the sound by
Pushing the F2 or ► button.
If you cannot find out what is wrong with your device please contact
your local specialized dealer.
4
Attention
Electronic equipment is not household waste - in accordance
with directive 2002/96/EC OF THE EUROPEAN
PARLIAMENT AND THE COUNCIL dated 27electrical and
electronic equipment, it must be disposed of properly.
At the end of its service life, take this unit for disposal at
a designated public collection point.
Spent batteries are special waste!
Do not throw spent batteries into your domestic waste; take
them to a collection point for old batteries!
21
th
4
Technical specifications
System capabilities
Fully DVB compliant
LCD Screen
3.5 inch TFT
LNB/Tuner input
Connector
F type, female
Frequency range
950MHz-2150MHz
Demodulator
System resource
Video decoder
MPEG Audio
Yes
Signal level
-65dBm~-25dBm
LNB supply
13/18V,max400mA
LNB switch control
22KHz
DiSEqC
DiSEqC 1.0 /1.1 / 1.2
Front end
QPSK
Symbol rate
2Mbps~45Mbps
SCPC and MCPC Capable
Yes
Spectral inversion
Auto conversion
Processor
32bit processor (216MHz)
SDRAM
256DDR
FLASH
4Mbyte
MPEG 2
Main Profile @Main Level
Data Rate
up to 15M bits/s
Resolution
720x576,720x480
Video format
PAL/NTSC/SECAM
MPEG 1 layer 1&2
Type
Mono
Sampling rates
32,44.1 and 48KHz
USB port
USB 2.0
Power supply
Li-on Battery
2700 mA
Supply voltage
12.6Volt
charger
90-240V
Panel connectors
Digital tuner input
F type, female
Physical Specification
Size
102*157*45MM
Weight(Net)
0.5Kg
22