1
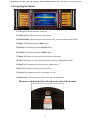
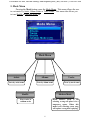
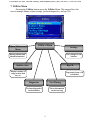
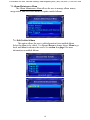
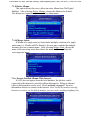
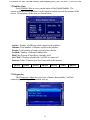
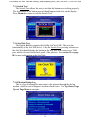
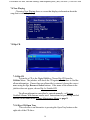
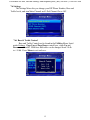
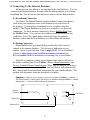
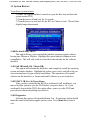
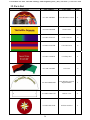
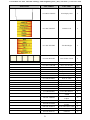
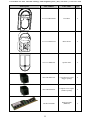
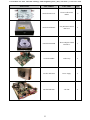
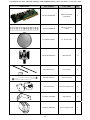
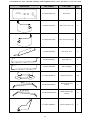
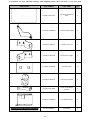
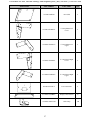
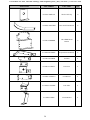
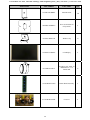
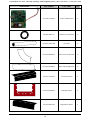
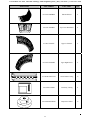
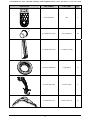
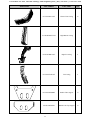
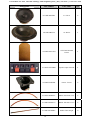
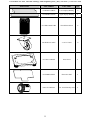
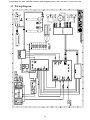
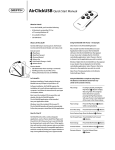
To Purchase This Item, Visit BMI Gaming | www.bmigaming.com | (800) 746-2255 | +1.561.391.7200
OWNER’S MANUAL
© Chicago Gaming Company 4616 W. 19th Street, Cicero, IL 60804 (800) 379-9776
(Rev.07)
1
To Purchase This Item, Visit BMI Gaming | www.bmigaming.com | (800) 746-2255 | +1.561.391.7200
DIGITAL BUBBLER
TM
Thank you for purchasing Chicago Gaming Company’s Digital Bubbler. You can look forward
to many hours of musical enjoyment. We strongly recommend that you follow the instructions
and procedures as presented in this Owner’s Manual and that it be read in its entirety before
setting up your jukebox.
Table of Contents
1. Important Safety Instructions……………….……………………………………….2-3
2. Warranty Information……………….……………………………………………….…3
3. Navigating the Menus………………….………………………………………………..4
4. CD Database and Untitled Albums………..….………………………………...……...5
5. Mode Menu……………………………….……………………………………………...6
6. Playlist Menu……………………….………………………………………………….7-8
7. Utilities Menu……….……………….………………………………….………..…...9-16
8. Connecting to the Internet………….………………………………………...………..17
9. Connecting External Speakers…….………………………………………...………...18
10. AirClick…………………………….…………………………………………………...18
11. System Restore…………………………………………………………………….…...19
12. Parts List……………….…………….……………………………………………...20-35
13. Wiring Diagram…………….……….……………………………………….…………36
14. FCC Compliance…………….……….…………………………………………………37
1. IMPORTANT SAFETY INSTRUCTIONS
•
•
•
•
•
•
•
•
•
•
•
•
•
•
Read these instructions.
Keep these instructions.
Heed all warnings.
Follow all instructions.
Do not use this apparatus near water.
Clean only with a dry cloth.
Do not block any ventilation openings. Install in accordance with manufacturer’s
instructions.
Do not install near any heat sources such as radiators, heat registers, stoves, or other
apparatus (including amplifiers) that produce heat.
Do not defeat the safety purpose of the polarized or grounding-type plug. A polarized
plug has two blades with one wider than the other. A grounding type plug has two blades
and a third grounding prong. The wide blade and third prong are provided for your
safety. If the provided plug does not fit into your outlet, consult an electrician for
replacement of the obsolete outlet.
Protect the power cord from being walked on or pinched, particularly at plugs,
convenience receptacles and the point where they exit from the apparatus.
Only use attachments/accessories specified from the manufacturer.
Unplug this apparatus during lightning storms or when unused for long periods of time.
Apparatus shall not be exposed to dripping or splashing and no objects filled with
liquids, such as vases, shall be placed on the apparatus.
Refer all servicing to qualified service personnel. Servicing is required when the
apparatus has been damaged in any way, such as power supply cord or plug is damaged,
liquid has been spilled or objects have fallen into the apparatus, the apparatus has been
exposed to rain or moisture, does not operate normally, or has been dropped.
2
To Purchase This Item, Visit BMI Gaming | www.bmigaming.com | (800) 746-2255 | +1.561.391.7200
THE LIGHTNING FLASH
AND ARROWHEAD WITHIN
THE TRIANGLE IS A
WARNING SIGN ALERTING
YOU OF “DANGEROUS
VOLTAGE” INSIDE THE
PRODUCT.
CAUTION: TO REDUCE THE RISK OF
ELECTRIC SHOCK, DO NOT OPEN
FRONT DOOR. NO USER SERVICEABLE
PARTS INSIDE. REFER SERVICING TO
QUALIFIED SERVICE PERSONNEL.
THE EXCLAMATION POINT
WITHIN THE TRIANGLE IS A
WARNING SIGN ALERTING
YOU OF IMPORTANT
INSTRUCTIONS
ACCOMPANYING THE
PRODUCT.
SEE MARKINGS ON PRODUCT
•
•
•
•
•
•
•
CAUTION: Shock hazard if instructions are not followed.
• WARNING: To reduce the risk of fire or electric shock, do not expose your system to
rain or moisture.
• WARNING: An apparatus with Class I construction shall be connected to a main socket
outlet with a protective earthing connection.
• WARNING: Bubble Tubes contain Methylene Chloride. Harmful if swallowed, inhaled
or absorbed through skin. Causes irritation to the skin, eyes and respiratory tract.
• Be sure to disconnect the power cable before working on the machine.
• Be sure to use fuses that meet the specified rating. (5A, 220V Quick-blow). Using fuses
exceeding the specified rating can cause a fire and electrical shock.
CAUTION: The jukebox’s monitor is a source of high voltage. Be EXTREMELY
CAREFUL when working near it; high voltage charges can still be present even after you’ve
unplugged the unit. Have a qualified technician perform a monitor repair.
CAUTION: Battery May Explode If Mistreated. Do Not Recharge, Disassemble Or Dispose
Of In Fire.
CAUTION: Danger of explosion if battery is incorrectly replaced. Replace only with the
same or equivalent type.
Replace Battery with Matsushita, Type CR2032, Only. Us Of Another battery May Present
A Risk Of Fire Or Explosion.
Optimum operating environment is between 50-105° Fahrenheit.
Use with only 115 volts ~ 60Hz
We recommend using a surge suppresser or UPS (Uninterruptible Power Supply) to
safeguard the jukebox from abrupt power spikes or losses
2. WARRANTY INFORMATION
The Digital Bubbler is warranted against manufacturing defects for 180 days. After that we will
provide free telephone support. If at some point you require warranty service, contact Chicago
Gaming at (800) 379-9776. Ask for technical support.
3
To Purchase This Item, Visit BMI Gaming | www.bmigaming.com | (800) 746-2255 | +1.561.391.7200
3. Navigating the Menus
3.1 Vol Up-This button turns the volume up.
3.2 Vol Down-This button turns the volume down.
3.3 Pause/Resume-This button pauses the current song. Pressing it again resumes play.
3.4 Mode- This button opens the Mode Menu.
3.5 Playlists- This button opens the Playlist Menu.
3.6 Utilities- This button opens the Utilities Menu.
3.7 Menu-This button is used to go to the previous or top menu.
3.8 Select-This button is used to make selections and proceed through the menus.
3.9 Page Up-This button moves the cursor up multiple lines.
3.10 Up-This button moves the cursor up one line.
3.11 Down-This button moves the cursor down one line.
3.12 Page Down- This button moves the cursor down multiple lines.
The power switch is located on the top center back of the machine
It is used to turn the machine on and off
4
To Purchase This Item, Visit BMI Gaming | www.bmigaming.com | (800) 746-2255 | +1.561.391.7200
4. CD Database and Untitled Albums
The majority of CDs do not contain text data on the artist name, album name
and track names. The Digital Bubbler contains a text database of 2,500,000
albums. This database allows the system to include album information even when
the jukebox is not connected to the internet.
This database is installed in the jukebox at the date of manufacture; therefore
any albums released after the latest database update will not be recognized by the
local database.
If you are ripping an album to the jukebox, and the name of the album does
not appear in the list, choose Rip As Untitled. After the CD is ripped, you can
either enter a title for the album through Edit Untitled Albums, or you can connect
to the updated Internet Database (via telephone line or ethernet connection) to
automatically enter the album information for all untitled albums you have copied
to your jukebox.
Alternately, you can leave The Digital Bubbler connected to the internet
through your high speed connection and the jukebox will always use the current,
updated Internet Database.
See section 7.1.i on page 10 for information on Editing Untitled Albums,
and check section 7.1.iv on page 11 for information on Processing Untitled
Albums With Internet
5
To Purchase This Item, Visit BMI Gaming | www.bmigaming.com | (800) 746-2255 | +1.561.391.7200
5. Mode Menu
Pressing the Mode button opens the Mode Menu. This menu allows the user
to sort music by Artist, Album Name or Track Name. This menu also allows you
to turn Shuffle or Jukebox Mode on.
Mode Menu
Artists
Albums
Tracks
Sorts by artist name
Sorts by album name
Sorts by track name
Jukebox Mode
Shuffle
Plays tracks in
random order
When Jukebox Mode is on,
selecting a song will place it in a
temporary queue. When this
mode is off, selecting a new song
will replace a song that is playing.
6
To Purchase This Item, Visit BMI Gaming | www.bmigaming.com | (800) 746-2255 | +1.561.391.7200
6. Playlist Menu
Pressing the Playlist button opens the Playlist Menu. This is used to create
and manage saved playlists.
6.1 Add Playlist
This option allows the user to create a new playlist. While adding
songs to a playlist, the tracks are sorted according to which mode you are in.
Select the track with the Select button and go back with the Menu button.
To exit and save, press Playlist. Upon saving, the playlist will be given a
generic name. To change the name, choose Edit Playlist Name.
6.2 Delete Playlist
Selecting Delete Playlist from the Playlist Menu allows the user to
erase unwanted playlists. Using the Up and Down buttons, select the
playlist to be deleted.
7
To Purchase This Item, Visit BMI Gaming | www.bmigaming.com | (800) 746-2255 | +1.561.391.7200
6.3 Edit Playlist Name
To edit a playlist name, select a playlist from the menu using Up,
Down, and Select.
Use Up and Down to change letters. Page Up and Page Down move
six letters at a time. Use Select to move the cursor forward and Menu to
save changes.
6.4 Select Playlist
Use this option to start a playlist that has already been created. Use
Up and Down to navigate and Select to begin playing.
8
To Purchase This Item, Visit BMI Gaming | www.bmigaming.com | (800) 746-2255 | +1.561.391.7200
7. Utilities Menu
Pressing the Utilities button opens the Utilities Menu. This menu allows the
user to manage albums, adjust settings, perform diagnostics, and rip CDs.
Album Maintenance
Menu
Utilities Menu
Settings
Manage albums and
album information
View settings for the
Jukebox
Bubbler Stats
Rip CD
Displays number of
songs, artists, disk
use, etc.
Copy music from a CD
to Jukebox
Diagnostics
Now Playing
Perform diagnostics
on the Jukebox
Shows information
on current song
9
To Purchase This Item, Visit BMI Gaming | www.bmigaming.com | (800) 746-2255 | +1.561.391.7200
7.1 Album Maintenance Menu
The Album Maintenance Menu allows the user to manage album names,
merge artists, and access the internet to update untitled albums.
7.1.i Edit Untitled Album
This option allows the user to add information for an untitled album.
Select the album to be edited. Use Up and Down to change letters, Menu to go
back, and Select to advance the cursor. See section 4 on page 5 for more
information on untitled albums.
10
To Purchase This Item, Visit BMI Gaming | www.bmigaming.com | (800) 746-2255 | +1.561.391.7200
7.1.ii Delete Albums
This option allows the user to delete an entire album from The Digital
Bubbler. After selecting Delete Albums, choose the album to be deleted.
The albums are organized alphabetically by album name.
7.1.iii Merge Artists
If albums of a single artist are listed under multiple variations of a single
artist name (i.e. Beatles and The Beatles), the user may combine the multiple
instances into one common name. After selecting Merge Artist, choose the
name of the surviving artist, then choose the name to be merged into the
surviving artist name.
7.1.iv Process Untitled Albums With Internet
If a CD does not appear from the local database, the jukebox can be
connected to the internet to search for album information. Either an ethernet
cable or dialup modem can be used. Check section 8 on page 17 for more
information on how to connect to the Internet. Note:You do not need an existing
Internet account to use the dialup modem; you just need a working telephone line.
11
To Purchase This Item, Visit BMI Gaming | www.bmigaming.com | (800) 746-2255 | +1.561.391.7200
7.2 Bubbler Stats
Select Bubbler Stats to view current status of the Digital Bubbler. The
current software version numbers can be found in a table towards the bottom of the
screen. Descriptions of the stats are shown below.
Artists: Number of different artists copied to the jukebox.
Albums: Total number of albums copied to the jukebox.
Tracks: Total number of songs copied to the jukebox.
Untitled: Number of albums without titles.
Disk Use: Percent of hard drive currently used.
Air Click*: Displays whether the AirClick is connected.
Internet: Either Connected or Not Connected to the internet.
ja-011
jb-054
kr-059
kp-028
kf-039
ci-021
pu-019
These boxes contain information on the various software version numbers
7.3 Diagnostics
The Diagnostics Menu accesses tests of button functionality, AirClick
connectivity, and a log of the modem activity.
12
To Purchase This Item, Visit BMI Gaming | www.bmigaming.com | (800) 746-2255 | +1.561.391.7200
7.3.i Switch Test
The Switch Test allows the user to test that the buttons are working properly.
The description of the button pressed should appear in the box on the display.
Press Menu three times to exit the Switch Test.
7.3.ii AirClick Test
The Digital Bubbler supports the Griffin AirClick USB. This tests the
functionality of the AirClick device. Like the Switch Test, pressing a button on
the AirClick should display the button in the box. AirClick connects to a USB
port, which is located on the back panel of the jukebox. See section 10 on page
18 for more information on the AirClick.
7.3.iii Modem Dialup Log
This is a log of attempted connections to the internet through the dial up
modem, which is used to diagnose modem related issues. Use Up, Down, Page
Up and Page Down to navigate.
13
To Purchase This Item, Visit BMI Gaming | www.bmigaming.com | (800) 746-2255 | +1.561.391.7200
7.4 Now Playing
Choosing Now Playing shows a screen that displays information about the
song that is currently playing.
7.5 Rip CD
7.5.i Rip CD
To transfer a CD to the Digital Bubbler, Choose Rip CD from the
Utilities Menu. The jukebox will check the CD against the database to find the
album information. If more than one album title is returned, choose the correct
name using the Up, Down and Select buttons. If the name of the album in the
jukebox does not appear, choose Rip As Untitled CD.
The album information can either be entered manually, or Process
Untitled Albums With Internet can be used. Instructions for processing untitled
albums can be found in the Albums Maintenance Menu on page 8.
7.5.ii Eject CD/Open Tray
This selection is an alternative to pressing the Open Tray button on the
right side of the CD drive.
14
To Purchase This Item, Visit BMI Gaming | www.bmigaming.com | (800) 746-2255 | +1.561.391.7200
7.6 Settings
The Settings Menu lets you change your ISP Phone Number, Bass and
Treble levels, and turn Main Channel and J-Pod Channel On or Off.
7.6.i Bass & Treble Control
Bass and Treble Control can be found in the Utilities Menu, listed
under Settings. Page Up and Page Down control bass, while Up and
Down control treble. Both bass and treble can be changed from -18 db
to +18 db. Press Menu to exit and save.
15
To Purchase This Item, Visit BMI Gaming | www.bmigaming.com | (800) 746-2255 | +1.561.391.7200
7.6.ii ISP Phone Number
This menu allows you to change the number the modem will dial
to connect to the internet. Press Up and Down to change the number,
Select to move to the next number, and Menu to exit and save. To find
the closest number to your location, go to page 35 to search by state, or
visit the following website and enter the first six digits of your telephone
number: https://myaccount.earthlink.net/cam/accessnumber.jsp
7.6.iii JPOD Channel
An external audio device, such as an MP3 player, can be played through The
Digital Bubbler. The line-in jack can be found just inside the CD Door, on the
right side.
This setting toggles the line in ON or OFF. When connecting an
external audio device, be sure to turn JPOD Channel ON.
7.6.iv Main Channel
This setting toggles the Main Channel ON or OFF. If the Main
Channel is OFF, audio will only be played through the Line-In.
16
To Purchase This Item, Visit BMI Gaming | www.bmigaming.com | (800) 746-2255 | +1.561.391.7200
8. Connecting To the Internet Database
Information on new albums is not included in the local database. You can
connect to the internet database through either the dialup modem or an existing
broadband line. You do not need an internet account to use the dialup modem.
8.1 Broadband Connection
To connect The Digital Bubbler using broadband, connect an ethernet
cable from your modem or router to the ethernet jack on the back of
the jukebox. You must have broadband service to update using this
method. The Digital Bubbler may need up to a minute to recognize the
connection. To check internet connectivity, choose Bubbler Stats from
the Utilities Menu. You can leave the jukebox connected to the internet
at all times. New CDs ripped while connected will use the internet
database, rather than the local database, to collect album information.
8.2 Dialup Connection
Digital Bubbler has an optional dialup modem that can be used to
connect to the internet database. The first step is finding the access
number closest to your location. Turn to pages 35-63, or visit Earthlink’s
website at https://myaccount.earthlink.net/cam/accessnumber.jsp.
Refer to section 7.6.ii for information on entering your access number.
After this is complete, simply run a telephone line from a wall jack to
the jukebox modem jack. Press Utilities, choose Album Maintenance, and
Process Untitled Albums Using Internet. When you are asked if you want to
connect using the modem, choose ‘YES’ and the jukebox will automatically
dial, connect and download album information for your untitled albums. The
modem will disconnect when the download is complete.
Summary: Find your access number, enter access number in Utilities => Settings =>
ISP Phone Number, connect phone line and access database through Utilities => Album
Maintenance => Process Untitled Albums With Internet.
Speaker
Terminal
USB Ports
Phone Jack
Ethernet Jack
17
To Purchase This Item, Visit BMI Gaming | www.bmigaming.com | (800) 746-2255 | +1.561.391.7200
9. Connecting External Speakers
The Digital Bubbler supports two 8 Ohm external speakers. The speaker
terminal can be found on the back panel, next to the ethernet and phone line jacks.
To attach the speakers, run the wire from the speaker to the jukebox. Press on the
colored release tab and push the end of the corresponding wire into the terminal.
Releasing this tab will hold the wire in place.
• Be sure to connect the red terminal on the speaker to the red terminal on
the jukebox. Do not connect red to black!
• If your speaker wire is not colored, make sure you connect the same wire
to the same color on both the speaker and the jukebox
• Use only 8 ohm speakers
• Do not add more than one speaker per channel
10. AirClick
The Digital Bubbler is compatible with the Griffin AirClick. This can be
used to remotely Pause, Skip Forward, Skip Backward or adjust the volume.
Connect the AirClick to a USB port on the back panel before turning the
jukebox ON. After the jukebox boots, press Utilities to access Diagnostics. Select
AirClick Test to make sure the AirClick is functioning properly. Pressing a button
on the remote should cause its function to appear on The Digital Bubbler’s display.
Griffin AirClick USB can be purchased at www.griffintechnology.com
The Manufacturer Part Number is 4023-ACUSB.
18
To Purchase This Item, Visit BMI Gaming | www.bmigaming.com | (800) 746-2255 | +1.561.391.7200
11. System Restore
To perform a system restore
1) While The Digital Bubbler is turned on, open the disc tray and insert the
system restore DVD
2) Turn the power off and wait for 10 seconds
3) Turn the power on, and wait for the JB Live! Menu to load. This will take
slightly longer than normal
11.00 Re-Install Only JB OS
This option allows you to reinstall the jukebox operating system without
loosing any Albums or Playlists. Highlight this option and press Select to start
reinstallation. This will only work on a hard drive that already has the software
installed.
11.01 Full JB Install (OS + Music DB)
This option will reformat the hard drive and completely install the operating
system and music database. Highlight this option, press select, and follow the onscreen instructions to begin software installation. This operation will reinstall
software on the hard drive or format and install software on a new hard drive.
11.02 EJECT JB-Live! & Power Down
After you have reinstalled the JB OS or performed a full installation, you
must select this option to eject the DVD before you power down. Or, if you
accidentally boot with the DVD, this option allows you to eject the DVD and
power down without reinstalling any software.
11.03 Diagnostics
Selecting this option will open the Button Test. Pressing any button should
make the name of that button appear on the screen. Press Menu three times to
exit.
19
To Purchase This Item, Visit BMI Gaming | www.bmigaming.com | (800) 746-2255 | +1.561.391.7200
12. Parts List
Part Picture
Part Number
Part Name
Qty.
015-ART-ARTWIN
Door Window Art Panel
1
015-ART-CDDOOR
CD Door Plexi
1
015-ART-CLRCCFL
CCFL Color Gel
2
015-ART-CLRTUBE
Color Tube Insert
2
015-ART-COINPLX
Coin Entry Plexi
1
015-ART-COLORS
Color Cone
2
015-ART-DWINDOW
Door Window Screened
“Digital Bubbler”
1
015-ART-GARTCVR
Grill Art Cover
1
015-ART-GRLSTAR
Grill Star Art Plexi
1
20
To Purchase This Item, Visit BMI Gaming | www.bmigaming.com | (800) 746-2255 | +1.561.391.7200
Part Picture
Part Number
Part Name
Qty.
015-ART-LCDPLEX
LCD Display Glass
1
015-ART-TITLEFT
Title Plexi Left
1
015-ART-TITLERT
Title Plexi Right
1
015-ART-WTUNEL
Door Window Tunnel
1
015-CBL-POWBUTN
015-CBL-12VDOOR
015-CBL-BUBHEAT
015-CBL-AMPBUTS
015-CBL-AMPCROS
015-CBL-AMPWR
015-CBL-AMPSERL
015-CBL-DOORAC
015-CBL-LCDPWR
015-CBL-SPEAKLF
015-CBL-SPEAKRT
015-CBL-LINEIN
015-CBL-SWPCB
015-CBL-POWER
Power Button Cable
Door +12Volt Cable
Bubble Heater Cable
Amp – Buttons Cable
Amp Crossover Cable
Amp Power Cable
Serial – Amp Cable
Door AC Cable
LCD Cable
Speaker Cable Left
Speaker Cable Right
Line In Jack
Switch PCB Harness
1
1
4
1
1
1
1
1
1
1
1
1
1
1
015-CBL-4FLTFLX
015-CBL-USB0402
000-CBL-3USBAB
000-CBL-6USBAB
000-CBL-2ENETC5
000-CBL-6PWR18G
000-CBL-IDE133F
21
Power Wire Harness
Molex-Cable Flat Flex 4"
.50MM
USB to Motherboard
Adapter
USB A-M to B-M 3’ long
6' USB Cable A-M to BM white
2’ Internal Ethernet Cable
6’ Power Cord 18 Gauge
IDE 133 Flat Cable 18" 3
Connector
1
2
1
1
1
1
2
To Purchase This Item, Visit BMI Gaming | www.bmigaming.com | (800) 746-2255 | +1.561.391.7200
Part Picture
Part Number
Part Name
Qty.
015-CCC-FRTDOOR
Front Door
1
015-CCC-MAINCAB
Main Cabinet
1
015-CCC-SPKPANL
Speaker Panel
1
000-CTR-ENETCPL
Cat-4 Ethernet Coupler
(Bigger opening)
1
000-CTR-PHONCPL
Telephone Line Coupler
(Smaller opening)
1
000-ELE-256DDR
RAM 256 DDR
(DDR266)
1
22
To Purchase This Item, Visit BMI Gaming | www.bmigaming.com | (800) 746-2255 | +1.561.391.7200
Part Picture
Part Number
Part Name
Qty.
000-ELE-BALLAST
Florescent Electronic
Ballast
2
000-ELE-DVDDRIV
Sony DVD Drive Black
DDU1615
1
000-ELE-HD250GB
Western Digital 250GB
Hard Drive
1
015-ELE-JAMPII
Audio Amp
1
015-ELE-PSUP460
Power Supply
1
000-ELE-ML8000
VIA SBC
1
23
To Purchase This Item, Visit BMI Gaming | www.bmigaming.com | (800) 746-2255 | +1.561.391.7200
Part Picture
Part Number
Part Name
Qty.
000-ELE-MODEMSL
Modem (smartlink,
winmodem)
1
015-GLS-HMIRROR
Mirrors For Side of
Cabinet
015-HDW-12GRILL
12” Woofer Grill
1
000-HDW-SMOUNT
Shock Mounts
4
000-LMP-12CCFL
CCFL Tubes
2
000-LMP-F20T12C
Florescent Lamp
2
000-LMS-042050
Florescent Lamp Socket
2
015-MLS-AGLBRKT
Angle Bracket
4
015-MLS-AMPHEAT
Power Amp Heat Sink
1
24
To Purchase This Item, Visit BMI Gaming | www.bmigaming.com | (800) 746-2255 | +1.561.391.7200
Part Picture
Part Number
Part Name
Qty.
015-MLS-BAKPANL
Back Panel
1
015-MLS-BASCNLF
Base Trim Corner Left
1
015-MLS-BASCNRT
Base Trim Corner Right
1
015-MLS-BASEFR
Base Front Trim
1
015-MLS-BASELF
Base Side Left
1
015-MLS-BASERT
Base Side Right
1
015-MLS-BUBHEAT
Bubble Tube Heater
16
015-MLS-BUBMTGL
Bubble Mount Left
Bracket
4
015-MLS-BUBMTGR
Bubble Mount Right
Bracket
4
015-MLS-CDBRKTL
CD Door Bracket Left
1
25
To Purchase This Item, Visit BMI Gaming | www.bmigaming.com | (800) 746-2255 | +1.561.391.7200
Part Picture
Part Number
Part Name
Qty.
015-MLS-ELECPLT
Electronics Mounting
Plate
1
015-MLS-CDBRKTR
CD Door Bracket Right
1
015-MLS-CDPIVTL
CD Door Pivot Left
1
015-MLS-CDPIVTR
CD Door Pivot Right
1
015-MLS-CDSPACR
CD Door Spacer
2
015-MLS-CFBALST
CCFL Inverter Mount
1
015-MLS-CFLAMP
CCFL Lamp Mount
Bracket
2
015-MLS-CLCDMNT
LCD Mount Bracket
1
015-MLS-DHING2
Door Hinge
1
26
To Purchase This Item, Visit BMI Gaming | www.bmigaming.com | (800) 746-2255 | +1.561.391.7200
Part Picture
Part Number
Part Name
Qty.
015-MLS-DSKID
Door Skid
1
015-MLS-FLMPLFL
F. Lamp Mount Left
Lower
1
015-MLS-FLMPLFU
F. Lamp Mount Left
Upper
1
015-MLS-FLMPRTL
F. Lamp Mount Right
Lower
1
015-MLS-FLMPRTU
F. Lamp Mount Right
Upper
1
000-MLS-FUSPLT
Power Inlet Plate
1
015-MLS-GLSBRKT
Display Glass Retainer
6
015-MLS-GRILCLM
Grill Clamp
10
27
To Purchase This Item, Visit BMI Gaming | www.bmigaming.com | (800) 746-2255 | +1.561.391.7200
Part Picture
Part Number
Part Name
Qty.
015-MLS-GRILCLP
Woofer Grill Clip
4
015-MLS-GRILTRM
Inner Grill Trim Bracket
2
015-MLS-HDDBRK
CD & HDD Mount
Bracket
2
015-MLS-KEYBRKT
Keyboard Mount Bracket
2
015-MLS-LCKBAR
Lock Bar
1
015-MLS-LCKPIVT
Lock Pivot
1
015-MLS-LCKRELS
Lock Release
1
015-MLS-LCKSTRK
Lock Strike
1
015-MLS-LINEIN
Line In Bracket
1
28
To Purchase This Item, Visit BMI Gaming | www.bmigaming.com | (800) 746-2255 | +1.561.391.7200
Part Picture
Part Number
Part Name
Qty.
015-MLS-PLSBRKT
Plastic Retainer
16
000-MLS-PWRPLT2
Power Switch Plate for
Chily Switch
1
015-MLS-WINCLIP
Window Clip
4
015-MON-LCD8INC
LCD Display
1
015-MTR-A224LC5
Synchron 110V, 60Hz, 10
RPM Motor w/ .175
flatted shaft
2
015-PCB-BUTTONS
Button Board Assembly
1
015-PCB-CROSOVR
Crossover
1
29
To Purchase This Item, Visit BMI Gaming | www.bmigaming.com | (800) 746-2255 | +1.561.391.7200
Part Picture
Part Number
Part Name
Qty.
015-PCB-LCDINT2
LCD to USB Interface
1
000-PIN-RING.75
Rubber for Lamp Wheel
2
015-PLE-CLRTUBE
Clear Tube
2
015-PLF-INNERCV
Inner Grill Curved Plastic
2
015-PLF-INNERST
Inner Grill Straight Plastic
2
015-PLF-LPILAST
Left Pilaster Plastic
1
015-PLF-NAMEPLT
Nameplate Plastic
1
015-PLF-RPILAST
Right Pilaster Plastic
1
30
To Purchase This Item, Visit BMI Gaming | www.bmigaming.com | (800) 746-2255 | +1.561.391.7200
Part Picture
Part Number
Part Name
Qty.
015-PLF-SIDERED
Side Red Plastic
1
015-PLF-TOPRED
Top Center Red Plastic
1
015-PLF-UPLEFT
Upper Left Plastic
1
015-PLF-UPRIGHT
Upper Right Plastic
1
015-PLM-CBUTTON
Center Button Casting
2
015-PLM-COININ
Coin Entry Casting
1
015-PLM-DRVWHL0
Lamp Drive Wheel
2
31
To Purchase This Item, Visit BMI Gaming | www.bmigaming.com | (800) 746-2255 | +1.561.391.7200
Part Picture
Part Number
Part Name
Qty.
015-PLM-GRILL
Grill
1
015-PLM-KEYCAPS
Selector Buttons
12
015-PLM-LBUTTON
Left Button Casting
015-PLM-LMPWHEL
Lamp Wheel
2
015-PLM-LWCAST
Left W-Casting
1
015-PLM-PILCAP
Pilaster Trim Cap
2
32
To Purchase This Item, Visit BMI Gaming | www.bmigaming.com | (800) 746-2255 | +1.561.391.7200
Part Picture
Part Number
Part Name
Qty.
015-PLM-PILCAST
Pilaster Trim Casting
6
015-PLM-RBUTTON
Right Button Casting
015-PLM-RWCAST
Right W-Casting
1
015-PLM-TAILCST
Tail Casting
1
015-PLS-BUBSPRT
Bubble Tube Support
4
015-PLS-BUBTOP
Bubble Tube Top Support
4
33
To Purchase This Item, Visit BMI Gaming | www.bmigaming.com | (800) 746-2255 | +1.561.391.7200
Part Picture
Part Number
Part Name
Qty.
015-SPK-DRIVER6
6.5” Driver
2
015-SPK-DRIVE10
10” Woofer
1
015-SPK-GRCLOTH
Grill Cloth Diamond
Pattern
1
015-SPK-OUTTERM
Speaker Output Terminal
1
015-SPK-TWEETER
Pioneer Tweeter
2
015-MSC-BUBINCV
Bubble Tube Inner Curve
2
015-MSC-BUBOTCV
Bubble Tube Outer Curve
2
015-MSC-BUBSTRA
Bubble Tube Straight
4
34
To Purchase This Item, Visit BMI Gaming | www.bmigaming.com | (800) 746-2255 | +1.561.391.7200
Part Picture
Part Number
Part Name
Qty.
015-WDM-LCDBOT
Lower Display Molding
3
015-WDM-LCDTOP
Upper Display Molding
1
015-WMA-DORCORN
Wood Pilaster Block
2
000-HDW-3SCASTE
3” Swivel Caster
4
015-WSA-CABASE
Base Wood
1
015-WMD-ESHELF
Electronics Shelf
1
000-LCK-78KY644
7/8” Lock With Key #644
1
35
To Purchase This Item, Visit BMI Gaming | www.bmigaming.com | (800) 746-2255 | +1.561.391.7200
13. Wiring Diagram
36
To Purchase This Item, Visit BMI Gaming | www.bmigaming.com | (800) 746-2255 | +1.561.391.7200
14. FCC COMPLIANCE
Note: This equipment has been tested and found to comply with the limits for a Class B
digital device, pursuant to Part 15 of the FCC Rules. These limits are designed to provide
reasonable protection against harmful interference in a residential installation. This equipment
generates, uses and can radiate radio frequency energy and, if not installed and used in
accordance with the instructions, may cause harmful interference to radio communications.
However, there is no guarantee that interference will not occur in a particular installation. If this
equipment does cause harmful interference to radio or television reception, which can be
determined by turning the equipment off and on, the user is encouraged to try to correct the
interference by one of more of the following measures:
--Reorient or relocate the receiving antenna.
--Increase the separation between the equipment and receiver.
--Connect the equipment into an outlet on a circuit different from that to which the receiver is
connected.
--Consult the dealer or an experienced radio/technician for help.
Changes or modifications not expressly approved in writing by Chicago Gaming Company could
void the user’s authority to operate the product.
37
To Purchase This Item, Visit BMI Gaming | www.bmigaming.com | (800) 746-2255 | +1.561.391.7200
38