1
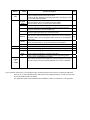
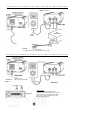
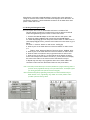
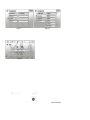
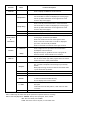
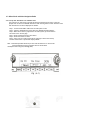
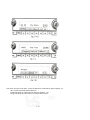
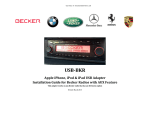
By: Discount Car Stereo.com
PA20-GM
iPod to G.M (LAN Bus) Interface
User's Manual
(Preliminary version 2008.9.3)
Tech Support: 626 336 3836
PST 9:00 AM to 5:00 PM
Thank you for purchasing USA SPEC product. This manual describes the functions and operation of
PA20-GM IPod interface for GM Please read this manual before installing the product in your
vehicle.
!! IMPORTANT!!
.:. It is strongly recommended that the unit is installed in an accessible location, so that
it can later be easily reset or upgraded.
.:. Eject ALL CDs from the built-in CDP player or CD changer 01' DVD before
installation or disconnect the power to radio!!!
.:. USASPEC sells its products through authorized dealers so we can insure customers will
receive proper services from the dealers. USASPEC reserves the right to offer
technical support or warranty only on products purchased through authorized
USASPEC accounts.
.:. It is strongly recommended that buy USASPEC product from sellers who provide dedicated
phone contact support. USASPEC will not provide technical support or warranty for
purchases made through any unauthorized internet sellers. (Discount Car Stereo.com is an
authorized USASPEC internet retailer—all warranty does apply)
.:. SAFETY NOTE: You should always give full attention to driving. Do not operate iPod in
such a way that distracts you while you are driving.
!!CAUTION!!
In general, IPod has not been designed to withstand temperature extremes in automobiles.
Please consult your iPod Owner's Manual regarding acceptable operation and storage
temperatures.
Do not disassemble or alter the cable and interface box.
Make the connections correctly.
Do not cut away the wire sheath or use the power for other equipments.
Do not install in locations which might hinder vehicle operation or create hazards for
vehicle occupants.
Having the wiring and installation done by professionals.
Arrange wiring so it is not crimped or pinched.
Do not use this product for purposes other than stated for the vehicle.
ABOUT PA20-GM INTERFACE ADAPTOR
This interface adaptor-connects an (Pod directly to your OM audio system. Its on-board software
translates commands from GM radio into commands that iPod understands. This interface enables
the (Pod be integrated into XM band and provides the following benefits:
· Directs the (Pod's audio output at dock connector to OM vehicle audio system for optimal
sound quality playback.
Controls the iPod via vehicle's radio and steering controls.
Charges the IPod's internal battery and during playing, and charging stops automatically
at 1/2 hours after IPod is paused. iPod goes to sleep mode when charging stops.
Compatibility
Future firmware updates for your iPod may affect the features and functions described in this
manual.
PA20-GM is compatible with GM navigation radio or radio it has a CAT button and is XM ready.
This interface adaptor is to co-exist with factory installed XM receiver, built-in CD change or CD
player.
Package Content
PA20-GM package contains one each:
PA20-GM adaptor,
CB-GML
CB-EXL
CB-PA100 iPod cable.
Display Text Information of Songs
1. When connected to a GM Navigation Radio
PA20-GM lists Artist, Album and Playlist Folders on navigation screen and therefore it allows text
based song track search with on-screen touch button. The FOLDER LIST can also be programmed
to FAV buttons for on radio easy, fast and friendly access to iPod folders from radio.
2. When connected to GM non-navigation radio (XM Ready)
PA20-GM provides text based menu on radio display to access Artist, album and Playlist
folders on iPod.
AUX INPUT OPTION
Besides iPod, the PA20-GM also can connect a second audio source to radio. Connecting the second
source to the RCA jack labeled AUX INPUT. Setting the DIP switch #1 at the side of the interface
adaptor to ON position will enable this second input.
Button
Menu
CAT
Playlist
Artist
Album
RDM
10x
iShortcut
Direct
AUX
i
< SCAN
or
>SCAN
Function Description
Press to display and select iPod control menu.
3 menu items are displayed per CAT page and total 3 CAT pages are used
to cover the whole men items.
Press the button below it to access iPod's Playlist folders.
The 1st Playlist is the All Song folder on iPod by default.
Press the button below it to access iPod's Artist folders.
Press the button below it to access iPod's Album folders
Press the right button to start playback of tracks in random sequence.
Press the left button to end the random clay.
Press the left button below it to reverse 10 tracks.
Press the right button below it to forward 10 tracks.
Press the button below it to program this menu into radio's FAV.
This FAV item (radio preset button) is a "shortcut" to return to iPod from
any band of radio. On non-navigation radios, this short cut is displayed as
X99 on radio.
Press the button below it to control and select folders or tracks from
iPod's click wheel directly. Song text information is unavailable.
Press the button below it to access the audio source at RCA AUX.
Note
(a)
Press to view text information of song.
Chan
Press "i" button to highlight it to display track number and song title.
Song
Press "i" button to highlight it to display folder name.
Artist
CAT
Press "i" button to highlight it to display artist name.
Press "i" button to highlight it to display the folder type being played.
Press to return to XM broadcast reception.
Note: Radios manufactured by Delphi CO. requires a2nd press to function.
On some radios, press and hold down SEEK button to return to XM band.
Note: (a) When connected to a non-navigation radio, the steering wheel control will not recognize the X99 (iPod
short cut) if it is also programmed into radio's FAV. Use the X99 preset button on radio to access iPod
directly from AM, FM, XM or CD modes.
The Application Guide in this manual has the information of which car models are 11-bit type data.
*USASPEC verified the published radio and vehicle application to the best of
our ability. Due to uncontrollable factors, USASPEC can not 100% guarantee
every published application. These factors include variables such as,
anomalies within a factory radio, factory radio heretofore unknown to
USASPEC and partial model year changes.
CABLE CONNECTION & DIP SWITCH SETTING
3-1 For vehicles equipped with G M XM receiver:
Step 1-a- Unplug the 16-pin male connector form GM XM receiver and connect it to the
female 16-pin connector on CB-GML cable. (To unplug the connector on XM
box, pull the blue latch towards you horizontally first)
Step 1-b- Plug CB-GML cable's male connector to X M receiver box.
Step 2- Plug the 13-pin DIN connector on CB-GML cable to PA20-GM interface adaptor
where is labeled RADIO. (A 13-pin extension cable is included. Use it if CB-GML is not
long enough for your installation job.)
Step 3- Set DIP switch #1 to ON position if the RCA AUX input is required .
3-2 For vehicles NOT equipped with GM XM receiver:
Step 1- Take the radio out from dash board.
Step 2-0- Unplug the 16-pin male connector from the radio and plug it to the female
16-pin connector on CB-GL29 cable or CB-GL 11 cable (It depends on car model. See the
notes of Application section in this manual.) Plug the 16-pin male connector on
USASPEC cable to radio.
Step 2-b- Unplug the 14-pin male connector from radio and plug it to the 14-pin
female connector on CB-GL29 or CB-GL 11 (It depends on car model. See
the of Application section in this manual.) Plug the 14-pin male connector
on USASPEC cable to the radio.
Step 3- Set DIP switch #1 to ON position if the RCA Input AUX option is required.
3-3 DIP Switch Setting Summary:
DIP Switch
Position
Function
#1
ON
To enable the RCA AUX feature or option
--------------------------------------------------------------------------------------------------#1
OFF
To disable the RCA AUX feature or option
#2
ON
For all non-navigation radios
#2
OFF
For all navigation radios
#3
ON
For all radios
#4
ON
For all radios
.
INSTALLATION IN VEHICLES EQUIPPED WITH GM XM RADIO RECEIVERS
CONNECT TO IPod
=
FRONT VIEW
,I
/ CBPA100
To CAR
(to 16pin connecter on factory XM receiver cable)
INSTALLATION IN VEHICLES WITHOUT GM XM RADIO OR PRE-WIRED FOR XM
FRONT VIEW
CB-GL29 or
TO car
(To the harness
that was connected to Radio)
CB-GL 11
AUX input
CAR RADIO
WARNING!!
Use only the iPod connection cable
included with PA20-GM Interface adaptor.
(CB-PA100) iPod connection cables from
other sources may look similar, but they
may damage your iPod.
When IPod is connected to PA20-GM adaptor, IPod will take a few moments to
change to external control mode. The iPod screen displays" OK to disconnect" to”
Connected to accessory”. IPod to PA20-GM connection can be made when radio
power is either OFF or ON.
4-1 Working with Navigation Radio
4-1-1 Set -up the "Short-cut" of iPod Folders and Control s to Radio's FAV
This Per-setting procedure is to enable quick access to and exit from IPod
folders through steering wheel control or radio touch screen.
1. Connect the PA20-GM adaptor to the radio and turn radio power “ON”
2. Switch the radio to XM band and connect IPod to PA20-GM adaptor.
3-a. Radio displays Fig (l) screen and press "Preset" button on radio screen. If
radio displays Fig (2) screen, press the touch button at screen center to go to
Fig (l).
3-b. Press “i- Shortcut" button on radio screen. See Fig (3)
4. Press any one of the folder buttons or function buttons on radio's screen
(i.e.
Folders: Artist, Album and Playlist; Functions: Direct, XM Band, AUX).
5. Press any one of the folder buttons or function buttons on radio's screen.
6. Press the "Back" touch button at top right hand comer of radio screen.
7. Press any one of the FAV (or, pre-set) buttons at the bottom of radio's
screen until a beep sound is heard. The FAV (or, pre-set) button will display
the name of the folder or the function which was selected in step 4.
8. Repeat step 4 to step 6 to program the short-cuts of other folders and
functions to FAV. Press the "End Preset" button to exit preset menu.
Note 1: GM radio provides 30 FAV pre-sets total (divided into 7 pages) and every folder or
function can be programmed into any one of the FAV buttons. An example of after
pre-setting the folders and function is shown in Fig (5).
..
Note 2: Without doing FAV programming, IPod folders are also accessible with your
Radio buttons. FA V programming only makes the control features much
friendlier from the steering wheel.
Fig (1)
Fig (4)
Fig (3)
Fig (5)
. .~..
.. ~..~
'___"_'"'__''''_'__''_''.''_'''
m'~'-'
Function
Menu
<Control>
Function Description
Press to display the MENU list of this function.
Press to list the next group of 24 files or tracks from iPod.
<Group Next>
6 of the 24 files or tracks are displayed per screen (page).
Use the up-down slide button on the right side of touch
screen to flip screen (page).
Press to list the previous 24 folders or tracks from iPod.
<Group Prey>
6 of the 24 files or tracks are displayed per screen (page).
<Random ON>
Use the up-down slide button on the right side of touch
screen to flip screen (page).
Press to engage random sequence play of tracks in a folder
<Random OFF>
Press to stop random play of tracks in a folder
Press to list the files in the folder. 6 files are displayed per
<folder name>
or
<file name>
screen (page), and 24 files per GROUP.
Press a file name from the list on the right to select
Press to list music tracks' name. 6 tracks are displayed
per screen, and 24 tracks per GROUP.
Press a track name from the list on the right to select
<i - Shortcut>
<Preset>
< Help>
Press to begin the set-up of shortcuts to iPod folders
and adaptor control functions
Displays the steps or guidelines of how to program the
shortcuts to FAV. Touch buttons are no function.
Press to display the top level folders and functions.
<Source>
Also for select folder type when program shortcuts of iPod
folders into FA V or radio preset buttons
<Artist>
Press to access the Playlist files on iPod
The 1 st folder of Playlist is the All Song on your iPod by
default.
When plays All song, the text on radio for the folder name
is your iPod's name by default.
Press to access the Artist files on iPod
<Album>
Press to access the Album files on iPod
<Playlist>
Press to unlock iPod's screen and to select folder, file
<Direct>
or tack from iPod click wheel directly
No text display when in Direct Mode.
Press to access the audio source connected to PA20-GM's
<i - AUX>
<XM Band>
RCA jacks
If DIP switch #1 is at OFF position, <AUX> does not show
on screen.
Return to XM broadcast station
Note 1: Radio may not allow some of the functions to operate while car is moving.
Note 2: Hierarchy Definition: FOLDER: The top level of Playlist, Artist, Album.
File: One level down from FOLDER.
Track: The music track in the files, or the lowest level.
4-2 When Works with Non-Navigation Radio
4-2-1 Set-up the" iPod Short-cut" to Radio's FAV
Set a shortcut-to -iPod to FA V list and this shortcut allows directly return to the last
played track on iPod from AM/FM /XM sources with steering wheel control and direct from
FAV This shortcut-to-iPod is displayed as "XM 99”
Step 1- Connect P A20-GM to radio and turn radio power to ON.
Step 2- Switch to XM band and connect iPod to P A20-GM interface adaptor.
Step 3- When iPod’s music is played from car audio system, press CAT button
and reach to the 3'd CAT page.
Step 4- Press a button below the "iPod" menu.
Step 5- Press FA V button on radio.
Step 6- Select a FA V or radio preset button and press it down until a beep
sound is heard and FA V preset will display "XM 99” .
Note 1: GM radio provides 30 FAV to pre-sets and this shortcut-to- iPod can be
preprogrammed a single or multiple times to the 30 FAVs.
Example screen in Fig (6-1) and Fig (6-2)
I
--~.
4-2-2 Playback of Folders and Songs on iPod
When IPod is connected, radio will go to XM band and change the display to Fig (7).
Explanation of radio display and function of buttons:
Button
Menu
CAT
Function Description
Press to display select iPod control menu.
3 menu items are displayed per CAT page and total 3 CAT pages
are used to cover the whole menu items.
Playlist
Press the button below it to access iPod's Playlist folders.
The 1 st Playlist is the All Song folder on iPod by default.
Artist
Press the button below it to access iPod's Artist folders.
Album
Press the button below ft to access iPod's Album folders
RDM
10x
Press the right button to start playback of tracks in random sequence.
Press the left button to end the random play.
Press the left button below it to reverse 10 tracks.
Press the right button below it to forward 10 tracks.
Press the button below it to program this menu into radio's FAV.
IPod
This FA V item (radio preset button) is a "shortcut" to return
to iPod from any band on radio.
Direct
AUX
Press the button below it to control and select folders or tracks from
iPod's click wheel directly. Song text information is unavailable.
Press the button below it to access the audio source at RCA AUX.
Press to view text information of song.
I
Chan
Press "i" button to highlight it to display track number and song title.
Song
Press "i" button to highlight it to display folder name. See Fig (8)
Artist
Press "j" button to highlight it to display artist name.
CAT.
Press Hi" button to highlight it to display the folder type being played.
Press to Switch between iPod mode and XM mode.
> SCAN
Note: Radios manufactured by Delphi CO. requires a 2nd press
to function.
*** On some radios, the SCAN function is activated by press and hold the seek button.
.8
~
I
Note: IPod, iPod nano, iPod classic, iTouch and iPhone are trade marks of Apple Computer, Inc.
XM is a trade mark of XM Satellite Radio Inc.
ACURA and Honda arc registered trade marks of Honda Co., Ltd.
Design and specifications are subject to change without notice.
PA20-GM APPLICATION GUIDE
90308
Make
Model
Buick
Enclave
Cadillac
Applicable Radio
XM Receiver Location
Note
2008
Non- Nav only
Right-Rear Q-panel
(1)
Lucerne
2007 - 08
Non- Nav only
Left-Rear trunk
(1)
DTS
2006 - 08
All
Left-Rear trunk
(1)
Escalade
2007 - 08
All
Behind Glove Box
(1)
EVS
2007 - 08
All
Behind Glove Box
(1)
EXT
2007 - 08
All
Behind Glove Box
(1)
2006-08
All
Behind Glove Box
(1)
Cobalt
2008
All
Under Rear Deck
(2)
Equinox
2007 - 08
All
Left Rear Q-Panel
(1 )
Avalanche
HHR
Chevy
GMC
Pontiac
Year
2006 - 09
All
Right-Rear Q-panel
(2)
Impala
2006-09
All
Right Rear Trunk
(1)
Malibu
2008 - 09
All
Under Left-Rear Deck
(2)
Silverado
2007 - 08
All
Behind Glove Box
(1)
Suburban
2007 - 09
All
Behind Glove Box
(1)
Tahoe
2007 - 09
All
Behind Glove Box
(1)
Arcadia
2007 - 08
Non- Nav only
Right-Rear Q-panel
(1)
Sierra
2007 - 08
All
Behind Glove Box
(1)
Yukon
2007 - 08
All
Behind Glove Box
(1)
Yukon Denali 2007 - 08
All
Behind Glove Box
(1)
All
Right Rear Trunk
(2)
Solstice
2007 - 08
Note (1): Order CB-GL29 cable if the car does NOT have XM receiver.
Note (2): Order CB-GL 11 cable if the car does NOT have XM receiver.
Cables can be ordered from USA SPEC @626-3363836 or discountcarstereo.com
Application guide as of: September 12, 2008