1
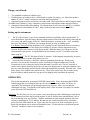
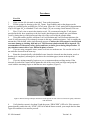
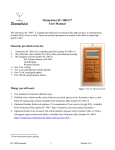
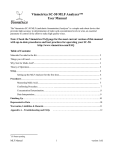
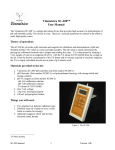
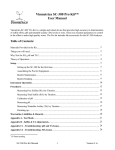
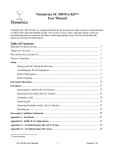
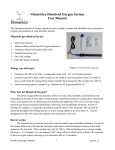
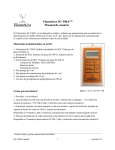
Vinmetrica SC-100A™ User Manual The Vinmetrica SC-100A* is a simple and robust device that provides high accuracy in determination of sulfite (SO2), levels in wine. These are essential parameters to control in the effort to make high quality wines. Theory of operation: Sulfite (SO2): The SC-100A, with the SO2 electrode and reagents provided, can be used to determine sulfite (or SO2) levels in wine, musts, and other samples. It relies on the Ripper titration based on the quantitative reaction of the SO2 with iodine (generated during the titration) which oxidizes the SO2 in the sample under acid conditions. - - IO3 + 5I + 6H+ 3I2 + 3H2O generation of iodine from iodate - SO2 + I2 + H2O 2I + SO3 + 2H+ reaction of SO2 and iodine When all the SO2 is titrated at the endpoint, excess iodine appears in solution. This is detected as current with the SO2 electrode and signaled by audible and visual indicators. The endpoint is much more sensitive than the starch color change commonly employed for Ripper titration, and it is sharp and clear, even when titrating red wines and musts. From the known concentration of the titrant and its volume required to reach the endpoint, the free SO2 is simply calculated. Materials provided in the kit: 1. 2. 3. 4. 5. 6. 7. Vinmetrica SC-100A SO2 controller unit (Part number SC100A-1) SO2 Electrode (Part number SC100-3), blue polycarbonate housing SO2 Reagent set (Part number SC100-2): SO2 Titrant solution (0.0156N) Acid Reagent Reactant solution One 5 mL syringe Two 3 mL polyethylene transfer pipettes One 25 mL serological pipette One 100 mL polypropylene beaker Figure 1. The SC-100A * US and international patents pending SC-100A manual 1 Version 1.0c Things you will need: 1. Two standard AA batteries (alkaline type). 2. Distilled water (it’s handy to have a wash bottle or similar for rinsing – see Vinmetrica product number SC100-17 at http://vinmetrica.com/wine-analysis-products/ ) 3. (Optional) magnetic stirrer and stir bar, electrode stand, 10 mL glass burette and lab support stand Available from Vinmetrica, http://vinmetrica.com/glassware-lab-support-stands-magnetic-stirrers/ 4. (Optional) Sodium Hydroxide solution, 1N concentration (if you want to do total SO2). Available from Vinmetrica (Part number SC100-7, http://vinmetrica.com/wine-analysis-products/ ) Setting up the instrument: 1. The SC-100A (Figure 1) runs on two standard AA batteries (alkaline cells recommended). To insert the batteries, open the battery housing on the bottom of the back of the unit by removing the two screws and gently prying off the lid. Install the batteries as shown by the + and – markings, then close the housing. If desired, you can prop the unit up using its folding stand. Low Battery Detection:When the battery level is getting low, the instrument shows a low battery icon on the upper left side of the display but continues to operate without impairment to any function. Replace the batteries as soon as practicable. When the battery level drops too far, the instrument does not operate. It rapidly flashes the low battery icon for 3.0 seconds, beeps and shuts itself off. Auto Shut-off: The SC-300 shuts off after 30 minutes. If this happens unexpectedly, just press the POWER button to resume from where you were. 2. Attach the SO2 electrode via the BNC connector protruding from the top. Remove any protective cover from the electrode tip (some electrodes are shipped without one). Put the electrode on its side, or hang it from an electrode stand if you have one. The SO2 electrode is sturdy with its plastic housing, but do take care not to let things touch or strike the platinum wires; they are somewhat fragile and will break if bent and straightened repeatedly. Electrode care: when done, always rinse with DI water and let air dry. There is no need to store the electrode in any kind of solution, and the protective cap (put on for shipping only) should not be replaced. OPERATION: Turn on the instrument by pressing the POWER button briefly. (Note: depressing the POWER button longer than two seconds at start-up will cause the instrument to enter Test Mode; see Appendix) The instrument will go through a power-up sequence. After a few seconds the instrument will start. You should see the display show a value less than 50 (usually 0.0) and the green (Proceed) LED should be on. Initial use: The first time you use your system, a new electrode may need conditioning to settle down. We recommend you place the electrode in about 30 mL of distilled water and add about 2 mL of the acid solution (as in step 4 below). With the instrument on and electrode attached, allow the system to equilibrate for 10-15 minutes. By that time the current should be below 50 and the green (Proceed) LED should be on. If not, allow the electrode to sit in the solution for up to 4 hours (the instrument can be turned off during this time). If after this time you still don't get the “Proceed” condition, contact us for assistance. SC-100A manual 2 Version 1.0c Procedures Free SO2 1. Make sure the SO2 electrode is attached. Turn on the instrument. 2. Fill the syringe by drawing up the SO2 Titrant. Expel bubbles and set the plunger on the syringe to a readable point, preferably the 5.0 mL point. [Note: the 5.0 mL setting allows determination of up to 100 ppm SO2 in a standard 25 mL wine sample.] If you are using a buret instead, fill it now. 3. Place 25 mL wine or must in the titration vessel. We recommend using the 25 mL pipette provided in the kit: draw sample up to the 0 mL mark, then dispense the sample into your titration vessel by letting the tip of the pipette touch the side of the vessel while the sample drains. 4. Using the transfer pipettes, add about 2 mL Acid Solution and 2 mL Reactant solution to the vessel. It is not necessary to be extremely accurate in this step; with these pipettes, 2 mL is roughly the amount that fills the bulb with a single thorough squeeze. Caution: the Acid reagent is corrosive and can cause damage to clothing, skin and eyes. The Reactant solution should not be ingested. We recommend use of laboratory safety glasses and latex or nitrile gloves during this procedure. If any solutions contact skin or eyes, flush with plenty of water. 5. If you are using a magnetic stirrer, turn it on to stir at a moderate rate. Be sure the stir bar will not strike the electrode in the next step. 6. Rinse the electrode briefly with distilled water. Insert the electrode into the titration vessel so that the tip is completely submerged to just above the circulation gaps (cutouts at the tip of the electrode). 7. If you are stirring manually, begin now; use a constant moderate swirling motion. If the electrode is not held in a stand, hold it against the side of the vessel with one finger and grasp the vessel with the remaining fingers so that the two move together. (Figure 2) Figure 2. Manual stirring technique. Hold the electrode against the side of the vessel and swirl gently; add titrant with other hand. 8. Verify that the current is less than 50 and the green (“PROCEED”) LED is lit. If the current is greater than this, and/or the red (“STOP”) LED is lit and the buzzer sounds, your sample has less than 2 ppm SO2 and there is no need to proceed. SC-100A manual 3 Version 1.0c 9. Titrate the sample by adding the SO2 Titrant dropwise from the syringe or buret, being sure to note the starting volume mark on the syringe or buret. Try to accomplish the titration as rapidly as possible (in 2 minutes or less), but be careful near the endpoint so as not to overrun it – here, dispense one or two drops at a time. Be sure to maintain stirring or swirling throughout the entire procedure. 10. During the titration, the LCD display will show transient currents, the red STOP LED will briefly illuminate, and the beeper will sound (“beep-beep!”). These transient indicators will last longer and longer as you approach the endpoint. Take the endpoint as the first addition of Titrant that causes the display to exceed 50, and the red LED and beeper to stay on, for longer than 15 seconds (or a count of 20 “beep-beeps”). It is important to maintain stirring or swirling to detect the endpoint well. Read the endpoint volume off of the syringe or buret. 11. The free SO2 content is calculated as ppm SO2 = 64 * V * N * 1000 2*S where V = mL Titrant needed to reach the endpoint; N = normality of the Titrant, S = mL sample. 1 If you use 25 mL of sample as directed, and the Titrant is 0.0156 N as supplied, then the calculation is simply ppm SO2 = 20 * V (i.e. 20 times V) For total SO2 1. Place 25 mL wine or must in the titration vessel. 2. Add 10ml 1N sodium hydroxide and mix well. Let stand approximately 10 minutes. 3. Using the transfer pipettes, add 8 mL Acid Reagent and 2 mL Reactant solution to the vessel. Remember that if you are using the transfer pipettes in the kit, 2 mL is the amount that fills the bulb with a vigorous squeeze, so dispense four of these for the Acid Reagent. 4. Proceed from step 5 in the Free SO2 procedure above. The result calculated will be total, rather than free, ppm SO2. Finishing up: 1. Turn off the instrument. 2. Rinse the SO2 electrode and syringe with distilled water. Let air dry. 3. Store all reagents tightly capped and away from heat and sunlight. 4. Discard waste samples and solutions in accordance with local regulations. Acidic solutions can be neutralized by slow addition of baking soda (sodium bicarbonate) with stirring until effervescence ceases Technical assistance: [email protected] tel. 760-494-0597 see also our FAQ section at www.vinmetrica.com 1 64 [mg SO2/mmol SO2 ]* V [mL] * N [meq/mL] * 1000 [mL/L] 2 [meq/mmol SO2] * S [mL] SC-100A manual 4 Version 1.0c WARRANTIES AND LIABILITIES 1. The materials provided in the kit, as described on pages 1 and 2 above, (“Materials”) are warranted as follows: The SC-100A instrument, electrode and non-reagent accessories are warranted against defects in workmanship for 12 months from date of purchase. The reagents are warranted to perform as described herein up until any stated expiration date or 6 months after purchase, whichever is later. THE WARRANTIES IN THESE TERMS AND CONDITIONS ARE IN LIEU OF ALL OTHER WARRANTIES, EXPRESS OR IMPLIED, INCLUDING WITHOUT LIMITATION ANY WARRANTIES OF MERCHANTABILITY, NONINFRINGEMENT, OR FITNESS FOR A PARTICULAR PURPOSE, SAID WARRANTIES BEING EXPRESSLY DISCLAIMED. 2. Buyer agrees that its sole and exclusive remedy against Vinmetrica shall be limited to the repair and replacement of Materials or parts of Materials, provided Vinmetrica is promptly notified in writing, prior to the expiration of the warranty period specified above, of any defect. Vinmetrica’s liability for any damages due Buyer shall be limited to the purchase price of the Materials. 3. VINMETRICA'S MAXIMUM LIABILITY FOR ALL DIRECT DAMAGES, INCLUDING WITHOUT LIMITATION CONTRACT DAMAGES AND DAMAGES FOR INJURIES TO PERSONS OR PROPERTY, WHETHER ARISING FROM VINMETRICA’S BREACH OF THESE TERMS AND CONDITIONS, BREACH OF WARRANTY, NEGLIGENCE, STRICT LIABILITY, OR OTHER TORT WITH RESPECT TO THE MATERIALS, OR ANY SERVICES IN CONNECTION WITH THE MATERIALS, IS LIMITED TO AN AMOUNT NOT TO EXCEED THE PRICE OF THE MATERIALS. IN NO EVENT SHALL VINMETRICA BE LIABLE TO BUYER FOR ANY INCIDENTAL, CONSEQUENTIAL OR SPECIAL DAMAGES, INCLUDING WITHOUT LIMITATION LOST REVENUES AND PROFITS. HAZARDS AND TOXICITY All Materials offered by Vinmetrica are intended for use by individuals who are familiar with laboratory procedures and their potential hazards. The Materials contain chemicals which may be harmful if misused. Due care should be exercised with all Materials to prevent direct human contact. Keep out of reach of children. Vinmetrica 1945 Camino Vida Roble, Suite I - Carlsbad, CA 92008 .www.vinmetrica.com (760) 494-0597 [email protected] Copyright 2010-12. Sportsman Consulting, LLC DBA Vinmetrica. All rights reserved. SC-100A manual 5 Version 1.0c Appendix Test Mode Test Mode provides various special functions that may be useful in testing the device, for example, if troubleshooting is necessary. • Test Mode is entered when the POWER button is pressed longer than 2 seconds while turning the instrument on. Remove the pH electrode if it is attached. • Test Mode is organized into sections. Press the POWER button briefly to step to the next section. After the last section, Test Mode restarts the first. • The Stop LED (red) is illuminated when an error is detected by the instrument The Proceed LED (green) is illuminated to indicate no error detected. The green LED does not guarantee proper functioning; it only indicates that no problem could be automatically detected. The user should make careful observations to discern proper operation. • To exit Test Mode, hold the POWER button down (5-10 seconds) until the instrument shuts off. If the device does not shut off after 10 seconds of holding down the button, move to the next section by releasing, then pressing again the POWER button briefly; then try to exit again. Section 0. Version Equipment Required None. Description The version number of the instrument software is displayed. The instrument goes through a continuous “burn-in” cycle, exercising sound, LEDs, and display. 1. Burn-in None 2. NA NA Not used by the 100A - Red LED flashes ___ and display shows “ “ blinking. 3. SO2 SO2 probe or SO2 probe simulator ( e.g., 450 kOhm resistor) After a brief pause, the SO2 current in nanoamperes is displayed. For values under 10, one decimal place is shown. 4. NA NA Not used by the 100A – display shows .000 5. SO2 Voltage SO2 probe or SO2 probe simulator. The raw voltage output from the instrument's current amplifier is displayed as X.XX volts. (.XXX if less than 1.00) 6. DAC Test None. Disconnect probe. The Digital-Analog Converter (DAC) is cycled through its 32 levels. 7. Battery Voltage Install two AA batteries The battery voltage is displayed as X.XX volts. SC-100A manual 6 Version 1.0c Section Equipment Required Description 8. Character Set None. Every ASCII character (space) to ~ is displayed. Due to the limitations of the 7-segment format, some characters are not used by the software. 9. Number Display None. The display cycles through showing every possible digit and every decimal point. 10. Sound Test None. The beeper is turned on continuously. SC-100A manual 7 Version 1.0c