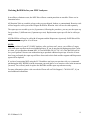
1
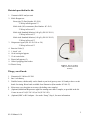
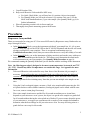
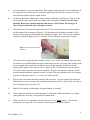
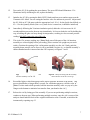
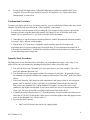
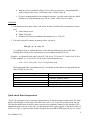
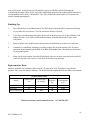
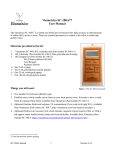
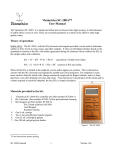
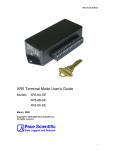
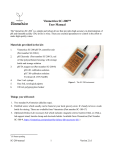
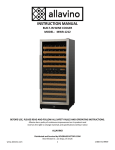
Vinmetrica SC-50 MLF Analyzer™ User Manual The Vinmetrica SC-50 MLF (malolactic fermentation) Analyzer* is a simple and robust device that provides high accuracy in determination of malic acid concentration levels in wine, an essential parameter to control in the effort to make high quality wines. Note: Check the Vinmetrica FAQ page for the most current version of this manual with up-to-date procedures and best practices for operating your SC-50. http://www.vinmetrica.com/FAQ Table of Contents: Materials Provided in the Kit............................................................................................................... 2 Things you will need............................................................................................................................ 2 Why Test for Malic Acid?.................................................................................................................... 3 Theory of Operation............................................................................................................................. 3 Setup.................................................................................................................................................... 4 Setting up the MLF Analyzer for the first time........................................................................ 4 Procedures.......................................................................................................................................... 5 Measuring Malic Acid............................................................................................................ 5 Confirming Procedure………………… .................................................................................. 7 Concentration Determination…………………………………………………………...….….8 Data Interpretation..…………………………………………………………………………...9 Finishing Up……………………………………………………………………………………...….10 Representative Data ……………………………………………………………………..…….........10 Warranties, Liabilities & Hazards.....................................................................................................11 Appendix A – Troubleshooting and FAQs ……………………....................................................12 * US Patent pending 1 SC-50 Manual v3.0 Materials provided in the kit: 1. Vinmetrica MLF analyzer unit 2. Malic Reagent set: Boost juice™ (Part Number: SC-50-4) ***Keep in Refrigerator*** Malic Acid (1M) concentrate (Part Number: SC-50-5) ***Keep in Freezer*** Malic Acid Standard Solution (0.40 g/L) (PN: SC-50-11) ***Keep in Freezer*** Malic Acid Standard Solution (0.10 g/L) (PN: SC-50-12) ***Keep in Freezer*** 3. Biopressure Agent (PN: SC-50-3-10 or -20) ***Keep in Freezer*** 4. Reaction Vials (5) 5. 1 ‘check’ vial 6. 10 ml serological pipette 7. 15 ml conical tube 8. Plastic bulb pipette (2) 9. 100 mL polypropylene beaker 10. Plastic Scoop Figure 1. The SC-50 MLF Analyzer with vial insertion assembly Things you will need: 1. Vinmetrica SC-100A or SC-300. 2. One 9 volt battery. 3. Distilled water, which usually can be found at your local grocery store. It’s handy to have a wash bottle for rinsing. Rinse bottle available from Vinmetrica (Part number SC-100-17) 4. Microwave oven, hot plate or stovetop (for boiling wine samples) 5. (Optional) Additional Biopressure agent for running more than 5 samples, as provided in the kit. Comes in sets of 10 (SC-50-3-10) or 20 (SC-50-3-20). 6. (Optional) BNC to RCA adapter - See under “Setup”, Step 4, for more information. 2 SC-50 Manual v3.0 Why Test for Malic Acid? In winemaking, malolactic fermentation (MLF) converts malic acid to lactic acid, with CO2 being the byproduct of the reaction. MLF, which is typically carried out in most red wines and in some white varietals, plays an important role in the finished wine’s feel and taste. MLF reduces titratable acidity, increases pH, and produces flavors often characterized as “soft” or “buttery”. Sulfite, as free SO2, inhibits the bacteria that carry out MLF. Therefore free SO2 levels must be kept low during MLF, carrying risks that the wine is left unprotected against oxidation and microbial contamination. As soon as MLF is done, then, SO2 should be raised to appropriate levels for protection of the wine. Thus it is important to know when MLF is done, and the best way to do this is to measure malic acid levels in the wine. Theory of operation: The SC-50 MLF Analyzer, with the SC-300 or -100A, can be used to determine malic acid concentration in wine. It relies on the biochemical MLF reaction caused by enzymes found in certain bacteria, including lactobacilli and oenococcus strains, and in the Biopressure agent component of the kit. These bacteria live on a variety of nutrients, but their production of CO2 results almost entirely from the enzymatic transformation of malic acid to lactic acid: Malic Acid Lactic Acid HOOC–CH2–CH(OH)–COOH CH3–CH(OH)–COOH + CO2 The CO2 creates pressure, which is converted by the MLF Analyzer to a signal for the SC-300 (or SC-100 or -100A). The CO2 pressure signal is directly proportional to the amount of malic acid in the sample. The device is set so that when malic acid levels exceed 0.1 g/L1 (suggesting MLF is incomplete), the user is alerted to this state by audible and visible indicators. The level of Malic acid can be calculated from the digital readout by a calibrator of Malic acid provided with the kit. Detection limit is below 0.04 g/L. The assay takes 30 to 60 minutes, depending on whether confirming or concentration procedures are performed. 1 On the original SC-100 model, the device will signal at a Malic Acid level of about 0.5 g/L. However, the sensitivity and accuracy of malic acid values lower than this are comparable to those determined with the SC-100A and SC-300. 3 SC-50 Manual v3.0 Setup Setting up the MLF Analyzer for the first time: 1. The MLF Analyzer runs on one 9 volt battery. To insert the battery, slide open the battery housing on the bottom of the back of the unit by gently pushing the lid. 2. Low Battery Detection: If the battery is good, the POWER LED will stay illuminated when the switch is pressed ON. When the battery level is too low, the LED on the POWER switch will flash on briefly and then shut off. Replace the battery. 3. Before connecting the SC-50, turn on your SC-100A or 300 (on the SC-300, select SO2 mode, press Enter) and wait for the initialization and green ‘Proceed’ light. 4. Now attach the MLF Analyzer to your via the SO2 electrode connector protruding from the top. Be sure to secure the electrode plug to the connector to ensure proper function. Note: on earlier SC-100A or -300 models, there is just one BNC-style connector for this purpose - see Figures 2 – 4. On newer models (June 2014) there is a separate phono- style SO2 connector that will require an adapter for SC-50 models that have a BNC plug (Figure 5)– contact us if you need one. Figure 2. Attach the SC-50’s cable to the BNC or RCA connector on the SC-300 (or 100) 5. Figure 3. Be sure the cable plug is screwed into place on the BNC connector or firmly inserted into the RCA plug. Figure 4. Recommended arrangement of the equipment Figure 5. The adapter for the SC-50. Prepare all Reaction Vials: a. Remove Biopressure Agent from freezer and allow to come to room temperature. b. Using the small plastic spoon provided, measure out two (2) level scoops (approx. 35-40 mg) of Biopressure Agent into each Reaction Vial. a. Due to the consistency of the Biopressure Agent, we recommend rinsing and completely drying the plastic spoon after filling approximately 5 vials. 4 SC-50 Manual v3.0 c. Cap all Reaction Vials. d. Keep out all Reaction Vials needed for MLF assay. a. For Quick Check Mode, you will need one (1) reaction vial per wine sample. b. For Quantify Mode you will need at least two (2) reaction vials, one (1) for the Malic Acid Standard and one (1) per wine sample. (See Quantify Mode, pg 8, for further information). e. Place all remaining reaction vials in freezer until use. f. Thoroughly rinse plastic measuring spoon with DI water. Procedures Biopressure Assay method: There are two modes for using your SC-50 to assess MLF status by Biopressure assay. Both modes use steps 1 through 18 below. In the Quick-check Mode, you set the instrument such that if your sample has 0.1 g/L or more of malic acid, you will see the STOP LED on the SC100/300 illuminate and the tone will sound, alerting you that MLF is not complete. There is an optional confirmation step (see Confirmation Procedure, below) that you can run after the test to verify the validity of a result. In the Quantify Mode, you set the instrument to higher sensitivity and run the assay with one or more malic acid standards provided in the kit. This allows you to determine the actual malic acid concentration in your wine samples. (See Quantify Mode Procedure on page 8). We recommend running the Quantify Mode until you are familiar with the workings of the instrument. Note: the following procedure is designed to be run at room temperature, between 66 and 73°F (19 - 23°C). Results may differ if temperatures are outside this range. See Appendix for more information. 1. Take out all Reaction vials needed for assay from freezer. One Reaction vial per sample is necessary. If you will run the assay in Quantify Mode you will need at least one additional reaction vial (See Quantify Mode Procedure on page 8). Allow Reaction vials to come to room temperature before initiating assay. Note that you can run multiple wine samples at one time. 2. Using the 10 mL serological pipette, measure a 10 mL wine sample and dispense into the 100 mL plastic beaker or other suitable container. (Serological pipette can be rinsed with DI water for re-use; remove cotton plug if necessary) 3. Place wine sample in microwave and boil for 90 seconds at medium power. Actual time depends on your microwave oven’s power; the object is to get the wine sample to a gentle boil for 60 seconds without having the wine splash out of beaker. If you are unsure about the power of your microwave, we suggest you experiment with a couple of wine samples beforehand to determine what the best settings are for your microwave oven. You may also bring wine to a gentle boil on a stove top for 60 seconds. 5 SC-50 Manual v3.0 4. Let wine sample cool to room temperature, then pour the sample into the 15 mL conical tube. If the sample has lost volume due to evaporation, add DI H2O to restore the volume to 10.0 mL, then pour the sample back into 100mL beaker. 5. Gently mix the bottle of Boost Juice. Using a plastic bulb pipette, add 5 drops (150 µL) of the Boost juice into the 10 mL boiled wine sample. Mix wine gently. Caution: Use care when handling. Boost Juice contains materials that may be a skin irritant. Do not ingest. If there is contact with skin, rinse with plenty of water. 6. Disconnect the vial insertion assembly from the SC-50 by unscrewing the luer lock connector on the bottom of the instrument. (Figure 6.) The disconnected vial insertion assembly will be used to zero the pressure immediately after capping the sample. Note: The luer lock connector should be reattached tightly to the SC-50 (step 13) before taking a measurement in step 19. Figure 6. Unscrew the Luer Lock connector. 7. Using the 10mL serological pipette, transfer exactly 3.0 mL of the wine sample from step 6 into the reaction vial with the Biopressure agent. Immediately cap the vial tightly, then quickly stand the vial upright and position the disconnected vial insertion assembly such that the needle punctures the septum of the reaction vial (see figures 6 and 7, but note that in this case the SC50 is NOT connected to the vial insertion assembly). Keep the vial insertion assembly with its needle inserted through the septum for about 3 seconds. This step equilibrates the vial’s internal pressure to ambient pressure, i.e., it “zeroes” the initial pressure. 8. Remove the vial from the insertion assembly and repeat step 7 for each sample to be analyzed. When done, be sure to reconnect the vial insertion assembly to the SC-50 by firmly screwing its luer lock fitting back on to the SC-50. 9. Shake all vials gently but thoroughly for approximately 10 seconds. 10. Allow sample to incubate at room temperature for 30 minutes. While incubation is occurring, gently shake the vial at the 10 minute and 20 minute mark. 11. Make sure the SC-50 is attached as described in step 3 of the Setup section. Turn on both instruments. If using an SC-300, select SO2 mode and press the ENTER button. 6 SC-50 Manual v3.0 12. Turn on the SC-50 by pushing the green button. The green LED should illuminate. If it illuminates briefly and then goes out, replace the battery. 13. Initialize the SC-50 by turning the black LEVEL knob until non-zero numbers appear on the Vinmetrica SO2 Meter. You are setting the baseline value for ambient air pressure. Adjust until the SC-100A or SC-300 meter reads the appropriate level: 20 ± 1 for the Quick-check Mode, or 45 ± 1 for the Quantify Mode (Note: every time device is turned on, it should be initialized) 14. Immediately following the 30 minute incubation period, shake the vial once more for 10 seconds and then proceed to the next step immediately. It is best to shake the vial by holding the cap, as holding the glass vial may change its temperature, resulting in a less accurate pressure reading. DO NOT remove the cap of the vial. 15. This is the CO2 pressure reading step. [Note: Make sure all the parts of the vial insertion assembly are secured tightly before proceeding.] Place reaction vial upright on your work surface. Position the opening of the vial insertion assembly over the vial. Gently push the assembly down onto the vial as far as it will go and hold it in place (i.e. so that the assembly’s rubber-sheathed needle is inserted into the vial’s septum); see figures 7 and 8. Figure 7. Position the opening of the vial insertion assembly over the vial. Figure 8. Gently but firmly push the assembly down onto the vial as far as it will go. 16. Record the highest value that appears on the meter right after insertion of the needle. This process should take no longer than 5 seconds. For calculation purposes, call this value “a”. [Note: If values tend to drift upwards, hold the insertion assembly at the very top or by the flanges at the bottom to minimize heat transfer from your hand to the vial.] 17. Release the vial by letting go of the assembly. If you are not performing multiple reactions, continue to the next step. When performing multiple reactions, once the vial is removed, the analyzer should stabilize back to the original initialization value. If needed, re-initialize the instrument by repeating step 13. 7 SC-50 Manual v3.0 18. For the Quick-check procedure, if Red LED light appears and tone is audible, MLF is not complete. If Green LED stays on, MLF is near or at completion. See “Quick-check Data Interpretation” section below. Confirmation Procedure: To ensure your Quick-check assay is working correctly, you can confirm the validity of the assay result using the 1M malic acid concentrate with a “just-completed” wine sample. 1. Add Malic Acid concentrate: After recording the CO2 response in step 16 above, open up the Reaction vial and, using the plastic bulb pipette, add 1 drop (30 uL) of 1M Malic Acid to the sample. This is equivalent to 1.3 g/L malic acid in the 3mL wine sample. 2. Immediately re-cap the reaction vial and equilibrate it with the disconnected insertion assembly as in step 7 above. Mix the vial thoroughly. 3. Repeat steps 14-17 from above, letting the sample incubate again for 30 minutes and performing the CO2 pressure reading step. Record the data. [If your instrument has turned off, it will need to be reinitialized.] To determine what these numbers mean and how to use them, please see the data interpretation step below. Quantify Mode Procedure: The Biopressure Assay Procedure above will allow you to quantitatively assign a value (in g/L) for malic acid in your wine samples by including the steps below when you run the assay. 1. You will run at least one “Standard Vial” at the same time as your wine samples. This will require one additional Reaction Vial. 2. It is advised to run all your samples within a few minutes of each other. Be prepared to begin the standard vial right after adding wine samples to the Reaction Vials (Step 7 under Procedures, above). 3. Take a new Reaction Vial (already at room temperature) and, using a clean 10 mL serological pipette, add 3.0 milliliters of the 0.1g/L Malic Acid Standard Solution to the Reaction Vial. This is now your Standard Vial. Cap the Standard Vial tightly. You may also run a 0.4 g/L standard or any higher concentration if you want to make one; however concentrations above about 2 g/L will give results that exceed the measurement limits of the device. 4. Complete the assay following steps 8-17 of the Biopressure Assay Procedure (note that you initialize the SC-50 at 45 for this mode). Make sure to record the highest value that appears on the meter for the Standard Vial. Call this value “c” 5. Measure the blank response. a. Add 3.0 mL DI water to the check vial, capping tightly. 8 SC-50 Manual v3.0 b. Read the vial as mentioned in Steps 15 & 16 in the section above, “Measuring Malic Acid by Biopressure Assay”. Record this value. Call this value “b” c. If you are running multiple wine samples at one time, you only need to take the “blank” reading once. If the instrument turns off, the “blank” will need to be re-done. Calculation 1. You should now have three values a, b, and c, in order to calculate the concentration of malic acid: a = Wine sample result b = Blank Vial result c = Standard Vial result for standard concentration S (e.g., 0.10 g/L) 2. The malic acid (MA) content, in grams per liter, is given by MA, g/L = S * (a - b)/(c - b) (i.e. subtract b from a, subtract b from c, divide the first difference by the second, then multiply that result by S, the concentration of your standard (usually 0.10 g/L ) Example: in a Quantify mode assay with an SC-300, a was 75.0, b was 59.2, and c was 129 for a 0.10 g/L standard, (i.e., S was 0.10). So the malic acid concentration was 0.10 x (75.0 - 59.2)/(129 - 59.2) = 0.02 g/L malic acid Having determined the concentration in g/L, you should use this table as a rough guideline for status of MLF in your wine Malic Acid Concentration, g/L Above 1 0.4 – 1.0 0.1 – 0.4 0.05 – 0.1 Below 0.05 MLF status Not started or just started Incomplete, probably started Progressing well Nearly complete, probably OK Complete Quick-check Data Interpretation The SC-50 is designed to give a readout of approximately 50 nA (nanoAmps) current on the SC-100A and SC-300 when the level of malic acid in the wine is at 0.1 g/L. At this level of the current, the red LED and the audible tone of the SO2 meter come on in the customary manner for SO2 titrations. This signals that malic acid is at or above 0.1 g/L and therefore MLF is not complete. If the malic acid level is below 0.04 g/L, a signal less than 50 nA will appear, the green PROCEED light will stay on, and no 9 SC-50 Manual v3.0 tone will be heard. At this point you will probably want to verify this result by following the confirmation procedure above. At the end of the confirmation procedure the reading should increase by several hundred nA for the SC-100A and SC-300. This confirms that when malic acid is present, the system responds appropriately. Finishing Up: 1. Turn off both devices and detach the SC-50 MLF analyzer from the BNC connector on the top of your other SC series device. You can remove the battery if desired. 2. If you have unused reaction vials, place these back in the freezer as well as the 1M Malic Acid and the 0.4 and 0.1 g/L Malic Acid Standard Solution. Place the Boost Juice™ back in the refrigerator. 3. Rinse all plastic ware with DI water and store the unit and plastic accessories in a safe place. 4. Vinmetrica is considering enacting a recycling program for all used reaction vials. If you are interested in participating, please hold on to them until further notice. We thank you in advance for your participation. 5. Rinse out all used reaction vials with DI (distilled) water two to three times and air dry with lid removed. Reaction vials can be re-used. Save all reaction vials and caps. Representative Data: Analyses performed at Vinmetrica Labs on an SC-50 with an SC-300. This table is for reference purposes only; your data may be different. The Red Wine had completed MLF; the White wine had not. Representative Data Sample White wine Red Wine 0.4 g/L malic acid Sample result (a) Standard result © (c, S = 0.4) Check Vial Response (b) Malic Acid Concentration (g/L) 702 63 ----349 59 59 59 0.92 0.006 --- Technical assistance: [email protected] tel. 760-494-0597 10 SC-50 Manual v3.0 Ordering Refill Kits for your MLF Analyzer: In an effort to eliminate waste, the MLF Kits will now contain parts that are reusable. Please see information below. All Reaction Vials are reusable as long as they are not chipped, broken, or contaminated. Reaction vials will no longer be sold as part of the Reagent Refill Kits. Reaction vials will now be sold separately. The septa caps are reusable up to six (6) punctures, following the procedure, you may use the septa cap for up to three (3) different tests (2 punctures per test). Replacement septa caps will also be sold separately. MLF Refill Kits will now be sold with all reagents and the Biopressure Agent only. Refill Kits will be sold in amounts enough for 10 or 20 tests. NOTE: With the purchase of your SC-50 MLF Analyzer, after you have run 5 assays, you will have 5 empty vials with septa caps that can be used additional times. If you do not plan on running more than 5 tests at a time, you can purchase the new MLF 10 Test Refill Kit (PN: SC-50-3-10). This Refill Kit will allow you to perform 10 more tests without having to purchase additional septa caps. After the 10 tests have been performed, the septa caps will have been used to their limit and the reagents and Biopressure agent will be depleted. If you have been testing MLF using the SC-50 and have not kept your reaction vials, we recommend purchasing the MLF Refill Kit (in the increment you need) plus a set of reaction vials (in the increment you need). You will only need to replace the Refill Kit and the septa caps when necessary. For more information, please visit our website. Please call our Tech Support, 1-760-494-0597, if you need additional information. 11 SC-50 Manual v3.0 WARRANTIES AND LIABILITIES 1. The materials provided in the kit, as described on pages 1 and 2 above, (“Materials”) are warranted as follows: The SC-50 MLF Analyzer instrument and non-reagent accessories are warranted against defects in workmanship for 24 months from date of purchase. The reagents are warranted to perform as described herein up until any stated expiration date or 6 months after purchase, whichever is later, provided storage recommendations are followed. THE WARRANTIES IN THESE TERMS AND CONDITIONS ARE IN LIEU OF ALL OTHER WARRANTIES, EXPRESS OR IMPLIED, INCLUDING WITHOUT LIMITATION ANY WARRANTIES OF MERCHANTABILITY, NONINFRINGEMENT, OR FITNESS FOR A PARTICULAR PURPOSE, SAID WARRANTIES BEING EXPRESSLY DISCLAIMED. 2. Buyer agrees that its sole and exclusive remedy against Vinmetrica shall be limited to the repair and replacement of Materials or parts of Materials, provided Vinmetrica is promptly notified in writing, prior to the expiration of the warranty period specified above, of any defect. Vinmetrica’s liability for any damages due Buyer shall be limited to the purchase price of the Materials. 3. VINMETRICA'S MAXIMUM LIABILITY FOR ALL DIRECT DAMAGES, INCLUDING WITHOUT LIMITATION CONTRACT DAMAGES AND DAMAGES FOR INJURIES TO PERSONS OR PROPERTY, WHETHER ARISING FROM VINMETRICA’S BREACH OF THESE TERMS AND CONDITIONS, BREACH OF WARRANTY, NEGLIGENCE, STRICT LIABILITY, OR OTHER TORT WITH RESPECT TO THE MATERIALS, OR ANY SERVICES IN CONNECTION WITH THE MATERIALS, IS LIMITED TO AN AMOUNT NOT TO EXCEED THE PRICE OF THE MATERIALS. IN NO EVENT SHALL VINMETRICA BE LIABLE TO BUYER FOR ANY INCIDENTAL, CONSEQUENTIAL OR SPECIAL DAMAGES, INCLUDING WITHOUT LIMITATION LOST REVENUES AND PROFITS. HAZARDS AND TOXICITY All Materials offered by Vinmetrica are intended for use by individuals who are familiar with laboratory procedures and their potential hazards. The Materials contain chemicals which may be harmful if misused. Due care should be exercised with all Materials to prevent direct human contact. Glassware can break and chemicals can splash during experiments; always use safety glasses. We strongly recommend using nitrile or latex gloves and wearing long pants, long sleeves and closed-toe shoes. Dispose of unwanted material by adding baking soda to wine samples and dumping down the sink with plenty of water. Keep out of reach of children. 1945 Camino Vida Roble, Suite I - Carlsbad, CA 92008 www.vinmetrica.com (760) 494-0597 [email protected] Copyright 2010-14. Sportsman Consulting, LLC DBA Vinmetrica. All rights reserved. 12 SC-50 Manual v3.0 Appendix A – Troubleshooting and FAQs 1. 2. The SC-50 does not power on: Check the battery and replace if necessary. No response on the SC100A/300: A. Make sure the BNC connector is firmly inserted and locked into place. B. Make sure the Power LED is illuminated on the SC-50 C. Turn the LEVEL knob fully clockwise, then back fully counterclockwise as needed until non-zero values appear. D. If an SC-300 is used, cycle through the MODE selections all the way back to SO2 mode, then press ENTER. Repeat step C FAQs 1. What are possible interferences in the assay? Very high alcohol levels (above 20% ABV) may change the response of the system somewhat. The boiling step generally reduces levels far enough to limit this problem. For very high alcohol levels, you can dilute the wine in distilled water to bring the concentration below 10% ABV. High free SO2 levels (>30ppm) may impact the Biopressure agent. Again, boiling will help this, but if needed you can dilute the wine sample as above. 2. I have an SC-300 Analyzer and upon initialization of the MLF Analyzer, I cannot get the value to reach the 20+ 1 (or 45 + 1 ) mark while in SO2 mode. Is my MLF Analyzer or my SC300 defective? If this occurs, the SC-300 Analyzer may just need the current output in SO2 mode reset. This can be achieved by cycling through the MODE function once until you get back to SO2 mode. Try to initialize again at the 20 + 1 mark. If you still cannot reach this mark please call Tech Support for assistance and information. 3. What if I did not shake the vial during the 30 minute incubation period? Do I need to start over? Is this vial no longer good? We highly recommend that you always shake your vial at the 10 minute and 20 minute mark during incubation to ensure that the Biopressure agent gets thoroughly mixed. At this point, how you proceed is at your discretion. We normally recommend that you start over with a new reaction vial, but if you choose to proceed, make sure that your sample has had a good thorough shake before performing the CO2 pressure reading step. You will need all of the Biopressure agent to be dissolved in your reaction vial. 4. What if I let the incubation period go for longer than 30 minutes? Is my sample no longer good? If you allow your reaction to incubate for longer than 30 minutes the reaction results may be affected. Timing in this step is not critical but needs to be as close to the 30 minute mark as possible. Accuracy 13 SC-50 Manual v3.0 of the technique may be affected by letting the reaction go for excessive periods of time. 5. While running several samples, SC-300 doesn’t go back to the 30 + 1 mark in between. Why is this occurring? This typically occurs after 5 or more samples but can show up at any time. We recommend checking the value in between each sample to ensure accuracy. If your value does drift below 39 or above 41, your unit will need to be re-initialized. Please follow Step 17 under the Procedure section. If this value is not maintained, your final values will be incorrect leading to an incorrect calculation of malic acid levels. We know that this may take some time to do in between samples but this is okay. Your results should not be affected. 6. What is the effect of temperature on the assay? Temperature can have a significant effect on the assay. The recommended temperature is standard room temperature, or about 70 °F (21°C). Temperatures within 3 degrees °F (or 1.5 °C) of this value should be fine. At lower temperatures, the rate of the Biopressure reaction slows down, and the pressure change also is lower, just like car tires lose pressure in cold temperatures. Therefore the assay is less sensitive at lower temperatures. At higher temperatures, the opposite effect occurs: the reaction will go faster and generate higher values. In principle this is not bad per se – the assay becomes slightly more sensitive with the higher pressures generated. There is nothing wrong with using a higher temperature up to about 95°F (35°C), with two cautions: 1. the higher pressure resulting from higher temperatures may throw off the instrument’s 50 nA set point so it now will signal at a level below the 0.1 g/L level – therefore you will have to pay attention to concentration calculations; 2. most users’ environments aren’t set up to control higher temperatures that well, so increased variability may result. A warm water bath with controlled temperature can be used. Technical assistance: [email protected] tel. 760-494-0597 14 SC-50 Manual v3.0