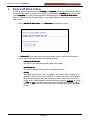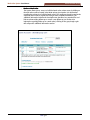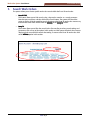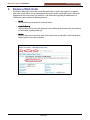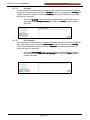
1
User
Manual
For the
Work Order Management System
© Copyright 2006, Cyzap Inc.
Work Order System User Manual
Blank Page
Page 2/21
Work Order System User Manual
Table of Contents
Table of Contents
1.
INTRODUCTION ................................................................
................................ ................................................................
................................ ..........................................................
................................ .......................... 5
1.1.
1.2.
Login ........................................................................................................................................................ 5
Welcome Screen .................................................................................................................................. 6
2.
ORDERS
RS ................................................................
....................................
.... 8
REVIEW ALL WORK ORDE
................................ ................................................................
................................ ................................
3.
SEARCH WORK ORDERS ................................................................
.........................................
.........10
................................ ................................................................
................................ ................................
......... 10
4.
........................................
........11
REVIEW A WORK ORDER ................................................................
................................ ................................................................
................................ ................................
........ 11
5.
ORDER
R ................................................................
..................................
..12
CREATE NEW WORK ORDE
................................ ................................................................
................................ ................................
.. 12
5.1.1.
5.1.2.
5.1.3.
5.1.4.
6.
Work Order Type ..................................................................................................................... 13
Title and Description .............................................................................................................. 14
Designated Parties/Due Date.............................................................................................. 14
File Attachments...................................................................................................................... 15
CREATE FOLLOWFOLLOW-UP................................
UP ................................................................
................................ ................................................................
................................ ................................................
................................ ................16
................ 16
6.1.1.
6.1.2.
6.1.3.
6.1.4.
6.1.5.
6.1.6.
6.1.7.
Add More Information ........................................................................................................... 17
Re-assign ................................................................................................................................... 18
Cancel ......................................................................................................................................... 18
Accepted .................................................................................................................................... 19
Not Accepted............................................................................................................................ 19
Send Additional Email Notifications.................................................................................. 20
File Attachments...................................................................................................................... 20
INDEX ................................................................
................................ ................................................................
................................ ................................................................
................................ .................................................
................................ .................21
................. 21
Page 3/21
Work Order System User Manual
Introduction
Blank Page
Page 4/21
Work Order System User Manual
1.
T
Introduction
Introduction
he zapManager Work Order Management sub-system allows you to log task assignment requests between
your organization and Cyzap related to any and all of the sub-systems that Cyzap hosts for your organization. This
sub-system works by creating electronic memo records for each work order request. The true functionality of this
system is found in the powerful tools which allow you to track, assign and edit the work orders. This extensive,
yet user friendly method of information classification creates an environment where work orders become a tool
to maximize communication and efficiency. Most notably, all communication regarding a single request is
consolidated in one place which reduces lost information and miscommunication that can occur when multiple
parties are accessing multiple sources to manage a task.
A work order can be assigned to any Cyzap staff user, be given a due date and can be assigned a reviewer. The
system is designed to automatically send an email notification of work order creation or updates to all parties
listed in the work order. Powered with these and other advanced functions, the Work Order Management system
provides a robust framework for handling all your request and task management needs.
The system uses the Internet as a medium to access the work order information. Cyzap is hosting the application
and data on secured servers. Cyzap takes care of maintenance, support, and upgrades. There is no software to
buy and install. There are no additional hardware requirements. All you need is a PC with Internet access. Any
authorized staff member at any location can access the system securely with a Web browser, user ID, and
password.
1.1.
Login
The Work Order Management system is accessed through the Login feature of the Cyzap Web site.
•
Open a new Internet browser window and then enter http://www.cyzap.com into the URL
address bar.
•
Click on the Login tab.
Page 5/21
Work Order System User Manual
•
The Login feature requires each user to enter a Username and Password to access the system.
This prevents unauthorized users from accessing any information and ensures that your data is
secure at all times. Please contact Cyzap to establish or retrieve login information.
o
1.2.
Introduction
Enter your Username and Password into the appropriate fields then click on the
Submit button.
Welcome Screen
The Online Services Welcome screen contains the Main Menu options which allow you to review
existing work orders or to create a new work order (these options are discussed in detail in other
sections).
Throughout the system, the Navigation Menu located along the left side of the screen will remain fixed
and will be visible on every screen. The Navigation Menu contains the options to update your user
account profile and login information. There is also an option to Logout of the system. It is advisable to
use the Logout feature since all activity is recorded to your Login ID when you are logged into the
system. If you leave the computer and someone else enters information or makes changes, those
changes will be attached to your Login ID. The Logout feature allows you to completely log off of the
system and is the preferred method for exiting a system session since it completely closes the session.
We also advise you to use system menus to move between different pages. All zapManager subsystems are Web applications. By nature a Web application works in a different way than a regular
desktop application or a static Web page. When you click on the Back button in your Internet browser
expecting to return to your previous location, you may encounter a message stating that the page
cannot be found. When you hit the Refresh button the system takes you to a lookup screen instead of
back to the record you were viewing.
Page 6/21
Work Order System User Manual
Introduction
In a Web application, if you are on a screen that contains fields where you have entered information
and you click on the Submit button, the system takes an action to create or update the fields in that
record. If you are then in a resulting screen and you click on the Refresh button in your Internet
browser the system will take the SAME actions again as if you had just clicked on the Submit button
again. That can end up overwriting information or adding duplicate records. This limitation exists in ANY
Web application and is not unique to zapManager products. The same limitation exists with the Back
button of your Internet browser. If you are on a screen that contains fields where you have entered
information and you click on the Submit button, then hitting the Back button can produce undesired
results.
Navigation Menu
Main Menu
Page 7/21
Work Order System User Manual
2.
Review All Work Orders
Review All Work Orders
This option allows you to view a list of all P ending and Complete work orders. All work orders that are
submitted to the system by a customer are assigned a primary status of Pending.
Pending Work orders are only
marked Complete by a Cyzap administrator after a thorough review. The Review All Work Orders
listing is a complete history since work orders are not automatically removed from the system based on
date or status.
•
Click on Review All Work orders in the Main Menu of the Welcome Screen.
•
The Review All screen shows you the work order status, number, date, title and assigned to
user. In addition, this screen contains the following features:
o
Create New Work Order
See Section 5 for information regarding work order creation.
o
Search/Jump
/Jump To
Search
See Section 3 for information regarding searching work orders.
o
Sort By
The default sort order for the list is ascending by work order number. However, all of
the fields in the list can be used as sort fields. To sort the entire list by one of the other
fields click on the field header located at the top of each column. Click on the field
header again to switch between ascending and descending order. Example: If you click
on Title the system will sort all of the work orders ascending alphabetically by title. If
you click on Title a second time the system will sort all of the work orders descending
by title.
Page 8/21
Work Order System User Manual
o
Review All Work Orders
Review
w a Work Order
Revie
The system allows you to access an individual work order review screen by clicking on
the work order number located in the WO# column (see Section 4 for information
regarding the review of an individual work order). The small grey triangle located under
each work order number expands the listing to show additional information. The
additional information includes the description text, the title of any attached files and
links to review existing follow-ups or create a new follow-up (see Section 6 for
information regarding follow-up to a work order). Clicking on the grey triangle again
will collapse the additional information section.
Page 9/21
Work Order System User Manual
3.
Search Work Orders
Search Work Orders
The system allows you to locate specific work order records within the list of all work orders.
•
Search Field
This feature allows you to find records using a key word or number as a search parameter.
Enter the text or numbers and then click on the Search button. The system will refresh the
screen to display all of the matching records. To return to the list of all work orders remove any
text from this search field and then click on All WOs in the Jump To section.
•
Jump To
This feature allows you to filter the records in the list according to various record settings and
parameters. Click on any of the options in this section and the system will refresh the screen to
display only the records which contain that setting. To return to the list of all work orders click
on the All W
WO
Os option in this section.
Page 10/21
Work Order System User Manual
4.
Review a Work Order
Review a Work Order
This feature allows you to review the current information that is saved in the system for a particular
work order record. If there are any attachments to the work order the system will provide a link to the
attachment in this review screen (see Section 5.1.4 for information regarding file attachments). In
addition, this screen contains the following features:
•
List All
This link will return you to the list of all work orders.
•
Create FollowFollow-up
This link allows you to access the options to create a follow-up to the work order (see Section 6
for information regarding follow-up).
•
Review
This link allows you to refresh the work order review screen and should be used instead of the
Refresh option in your Internet browser.
Page 11/21
Work Order System User Manual
5.
Create a New Work Order
Create New Work Order
The option to create a new work order is contained in the initial Welcome Screen and also in the
Review All Work Orders screen.
•
Click on the Create New Work Order option.
Page 12/21
Work Order System User Manual
•
Create a New Work Order
The system will automatically generate a work order (WO) number for every new record. This
number is a permanent part of the record and can be used to identify and locate the work
order in the system. Fields that are noted with a red asterisk are required. The system will not
save the record if any required field is left blank.
5.1.1.
Work Order Type
Work Orders are primarily classified by the type of request or issue they address. Selecting the
most appropriate work order type can help later when sorting work orders. There are three types
that can be selected to describe a work order:
o
Change Request
This type identifies work orders where new functionality or a change to existing
functionality is being requested.
o
General Request
This type identifies work orders that do not fit into either of the other two types.
o
Problem Ticket
This type identifies work orders where existing functionality is not working properly.
Page 13/21
Work Order System User Manual
Create a New Work Order
5.1.2.
Title and Description
5.1.3.
Designated Parties/Due Date
Enter a title which will identify the work order and briefly describe the issue. Use the description
field to enter a detailed explanation of the issue and any specific instructions or requests.
o
Requested By
The system automatically fills this field with the email address of the logged in user.
Even though this default entry can be changed, it would be very rare that you would
enter another email address. The R equested By field is a tool to identify the user who
actually created the work order. When the work order is submitted and whenever it is
updated the system will send an email notification to this user.
o
On Behalf Of
This field is used to enter the name of anyone who is requesting the work order but is
not the creator of the work order. This is for your information only so there is not a
required format for the entry in this field. The system does not send an email
notification to this person when the work order is created or modified.
o
Requested Completion Date
If there is a due date or deadline related to the work order enter the date as
mm/dd/yyyy or click on the drop down arrow to select a date from the calendar.
o
Initially Assigned To
This feature allows you to assign the work order to any Cyzap staff member. The system
default for this field is Auto Assign.
Assign If you use the default then the work order will be
reviewed by a Cyzap administrator and directed to the appropriate staff member.
o
Also Notify Updates To
Enter the email address of any other people to receive an email notification when the
work order is created or updated. This option is not limited to Cyzap staff members,
you can enter anyone’s email address. Separate multiple addresses with a comma and
no spaces or manual returns. Click on the Zoom button to expand this field.
Page 14/21
Work Order System User Manual
5.1.4.
Create a New Work Order
File Attachments
This feature allows you to attach any file that is saved on your PC or local network to the work
order record. The system allows a total of two files to be initially attached to each new work
order.
o
Click on the Browse button to locate and select a file from your PC or local network.
o
Click on the Submit button to save the New Work Order record and any attached files.
Page 15/21
Work Order System User Manual
6.
Create Follow-up
Create Follow-up
The follow-up feature is used to document changes, updates and additional information that develops as
the work order is processed. The system does not limit the number of follow-ups that can be created for an
individual work order. Each follow-up that is created becomes a permanent part of the work order and is
seen whenever the work order is reviewed. The option to create a follow-up is contained in the expanded
record view of the List All work orders screen and also in the individual Work Order Review screen.
•
Click on the Create New Follow
Follow--up option.
Page 16/21
Work Order System User Manual
•
Create Follow-up
The Create FollowFollow-up screen contains three links. The List All link will return you to the list of
all work orders, the Create FollowFollow-up link will refresh the screen and should be used instead
of the Refresh option in you Internet browser, the Review link allows you to review the current
information that is saved for the individual work order. The follow-up actions that appear on
this screen are discussed in Sections 6.1.1-6.1.7.
6.1.1.
Add More Information
This action allows you to add additional updates, notes and instructions to the work order record.
The additional information will be a permanent part of the record and can be viewed whenever
the record is accessed.
o
Click on the Add More Info button and then enter the information into the Enter
Additional Information field. Click on the Zoom button to view the entire field.
Page 17/21
Work Order System User Manual
6.1.2.
Create Follow-up
Re-assign
This action allows you to change the assignment of the work order to any Cyzap staff member.
The system will include the original assignee in the email notification of the re-assignment but not
in future updates.
o
6.1.3.
Click on the ReRe-assign button and then select the staff member from the drop down
menu. Use the FollowFollow-up Notes field to document the reason for the re-assignment
and any additional information pertaining to the re-assignment. Click on the Zoom
button to view the entire field.
Cancel
This action allows you to cancel the work order request. Canceling a work order does not delete
the work order from the system, it will still appear in the work order history as “cancelled”. A work
order that is Canceled is still has a primary status of Pending until a Cyzap administrator reviews
it and marks it Complete
Complete.. Only Cyzap administration can change the main status of a work order.
o
Click on the Cancel button and then document any information pertaining to the
cancellation into the Enter Cancellation
Cancellatio n Reason field. Click on the Zoom button to
view the entire field.
Page 18/21
Work Order System User Manual
6.1.4.
Create Follow-up
Accepted
This action allows you to document your acceptance of the steps that have been taken to satisfy
the work order request. A work order that is A ccepted is still has a primary status of Pending until
a Cyzap administrator reviews it and marks it Complete
Complete.. Only Cyzap administration can change
the status of a work order.
o
6.1.5.
Click on the Accepted button and then document any information pertaining to the
acceptance into the Acceptance Notes field. Click on the Zoom button to view the
entire field.
Not Accepted
This action allows you to document your rejection of the steps that have been taken to satisfy the
work order request. A work order that is Not Accepted is still has a primary status of Pending
until a Cyzap administrator reviews it and marks it Complete.
Complete. Only Cyzap administration can
change the status of a work order
o
Click on the Not Accepted button and then document any information pertaining to
the rejection into the Reason for not Accepting field. Click on the Zoom button to
view the entire field.
Page 19/21
Work Order System User Manual
6.1.6.
Create Follow-up
Send Additional Email Notifications
The system creates an email notification whenever a work order is updated. By default, the
system always sends the email to the work order creator and the current assignee. This feature
allows you to add an address to the list of recipients.
o
6.1.7.
Enter the complete email address of each additional recipient into the Send Additional
Notifications To field. Separate multiple addresses with a comma and no spaces or
manual returns.
File Attachments
This feature allows you to attach any file that is saved on your PC or local network to the work
order record. The system allows a file to be attached to each follow-up to a work order.
o
Click on the Browse button to locate and select a file from your PC or local network.
o
Enter a brief title or summary into the File Description field to identify the attachment.
Click on the Zoom button to view the entire field.
o
Click on the Submit button to save the FollowFollow-up and any attached files.
Page 20/21
Work Order System User Manual
Index
Index
M
Main Menu · 6
A
N
Accepted · 19
Add More Information · 17
Also Notify Updates To · 14
Navigation Menu · 6
Not Accepted · 19
B
O
Back · 6
Browse · 15
On Behalf Of · 14
C
P
Cancel · 18
Change Request · 13
Complete · 18, 19
Create Followup · 16
Create New Work Order · 12
Password · 6
Pending · 18, 19
Problem Ticket · 13
D
Re-assign · 18
Refresh · 6
Requested By · 14
Requested Completion Date · 14
Required Fields · 13
Review a Work Order · 9, 11
Review all Work Orders · 8
R
Description · 14
F
File Attachments · 15
File Description · 20
S
General Request · 13
Search Field · 10
Send Additional Email Notifications · 20
Sort Work Orders · 8
Submit · 7, 15
I
T
Initially Assigned To · 14
Introduction · 5
Title · 14
G
U
J
Username · 6
Jump To · 10
W
L
Welcome Screen · 6
Work Order (WO) Number · 13
Work Order Type · 13
List All · 11
Login · 5
Logout · 6
Page 21/21