1
User Manual: Advanced Topics
aspMENU.net User Manual
TABLE OF CONTENTS
Advanced Topics ................................................................................................3
Overview........................................................................................................3
How do I use server side events?..................................................................3
Step 1: Set the Postback property...................................................................................3
Step 2: Setup the MenuItems you want to postback ........................................................3
Step 3: Create the event handler.....................................................................................4
Step 4: Run the web application......................................................................................5
How do I setup permissions?.........................................................................5
Step 1: Set the EnableAccessControlList property...........................................................5
Step 2: Set the SessionName property............................................................................5
Step 3: Specify access rights for MenuItems and MenuGroups .......................................6
Step 4: Set the user group for the current user ................................................................6
Step 5: Run the web application......................................................................................7
How do I setup effects for my menu? ............................................................7
Step 1: Set the ExpandEffect property.............................................................................7
Step 2: Set the EffectDuration property ...........................................................................7
Step 3: Run the web application......................................................................................8
How do I setup scrolling on my menu? ..........................................................8
Step 1: Set the Scrollable property ..................................................................................8
Step 2: Set the VisibleHeight property .............................................................................8
Step 3: Run the web application......................................................................................8
How do I make use of images in my menu? ..................................................9
Step 1: Create an images folder......................................................................................9
Step 2: Set the ImagesURL property............................................................................. 10
Step 3: Add your images to the images folder ............................................................... 10
Step 4: Set the image properties ................................................................................... 10
Step 5: Setup individual images for MenuItems ............................................................. 11
Step 6: Run the web application.................................................................................... 11
Page 2 of 11
aspMENU.net User Manual
ADVANCED TOPICS
Overview
This section explains how to use some of the more advanced features of
aspMENU.net. Some of these features include:
•
Server side events.
•
Permissions.
•
Effects.
•
Scrolling.
•
Images.
This section assumes that you have already added an instance of aspMENU.net
to your web form as described in the Initial Setup section. It also assumes that
you have already setup the content and style of your menu as explained in the
Specifying Content and the Specifying Style sections.
How do I use server side events?
Step 1: Set the Postback property
Navigate to the Postback property in the property grid and set it to True.
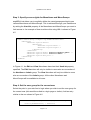
Step 2: Setup the MenuItems you want to postback
aspMENU.net allows you to select the MenuItems you want to cause a postback.
This is achieved by setting the Href property of these MenuItems to “PostBack”
through your DataSource. An example of how to achieve this using XML is
shown in Figure 4.1.
Page 3 of 11
aspMENU.net User Manual
<?xml version="1.0" encoding="utf-8" ?>
<ASPMenu xmlns="http://tempuri.org/ASPMenuSchema.xsd">
<MenuGroup>
<MenuItem Caption="File" Href="PostBack">
<MenuGroup>
<MenuItem Caption="New" Href="PostBack" />
<MenuItem Caption="Open" />
</MenuGroup>
</MenuItem>
<MenuItem Caption="Edit" />
<MenuItem Caption="View" Href="PostBack" />
<MenuItem Caption="Project" />
</MenuGroup>
</ASPMenu>
Figure 4.1
In Figure 4.1, the File, New and View MenuItems have had their Href property
set to “PostBack”. This will cause these MenuItems to cause a postback when
they are clicked on.
Step 3: Create the event handler
Select the instance of aspMENU.net on your web form and double click on it.
This will create a method to handle the OnClick event generated by your menu.
This should add some code to the code behind the page for your web form
similar to that displayed in Figure 4.2.
private void ASPMenu2_Click(object sender, WebActive.ASPMenu.ASPMenuEventArgs e)
{
}
Figure 4.2
Now you can add some code to the event handler.
WebActive.ASPMenu.ASPMenuEventArgs supplies you with both the
ClickedItemCaption and the ClickedItemID. You can use this information as
you see fit. The example shown in Figure 4.3 contains the code to show the
caption of the MenuItem that was clicked on in a text box.
Page 4 of 11
aspMENU.net User Manual
private void ASPMenu2_Click(object sender, WebActive.ASPMenu.ASPMenuEventArgs e)
{
TextBox1.Text = e.ClickedItemCaption;
}
Figure 4.3
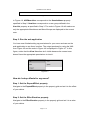
Step 4: Run the web application
You have now finished setting up server side events for your menu and can run
the web application to see them in action. The output produced by using the XML
from Figure 4.1 and the code in Figure 4.3 is displayed in Figure 4.4. In this
Figure the View MenuItem has been clicked on.
Figure 4.4
How do I setup permissions?
Step 1: Set the EnableAccessControlList property
Navigate to the EnableAccessControlList property in the property grid and set it
to True.
Step 2: Set the SessionName property
Navigate to the SessionName property in the property grid and set it to a value
of your choice. This property specifies the session variable name that holds the
current user’s group.
Page 5 of 11
aspMENU.net User Manual
Step 3: Specify access rights for MenuItems and MenuGroups
aspMENU.net allows you to explicitly define the users/groups permitted to see
various MenuItems and MenuGroups. This is achieved through your DataSource
by setting the UserList property of the MenuItems and MenuGroups you want to
limit access to. An example of how to achieve this using XML is shown in Figure
4.5.
<?xml version="1.0" encoding="utf-8" ?>
<ASPMenu xmlns="http://tempuri.org/ASPMenuSchema.xsd">
<MenuGroup>
<MenuItem Caption="File">
<MenuGroup>
<MenuItem Caption="New" />
<MenuItem Caption="Open" />
</MenuGroup>
</MenuItem>
<MenuItem Caption="Edit" UserList="NewUser;Admin" />
<MenuItem Caption="View" UserList="Admin" />
<MenuItem Caption="Project" />
</MenuGroup>
</ASPMenu>
Figure 4.5
In Figure 4.1, the Edit and View MenuItems have had their UserList property
specified. The Edit MenuItem will only be visible to users who are a member of
the NewUser or Admin group. The View MenuItem will only be visible to users
who are a member of the Admin group. All the other MenuItems and
MenuGroups will be available to all users.
Step 4: Set the user group for the current user
Select the point in your web form’s logic where you wish to set the user group for
the current user (this would be suited to a login page or similar). Add an entry
similar to the one shown in Figure 4.6.
private void Page_Load(object sender, System.EventArgs e)
{
Session["ASPMenuUser"] = "NewUser";
Page 6 of 11
aspMENU.net User Manual
}
Figure 4.6
In Figure 4.6, ASPMenuUser corresponds to the SessionName property
specified in Step 2. NewUser corresponds to a user group defined in the
UserList property as specified in Step 3. The code in Figure 4.6 will make sure
only the appropriate MenuItems and MenuGroups are displayed to the current
user.
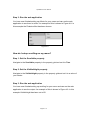
Step 5: Run the web application
You have now finished setting up permissions for your menu and can run the
web application to see them in action. The output produced by using the XML
from Figure 4.5 and the code in Figure 4.6 is displayed in Figure 4.7. In this
figure, notice that the View MenuItem isn’t visible because the current user
doesn’t have the appropriate permissions to view it.
Figure 4.7
How do I setup effects for my menu?
Step 1: Set the ExpandEffect property
Navigate to the ExpandEffect property in the property grid and set it to the effect
of your choice.
Step 2: Set the EffectDuration property
Navigate to the EffectDuration property in the property grid and set it to a value
of your choice.
Page 7 of 11
aspMENU.net User Manual
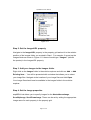
Step 3: Run the web application
You have now finished setting up effects for your menu and can run the web
application to see them in action. An example of this is shown in Figure 4.8. In
this example the Pixelate effect has been chosen.
Figure 4.8
How do I setup scrolling on my menu?
Step 1: Set the Scrollable property
Navigate to the Scrollable property in the property grid and set it to True.
Step 2: Set the VisibleHeight property
Navigate to the VisibleHeight property in the property grid and set it to a value of
your choice.
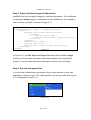
Step 3: Run the web application
You have now finished setting up scrolling for your menu and can run the web
application to see the output. An example of this is shown in Figure 4.9. In this
example VisibleHeight has been set to 50.
Page 8 of 11
aspMENU.net User Manual
Figure 4.9
How do I make use of images in my menu?
Step 1: Create an images folder
Select your web application project from the solution explorer window. This is
shown in Figure 4.10.
Figure 4.10
Click on Project g New Folder from the top menu. A new folder will be added to
the solution explorer and you can now type in a name for your folder. We suggest
that you call it images. The solution explorer should now look similar to the one
displayed in Figure 4.11.
Page 9 of 11
aspMENU.net User Manual
Figure 4.11
Step 2: Set the ImagesURL property
Navigate to the ImagesURL property in the property grid and set it to the relative
position of the images folder you created in Step 1. For example, if we set up the
images folder as shown in Figure 4.11 then we would type “images/” (without
the quotes) in the ImagesURL property.
Step 3: Add your images to the images folder
Right click on the images folder in the solution explorer and click on Add g Add
Existing Item…. You will be presented with a window that allows you to select
your image files. Navigate to the location of your image files and click Open.
Your image files should now be available in the images folder in the solution
explorer.
Step 4: Set the image properties
aspMENU.net allows you to specify images for the NestedArrowImage,
ScrollUpImage, ScrollDownImage. These can be set by writing the appropriate
image name for each property in the property grid.
Page 10 of 11
aspMENU.net User Manual
Step 5: Setup individual images for MenuItems
aspMENU.net lets you specify images for individual MenuItems. This is achieved
by setting the Image property of MenuItems in your DataSource. An example of
how to do this using XML is shown in Figure 4.11.
<?xml version="1.0" encoding="utf-8" ?>
<ASPMenu xmlns="http://tempuri.org/ASPMenuSchema.xsd">
<MenuGroup>
<MenuItem Caption="File" Image="sound.gif">
<MenuGroup>
<MenuItem Caption="New" />
<MenuItem Caption="Open" Image="printer.gif" />
</MenuGroup>
</MenuItem>
<MenuItem Caption="Edit" />
<MenuItem Caption="View" />
<MenuItem Caption="Project" Image="envelope.gif" />
</MenuGroup>
</ASPMenu>
Figure 4.11
In Figure 4.11, the File, Open and Project MenuItems have had their Image
property set to an image contained in the folder specified in the ImagesURL
property. This will cause these three MenuItems to have a left icon image.
Step 6: Run the web application
You have now finished setting up images for your menu and can run the web
application to see the output. The output produced by using the XML from Figure
4.11 is displayed in Figure 4.12.
Figure 4.12
Page 11 of 11