1
User Manual: Specifying Content
aspMENU.net User Manual
TABLE OF CONTENTS
Specifying Content .............................................................................................3
Overview........................................................................................................3
How do I setup menu content through a new XML file?.................................3
Step 1: Set the DataSource property...............................................................................3
Step 2: Create a new XML File........................................................................................3
Step 3: Add the ASPMenu schema .................................................................................4
Step 4: Specify the target schema in the XML file............................................................5
Step 5: Specify menu content .........................................................................................6
Step 6: Set the XmlFile property......................................................................................7
Step 7: Run the web application......................................................................................7
How do I setup menu content through an existing XML file? .........................7
Step 1: Set the DataSource property...............................................................................7
Step 2: Add an existing XML File ....................................................................................8
Step 3: Set the XmlFile property......................................................................................8
Step 4: Run the web application......................................................................................8
How do I setup menu content programmatically? ..........................................8
Step 1: Set the DataSource property...............................................................................8
Step 2: Add a reference to the WebActive namespace ....................................................8
Step 3: Build the menu programmatically ........................................................................9
Step 4: Run the web application.................................................................................... 10
How do I setup menu content through a database connection? ..................10
Step 1: Set the DataSource property............................................................................. 10
Step 2: Create your database ....................................................................................... 10
Step 3: Add database file to your web application (Ignore this step if your database is
available on an external server) .................................................................................... 12
Step 4: Define the connection string.............................................................................. 12
Step 5: Run the web application.................................................................................... 13
Page 2 of 13
aspMENU.net User Manual
SPECIFYING CONTENT
Overview
This section explains how to setup the content of your menu. aspMENU.net
allows you to set up your menu’s content through an XML file, through a
database connection or programmatically. This section assumes that you have
already added an instance of aspMENU.net to your web form as described in the
Initial Setup section.
How do I setup menu content through a new XML file?
Step 1: Set the DataSource property
Navigate to the DataSource property in the property grid and set it to XML.
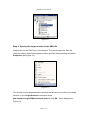
Step 2: Create a new XML File
Click on File g Add New Item… from the top menu. A window similar to the one
shown in Figure 2.1 should be displayed to you.
Page 3 of 13
aspMENU.net User Manual
Figure 2.1
Select the XML File icon, type in a Name and click Open. A new XML file has
now be added to your project.
Step 3: Add the ASPMenu schema
Click on File g Add Existing Item… from the top menu. You will be presented
with a window that allows you to select the ASPMenuSchema.xsd file. Navigate
to the location where you installed aspMENU.net (by default, aspMENU.net will
be installed in C:\Program Files\WebActive Corporation\ASPMenu.NET\), select
the ASPMenuSchema.xsd file and click Open. The ASPMenuSchema.xsd file
should now be available in the solution explorer as displayed in Figure 2.2.
Page 4 of 13
aspMENU.net User Manual
Figure 2.2
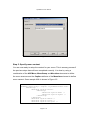
Step 4: Specify the target schema in the XML file
Double click on the XML file you just created. This should open the XML file
ready for editing. Right click anywhere within the XML editing window and select
Properties (see Figure 2.3).
Figure 2.3
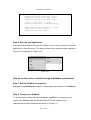
You should now be presented with a window that allows you to select your target
schema. In the Target Schema combo box select
http://tempuri.org/ASPMenuSchema.xsd and click OK. This is displayed in
Figure 2.4.
Page 5 of 13
aspMENU.net User Manual
Figure 2.4
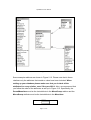
Step 5: Specify menu content
You are now ready to setup the content for your menu. This is an easy process if
the previous steps have all been completed correctly. It is done by using a
combination of the ASPMenu, MenuGroup and MenuItem elements to define
the menu structure and the Caption attribute of the MenuItem element to define
menu content. Some sample XML is shown in Figure 2.5.
<?xml version="1.0" encoding="utf-8" ?>
<ASPMenu xmlns="http://tempuri.org/ASPMenuSchema.xsd">
<MenuGroup>
<MenuItem Caption="File">
<MenuGroup>
<MenuItem Caption="New" />
<MenuItem Caption="Open" />
</MenuGroup>
</MenuItem>
<MenuItem Caption="Edit" />
<MenuItem Caption="View" />
<MenuItem Caption="Project" />
Page 6 of 13
aspMENU.net User Manual
</MenuGroup>
</ASPMenu>
Figure 2.5
Step 6: Set the XmlFile property
Navigate to the XmlFile property in the property grid and set it to the relative
location of the XML file you just created and edited. For example, if you called
your XML file “myxml.xml” and placed it in the root directory of the web
application then you would type “myxml.xml” (without the quotes) in the XmlFile
property.
Step 7: Run the web application
You have now finished setting up the content of your menu and can run the web
application to view the menu. The output produced by using the XML supplied in
Figure 2.5 is displayed in Figure 2.6.
Figure 2.6
How do I setup menu content through an existing XML file?
Step 1: Set the DataSource property
Navigate to the DataSource property in the property grid and set it to XML.
Page 7 of 13
aspMENU.net User Manual
Step 2: Add an existing XML File
Click on File g Add Existing Item… from the top menu. You will be presented
with a window that allows you to select your XML file. Navigate to the location of
your XML file and click Open. Your XML file should now be available in the
solution explorer.
Step 3: Set the XmlFile property
Navigate to the XmlFile property in the property grid and set it to the relative
location of your XML file. For example, if you XML file is called “myxml.xml” and it
is located in the root directory of the web application then you would type
“myxml.xml” (without the quotes) in the XmlFile property.
Step 4: Run the web application
You have now finished setting up the content of your menu and can run the web
application to view the menu.
How do I setup menu content programmatically?
Step 1: Set the DataSource property
Navigate to the DataSource property in the property grid and set it to
Programmatic.
Step 2: Add a reference to the WebActive namespace
Go to the code behind the page for your web form and add a reference to the
WebActive namespace. This is achieved by adding “using
WebActive.ASPMenu” (without the quotes) to the top of your web forms logic.
An example of this is shown in Figure 2.8.
Page 8 of 13
aspMENU.net User Manual
using System;
...
using WebActive.ASPMenu;
namespace Tutorial
{
public class WebForm1 : System.Web.UI.Page
{
...
}
}
Figure 2.8
Step 3: Build the menu programmatically
You are now ready to build your menu programmatically. To achieve this
navigate to the section of your code where you want to create the menu
(probably the Page_Load event). Now you can start defining your menu’s
content by creating MenuItems and adding them to MenuGroups. Figure 2.9
shows an example of how to achieve this.
...
protected WebActive.ASPMenu.ASPMenu ASPMenu1;
private void Page_Load(object sender, System.EventArgs e)
{
//Create the RootGroup for the menu
ASPMenu1.RootGroup = new MenuGroup( ASPMenu1 );
//Create the MenuItems
MenuItem item1 = new MenuItem( ASPMenu1 );
item1.Caption = "File";
MenuItem item2 = new MenuItem( ASPMenu1 );
item2.Caption = "Edit";
MenuItem item3 = new MenuItem( ASPMenu1 );
item3.Caption = "View";
MenuItem item4 = new MenuItem( ASPMenu1 );
item4.Caption = "Project";
MenuItem item5 = new MenuItem( ASPMenu1 );
item5.Caption = "New";
MenuItem item6 = new MenuItem( ASPMenu1 );
item6.Caption = "Open";
//Add items to the RootGroup
Page 9 of 13
aspMENU.net User Manual
ASPMenu1.RootGroup.Items.Add(
ASPMenu1.RootGroup.Items.Add(
ASPMenu1.RootGroup.Items.Add(
ASPMenu1.RootGroup.Items.Add(
item1
item2
item3
item4
);
);
);
);
//Make a child group for item1
MenuGroup subgroup1 = item1.MakeGroup();
//Add items to the childgroup of Item1
subgroup1.Items.Add( item5 );
subgroup1.Items.Add( item6 );
}
...
Figure 2.9
Step 4: Run the web application
You have now finished setting up the content of your menu and can run the web
application to view the menu. The output produced by using the code supplied in
Figure 2.9 is displayed in Figure 2.10.
Figure 2.10
How do I setup menu content through a database connection?
Step 1: Set the DataSource property
Navigate to the DataSource property in the property grid and set it to Database.
Step 2: Create your database
To specify menu content through a database, aspMENU.net requires you to
create your database with predefined relations. These relations, their
relationships and their attributes are shown in Figure 2.11.
Page 10 of 13
aspMENU.net User Manual
Figure 2.11
Some example relations are shown in Figure 2.12. Please note that in these
relations only the attributes that contain a value have been included. When
setting up your database please make sure that you include all the
attributes for every relation, even if they are NULL. Also, we recommend that
you follow the order of the attributes as set up in Figure 2.12. Specifically, the
ParentMenuItem must be the last attribute in the MenuGroup relation and the
MenuGroup attribute must be the last attribute in the MenuItem.
ASPMenu
ASPMenu
Page 11 of 13
aspMENU.net User Manual
ASPMenu
MenuItem
MenuItem
MenuItem
MenuItem2
MenuItem3
MenuItem4
MenuItem5
MenuItem6
Caption
File
Edit
View
Project
New
Open
MenuGroup
RootGroup
RootGroup
RootGroup
RootGroup
Item1Group
Item1Group
MenuGroup
MenuGroup ParentMenuItem
RootGroup
Item1Group MenuItem
Figure 2.12
Step 3: Add database file to your web application (Ignore this step if
your database is available on an external server)
Click on File g Add Existing Item… from the top menu. You will be presented
with a window that allows you to select your database file. Navigate to the
location of your database file and click Open. Your database file should now be
available in the solution explorer.
Step 4: Define the connection string
You now have to define the connection string for your database. To achieve this
navigate to the section of your code where you want to connect to the database
(probably the Page_Load event) and define the DatabaseConnectionString
property of your menu. Figure 2.13 shows an example of how to do this for a
MSAccess database. Note, the connection string using in this Figure is only
appropriate for MSAccess databases.
Page 12 of 13
aspMENU.net User Manual
protected WebActive.ASPMenu.ASPMenu ASPMenu1;
private void Page_Load(object sender, System.EventArgs e)
{
ASPMenu1.DatabaseConnectionString = "Provider =
Microsoft.JET.OLEDB.4.0;DataSource=" + Server.MapPath(
"aspmenu.mdb" );
}
Figure 2.13
Step 5: Run the web application
You have now finished setting up the content of your menu and can run the web
application to view the menu. The output produced by using the relations
supplied in Figure 2.12 is displayed in Figure 2.14.
Figure 2.14
Page 13 of 13