1
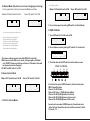
User Manual
Professional Entertainment Equipment
Features
Multi-Colors
Color Strobe
Electronic Dimming 0-100%
Built in Microphone
DMX-512 Control
Auto/Master&Slave synchronization
Multi-channel mode
Dip switch to choose menu
General Instructions
To optimize the performance of this product, please read these operating
instructions carefully to familiarize you with the basic operations of this
unit. These instructions contain important safety information regarding
the use and maintenance of this unit. Please keep this manual with the
unit, for future reference.
Unpacking:
Thank you for purchasing the RGBPAR64-03. Every RGBPAR64-03 has
been thoroughly tested and has been shipped in perfect operating
condition. Carefully check the shipping carton for damage that may
have occurred during shipping. If the carton appears to be damaged,
carefully inspect your fixture for any damage and be sure all accessories
necessary to operate the unit has arrived intact. In the case damage has
been found or parts are missing, please contact the manufacturer or
your dealer for further instructions. Do not return this unit to your dealer
without first contacting.
Introduction:
The RGBPAR64-03 is a DMX Control PAR light. This LED PAR is light
weight and compact which makes it a great piece for mobile DJ's and
clubs. This unit can be used as a stand alone, or a sound-active mode.
The unit can also be controlled via DMX controller.
Caution!
There are no user serviceable parts inside this unit. Do not
attempt any repairs yourself; doing so will void your manufactures
warranty. In the unlikely event your unit may require service please
contact the manufacturer or your dealer.
Specifications
Model:
Voltage:
Power consumption:
Colors:
LED:
Gross Weight:
Dimensions:
Fuse:
DMX:
Working position:
LED-PAR64-10183-RGB
110V / 60Hz
30W
RGB Color Mixing
Red 60 x 10mm; Green 63 x 10mm;
Blue 60 x 10mm
2.3Kgs
230(H) x 230(W) x 180(L) mm
2A
5 DMX Channel
Any safe Secure Position
Please recycle the shipping carton when ever possible.
Cleaning
Due to fog residue, smoke, and dust cleaning the internal and external
optical lenses must be carried out periodically to optimize light output.
1.Use normal glass cleaner and a soft cloth to wipe down the outside
casing.
2.Clean the external optics with glass cleaner and a soft cloth every 20
days.
3.Always be sure to dry all parts completely before plugging the unit
back in.
Cleaning frequency depends on the environment in which the fixture
operates (i.e. smoke, fog residue, dust, dew).
Trouble Shooting
Listed below are a few common problems the user may encounter, with
solutions.
Unit not responding to DMX:
1.Check that the DMX cables are connected properly and are wired
correctly (pin 3 is hot; on some other DMX devices pin 2 may be
'hot'). Also, check that all cables are connected to the right
connectors; it does matter which way the inputs and outputs are
connected.
Unit does not respond to sound:
1.Quiet or high pitched sounds will not activate the unit. If problems
are not resolved, contact your dealer for service.
Safety Precautions
Be sure that the local power outlet match that of the required voltage for
your unit.
Do not attempt to operate this unit if the power cord has been frayed or
broken. Do not attempt to remove or break off the ground prong from the
electrical cord. This prong is used to reduce the risk of electrical shock
and fire in case of an internal short.
Disconnect from main power before making any type of connection.
Do not remove the cover under any conditions. There are no user
serviceable parts inside.
Never operate this unit when it's cover is removed.
Never plug this unit in to a dimmer pack.
Always be sure to mount this unit in an area that will allow proper
ventilation.
Allow about 6 inch (15cm) between this device and a wall.
Do not attempt to operate this unit, if it becomes damaged.
During long periods of non-use, disconnect the unit's main power.
Always mount this unit in safe and stable matter.
Power-supply cords should be routed so that they are not likely to be
walked on or pinched by items placed upon or against them, paying
particular attention to the point they exit from the unit.
Cleaning -The fixture should be cleaned only as recommended by the
manufacturer. See Cleaning for details.
Heat -The appliance should be situated away from heat sources such as
radiators, heat registers, stoves, or other appliances (including amp
lifiers) that produce heat.
The fixture should be serviced by qualified service personnel when:
A. The power-supply cord or the plug has been damaged.
B. Objects have fallen, or liquid has been spilling to the appliance.
C. The appliance has been exposed to rain or water.
D. The appliance does not appear to operate normally or exhibits a
marked change in performance.
Set Up
Power Supply: Before plugging your unit in, be sure the source voltage
in your area matches the required voltage for your RGBPAR64-03-183.
The RGBPAR64-03-183 is available in a 110v to 250v version. Because
line voltage may vary from venue to venue, you should be sure your unit
voltage matches the wall outlet voltage before attempting to operate
you fixture.
A. Manual Mode (fixed color, w/o color changing w/o chasing)
1. Link up more than 2 units or more and set Master and Slave
Master: DIP switch 9 and 5 at ON
1.To set Master and Slave
Master: DIP switch 9 and 5 at ON.
Slave: DIP switch 10 at ON
Slave: DIP switch 10 at ON
2. To set chase speed by setting DIP switch 1-6 of the Master
D. DMX-512 Mode
2. To set color by setting dip switches of Master unit:
1. To set DIP switch 10 of all units at ON.
DIP 1 ON: Red LED at medium brightness;
DIP 2 ON: Red LED at high brightness;
DIP 3 ON: Green LED at medium brightness;
DIP 4 ON: Green LED at high brightness;
DIP 5 ON: Blue LED at medium brightness;
DIP 6 ON: Blue LED at high brightness;
2. To set address code by setting DIP switch 1-9 of each unit.
¡The above settings cannot work with DMX-512 controller.
¡When two or more LEDs are in serial, settings applies to Master
only. DO NOT make any settings on Slaves. Otherwise, there will
be unexpected color changing.
¡DO NOT set DIP switch 7 at ON.
3. The total value of the DIP switches is the address code.
DMX CHANNEL
2
32
8
128
SP
B. Sound-active Mode
Master: DIP switch 8 and 5 at ON
Slave: DIP switch 10 at ON
NO
1
1
C. Built-in Chases Mode
2
3
4
4
5
16
6
7
64
8
9
10
256
4. Each unit occupies 5 DMX channels, functions as below:
DMX ChannelFunction
Channel 10-255 Strobe
Channel 20 Close 1-255 Brightness Adjust
Channel 30-255 (R) Brightness of red color
Channel 40-255 (G) Brightness of green color
Channel 50-255 (B) Brightness of blue color
As each units occupies 5 DMX channels, the address code
of the first unit should be set as 0; and the second as 5; third,
10; fourth, 15.....