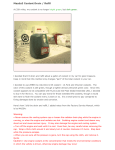
1
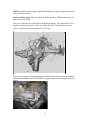
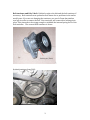
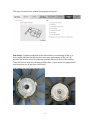
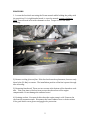
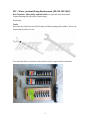
DIY – Water (coolant) Pump Replacement (ML320, MY 2002) Belt Tensioner, Idler pulley and Fan clutch are optional items that can be replaced during this procedure (if necessary) by Merzatt Tools: Mercedes fan clutch nut wrench (36 mm) and Water pump pulley holder. These can be purchased online as a set. Torx external driver, torx driver bits, hex bit socket, torque wrench, extension. 1 Fluid: Zerex G05 or MB coolant (1 gal), distilled water (1 gal), plastic drain pan to collect the old coolant. Water (coolant) pump. Buy from dealer or online retailers. OEM manufacturers are said to be Graf or Saleri. There are 3 different size of torx bolts with different lengths. You will need E10, E12 and E14 external torx drivers. E10’s are 10 Nm, E12 are 25 Nm and E14 (4i in the picture) is the bolt for alternator and is set to 42 Nm. There are two types of water pumps; one with the oil cooler line and one without. This demonstration is on a ML320 (M112 engine), which is not equipped with oil cooler. 2 Belt tensioner and Poly V-‐belt. Definitely replace the belt and the belt tensioner if necessary. Belt tensioner was updated several times due to problems in the earlier model years. If you are not changing the tensioner, you need a 5 mm dm stainless steel pin in order to remove the belt. New tensioner will come with a locking pin in place. This pin needs to be strong enough to withhold the internal spring force of the belt tensioner. The current OEM tensioner is Litens. \ Original tensioner from 2002. 3 This page is from the user manual showing the belt layout. Fan clutch. A common symptom of fan clutch failure is overheating at idle or in heavy traffic. Bad fan clutches can also cause poor performance of the car's AC because the fan also cools the condenser, which is directly in front of the radiator. There will be less need for activating auxillary fans. If your model is equipped with an electric fan, you do not have a fan clutch. Left (engine side) and right (radiator side) 4 PROCEDURE: 1. Loosen the fan clutch nut using the 36 mm wrench while holding the pulley with the special tool. It is right handed tread, i.e. turn the wrench counter-‐clockwise (left). You will need to hit with a hammer at first. Torque it to 45 Nm when installing. 2.) Remove cooling (viscous) fan. If the fan clutch needs replacement, there are only three bolts (10 Nm) to remove. The installation position of the fan is preset through ribs at fan ring. 3.) Removing fan shroud. There are two screws at the bottom of the shroud on each side. Take your time to find out how to steer the shroud out of the engine compartment. Do not damage the radiator hoses! 4.) Draining coolant. You must do this when the engine temp is cold. Remove the cap from the expansion tank. Disconnect the lower radiator hose to drain coolant. It is a good idea to wear gloves and goggles for protection. 5 5.) Locking the belt tensioner. While turning the bolt (16 mm) of the belt tensioner counter-‐clockwise with one hand, insert the (5 mm diameter) locking pin to lock it. You should do this from below, under the engine. If you reach from above, it is easer to turn the nut but you will not see the pinhole. Remove the serpentine belt (and replace if necessary). Replace the tensioner (optional): There are two bolts for the tensioner (25 Nm) 6.) Remove the belt pulley of the coolant pump. 4 bolts (10 Nm). 6 7.) Disconnect two hoses from the pump. Marks on the hoses will help you during installation. The old pump was leaking (yellowish brown fluid) from the bleed hole. 8.) Remove the dust cover using a small screwdriver. Remove the idler (guide) pulley from the pump. Remove the large bolt (torque is 20 Nm). Replace pulley if necessary. 7 9.) Moving the coolant temp sensor out of the way. Unplug the cable and carefully turn the sensor clockwise to at least 11:00 position. It is getting in the way when removing & installing the pump. 10.) Remove the bracket bolted to the coolant pump. 8 11.) Remove all the bolts. These have different length and size; so do not forget where you removed it. Torx values change with the size of the bolts. Remove the old pump. 9 Here it is without the pump. 12.) You will see tiny pieces of the gasket stuck to the surface, not to mention the accumulated dust. Clean it thoroughly to prevent leaks. Graf pump came with two gaskets. Use the flat gasket (same as the original). 10 13.) Installing the new pump. Brush the bolts and cover it with a zinc based anti-‐ seize compound. (Thanks to 43sqd for this tip) E10 = 10 Nm E12 = 25 Nm E14 = 42 Nm (alternator) 11 14.) Install everything in reverse order. Inspect the hose that runs from to the auxiliary coolant pump and make sure it is free from the fan or alternator which will obviously damage the hose. Note the position of the white mark before and after the procedure. 15.) Refill coolant. Mix equal amount of coolant and distilled water to refill the system. Run the engine with the cap off and bleed the air from the engine, check the level and replace as necessary. Keep the AC in full heating setting during this. Replace the cap of the expansion tank. Check the fluid level and hoses for leak after a drive. Remember that it is important to properly dispose the coolant. Rules may be different in each state. Call your local hazardous waste and recycling agency for information. -‐-‐-‐-‐-‐-‐-‐-‐-‐-‐-‐-‐-‐-‐-‐-‐-‐-‐-‐-‐ Check youtube for the videos. 12