1
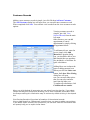
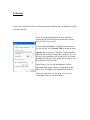
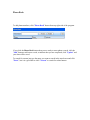
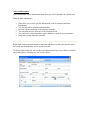
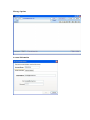
The Technician Database Pro software User Manual
Revision 6/2010
This is the basic help manual for The Technician Database Pro 1.2b
Version 1.2c comes with Local networking and a more detailed manual.
Copyright 2008 2010
Rentronics Services
Copyright, License and Disclaimer Notice
The copyright and trade mark rights over the software, name, style, design,
logo and the documentation etc are reserved.
The terms of license to this software and documentation are given
separately.
Your use of the software and documentation implies your consent to the
terms.
Any violation thereof would nullify all your rights on the software and
documentation.
You may not modify, reproduce, transfer or distribute the software or the
documentation in whole or in part in any manner except as expressly
provided in the terms without first obtaining the written permission of
Rentronics Services.
Rentronics Services believes that the information contained in the
documentation is correct.
Rentronics Services reserves the right to revise and make changes to the
software without having to notify any person about such changes.
There may also be variations in the software, the manual and documentation
because of changes to the program or other reasons.
Welcome to The Technician Database Pro
Thank you for choosing The Technician Database Pro software.
This software enable users to maximizes their ability at the office, industries, repair
shop or even at home.
This is a full-featured, stand-alone, complete
technician's tool, which includes all that's
necessary to run your business. There is no
grate need to know about setting up this
software because it is simple to use.
The Technician Database Pro has gone well
beyond trying to create a complete
technician's tool with accounting features that
will make working with customer information
easy. It also offers a suite of powerful and
comprehensive database tools for any
technician's solutions.
This software is comprehensive, innovative,
user-friendly, powerful yet affordable which
will fit into any technician's business big or
small.
It was designed taking into consideration the
end user's perspective, this enables
technician's to maximize maintenance and
profits in their area of work.
Remember to email us to get your updated
download link
All our new versions after 2009 are standard, meaning when ever we develop a newer
version with added features your old database table will continue working without having
to re-enter your old data.
How this is this accomplish? This is accomplish because we already incorporated
advanced features into the main database table so your database table structure
remains the same even after you restored your backup files.
Click on any help topic on the left to view more information about this software.
The Technician Database Pro Table of Contents
PDF viewers note: These page numbers refer to the printed version of this document.
Use the Adobe bookmark tabs to specific sections.
The Technician Database Pro Introduction…………………………..
Preface……………………………………………………………………
Getting Started…………..…………………………………………
Customer Records………………………………………………….
Common Defects……………………………………………………
Diagram Viewer……………………………………………………..
Stock Inventory……………………………………………………..
To Do List………………………………………………………………..
Phone Book…………………………………………………………….
Sales………………………………………………………………………..
Purchase………………………………………………………………….
Word Processor……………………………………………………….
Backup and Restore………………………………………………..
Administrator…………………………………………………………..
Email Composer………………………………………………………
Printing……………………………………………………………………
Snap Options…………………………………………………………..
Internet Browser……………………………………………………..
Preface
To survive as a technician in today's world you require tools that will help you to have
critical information at your fingertips.
Welcome to: The Technician Database Pro.
Our software is simple, yet a powerful tool with versatile maintenance features and
accounting.
This software offers you a unique combination, great features and amazing simplicity of
use.
When using our application you can quickly process information
efficiently, managing repairs and components purchase. The
application can also monitor inventory levels, track schedules and
preparing financial information.
The application comprises some of the following modules:
Accounting - providing financial information
Backup and Restore - keeping your data safe
Common Defects - track common defects you encounter
Components Information - track components information
Diagram Viewer - view diagrams and save the links
Customers Records - Complete management of customers records
Phone Book - keeping important information
Purchase - track purchasing
Sales - track all your sales
Schedules - track customer's schedules
To Do List - track information you want to remember
You can also generate Monthly, Yearly Tax information and statements
instantly.
Getting Started
First step to start working with The Technician Database Pro is to setup your company profile but
you must have the software installed and running.
Go to the main menu top left and click (File), now click (Administrator Login)
Note: if you are the administrator, boss or manager then you must enter your password, if no
password was entered then you will be ask to do so.
After setting up your password is completed you should be able to now setup your company
preferences.
Using your password is simple but you must be the administrator or the manager to use such
options as this is the security for the database.
Enter the correct password and you will be able to access all the options necessary.
If you forget your password and can’t remember please contact the author or check your
installation CD for more information.
Note: remember to enter this information correctly because this is the information that will be
shown on all your records and printed forms.
Organization Profile
Tax Information
Printer Settings
Access-Privileges
After you entered your company profile you can now click on the company logo to insert your
new company logo.
The picture size should be about 200 X 200 or squared in size, at this stage you can preview the
picture file in the open picture dialog box.
This picture together with your profile will be used true-out the processing of your records.
Tax Information is simple, just enter your tax registration number and adjust the tax percentage
up-down arrows to meet your country or state tax rates. Enter your company registration number,
this information will not be shown on your customer's records, this is for personal use and in the
event you cannot remember such information.
Printer Setup will allow you to setup your printer and fax services, again this is simple by just
clicking the printer and faxes button and select your devices. Now enter your print header and
footer details, this information will be shown on your printed information.
Access-Privilege options, this is the security level of the database.
The Allow Options will allow or not allow the selected functions, when you click in the boxes on
the left section of the Allow Options you can set if you want files deleted or not, allow schedules
to be checked or not, allow backup or web browsing or not allow access and more.
Customer Records
Adding a new customer records is simple, just click file then Add new Customer.
The Add Customer dialog box will open, now you can add a new customer record.
When completed click Save. You can later view records from the view customer records
options.
Viewing customer records is
simples, just click View
Selected Record from the main
left menu.
Other features, you can add
appointment or cancel
appointment by simply clicking
set appointment date.
To add material cost, enter the
cost or simply click Add
Material to open the dialog
box, you should be able to now
add material that you purchase
also included is a calculator for
quick calculations.
Adding labor cost is almost the
same as adding material cost.
When you click the Labor cost
button, the Labor Price Listing
dialog box will open
now you can enter labor prices
that you can select and auto
insert into the labor cost.
To update all calculations, click
Calculate all new entries.
When you click Method of payments you can select from the drop list, if you select
cheque a dialog box should open allowing you to enter important information from
the cheque making this information easy to retrieve by double-clicking in the deposit
box.
Print Preview Receipt will preview information of the selected records.
View or Add Reports to (References) is useful when you want to add a new problem
in the defect report records, this is useful so you can later view this information that
will speedy help you to repair similar items.
Transfer Accounts is also useful, you must transfer an account to be able to use it in
the expense option, and account from this option must not have any balance.
Common Defects
Common defects are useful when you want to keep tabs on common
problems you encounter when repairing items.
If you are repairing any item for the first time you can enter the name
and model of that item in this option so you can add common
problems as you encounter them.
You can also quickly check all the common problems for items making
it easer to identifier known defects and quickly repair the item.
If you are updating a customer record with the item name and model
that’s in your database, you can view or add a report to this item, if
the item was in the records then you will be able to view, edit any
common defect you added for this item.
If the item was not in the records then you must first add your
technician’s report and click the button that say ‘View or add report to
References’ from the customer view edit options.
Diagram Viewer
Diagram Viewer is very useful for viewing diagrams stored on your computer's hard
drives.
Viewing Diagrams:
To view any graphic diagrams, click 'File and then Open Images or Diagram Files' or click on the
diagram button from the left menu.
You can also use our snap options to snap diagrams from any programs including online web diagrams and
save them using Tool options.
After you add your graphic diagram to the viewer you can use the magnifier to view the smaller areas.
Magnifier Options: Opacity, Magnification and Rotation
If the image is larger than the view area then you can: (right-click) to drag and move around the image.
To view PDF diagrams that's commonly used today, just open the PDF file from within the program and
save the title name, however this program dose not view PDF files, you must install the Acrobat Reader
software that is free online, this program only execute it for you.
Saving the links, any currently viewed files can be easily saved, click save to open and the save dialog box,
enter any name 20 characters maximum and click save.
The saved name will appear on the diagram saved List, if the file was a PDF format then the letters PDF
will be place before the name.
Viewing Saved Links, just click the name in the Saved Links List.
Viewing Saved PDF Links, double click the PDF-name and the Adobe Reader should open once installed.
Stock Inventory
Stock Inventory will be your tools for keeping information on any replacement
components.
You can enter any device number, even a complete item and then enter the replacement
so you can later have this information available with just a click.
This can be useful when you need to quickly check replacement components, your
information entered can also be quickly sorted making it easy to know what replacement
will work because you already reviewed these components information.
You can also enter the purchaser name, purchaser phone, Email, Website and even the
stock information if you are stocking components over time.
Stock information: enter the amount if you updated your stock, this option will also
track the last date you updated information.
Enter cost per item: again useful for having the cost of that item, this also reflects the
calculated information.
Enter the amount used from stock: this is useful for updating your stock balance, but
you must update this information when you use components.
Transfer Accounts: This will send the current stock value to the bulling expenses
records, you can update this at any time, the database will remember this record and
update it as needed.
Stock Inventory main menu: you can view/edit records, select by category, search for
names.
You can also add names to the category option making it easy to select any of these
names examples: disk, memory, fans etc.
To Do List
To Do List is a powerful tool for tracking important schedules that you added or set in the
customer's records.
If you set any appointment date from the customer
options then this record will be automatically inserted
into the To-Do-List records.
You can add New Task by clicking the button that say
so, you can also View Selected Task by doing the same.
Options: this will control if and how a sound should be
played or not and the location of the sound file, you can
add your any sound and it will be played for 20 seconds
depending on the alarm play option which will play for a
maximum time of 60 seconds.
Other features, you can add appointment or cancel
appointment by simply clicking set appointment date.
Check now will display only scheduled information.
When you right-click over the main view area you
should also be able to sort information.
Phone Book
To add phone numbers, click "Phone Book" button from top right side of the program.
If you click the Phone Book button then you are ready to enter phone records, click the
"Add" button to add a new record, to indicate that you are completed, click "Update" and
your data will be saved.
To search for a name just type the name you want to search in the search area and click
"Exact", but it is a good idea to click "Nearest" to search for related names.
Sales and Purchases
Sales and Purchase stores information about items you sell or purchase in a similar way.
What are their advantages?
•
•
•
•
•
•
Sales allow you to store specific information, such as customers and item
information.
You records can be calculated automatically.
Records can be transferred to the expenses accounts.
You can print invoices from any of the selected record.
You can create a email reminder or just a thank you email for your customers.
Keep notes on any item that was sold.
Right-click on the main sales menu to sort items and delete records, you can also select
the search options that allow you to search for items.
To the top right corner you will see the search button and a easy way to filter records for
the current year by selecting any one of your choice.
Word Processor
Powerful word processor full of features that includes forms.
To use the word processor, select File then 'Open RichText(RTF) of
Text files', and click on it.
This is a full advance word processor as you will see in the picture
provided.
Two main options are the Database menu and the Select Forms:
When you open any text file you can now save this file to any location
or to the database records, you will be ask to select a category name
from the list provided, then you will be ask to enter a title name and
now you can save the file inside the database records, not any
external file.
Select Forms is useful for keeping information on many forms in a simple way, when
you select a category another menu will open allowing you to select from the list that you
created, on the right side you can preview the selected form.
You can also export your work to MS-Word if you want to edit in an even more advance
way.
Backup and Restore
Backup /Restore Utility
The Technician Database Pro gives you the options of backing up your data onto your
computer, external drives, pen drives etc.
You should backup your database records in the event your computer
crashes or was affected by viruses.
This function will backing or restore your data, once the backup is
completed the program must be restarted, don't worry the program
will auto restart.
Restoring your data is much like backup but the opposite; the program
should close and restart automatically.
Administrator
First step to start working with The Technician Database Pro is to
setup your company profile, you must have the software installed and
running.
Go to the main menu top left and click (File), now click (Administrator Login)
Note: if you are the administrator, boss or manager then you must enter your password, if
no password was entered then you will be ask to do so.
After setting up your password is completed you should be able to now setup your
company preferences.
Using your password is simple but you must be the administrator or the manager to use
such options as this is the security of the database.
Enter the correct password and you will be able to access all the options necessary.
If you forget your password and can’t remember please contact the author or check your
installation CD for more information.
Note: remember to enter this information correctly because this is the information that
will be shown on all your records and printed forms.
Organization Profile
Tax Information
Printer Settings
Access-Privileges
After you entered your company profile you can now click on the company logo to insert
your new company logo.
The picture size should be about 200 X 200 or squared in size, at this stage you can
preview the picture file in the open picture dialog box.
This picture together with your profile will be used true-out the processing of your
records.
Tax Information is simple, just enter your tax registration number and adjust the tax
percentage up-down arrows to meet your country or state tax rates. Enter your company
registration number, this information will not be shown on your customer's records, this
is for personal use and in the event you cannot remember such information.
Printer Setup will allow you to setup your printer and fax services, again this is simple
by just clicking the printer and faxes button and select your devices. Now enter your print
header and footer details, this information will be shown on your printed information.
Access-Privilege options, this is the security level of the database.
The Allow Options will allow or not allow the selected functions, when you click in the
boxes on the left section of the Allow Options you can set if you want files deleted or not,
allow schedules to be checked or not, allow backup or web browsing or not allow access
and more.
Email Composer
Manage sending emails with this option.
What are their advantages?
•
•
•
•
•
•
Compose Mails from this program, you don’t have to use any external programs.
Message menu will allow you to send your message from this program or your
external email program using Send Basic.
You can save any composed email into the database and view it later.
Selecting saved message, this is listed under Seved Emails from the Email
Service menu.
Preformatted Emails is useful when you want to use pre formatted for later use.
Account or Email Account Manager is used to save all your email settings.
Message Options
Account Information
Snap Options
The Technician Database Pro is also a fully snap program, snap
anything and save it as image to your computer.
To use this option select Tools from the top main menu.
Capture Desktop, this option will snap everything on your computer
desktop.
Snap Region, snap the region of any thing on you your computer
desktop.
Snap Active, snap any active on your desktop
Snap Windows or Controls, just select any window controls and snap
it.
Remember when you snap images the diagram viewer will open which
is used as your imager viewer.
Snap images can be saved to any location on your computer, the image is auto
recompress into .jpg format but you can select other formats.
You can save the image link to the diagram options if the image was related to a diagram.
Internet Browser
The Technician Database Pro has it's built in web browser with some
useful options that will make it easy to find the answer you need.
If the allow browsing was enabled then you can browse the internet
like any other web browser.
Just select Web Tools from the main menu to get started then select
Internet Browser.
The program will now open in full screen mode because you will need
all the space to view the web, the first screen will be the help screen
just like the one you are viewing now.
To quickly search the web enter your search in the top right search
with Google, the help screen will be replaced with the Google search
listing if you were connected to a web service, you might see a green
percentage line at the bottom of the program that displays the
progress of the content downloading, you will get use to it.
You can also enter your web address just like any other web browser
at the top edit box.
Tabs are also included if you select open in a new page, you can close
any tabs but not the first tab by right-clicking over the tab area.
There are many options and you will eventually get use to them, you
can also right-click over the browser to view other options.
You can hide the browser by clicking hide from the top right and
reopening it by selecting Web Tool and Internet Browser.
If you select Close Browser then you will close all open pages, you
can also save web pages with passwords by selecting save address.
Clicking Web-Save-Address will open the save web address menu as
a drop down menu, click Close Web-Save and it will closed.
There are many options too much to highlight now but we will release
a new help for you to download, install and update this software.