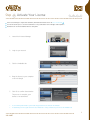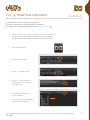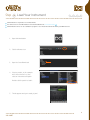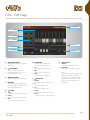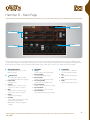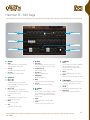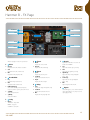
1
Software User Manual
Software Version 1.0
EN 150826
End User License Agreement (EULA)
Do not use this product until the following license agreement is understood and accepted.
By using this product, or allowing anyone else to do so, you are accepting this agreement.
Retro Organ Suite (henceforth ‘the Product’) is licensed to you
3. Ownership
as the end user. Please read this Agreement carefully.
As between you and UVI, ownership of, and title to, the
You cannot transfer ownership of these Sounds and Software
enclosed digitally recorded sounds (including any copies)
they contain. You cannot re-sell or copy the Product.
are held by UVI. Copies are provided to you only to enable
you to exercise your rights under the license.
LICENSE AND PROTECTION
4. Term
This agreement is effective from the date you open this package,
and will remain in full force until termination. This agreement
1. License Grant
will terminate if you break any of the terms or conditions of this
UVI grants to you, subject to the following terms and
agreement. Upon termination you agree to destroy and return to
conditions, a non-exclusive, non-transferable right
UVI all copies of this product and accompanying documentation.
to use each authorized copy of the Product.
5. Restrictions
The product is the property of UVI and is licensed to you only
Except as expressly authorized in this agreement, you may not rent,
for use as part of a musical performance, live or recorded.
sell, lease, sub-license, distribute, transfer, copy, reproduce, display,
This license expressly forbids resale or other distribution of the
modify or time share the enclosed product or documentation.
sounds and software included in the Product or their derivatives,
either as they exist on disc, reformatted for use in another
6. Hardware
digital sampler, or mixed, combined, filtered, resynthesized or
The accompanying USB flash media is only guaranteed in it’s
otherwise edited, for use as sounds, multi-sounds, samples,
original state, as an installation medium for the Product. Any
multi-samples, wavetables, programs or patches in a sampler,
variance from this use including but not limited to deleting,
microchip or any hardware or software sample playback device.
altering or adding data, reformatting the media or any physical
alteration of the device will void its warranty. If the media is found
You cannot sell the Product content or give it away for use by others
to have a physical or manufacturing defect please contact our
in their sampling or sample playback devices. In the event UVI
support department (http://www.uvi.net/contact-support).
terminates this agreement due to your breach, you agree to return the
original and all other copies of the software and documentation to UVI.
UVI reserves all rights not expressly granted to herein.
2. Protection of Software
You agree to take all reasonable steps to protect the product and
any accompanying documentation from unauthorized copying
or use. You agree not to modify the product to circumvent any
method or means adopted or implemented by UVI to protect against
or discourage the unlicensed use of copying of the Product.
©2015 UVI. All rights reserved.
All trademarks are the property of their respective owners.
2
Table of Contents
Introduction....................................................................................................................................................................................................4
System Requirements...............................................................................................................................................................................5
Installation
Step 1: Register Your Serial Number..........................................................................................................................................6
Step 2: Activate Your License........................................................................................................................................................7
Step 3: Install Your Instrument......................................................................................................................................................8
Step 4: Load Your Instrument........................................................................................................................................................9
EXIII
Edit Page...................................................................................................................................................................................................10
FX Page......................................................................................................................................................................................................11
Preset List.................................................................................................................................................................................................12
Hammer B
Main Page................................................................................................................................................................................................13
Edit Page...................................................................................................................................................................................................14
FX Page......................................................................................................................................................................................................15
Preset List.................................................................................................................................................................................................16
GT2500
Main Page................................................................................................................................................................................................17
Edit Page...................................................................................................................................................................................................18
FX Page......................................................................................................................................................................................................19
Preset List.................................................................................................................................................................................................20
Combo K
Main Page................................................................................................................................................................................................21
Edit Page...................................................................................................................................................................................................22
FX Page......................................................................................................................................................................................................23
Preset List.................................................................................................................................................................................................24
Super V
Main Page................................................................................................................................................................................................25
Edit Page...................................................................................................................................................................................................26
FX Page......................................................................................................................................................................................................27
Preset List.................................................................................................................................................................................................28
Retrocorda
Main Page................................................................................................................................................................................................29
Edit Page...................................................................................................................................................................................................30
FX Page......................................................................................................................................................................................................31
Preset List.................................................................................................................................................................................................32
UVI Workstation: Tips and Tricks.........................................................................................................................................................33
Links...................................................................................................................................................................................................................34
Credits and Thanks.....................................................................................................................................................................................35
3
Introduction
Retro Organ Suite
Retro Organ Suite delivers in a very raw and personal way the sounds that define
a near 100 year legacy of electronic organ instruments. Spanning the globe,
dating back to the early 1900s, a small and specialized group of manufacturers
first designed and produced these elegant instruments as low-cost alternatives
to wind-driven pipe organs for houses of worship and homes of the social elite.
Later finding place in jazz ensembles, organs gained popularity in many genres of
contemporary music through the mid 20th century. By the late ‘70s, due to the rapid
pace of technological advancement and tastes, their popularity and commercial
presence saw extraordinary decline. Since that time these instruments have seen
some emulation in digital form, but their tangible beauty, the sounds of their raw
mechanisms clad in wood and novel amplifiers have largely vanished, frozen in time
on commercial recordings of old.
With Retro Organ Suite we aim to both present and preserve the original sound and
majesty of this legacy in an uncompromising way, delivering 6 unique instruments
that showcase what we feel are the best of best. Starting with factory-spec restored
instruments we captured comprehensive sample sets, making sure to accurately
document each instruments tonal range and natural sonic character. Recordings
were made through the original speakers, rotary speaker cabinet, with vibrato,
percussion, through D.I. boxes and through an assortment of vintage guitar amps.
Top-grade microphones were used with well regarded preamps, along with a special
selection of processors to provide the greatest degree of clarity and fidelity. This
tremendous sample base allows for a huge variety of tonal options in addition to a
faithful preservation of typical recording setups used in years past.
Leveraging these libraries within the UVI Engine™ hybrid instruments are created,
providing you with both the natural and untreated sounds of the original hardware
and the advanced sound design facility of a modern digital workstation. Sounds can
be customized from subtle to extreme effect; shape your perfect organ, create a
crushing vintage lead from a ’60s Italian combo, or build a brooding pad from a ’40s
Hammond. The huge variety of samples presented in UVI instruments can serve
as both destination or starting point. Retro Organ Suite also introduces our new
rotary speaker emulation, with DSP tailor-made to match the characteristics of a
vintage unit.
Retro Organ Suite fully realizes the original soul of these instruments in beautiful
detail, and provides a platform for them to move forward into the 21st century.
4
System Requirements
Compatibility
Compatibility
Audio Units, VST, MAS, RTAS, AAX or standalone
VST, RTAS, AAX or standalone
UVI Workstation 2.5.15 or higher
UVI Workstation 2.5.15 or higher
Minimum System Requirements
Minimum System Requirements
Intel CPU
Core Duo or faster
4 GB of RAM (8 GB+ recommended)
4 GB of RAM (8 GB+ recommended)
4.3 GB of disk space
4.3 GB of disk space
Mac OS X 10.7 or higher
Windows 7 or higher
iLok account (free, dongle not required)
iLok account (free, dongle not required)
Authorize the Way You Want
Your license allows 3 concurrent authorizations on any combination of computers and iLok dongles.
License management is a simple drag-and-drop process done through iLok License Manager.
Visit ilok.com/
to download iLok License Manager and create your free account.
5
Step
1
Register Your Serial Number
1
2
3
4
You must have an account on uvi.net/ and ilok.com/ prior to registration
If you purchased a physical version of this product, your serial number is located on the inside of the box
If you purchased an electronic version of this product, your serial number will be included in a confirmation email
You can see a list of the products you’ve registered and their serial numbers anytime at uvi.net/my-products
1. Login to your account on uvi.net/
2. Navigate to the ‘Product Registration’ page
3. Enter your details and click ‘Register’
Upon completion a new license will be
deposited in your iLok account
6
Step
2
Activate Your License
1
2
3
4
iLok License Manager is required for activation, download the newest version at ilok.com/ilm.html
Your license allows up to 3 concurrent activations on any combination of iLok dongles and computers
Activations can be moved between devices at anytime
1. Launch iLok License Manager
2. Login to your account
3. Click the ‘Available’ tab
4. Drag the license to your computer
or an iLok dongle
5. Click ‘Ok’ to confirm the activation
The process is complete, your device is now authorized
»
»
To see how many authorizations you have left simply select the license and click ‘Show Details’
To deactivate your license, right-click it and select ‘Deactivate’ — doing so will return your license to the ‘Available’ tab
7
Step
3
Install Your Instrument
1
2
3
4
UVI Instruments can be stored anywhere on your system
Storing your instruments on a fast drive will improve performance
Your instruments can be downloaded at any time from uvi.net/my-products
1. Create a folder on your computer and place your UVI Instruments in it
Once this is done we need to tell UVI Workstation where to find your instruments.
We do this by creating a watch folder, follow the steps below to create your own:
2. Open UVI Workstation
3. Click the Settings page
4. Click the ‘Sound Banks’ tab
5. Click the ‘...’ button and select
the folder where you’ve placed
your instruments
6. Restart UVI Workstation and
open the Browser
Your instruments will be available under the ‘Soundbanks’ tab
8
Step
4
Load Your Instrument
1
2
3
4
UVI Workstation is required to run UVI Instruments
The newest version of UVI Workstation can be downloaded free at uvi.net/downloads
UVI Workstation can be run as a standalone program or as a virtual instrument from within your DAW of choice
1. Open UVI Workstation
2. Click the Browser icon
3. Open the Sound Banks tab
4. Select a product, in this example
we’ll choose Vector Pro, then select an instrument and patch
Double-click the patch to load it
5. The UI appears and you’re ready to jam!
9
EXIII - Edit Page
1
Timbre
4
Volume
5
Equalizer
6
Global Volume
3
Preset Menu
2
Page Navigation
Navigate between 2 pages of controls:
EDIT and FX
2
Preset Menu
Choose the desired preset from
the MENU DISPLAY or use the [<>]
navigation buttons below
3
Global Volume
Adjust the global volume of the EXIII
4
Timbre
Customize overall tonal quality of the
organ by adjusting the influence of each
of the 9 discrete timbre bars
5
Volume
»Sustain
Volume control of the sustain sample
»Release
Volume control of the release sample
»Click
Volume control of the click sample
6
Equalizer
3-band shelf EQ, +/-12dB with
crossovers at 180Hz and 3kHz
»HI
Adjust the EQ’s treble frequency
»MID
Adjust the EQ’s mid frequency
»LOW
Adjust the EQ’s bass frequency
7
Percussion
»ON/OFF
Turn the percussion section on/off
»4”
Turn the 4” sample on/off
»2/3”
Turn the 2/3” sample on/off
»Volume
Adjust the percussion section volume
»Decay
Adjust the percussion section delay time
7
1
Page Navigation
7
Percussion
8
Rotary FX
Rotary FX
»ON/OFF
Turn the rotary speaker FX on/off
»SLOW/FAST
Change the mode between slow/fast
NOTE:
EXIII includes two styles of rotary speaker
simulation; ROTARY FX on the Edit
page provides an accurately modeled
algorithm, the LEZLY effect on the FX
page provides a more typical stereo
rotary effect.
10
EXIII - FX Page
Box Modeler
2
Drive
1
Delay
6
Phaser
5
Bypass
8
Effects displayed + listed in signal order
1
Drive
»Amount
Adjust the amount of tube coloration
»Gain
Adjust the amount of drive level
»Mix
Adjust the mix (dry/wet) ratio
2
Box Modeler
»Dry
Adjust the Dry volume level
»Wet
Adjust the Wet volume level
» IR Menu [Display]
Shows the currently selected impulse
response; click to open a pull-down menu
» < [PREV]
Select the previous IR
» > [NEXT]
Select the next IR
3
4
Chorus
»Width
Adjust the chorus width
»Amount
Adjust the effect intensity
5
Phaser
»Speed
Adjust the phaser speed
»Feedback
Adjust the feedback amount
»Depth
Adjust the effect depth
6
Delay
»Time
Adjust the delay time [1/32 to 1/1]
»Feedback
Adjust the feedback amount
»Mix
Adjust the mix [dry/wet] ratio
7
3
Lezly
4
Chorus
7
Reverb
Reverb
Sparkverb™ with fixed crossovers at
250Hz and 11.78kHz
»Size
Adjust the reverb space [4-50m]
»Time
Adjust the decay time [0.5-50s]
» High Decay
Adjust the high decay multiplier
[x0.1 - x10]
» Low Decay
Adjust the low decay multiplier
[x0.1 - x10]
»Mix
Adjust dry/wet mix amount
8
Bypass
Global FX bypass; use to switch between
clean signal (bypass on) and processed
signal [bypass off]
Lezly
»Mode
TREMOLO – fast; 6.7Hz
BRAKE – stopped
CHORALE – slow; 1Hz
11
EXIII - Preset List
Presets are divided by Normal and Solo
modes; Normal is a typical polyphonic
organ, Solo presets are designed for
monophonic lead use.
EXIII NORMAL
00-Default
A Beauty Soft
A Classic One
A Classic Two
Celebration
Electric Church
Full Excited
Garnerolistic
Gospellito
Greg Air
Jazz Fusion
Jazzospheric
KotOrgan
Lost Percs
Low DistoPunch
My House
Neat and Clear
No Reeds
Noemi Leave
Noisorganic
Onions Garden
Orgadreaming
Orgue Barbare
OShimmering
Phaser Full Dist
Piccolox
Play Your Bass
Popular Blues
Popular Jazz
Purity
Put the Vine
Raw Bars
Reggae Clav 1
Reggae Clav 2
Rollmops Organ
Sacrifice
Shinning Joint
Singing FX Flute
So Lezly
Soft Chorda
Softana Ways
Softimistic
Sol Imran
Soon Basson
Space Broken
Space PopCorn
Spell Go
Strange Percs
Sub Sixteen
Super Wet
Terra Loop
The Bee The Fly
The Maurice
Theater Bar
Very Dirty
Whyto Spiritual
Xtreme Wet
XXL Church
EXIII SOLO
00-Default
Clean Lead
Club Rotary
Dist Solo
Full Lead
My House
Power Bass
Pure Lead
Realezly
Spring Break
Transylvania Voice
12
Hammer B - Main Page
Layers 1 + 2
2
Volume
3
1
Page Navigation
4
Equalizer
The UI is divided into two sections; the upper-half provides control over two discrete layers, including individual volume control and a MIDI-mappable
crossfader. When mapped to a volume pedal or modwheel, the crossfader can provide dynamic fading between slow and fast layers for example. The UI’s
bottom-half provides detailed control of each layers volume (broken out by sustain, release, and percussion samples) and a 3-band equalizer.
1
Page Navigation
Navigate between 3 pages of controls:
Main, Edit and FX
2
Layers 1 + 2
Two discrete layers allow for creative
sound layering and expressive crossfading
» Power On/Off
Turn layer on/off
»Category
Click the name to select from a dropdown menu or use the [<>] buttons
»Wave
Click the name to select from a dropdown menu or use the [<>] buttons
»Volume
Adjust the level of the layer
»Crossfader
Turn crossfader on/off; adjust crossfader
amount; right-click the fader to
MIDI-map and control via. a physical
controller;
3
Volume
»Sustain
Volume control of the sustain sample
» Release [On/Off]
Turn the release sample on/off
» Release Volume
Volume control of the release sample
» Percussion [On/Off]
Turn the percussion sample on/off
» Percussion Volume
Volume control of the percussion sample
» Percussion Mode
Select between 4”, 2”2/3, or 4”+2”2/3
» Percussion Decay
Decay control for the percussion sample
4
Equalizer
3-band shelf EQ, +/-12dB with
crossovers at 180Hz and 3kHz
»Bass
Adjust the EQ’s bass frequency
»Mid
Adjust the EQ’s mid frequency
»Treble
Adjust the EQ’s treble frequency
13
Hammer B - Edit Page
Amp
1
Filter
3
Tremolo
1
4
Amp
»ADSR
Typical Attack, Decay, Sustain, Release
envelope controls for the amp
»Velocity
Adjust the amp velocity sensistivity
» Vel > Atk
Remaps Attack to Note Velocity
2
Unison
» Mode - OFF
» Mode - ALT
Sets the unison mode to ALT; stereo
position alternates L/R every note, width
controlled by [WIDTH]
» Mode - UNI
Sets the unison mode to UNI; layers
multiple samples and augments them for
increased stereo presence
»Color
Utilizes neighboring samples from the
library to a unique effect
»Width
Sets the stereo width
»Tune
Adjust pitch of unison layers
3
Filter
» Filter Type
Multimode filter can be set to low-pass
(LP), band-pass (BP), or high-pass [HP]
» Cutoff Frequency
Filter cutoff frequency
»Resonance
Filter resonance amount
» ENV [Depth]
Depth of the filters EG
»ADSR
Typical envelope controls for the filter
» Vel Sens
Adjust the filter velocity sensitivity
4
Tremolo
»Mode
Choose between OFF, TREMOLO, or PAN;
choose TREMOLO for a typical tremolo
effect or choose PAN mode to modulate
stereo position
»Depth
Set the depth (amount] of the effect
»Speed
Set the speed of the LFO [1/32 to 1/1]
5
2
Unison
5
Vibrato
6
Modwheel
Vibrato
»Mode
Choose between OFF, SINE or TRIANGLE;
SINE and TRIANGLE modes switch
between sine and triangle LFO wave
shapes, respectively
»Depth
Set the depth (amount] of the effect
»Speed
Set the speed of the LFO [.01Hz to 10Hz]
6
Modwheel
Use your MIDI controller’s Mod Wheel
controller to interactively control the
Filter Depth
»On/Off
Enable ModWheel>Filter Depth routing
» Filter Depth
Set the depth [amount] of influence
14
Hammer B - FX Page
Box Modeler
2
Drive
1
Delay
6
Phaser
5
Bypass
8
Effects displayed + listed in signal order
1
Drive
»Amount
Adjust the amount of tube coloration
»Gain
Adjust the amount of drive level
»Mix
Adjust the mix (dry/wet) ratio
2
Box Modeler
»Dry
Adjust the Dry volume level
»Wet
Adjust the Wet volume level
» IR Menu [Display]
Shows the currently selected impulse
response; click to open a pull-down menu
» < [PREV]
Select the previous IR
» > [NEXT]
Select the next IR
3
4
Chorus
»Width
Adjust the chorus width
»Amount
Adjust the effect intensity
5
Phaser
»Speed
Adjust the phaser speed
»Feedback
Adjust the feedback amount
»Depth
Adjust the effect depth
6
Delay
»Time
Adjust the delay time [1/32 to 1/1]
»Feedback
Adjust the feedback amount
»Mix
Adjust the mix [dry/wet] ratio
7
3
Lezly
4
Chorus
7
Reverb
Reverb
Sparkverb™ with fixed crossovers at
250Hz and 11.78kHz
»Size
Adjust the reverb space [4-50m]
»Time
Adjust the decay time [0.5-50s]
» High Decay
Adjust the high decay multiplier
[x0.1 - x10]
» Low Decay
Adjust the low decay multiplier
[x0.1 - x10]
»Mix
Adjust dry/wet mix amount
8
Bypass
Global FX bypass; use to switch between
clean signal (bypass on) and processed
signal [bypass off]
Lezly
»Modes
TREMOLO – fast; 6.7Hz
BRAKE – stopped
CHORALE – slow; 1Hz
15
Hammer B - Preset List
Presets included are
practical configurations that
should serve as a starting
point for customization and
exploration. Choose one that
has a feel you like and scroll
through the available layers
and edit to taste.
PRESETS
Rotary Wheel Hard
Black Fading
Blues Churchy
Chappel Organ
Cocker J
Crystal Rock
Design Organ
Hammer Flute
IgOrgan
In Da Church
Intimate
Jazz Swing
Latin Funk
Lord Full
Mild Full
Mr Fletcher
Organ In A Box
Really Full
Reggae Dem
Santa Organ
Seventies
Turn Manege
Rotary Wheel Soft
After Midnight
Best Regards
Big Bottom
Big Hamm
Ceremonial
Club Organ
Cool Be
D Street
Deep and Sweet
Dont Miss Me
Entrance
For My Band
Fruity Flute
Hi Pass Organ
In The Wood
Light Organ
Lounge Organ
Massive Organ
Meditation
Michel and John
No Mercy
Old Fashion
On The Beach
Organ Zone
Organisation
Over The Moon
Praying
Pretty Organ
School Of Life
Serious Full
Standard Jazz
Tower Power
Templates
Mic C414 Leslie Wheel
Mic MD421 Leslie Wheel
Mic U67 Leslie Wheel
Mic U87 Leslie Wheel
Pedal Basic
Pedal Wheel
Template Bass Dist
Template Bell
Template Clavinet
Template Piano
Xtra Presets
Dirty Bass
Funky Town
New Lezly on Wheel
Organ Hero
Pad Single Wheel Filter
Pad Wheel Morph
Right Away
Scream Lead
Slow Motion
Sweep Wheel Filter
Very Percy
LAYERS - SUBLAYERS
C414 Fast
000788080
000808000
008800000
327645222
512481420
800000000
800000888
800800000
800800008
808104000
808800008
808808008
832000003
858000000
885324588
888000000
C414 Slow
000788080
000808000
008800000
327645222
512481420
800000000
800000888
800800000
800800008
808104000
808800008
808808008
832000003
858000000
885324588
888000000
DI
000487458
008800000
015111388
204545132
415126187
512481420
532000002
540202113
544500000
800000000
800000000-Vib
800005210
808000808
808800008
808800084
851048448
882303288
888888888
888888888-Vib
Guitar Amp
AC30
Bassman
JCM800A
JCM800B
JTM45
Matchless
Plexi
SoldanoA
SoldanoB
SoldanoC
SoldanoD
TwinA
TwinB
MD421 Fast
204545132
532000002
540202113
544500000
800000000
800005210
808800008
808800084
882303288
888888888
MD421 Slow
204545132
532000002
540202113
544500000
800000000
800005210
808800008
808800084
882303288
888888888
U67 Fast
000487458
006544310
006735222
006808000
008080000
008880000
015111388
415126187
800008678
800008888
808000808
828868447
851048448
888000888
888880008
888888888
U67 Slow
000487458
006544310
006735222
006808000
008080000
008880000
015111388
415126187
800008678
800008888
808000808
828868447
851048448
888000888
888880008
888888888
U87 Fast
800000000
800000000-Vib
800370000-Vib
880000000
888000000
888454688-Vib
888800000
888888888
888888888-Vib
PEDAL
C414 Fast
00
08
44
80
88
C414 Slow
00
08
44
80
88
DI
00
08
44
80
88
U47 Low Speaker Fast
000487458
008800000
015111388
204545132
415126187
512481420
532000002
540202113
544500000
800000000
800000000-Vib
800005210
808800008
808800084
851048448
882303288
888888888
888888888-Vib
U47 Low Speaker Slow
000487458
008800000
015111388
204545132
415126187
512481420
532000002
540202113
544500000
800000000
800000000-Vib
800005210
808800008
808800084
851048448
882303288
888888888
888888888-Vib
U67 Fast
00
08
44
80
88
U67 Slow
00
08
44
80
88
16
GT2500 - Main Page
Layers 1 + 2
2
Volume
3
1
Page Navigation
4
Equalizer
The UI is divided into two sections; the upper-half provides control over two discrete layers, including individual volume control and a MIDI-mappable
crossfader. When mapped to a volume pedal for example, the crossfader can provide dynamic fading between slow and fast layers for example. The UI’s
bottom-half provides detailed control of each layers volume (broken out by sustain, release, and percussion samples) and a 3-band equalizer.
1
Page Navigation
Navigate between 3 pages of controls:
Main, Edit and FX
2
Layers 1 + 2
Two discrete layers allow for creative
sound layering and expressive crossfading
» Power On/Off
Turn layer on/off
»Category
Click the name to select from a dropdown menu or use the [<>] buttons
»Wave
Click the name to select from a dropdown menu or use the [<>] buttons
»Volume
Adjust the level of the layer
»Crossfader
Turn crossfader on/off; adjust crossfader
amount; right-click the fader to
MIDI-map and control via. a physical
controller;
3
Volume
»Sustain
Volume control of the sustain sample
» Release [On/Off]
Turn the release sample on/off
» Release Volume
Volume control of the release sample
» Percussion [On/Off]
Turn the percussion sample on/off
» Percussion Volume
Volume control of the percussion sample
» Percussion Mode
Select between 4”, 2”2/3, or 4”+2”2/3
» Percussion Decay
Decay control for the percussion sample
4
Equalizer
3-band shelf EQ, +/-12dB with
crossovers at 180Hz and 3kHz
»Bass
Adjust the EQ’s bass frequency
»Mid
Adjust the EQ’s mid frequency
»Treble
Adjust the EQ’s treble frequency
17
GT2500 - Edit Page
Amp
1
Filter
3
Tremolo
1
4
Amp
»ADSR
Typical Attack, Decay, Sustain, Release
envelope controls for the amp
»Velocity
Adjust the amp velocity sensistivity
» Vel > Atk
Remaps Attack to Note Velocity
2
Unison
» Mode - OFF
» Mode - ALT
Sets the unison mode to ALT; stereo
position alternates L/R every note, width
controlled by [WIDTH]
» Mode - UNI
Sets the unison mode to UNI; layers
multiple samples and augments them for
increased stereo presence
»Color
Utilizes neighboring samples from the
library to a unique effect
»Width
Sets the stereo width
»Tune
Adjust pitch of unison layers
3
Filter
» Filter Type
Multimode filter can be set to low-pass
(LP), band-pass (BP), or high-pass [HP]
» Cutoff Frequency
Filter cutoff frequency
»Resonance
Filter resonance amount
» ENV [Depth]
Depth of the filters EG
»ADSR
Typical envelope controls for the filter
» Vel Sens
Adjust the filter velocity sensitivity
4
Tremolo
»Mode
Choose between OFF, TREMOLO, or PAN;
choose TREMOLO for a typical tremolo
effect or choose PAN mode to modulate
stereo position
»Depth
Set the depth (amount] of the effect
»Speed
Set the speed of the LFO [1/32 to 1/1]
5
2
Unison
5
Vibrato
6
Modwheel
Vibrato
»Mode
Choose between OFF, SINE or TRIANGLE;
SINE and TRIANGLE modes switch
between sine and triangle LFO wave
shapes, respectively
»Depth
Set the depth (amount] of the effect
»Speed
Set the speed of the LFO [.01Hz to 10Hz]
6
Modwheel
Use your MIDI controller’s Mod Wheel
controller to interactively control the
Filter Depth
»On/Off
Enable ModWheel>Filter Depth routing
» Filter Depth
Set the depth [amount] of influence
18
GT2500 - FX Page
Box Modeler
2
Drive
1
Delay
6
Phaser
5
Bypass
8
Effects displayed + listed in signal order
1
Drive
»Amount
Adjust the amount of tube coloration
»Gain
Adjust the amount of drive level
»Mix
Adjust the mix (dry/wet) ratio
2
Box Modeler
»Dry
Adjust the Dry volume level
»Wet
Adjust the Wet volume level
» IR Menu [Display]
Shows the currently selected impulse
response; click to open a pull-down menu
» < [PREV]
Select the previous IR
» > [NEXT]
Select the next IR
3
4
Chorus
»Width
Adjust the chorus width
»Amount
Adjust the effect intensity
5
Phaser
»Speed
Adjust the phaser speed
»Feedback
Adjust the feedback amount
»Depth
Adjust the effect depth
6
Delay
»Time
Adjust the delay time [1/32 to 1/1]
»Feedback
Adjust the feedback amount
»Mix
Adjust the mix [dry/wet] ratio
7
3
Lezly
4
Chorus
7
Reverb
Reverb
Sparkverb™ with fixed crossovers at
250Hz and 11.78kHz
»Size
Adjust the reverb space [4-50m]
»Time
Adjust the decay time [0.5-50s]
» High Decay
Adjust the high decay multiplier
[x0.1 - x10]
» Low Decay
Adjust the low decay multiplier
[x0.1 - x10]
»Mix
Adjust dry/wet mix amount
8
Bypass
Global FX bypass; use to switch between
clean signal (bypass on) and processed
signal [bypass off]
Lezly
»Mode
TREMOLO – fast; 6.7Hz
BRAKE – stopped
CHORALE – slow; 1Hz
19
GT2500 - Preset List
Presets included are
practical configurations
that should serve as
a starting point for
customization and
exploration. Choose one
that has a feel you like
and scroll through the
available layers and edit
to taste.
PRESETS
Default
00 Default Basic
00 Default Pedal
00 Default Wheel Xfade
Bass
Bass Dist One
Bass Dist Two
Orbi Bass
Sub Lee Minal
Bells
Basic Bell One
Basic Bell Two
Digital Bells
Emminence
Fantasia 2500
Keys
California Dreamin
DynOrgan
Express Keys
Jamaiclav
Mellow Road
Poly Clav
Solo Keys
Lead
Brassolo
Retroleadia
Soli Tutti
Solo Ambient
Square Lead
Trumpet
Wha Zalead
Who Raggan
Organs
Clean Sream Full
Clubbing Jazz
Distorded One
Gospel Fast Wheel
Jazzy Morphy
Lezly Classic
Lezly Talk
Plain Orbiwheel
Sawrgan
Wheel X Fade
Pads/Strings
Dark Mood
Full Orchestra
Marketto
Mellow Pad
Pad Wheel Morph 1
Pad Wheel Morph 2
Pizzicati
Soft Chill Pad
Solina
Stereo Morphing Wheel
Strings Ambient
Strings Brassy
Sweep Cotton
Sweep Lina
Percussive
Brassology
Pluckissimo
Square Fashion
Steel Dream
Xylallmost
LAYERS
Drawbars
751607077
850000000
855000000
860000048
Tutti
Drawbars, Multivoice
751607077
850000000
855000000
860000048
Tutti
Drawbars, Orbitone
751607077
850000000
855000000
860000048
Tutti
Percussion
Cymbalo
CymbaloVibraphone
Harp
Harpsichord
MusicBox
Piano
Piano-Music-Box
Vibraphone
Percussion, Orbitone
Cymbalo
CymbaloVibraphone
Harp
Harpsichord
MusicBox
Piano
Piano-Music-Box
Vibraphone
Principals
0100010
0100011
1000000
1010000
1100011
Tutti
Principals, Multivoice
0100010
0100011
1000000
1010000
1100011
Tutti
Principals, Orbitone
0100010
0100011
1000000
1010000
1100011
Tutti
Solos
00000000111
00000010000
00010001100
10000100000
10010011000
Tutti
Tutti-Wah
Tutti-Woh
Solos, Multivoice
00000000111
00000010000
00010001100
10000100000
10010011000
Tutti
Tutti-Wah
Tutti-Woh
Solos, Orbitone
00000000111
00000010000
00010001100
10000100000
10010011000
Tutti
Tutti-Wah
Tutti-Woh
Strings
Ensemble-4
Ensemble-8
Ensemble-8-4
PEDAL
Drawbars
800
808
880
888
Drawbars
0001
1000
1001
1010
1100
Drawbars
8
16
168
Stack
KeyOrgan
OrganDrive
PolySynth
Solid-State
SynthPerc
VibrOrgan
WoodSquare
Stack, Multivoice
KeyOrgan
OrganDrive
PolySynth
Solid-State
SynthPerc
VibrOrgan
WoodSquare
Stack, Orbitone
KeyOrgan
OrganDrive
PolySynth
Solid-State
SynthPerc
VibrOrgan
WoodSquare
20
Combo K - Main Page
Layers 1 + 2
2
Volume
3
1
Page Navigation
4
Equalizer
The UI is divided into two sections; the upper-half provides control over two discrete layers, including individual volume control and a MIDI-mappable
crossfader. When mapped to a volume pedal for example, the crossfader can provide dynamic fading between slow and fast layers for example. The UI’s
bottom-half provides detailed control of each layers volume (broken out by sustain, release, and percussion samples) and a 3-band equalizer.
1
Page Navigation
Navigate between 3 pages of controls:
Main, Edit and FX
2
Layers 1 + 2
Two discrete layers allow for creative
sound layering and expressive crossfading
» Power On/Off
Turn layer on/off
»Category
Click the name to select from a dropdown menu or use the [<>] buttons
»Wave
Click the name to select from a dropdown menu or use the [<>] buttons
»Volume
Adjust the level of the layer
»Crossfader
Turn crossfader on/off; adjust crossfader
amount; right-click the fader to
MIDI-map and control via. a physical
controller;
3
Volume
»Sustain
Volume control of the sustain sample
» Release [On/Off]
Turn the release sample on/off
» Release Volume
Volume control of the release sample
» Percussion [On/Off]
Turn the percussion sample on/off
» Percussion Volume
Volume control of the percussion sample
» Percussion Mode
Select between 4”, 2”2/3, or 4”+2”2/3
» Percussion Decay
Decay control for the percussion sample
4
Equalizer
3-band shelf EQ, +/-12dB with
crossovers at 180Hz and 3kHz
»Bass
Adjust the EQ’s bass frequency
»Mid
Adjust the EQ’s mid frequency
»Treble
Adjust the EQ’s treble frequency
21
Combo K - Edit Page
Amp
1
Filter
3
Tremolo
1
4
Amp
»ADSR
Typical Attack, Decay, Sustain, Release
envelope controls for the amp
»Velocity
Adjust the amp velocity sensistivity
» Vel > Atk
Remaps Attack to Note Velocity
2
Unison
» Mode - OFF
» Mode - ALT
Sets the unison mode to ALT; stereo
position alternates L/R every note, width
controlled by [WIDTH]
» Mode - UNI
Sets the unison mode to UNI; layers
multiple samples and augments them for
increased stereo presence
»Color
Utilizes neighboring samples from the
library to a unique effect
»Width
Sets the stereo width
»Tune
Adjust pitch of unison layers
3
Filter
» Filter Type
Multimode filter can be set to low-pass
(LP), band-pass (BP), or high-pass [HP]
» Cutoff Frequency
Filter cutoff frequency
»Resonance
Filter resonance amount
» ENV [Depth]
Depth of the filters EG
»ADSR
Typical envelope controls for the filter
» Vel Sens
Adjust the filter velocity sensitivity
4
Tremolo
»Mode
Choose between OFF, TREMOLO, or PAN;
choose TREMOLO for a typical tremolo
effect or choose PAN mode to modulate
stereo position
»Depth
Set the depth (amount] of the effect
»Speed
Set the speed of the LFO [1/32 to 1/1]
5
2
Unison
5
Vibrato
6
Modwheel
Vibrato
»Mode
Choose between OFF, SINE or TRIANGLE;
SINE and TRIANGLE modes switch
between sine and triangle LFO wave
shapes, respectively
»Depth
Set the depth (amount] of the effect
»Speed
Set the speed of the LFO [.01Hz to 10Hz]
6
Modwheel
Use your MIDI controller’s Mod Wheel
controller to interactively control the
Filter Depth
»On/Off
Enable ModWheel>Filter Depth routing
» Filter Depth
Set the depth [amount] of influence
22
Combo K - FX Page
Box Modeler
2
Drive
1
Delay
6
Phaser
5
Bypass
8
Effects displayed + listed in signal order
1
Drive
»Amount
Adjust the amount of tube coloration
»Gain
Adjust the amount of drive level
»Mix
Adjust the mix (dry/wet) ratio
2
Box Modeler
»Dry
Adjust the Dry volume level
»Wet
Adjust the Wet volume level
» IR Menu [Display]
Shows the currently selected impulse
response; click to open a pull-down menu
» < [PREV]
Select the previous IR
» > [NEXT]
Select the next IR
3
4
Chorus
»Width
Adjust the chorus width
»Amount
Adjust the effect intensity
5
Phaser
»Speed
Adjust the phaser speed
»Feedback
Adjust the feedback amount
»Depth
Adjust the effect depth
6
Delay
»Time
Adjust the delay time [1/32 to 1/1]
»Feedback
Adjust the feedback amount
»Mix
Adjust the mix [dry/wet] ratio
7
3
Lezly
4
Chorus
7
Reverb
Reverb
Sparkverb™ with fixed crossovers at
250Hz and 11.78kHz
»Size
Adjust the reverb space [4-50m]
»Time
Adjust the decay time [0.5-50s]
» High Decay
Adjust the high decay multiplier
[x0.1 - x10]
» Low Decay
Adjust the low decay multiplier
[x0.1 - x10]
»Mix
Adjust dry/wet mix amount
8
Bypass
Global FX bypass; use to switch between
clean signal (bypass on) and processed
signal [bypass off]
Lezly
»Mode
TREMOLO – fast; 6.7Hz
BRAKE – stopped
CHORALE – slow; 1Hz
23
Combo K - Preset List
Presets included are practical
configurations that should serve as a
starting point for customization and
exploration. Choose one that has a feel
you like and scroll through the available
layers and edit to taste.
PRESETS
Default Mono
Default Stereo
Dirty K 1
Dirty K 2
Fair K Voices
Lezly on Wheel
Magic Pad
Mello K
Morphing Wheel Pad 1
Morphing Wheel Pad 2
Perc Wheel Morph
Radio Lezly
Sweep Wheel Filter
Template Basic Organ
Template Bass Dist
Template Bell
Template Clavinet
Template Piano
Unison Wheel Filter
Vox Populi
LAYERS
CHEEZY
DarkMood
FullFast-1
FullFast-2
Jazzy-1
Jazzy-2
MellowFast
MellowTrump
Motown
Perc-Fast
Soft-Fast
UpTown
COMBO
000808
000880
008008
008080
080008
080080
688656
800008
800080
800884
844886
880086
886584
888080
888084
888556
888586
888808
888856
888880
COMPACT
AllWhiteTabs
Bass16
Flute4
Flute8
Piccolo4
Strings4
Strings8
Strings16
Tabs-4Man0
Tabs-4ManF
Tabs-8Man0
Tabs-8ManF
Tabs-16Man0
Tabs-16ManF
Tabs-AllMan0
Tabs-AllManF
Trumpet8
M100
80000888
80808000
88000080
88080008
88808000
88880600
88888888
718714002
800008888
888080000
888532200
888600060
888888888
Flute
Percs
P1960
8-Vib-Rev
8+2-Vib
8+2-Vib-Rev
8+4-Vib
8+4-Vib-Rev
8+4+2-Vib
8+4+2-Vib-Rev
Bass+8+4-Vib
Bass+8+4+2-Vib
24
SuperVX - Main Page
Timbre
2
Volume
3
1
Page Navigation
4
Equalizer
The UI is divided into two sections; the upper-half provides control over timbre. The UI’s bottom-half provides detailed control of the timbre (broken out
by sustain, click, and percussion samples) and a 3-band equalizer.
1
Page Navigation
Navigate between 3 pages of controls:
Main, Edit and FX
2
Timbre
»Wave
Click the name to select from a dropdown menu or use the [<>] buttons
3
Volume
»Sustain
Volume control of the sustain sample
» Release [On/Off]
Turn the release sample on/off
» Release Volume
Volume control of the release sample
» Percussion [On/Off]
Turn the percussion sample on/off
» Percussion Volume
Volume control of the percussion sample
» Percussion Mode
Select between 4”, 2”2/3, or 4”+2”2/3
» Percussion Decay
Decay control for the percussion sample
4
Equalizer
3-band shelf EQ, +/-12dB with
crossovers at 180Hz and 3kHz
»Bass
Adjust the EQ’s bass frequency
»Mid
Adjust the EQ’s mid frequency
»Treble
Adjust the EQ’s treble frequency
25
SuperVX - Edit Page
Amp
1
Filter
3
Tremolo
1
4
Amp
»ADSR
Typical Attack, Decay, Sustain, Release
envelope controls for the amp
»Velocity
Adjust the amp velocity sensistivity
» Vel > Atk
Remaps Attack to Note Velocity
2
Unison
» Mode - OFF
» Mode - ALT
Sets the unison mode to ALT; stereo
position alternates L/R every note, width
controlled by [WIDTH]
» Mode - UNI
Sets the unison mode to UNI; layers
multiple samples and augments them for
increased stereo presence
»Color
Utilizes neighboring samples from the
library to a unique effect
»Width
Sets the stereo width
»Tune
Adjust pitch of unison layers
3
Filter
» Filter Type
Multimode filter can be set to low-pass
(LP), band-pass (BP), or high-pass [HP]
» Cutoff Frequency
Filter cutoff frequency
»Resonance
Filter resonance amount
» ENV [Depth]
Depth of the filters EG
»ADSR
Typical envelope controls for the filter
» Vel Sens
Adjust the filter velocity sensitivity
4
Tremolo
»Mode
Choose between OFF, TREMOLO, or PAN;
choose TREMOLO for a typical tremolo
effect or choose PAN mode to modulate
stereo position
»Depth
Set the depth (amount] of the effect
»Speed
Set the speed of the LFO [1/32 to 1/1]
5
2
Unison
5
Vibrato
6
Modwheel
Vibrato
»Mode
Choose between OFF, SINE or TRIANGLE;
SINE and TRIANGLE modes switch
between sine and triangle LFO wave
shapes, respectively
»Depth
Set the depth (amount] of the effect
»Speed
Set the speed of the LFO [.01Hz to 10Hz]
6
Modwheel
Use your MIDI controller’s Mod Wheel
controller to interactively control the
Filter Depth
»On/Off
Enable ModWheel>Filter Depth routing
» Filter Depth
Set the depth [amount] of influence
26
SuperVX - FX Page
Box Modeler
2
Drive
1
Delay
6
Phaser
5
Bypass
8
Effects displayed + listed in signal order
1
Drive
»Amount
Adjust the amount of tube coloration
»Gain
Adjust the amount of drive level
»Mix
Adjust the mix (dry/wet) ratio
2
Box Modeler
»Dry
Adjust the Dry volume level
»Wet
Adjust the Wet volume level
» IR Menu [Display]
Shows the currently selected impulse
response; click to open a pull-down menu
» < [PREV]
Select the previous IR
» > [NEXT]
Select the next IR
3
4
Chorus
»Width
Adjust the chorus width
»Amount
Adjust the effect intensity
5
Phaser
»Speed
Adjust the phaser speed
»Feedback
Adjust the feedback amount
»Depth
Adjust the effect depth
6
Delay
»Time
Adjust the delay time [1/32 to 1/1]
»Feedback
Adjust the feedback amount
»Mix
Adjust the mix [dry/wet] ratio
7
3
Lezly
4
Chorus
7
Reverb
Reverb
Sparkverb™ with fixed crossovers at
250Hz and 11.78kHz
»Size
Adjust the reverb space [4-50m]
»Time
Adjust the decay time [0.5-50s]
» High Decay
Adjust the high decay multiplier
[x0.1 - x10]
» Low Decay
Adjust the low decay multiplier
[x0.1 - x10]
»Mix
Adjust dry/wet mix amount
8
Bypass
Global FX bypass; use to switch between
clean signal (bypass on) and processed
signal [bypass off]
Lezly
»Mode
TREMOLO – fast; 6.7Hz
BRAKE – stopped
CHORALE – slow; 1Hz
27
SuperVX - Preset List
Presets included are practical configurations
that should serve as a starting point for
customization and exploration. Choose one
that has a feel you like and scroll through the
available layers and edit to taste.
PRESETS
LAYERS
Default Mono
Default Stereo
Dirty Wheel 1
Dirty Wheel 2
Full Process
Little Caroussel
Lounge Bubble
Mireille Dark
Over Distorted
Perc Smooth VX Pad
Piano Digital
Pro Active
Reggae One
Reggae Two
Serious Drawbars
Sine Piano
Soft Mood
Spacial Organ
Steel D Keys
Subby Lead
Super Lezly
Tone Bass 1
Tone Bass 2
Vibrant Keys
VX Bells 1
VX Bells 2
VX Bells 3
VX Pad One
VX Pad Two
VX Soft Sweep
VXurlitzer
Windows 1
Windows 2
000808 - Bell Harm
000808 - Bell Harm Vib
008008 - Flute
008008 - Flute Vib
008080 - Dark Flute
008080 - Dark Flute Vib
080008 - Claring
080008 - Claring Vib
080080 - Soft Sine
080080 - Soft Sine Vib
688656 - Med Tone
688656 - Med Tone Vib
800008 - Bass Tone
800008 - Bass Tone Vib
800080 - Subby
800080 - Subby Vib
800884 - Church
800884 - Church Vib
844886 - Rock
844886 - Rock Vib
880086 - Soft Mood
880086 - Soft Mood Vib
886584 - Chapel
886584 - Chapel Vib
888080 - Scholar
888080 - Scholar Vib
888084 - Little
888084 - Little Vib
888556 - Classic
888556 - Classic Vib
888586 - Classic Dark
888586 - Classic Dark Vib
888808 - Halfull
888808 - Halfull Vib
888856 - Pop Tone
888856 - Pop Tone Vib
888880 - Full Dark
888880 - Full Dark Vib
888888 - Full
888888 - Full Vib
28
Retrocorda - Main Page
Timbre
2
Volume
3
1
Page Navigation
4
Equalizer
The UI is divided into two sections; the upper-half provides control over timbre. The UI’s bottom-half provides detailed control of the timbre (broken out
by sustain, click, and percussion samples) and a 3-band equalizer.
1
Page Navigation
Navigate between 3 pages of controls:
Main, Edit and FX
2
Timbre
Choose the desired timbre; selections
are exclusive; organized between Normal
[raw] and REV/VIB [with reverb and
vibrato] sounds
3
Volume
»Sustain
Volume control of the sustain sample
» Release [On/Off]
Turn the release sample on/off
» Release Volume
Volume control of the release sample
» Percussion [On/Off]
Turn the percussion sample on/off
» Percussion Volume
Volume control of the percussion sample
» Percussion Mode
Select between 4”, 2”2/3, or 4”+2”2/3
» Percussion Decay
Decay control for the percussion sample
4
Equalizer
3-band shelf EQ, +/-12dB with
crossovers at 180Hz and 3kHz
»Bass
Adjust the EQ’s bass frequency
»Mid
Adjust the EQ’s mid frequency
»Treble
Adjust the EQ’s treble frequency
29
Retrocorda - Edit Page
Amp
1
Filter
3
Tremolo
1
4
Amp
»ADSR
Typical Attack, Decay, Sustain, Release
envelope controls for the amp
»Velocity
Adjust the amp velocity sensistivity
» Vel > Atk
Remaps Attack to Note Velocity
2
Unison
» Mode - OFF
» Mode - ALT
Sets the unison mode to ALT; stereo
position alternates L/R every note, width
controlled by [WIDTH]
» Mode - UNI
Sets the unison mode to UNI; layers
multiple samples and augments them for
increased stereo presence
»Color
Utilizes neighboring samples from the
library to a unique effect
»Width
Sets the stereo width
»Tune
Adjust pitch of unison layers
3
Filter
» Filter Type
Multimode filter can be set to low-pass
(LP), band-pass (BP), or high-pass [HP]
» Cutoff Frequency
Filter cutoff frequency
»Resonance
Filter resonance amount
» ENV [Depth]
Depth of the filters EG
»ADSR
Typical envelope controls for the filter
» Vel Sens
Adjust the filter velocity sensitivity
4
Tremolo
»Mode
Choose between OFF, TREMOLO, or PAN;
choose TREMOLO for a typical tremolo
effect or choose PAN mode to modulate
stereo position
»Depth
Set the depth (amount] of the effect
»Speed
Set the speed of the LFO [1/32 to 1/1]
5
2
Unison
5
Vibrato
6
Modwheel
Vibrato
»Mode
Choose between OFF, SINE or TRIANGLE;
SINE and TRIANGLE modes switch
between sine and triangle LFO wave
shapes, respectively
»Depth
Set the depth (amount] of the effect
»Speed
Set the speed of the LFO [.01Hz to 10Hz]
6
Modwheel
Use your MIDI controller’s Mod Wheel
controller to interactively control the
Filter Depth
»On/Off
Enable ModWheel>Filter Depth routing
» Filter Depth
Set the depth [amount] of influence
30
Retrocorda - FX Page
Box Modeler
2
Drive
1
Delay
6
Phaser
5
Bypass
8
Effects displayed + listed in signal order
1
Drive
»Amount
Adjust the amount of tube coloration
»Gain
Adjust the amount of drive level
»Mix
Adjust the mix (dry/wet) ratio
2
Box Modeler
»Dry
Adjust the Dry volume level
»Wet
Adjust the Wet volume level
» IR Menu [Display]
Shows the currently selected impulse
response; click to open a pull-down menu
» < [PREV]
Select the previous IR
» > [NEXT]
Select the next IR
3
4
Chorus
»Width
Adjust the chorus width
»Amount
Adjust the effect intensity
5
Phaser
»Speed
Adjust the phaser speed
»Feedback
Adjust the feedback amount
»Depth
Adjust the effect depth
6
Delay
»Time
Adjust the delay time [1/32 to 1/1]
»Feedback
Adjust the feedback amount
»Mix
Adjust the mix [dry/wet] ratio
7
3
Lezly
4
Chorus
7
Reverb
Reverb
Sparkverb™ with fixed crossovers at
250Hz and 11.78kHz
»Size
Adjust the reverb space [4-50m]
»Time
Adjust the decay time [0.5-50s]
» High Decay
Adjust the high decay multiplier
[x0.1 - x10]
» Low Decay
Adjust the low decay multiplier
[x0.1 - x10]
»Mix
Adjust dry/wet mix amount
8
Bypass
Global FX bypass; use to switch between
clean signal (bypass on) and processed
signal [bypass off]
Lezly
»Mode
TREMOLO – fast; 6.7Hz
BRAKE – stopped
CHORALE – slow; 1Hz
31
Retrocorda - Preset List
Presets included are practical configurations
that should serve as a starting point for
customization and exploration. Choose one
that has a feel you like and scroll through the
available layers and edit to taste.
PRESETS
LAYERS
Default Mono
Default Stereo
Emotional
Fourmidable
Harmonium
Harpsy Mind
Leymar Bob
Lezlycorda
Magic Lead
Mati Bass Rice
Mono Chaos
Nostalgic Keys
Perc Smooth Pad
Phillidarka
Piano Analog 1
Piano Analog 2
Processed Pad
Radioactive
Ragga Muffin
Retro Bells 1
Retro Bells 2
Sad Steeldrums
Soft Chill Keys
Solo Clinton G
Sweeperman
Tortured Reality
2’ Normal
2’ Vibrato + Reverb
4’ Normal
4’ Vibrato + Reverb
8’ Normal
8’ Vibrato + Reverb
4’+2’ Normal
4’+2’ Vibrato + Reverb
8’+4’ Normal
8’+4’ Vibrato + Reverb
8’+2’ Normal
8’+2’ Vibrato + Reverb
8’+4’+2’ Normal
8’+4’+2’ Vibrato + Reverb
32
UVI Workstation: Tips + Tricks
MIDI Learn
Arpeggiator
Most UVI Workstation parameters can be automated via. a convenient
UVI Workstation comes equipped with a robust arpeggiator. To insert
MIDI Learn. MIDI Learn allows you to bind a physical MIDI controller to
an arpeggiator in a part, you need to display the Single view in the
specific parameters within UVI Workstation.
UVI Workstation, then click on the note icon. The arpeggiator can
be employed as a pattern gate, arpeggiator, or even an advanced
Any FX tab parameter, Macro Knob or Slider in UVI
instruments can use the MIDI Learn feature
rhythmic processor for your live MIDI performance or sequenced MIDI
tracks. Arpeggiators can be inserted in an unlimited number of parts.
The MIDI controller type and the MIDI Channel assignment will
be saved with the multi or with your song in the host sequencer
Automation is assigned per-part
To use MIDI Learn:
1. Right-click the parameter in UVI Workstation
that you want to automate
2. After the MIDI Learn dialog appears, Trigger the
desired MIDI input controller (knob, fader etc.)
Preset Stacking
Thanks to the simplicity of the UVI Workstation you can stack as many
preset as you want by simply assign multiple part on the same MIDI
channel.
Split, Velocity & Key Switch
To remove a MIDI controller assignment:
Right-click the desired parameter and press “Delete”
Unlimited FX
The Keyswitch settings allow you to load multiple presets into two
or more parts and dynamically play and mute them from your MIDI
controller using key switching, note range, velocity range or any
combination of the three parameters. This powerful feature gives you
a great deal of real-time control.
UVI Workstation offers a wide variety of FX, or effect
processors, to cover all your audio processing needs. The FX
Scroll Wheel
implementation is robust and includes the ability to insert
unlimited FX slots in several stages of the signal flow.
All knobs can be adjusted with the scroll wheel on your mouse.
When you double-click on any knob or slider, you can manually enter
Click the “FX” tab to open the FX page on the Single view
or type in the desired value.
In Multi view the FX section is always displayed
33
Links
UVI
Home . . . . . . . . . . . . . . . . . . . . . . . . . . . . . . . . . . . . . . . . . . . uvi.net/
Download UVI Workstation and User Manuals . . . . . . . . . . . . . . . . . . . uvi.net/downloads
Your Registered Product Serial Numbers and Download Links . . . . . . . . . uvi.net/my-products
FAQ . . . . . . . . . . . . . . . . . . . . . . . . . . . . . . . . . . . . . . . . . . . . uvi.net/faq
Tutorial and Demo Videos . . . . . . . . . . . . . . . . . . . . . . . . . . . . . . . youtube.com/
Support . . . . . . . . . . . . . . . . . . . . . . . . . . . . . . . . . . . . . . . . . . uvi.net/contact-support
iLok
Home . . . . . . . . . . . . . . . . . . . . . . . . . . . . . . . . . . . . . . . . . . . ilok.com/
iLok License Manager . . . . . . . . . . . . . . . . . . . . . . . . . . . . . . . . . ilok.com/ilm.html
FAQ . . . . . . . . . . . . . . . . . . . . . . . . . . . . . . . . . . . . . . . . . . . . ilok.com/supportfaq
34
Credits and Thanks
Produced by UVI
Recording / Editing / Sound Design
Damien Vallet
Kevin Guilhaumou
Alain J Etchart
Software + Scripting
Olivier Tristan
Remy Muller
GUI, Graphic Design
Nathaniel Reeves
Anthony Hak
Special Thanks
Manu @ master-wave.com
David @ egrefin.free.fr
Midilive Studios @ midilive.fr