1
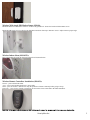
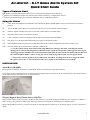
Air-Alarm1 - D.I.Y Home Alarm System Kit
Quick Start Guide
Types of Defense Lines:
24Hr Defense Line defends & monitors 24hrs areas (ie. Emergency Panic Buttons, Smoke Detectors).
1st Defense Line defends the perimeter area of homes such as doors & windows (i.e. Magnet Door Sensors).
2nd Defense Line defends living spaces, bedrooms, & hallways areas (i.e. PIR Motion Sensors).
Using Air-Alarm:
i)
Check the Wireless Magnetic Door/Window Sensor & Wireless Wide Angle PIR Motion Sensor to ensure batteries is installed
properly.
ii)
Turn on the PIR sensor and face it toward an area where there are no movement to avoid faults alarm.
iii)
Place the magnetic/emitting sensor close to each other within 10mm to avoid faults alarm.
iv)
Plug in the Indoor Siren to an electrical wall outlet.
v)
Locate a telephone LAND line and plug it into the TEL IN of the Alarm Host (SM-8088E).
vi)
Plug in the A/C to the Alarm Host and turn the power switch to the ON/DC position.
vii)
Input telephone number for group 01: Press SET+Password+ENT+01+ENT+TelephoneNumber+ENT. (Group# 01~05)
viii)
Press the AWAY button on the Remote Controllers to ARM. Done!
*** Any movements in front of the Wireless Wide Angle PIR Sensor will trigger the alarm. If the magnetic and the
emitting sensor of the Wireless Magnetic Door/Windows Sensor spreads beyond parameter will trigger the alarm. Upon
alarm trigger the Host and Indoor Siren will sound off the alarm and at the same time the Alarm Host will auto dial out to
the enlisted telephone number. When receiving call; a siren sound message will be heard, reference pg6 for detail.
*** Each wireless sensor by default is already added to the Alarm Host. If sensing devices does not trigger the Alarm
Host, please refer to the “To Add” instructions on the user’s manual to add wireless devices accordingly.
INSTALLATION
Alarm Host (SM-8088E):
Find a location to install the Alarm Host, recommend flat surface near an electricity outlet and LAND line.
Level off the Anchor Card and secure the two 25mm screws through the card into the wall (use dry wall anchor for dry wall). Hook and secure
the Air-Alarm host onto the anchor screws as illustrated below.
Wireless Magnetic Door/Window Sensor (SM-87B):
Find a suitable location for the sensor near a window or door entrance or exit. Mount the magnet & emitting sensor onto doors or windows at
least 5~6ft above the ground level and less than 10mm gap in between the magnetic & emitting sensor as illustrated below.
Mount with the adhesive stickers or 13mm screws and/or use mounting bracket (25mm screws). (Reference pages 9~10 in user’s manual for
detail)
SecurityMan Inc.
1
Wireless Wide Angle PIR Motion Sensor (SM-80):
Mount the bracket to wall surface at least 6~7ft above the ground level. Secure the bracket with the 20mm screws.
Match the PIR sensor grooves to bracket & slide PIR sensor down from top to bottom to secure. Adjust sensor to proper angle.
Wireless Indoor Siren (SM-103W):
Plug in the Indoor Siren into an electrical wall outlet as illustrated below:
Wireless Remote Controllers Installation (SM-88X):
Disarm – press to disarm the alarm
Away – press to arm (default dwell time is 40 seconds)
Home – press to arm the 1st defense line only (the perimeters of home commonly before going to sleep).
Emergency – press in case of panic or emergency to activate the sirens & auto dial to the enlisted numbers.
NOTE: Please reference Air-Alarm1 user’s manual for more details.
SecurityMan Inc.
2