1
EXPERDOCS USER MANUAL 1 / 64 Table of Contents Introduction ............................................................................................................................................... 4 User Types and Access ........................................................................................................................ 6 Sharing Documents and Projects ................................................................................................... 7 Experdocs Features .............................................................................................................................. 8 Experdocs Benefits ............................................................................................................................. 11 Getting Started ........................................................................................................................................ 13 How to Start with Experdocs ......................................................................................................... 14 Quick Start Guide ................................................................................................................................ 25 FAQ's ........................................................................................................................................................ 26 Getting help .......................................................................................................................................... 35 Document Organization ................................................................................................................... 36 Additional Program Features ......................................................................................................... 40 Experdocs Program Screens ............................................................................................................... 41 Top Menu ............................................................................................................................................... 42 Search Pane .......................................................................................................................................... 45 Current Document Pane ................................................................................................................... 47 Thumbnails Pane ................................................................................................................................ 49 Info Pane ............................................................................................................................................... 50 Using Experdocs ...................................................................................................................................... 51 Opening a New Project ..................................................................................................................... 52 Importing Files .................................................................................................................................... 53 Adding, Coping and Deleting .......................................................................................................... 57 Assigning Metadata ........................................................................................................................... 58 Generate Document Report ............................................................................................................ 59 Export Documents .............................................................................................................................. 60 Printing ................................................................................................................................................... 61 2 / 64 Saving and Sync .................................................................................................................................. 62 Working Offline ................................................................................................................................... 63 Presentation and Production .......................................................................................................... 64 3 / 64 Introduction Experdocs is a secure document management system for documents and photographs that facilitates easy organization, storage, access and retrieval. Your documents are easily accessed online or on your local computer drive. The program catalogs and categorizes documents that are then easily accessed to view and share. Each project or dataset requires its own organization, access and retrieval format. Experdocs is a database program designed to provide the freedom for you to set up the unique organization format required for each individual project. You choose the document format best suited for the project on which you are working by naming the tabs, tags, and ‘childs’ or sub-tags that best represent the information contained within the project. Working with data and using the tabs and tags will be described within this User Manual, but as is pointed out within this Manual, it is important that thought be given to how your data is organized; please see the section on Document Organization. Three key features set Experdocs apart from many other programs. First is ease of use. You will find that Experdocs is a tool you will use each day, like Word or PowerPoint. Second is its ability to tab and tag documents as was discussed in the prior paragraph. Third is the ability to share information with anyone you choose. Please see a description of Experdocs sharing (Sharing Documents) flexibility below. Please remember that this program securely stores your documents in a “cloud” environment. You will be prompted to sync your data when you enter the program and when you exit. You may also request the program sync at any time by going to the File menu in the top left corner, and selecting Synchronize Data With Server. Your data is also stored on your local drive or laptop. If, for any reason you choose or cannot be connected to the internet, you can still work on your data. When you are once again connected to the internet, the sync process updates the “cloud” secure online storage feature. Program Download - See our How to Start guide After purchasing Experdocs, or being invited to share project data (as an Additional User), a download link will be sent to you in an email. Clicking on the email link will begin the program download to your computer (you must be connected to the internet for this process to precede). Once the download is complete, you will be prompted to enter your User Name (email address) and Password. Once the program has identified you as a Primary User or an Additional User, you are ready to proceed in creating your desired document organization format and uploading documents to Experdocs. 4 / 64 Future program updates will be downloaded automatically when opening Experdocs. Please visit our website from time to time as you work with Experdocs and share your comments or suggestions on how we may be able to improve the way documents are organized. We are committed to continuous enhancement of the features and flexibility of the program and your feedback is important to us. 5 / 64 User Types and Access There are potentially three types of Experdocs Users: The purpose of this information about users is to show the functionality and flexibility of Experdocs. Experdocs allows and encourages sharing information. This is possible because of the way Users are permitted to view databases: • The first is a Primary User which allows full access to the program and its features. If additional storage space is needed, more can be purchased any time. Primary Users purchase Experdocs software inclusive of full functionality, all features, upgrades and support. Primary Users can add or invite one or more Additional Users/Affiliate Users to join their account and can customize what each Additional User/Affiliate User is allowed to see and do within specific files. This allows controlled access and real-time collaboration amongst an unlimited number of users. • The second is an Additional User. The Additional user only has access to Experdocs via an invitation from a Primary User, and can only view data based on the permissions set up by the Primary User. Additional User accounts share the server space of a Primary User Account. Additional User accounts enjoy full functionality of the software, including features, upgrades and support, but are limited to the custom controls set up by the Primary Account. Primary Users can add an unlimited number of Additional Users to view and work within their project files. This type of user typically works within the projects of one Primary User. • The third is an Affiliate User. An Affiliate User, like an Additional User may access Experdocs data only by accepting an invitation from a Primary User to view or work with their project. An Affiliate User is differs from an Additional User only in that the Affiliate User does not have a set Primary Account with which to work. An Affiliate may be invited to view projects by numerous Primary Accounts, so we have made a distinction between the types of users. 6 / 64 Sharing Documents and Projects Data can be shared with other users as well as non-users. First, sharing with other Experdocs Users: • Primary Users can set permissions by accessing the Experdocs Webapp. Within the program, go to File/ Invite Someone to Access Your Account or File or Manage Users and Permissions. Setting permissions allows both other Primary Users and Additional Users to view your data. The Primary User determines what data Additional or Affiliate Users (with an Experdocs account) can see, and what data may be changed or sorted by those Users. Second, sharing with non-Experdocs Users: • Clicking on the ‘Shares’ tab at the Menu bar at the top of the program lets you tag documents, or a specific group of documents to be shared. Experdocs then creates an online link, available for you to share information, allowing those you invite to view data online, on our secure website. This method of sharing does not require that the person invited to view documents have an Experdocs account, but document may only be viewed for a limited time. 7 / 64 Experdocs Features Experdocs Features Below is a quick glimpse of some of the technical features of Experdocs. We encourage users to submit their suggestions online or via email and we’ll do our best to incorporate your desired features in our next version release. Experdocs takes a proactive approach to ensuring our product meets the needs and expectations of various users. We are constantly updating our features and making sure our benefits exceed those of other products on the market, while striving to deliver Experdocs at the lowest cost possible. Free Online Updates: Experdocs provides free updates to users automatically ensuring users always have the latest version of Experdocs’ features and functionality. Unlimited Document/Image Storage: Large projects are easily managed with unlimited, User definable online storage. Enjoy safe, secure, redundant backup of your documents with Experdocs’ state-of-the-art , high bandwidth, 24/365 servers. Cloud Based Networking: Share document and image management, organization and analysis with other employees, colleagues, consultants, anyone, anywhere, without costly servers, licenses, dedicated internet connections or IT costs. Unlimited Metadata: Attach powerful document and image organization data, including assignment of unlimited folders, tabs, tags and text, to each document or image. Easy Importing and Exporting: Save time and organize documents and images as they are imported. Quickly export images and documents to industry standard PDF or TIFF files. Smart Report Generation: Select the metadata, documents and images you desire and instantly create custom PDF reports. Online Web Gallery: Post documents, images and analysis to your own private web gallery instantly and share access to your website with your project team in real time. Presentation Tools: Build pre-presentation collections of User defined documents and images. Ideal for Mediations, Expert Meetings, even Trial Presentation. 8 / 64 Simple Drag and Drop: Multitude of easy click, drag and drop features within user interface Advanced Filtered Search: Leverage Experdocs’ powerful filters to focus your analysis on specific, filtered documents and images. Customizable User Interface: Select from different interface themes to match your preferred look and feel. Customize drop-down fields, tabs, tags and functionality per a project’s specific needs. Automatic Bate Number: For legal and large volume collections, assign automatic bate numbers to documents and images. Export a deposit ready, Bated expert or client file. Advanced Editing: Powerful editing tool allows users to edit, tag and classify multiple images at the same time, saving huge amounts of labor for the Experdocs user. Sync Users & Data: Selective synchronization/backup of all documents, information and data, including Additional User contributions Thumbnail Views: Select different viewing options for images and documents, including thumbnail view during and after imports as well as full page and grid view for presentations. Reduced Paper Costs: Save money by reducing paper costs through electronic file sharing, including costs of raw paper, printers, ink, filing systems and materials, filing personnel, postal mailing and delivery services (no more FedEx, UPS, OnTrac, YouSendIt, or other large electronic file delivery services). Work Offline or Online: Users can work with files with or without an internet connection by downloading the program to individual’s PC based laptops or desktops. Then automatically synchronize your local data with the server when you get to an internet connection. Infinite Users: Add an unlimited number of additional users (employees, colleagues, collaborators, clients, etc.) to your account for a low monthly user fee. No long term contracts required and cancel any time. 9 / 64 Mobile Access via Web Browser, IPad or Tablet: Access your documents and images via our web app using your cell or smart phone by logging in with a web browser to www.login.Experdocs.com Managed/Controlled Access: Powerful user controls including client access grant, entry logs and customizable multi-level permission based functionality allows users to specify what others can see and do within specific projects or files, while keeping track of who does what. Earth Friendly: Go Green! Paperless sharing of files reduces printing, saves trees and is Earth friendly Disaster Proof: Allows safe, secure storage and recovery of project files during personal accidents or natural disasters Experdocs Community: Expand your company's resources with unlimited real time collaboration with other Experdocs Accounts and Users. Unlimited Projects: Create an unlimited number of projects and project categories. Purchase more server space easily on line if required for low monthly fees. 10 / 64 Experdocs Benefits Experdocs is Easy to Use Experdocs will become a tool you use everyday like Word or Excel or PowerPoint. Do It All Now with Just One Tool With Experdocs professionals no longer need to waste time switching back and forth between different software programs and databases. Users can easily review, organize, sort, analyze, report, share and present all of their project or case documents and images in the same program. Cloud Based Technology Experdocs incorporates the latest cloud based technology allowing real-time access and collaboration to all your critical electronically stored documents via an internet connection. Whether across firms or across the world documents and photographs are safe and always accessible to whomever you desire. Tiered Permission Control Experdocs includes customizable tiered permission or "rule-based" functionality which allows Primary Users full control over what Additional Users can see and do on a per project basis. This means you can give others ability to either just view OR work on your files, selecting exactly what files they can see and not see. Advanced, Rapid-Fast File Search Experdocs contains advanced document and image scanning, tagging and sorting features which means you find the exact photo or document you are looking for right when you need it, no matter how much data you have to sift through. This makes Experdocs a hard tool to beat in deposition, mediation or trial as you find electronically stored evidence sets so fast and accurately that it’s hard for others to challenge and almost impossible to beat. Unlimited Number of Users Whether you work independently or often share or collaborate with hundreds of people, Experdocs allows an unlimited number of Additional Users to be added to your account for a low monthly fee. If Additional Users want full access to all Experdocs services and functionality they can just upgrade to Primary User status. It’s simple and clear, with no hidden charges or gimmicks. Infinitely Scalable to Fit Your Firm's Size and Project Needs 11 / 64 Regardless if you have 100 documents or 100,000 photos Experdocs is infinitely scalable to meet your firm or project needs. We can provide you with enough space on our dedicated secure servers to accommodate anywhere from 1GB up to 100GB of storage. Larger requirements just require a bit of custom pricing so give us a call. Intuitive, simple-to-use features Experdocs was designed so even the most entry level employee with no technical experience can now work on advanced electronically saved project or case work. This is due to the intuitive nature and design of the user interface which has customizable folders and tabs to make Experdocs work for you instead of making you work to figure out Experdocs. No more costly training hours spent learning difficult and confusing software programs. Total File Security The safety and security of your electronically stored files are your first priority and ours. We utilize the latest 256K secure socket layer encryption technology to make sure your documents and images are always safe. Our servers are maintained at secure, highly protected energy efficient offsite locations in the San Diego area of California and backed up automatically to make sure no customer ever loses a thing, no matter what happens to their own computer or in a disaster. Highly Cost-Effective Experdocs challenges customers to find a more affordable program that does everything Experdocs does. From the beginning Experdocs was designed to be cost effective and solve expensive IT problems faced by Experts, law firms, insurance companies and various professionals who work with large quantities of documents and images. With increasing budget cuts across all industries and sectors, Experdocs maintains a very competitive pricing structure based on comprehensive, up-to-date market research from competing products. We guarantee to be the lowest cost solution for electronically managing your project or case Professional Customer Service and Technical Support Experdocs maintains a commitment to excellent customer service and timely technical support. Customers can find answers to general questions and technical support queries from the support page of our website which will be answered by one of our level 1, 2 or 3 engineers, depending on the nature of the inquiry. We guarantee to respond to your query within 2 business days, often also on weekends and major holidays. We host a multitude of tutorials, FAQs, and our program manual right on our website for fast answers online. Customers also can email us at [email protected] for timely responses. 12 / 64 Getting Started The following pages will cover: • • • • • • • How to Start (order and download) Quick Start Guide (how to begin using the program) FAQ's System Requirements for using Experdocs Getting Help (if support is needed) Document Organization Additional Program Features 13 / 64 How to Start with Experdocs 1. Go to http://Experdocs.com/ and select “Sign up for Free Trial”. On Your Way! 14 / 64 2. Select the number of Additional Users you would like to join you in your free trial. Your Experdocs Primary Account comes with one User Account. So for instance, if you have three additional people in your office who work with you in organizing, managing, analyzing or presenting documents you might want to choose (3) Additional User accounts. Perhaps you also have a consultant (1) who collaborates on your documents and a few clients (2) whom you would like to see the document organization. In that case you might select (6) Additional User accounts. Remember, you can assign these to whomever you like at a later time. You can also add or remove Additional User accounts at any time. 15 / 64 3. How much space do you need to store all of your Project documents? One of the most exciting features of Experdocs is its online server storage for all of your documents, images and data. Your Experdocs account comes with 4 gigabytes of online storage. If you need more storage you can add additional capacity at any time. You can also reduce you storage needs if you desire. For example, on average 4 gigabytes of storage will accommodate 20,000 average documents and 6,000 digital photographs*. Simply estimate what your Project requirements will be and select the storage you need. 4. Select “Order Now”. *Based upon Experdocs’ highest quality average image size, the average PDF document file size. 5. Complete the on‐line information form so that Experdocs can create your 16 / 64 Account. Your payment information will be completed next. Experdocs values your privacy and will never sell your information or use it for any purpose other than supporting your Experdocs experience (see Experdocs privacy policy). Please be sure to use the best email address to receive Experdocs Trial sign up receipts and future Experdocs notices, such as the notice informing you that your trial period will be expiring. Your name, address and User email address may be used by Experdocs support for security purposes. 6. Select “Next”. 7. Here you can enter your payment information. Your debit card, credit card 17 / 64 or PayPal account will not be charged unless you’ve requested additional storage during your Trial. You may cancel your account at any time prior to 30 days. Approximately one week before your trial period expires you will receive a notice informing you of the approaching expiration and providing you with links should you choose to cancel. The Primary Account Name will be your account name, such as the name of your company (ex. ABC Consulting, LLC). 18 / 64 8. The Primary User Account First Name will be the name of the individual who will have primary administrator rights over the account, rights such as inviting Additional Users and assigning access privileges for each Project you create. The Primary User Account can be reassigned at a later date, for instance if you desire to have your office manager control this. You can also create multiple administrator accounts to share this responsibility. Be sure to enter your name and email correctly. Your email will also be your initial User ID for logging into the program (client) and the Web Application (WebApp). 9. Select “Complete Order”. You will receive a series of emails from Experdocs Support. Watch for them in the event they are moved to your junk mail box in error. 19 / 64 10. The first email you will receive from Experdocs Support will look like this: 11. You will receive an email like this for each item ordered, your Experdocs Account, and Additional Users and any Additional online storage space. 20 / 64 12. The next email you will receive from Experdocs Support will look like this: 13. The links in the email will take you to printable receipts for your purchase. The Experdocs Account will show $0.00 due to the 30 day free trial. The same type of emails will be sent to you each month, for your records, should you decide to keep and continuing using Experdocs. 21 / 64 14. Following you receipt you will receive an email from Experdocs Support will look like this: This email informs you that your own Experdocs account, web site and User account has been created by Experdocs. 15. Follow the link to “….complete the activation process.” Here you will enter the User email address you wish to use and you own password. You can change your password at any time. 16. Select “Activate”. 17. You may now log into the Experdocs Web App created for your account. The Web App is provided so that you, and any Users you add, can access Project documents from any computer, tablet or mobile device connected to the Web. Any documents for which a User has permission may be accessed and shared from the Web App. However, at this time you will find that you have no project rights as you have not yet created a project. You will do this next after downloading and installing the Client. 18. Notice the line in the email above that reads “Click here to install the Experdocs client software. Select “Click here” to begin the software download process. Follow the online instructions and install all components recommended. Depending on the speed of your internet access and your computer this could take several minutes. 22 / 64 19. The Experdocs program will install automatically and will open upon completion to the registration box. The program wants to know who you are so enter your Account email address and password, the one you used before to activate. This is the Experdocs client, where the majority of your document organization, management, analysis, sharing and presentation will take place. To begin using Experdocs right away, follow the next few steps. 20. There will be a box indication the need for a first time synchronization. Select OK. 23 / 64 21. Now you will be asked to create a new Project for Experdocs. If you use Project number then you would enter the Project number in the first text space. Enter a Project name. You can select from the default “Standard Projects” or you can create a project category of your own, such as Plaintiff Litigation, Defense Litigation, Project Management, etc. The Bate Number Format is the default format you would use in the event you were required to deposit documents in a litigation matter. The Bate numbering format can be changed at a later time. Selecting “OK” will create you Project. Congratulations! You are signed up for Experdocs and ready to begin working smarter than you ever have at organizing and managing your Project documents. 24 / 64 Quick Start Guide Section to be updated. 25 / 64 FAQ's 1. Can I share my photographs and documents with other employees/colleagues in Experdocs? Yes! Additional Users can easily join your Primary Account for only $14.95/month. It is also easy to share your electronically stored documents with other Users via our convenient Web App. Users can log-in to the Web App from our website in the top right corner or any browser by visiting http://login.Experdocs.com 2. Can I import and work with PDF documents in Experdocs? Yes! Experdocs permits quick and easy import and export via industry standard PDF. Users can organize documents intelligently as they are imported and save time. Experdocs offers custom report generation where Users can specify what information and data accompanies their documents and images. Then it’s really simple to export to PDF. 3. How do I get my documents into Experdocs? In the Experdocs interface, at the top, go to "Project Data," then scroll over Documents and Photos, and click on "Add Photos and Documents." Then you can import by a folder or by a file. Either select all files in a folder or folder tree or select individual photos or documents on the computer, network, or USB flash drive. 4. How do I set up Metadata for my project in Experdocs? You can choose to set up meta data as you import files or after. In order to set up data as files are imported go to the top and click on "Project Data" then scroll over Documents and Photos, and click on "Add Photos and Documents." Here is where you can configure what data is included and attached to your files as you import them . At the top if you click on the folder titled "Photo/Document Info" you can specify items like the Photographer, Time/Date, Photo Size, Comments or Bate Numbers. If you click the folder titled "Tags" you can attach tags from the list you created prior or edit and create new tags to attach. Now, if you have already imported your files and then want to set up meta data manually you can either use the "Info" panel on the left side to specify data for the given fields, or you can go to the top of the Experdocs interface and click on "Project Data" and then click either on "Edit Project Information" or "Edit Photographers." If you choose "Edit Project Information" you can specify Project Information fields, and edit or create tabs and tags which allow you to easily sort your files by keywords later. 5. What kind of images will Experdocs accept? Experdocs accepts images in .jpeg, .tiff, and .pdf file formats 6. Will Experdocs allow me to make reports? 26 / 64 Yes! Users can easily create custom or generic reports and export to PDF. To do this, at the top of the Experdocs interface, click on "File" and scroll down to click on "Generate Document Report." Here you can specify which photos to include in your report, how you would like to export your report, what data will be included and more. 7. Can I search for specific Meta data in Experdocs? Yes! In the Experdocs interface, on the left side there is a Search panel. Here you search for specific meta data by entering key words into the blank search field, selecting either exclusive or inclusive filter search, and clicking search. If you have created folders, tabs, or tags you will see them listed in the Search panel. You can select exclusive or inclusive filtering, and then select which tag, tab or folder you want to search and then click Search. 8. What is Metadata? Simply put, metadata is data about data. It is descriptive information about a particular data set, object, or resource, including how it is formatted, and when and by whom it was collected. Although metadata most commonly refers to web resources, it can be about either physical or electronic resources. It may be created automatically using software or entered by hand. The underlying concepts of metadata have been in use for as long as collections of information have been organized. For example, the information structure for materials in library card catalogs is a type of metadata that has served as a collection management and resource discovery tool for decades. Using metadata, it is possible to create customizable tags for markup languages such as XML and SGML. 9. What are filters? Filters are organizational tools which allow users to quickly and easily sort documents and images by informational cues and/or meta data specified by the user and input into the filter. By creating filter sets user can separate a given set of files per the desired characteristics of the files and user. 10. How many copies of my documents does Experdocs require? Just one! 11. Where are documents stored in Experdocs? Experdocs has secure, SSL encrypted, offsite servers operating 24 hours per day/365 days per year and which are located at a third party protected location in the San Diego area of California. Experdocs utilizes cloud-based technology to ensure users can access documents and images across the firm or from across the world with an internet connection. Data can also be stored locally on users PC desktops or laptops which the option to synchronize local data with Experdocs servers anytime an internet connection is available. 12. Do I have to be connected to the Internet to use Experdocs? 27 / 64 ce. with the Experdocs servers whenever they reach an internet connection. 13. Can I work offline in Experdocs? Yes! Users can work either offline or online. You simply download the program onto your PC or laptop and then you can work offline. When you get to an internet connection you simply synchronize your local data with the Experdocs servers and your project files are all updated automatically in your account. 14. Can more than one person at a time work in Experdocs? Yes! Experdocs permits an unlimited number of Additional Users to join a Primary Account. Experdocs accounts are also infinitely scalable to meet your project data needs. Whether you require 4GB or storage or 400GB, Experdocs provides affordable solutions to all users. 15. Can more than one person at a time work on the same Project in Experdocs? Yes! Experdocs permits real-time collaboration amongst an unlimited number of users. Project teams can work on files at the same time, from remote locations, and always have access to updated project information via our automated data synchronization function. If users are working without an internet connection, Experdocs will automatically synchronize their local data the next time an internet connection is available and users log on to Experdocs. 16. What equipment do I need to use Experdocs? Experdocs works on the Windows platform and is compatible with PC desktops and laptops. Users can use the Experdocs Web App via an internet browser from an IPad, Tablet or Smart Phone. Experdocs is not fully compatible with Mac systems yet (but we’re working on it!) 17. Do I need a server to use Experdocs? Nope! Experdocs utilizes cloud technology and state-of-the-art, high bandwidth, offsite protected servers which are up and running 24/365. All Primary Accounts include 4GB of secure dedicated server space. If additional space is required users can simply purchase more in convenient blocks which are priced on the Pricing page of our website. This feature saves users costs on expensive equipment, IT personnel and costly software licenses. There are no contracts required and you can cancel at any time. 18. How is Experdocs supported? Windows platform on PC based desktop or laptop; Internet connection 19. What does Experdocs cost? See our Pricing page for purchasing information. Primary User accounts cost 28 / 64 $34.95/month and Additional Users can be added to Primary User accounts for only $14.95/month. 20. Can I get a discount if I purchase multiple Experdocs user accounts? For enterprise pricing options please contact our billing department by visiting our Support page and selecting Contact Experdocs. Then in the form subject select Billing and submit your inquiry. 21. How long does it take to install Experdocs? Experdocs usually installs in just a few minutes however if you are using dial up internet connection it may take a little longer. The installation process is generally very fast. 22. Do I need an IT person to set up Experdocs for me? No! Experdocs is easy to set up and intuitive to use. Users simply download the program with a couple clicks and are ready to work. We host a multitude of user help right on the Support page of our website, including the product manual, FAQs, and technical support submission. 23. How do I start a project in Experdocs? To start a new project in Experdocs, go to the top of the Experdocs user interface (EUI) and click on “File.” Scroll down to click on “New Project.” Verify your choice, choose whether you want to synchronize your local data with the server, and you’re done. Then a new blank interface will appear with a pop-up window that reads “Create Project.” Here users specify data for the given fields and a new project is created. To close a current project and open a different one, go to the top of the EUI and click on “File.” Scroll down to click on “Open Project” where you can select from your list of available projects. 24. Can I set up my own Metadata in Experdocs? Yes! Please see number 4 above. 25. What is the difference between “Exclusive Filter” and “Inclusive Filter”? If “Exclusive Filter” is selected, then when a user clicks on “Apply Filter,” the system will use the specified filter parameters as exclusive criteria to sort the electronic file set. In other words, all files which do not contain the specified filter set criteria will sort and appear. If “Inclusive Filter” is selected, then when a user clicks “Apply Filter,” the system will use the specified filter parameters as inclusive criteria by which to sort the electronic file set. This means all the files which do contain the specified filter set criteria will be sorted and appear. These features allow users to organize, sort and review documents and images according to both inclusive and exclusive filtered metadata file sets. 26. What is “Save Filter Set” and how does it work? Once a user creates a filter set, or specifies sorting criteria for a given file or 29 / 64 file group, then the user can select “Save Filter Set” and the system will save all the pre-sorted documents and images which belong to the given set of filter criteria. This allows users to sort sets of documents and images and then quickly and easily retrieve, share, analyze or present this specific group of files with others. This is especially useful when working with or sharing a large volume of documents and images and the need arises to organize, sort, work or present small groups of specific files at a time. 27. Can I add Metadata to more than one file at a time in Experdocs? Yes! You can add Meta data to individual files or multiple files and file groups simultaneously in Experdocs. This is useful if you want to categorize or attach similar data to groups of files with similar data information at once, which allows for quick group file sorting later. 28. I already have my documents organized in folders in Windows. Will I lose this organization when I import to Experdocs? No, you can keep the same folder organization by importing with the folder or folder tree import option in Experdocs. You can also organize documents and images as they are imported into Experdocs, thereby allowing users to create the same organization parameters and sort criteria which exist prior to uploading into Experdocs. Unlimited number of folders, tabs and tags can be set up for documents and images to replicate folder organization in Windows. 29. How do I know if someone else is working on my Experdocs project at the same time? On the bottom left corner of the Experdocs user interface, the third information field displays “Current Users.” This will show you what other users are working on a project at a given time. 30. What does “Rating” mean and how is it used? Rating is a user classification system in Experdocs which allows users to rate their favorite file, or indicate their preference or relative opinion on a scale of one star (least favorite/not relative/poor) to five stars (most favorite/very relevant/excellent). Then users can share their rating with others and can sort files according to user ratings. To use the file rating system, click on the star icons on the right “Info” panel of the Experdocs interface, next to the “Rating” scale. 31. Can I change the way my Experdocs desktop looks? Yes, users can select from different theme options and interface modifications by going to the top of the Experdocs interface and clicking on “View.” Here there are different options for users to adjust the way the desktop looks. If you want a custom interface for your company, Experdocs may be able to create one for an additional fee. Please contact us directly to inquire about this. 32. Can I use a second monitor in Experdocs? 30 / 64 Yes, users can utilize dual monitor mode in Experdocs. 33. Will Experdocs work with projection equipment? Yes, Experdocs can be displayed with projection equipment or by utilizing the Experdocs Web App by visiting http://login.Experdocs.com 34. What is Bate numbering and how do I use it in Experdocs? Bate Numbering is a stamp and classification system where documents and images are attached with a alpha-numerical series code in order to record and keep track of document and image volumes within depositories or legal setting. Expert files and legal documents are usually bate numbered and Experdocs allows users to create deposit ready Expert or Attorney files. 35. How do I report a problem with Experdocs? Simply visit our Support page, and depending on the nature of your concern, select either “Get Technical Support,” “Contact Experdocs” or “Help Make Us Better.” Select the subject in the drop down menu after you select one of the above three options, then fill out the short contact form and click Submit. We will usually respond before 24 hours and we will respond in no longer than 48 hours. 36. How will my problems be corrected with Experdocs? Experdocs hosts a multitude of user support on our website including FAQs page, our downloadable Product Manual via searchable PDF, and our technical support submission portal. If users can’t find the answer they need online from our website they can email us at [email protected] and will respond quickly. If it is determined that your problem requires a telephone call we will call you on the phone to troubleshoot your problem. In very rare circumstances Experdocs may provide on sight technical support for an additional service fee. 37. Can I make suggestions for improving Experdocs? Yes! We hope you do. Experdocs is always interested in hearing your comments, suggestions and concerns. If you have features you want to see in Experdocs you can submit those too and we will do our best to incorporate your desired features in our next version release (free updates!). To make a suggestion, go to our Support page and click on “Help Make Us Better.” 38. How do I export my information from Experdocs? At the top of the Experdocs interface, click on “File” and then you can scroll down to select either “Generate Document Report” or “Export Documents” for different exporting options. 39. Can I export my information from Experdocs? Yes! Please see #42 above for quick and easy export instructions. 40. What is the difference between File/Synchronizing and File/Saving in 31 / 64 Experdocs? Selecting File Synchronize will synchronize locally saved image and document files and metadata from ones PC desktop or laptop with the users account on the Experdocs servers. Selecting File Save will save the local image and document files and metadata onto one’s own computer but will not update the user’s same files on the Experdocs servers until an automatic file synchronization is permitted or manually initiated. 41. What is “Layout” under the View menu? This is where users can select from different user interface color themes for Experdocs. 42. What does “View/Save Layout” mean? Selecting this will save the users currently selected interface theme so it launches as default opening theme when Experdocs is launched. 43. Can I delete documents from Experdocs? Yes! At the top of the Experdocs interface, go to click on “Project Data” and scroll down to “Documents and Photos” and then scroll over to click on “Delete Photos/Documents” 44. Could another user delete documents from Experdocs? Experdocs provides tiered permission-based rules or functionality parameters where Primary Users and Additional Users (if allowed by Primary) can specify exactly what other Users can see and do within project files. Users can allow others to just view or work on file groups or individual files, as custom control systems are effectively designed within Experdocs to permit safe, controlled access to an unlimited number of users. User activity is also logged in Experdocs keeping track of who accesses what project and notes when and does what. 45. Can I share my Project documents if the other person does not have Experdocs? Yes! While Additional User accounts are only $14.95/month, require no contract and can be canceled any time, you may share your project documents via our Web App accessible from the top right corner of our website or by any browser by visiting http://login.Experdocs.com. 46. What are the recommended Hardware requirements to run Experdocs? You will have the best user experience with Experdocs on a PC that meets the recommended system specifications below: Intel® Core™2 Duo Processor 2.0 Ghz (or better) Microsoft Windows® 7 operating system (64-bit) 4GB System RAM 32 / 64 256MB Dedicated Display Graphics Memory*** 1280 X 1024 Display Resolution at 32-bit color palette High Speed Internet Connection (required for initial and regular synchronizations with the server and the transfer of photos and documents) ***Microsoft DirectX 10, DirectX 9, or OpenGL capable graphics card recommended. A Windows Experience Index graphics subscore of 4.0 (or higher) is recommended for best presentation performance. 47. Will Experdocs Run on a 64-Bit and 32-Bit Version of Windows XP, Vista or Windows 7 Operating System? Yes! 48. Will Experdocs Run on a PC Using the New Intel® Core™ i3, i5 and i7 Processors? Yes! 33 / 64 System requirements What are the recommended Hardware requirements to run Experdocs? You will have the best user experience with Experdocs on a PC that meets the recommended system specifications below: Intel® Core™2 Duo Processor 2.0 Ghz (or better) Microsoft Windows® 7 operating system (64-bit) 4GB System RAM 256MB Dedicated Display Graphics Memory*** 1280 X 1024 Display Resolution at 32-bit color palette High Speed Internet Connection (required for initial and regular synchronizations with the server and the transfer of photos and documents) ***Microsoft DirectX 10, DirectX 9, or OpenGL capable graphics card recommended. A Windows Experience Index graphics subscore of 4.0 (or higher) is recommended for best presentation performance. 1. Will Experdocs Run on a 64-Bit and 32-Bit Version of Windows XP, Vista or Windows 7 Operating System? Yes! 2. Will Experdocs Run on a PC Using the New Intel® Core™ i3, i5 and i7 Processors? Yes! 34 / 64 Getting help Please email your support request(s) to: [email protected] In the alternative, visit our website: www.Experdocs.com and click the support button. Fill out a complete description of the issue you wish to resolve and a message will be sent to our support department. Be sure your email address is correct and include a phone number in case we cannot provide complete support via email. Depending on the nature of your problem or inquiry, we may pass along to the Experdocs department best suited to assist you, including technical support, customer service, or sales. We will respond, usually with 24 hours. 35 / 64 Document Organization Before you begin, please think about how your documents should be organized. Although the way you choose to “tab” and “tag” the documents uploaded to Experdocs can be changed, giving thought to how documents will be accessed right from the start of using the program will save time. (Note: there may be templates available to use in organizing data, see the Experdocs website from time to time for updates). Although each project presents different organization challenges, the following tips may help to organize in the most efficient way and demonstrate how Experdocs database design provides flexibility in organization and subsequent retrieval of documents. The need to organize thousands of documents and images is commonplace. It can be a tremendous project cost and being able to find that specific document quickly and efficiently can be critical. But different than many businesses or industries the litigation industry deals primarily with “already created documents” as opposed to “creating documents”. Of course attorneys create legal documents and consultants prepare reports, but these are minimal in number compared to the volumes of existing documents at issue in any given conflict matter, which these professionals must routinely reference. At the heart of this problem is the essential question, “do I create intelligence, such as a folder name, and put the document there, or do I attach intelligence to the document and stick them all in the same place?” The latter was really not a practical option until the advent of computers. The creation of relational databases paved the way for the ultimate answer to document organization Relational databases have been around in practical, affordable tools for more than thirty years. Microsoft Outlook® is an example of a relational database, which manages contacts. A new record is created and intelligence, such as a person’s name, number and address are attached to one record. So you might be surprised to learn that until Experdocs, a practical, cost effective, highly productive and simple to learn relational database solution simply did not exist for organizing documents and images. Experdocs has been designed by litigation Experts who understand what has been 36 / 64 missing and what is needed. Experdocs harnesses the power of relational databases by focusing on the key item, the document, and using proprietary database structure to give the user unlimited control over the intelligence and structure that can be attached to that document, no matter how many documents or images. Buy realizing that each document must be examined and that it is in the best interest of the user to do so only once, Experdocs has implemented tools that permit rapid document review and on-the-fly creation and attachment of intelligence the user is able to see when a document is "clicked" on and visible in the Current Document pane . When a document is seen, the user can quickly and easily attach a date, time, player, event, keyword, type or even comments to that document. This is especially useful in managing images, where text extraction and searching is simply not possible. Experdocs permits the user to add a specific metadata only once, thereafter referencing that intelligence to any other document with a simple click of a box. Thereafter the user can search for specific documents with any combination of filters to find that “smoking gun” at a later date. Never again will you need to make or keep duplicate documents simply because it applies to more than one folder. Note: The names you choose for Tabs and Tags can be changed at any time. Additionally, Experdocs makes your documents available anywhere you go, whether you are still organizing, sharing or presenting. Because Experdocs is both “Client” and “Cloud” based, your documents are available to you whether you have or don’t have your computer with you and even if you do not have access to the internet. Now some document organization tips: CHOOSE STANDARD NAMING CONVENTIONS Choosing standard naming conventions for your filing system will help you name, file, and locate your electronic documents and images more easily. Use the “Tabs” tools to create general organization structure, such as Dates, Events, Documents, Locations, Players, Key Words. Then, use the powerful “Tags” tools to attach any depth of metadata to your documents. For example, under Documents you might have Tags labeled Letter, Fax, Email, Contract, Invoice, Change Order, etc., and similarly for the other Tab titles. There are sub-tags or 'Childs' that can be added to Tags that will allow a virtually unlimited amount of detail to document organization. 37 / 64 Use these structures over and over again so that your organization and recall skills become more effective with repetition. MAKE THE MOST OF METADATA Metadata is data describing data, in other words, data describing context, content and structure of documents and photographs. With each document or image ‘metadata’ can be added which includes words, dates, times, and other characteristic properties to an image or document. This metadata provides search-able criteria to better identify, via the Search Filters, files in the future. In Experdocs, you can choose to set up metadata before you import files or after. Tabs, Tags, or identifying filter criteria for electronic data, can be added and customized to whatever the user need requires. An unlimited number of tabs and tags can be created for each project in Experdocs. Metadata allows the user to examine a document or photo once and capture all relevant data for later recall. For instance, a letter might have the date, names, amounts, type of document and subjects, all of which can be quickly and easily Tagged. Later the user can filter on any combination of these metadata to find a specific document. Images are especially difficult, but Experdocs makes them easy as well. Again, for example, the user might view a photograph and identify metadata including the location, the materials or people in the photo, viewpoints angle of view, etc. The standard image data is all captured automatically. Once the user practices and understands the three main elements of electronic document organization discussed above (file structure hierarchy, standard naming conventions, metadata) they will be on their way to better document and image organization. Experdocs was built to take advantage of these three basic elements, and more. DOCUMENT MANAGEMENT SOFTWARE: Relational database software designed to track the process of creating documents, such as letters, reports, etc. and the storing of current and archival documents and images with the ability to attach intelligence to each document. Document management software leverages the power of relational databases to manage, primarily, the creation of documents. The process of creating documents often includes multiple edits, revisions and contributions from 38 / 64 many individuals. These tools are adept and invaluable at doing so. However, for the litigation and litigation support industries these tools are somewhat like ‘swatting a fly with a sixteen ton weight’ for some tasks and frustratingly limited in effectiveness in others. At the same time, they are tremendously expensive and exact an even higher cost in training before they can be used effectively. The litigation support industry, as mentioned earlier, does not focus primarily on creation of documents. Additionally, when documents are created, this process typically happens behind firewalls where security is high and not easily, if at all, available to those outside a firms internal network. Where the documents created in a typical case might total in the hundreds, or even thousands in rare instances, the need to review and consider thousands, tens of thousands and even hundreds of thousands of documents and images produced in many complex cases by the parties at issue is quite common. Since there is no need or desire to edit any of these documents, only to be able to review, attach intelligence and share them, the primary features of traditional document management software us unnecessary. At the same time the most important feature in organizing documents in the litigation industry, reviewing and capturing unlimited and customizable intelligence so the information can be retrieved easily, is usually extremely minimal and limited to “search word boxes”. Adding to the basic lack in traditional document management software they are not easily shared. Typical licensing scenarios require significant per seat licensing to deploy the database to users. So, if you wish to share your case documents with a colleague, such as an Expert or attorney, they would have to have the same software or a license to access the database. This is often cost prohibitive. Document management software is traditionally not designed to function as a presentation platform. However, because data in Experdocs is “intelligent” in terms of adding comments and tags to the data, it can also be used as a basic presentation tool. Future releases of Experdocs will enhance the program presentation features; you may find it to be the only tool you need. 39 / 64 Additional Program Features Multi-User Feature Another key feature of Experdocs is the ability to share data. Multiple users may log into a project at any given time. After a user has been given a login and password, the projects are listed in their individual menus; users will have access through the Select Project menu. Names of users currently accessing the project are listed on the bottom of the desktop. As an Organization Tool Assigning metadata to projects and individual images allows for easy project organization. Search for specific metadata, and the photographs/documents/videos associated with that information will be quickly retrieved for you to view and share. 40 / 64 Experdocs Program Screens The Experdocs Program Screen - can be described as 4 distinct panes, plus the top menu bar: Top menu bar: File, View, Project Data, Photo Shares, Filter Sets, and Help Working with a Project The following pane description sections (Search, Current Document, Thumbnails, and Info) will provide information about working with a project once a set of files has been uploaded and ready to view. Now that all areas of the screen have been identified, please refer back to these sections of the manual for information as you use Experdocs. 41 / 64 Top Menu 1. Top menu bar: File, View, Project Data, Photo Shares, Filter Sets, and Help a. File a. New Project – generates project - see section below ‘Opening a New Project’ b. Open Project – you will be prompted to choose an existing project. A ‘Select Project’ menu will appear, showing projects that are available to choose from. c. Save Project – saves data to your local computer drive. d. Synchronize Data With Server – saves data and creates a copy or ‘mirror’ of data on secure server. e. Generate Document Report – see complete description section below. • Note: These two options open up two different tabs in the same window f. Export Documents - see complete description section below. • Note: These two options open up two different tabs in the same window g. Invite Someone to Access Your Account – choose this option to set up and invite another User to view your documents or become an Additional User (see explanation of User ‘Additional User’ above). You will be directed online to work within the Experdocs Web Application (WebApp). After entering the required information, an email will automatically be sent to the email address you designated, inviting that person to become a User or view documents. h. Manage Users and Permissions – this option directs you online to work within the Experdocs Web Application (WebApp). You may set up or change permissions for your (Primary Account) and the other Users you allow to view your documents/projects. i. Launch Experdocs Web Application (WebApp) – this option allows you to view your project and documents online through the Experdocs Web Application (WebApp). Also, as noted, you may invite additional users and manage current users and permissions for those users. j. Change Account – if you have more than one Experdocs account, or have been invited to more than one, this selection will allow you to move to another account to view projects within those accounts. k. Exit – exit/close the program 42 / 64 b. View – see the section titled, ‘Minimize/Maximize Individual Panes’ for a complete description of the selections and their use within this tab. a. Save Layout - If you have found a desktop layout that works best for your project, go to View, select Save Layout. You will be prompted to enter a name for the layout. This allows you to save and re-apply the desktop layout for future use. b. Apply Layout - this selection allows the user to view and re-apply layouts that have set up; or choose Default to return to original desktop settings. c. Show Info – restores the ‘Info’ pane d. Show Search – restores the ‘Search’ pane e. Show Thumbnails – restores the ‘Thumbnails’ pane f. Show Tabs – tabs on the ‘Info’ pane will be displayed Minimize/Maximize Individual Panes: Click on the Thumb-tack symbol in the upper right hand corner of the Search or Info or Thumbnail panes. This will automatically move that pane to the side of the screen, and maximize the other three. The minimized pane can be easily expanded again by clicking on the name of the pane on the right, left, top, or bottom of the screen (depending on which pane was minimized). To return the pane to its original location on your desktop, click the Thumb-tack symbol once again. To remove the individual pane from the screen completely, click on the (x) in the upper right hand corner of the pane. Also, panes can be restored by clicking on the View menu and choosing one of the panes. c. Project Data – information on the four selections below are detailed under the headings: Opening a New Project, Importing Files, and Assigning Metadata to Your Project. a. Documents and Photos b. Edit Project Information c. Edit Photographers d. Discard Changes d. Shares a. Share Selected Documents Online – Experdocs creates an online link, available for you to share information, allowing those you invite to view data online. b. Edit Share – allows you to edit/change the shared data. e. Filter Sets a. Save Current Filters – detailed information under the heading, Save Search and Filter Sets b. Manage Filter Sets - detailed information under the heading, Save Search and Filter Sets f. Help – options available: a. About b. Contact support – brings up your email service to send a message to Experdocs support department. 43 / 64 c. Manual and FAQs – directs you to the Experdocs website to view help documentation and other product information. 2. Search or Filter pane: this is left 1/3 of the screen and is designed as the area to set the parameters by which your documents can be found and then displayed. Full description below. 3. Center 1/3 of screen is by default in 2 parts. The top half is the ‘Current Document’ window where larger images can be seen; see also, ‘minimize/maximize individual panes’ below. Full description below. 4. The bottom half is the ‘Thumbnails’ / ‘Detail’ views of images (the Main viewer and Thumbnail viewer can be enlarged for clearer viewing of images. Full description below. 5. The right side of the screen is the Info pane. This is the area from which your data is set up and where each document is ‘Tabbed’ or ‘Tagged’; at the bottom of this screen section tabs will appear as you enter ‘Tab’ data from the Project Data / Edit Project Information menu. Full description below. 44 / 64 Search Pane Located on the leftmost area of your desktop, this pane allows you to search from filters that you have chosen and entered for the project (filters = the tabs tags and 'childs' set up and viewable in the Info pane). Filters may include, for example: Locations, Events, Issues, Players, and Ratings (Note: these are categories you have chosen and entered as a way to organize and access your data) by putting a check mark in the box to the left of the filter, you will automatically change the documents/photographs/video to be viewed at that time. Exclusive Filter (default): Selecting this option will include ALL filters associated with the current project. Within the search pane, check the boxes to the left of the metadata that you require in your search, and the documents/photographs/video associated with those filters will automatically be visible in the project information pane. Inclusive Filter: Selecting this option will include only filters associated with the photographs/documents/video that are currently uploaded and associated with the current project. Choosing this option will help you more easily locate the photographs/documents/videos you may be searching for on this project. Within the search pane, check the boxes to the left of the metadata that you require in your search, and the photographs/documents/video associated with those filters will automatically be visible in the Main Viewer pane. Search Option: You may also do a quick search for Metadata information associated with individual documents/photographs/videos. For Example: If you intend to search for photographs/documents/videos that were taken or have to do with the state of California, type “California” in the search box, and all documents associated with “California” will be visible in your Thumbnail pane. If no photographs/documents/videos are associated with the search criteria you have entered, no documents will be visible in either the Thumbnails pane or the Main Viewer pane. Please select a different search criterion. Clear Filters: Clear your current search and current filters by clicking on Clear Filters in the bottom left corner of the Search pane. All photographs/documents/videos associated with the current project will now be visible in the Thumbnails pane as well as the Project Information pane. Multiple Searches: To perform more than one search at a time, go to View and select Show Search Pane. A new search box will be added, as visible at the bottom of the search pane. Saving Search and Filter Sets Saving search, filter and sort sets will allow you easy future access to a group or groups of files to quickly view and/or share within a project. Saving Search Sets: Go to File, select Save Project. Saving Filter Sets: Go to Filter Sets, select Save Current Filters. A new 45 / 64 menu will appear entitled Select or Create Filter Sets. From this menu, you may Save, Add, Edit, Delete, or Search filter sets. Save Filter Set: Click on one of the filter set names listed in the menu which you would like to save as your current project filter set. Choose OK. The name of your filter set will now be listed in the Filter Sets drop down menu on your desktop for easy access and retrieval of your filtered files. Add Filter Set: From the Select or Create Filter Sets menu, select Add. A new menu will appear entitled Create Filter Set. Name your new filter set, and click OK. Edit Filter Set: From the Select or Create Filter Sets menu, highlight the name of the filter set that you would like to change, and select Edit. A new menu will appear entitled Edit Filter Set. Edit the name of the filter set, and click OK. Delete Filter Set: From the Select or Create Filter Sets menu, highlight the name of the filter set that you would like to delete, and select Delete. A new menu entitled ‘Confirm Delete?’ will appear. Select Yes. Filters can also be changed by selecting Filter Sets, and then Manage Filter Sets Search Filter Set: From the Filter Sets, Select or Create Filter Sets menu, use the search feature to locate the name of a particular filter set that you would like to use to save the current project under. When the filter you would like to choose is listed, use your mouse to highlight, and click OK. 46 / 64 Current Document Pane Located in the topmost center area of your desktop, this pane allows you a preview of your photograph/document/video. By default, the first image on the server (or Thumbnail section) will be visible in this pane. As you work on or explore the project and its contents, this image may change as the filter options are utilized. Choosing an Image: Change the image in this panel by clicking on one of the thumbnails located in the Thumbnails panel below the Project Information panel. Large Image View: To view a larger version of the individual image, double click on the selected image, and a new window including the image will expand. To return to your original desktop view, simply click on the Close icon at the bottom center of the screen. Experimenting with Individual Images: Experimenting and changing the view of individual images is simple with Experdocs. You will be able to move the image within the frame, maximize the view of cropped areas within an image, maximize, minimize, return to default size, and rotate the images. To experiment with individual images, use the seven tools located on the bottom of the Project Information pane. These same tools are also available when the Large Image View is set. Move Image: Click on the leftmost tool (the hand symbol). Place your curser on the image, and click and drag the image until it is set to your preference. If the image cannot be moved further in a given direction, the image will remain unchanged. Maximize View of Cropped Areas: Click on the second tool (magnifying glass with rectangle on the right). Place your curser on the image and click and drag to highlight the area of the image that you would like to view. Un-click your mouse and the highlighted section of the image will be automatically maximized. If the image cannot be maximized further, the image will remain unchanged. Maximize Image: Click on the third tool (circle with plus symbol). Place your curser on the section of the image to be maximized. If the image cannot be maximized further, the image will remain unchanged. Minimize Image: Click on the fourth tool (circle with minus symbol). Place your curser on the section of the image to be minimized. If the image cannot be minimized further, the image will remain unchanged. Return to Default Size: Click on the fifth tool (rectangle with arrows pointing outward) and the image will return to its original default size. Rotate Image Clockwise: Click on the sixth tool (clockwise circular arrow). Each click of this tool will result in a 90 degree rotation of the image. This rotation will also change the image view in the Thumbnails panel. Rotate Image Counter-Clockwise: Click on the seventh tool (counter-clockwise circular arrow). Each click of this tool will result in a 90 47 / 64 degree rotation of the image. This rotation will also change the image view in the Thumbnails panel. 48 / 64 Thumbnails Pane Located in the bottom center area of your desktop. Scroll using the up and down arrows to view thumbnails of documents/photographs/videos associated with current project and your chosen filters. Shown at the top of the pane are the views available. Views available: Thumbnail View and Details View. To change the viewing option click on the dropdown menu at the top of the Thumbnails pane. Thumbnail View: The leftmost icon in the top left of the Thumbnails pane. When this option is chosen, all images in the project are shown as small thumbnails. The image number is below each image. If there are filters chosen, photographs/documents/video will reflect those filters in this view. Click once to preview the image in the Project Information pane, click twice to show the image in Large Image View. Details View: The middle icon in the top left of the Thumbnails pane. When this option is chosen, all images in the project are shown as tiny thumbnails. Also listed with the image are its Image Number, Bate Number, and Image Name. If there are filters chosen, photographs/documents/video will reflect those filters in this view. Click once to preview the image in the Project Information pane, click twice to show the image in Large Image View. 49 / 64 Info Pane Located on the right side of your desktop. As you choose different images from the Thumbnails pane, the Info pane will also change depending on the image chosen. The Info pane lists all metadata relating to the image. The names you have given Tabs, Tags, and Tag Childs (sub-Tags) are visible in this pane. Click on the tab at the bottom of the Info pane that you wish to view, and information associated and entered during set up of the data will be available. Info: First tab from the left in the Photo/Document Information pane. This tab lists metadata that has been assigned to the image including; Image Name, Contents, Image Number, Bate Number, Orig Filename, Photographer, Taken, and Rating. Below Rating will be a list of the Tabs you entered during set up and organization of data. o Image Name: The original image name of the uploaded image. o Comments: Includes information associated with the image, or a set of images. Information may include specific notes you want to associate with a particular document or group of documents. This information may have been completed before the image was uploaded. o Image No: The number assigned to the image within the project (the last number/numbers of the image's Bate Number. o Bate Number: The number assigned to the image to categorize and organize your set of documents, and find the image easily. For example: OGTP00001 o Orig Filename: The original filename including the type of uploaded image. Data uploaded directly with the file is the default Orig Filename. o Photographer: The name and/or company who created or is in possession of the image. o Taken: The original date and time that the photograph was taken or original date and time associated with the document. Data uploaded directly with the file is the default date and time. o Rating: An option for each image is a five-star rating system. Click on the number of stars that you wish to rate the image. Click on the X to reset. Below the Rating stars are a list of the Tabs you established when setting up the organization of the data. Clicking on these Tab names that are highlighted in blue, will show all Tags and sub-Tags associated with that Tab. 50 / 64 Using Experdocs Using Experdocs: including first time users After entering your email address and password, and clicking Submit, you will be prompted to Select Experdocs Account. Once you have chosen the account you will work with, you will be asked if you wish to sync the project data. Choose Yes. Next you will be able to choose the Project on which to work. You may either select the Category of project, or Search by name. Highlight the project name that you would like to work on, and then choose Select. 51 / 64 Opening a New Project Opening a new project will allow you to create a new set of documents and photos for storage and retrieval. Give your new project a number, title, category, and bate number. Go to the Select Project Menu or from the File menu, select New Project. Project Number: Choose a number of projects starting with (1) to find your projects easily, or choose any set of numbers with which your project will be identified. Project Name: Select a name with which your project will be identified. Category: Select a category with which your project will be identified from the drop-down menu. Bate Number: Select a Bate Number with which your project will be identified. Select OK and your project will be created. The next step is to upload documents for the project created. The next section on Importing files will get you started. 52 / 64 Importing Files (Documents, Photographs, Videos) With Experdocs, importing documents, images, and video is a simple process. Select a folder to upload, or select individual documents, photographs or videos. Please note: You may enter metadata for your files before you upload them, or you may return later to enter or edit the information. Plan on how you wish to have your documents organized. Visit our manual section on Document Organization to clearly understand the best way to proceed. Go to the Project Data Menu, select Documents and Photos, then select Add Photos / Documents... File Selection: Choose which files to add to your project. Please note that information entered here will be applied to ALL of the importing files. Select all files in a folder or folder tree (Default): Browse and locate the files you wish to upload. Once you have located the folder from your hard drive, click OK, and the file you chose will be highlighted in the browse box. Include Sub-Folders (Recursive): Only choose this option if you want to include files located in sub folders to the one you have chosen. Highlight the box if you so choose. Prompt for Default Tags on Each Folder: If you have chosen to include sub folders, you will also be prompted to choose to set the default tags on each folder opened. Your current default settings will be placed on each folder and sub folder. Include Relative Folder Path in Analysis: If you have chosen to include sub folders, you will also be prompted to choose to include relative folder path in analysis of your documents. Select individual image and/or document files on the computer, network share, or USB flash drive: When this option is chosen, you will be able to add or delete separate individual files to include in your project. Click Add, once you have found the file you wish to include, simply click OK. You may either choose to add more files, or click on Import and your files will quickly be uploaded into the software. You may also choose Next to select more options in this menu for your files to be uploaded. Note: Holding the Ctrl key while clicking lets you select or de-select individual files. Holding shift and clicking on two files allows those files, and all files in between to be highlighted for selection. PDF Options: This tab allows you to choose options dealing with PDF files and document splitting. Please note that information entered here will be applied to ALL of the importing files. Do not split any PDF documents: If this option is chosen, your PDF files will be kept as a file in its entirety and not be separated into different files. 53 / 64 For example: If you want to upload a PDF document that is five pages, your Experdocs file for that PDF will remain five pages, and not be split into individual documents. This will be the case for each and every PDF you have added with intent to upload. Click on Import and your photographs will quickly be uploaded into the software. You may also choose Next to select more options in this menu for your photographs. Ask for each PDF document: If this option is chosen, you will be asked if you would like to split your PDF documents individually. This will be the case for each PDF file you have added with intent to upload. Click on Import and your photographs will quickly be uploaded into the software. You may also choose Next to select more options in this menu for your photographs. Split all PDF documents: If this option is chosen, all of your PDF documents will be split creating an individual Experdocs document for each page of the PDF. This will be the case for each PDF file you have added with intent to upload. Click on Import and your photographs will quickly be uploaded into the software. You may also choose Next to select more options in this menu for your photographs to be uploaded. Photo/Document Info: This tab allows you to edit some basic information about your files. Please note that information entered here will be applied to ALL of the importing files. Photographer: From the list of names, choose the person/persons who should be created as the person who took the photograph, video, or is responsible for the document. If the photographer is not listed, select Edit. Edit Photographers: Use the drop-down menu to browse from the list of photographers. When you have found the correct photographer, choose OK. If the photographer you wish to use is not listed choose Add. Type the photographers name and/or company and click OK. This will add the name and/or company to the list of photographers on all projects with which you are associated. From this menu, you may also edit photographers/companies by highlighting the name/company name on the list and clicking Edit. Change the name/company name and click OK. From this menu, you may also delete photographer names/company names by highlighting the name/company name on the list and clicking Delete. You will be prompted again to delete to confirm your action. When you are finished editing photographers, click OK. Taken: Use the drop-down menu to choose the date and time that should be associated with the set of files to be uploaded. Normally, this is used to confirm the date and time that the photographs, documents, videos were originally taken. Use the Default setting Use Data File to include data from the files themselves. • Note: If you choose to use the timestamp assigned by the 54 / 64 original photographer, it may or may not be correct. This will depend on whether the photographer set the correct timestamp on their camera when used. Resize Photo: Use the drop-down menu to choose to resize the photographs, documents, or video to be uploaded to 2560x1920 (4.9 MP), or choose to keep the files their original size by clicking the appropriate action. Comments: Add information about your set of files. Information may include development, environmental or situational information. This information should be true for all files in the set to be uploaded. Bate Number: Select a format and starting number to categorize and organized your set of files to be uploaded. You will be able to easily identify this set of files to their corresponding bate numbers. Example: Format (OGTP00000) Starting Number (1), OGTP identifies the company Oris Group Test Project. This identifies the first uploaded files as (OGTP00001) and the second uploaded photograph as (OGTP00002), and so on. If you already have photographs/documents/videos associated with this certain project, the default is set at the next available number for your files. Example: If you already have 15 files associated with your project the Starting Number will be set at 16. You may change this number if you so choose. Click on Import and your files will quickly be uploaded into the software. You may also choose Next to select more options in this menu for your files to be uploaded. Tags: This tab allows tagging of documents as they are uploaded. Use of this tab requires that an organization and naming convention be decided upon prior to uploading, and ‘Tab’ and ‘Tag’ names be given to, and attached to, documents as they are uploaded. (Note: Go to the top menu bar and click Project Data, then click Edit Project Information, to set up your data organization and naming of Tabs, Tags, and Sub-tags to imported data). In the alternative, you may set up Tabs and Tags after data has been uploaded, but remember, if they are set up prior to upload, you can save time by having data tagged as it is uploaded. o Example: let’s say for example, you choose to setup the following Tabs under Project Data/Edit Project Information. Locations: Check any and all boxes of the locations that are associated with your project. Locations identify a specific geographical area in which the photograph/document/video takes place or refers to. Please note that information entered here will be applied to ALL of the importing files. If no locations are visible on the menu, click on Edit Tags in the upper right hand corner of the menu. Click on Import and your photographs will quickly be uploaded into the software. You may also choose Next to select more options in this menu for your photographs to be uploaded. 55 / 64 Tags: Check any and all boxes of the tags that are associated with your project. Tags usually identify some specific aspect of the photographs. Please note that information entered here will be applied to ALL of the importing files. If no tags are visible on the menu, click on Edit Tags in the upper right hand corner of the menu. Click on Import and your files will quickly be uploaded into the software. You may also choose Next to select more options in this menu for your files to be uploaded. Issues: Check any and all boxes of the issues that are associated with your project. Issues usually identify some specific problem or dealing shown in the files. Please note that information entered here will be applied to ALL of the importing files. If no issues are visible on the menu, click on Edit Tags in the upper right hand corner of the menu. Click on Import and your files will quickly be uploaded into the software. You may also choose Next to select more options in this menu for your files to be uploaded. Events: Check any and all boxes of the events that are associated with your project. Events usually identify a certain event that may have occurred which are shown or documented in the files. Please note that information entered here will be applied to ALL of the importing files. If no events are visible on the menu, click on Edit Tags in the upper right hand corner of the menu. Click on Import and your files will quickly be uploaded into the software. You may also choose Next to select more options in this menu for your files to be uploaded. Players: Check any and all boxes of the players that are associated with your project. Players usually identify a certain person/persons or company/companies that are indentified in or are associated with the files. Please note that information entered here will be applied to ALL of the importing files. If no players are visible on the menu, click on Edit Tags in the upper right hand corner of the menu. Click on Import and your files will quickly be uploaded into the software. You may also choose Next to select more options in this menu for your files to be uploaded. 56 / 64 Adding, Coping and Deleting Adding, copying, and deleting documents from a project is easy with Experdocs software. Adding Documents: Go to Project Data, select Documents and Photos, and select Add Photos/Documents. Deleting Documents: Delete individual photographs/documents/video easily with Experdocs. 1. Go to the Thumbnails Pane, and highlight the document you wish to delete by clicking on the thumbnail image. To delete multiple documents, hold down the Ctrl key while clicking on the thumbnail images. This will highlight the multiple images you intend to delete. 2. Go to Project Data, select Documents and Photos, and select Delete Photos/Documents. 3. A Delete Photo menu will appear on screen. Confirm you intend to delete the selected document/documents and click Yes. If you have made a mistake, and do not want to delete the selected file/files click No and you return to the desktop. 4. Your selected document/documents as well as their information and metadata will be deleted from the current project. 57 / 64 Assigning Metadata Assigning Metadata To Your Project (All Files): metadata (or tagged information) allows you to classify, organize and sort your files. Following these instructions will guide you through creating metadata that will be assigned to your project as a whole. For instructions on how to assign metadata to your individual files, please go to the section entitled Assigning Metadata For Your Files (Individual Files). Please note: You may enter metadata for your files before you upload them, or you may return later to enter or edit the information. Go to the Project Data Menu, select Edit Project Information. Project Information: Review and/or change your original set up of information relating to your project including Project Number, Project Name, Project ID, Category, and Bate Number. Tabs: Allows you to add the top layer of metadata. Type the names or identifiers from which to later search and locate specific documents. See section on Data Organization. Three buttons appear at the bottom left of the screen under Tabs: Click the green Plus button to add a Tab name; click the red X to delete a Tab; and click the Pencil to rename a Tab. Tags: Tags add more detail to your data, subordinate to Tab metadata. You may also choose to Add, Add Child, Edit, Move, or Delete tags using the options to the right of the menu. The Add Child button allows you to continue to add multiple layers of detail to each Tag entered. Assigning Metadata For Your Files (Individual Files) These instructions are for adding metadata to individual documents. After you have uploaded files in your project, and have specified metadata for your project, you are ready to assign metadata to your individual images for easy access. Following these instructions will guide you through creating metadata for your individual files. For instructions on creating metadata for your project as a whole, multiple documents, please go to section Assigning Metadata For Your Project (All Files). Please note: You may enter metadata for your files before you upload them, or you may return later to enter or edit the information. Starting from the bottom part of the center document viewing panes, go to the Thumbnails pane. Click on the image of the file you would like to edit. Go to the Info pane on the right of your desktop. Click on the individual tab you would like to assign metadata. Choose from any of the Tabs or Tags or ‘Tag Childs’ you entered to identify the data. Click on the box to the left of the metadata you would like to assign to this individual file. Uncheck the box to the left of the metadata to deselect the option. 58 / 64 Generate Document Report Generate Document Report / Export Documents Note: these functions use the same screen and operate in the same way. The description below serves to outline the functions for both features. Export a project, or individual files to your computer simply and easily. Choose your options; choose which files, export documents as individual files or PDF documents, name files, and choose where you would like them to be exported on your computer. Go to File, and select Export Photos. Which Documents? When this first section of the Export Photos screen appears, make choices based on the explanations below: Selected Photos: Only export the files that are highlighted within your current project. To highlight photographs/documents/videos, go to the Thumbnails pane and select the files by clicking on the corresponding image. To select multiple files, hold down the Ctrl Key and click on the files you would like to include. Filtered Photos: Only export the files that are associated with your current filter set. All Project Photos: Export ALL files in the current project. Export Photos As? Continue to choose how documents are to be exported: Individual Image/Document Files: Export files individually. PDF Documents: Export files as PDF documents. How Do You Want The Files Named? / Base Filename None: Do not label exported files with a base name. Project Number: Use the project number as the base filename for the files. Image Name: Use the image names as the base filenames for the files. Custom: Create a base filename for every file you intend to export. Filename Serialize Bate Number: Export your files using the bate number categorization. Project Image Number: Export your files using the project image number categorization. Number Each File Starting With: Export your files using a chosen number system. Enter the number with which you would like to begin. Where Do You Want To Put The Files? Browse your computer to choose where you would like to have the selected files exported. When you are finished select Export. 59 / 64 Export Documents Generate Document Report / Export Documents Note: these functions use the same screen and operate in the same way. The description below serves to outline the functions for both features. Export a project, or individual files to your computer simply and easily. Choose your options; choose which files, export documents as individual files or PDF documents, name files, and choose where you would like them to be exported on your computer. Go to File, and select Export Photos. Which Documents? When this first section of the Export Photos screen appears, make choices based on the explanations below: Selected Photos: Only export the files that are highlighted within your current project. To highlight photographs/documents/videos, go to the Thumbnails pane and select the files by clicking on the corresponding image. To select multiple files, hold down the Ctrl Key and click on the files you would like to include. Filtered Photos: Only export the files that are associated with your current filter set. All Project Photos: Export ALL files in the current project. Export Photos As? Continue to choose how documents are to be exported: Individual Image/Document Files: Export files individually. PDF Documents: Export files as PDF documents. How Do You Want The Files Named? / Base Filename None: Do not label exported files with a base name. Project Number: Use the project number as the base filename for the files. Image Name: Use the image names as the base filenames for the files. Custom: Create a base filename for every file you intend to export. Filename Serialize Bate Number: Export your files using the bate number categorization. Project Image Number: Export your files using the project image number categorization. Number Each File Starting With: Export your files using a chosen number system. Enter the number with which you would like to begin. Where Do You Want To Put The Files? Browse your computer to choose where you would like to have the selected files exported. When you are finished select Export. 60 / 64 Printing To print documents you must first click File/Generate Document Report (or Export Documents) from top Menu bar. Once documents have been exported to your local drive, choose print. 61 / 64 Saving and Sync Synchronizing with Server Go to the File Menu, select Synchronizing Data With Server. This option allows your work to be saved and shared on the server with other users. Use this option when it is necessary for others to view photographs/documents/videos, or when you have completed working on a project and would like others to view your photographs/documents/videos. Saving Project Go to the File Menu, select Save Project. This saves project data to your local drive. File Menu/Synchronize Data With Server also saves data, but saves to the ‘cloud’ (or secure online server) so updated information can be shared. The updates and changes you have made to your project are automatically saved. Backing Up Your documents and projects are backed-up automatically when you sync with the secure Experdocs server. In addition, data is also saved to your local drive or computer. Although Experdocs protects your documents and projects be sure to back up the information stored on your personal computer regularly. 62 / 64 Working Offline One of Experdocs’ features is the ability to work offline. It may be necessary for any number of reasons for you to work offline. Remember that Experdocs saves data on a secure server (a cloud environment), but your data is also saved on your local computer or drive, permitting work to be done either connected to the internet or not connected. When you connect once to the internet, Experdocs will ask if you would like to sync with the server, and when you do, data input during the time you worked offline will be updated and saved to the Experdocs server. 63 / 64 Presentation and Production Please see the heading, “Generate Document Report / Export Documents” for information on reporting. Note: Document management software is traditionally not designed to function as a presentation platform. However, because data in Experdocs is “intelligent” in terms of adding comments and tags to the data, it can also be used as a basic presentation tool. Future releases of Experdocs will enhance the program presentation features; you may find it to be the only tool you need. 64 / 64


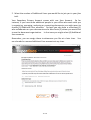

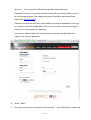

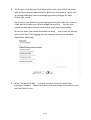


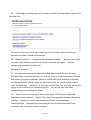


![[54] W, rm-pg`vzvlsggéggllslswnolq MONITOR OTHER](http://vs1.manualzilla.com/store/data/005697201_1-5cf72edac23b396dc325f3c508f97781-150x150.png)