1
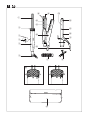
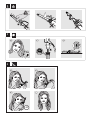
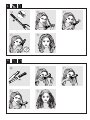
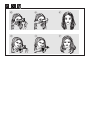
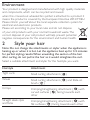
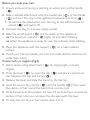
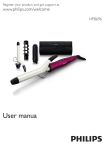
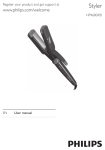
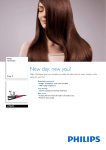
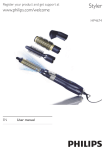
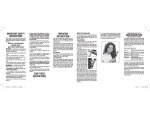
Register your product and get support at
www.philips.com/welcome
HP8698
User manual
o
n
m
a
l
p
q
b
k
j
r
c
i
d
Salon
e
s
f
g
h
u
t
24
v
3
4
7~10
sec.
5
7~10
sec.
6
7
English
Congratulations on your purchase, and welcome to Philips! To fully
benefit from the support that Philips offers, register your product at
www.philips.com/welcome.
1Important
Read this user manual carefully before you use the appliance and keep it
for future reference.
• WARNING: Do
not use this appliance
near water.
the appliance is used in a
bathroom, unplug it after use since
the proximity of water presents a risk,
even when the appliance is switched
off.
• WARNING: Do not use
this appliance near bathtubs,
showers, basins or other
vessels containing water.
• Always unplug the appliance after use.
• If the mains cord is damaged, you
must have it replaced by Philips, a
service centre authorised by Philips or
• When
similarly qualified persons in order to
avoid a hazard.
• This appliance can be used by
children aged from 8 years and above
and persons with reduced physical,
sensory or mental capabilities or
lack of experience and knowledge
if they have been given supervision
or instruction concerning use of
the appliance in a safe way and
understand the hazards involved.
Children shall not play with the
appliance. Cleaning and user
maintenance shall not be made by
children without supervision.
• Before you connect the appliance, ensure that the voltage indicated
on the appliance corresponds to the local power voltage.
• Do not use the appliance for any other purpose than described in
this manual.
• When the appliance is connected to the power, never leave it
unattended.
• Never use any accessories or parts from other manufacturers or that
Philips does not specifically recommend. If you use such accessories
or parts, your guarantee becomes invalid.
• Do not wind the mains cord round the appliance.
• Wait until the appliance has cooled down before you store it.
• Pay full attention when using the appliance since it could be
extremely hot. Only hold the handle as other parts are hot and
avoid contact with the skin.
• Always place the appliance with the stand on a heat-resistant, stable
flat surface. The hot heating plates/barrel should never touch the
surface or other flammable material.
• Avoid the mains cord from coming into contact with the hot parts
of the appliance.
• Keep the appliance away from flammable objects and material when
it is switched on.
• Never cover the appliance with anything (e.g. a towel or clothing)
when it is hot.
• Only use the appliance on dry hair. Do not operate the appliance
with wet hands.
• Keep the heating plates/barrel clean and free of dust and styling
products such as mousse, spray and gel.
• The heating plates/barrel has coating. This coating might slowly wear
away over time. However, this does not affect the performance of
the appliance.
• If the appliance is used on color-treated hair, the heating plates/barrel
may be stained. Before using it on artificial hair, always consult their
distributor.
• Always return the appliance to a service centre authorized by Philips
for examination or repair. Repair by unqualified people could result
in an extremely hazardous situation for the user.
• Do not insert metal objects into openings to avoid electric shock.
Electromagnetic fields (EMF)
This appliance complies with all standards regarding electromagnetic
fields (EMF). If handled properly and according to the instructions in this
user manual, the appliance is safe to use based on scientific evidence
available today.
Environment
Your product is designed and manufactured with high quality materials
and components, which can be recycled and reused.
when this crossed-out wheeled bin symbol is attached to a product it
means the product is covered by the European Directive 2012/19/EU.
Please inform yourself about the local separate collection system for
electrical and electronic products.
Please act according to your local rules and do not dispose
of your old products with your normal household waste. The
correct disposal of your old product will help prevent potential
negative consequences for the environment and human health.
2
Style your hair
Note: Do not change the attachments or styler when the appliance is
heating up or when it is hot. Let the appliance heat up for 3-5 minutes
for perfect styling results. When unwinding the section of the hair
after curling, do not pull at the hair as it would straighten the curl.
Select a suitable attachment and styler for the hairstyle you want.
Hairstyle
Attachment
Tight curls
Small curling attachment (
)
Waves
Small curling attachment (
brush ( )
) and Slide-on
Crimps
Crimping/straightening attachment ( ) with
curved surfaces ( ) facing towards each
other
Straight sleek style
and flicks
Crimping/straightening attachment ( ) with
flat surfaces ( ) facing towards each other
Before you style your hair:
1 Ensure arrow on the ring is pointing at unlock icon on the handle
( ).
2 Slide a suitable attachment onto the metal tube ( ) of the handle
( ) and turn the ring to the right/anti-clockwise to lock it ( ).
• To remove the attachment, turn the ring to the left/clockwise to
unlock ( ) and pull it off.
3 Connect the plug to a power supply socket.
4 Slide the on/off switch ( ) to I to switch on the appliance.
»»The power-on indicator ( ) lights up and starts blinking.
»»When the appliance is ready for use, the indicator stops blinking.
5 Place the appliance with the support (
surface.
) on a heat-resistant
6 Comb your hair and divide your hair into small sections that are not
wider than 2-4cm.
Create curls or ringlets (Fig.4)
1 Select small curling attachment (
ringlets.
) for styling tight curls and
2 Press the lever ( ) to open the clip (
hair between the clip and barrel ( ).
) and place a section of
3 Release the lever and slide the barrel to the hair tip.
4 Hold the end of the cool tip ( ) and the handle ( ). Then wind
the section of hair round the barrel from end to root.
5 Hold the barrel in the position for max. 10 seconds. Then unwind the
section of hair until you can open the clip again with the lever.
6 To style the rest of your hair, repeat steps 2 to 5.
Create waves (Fig.5)
1 Select the small curling attachment (
brush ( ) onto barrel.
). Then slide the Slide-on
2 Wind a section of hair round the brush.
3 Hold the barrel in the position for max.10 seconds. Then unwind the
section of hair to remove the Slide-on brush ( ) from your hair.
4 To style the rest of your hair, repeat steps 2-3.
Create crimps (Fig.6)
1 Select crimping/straightening attachment ( ).Make sure that the
curved surfaces ( ) are facing each other.
• To remove the the crimping/straightening plates, grab each
protruded side of the plate ( ) and pull it off.
2 Press the lever ( ) to open the attachment and place a section of
hair between the crimping plates.
3 Release the lever and keep the plates together for 5 to 10 seconds.
4 Press the lever to open the plates and place the next section of hair
between the plates. Make sure there is an overlap.
5 Repeat this process until you have reached the hair tip.
6 To style the rest of your hair, repeat steps 2 to 5.
Create straight sleek style and flicks (Fig.7)
1 Make sure that the flat surfaces ( ) are facing each other. Press
the lever ( ) to open the attachment and place a section of hair
between the straightening plates.
2 Slide down slowly the length of the hair in a single motion from root
to end, without stopping to prevent overheating.
• To create your desired type of flick, turn the styler half-circle
inwards (or outwards) when it reaches the last 3-5 cm of the hair
tip. Hold in that position for 2 to 3 seconds, and then release it.
3 To style the rest of your hair, repeat steps 1 to 2.
Note: The appliance is equipped with an auto-shut off function. After
60 minutes, the appliance switches off automatically. You can re-start
the appliance by sliding the ON/OFF switch to | to power on the styler
again.
After use:
1 Switch off the appliance and unplug it.
2 Place it on a heat-resistant surface until it cools down.
3 Remove hairs and dust from the appliance and attachments.
4 Clean the appliance and attachments by damp cloth.
5 Keep the appliance in a safe and dry place, free of dust. You can also
hang it with the hanging loop ( ) or store it in the supplied heat
resistant pouch ( ).
3
Guarantee and service
If you need information e.g. about replacement of an attachment or if
you have a problem, please visit the Philips website at www.philips.com
or contact the Philips Customer Care Centre in your country (you find
its phone number in the worldwide guarantee leaflet). If there is no
Consumer Care Centre in your country, go to your local Philips dealer.
Specifications are subject to change without notice
© 2013 Koninklijke Philips N.V.
All rights reserved.
3140 035 33101