1
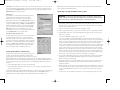
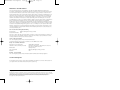
AN1manual30-4-01.xpress
24/5/01
11:53 AM
Page 1
xitel
TM
MD-PORT AN1
PC TO MINIDISC ANALOG RECORDING KIT
USERS MANUAL
AN1manual30-4-01.xpress
24/5/01
11:53 AM
Page 2
Getting started
Getting your AN1 going is as simple as plugging it into a primary USB port of any computer running
Windows 98, Windows ME, or Windows 2000. There's no need to load any special software, but you will have
to follow a few simple steps to enable the Windows USB audio drivers. After you've finished these steps,
make sure to read our tips on recording before launching into a full session.
Windows 98 installation
Note: Some computer systems ship with an OEM version of Windows 98 that does not contain the entire
generic USB driver and audio platform. If you experience any trouble loading the USB drivers, please refer to
TM
MD-PORT AN1
PC USERS MANUAL
(Mac users: please turn to page 11)
the troubleshooting section at the end of this user manual for further instructions.
1. There's no need to turn your computer off when plugging the AN1 in for the first time. Locate your
computer's USB port and plug the supplied USB cable in. Now plug the AN1 into the other end of the
USB cable.
2. Windows 98 will open an Add New Hardware Wizard and let you know it's found the AN1. It will then
start loading drivers for a USB Composite Device, USB Human Interface Device, or USB Audio Device,
depending on what components have previously been installed on your system. Click Next.
3. Check the option Search for the best driver for your device (Recommended) and click Next.
4. Windows 98 should already have the various USB components installed and will automatically default to
the location of those drivers on your hard drive. Click Next. If Windows 98 does not have the various
USB components loaded, it will tell you that the files could not be found and will request the Windows
98 CD. In this case, put your Windows 98 CD into the CD-ROM drive and place a check next to CD-ROM
drive, then click Next.
5. The Wizard will now let you know it has located drivers for a USB Composite Device, USB Human
Interface Device, or USB Audio Device and will identify these drivers under the heading Location of
Driver. This location may be your hard drive, or CD-ROM drive, depending on what drivers your system
has had installed in the past. Click Next.
6. The first set of drivers will now install.
7. Once the first set of drivers finishes installing, Windows 98 may require the other two USB drivers to also
be installed. This will depend on what USB audio devices have previously been used on your system.
Simply follow the procedure outlined above until all the required USB drivers have been loaded.
8. Once all of the required drivers have been installed, Windows 98 will start. We recommend rebooting
your computer to ensure all changes take effect. Your driver installation for the AN1 is now complete.
2
3
AN1manual30-4-01.xpress
24/5/01
11:53 AM
Page 4
Windows Millennium Edition
Checking that the AN1 is selected as preferred device in
Windows 98, Windows ME, and Windows 2000
1. There's no need to turn your computer off when plugging the AN1 in for the first time. Locate your
computer's USB port and plug the supplied USB cable in. Now plug the AN1 into the other end of the
With USB technology, there's never any need to turn your computer off when unplugging or plugging in the
USB cable.
AN1. When you want to use the AN1, simply close any running programs and plug it into the USB port.
2. Windows ME will open a New Hardware Found window and let you know it's found the AN1. It will then
Your system will automatically configure itself. When you're done, you can unplug the AN1 and your
start loading drivers for a USB Composite Device, USB Human Interface Device, or USB Audio Device,
computer will automatically configure for whatever soundcard is installed. In both cases, it doesn't matter if
depending on what components have previously been installed on your system. Click Next.
the system is on or off. For smooth automatic loading, please ensure all audio programs are closed before
plugging in, or unplugging the AN1.
3. In the Add New Hardware Wizard, place a check next to the option Automatic Search for a Better Driver
(Recommended) and click Next.
Note: when the AN1 is selected as your system's preferred audio device, no sound will come out of any
speakers plugged into your soundcard. If you wish to use your soundcard instead of the AN1, either unplug
4. The Add New Hardware Wizard will load a Windows Driver folder. When it has completed loading the drivers
from this folder, the Add New Hardware Wizard will let you know it has finished installing the new hardware
device. Click on Finish. If during this process, Windows ME notifies you that there is a version conflict and
the AN1 from the USB cable, or select your soundcard as preferred audio device in the Multimedia
Properties control panel for Windows 98, or Sounds and Multimedia control panel for Windows ME and
Windows 2000. It is not possible to use a soundcard and the AN1 at the same time.
that a file being copied is older than a file currently on your computer, click Yes to keep the existing file.
5. Once the first set of drivers has finished installing, Windows ME may require the other two USB drivers to
Windows 98
also be installed. This will depend on what USB audio devices have previously been used on your system.
Once Windows 98 starts and the appropriate drivers have been
Simply follow the procedure outlined above until all the required USB drivers have been installed.
loaded, the AN1 will automatically be set as your system's
6. Once all of the required drivers have been installed, Windows ME will start. We recommend rebooting your
computer to ensure all changes take effect. Your driver installation for the AN1 is now complete.
preferred audio device. To verify this, open the Multimedia
Control Panel and make sure that USB Audio Device appears in
the Sound Playback section under Preferred Device. To get to
Windows 2000 installation
the multimedia control panel hit Start, then go to Settings,
then Control Panel. The multimedia icon will be in the Control
1. With USB technology, there's no need to turn your computer off when plugging the AN1 in for the first
2.
Panel window. Double click on the icon to open the Multimedia
time. Locate your computer's USB port and plug the supplied USB cable in. Now plug the AN1 into the
Properties window. In the Audio tab, under the heading Sound
other end of the USB cable.
Playback Preferred Device, make sure that USB Audio Device
Windows 2000 will automatically detect the addition of a new USB interface. It will automatically update
your USB drivers, including USB Composite Device, USB Human Interface Device, and USB Audio Device.
3. Once Windows 2000 has completed updating the USB drivers, it will automatically set the AN1 as your
preferred multimedia device.
4. We recommend rebooting your computer to ensure all changes take effect. Your driver installation for the
AN1 is now complete.
appears. If it doesn't, use the scroll arrow to the right and
choose USB Audio Device. You're now fully loaded.
Note: Some computer systems ship with an OEM version of
Windows 98 that does not contain the entire generic USB
Windows 98
driver and audio platform. If you cannot select USB Audio
Device in the Preferred Device Window, please refer to the
troubleshooting section at the end of this user manual for
further instructions. In this situation you may not be able to
select USB Audio Device even though the USB drivers seemed
to install fine when you first plugged in the AN1.
Windows ME
Once Windows ME starts and the appropriate drivers have been
loaded, the AN1 should automatically be set as your system's
preferred audio device. To verify this, open the Sounds and
Multimedia Properties control panel and make sure that USB
Audio Device appears in the Sound Playback section under
Preferred Device. To get to the Sounds and Multimedia
Properties control panel hit Start, then go to Settings, then
4
Windows ME
5
AN1manual30-4-01.xpress
24/5/01
11:53 AM
Page 6
Control Panel. The multimedia icon will be in the Control Panel window. Double click on the icon to open the
Note: You don't have to run MusicMatch to use the AN1 - it will also work with any of your other favorite
Sounds and Multimedia Properties window. In the Audio tab, under the heading Sound Playback Preferred
players, including the Windows Media Player.
Device, make sure that USB Audio Device appears. If it doesn't, use the scroll arrow to the right and choose
USB Audio Device. You're now fully loaded.
Recording from PC to MiniDisc with the AN1
Windows 2000
Once Windows 2000 starts and the appropriate drivers have been
WARNING - It is important to read through these instructions carefully and to adjust the volume
loaded, the AN1 will automatically be set as your system's
controls as directed. Do not at any stage place headphones on your ears without first checking that the
preferred audio device. To verify this, open the Sounds and
volume controls are set to a minimum and slowly raised to a comfortable listening level.
Multimedia panel and make sure that USB Audio Device appears in
the Playback section under the Audio tab. To get to the multimedia
control panel hit Start, then go to Settings, then Control Panel. The
1. Before starting, make sure that both the Wave Balance and Speaker Balance volume sliders are set to a
Sounds and Multimedia icon will be in the Control Panel window.
minimum. You can access the AN1's volume sliders by double clicking the speaker icon at the bottom
Double click on the icon. In the Audio tab, make sure that USB
right had side of the Windows task bar.
Audio Device appears in the Sound Playback section under
2. Plug a set of headphones or monitor speakers into your MiniDisc recorder.
Preferred Device. If it doesn't, use the scroll arrow to the right and
3. With the supplied 3.5mm dual stereo cable, connect the AN1 to the Line-In of your MiniDisc recorder.
choose USB Audio Device. You're now fully loaded.
4. Start MusicMatch Jukebox Plus, or your favorite Windows media player, and load a selection of wav or
Controlling the output and volume levels
Windows 2000
The AN1's volume and output controls can be accessed by double
MP3 files to be recorded.
5. If you are using MusicMatch Jukebox Plus, go to point 6 now.
clicking the standard volume control icon. Depending on what
If you are not intending on using MusicMatch Jukebox Plus, you will have to work out which volume
media player you are using, for most of the AN1’s operations the
slider your media player controls in the AN1 volume control panel, so that you can set the initial output
volume will be set either by the Wave Balance slider or the Speaker
level. Press play on your media player and open the AN1 volume control panel by double clicking on the
Balance slider. To activate the Wave Balance and Speaker Balance
speaker icon down in the Windows task bar at the bottom right had corner of your screen. Move the
sliders, go to Options and then Properties. In the bottom section of
volume control up and down on the media player and watch which slider this controls in the AN1 volume
the Properties window, make sure a check appears next to Wave
control panel. In the AN1 volume control panel, set the volume level of the slider that the media player
Balance and Speaker Balance. Click OK once you're done.
did not control all the way up. So, for example, if moving the media player volume control caused the
Wave Balance slider in the AN1 volume control panel to move, you would set the volume of the Speaker
Balance control all the way up. If moving the media player volume control caused the Speaker Balance
Installing MusicMatch Jukebox Plus
After the AN1's USB drivers have loaded, you will be ready to start
slider in the AN1 volume control panel to move, you would set the volume of the Wave Balance control
Controlling volume levels
recording. The AN1 works with any Windows compatible media
all the way up. Close the AN1 volume control panel. Press stop on your media player.
6. Set the volume of MusicMatch Jukebox Plus or your favorite media player to minimum. Press record on
player, although to help make things easy we've included a full version of MusicMatch Jukebox Plus. This
your MiniDisc recorder. Press play on MusicMatch Jukebox Plus or your favorite media player. Your
powerful software will let you quickly rip and encode tracks from CDs, run customized playlists, and apply
MiniDisc recorder should start recording.
graphic equalization to all of your recordings. After exhaustive testing, we definitely think MusicMatch is one
of the best programs around for getting superior results. To install MusicMatch Jukebox Plus please do the
following:
1. Insert the MusicMatch Jukebox Plus CD into your CD-ROM drive.
2. When the MusicMatch Jukebox Plus splash screen opens, click on the option Install Jukebox Plus and
follow the onscreen instructions.
A users manual detailing how to use MusicMatch Jukebox Plus is contained on the CD. If you wish to view the
manual, simply insert the MusicMatch CD into your CD-ROM drive and select User's Guide. For further
7. Wearing the headphones connected to the MiniDisc recorder, start to slowly raise the volume control in
MusicMatch Jukebox Plus, or your favorite media player. You will start to hear the volume increase
through the headphones.
8. Make sure that you raise the volume control only to an appropriate level for your MiniDisc recorder. If you
increase the volume past the signal level that the MiniDisc recorder can tolerate, it will cause distortion
in your recording. Many MiniDisc recorders have a level display that lets you monitor the input signal
strength.
9. You have set the levels of your AN1 for recording. You can now load a playlist and start a full session.
information and news on software updates, please visit www.musicmatch.com or www.xitel.com.
6
7
AN1manual30-4-01.xpress
24/5/01
11:53 AM
Page 8
10. MusicMatch Jukebox Plus includes a special feature for AN1 users that automatically adds a 3 second
Troubleshooting Guide
gap of silence between tracks during playback. This feature will allow many MiniDisc recorders to
automatically insert track marks in syncro record mode. Please check your MiniDisc user manual to see if
your recorder supports this form of track marking. To turn the MusicMatch Jukebox Plus gapping feature
In this section are various suggestions for problems or issues you may encounter using the AN1 including:
on, click on File in MusicMatch Jukebox Plus, then scroll down and click on MiniDisc Analogue
1. My computer doesn’t seem to have all the right drivers in Windows
Trackmarking. A check mark will appear to show the feature is enabled. To disable the gapping feature, go
2. My AN1 looked to install fine, but I can’t select it as preferred device
to Options and then scroll down and select MiniDisc Analogue Trackmarking. The check mark will
3. My AN1 fails to set itself as preferred audio device automatically
disappear.
4. My AN1 seems to be introducing pops and clicks
11. During recording it not advisable to use any other applications on your system. Most MP3 players require
large amounts of resources to ensure flawless MP3 decoding and playback. If you interfere with the
computer during recording, it can effect MP3 decoding, which can in turn effect the quality of your
1. My computer doesn’t seem to have all the right drivers in Windows
recording or the addition of track marks. Read the next section for further tips on getting the best results
Problem: After plugging in your AN1 for the first time, Windows doesn’t seem to automatically default to
out of your AN1.
where the drivers should be and you can’t seem to find them on the Windows CD either.
Note: If you are noticing any distortion or pops and clicks during recording, it is likely that the USB data
Fix: A lot of the large branded computer manufacturers ship their systems with a cutdown OEM version of
travelling to your AN1 is being corrupted. To reduce the likelihood of this, make sure that you are not using
Windows that does not always include all the USB audio components. Because this is specific to each
any other programs and that all virus checkers have been disabled during recording. For further information,
manufacturer, you will need to contact the one who built your system and ask them to send you a USB audio
please refer to the troubleshooting guide at the end of this user manual.
upgrade to bring your version of Windows up to the same standard as the retail version. The AN1 does not
need any special device drivers, using only the following generic Windows ones that are usually stored in the
Tips for getting the best results with your AN1
listed directories for each USB component:
C:\win\inf\usb.inf - driver location for USB Composite Device
The AN1 is a high fidelity medium that has been specifically designed to transferring audio between a PC
and MiniDisc recorder with the highest possible clarity. If you're finding any distortion in a recording, there
C:\win\inf\hiddev.inf - driver location for USB Human Interface Device)
C:\win\inf\wdma_usb.inf - driver location for USB Audio Device
are a couple of possible reasons.
These drivers are all that is needed to operate the AN1.
The first is that the original source MP3 or wav file contains distortion, or is being corrupted during playback.
Because the AN1 plays these files exactly, any anomalies in an original recording, or that occur during
playback, will also be played. To reduce the likelihood of distortion in your source file, make sure not to use
2. My AN1 looked to install fine, but I can’t select it as preferred device
your computer for any other tasks during ripping, MP3 compression, or playback. Contact the vendor of your
Problem: Your AN1 went through most of the driver install or all of the driver installation fine, but now when
ripper and encoder to make sure you meet their minimum system requirements and are using the program
you try to select it in the Playback section of the multimedia control panel, there doesn’t appear to be any
correctly.
option for USB audio device.
If your source file does not contain any distortion, another place that it can be corrupted is in the MiniDisc
Fix: The symptom occurs where large branded computer manufacturers ship their systems with a cutdown
recorder. Make sure that the AN1's output level is not set too high. Having the output of the AN1 set higher
OEM version of Windows that does not always include all the USB audio components. Because this is
than the maximum input level of your MiniDisc recorder can cause degradation in sound quality. Most
specific to each manufacturer, you will need to contact the one who built your system and ask them to send
MiniDisc recorders have an input level indicator that allows you to monitor the strength of the input signal.
you a USB audio upgrade to bring your version of Windows up to the same standard as the retail version. The
Verify that the MiniDisc recorder is not being overloaded. If distortion is still occurring, make sure that the
AN1 does not need any special device drivers, using only the following generic Windows ones that are
lens of your MiniDisc recorder is clean.
usually stored in the listed directories for each USB component:
In order to automatically track mark using the AN1, you will need to ensure that there is a two to three
C:\win\inf\usb.inf - driver location for USB Composite Device
second gap of silence between each track. Many media players offer this facility as a plug-in. If your media
player does not have this feature, simply add a two or three second silent MP3 or wav file between tracks.
C:\win\inf\hiddev.inf - driver location for USB Human Interface Device
MusicMatch Jukebox Plus includes a special feature for AN1 users that automatically adds a 3 second gap of
C:\win\inf\wdma_usb.inf - driver location for USB Audio Device
silence between tracks during playback. To turn the MusicMatch Jukebox Plus gapping feature on, click on
Even though these drivers may be present on your system, if the OEM version of Windows you are running
File, then scroll down and click on MiniDisc Analogue Trackmarking. A check mark will appear to show the
does not contain all the underlying USB audio components, you will not be able to select USB Audio Device
feature is enabled. To disable the gapping feature, go to File, then scroll down and select MiniDisc Analogue
as the preferred playback device in the Multimedia Window. You will need to contact the supplier of your
Trackmarking. The check mark will disappear.
system to obtain an upgrade patch that brings your entire USB audio system up to the minimum
specification of the retail version of Windows.
8
9
AN1manual30-4-01.xpress
24/5/01
11:53 AM
Page 10
3. My AN1 fails to set itself as preferred audio device automatically
Problem: When you plug in the AN1, it is not automatically being configured as preferred audio device.
Fix: This occurs if a system’s soundcard is ISA based – common for standard on board audio solutions (since
Windows cannot automatically take a setting away from an ISA soundcard and give it to the AN1). It will also
occur if you are running an audio program when you plug in or unplug the AN1. Make sure to therefore close
all audio programs before doing this. You may need to configure your computer manually by selecting USB
Audio Device in the Multimedia Control Panel or the Sounds and Multimedia Properties control panel. See
the section "Checking that the AN1 is selected as preferred device in Windows 98, Windows ME, and
Windows 2000" earlier in this manual for further details.
4. My AN1 seems to be introducing pops and clicks
TM
Problem: You’ve installed the AN1 and it seems to be recording fine, except there are pops and clicks every
now and then.
Fix: Some USB host controllers do not function within USB specification. Also Windows, in conjunction with
MD-PORT AN1
MAC USERS MANUAL
(PC users: please turn to page 2)
other hardware in your system, may be consuming all the isochronous bandwidth of the USB bus. Both of
these interfere with the data flowing to the AN1, causing it to randomly add pops and clicks. The main
instances where this occurs is if:
•
USB frame rates are out of specification - isochronous data transfer (required for audio) is not possible
via USB with a frame rate that is too fast or too slow.
•
Controllers do not enumerate devices correctly - some controllers do not send USB resets at the
appropriate times or may enumerate one part of a composite device.
•
Corrupting audio data - some USB controllers introduce artifacts into sound data (i.e. CATC traces of USB
data have shown non-zero vales in data that should be all zeros).
To solve this problem, make sure you are not running any other programs in the background when trying to
record with the AN1 - anything that causes a lot of hard disk access can effect the data flowing down the
USB bus. Virus checking programs that continually run in the background are particular bad. Some drastically
effect the isochronous data flow down the USB bus and starve the AN1 of data. It is therefore important to
disable all virus checking programs. Also, make sure that you are running the most up to date drivers for your
graphics cards and modems. If you are on a network, it is advisable to log off.
Note: If you are using a laptop or notebook computer, the data flowing to the AN1 can be severely effected by
the processing power management of the CPU. Ensure that in the System control panel your computer is set
to Desktop. To verify this, go to Start, then Settings, then Control Panel. Click on System and go to the
Performance Tab. In Performance, click on File System and make sure your laptop is set to Desktop and not
Server. Some laptops are not suitable for the decoding and recording of MP3 via USB due to the variable
operating speed of their CPU and other power management features. Check with your laptop manufacturer to
ensure that the USB environment on your system supports USB audio applications.
Further information on all of these topics is available on our website at www.xitel.com.
10
11
AN1manual30-4-01.xpress
24/5/01
11:53 AM
Page 12
Getting started
Loading MusicMatch Jukebox Plus
Contained on the MusicMatch CD is a copy of MusicMatch Jukebox Plus, a powerful program that will let you
1. Before plugging in your AN1 for the first time, you will need to ensure that your computer is running the
necessary operating system and Apple Audio Extensions.
2. To verify that your computer is running the correct operating system, close all open applications. Click on
compile and play various forms of computer and CD audio. It will also let you rip tracks from audio CDs and
turn them into your own MP3 files. While your AN1 will work with any of your other favorite media players, we
suggest using MusicMatch Jukebox Plus because of it’s track marking feature which assists MD recorders in
the apple icon in the top right had corner of the screen. Scroll down to the first item in the pop up menu
automatically adding track marks. To install MusicMatch Jukebox Plus:
called About This Computer and click on it. A window with details of the operating system currently running
1. Insert the CD into the CD drive and when the icon that corresponds to the CD appears on your desktop,
on your computer will now open. Verify that in the Version line, a number 9.0.4 or higher appears. If this, or
a higher number appears, you’re running an operating system that is compatible with the AN1. If you’re
running an earlier version of the Mac operating system, your AN1 may not operate.
double click on it. This will open a window that contains the Music Match Jukebox installer.
2. Double click on the icon labeled MusicMatch Jukebox 2.0 Xitel. This will install MusicMatch Jukebox onto
your hard drive.
3. To verify that your computer is running the necessary Apple Audio Extensions, close all open applications.
On the desktop, find the icon that corresponds with your Mac hard drive. Double click on it. A window will
open listing all the files and folders on your hard drive. Scroll down and find the System Folder icon. Click
on the arrow to the left of the System Folder icon so that all the folders contained in the System Folder
become visible. Scroll down until you find the Extensions folder and click on the arrow to the left of the
folder icon. In the files that are listed in the Extensions folder, scroll down and verify that a file Apple Audio
Extension appears. Check that the version of this file is 1.0.5 or higher. If a version column does not
appear, go to View in the top navigation bar and select View Options. Place a check next to Version in the
Show Columns section. Click on OK. A version column will now appear and let you check the version of the
Apple Audio Extension file running on your computer. If your system is not running Apple Audio Extension
1.0.5 or higher, the AN1 may not operate.
4. After verifying your computer has the necessary operating system and audio extensions, close all
3. If you want, you can choose a different folder, or create a new folder, into which the installer will load
applications. Plug the supplied USB cable into a USB port on your computer. Now plug the AN1 into the
MusicMatch Jukebox. If at any time during installation you’re promoted to type in a registration key, enter
other end of the USB cable. Don’t plug the AN1 into a USB hub, as other devices on the hub may effect
the code that appears on the outside of your CD cover. This will unlock all the advanced features of
the digital audio data, causing unwanted pops and clicks in your recordings.
MusicMatch Jukebox Plus.
5. Your computer will now automatically initiate the AN1 and set it as preferred playback device. After a few
seconds, you should notice that no audio will come out of your computer speakers. If you can still hear
sound coming out your computer speakers, verify that you’re running at least the minimum operating system
and apple audio extensions requirements. If you are, restart your system with the AN1 plugged in to let your
system initialize it. That’s all there is to installing the AN1. Now head on to the next section, Loading
MusicMatch Jukebox Plus.
4. After the installation is complete, you should restart your Mac.
12
13
AN1manual30-4-01.xpress
24/5/01
11:53 AM
Page 14
If during installation, a prompt didn’t come up to enter your registration code, simply start MusicMatch
Automatic Track Marking
Jukebox and go to Register and then Enter Key. Now type in the key that appears on the outside of your CD
cover. Keep this in a safe place, as you may need it for future upgrades or if you have to install the software
In order to assist your MD recorder in adding track marks, you can use the Analog Minidisc Trackmarking
again. Do not share this key with anyone, as it is your own personal one.
feature that comes standard with MusicMatch Jukebox Plus. By enabling this feature, a three-second gap of
silence is automatically inserted between tracks, helping your MD recorder insert track marks. To verify that
this feature is turned on, in MusicMatch Jukebox Plus go to Edit then Preferences. Down the bottom of the
Recording to MiniDisc with the AN1
screen is a selection box next to the title Minidisc Analog Trackmarking. Put a check in this box to enable the
gapping feature – you should find that it already has a check by default. If you don’t want to use this feature,
1. With the AN1 plugged into your computer’s USB port, go to the system audio volume control and
click on the selection box to remove the check mark.
set it to maximum.
Some MD recorders add a ghost track that consists of no audio data when using this feature. This is a
2. Open up MusicMatch Jukebox Plus or the media player you intend using. Before starting anything, make
sure that the player’s volume controls are set to minimum.
function of the MD recorder’s internal recording mechanism and not your AN1. Any ghost tracks can be easily
removed by using the delete function of your MD recorder.
3. Plug a set of headphones or monitor speakers into your MiniDisc recorder.
4. With the supplied ministereo cable, connect the AN1 to the Line-In of your MiniDisc recorder.
5. In MusicMatch Jukebox Plus, load a selection of MP3 files or CD music that you want to record.
6. Make sure that the volume control of your media player is still set to minimum, then press record on your
MiniDisc recorder. Now press play in MusicMatch Jukebox Plus.
7. Wearing the headphones connected to your MiniDisc recorder, start to slowly raise the volume control in
MusicMatch Jukebox Plus. You’ll start to hear the volume increase through the headphones.
8. Make sure that you raise the volume control to an appropriate level for your MiniDisc recorder. If you
increase the volume past the signal level that your MiniDisc recorder can tolerate, it will cause distortion
in your recording. Many MiniDisc recorders have a level display that lets you monitor the input signal
Technical Support
For all technical support inquiries, please visit our website at www.xitel.com. If you can’t find an answer to
your problems there, drop us an email at [email protected]. We will need the following details so that our
tech guys can quickly provide assistance:
1. serial number on the base of your MD-Port;
2. details of your computer including operating system; and
3. a step by step explanation of the problems you’re experiencing – the more detail,
the easier it is for us to help you.
strength.
9. You have now set the levels of your AN1 for recording. You can now load a playlist and start a full
recording session.
Note: during recording it is advisable not to use any other applications on your system. Most MP3 decoders
require large amounts of resources to ensure flawless MP3 decoding and playback. If you interfere with the
computer during recording, it can effect MP3 decoding, which can in turn effect the quality of your recording.
14
15
AN1manual30-4-01.xpress
24/5/01
11:53 AM
Page 16
Warranties and Disclaimer
The actual physical dimensions and capabilities of the AN1 may differ slightly from illustrations and
descriptions contained within this manual. Every effort has been made to ensure that electrical functionality
has been maintained wherever possible. Xitel reserves the right to change specifications of the AN1 or the
bundled software without notice. Xitel warrants the AN1 against defects in material and workmanship for one
year from the date of original purchase from an authorized dealer or Xitel representative. This warranty only
applies to the original purchaser and is not transferable. At Xitel's sole discretion, proof of purchase and/or
the AN1's serial number will be required to initiate any warranty claim. This warranty does not cover any
incompatibilities due to the user's computer, hardware, software or any other related system configuration the
AN1 is installed with. This warranty does not cover any damage caused by negligence, non-authorized
modifications, service by any other persons other than Xitel, or if the product has been damaged by accident,
abuse, misuse, negligence, or misapplication. Xitel is not responsible for any lost profits, lost savings or other
incidental or consequential damages arising out of the use of, or inability to use, this product. That includes
damage to property and, to the extent permitted by law, damages for personal injury. This warranty is in lieu
of all other warranties including implied warranties of merchantability and fitness for a particular purpose to
the extent permitted by law.
USA - FCC Part 15 Class B Registration Warning
Product Name:
Product Model Number:
MD-Port USB Digital to Analog Converter
AN1
This device complies with part 15 of the FCC Rules. Operation is subject to the following two conditions: (1)
This device may not cause harmful interference, and (2) this device must accept any interference received,
including interference that may cause undesired operation.
Canada – ICES-003 Conformity
This class B digital apparatus complies with Canadian ICES-003
Cet appareil numerique de la class B est conforme a la norme NMB-003 du Canada
Europe – CE Conformance Information
Application of Council Directive(s)
Standards to which Conformity is Declared
Manufacturer:
Type of Equipment:
Model No:
89/336/EEC & 92/31/EEC
EN 50081-1, EN 50082-1, EN 55022, EN 61000-4-2,
EN 61000-4-3 & EN 61000-4-4
Xitel Pty Limited
MD-Port USB Digital to Analog Converter
AN1
Australia – C-Tick Conformity
This class B digital apparatus complies with the Australian Communications Authority regulations.
Technical Support
For any further technical support, please email [email protected]. Make sure to include a full description of
your system and the exact nature of the problem you are experiencing.
Copyright
MD-Port™ AN1 and Xitel™ are trademarks of Xitel Pty Limited. MusicMatch™ and MusicMatch Jukebox Plus™ are the trademarks
of MusicMatch Inc. All other trademarks are the trademarks or registered trademarks of their respective owners. Except as permitted
under the United States Copyright Act (1976), no part of this publication or accompanying software may be reproduced or
distributed in any form, or by any means, without the prior written permission of Xitel Pty. Limited or MusicMatch Inc.
© Copyright 2001, Xitel Pty Limited Australia.