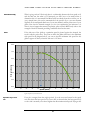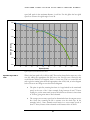
1
SOUTHERN CROSS GLIDING CLUB A simple guide to your first cross-country camp Cross-Country Manual SOUTHERN CROSS GLIDING CLUB Cross-Country Manual Derek Ruddock Southern Cross Gliding Club PO Box 132 Camden NSW 2570 Australia Phone (612) 4655 8882 • Mob 0402 055 093 www.gliding.com.au Version 1.4 August 2009 Proof reading by Michael Brandon Table of Contents So you want to fly Cross-Country? 1 What skill level must I have? 1 When are the camps held? 3 Where are the camps held? 3 How do I find out more about the camp? 3 Do I need to book? 3 What about accommodation? 4 How do the gliders get to camp? 4 What can I hope to achieve at camp? 4 How are aircraft allocated to pilots? 4 How much will it cost? 4 Water, Water Everywhere 6 What goes in, must come out 7 What to wear 7 Maps 8 Outlanding kit 12 Miscellaneous 13 Technique 1 – Worst reading 25 26 Technique 2 – Reduce bank as lift increases 26 Technique 3 – Increase bank as lift decreases 27 Speed to Fly 31 Maximise your climb rate 37 Cambridge 302 variometer 40 Cambridge 303 navigation display 42 Entering a task 45 In flight 45 S O U T H E R N C R O S S G L I D I N G C L U B C R O S S C O U N T R Y M A N U A L 1 Chapter So you want to fly Cross-Country? Heard all the tall stories from the pundits and wanted to join in but don’t know how? Use the guides in the following sections to find out how. What skill level must I have? You must have solo’ed The very minimum skill level is to have flown solo T he first thing to determine is your skill level. Obviously, everyone flies crosscounty for the first time once in their flying career, so what skill level do you need before you can fly cross-country? Note that there is no ab initio training available at a cross-country camp, so the very minimum skill level is to be able to fly solo. After all, the instructors are there to fly cross-country too! However, the instructors will be more than happy to teach you cross-country techniques, and to this end, the club usually takes one or two 2 seaters to each camp. You will get the most out of a cross-country camp if you have a reasonable number of flights under your belt. FAI C level standard is required for solo cross-country flight You must be current in the aircraft you intend to fly For Solo Cross-Country Flight the minimum flight standard is the FAI C level. See the Operations manual Procedures For Training and Assessment For C Certificate Requirements Parts 2, 3, 6 & 7. before cross-country flight in a previously flown single seater, at least one check flight is required (at the discretion of the instructor in charge) by pilots with: You must be current: under 100hrs who have not flown that aircraft for 30 days. over 100hrs who have not flown that aircraft for 90 days. It is in your best interests to ensure that you have had at least 3 flights in the aircraft you would like to fly at a camp, otherwise, in the interest of safety, the instructor in charge may restrict you to local flying only. 1 S O U T H E R N You must have an outlanding check You must have had an outlanding check within the last 12 months before being cleared C R O S S G L I D I N G C L U B C R O S S C O U N T R Y M A N U A L Before being allowed to fly out of gliding range of the field, you must have had an outlanding check within the last 12 months. For those early pilots who may not have landed in a paddock before, training will be provided. See Don’t Panic! on page 46. When are the camps held? The main cross-country camp starts on Boxing Day (December 26th) and runs for 3 weeks. In addition, the club may send gliders to the Gloucester Ridge camp in September, and the Narromine Cup in November. If the demand exists, gliders may also be taken away over the Easter break. Note the club usually has a presence at the wave camp at Bunyan, south of Canberra, usually in August. This camp, however is for experienced pilots only. Where are the camps held? The main summer camp is held in various locations, depending upon the wishes of the club members, and the club committee. State, National and International competitions may be held after Christmas so this may restrict the choice of available locations. Perennial favourites are Forbes and Narromine. In recent years, we have also visited Temora, Cootamundra and Lake Keepit. How do I find out more about the camp? Details of the camps are normally posted on the notice board in the piecart in the latter half of the year, when the venue has been decided. As the vast majority of the club membership now has email, the Expeditions Officer now emails the club mail list with the details of camps. The club website is also a good source of information. See www.gliding.com.au . Do I need to book? Booking is Essential to avoid disappointment Absolutely. The instructor running the camp has to know the number of pilots attending, and the number of pilots able to attend in any particular week is restricted, depending on the number and availability of aircraft. Somebody turning up out of the blue and wanting to fly can expect to be disappointed. Contact the Expeditions Officer as soon as possible to avoid disappointment, and to reserve a place. Book your accommodation early 3 S O U T H E R N C R O S S G L I D I N G C L U B C R O S S C O U N T R Y M A N U A L What about accommodation? You are responsible for arranging your own accommodation. In many places, there is a limited amount of accommodation available, and, in popular locations, this accommodation may be booked out quickly. Club members who do not take their families to camp usually share accommodation. How do the gliders get to camp? Towing Gliders Members attending camps should have towbars fitted The gliders are towed to camp by club members. The club strongly encourages club members who wish to attend camp to fit a towbar to their car. If there are not enough members with towbars to ensure that the gliders are returned to Camden at the end of the camp, the gliders will be towed back early. In extreme cases, the gliders may not be taken to camp at all. Fuel Costs I’m towing a glider, but then my car uses much more fuel. Isn’t this unfair? The club recognises the additional fuel used in towing gliders to camp, and makes allowances for gliders towed when calculating the camp levy: those towing a glider will be charged less than those who do not. What can I hope to achieve at camp? Early solo pilots can look forward to perhaps a five hour flight or a 50km flight towards their Silver C badge, perhaps both on the same flight!. More experienced pilots will be looking to complete a 300 or even 500km flight. See FAI Badges on page 15 for details of FAI badges, and their requirements. How are aircraft allocated to pilots? The sixty-four thousand dollar question! This is always a difficult topic. The camp instructor tries to make the allocation as fair as possible, in order to maximise the amount of flying for everyone, while at the same time taking into account a pilot’s needs and skill level. Normally the allocation is made initially by a draw, then rotating subsequent allocations so everyone has an equal opportunity to fly. How much will it cost? Flying a club glider will cost the same as it does at Camden, with a maximum charge of 3 hours. If using one of our tow planes, then the launch charges are also the same. Bulk Flying I’m a member of the Bulk Flying Scheme. Can I use this at Camp? We have no control over the amount that any resident club charges for a launch, so you will have to pay whatever they charge if you choose to use one of their tugs. 4 S O U T H E R N C R O S S G L I D I N G C L U B C R O S S C O U N T R Y M A N U A L It costs a considerable amount to ferry a tug to a camp. In addition, towing a glider trailer to a camp uses up much more fuel. In the interests of fairness, the club charges all pilots who attend a camp a levy. This amount is used to offset the costs of the tug ferry, and to compensate the club members who choose to tow a glider to or from the camp. Bulk flying charges are not applicable at camps. 5 S O U T H E R N C R O S S G L I D I N G C L U B C R O S S C O U N T R Y M A N U A L 2 Chapter What do I need to take? Have you spoken to 20 people and had 20 different answers on what to take? This chapter attempts to detail a comprehensive list of equipment you should take for your cross-country camps. Water, Water Everywhere Dehydration is Deadly I f you take a look at any glider on a camp one of the first things you will notice is that every one carries a water bottle of some description. Dehydration is insidious and leads to poor decision making, the possibility of accidents and worse. Temperatures in the Australian bush can regularly get to over 40 degrees, and inside a glider it can be worse. Water must be carried to replace that lost through sweating and evaporation in the breath. In addition, if you land out in a paddock, it may be several hours in searing heat before you are retrieved, so a backup supply is essential. Many pilots take the ‘CamelBak’ type of water container, but any bottle that is easily handled and is able to be reached in flight will suffice. Due to the limited storage available in most gliders, a bottle with a sealable plastic tube will do. You can drill a hole in the lid of a 2 litre plastic bottle, or buy a purpose built one from Target or Kmart. put additives into your water, as they can encourage mould and bacteria growth. The best thing to do with the water is to partially freeze it so it remains cold and refreshing during the flight. Do not take another container of water to drink from before flight: save your main supply for your flight. Do drink carbonated drinks before flight. If you are lucky enough to be able to thermal to a reasonable height, the gas expands as the pressure decreases, with painful and unpleasant results (especially for the other pilot in a 2 seater!). Do not 6 S O U T H E R N C R O S S G L I D I N G C L U B C R O S S C O U N T R Y M A N U A L What goes in, must come out If you drink 2 litres of water during a flight, you may think that this would cause problems at the other end. Surprisingly, most of the water is lost in sweat, however, not all of it. On a long flight, being unable to take a leak is uncomfortable at first, but soon becomes a distraction, then a major problem, and may result in at best a premature landing to enable the pilot to relieve himself, and at worse an accident caused by the pilot being distracted. There are a number of solutions to this problem. Some aircraft have built in plumbing: the Jantar and Junior have a funnel arrangement fitted near the joystick (please note: if you think you may make use of these, ensure they are present before you take off). Some gliders have a similar arrangement, but instead of a funnel, the pilot wears a Uridom: a device rather like a condom, with a catheter attached, which is inserted into the tube which leads to the outside of the aircraft. Some pilots take a plastic container, some use condoms, tie them up & dispose of them through the window. A ziplock plastic bag with a child’s nappy serves the same purpose and is more robust Whatever method you decide suits you best, at least take something. It may make the difference between you completing your flight or ending up in a paddock. Taking a leak while lying down in a cockpit is not as easy as it would seem. A trial run, dressed in your gliding clothes and laying in an empty bath is a good idea. I believe ladies can make use of incontinence pads: these are like an adult nappy, and are incredibly absorbent. What to wear I’m sure we’ve all flown locally in shorts and a T-shirt. While this is ok for a short local flight, it is not a good idea for camps: the sun can be fierce, and you need as much protection as possible. In addition, if you are unfortunate enough to land in a paddock, long trousers will help protect from mosquitoes and thistles. An old, long sleeved business shirt help will protect the arms and neck from the sun. Many pilots also protect the back of their hands by wearing special fingerless sun-blocking gloves, available from the Cancer Council. Protect your head Keeping a cool head when flying is essential in every sense. Baseball caps are totally inadequate: the brims give limited upward vision, and they provide no protection whatever for the neck, which can lead to sunburn and sunstroke. Terry towelling hats are ideal, and when soaked in water, make excellent head coolers too. 7 S O U T H E R N C R O S S G L I D I N G C L U B C R O S S C O U N T R Y M A N U A L Maps Maps, or charts, are essential for cross-country flight. Even in these days of almost universal use of loggers and GPSs, the skill of map reading is essential for those occasions when the batteries fail. If you wish to get the most out of your map, protect it with self adhesive clear film. World Aeronautical Chart (WAC) World Aeronautical Chart In Australia, with huge distances between items of interest, the most common form of map is the World Aeronautical Chart (WAC). These are on the scale of 1:1,000,000, so you will not see a great deal of detail; however one map will usually cover the area in which you will be flying. Figure 1 WAC chart 8 S O U T H E R N VTC C R O S S G L I D I N G C L U B C R O S S C O U N T R Y M A N U A L Visual Terminal Chart VTCs provide both aeronautical and topographical information at a scale of 1:250,000 for VFR operations in the vicinity of major aerodromes. Every pilot who flies from Camden should have a Sydney VTC. For our camps, the only area where a VTC is required is Lake Keepit, which is close to Tamworth airport. Figure 2 VTC of the Sydney basin 9 S O U T H E R N VNC C R O S S G L I D I N G C L U B C R O S S C O U N T R Y M A N U A L Visual Navigation Chart VNCs are produced on a scale of 1:500,000 and are an excellent amalgam of the VTC and the WAC. Unfortunately they are only produced for the Eastern Coastal areas in Australia, so are of no use on a camp. Figure 3 VNC of the Sydney basin 10 S O U T H E R N Joint Operation Graphic (JOG) C R O S S G L I D I N G C L U B C R O S S C O U N T R Y M A N U A L Joint Operations Graphic The JOG chart is a 1:250,000 chart, and as such, shows much more detail than a WAC chart. However, the amount of ground they cover means that several charts would be required to cover a typical camp, and as such their use is limited. These maps are useful when retrieving a glider that has landed out. Note that these charts are not aeronautical charts, unlike the others mentioned here. Figure 4 JOG chart of Cootamundra 11 S O U T H E R N NATMAP Raster 250K C R O S S G L I D I N G C L U B C R O S S C O U N T R Y M A N U A L By Geoscience Australia Similar to the Joint Operations Graphic, these maps cover all of Australia at 1:250,000, and are available on CD, or DVD for the Raster premium set. These maps are useful for task planning and retrieves (with a laptop of course), but of no use in the air. See http://www.oziexplorer.com Outlanding kit Outlanding is a part and parcel of flying cross-country. As Australia is a hostile environment, it pays to do some forward planning and have an outlanding kit that can be tucked into the glider in a small bag. The items you have in your kit are a personal choice, but some essential items are: A pack of tissues Change for payphones – keep it in a used 35mm film container Space blanket – occupies little space & will keep you warm if waiting overnight Raincoat – disposable plastic bag type Spare batteries – for your GPS if you have one Munchies – a muesli bar or two Signalling mirror – useful for attracting attention Strobe – buy from Dick Smith or a yachting chandler, this is essential to be able to locate the glider once it gets dark. This alone could save you from a cold and lonely night Sunscreen Insect repellent – RID works well against mosquitoes, Aerogard works well against flies Penknife Torch Pen Paper 12 S O U T H E R N C R O S S G L I D I N G C L U B C R O S S C O U N T R Y M A N U A L Matches/lighter More water! At least 2 litres Orienteering compass – essential if you have to find your way to a road (and your GPS batteries fail…) Miscellaneous Other items you may find useful to take: Mobile phone (preferably 3G/NextG rather than GSM) – reasonably essential these days, but beware of coverage issues Mobile phone charger Prepaid Telstra mobile phone SIM – if you are with a network other than Telstra, buy a $20 prepaid SIM, then you can temporarily use the Telstra network while at camp Grease – every time a glider is rigged or de-rigged, the pins and joints must be greased. Take a small pot of grease with a screw top lid Hand cleanser – see above Rags – for removing the old grease from the pins White electrical tape – for sealing wing gaps Methylated spirits – for removing old tape residue Camphor blocks – if you do not have a logger, camphor is needed to smoke barograph foils. Hair spray – for fixing barogram traces Powerful torch – for the inevitable night-time retrieve Sellotape – for protecting your maps Permanent markers – for marking maps Compass – drawing type, useful for drawing ranges on maps Ruler 13 S O U T H E R N C R O S S G L I D I N G C L U B C R O S S C O U N T R Y M A N U A L More batteries… you can’t have enough Power board – someone has to plug in the aircraft battery chargers Gel Cell charger (Dick Smith/Tandy) – because invariably there will be a shortage of chargers Laptop computer – if you have one Club hammer – i.e. a small hammer resembling a sledgehammer, rather than a hammer belonging to the club! For hammering in pegs to anchor gliders and trailers Earplugs – if you are a light sleeper, and are sharing your accommodation, a set of earplugs can make the difference between a good nights’ sleep, and none at all 14 S O U T H E R N C R O S S G L I D I N G C L U B C R O S S C O U N T R Y M A N U A L 3 Chapter FAI badges Heard all this talk of Silver Cs and 300’s, Gold heights and diamond distances? This chapter details the FAI badge system, and the requirements for each badge FAI Fédération Aéronautique Internationale T he soaring performances required to qualify for the FAI badge standards of achievement are: Silver Badge SILVER DISTANCE SILVER DURATION SILVER HEIGHT a flight on a straight course of at least 50 kilometres a duration flight of at least 5 hours a gain of height of at least 1000 metres GOLD DISTANCE GOLD DURATION GOLD HEIGHT distance flight of at least 300 kilometres a duration flight of at least 5 hours a gain of height of at least 3000 metres Gold Badge Diamonds DIAMOND DISTANCE a distance flight of at least 500 kilometres DIAMOND GOAL a goal flight of at least 300 kilometres over an outand-return or triangular course DIAMOND HEIGHT a gain of height of at least 5000 metres (see Sporting Code, Section 3, Chapter 2). Before you attend a camp, you should have your A, B and C certificates, so I won’t go into those any further. 1% rule Loss of height allowed for flights of less than 100km Silver Distance: A flight on a straight course of 50km in a straight line. Seems straightforward eh? Take a tow to 8000 feet, release & glide 50km. Unfortunately this won’t work, as the ‘1% rule’ applies to flights of less than 100km. This is nothing to do with being a Hell’s Angel, but refers to the maximum height loss allowed as a percentage of distance flown. 1% of 50km is 500m, or 1640 feet, so, if the distance you fly is exactly 50km, the maximum launch height that you are allowed is 1640 feet above 15 S O U T H E R N C R O S S G L I D I N G C L U B C R O S S C O U N T R Y M A N U A L your landing place. If your landing place is lower than your takeoff place, this means your launch height is lower than 1640 feet. There is no margin allowed, so, if the launch height is more than 1640 feet above your landing point, the claim will not be allowed. Note that the 1% applies to the straight line distance: if you land 64km away, the launch height can be 640m, or 2099 feet. Out and Return Can I fly out then back again? For your silver distance badge, one leg of the flight must be over 50km. What’s to stop you launching, flying 50km, and then returning to your launch point? The answer is nothing: the 1% rule applies and applies to the total distance flown, not just the 50km leg, however, it would be prudent to take a launch to a height allowed under the 1% rule, in case an outlanding was made after the 50km was flown. Duration flights are self explanatory. Can I do more than one at a time? Soaring tasks can be combined. For example, if it took you 5 hours to fly your 50km leg(!), and you managed to thermal up to 3000 metres above your launch point, you would satisfy the requirements for the following, provided your evidence met the requirements: Goal vs. Distance What’s the difference? Silver Distance Silver Duration Silver Height Gold Duration Gold Height The Gold Distance flight of 300km is a distance flight: this may be distance in a straight line (although you would not be too popular when it came to the retrieve), or a flight from a start point, via up to 3 turn points, to a finish point. The only restriction on the turnpoints is that they must be at least 10km apart, thus a cat’s cradle type flight would suffice for the Gold Distance. The start and the turnpoints must all be pre-declared before flight. The finish need not be the same as the start, but if it is, it is not necessary to declare it separately. See below for details of the information required on a declaration. The Diamond Goal of 300km is a goal flight: in this case you may use an out-andreturn flight (one turnpoint) or a triangular course only. The Diamond Distance is a 500km distance flight, thus may be a straight line or cat’s cradle flight, as for the Gold Distance. 16 S O U T H E R N Pilot preparation is essential for flying a task successfully C R O S S G L I D I N G C L U B C R O S S C O U N T R Y M A N U A L Pilot preparation is essential prior to flying a task. The following is from the Official Observer & Pilot Guide Annex C to FAI Sporting Code Section 3 – Gliders 1.4 The most valuable thing a pilot can do to meet the requirements of a badge or record task is to make careful preparation. Lack of preparation results in weak evidence, accounts for most rejected claims, and may seriously delay or even cancel your planned flight. Your preparation of impeccable evidence requires some care and time, and time is invariably in short supply on the morning of the “Big Flight”. Therefore anticipate the day and prepare for it this will go a long way towards a successful flight. Consider the following a. Study the current FAI sporting code and be aware of the requirements of a given flight and discuss your planned flight with your OO. See Documentation in Appendix 4. b. If you are using a camera and barograph for evidence, always have a barograph prepared for flight, and have a fresh roll of film available for the camera. Practice turn point photography to check out the camera and especially your own flying techniques around the turn point. c. If you are using as FR for evidence, be completely familiar with the equipment and the loading of turnpoint data. Use the FR on several local flights before trusting yourself to use it correctly for an important flight. d. Always have landing cards, flight declaration and the most current version of other badge or record forms. Keep all this material in a separate container and keep it handy. Record forms are available on the IGC website. NAC’s hold badge claim forms and may have their own, locally modified record forms. e. Study possible tasks beforehand and prepare maps for them or load them into your FR. f. Prepare and use a task checklist I would add, replace the batteries in your camera before the camp! Burden of proof How do I prove I flew the task? Unfortunately, nobody will just take your word that you have flown a task, so the burden of proof is on the pilot.. The person you have to convince is called an Official Observer, and these are upstanding members of the gliding community who have studied the relevant documentation, and have passed a knowledge test of the rules. Originally, the only way that you could prove that you had been to a turnpoint was to station an observer there with a pair of binoculars, and wait until the glider was physically seen to round the turnpoint. Fortunately this method is no longer in use. There are 2 main methods of proof of flight. The first method is photographic evidence. In this instance, the glider pilot must take photographs of the turnpoints in the declared sequence. If you are planning to use a camera, it MUST be a film camera, 17 S O U T H E R N C R O S S G L I D I N G C L U B C R O S S C O U N T R Y M A N U A L and mounted securely to the right hand side of the glider. Hand held cameras and digital cameras are not allowable for badge claims. The second method is to use an FAI approved data logger. Note that the use of other types of data loggers (Palms PDAs etc) is NOT acceptable evidence for badge claims. Required evidence What evidence is required? The following is a simplified list of the requirements for claiming a badge flight using equipment other than a data logger. For full details, see the FAI sporting code. Declaration: A declaration must be made and signed before the flight is commenced. This should consist of: Date of flight Name of pilot Type and registration of glider Type and serial number of barograph Waypoints, and the sequence in which they are to be flown, start, turns and finish points. Signature of pilot Signature of OO, with data and time Flight Continuity Verification: This is a means of verifying continuity of the flight. For non-logger flights, this will consist of a barograph trace. Note that there is one exemption for the requirement for a barograph: if a 5 hour flight is continuously monitored and observed by an official observer, a barograph need not be carried. Landing Evidence If you are not returning to the start aerodrome, a signed declaration by 2 witnesses of your landing Height evidence If you are claiming a Gold Height, the barograph used must be calibrated, and a certificate of height gain obtained, within 2 months of the flight being made. Position Evidence. Satisfactory evidence must be supplied that you have rounded the turnpoints in the correct sequence. These photographs must prove you were in the FAI photographic zone (see Figure 5 FAI Photographic Sector on page 21). The photographs must be in sequence on a length of uncut film. The camera must be mounted in a fixed position on the glider canopy frame, such that the wingtip is visible in the photograph. The Official Observer then makes a random mark on the canopy, ensuring it is at least 3mm wide, so as to appear on the photo. If the OO is developing the film, then the camera does not have to be sealed in the glider. 18 S O U T H E R N C R O S S G L I D I N G C L U B C R O S S C O U N T R Y M A N U A L The following sequence of events must be photographed: 1. The pre-flight clock synchronization photo (not necessary with cameras with a date back) 2. The declaration 3. Photo(s) of the glider that show indisputably the glider in the sector of each turnpoint, in the correct sequence (as in the declaration) 4. The glider after landing (a photo of the rego on the fin) 5. The after landing photo of the clock, if a date back camera is not used. Barograph In addition to the photographic evidence showing your position, evidence must be furnished to show your altitude during the flight. This is achieved by the use of a barogram. A barogram is produced by a barograph, and records your height during the flight as a line scribed on a smoked piece of aluminium foil. If a height gain is being claimed as part of a badge then the barograph must have been calibrated within the last 12 months. Prior to the flight, the OO must seal the barograph usually with brown paper tape, and sign the seal, after recording the following: a. Identification mark of OO before takeoff, b. For altitude and gain of height records, the pressure at ground level (QFE) at time of takeoff, c. Date of flight, d. Name of pilot, e. Type, serial number and altitude range of barograph, f. Type and registration of glider After landing, the sealed barograph is retrieved by the OO, who then adds g. Altitude of release (or of stopping the means of propulsion for motor gliders), h. Proof of no intermediate landing, i. Date and signature of OO after landing. The barogram is preserved by spraying lightly with hair spray. Notching the barograph Ok, so you have photographed your declaration from the fixed camera before takeoff, the OO has signed and sealed your barograph, and it is ticking away nicely in the space behind your head. If at this point, you do not hear the ticking, you have forgotten to turn it on, so either abort the takeoff, or land and switch it on: the flight cannot be validated if the barogram cannot be supplied to the OO. 19 S O U T H E R N C R O S S G L I D I N G C L U B C R O S S C O U N T R Y M A N U A L After release you must descend at least 200 feet to ‘notch the barograph’. This means that there is a noticeable descent on the barogram after launch, and is supposed to show that the glider has released from the tug and has descended before finding lift. If you have released into a thermal, then either descend in the thermal using airbrakes (providing no other gliders are below you), or leave the thermal and rejoin after descending 200 feet. Turnpoints When choosing your turnpoints, be as explicit as possible, leaving no room for doubt, e.g. Forbes Terminal Building, Narromine Beehive Silo or Gilgandra Runway Intersection. This avoids confusion and the possible rejection of your claim. Observation Zone using photographic evidence It is always good practice to take a picture of the launch point on the opposite side of your intended track to the first turnpoint. This helps prove your point of release. You need to fly the glider to the correct position, then dip the wingtip to point towards the airfield, while simultaneously pressing the shutter button, and maintaining a lookout. This is not as easy as it seems, but it is good practice, saving additional stress when you are a long way from home. If at this point you notice that the camera is on the opposite side to the ‘pointing wing’, then repeat the exercise in the opposite direction, and take a photo of the ground instead of the sky. When you arrive at your first turnpoint, you must take a photograph of that turnpoint, however the glider must be within the FAI photographic sector. This is a 90 degree sector on the opposite side of your direction of approach: a line dividing the sector in 2, if extended towards the incoming and outgoing tracks would bisect the track lines. See Figure 5 FAI Photographic Sector. The best way to do this is to pick a landmark, preferably prior to the flight that lies somewhere beyond the turnpoint and on the bisector of the observation zone. Fly along this imaginary line some distance past the turnpoint, then turn and photograph your turnpoint. The distance you have to fly past the turnpoint to ensure you have the turnpoint in the photograph is surprisingly large, especially if you are not comfortable with large angles of bank. It is acceptable to take several photographs; if you are at all unsure if you are in sector, then reposition the glider and try again: yours would not be the first claim to have been disallowed because you were not in sector when photographing the turnpoint. Take photographs(s) of each turnpoint in the above manner, and when you have landed take a photo of the glider in a recognizable position (e.g. with terminal buildings in the background), showing the registration of the glider. Hand the camera and barographs with intact seals to the OO (better still get him to remove them from the glider: this means there has been no possibility of substitution). 20 S O U T H E R N C R O S S G L I D I N G C L U B C R O S S C O U N T R Y M A N U A L Bisector of angle of track in and track out PHOTO SECTOR Track out Track in Figure 5 FAI Photographic Sector IGC approved logger Fortunately the days of crouching over a lump of burning camphor to smoke foils (for barograms that is) in a corner of a hangar, and of pilots performing gyrations in the air over a turnpoint in an attempt to get in sector are, in the main, over. Southern Cross Gliding Club has IGC approved loggers fitted in most of the fleet, and has IGC approved portable loggers and mounts for the remaining gliders. IGC approved loggers provide a means of recording both the position and the height of the glider during the flight. The OO must have incontrovertible evidence that the logger was actually used for the flight being claimed. This means inspecting the downloaded trace and validating the security record by means of an approved program, and in addition for mobile loggers ensuring that the logger was actually used on the flight, by seeing the pilot take off and land, and retrieving the logger himself. The great advantage of using a logger, apart from not getting covered in soot, is the ability to use the trace to analyse and replay part, or the whole of the flight. This will be covered in a later chapter, as will the actual means of setting up the logger. Declarations As for flights verified using cameras, a declaration must be made prior to the flight using a logger. In this case, the declaration is made electronically in the logger itself. The means of making the declaration is particular to the logger itself, so refer to the manual. 21 S O U T H E R N C R O S S G L I D I N G C L U B C R O S S C O U N T R Y M A N U A L Frequency of logging Depending on the type of logger, the frequency at which the logger takes a fix may be varied. Providing that the memory of the logger is sufficient, it is best to take a fix every 4 seconds. Important note: some makes of logger do not overwrite old logs when the memory is full. For those loggers it is important to clear the memory of old data before commencing a flight. If the flight is likely to be long, and the logger does not have sufficient memory using a 4 second fix interval, then a 10 second interval is acceptable, but this affects how soon you can turn when arriving at a turnpoint. Observation Zone using IGC approved loggers The observation zone when using a logger is a 500 metre circle centred on the turnpoint itself. The requirement is for one fix to be inside this circle, which is easily achieved with a 4 second fix interval, or alternatively a straight line joining 2 consecutive fixes must cut the circle. This is more significant if using 10 second fixes, as at 90 knots, a distance of almost 500 metres is covered in 10 seconds; an exuberant pilot could approach the turnpoint at speed, and turn for his next turnpoint, without either a fix in sector, or 2 consecutive fixes cutting the sector. DATUM The singular of data . If the datum format used by the flight recorder is capable of being changed, it is essential that it is set to the WGS84 standard and no other, else the flight will not be valid. 22 S O U T H E R N C R O S S G L I D I N G C L U B C R O S S C O U N T R Y M A N U A L 5 Chapter Who’s watching anyway? Wondered why that person was autographing a camera or that odd looking piece of equipment? This chapter describes what an official observer does, and how you can become one. Appointment Who can become one? T he appointment of Official Observers is delegated to the GFA by the FAI, and is currently looked after by Beryl Hartley from Narromine. Their duties are to control and certify FAI badge and record flights and competitions sanctioned by the FAI. Control in this case means the observation of flights, observation of declarations, and the sealing, installation and removal of barographs and cameras and the like. Any competent and reliable glider pilot may become an Official Observer, providing they have the integrity, skill and competence to perform the above duties. An essential competence for the OO is knowledge of the FAI sporting code, section 3. This may be downloaded from the FAI at http://www.fai.org/gliding/system/files/sc3.pdf or viewed online at http://www.fai.org/gliding/sc3 . Once you are familiar with the code, download the application form and test forms from the GFA at http://www.gfa.org.au/index.php?option=com_content&task=view&id=393&Itemid =184 and get the CFI to countersign. Enclose the appropriate payment and the completed test form to the GFA Claims Office as detailed on the application form. The test itself is not supervised, and is open book; they are simply questions that test your understanding and interpretation of the sporting code. 23 S O U T H E R N C R O S S G L I D I N G C L U B C R O S S C O U N T R Y M A N U A L 6 Chapter Going round the Bend Why do those gliders that join your thermal always end up higher than you? Read on for some tips on improving your thermalling technique. What is a thermal? W hat is a thermal anyway? It is a mass of air that is warmer than its surroundings. Because the air in the thermal is warmer, it is less dense, and so rises. There is some debate as to the actual shape of the thermal: some people think it is an extended column, like a willy-willy, some think it is a bubble, and others believe the shape of the thermal is a torus (doughnut). For our purposes I will treat the thermal as a bubble. Thermals are often, but not always, capped by a cumulus cloud, which much more than any theory shows at least what the top of the thermal looks like. Thermal core The centre of the thermal where lift is the strongest Thermal strength Varies from 50 to 2000 feet per minute Convection height Varies enormously from a couple of thousand feet to the stratosphere LOOKOUT!!! You are often not alone in a thermal. It is ESSENTIAL to keep a good lookout at all timers As the thermal rises, the air towards the outside of the thermal is dragged back by friction with the surrounding air. This results in the air in the centre of the thermal rising more quickly than near the edges. As a glider pilot, we should aim to get into the centre (core) of the thermal, as that will enable us to climb more quickly. Thermals vary enormously in both size and strength: from a half knotter (a cow’s fart) which may save your bacon on a cross-country task, through a ‘British Standard Thermal’ of 2 knots, or 200 feet per minute, up to 20 knotters in some parts of Australia, the USA and South Africa. Thermal depth also varies enormously. As cloud flying is illegal in Australia, we are limited to 1000 feet below cloudbase on days when clouds are present, however, in summer the cloudbase is often well above 10,000 feet. Note: very often, especially in areas where gliding is popular, such as New South Wales in the summer, there are many gliders that may be in the same thermal. It is essential that a good lookout is kept, including up and down, before making any change in direction. This means rolling out of a turn as well as rolling into a turn. 24 S O U T H E R N C R O S S G L I D I N G C L U B C R O S S C O U N T R Y M A N U A L Keep a good lookout, and don’t get fixated on the instruments in an effort to improve your thermalling otherwise you may not survive the exercise. Use the audio vario and keep your head ‘out of the cockpit’. Centring techniques So, how does Mr Glider Pundit keep outclimbing you? The answer is usually that he manages to locate the centre of the thermal more quickly, and turns tighter to keep in the stronger lift in the core of the thermal (the fact that he’s flying a ‘you beaut’ private glider, and all you can afford to fly is the crappy club gliders has absolutely nothing to do with it. Honest! ) Position y: lift increasing THERMAL Position x: lowest reading Distant Landmark Position z: Lift Decreasing Figure 6 Worst Reading Technique – look where the lower wig points at the worst reading in the circle Look at the above diagram. The glider is circling half in, and half out of the thermal, as indicated by the variometer readings. Obviously, we want to move the circle to coincide with the thermal, so how do we do that? Technique 1 – Worst reading Lower wing pointing Look where the lower wing is pointing at the weakest part of the circle As the glider is circling, listen to the variometer. When the reading is at its lowest, we will be at position x. Note that in this position, the lower wing is pointing towards the centre of the thermal. Look in the distance and pick a suitable landmark, and, when the nose points in this direction, straighten up and fly towards the landmark for 2 or 3 seconds, then re-commence circling. This has the effect of moving the circle towards the centre of the thermal. 25 S O U T H E R N C R O S S G L I D I N G C L U B C R O S S C O U N T R Y M A N U A L THERMAL Straighten for 2-3 seconds Distant Landmark (not to scale) Figure 7 Worst Reading Technique – straighten towards a point in the distance from the worst reading Straighten on the surge Straighten up when lift is felt Technique 2 – Reduce bank as lift increases As the glider is circling, listen to the variometer. When the reading starts to increase, i.e. at position y in figure 6, reduce the angle of bank and straighten on the surge. While the lift is increasing, maintain a straight path. As soon as the lift remains constant, recommence circling at the previous angle of bank. THERMAL Reduce bank as lift increases Figure 8 Reduce bank as lift increases 26 S O U T H E R N Tighten on sink Tighten up when flying out of lift C R O S S G L I D I N G C L U B C R O S S C O U N T R Y M A N U A L Technique 3 – Increase bank as lift decreases As the glider is circling, listen to the variometer. When the reading starts to decrease, increase the angle of bank i.e. tighten up the turn. As you fly into the lift, reduce the angle of bank. When the reading is constant, recommence the turn. This is essentially the opposite of technique 2. THERMAL Increase bank as lift increases Figure 9 Increase bank as lift decreases Which one should I use? Use whichever you are most comfortable with, or a combination of all three. Note that the stall speed is increased in a tight turn: if you are flying slowly in the thermal and increase your bank you may stall. In addition you have to be comfortable flying at steep angles. For this reason I recommend you use techniques 1 or 2. Note The above techniques are the opposite of what is taught in Britain, where the thermals are weaker and smaller. In that case it is important to maintain contact with the thermal, so you tighten on the surge. Don’t turn too soon When you first encounter lift, it is important not to turn too soon, in the buoyant air being dragged up by the thermal: as long as the lift is increasing, keep flying straight. Which way do I turn? Hold the stick loosely when flying into lift. Look closely at the attitude of the glider: if the left wing rises, the thermal is on the left, so turn left. If the right wing rises it is on the right so turn in that direction. If you are fortunate enough to hit a thermal in the middle, turn either way. Remember that you are going to be slowing down, climbing and turning, so make certain that you look up and behind in the intended direction of turn before you manoeuvre. Fly accurately All of the above will be pretty pointless unless you can fly circles with a consistent angle of bank, and a consistent speed, otherwise it will be impossible to determine if the air you are flying in is rising, or whether it is a result of your gyrations. 27 S O U T H E R N Fly with consideration C R O S S G L I D I N G C L U B C R O S S C O U N T R Y M A N U A L There is nothing more guaranteed to cheese people off than to thrash around in a thermal, forcing others to take evasive action. Please consider other gliders before making any changes in bank, speed and direction and remember to keep a good lookout! What speed? What is the optimum speed to fly in a thermal? The optimum speed to fly in a thermal is the circling minimum sink speed, bearing in mind the need to retain controllability. As circling polars for gliders are as rare as hen’s teeth a reasonable assumption has instead to be made. The club gliders (except the K13) have a minimum sink speed of around 45 knots. When circling, the wing loading increases, and this has the effect of raising the minimum sink speed, thus, without any documentation to the contrary, regard 50 knots as the optimum speed to circle in club gliders. Note that there is no advantage whatsoever in flying the glider too slowly in thermals: if you are below the minimum circling speed, the drag is the same as when flying a few knots above the minimum circling speed, but you are much closer to the stall. Stalling when circling is very likely to lead to a spin, and, if you spin down through a thermal with other gliders below you, you are not likely to make a good impression, assuming you survive. Which Bank? That’s angle of bank of course! As the bank angle increases, the diameter of the circle decreases. Thus increasing the bank angle keeps the glider in the stronger part of the thermal, as the thermal is stronger in the centre. This is a Good Thing. Unfortunately, a higher bank angle requires a higher wing loading, which increases the sink rate, and also the speed at which the circle must be flown. This is not a Good Thing. As with most things in life, a compromise works best, and an angle of around 45 degrees is best for Australian conditions, providing you can fly that angle consistently. Most club pilots may think they circle at around 45 degrees, but in fact the angle of bank is often much shallower. Some pilots paste a 45 degree triangle, homemade from a protractor set, on top of the instrument panel, and use this to judge their angle of bank. Practice thermalling at this angle as much as you can before attending a camp. How do I join? Very carefully! If you are joining a thermal that already contains other gliders, you must do so carefully. Remember that a glider may gain hundreds of feet while slowing down from cruising to circling speed. Blundering into a thermal at high speed followed by a pull up, as the other gliders scatter to the four winds, is very poor airmanship, and, if you are really unlucky, could really spoil the rest of your life: all ten seconds of it. Slow down before entering the thermal: if other gliders are at a similar height, you should attempt to join the thermal on the opposite side. This needs anticipation and some planning, and is best practiced in a 2 seater with an instructor. Where is it? Thermals are rarely vertical Unless there is no wind, it is extremely unlikely that the thermal will be directly underneath a cumulus cloud, except close to cloudbase. Think of a column of smoke rising from a fire; even better, if you can see a fire or column of dust in the vicinity, this will give you an ideal picture of how the thermal is skewed. You must search upwind 28 S O U T H E R N C R O S S G L I D I N G C L U B C R O S S C O U N T R Y M A N U A L of the cloud (or gaggle of circling gliders) for the thermal. The distance to search upwind is dependent upon the strength of the wind. If you are fortunate enough to arrive under a likely looking cloud, and have gliders beneath you, the thermal is likely to be in a line between the circling gliders and the cloud itself. Blue, BlueMy world is Blue No clouds? You have to search for triggers On many days, the conditions, although thermic, do not allow for cumulus clouds to form. This may be for many reasons, and is outside the scope of this manual. Suffice it to say that you may be flying cross-country one day without a friendly cu in the sky. What do you do? 1. Look for other gliders: Unless the pilot is playing silly buggers, any glider that you see flying in circles is almost certainly in lift: if you look carefully you can see if they are climbing well. Assuming the other glider is within gliding range, the pilot has saved you a lot of effort. Go join him. After you leave the thermal, perhaps you could repay him in a similar way. 2. Look for free gifts: Though it is illegal to deliberately light stubble fires, they still happen occasionally. Grass fires caused by discarded cigarettes or bottles also occur. If you can fly into the rising air above one of these, the lift can be immense: I got my Gold Height over a stubble fire: 20 knots plus to well over 10,000 feet. Bear in mind that visibility isn’t going to be too great due to soot, smoke and ash there could be noxious fumes there could still be burning embers it is likely to be extremely turbulent: add 10 knots or so to your normal thermalling speed if you are low, consider avoiding fires: if you have to land, and the field below you is burning… all the crap accumulating on your wing is going to reduce performance 3. Look for rising air: How you may ask, as air is invisible. It’s amazing how much debris becomes airborne when a thermal takes off: dust, insects, plastic bags, chaff etc etc all help to make a thermal visible. 4. Look for willy-willys: These are often the precursor to thermals. Beware however; if you are low, you are risking much by using willy-willys: they are of small diameter, extremely turbulent and high energy. They are best avoided unless you are extremely experienced, foolish or both (in which case, why are you reading this?) 5. Look for trigger points: Often, heated air will sit on the ground, until something triggers it, and it starts to rise, to become a thermal: this trigger point may be something as simple as 29 S O U T H E R N Ever skied through trees with your eyes closed? You normally don’t have a problem finding trees… C R O S S G L I D I N G C L U B C R O S S C O U N T R Y M A N U A L a line of trees or the edge of a wood facing into wind an isolated building an isolated outcrop of rock a farmer ploughing a paddock (watch what the dust is doing) a moving car or train a line of water facing into wind rising ground, facing into wind 6. Watch for the signs: Failing all else, pick a point in the distance along your track and fly towards it (the tree skiing with your eyes closed technique). If you find yourself turning, or the nose wandering to one side, a thermal is on the side of the lifting wing, so turn immediately towards it. It’s surprising how many pilots, when asked to fly towards a point, will often end up more than 45 degrees off track due to this effect not being noticed, yet can convince themselves they are flying straight. If you cannot fly straight without deviating, it is almost guaranteed that you will fail to find a thermal. 30 S O U T H E R N C R O S S G L I D I N G C L U B C R O S S C O U N T R Y M A N U A L 7 Chapter Flying Further and Faster Wondered how those pilots manage to fly 300 and 500km flights, while you are still 20km from the field hours later? Ever wondered what those odd dials around the variometer are for? This chapter gives an insight into techniques to help improve your cross-country speed. A chieving a high cross-country speed is essential: for your first cross-country flights it may mean the difference between getting home, and landing in a paddock with a long and tiring retrieve. There are many techniques to do this, and I shall cover some in the following chapter. Speed to Fly What speed to fly between thermals Every glider pilot in their early flying career makes the mistake of flying too slowly, for example flying at 50 knots between thermals because that is what they were shown when learning. This is fine when local soaring, but once you start to fly cross-country, it is essential to fly at the appropriate speed. But what is the correct speed to fly? And what difference does it make? This is best illustrated with an example. Suppose we take 2 gliders of identical performance. At 50 knots the glider has a sink rate of 1.25 knots (125 per minute), and at 80 knots the sink rate is 3 knots (300 feet per minute). If we encounter an area of sinking air a nautical mile across, sinking at 2 knots, the sink rate of the gliders become 3.25 knots and 5 knots relative to the ground. The slower glider takes 1.2 minutes to cover the distance (1/ (50/60)) thus losing 1.2* 3=360 feet in this time. The faster glider takes only 0.75 minutes to cover the same distance (1/ (80/60), but loses 0.75*5=375 feet. In this case the slower glider is obviously flying at a more appropriate speed than the faster glider. What happens if the sink is 4 knots? The slower glider has a sink rate of 5.25 knots, and will lose 1.2*5.25=630 feet, and the faster glider has a sink rate of 7 knots, and loses 0.75*7=525 feet. 31 S O U T H E R N C R O S S G L I D I N G C L U B C R O S S C O U N T R Y M A N U A L Paul MacCready What is going on here? Obviously there is a relationship between the best speed to fly and the sink rate, but what is it? Fortunately you don’t have to be maths whizz to determine this, as a man named Paul MacCready has already done the work for you. In (very) simple terms, this can be summarised as: the speed to fly to your next thermal depends on the anticipated climb rate of your next thermal, and the polar curve of your glider. Note that the thermal strengths you have been experiencing are irrelevant: it is what is about to happen that matters. In practice, pilots set their MacCready value to the strength of their last thermal, providing conditions ahead are the same. Polar If the sink rate of the glider at a particular speed is plotted against the airspeed, the result is called a polar curve. The point at which the glider sinks least is the minimum sink speed. In the diagram below, you can see that the minimum sink speed for this glider is approx 45 knots, when the sink rate is 1.25 knots 0.00 -1.00 -2.00 Sink rate (knots) -3.00 -4.00 -5.00 -6.00 0 10 20 30 40 50 60 70 80 90 100 110 Speed (knots) Figure 10 Speed to fly for minimum sink Speed to fly in zero lift If we plot a tangent from the origin (point 0, 0) to the curve and extend to the speed axis, this shows the best speed to fly at zero sink, as shown below; the best speed to fly at zero sink is normally a few knots higher than the minimum sink speed. Flying at this 32 S O U T H E R N C R O S S G L I D I N G C L U B C R O S S C O U N T R Y M A N U A L speed will result in the maximum distance, in still air. For this glider the best glide speed is at 50 knots for a glide angle of over 40. 0.00 -1.00 -2.00 Sink rate (knots) -3.00 -4.00 -5.00 -6.00 0 10 20 30 40 50 60 70 80 90 100 110 Speed (knots) Figure 11 Speed to fly for maximum distance in still air Speed to fly in lift or sink What is the best speed to fly in lift (or sink)? That can be plotted in the same way as for zero lift, adding the appropriate sink (lift) rate to the zero lift curve. Obviously this would become tedious; as it happens, there is a better way. This is to extend the axis and to plot the starting point from the appropriate value of lift/sink, as in the diagram below. There are two things to note about these diagrams: The polar is quite flat, meaning that there is a large latitude in the nominated speed, in the case of the 2 knot example, flying between 60 and 75 knots would give you the same result, however the sink rate at 60 knots is lower than at 70 knots, giving more time to find a thermal The average cross-country speed can be determined where the tangent crosses the 0 knot line, assuming the lift is constant over the whole trip. In the examples below, 2 knot thermals would result in a cross-country speed of about 37 knots, whereas 4 knot thermals would increase this to 65 knots. 33 S O U T H E R N C R O S S G L I D I N G C L U B C R O S S C O U N T R Y M A N U A L 4.00 3.00 2.00 1.00 0.00 Sink rate (knots) -1.00 -2.00 -3.00 -4.00 -5.00 -6.00 0 10 20 30 40 50 60 70 80 90 100 110 Speed (knots) Figure 12 Speed to fly in 2 knots of lift or sink 4.00 3.00 2.00 1.00 0.00 Sink rate (knots) -1.00 -2.00 -3.00 -4.00 -5.00 -6.00 0 10 20 30 40 50 60 70 Speed (knots) Figure 13 Speed to fly in 4 knots of lift or sink 34 80 90 100 110 S O U T H E R N MacCready ring C R O S S G L I D I N G C L U B C R O S S C O U N T R Y M A N U A L If all the possible values of lift (sink) were plotted, the result would be a table that showed the best speed to fly at any particular thermal strength. Fortunately there is a very neat alternative to using a table: the MacCready ring. This is a circular ring that fits around the vario, containing the values from the table, as shown below. Figure 14 Using the MacCready ring The ring can be used in three ways: A. To fly for the longest time, i.e. at the minimum sink speed for the glider, rotate the index arrow on the ring to the minimum sink rate of the glider and fly at the speed that the vario pointer is indicating. In this example, the arrow has been set to just over 1 knot. The glider is in sink of 2 knots, indicating that the pilot should fly at a speed of approximately 50 knots. B. To fly the maximum distance in still air, the pointer is rotated to point to the Zero mark of the vario. In this example the pilot should be flying at approximately 57 knots to achieve maximum distance C. To fly for the highest average cross-country speed, the arrow is rotated to the anticipated strength of the next thermal, and the pilot then flies at the speed on the ring that the pointer is indicating, in this case at 75 knots. Speed to fly in winds What effect does a headwind or tailwind have on performance? In relation to the airmass, the answer is none. However if you are trying to reach a turnpoint on the ground, the wind does have an effect on your performance. Given that 1 nautical mile is approximately 6000 feet, and 1 knot is 100 feet per minute, if you were flying a glider with a sink rate of 2 knots at an airspeed of 50 knots, then your L/D ratio would be 25:1. 35 S O U T H E R N C R O S S G L I D I N G C L U B C R O S S C O U N T R Y M A N U A L Assume you were trying to reach an airfield 8 miles away. From a height of 2000 feet in still air, you would hit the ground (leaving aside the need to perform a circuit) after (2000/200) or 10 minutes, and in that time be able to glide a distance of (25*2000) feet or (50000/6000) i.e. 8.3 nautical miles [an alternative way of calculating this is: 10 minutes is 1/6th of an hour, therefore the distance travelled is the speed * time i.e. 50*1/6nm] If the same glider, starting from the same height, encountered a constant headwind of 20 knots, the descent rate would remain unchanged, indeed, relative to the airmass, nothing would change, however to the observer on the ground, the groundspeed of the glider would now be (50-20) or 30 knots. The glide angle relative to the ground would become (30/2) or 15:1, and the distance travelled before the glider landed would become 30*1/6 or 5nm. With a 20 knot tailwind the situation is reversed: the groundspeed becomes 70 knots, and the distance travelled 70*1/6 i.e. 11.7nm. As with thermal (or sink) plots against the polar, speed to fly can be plotted to take into account headwind or tailwind, however in this case the starting point for the tangent is displaced to the left or right, rather than up. To put this into action is more complex, but if the values of various headwinds and tailwinds are plotted, it can be demonstrated that the best speed to fly is increased by about half the strength of the headwind. Conversely with a tailwind, the indicated speed to fly can be reduced by approximately half the tailwind speed. Electronic varios Fortunately the fleet of the club is fitted with electronic varios, such as the Borgelt B40 and B50, or the Cambridge 302/303 combinations fitted in the DGs. With these instruments, it is a simple matter of setting your anticipated climb rate, then the speed directors, usually an arrow, that may be accompanied by a tone, indicate whether you should speed up or slow down, depending on the movement of the air mass you are flying through. See Cambridge 302 on page 40. Dolphin flying What does this mean for your cross-country flight? Theory says you should slow down in lift, and speed up in sink. This is correct: in fact for high performance gliders, practically all of their flights can be made using this mode of flying, termed Dolphin Flying, without the need to circle at all. For mere mortals who have to be content with flying club gliders, this is still a very useful technique. Block speeds Whilst classical MacCready theory still has its adherents, you may hear the pundits talking about flying a ‘Block Speed’ and not slowing down and speeding up as MacCready dictates. Why is that? When pulling back on the stick to slow down for lift, a la MacCready, one unavoidable drawback is an increase in the induced drag created by the sailplane, as a consequence of the increased wing loading. Although this increase in drag can be minimised to some degree by not pulling up so abruptly, it cannot be eliminated. 36 S O U T H E R N C R O S S G L I D I N G C L U B C R O S S C O U N T R Y M A N U A L In addition to the increase in drag, the glider has slowed down, and must be speeded up again before encountering the sink on the outside of the thermal. This speeding up consumes valuable height. In fact, often the height gained is lost on the other side of the thermal, rendering the whole exercise pointless. One further factor is that slowing down costs valuable seconds compared to a glider pilot who flies through the lift without slowing. This is not something that is only of concern in racing: the time period in which lift is available is limited, and the cross-country pilot should do his best to cover the maximum distance in the minimum time possible. A final consideration, especially if flying a 2 seater, is that such up and down rollercoaster movements can actually make pilots airsick. It is for all the above reasons that classical MacCready and dolphin flying has largely been replaced, certainly in Australia, by the use of Block Speeds. Put simply, the pilot estimates the thermal strength, by forecast or by actually encountering lift, and sets the speed he is going to fly at accordingly, in the same manner as MacCready Theory. The main difference is that the pilot then flies this speed between thermals, regardless of whether the glider is in lift or sink. Maximise your climb rate Consider this scenario: two identical gliders with a 30:1 glide ratio at 50 knots attempt a 300km flight. At best glide angle, the gliders would have climb 10km, almost 33,000 feet in total to complete the task. If Pilot A manages an average climb rate of 3 knots, then his total time spent climbing would be (33,000/3) or 110 minutes. If pilot B, using his superior skill manages an average of 5 knots, he will spend 66 minutes climbing and be home, assuming they glide at the same speed, 44 minutes before the other pilot. This time margin can make all the difference between a successful flight or running out of lift and a paddock landing, at the end of the day. In a more realistic scenario, where the pilot is working a height band of 4000-8000 feet, this equates to (33,000/4000) i.e. just over 8 thermals being needed to cover the 300km. Don’t turn in every thermal The first thing an aspiring cross-country pilot should concentrate on is thermal selection. The habit of turning in every thermal encountered is a hard one to break, however this is also one of the most time consuming. If you are near to the top of the convection height, just fly through. The only exception is if you fly into a thermal that is much stronger than your MacCready setting. If you have set 4 knots and you fly into a thermal that is going to give 8 knots, then take it, but remember to increase your MacCready setting if conditions ahead look to be the same or better. 37 S O U T H E R N C R O S S G L I D I N G C L U B C R O S S C O U N T R Y M A N U A L Centre the thermal quickly Every turn takes about 30 seconds, depending on the angle of bank, and at 70 knots cruising speed this is equivalent to over a kilometre in distance lost. Practice centering a thermal quickly. Try to form a mental image of where the thermal is, using the ‘Lowest Rate of Climb’ technique already discussed. Leave the thermal when the lift strength decreases Thermals are not uniform through their height. In many Australian thermals, the lift is weak and turbulent near the ground. As the thermal climbs, the lift becomes smoother, and the strength increases. In the top third or so of the thermal, the lift strength decreases as the thermal approaches cloudbase. A good rule of thumb is to leave the thermal when the lift strength has decreased to 75% of the average maximum. By doing this it means you will work only the strongest part of the thermals, with a consequent increase in your cross-country speed. Don’t overestimate your rate of climb I’m certain that every glider pilot is prone to exaggeration, especially when it comes to describing the strength of thermals. How many of us have said ‘there I was in 10 knots’ when in fact it took half a dozen turns to centre the thermal, and we were so pleased to be in good lift, we stayed until cloudbase, when the lift had dropped to 4 knots? In fact, the true average rate of climb is much lower. For example, assuming a cloudbase at 8000 ft, and the glider encounters the thermal at 4000 feet, if the pilot takes 6 turns to centre at say an average strength of 4 knots, this will take 3 minutes at 30 seconds per circle, and the resulting climb will be 1200 ft. The pilot persists in turning in the thermal after the strength has diminished: let’s say 6 turns at 5 knots, taking 3 minutes and climbing 1500 feet in the process. That leaves 1300 feet for the ‘true’ 10 knots, which will take 1.3 minutes. What is the true ‘average rate of climb’? The glider has taken 3+3+1.3 or 7.3 minutes to climb 4000 feet, which is a true average rate of climb of less than 5.5 knots. If the pilot was to use 10 knots, he would soon be down low and struggling: a better MacCready setting in this case would be 5 knots. Note: if using the Cambridge 302/303 the true rate of climb from the start of circling in a thermal is displayed 2 screens up from the home screen. Use the correct MacCready setting The penalty for using a MacCready setting that is too high for the conditions is that the pilot will be flying too fast, and will usually end up low and struggling, losing valuable time and decreasing his cross-country speed. The penalty for using a setting that is too low is that the pilot flies more slowly than optimal. However the effect on the achieved cross-country speed by setting 1 or 2 knots lower is in the order or 2-3%, and a distinct advantage is that the pilot will remain in the air longer, and is able to explore a much larger area for lift, compared to the pilot who has a setting 1-2 knots too high. Fly consistently There is not much point in putting the above into practice if you cannot fly circles at a constant angle of bank, and a constant speed. At best, you will find it impossible to centre a thermal, and at worse you are going to upset a lot of pilots or worse if you fly like that in a crowded thermal. This is definitely something you can practice at Camden (or your home field). 38 S O U T H E R N C R O S S G L I D I N G C L U B C R O S S C O U N T R Y M A N U A L Know when to change gear Know when it is time to reassess and change your tactics. For example if you have been barrelling along under great clouds giving 10 knot thermals, but the sky ahead is full of stratus, it is likely that you will not be finding 10 knots ahead. Wind the MacCready setting back to something more apt, like 2 (or even zero if you think the air ahead is dead). Conversely, if you have been scratching around in 2 knot thermals, and enter an airmass that start giving 6 knot thermals, then change up a gear, increase your setting and start to fly faster. Work a height band If the thermals are working at say, 4 knots to 8000 feet, the mentally divide the height into 2 halves. Once you leave a thermal at 8000 feet, you will not stop for any thermal down to 4000 feet unless that thermal is stronger than your current MacCready setting of say, 3 knots. If you do take a stronger thermal, reset your MacCready to an appropriate higher setting and increase your cruising speed to suit. If you have glided from 8000 to 4000 feet without finding a thermal, it is prudent to change gears, rather than barrelling along at high speed until you are on the deck or grovelling down low. Reduce your MacCready setting from 3 to 2 knots for example, and reduce your cruising speed from say, 75 knots to 60 knots. This gives you a longer time, and therefore larger area to search for lift. Once you find a good climb, then increase your settings and cruise speeds to suit. Fly towards good looking paddocks If you have not found a thermal by the time you are down to 2000, then wind the Macready back to zero, and fly the appropriate speed. Again, this gives you more time and distance to find something. It is important at this stage to ensure you are flying towards good outlanding paddocks. It is possible you may find nothing at all, and be forced to outland. DO NOT leave your paddock selection to the last minute. Don’t stick with rubbish If you manage to climb away in a cow’s fart, it is very understandable that in your relief you want to stick with a poor thermal until cloudbase. Resist this temptation at all costs. If the thermal increases in strength back to the 4 knots or so that you were experiencing up to then, then stick with it, however if it remains weak, it is better to climb to say 4000 feet then leave to find something better, than stick with a poor climb. After all, you are far from the airfield, and one suitable paddock is much the same as another suitable paddock, so you may as well proceed on your way, especially if the air ahead looks promising. Obviously if the area ahead is tiger country, with no outlanding possible, it is prudent to remain, when relatively low, within gliding range of suitable outlanding paddocks. 39 S O U T H E R N C R O S S G L I D I N G C L U B C R O S S C O U N T R Y M A N U A L 8 Chapter Using the Cambridge 302/303 The club has decided to standardise on the Cambridge 302/303 combination in club gliders. This chapter gives a brief introduction to their use. T he Cambridge 302(vario) and 303(navigation) combination provide a simple and easy to use navigation solution that is perfect for a gliding club. At first they may seem intimidating, however familiarising yourself prior to flight reduces the stress of learning while flying. In addition, the fitting of this combination to the latest club 2 seaters means that an instructor can give instruction on their use whilst in flight. In addition to this chapter, I have written an interactive simulator that works within a web browser. This simulator can be downloaded from the club webpage at http://www.gliding.com.au : just click on instruments, then Cambridge303 Demo, and save the self extracting file into an appropriate directory and run it. Once the files are extracted, double click on the file _303demo.htm to run the demo. Cambridge 302 variometer Cambridge 302 vario This is an electronic variometer that includes an altimeter and speed to fly director. In addition, the unit can display airspeed, climb rate and average climb rate and MacCready setting. The unit displays an indicator when the average climb rate is increasing or decreasing. The units fitted to the club gliders contain an FAI approved logger that can be used to claim badge flights. 40 S O U T H E R N C R O S S G L I D I N G C L U B Slow Down (Pull) C R O S S C O U N T R Y M A N U A L Circling Indicator Altimeter GPS Status/ screen number Average increasing MacCready Setting Average Speed Up (Push) Average decreasing Control knob General description Getting started The 302 vario consists of a screen and a control knob. The control knob may be rotated to change values (or volume). There are a number of screens that can be displayed, however only the first three are of interest to the club pilot: the remainder are for setting up the instrument, and should not be changed. The screens are stepped through by pushing on the control knob, similar to clicking on a mouse. To return to the home screen from any screen, the knob is pushed twice quickly (double click). The home screen can be identified by the screen number on the right being replaced by 3 horizontal bars. Three bars indicate that the unit is receiving sufficient GPS satellite signals for 3D navigation. When the unit is first powered on, the screen defaults to screen 2 (a figure 2 is displayed in the screen number on the right). This screen is used to set the pressure; in practice the unit can be set to the correct value by rotating the knob until the altitude displays the height of the airfield above sea level (250 feet at Camden). After doing this, the control knob should be pressed twice quickly to return to the home screen. Vario volume On the home screen (3 horizontal bars displayed on the right) the control knob is rotated to control the volume of the vario (clockwise to increase, anticlockwise to decrease). In flight In flight, the only other screen that is of use is number 1. This screen is displayed by pressing the control knob once from the home screen. The knob is rotated clockwise to increase and anticlockwise to decrease the MacCready setting. After use the control knob should be pressed twice to return to the home screen. 41 S O U T H E R N Cambridge 303 navigation display C R O S S G L I D I N G C L U B C R O S S C O U N T R Y M A N U A L Cambridge 303 navigation display The 303 navigation display is a simple to use unit that enables the pilot to navigate by the use of GPS. In addition, tasks can be declared to enable FAI badges to be claimed. The unit sounds a warning when approaching the turnpoint, and notifies you when you are in the sector. Loading turnpoint databases Before use, a database of turnpoints must be loaded into the unit. Unfortunately there is no editing facility, so the database of Camden turnpoints differs from the ones used at camp. The creation and loading of these databases is beyond the scope of this manual. Select pilot The first thing to do is to select the pilot. Press the bottom left button five times until the screen says ‘Select Pilot’ then press the ‘GO’ button (top right). The unit will display each pilot stored in the unit by pressing the up or down buttons: the list will wrap when all pilots have been displayed. If you are not stored, select New Pilot and press GO to enter your name. 42 S O U T H E R N C R O S S G L I D I N G C L U B C R O S S C O U N T R Y M A N U A L The screen display indicates pressing the right arrow allows the name to be entered, and the left arrow for preferences. Names are entered by selecting each letter in turn using the left or right arrows, then the up and down arrows to select the letters of your name. Press GO to store the name. The screen will display Save? and No. Press the down arrow to change the prompt to Yes, and press GO to store the name. Entering preferences The pilot preferences can be entered at the same time as the pilot name, or if you have saved the name by pressing the left button five times, and selecting your name, and pressing GO, then selecting the left arrow. 1. Goal Height Use the up or down arrows to select the goal height: I suggest 1000 feet, and then press the left arrow. 2. Sink Tone Use the up or down arrow to select if you want the vario to provide a tone in sink. I suggest you set this to Yes by using the up arrow, then press the left arrow. 3. STF Deadband The STF deadband is the speed, either side of the appropriate speed to fly (from the MacCready setting) that the vario will not notify you with tones. This can be irritating, so I suggest selecting 20 knots using the up and down arrows (the vario will not sound 43 S O U T H E R N C R O S S G L I D I N G C L U B C R O S S C O U N T R Y M A N U A L unless you are 10 knots too fast or too slow). Press the left arrow to select the next screen. 4. Arrival Radius The ‘Arrival’ alarm will sound when you are this distance from the turnpoint. This should be set to 0.2 Nmi (370 metres), as this will guarantee at least 1 fix in the FAI turnpoint zone radius of 500 metres. Press the left arrow to proceed to screen 5. 5. Approach Radius The ‘Approaching’ alarm will sound when you are this distance from the turnpoint. I suggest you use a value of 1 Nm, or 1.5km, then press the left arrow. 6. QNH This screen sets the units for the pressure. Set this to millibars then press the left arrow. 7. Temperature This screen sets the units for the temperature. Set this to Celsius then press the left arrow. 8. Altimeter This screen sets the units for the altimeter. Set this to feet, unless you have a continental bent, then press the left arrow. 9. Vario This screen sets the units for the vario. Set this to knots then press the left arrow. 10. Distance This screen sets the units for the distance. Set this to kilometre, and then press the left arrow. (Note: we have already encountered 2 screens that depend on this unit to set the distance. This is an example of poor design ) 11. Speed This screen sets the units for the speed. Set this to knots then press the left arrow. 12. Variometer This screen sets the vario mode. If this is set to Super Netto, then in cruise the unit will display the rate of climb with the sink rate already deducted. Saving your changes and making your pilot active If you press left again, it will take you back to the ‘New Pilot’ screen, so instead press the GO button, press the up or down arrow to change No to Yes, then press GO again. 44 S O U T H E R N C R O S S G L I D I N G C L U B C R O S S C O U N T R Y M A N U A L Entering a task Edit Task To enter a task, from the home screen, press the right arrow 6 times to get to the ‘Edit Task’ screen. Then press GO. Select launch point TP#0 will be displayed. Press the up or down arrow until your START point is displayed. This is normally the home airfield or launch point. Press the right arrow to select the next turnpoint. Select remaining turnpoints The next screen will show TP#1 End of Task. In the same manner as above, use the up and down arrows to select the next turnpoint. Repeat this process until all turnpoints, including your destination/landing airfield have been entered, then press the GO button. Declare this Task? This screen enables you to declare the task. Select Yes then press the GO button to return to the home screen. Note: at this point the task has been declared, but not activated. Activating the task To activate the declared task, press the right arrow twice: the ‘Start This Task’ window is displayed. Press GO to activate the task. Deleting a task To delete a task, edit the task as above, and set TP#0 to ‘End of Task’ and press GO. In flight Displaying the task If the task has been declared and activated, the arrow on the home screen will point to the first turnpoint (in this case the launch point). You should fly to the turnpoint, then, when in sector, the 303 will display ‘Arrival!’ at which point the 303 will switch to the next turnpoint. Checking the distance to a point To check the distance to any turnpoint in the database, from the home screen, press the right arrow 3 times to display landing points, 4 times to display an alphabetical list of turnpoints or 5 times to display a list of turnpoints in the numeric sequence in which they were entered into the database. Press GO to select the turnpoint. This will return to the home screen and display the distance to the selected turnpoint. Lat point To return to the previous point that you selected, press the right arrow once. Note that 15 of the most recent points can be scrolled through. This function is very useful in being able to toggle between points, especially when low. Resuming a task If you have selected a turnpoint other than one in the task, when the right button is pressed twice the screen displays ‘Resume Task?’ instead of ‘Start Task’. Press GO to resume navigation to the next turnpoint. 45 S O U T H E R N C R O S S G L I D I N G C L U B C R O S S C O U N T R Y M A N U A L 9 Chapter What If the Wind Stops? Nothing of course! But what happens if the lift stops and you are outside of gliding range of the airfield? This chapter will explain the principles of field landings. Don’t Panic! Landing in a paddock is a fact of life for glider pilots How high? Your altimeter is useless for paddock landings. T here you are at 2000 feet, miles from the field and you cannot find a thermal….What do you do? The first thing to do is to not panic. Allowing 1000 feet for a safe circuit, you still have 1000 feet in which to find a thermal, however you should at this point be looking for a suitable area in which to land. Remember that your altimeter is useless when you are landing in a paddock, as the height of the field is unknown. What can you do about this? The best answer is to practice at Camden until you are comfortable at estimating your height. You can use things such as: Houses: how big are they? Animals? Can you see any? How big are they? Can you see their legs? Power poles. How low do you have to be to see them? You can easily tell their position in cropped fields. Cars: how big are they? Can you see the wheels? Fenceposts: can you see them? People: can you see them? You should start looking for good paddocks by the time you are 2000 feet AGL. Don’t leave it until it’s too late. One rule of thumb I use is if you can see the legs on cattle or horses, it’s about time to start your circuit. You obviously should have your paddock picked and circuit planned long before that point. Paddock selection . 46 S O U T H E R N C R O S S G L I D I N G C L U B C R O S S C O U N T R Y M A N U A L OK, you are getting low and are over tiger country. Your first priority should be to fly towards an area with good looking paddocks, in the event that you need to land out. Fly over your first choice at height to determine if it is suitable. Fly to one side, not directly over the field. Once you have selected a suitable field, do not turn your back on it as it is easy to become disoriented and lose sight of it. If your first selection is unsuitable, choose another. Do not fly towards an area with only 1 field, as that may be unusable on closer inspection – what do you do then? How do you select a good paddock? Use the following mnemonic: SSSWSOS Size Size Is the paddock big enough to land in? . Surface . Slope . Wind . Stock . Size . Obstacles . SWER . Surface Is the surface smooth enough to land on? Has it been cropped (in which case it is unlikely to contain rocks? A ploughed field is fine, but you will stop very abruptly (don’t bother calling for an aero retrieve...) In the Forbes area, many fields have deep circular depressions (sinkholes) these may be noticeable from the air by many small green circles. In the Narromine area the cotton fields have been laser levelled. These can usually be identified by their regular shape, colour (usually dark green) and the presence of irrigation channels. If you do not want a very expensive experience, do not land in them. Due to the extended drought, these fields may not be carrying a crop, but avoid anyway. If you can see ripples in a paddock, the chances are that it contains deep wheat or other crop, which will rip the wings off the glider if you land in it. Avoid at all costs. Slope Is there a visible slope? If you can see a slope from the air, it is too steep to land in. Wind Look for smoke or dust trails for an indication of the wind direction. Look at bodies of water for ripples and wind shadow. Remember that the wind on the ground is quite different from the wind at altitude, so you should discount the wind direction from flight instruments. Stock Are there any animals in your selected field? If so, select another if possible. Sheep can panic and run in front of you. Horses can also panic and are valuable animals. COWS EAT GLIDERS. If there is one cow standing in a field, it is probably a bull! (Ask Don Palmer about his outlanding in a paddock with SEVEN bulls sometime ) Obstacles Look carefully for fences: you may not see the fence, but there may be evidence such as a different surface in a straight line across a field. Power lines are not always obvious, and may run along roadsides or fencelines. Power poles in cropped fields are visible where the header has gone around them. SWER Stands for Single Wire Earth Return, and is a common way to deliver power in remote areas. The wires are practically invisible, and can be stretched between trees rather than posts. Avoid landing between houses or sheds and trees. Hitting one 47 S O U T H E R N C R O S S G L I D I N G C L U B C R O S S C O U N T R Y M A N U A L at speed will likely be very unpleasant, with severe damage and loss of control at a minimum, and perhaps worse. People . One important thing to take into account is the proximity of houses or roads to your selected field: the house, if there is anyone home will probably have a working phone (mobiles are unreliable in the bush) and a cool drink. Proximity to a road will make the retrieval easier. All things being equal, select a paddock near a house or road if the paddock is suitable for a landing. Do not choose an unsuitable paddock merely because of the convenience. Before landing, note the position of any other houses in the vicinity: you will not be able to spot them from the ground, and may need to walk to them if your first house is empty or abandoned. Circuit and landing . It is essential to perform a normal 3 leg circuit and landing. Your stress level will probably be high, so by flying a ‘normal’ circuit you will have chance to settle down. Remember your FUST check. Take the opportunity to have one last look at the field on downwind. Remember to land into wind: you have already checked the wind strength and direction, which determines the direction of your downwind leg. Don’t lose site of the paddock, especially down low, where you may be unable to reach it. Keep your circuit speed to the absolute minimum consistent with safety, to minimise the ground roll. Low saves . You may hear the pundits talking about low saves, and scraping away from 400 feet. DONT! Those pilots are likely to be a) exaggerating and b) much more skilful than you. Pilots have been killed trying to get away from a low height. Landing . After landing . Once you are down, apply the wheelbrake sufficiently to stop the glider in the minimum distance, without putting the glider on its nose. The longer the ground roll, the higher is the chance of hitting something unseen. In an emergency, for example if you see a wire fence just ahead, then ground loop the glider by applying full forward and side stick, with full rudder in the direction of the wing on the ground. This is a manoeuvre of last resort, as it is likely to break the glider, but is far preferable to being decapitated by a fence. Once the adrenalin has had chance to disperse, take stock of your situation. If you have a GPS handy make a careful note of your position: it is easy to mistake the coordinates given in fractions to one given in decimals (ask me how I know...) 48 S O U T H E R N C R O S S G L I D I N G C L U B C R O S S C O U N T R Y M A N U A L Before leaving the glider, turn off the battery and remove any valuable portable pieces of equipment. Turn on the strobe and attach it to the glider (the Brunswick tube , also known as the total energy probe is a good spot) as it could be dark by the time you return to the glider. Tie the glider down firmly using the tie down kit. If your mobile phone works, you can call in to the camp base and let them know your position. If not, try an SMS, but ask for an acknowledgment: you cannot assume that an sms will be delivered. Failing that you can try raising any gliders in the air to relay your position back to base: it is unlikely that your radio will reach the base, as it is line of sight only. If you cannot use either of these methods, and you are close to buildings, try seeing if the people there have a phone, and can give directions to your retrieve crew. One other method is trying to call on the area frequency. This should be monitored by aircrew passing overhead. The area frequency varies depending on location. If all else fails and it is getting late, one last resort is to use the international distress frequency of 121.5 MHz. This frequency is usually monitored by scheduled air traffic, and they can relay your location to base. Once you have managed to contact the crew, return to the glider and stay with it (unless the directions include calling in at the homestead or farm). Aerotow retrieves . If you think the surface is suitable for an aerotow retrieve, pace the length of the field, looking for obstructions (fences, skulls, ditches, rocks and power lines) and length. If the field has any obstructions or is less than 700 metres in length (about 750 paces) it is unsuitable for an aerotow retrieve. If the tuggie agrees to come for you, he will make an inspection from the air, and if he decides it is unsuitable, you will foot the bill. Use your signalling mirror to let him know where you are by holding your free thumb at arm’s length: if you hold your thumb towards the tug, and get the sun to flash on your thumb, the tuggie will be able to see it. Push the glider as far back as it will go towards the fenceline in the paddock. 49 Chapter 10 Further reading Cross-Country Soaring Winning II 1978 Reichmann 2005 Thomson Publications Moffat Knauff and Grove inc ISBN 0-9704254-4-9 Gliding, The Theory of Flight Longland A & B Black ISBN 978 0 7136 8660 9 Advanced Soaring Made Easy Eckey Eqip ISBN 97839880883825 Flying Further and Faster Bradney http://www.gfa.org.au/Docs/sport/coaching/Further & faster part 1.pdf http://www.gfa.org.au/Docs/sport/coaching/Further & faster part 2.pdf How to find the core of a thermal http://www.jamescooper.com.au/Gliding/Poster Thermal.pdf Performance airspeeds for the soaring challenged http://home.att.net/~jdburch/polar.htm 50