1
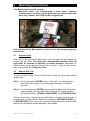
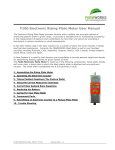
Automatic Gateway Release Timer ► Instruction Manual Revised Aug 2013 Instruction Manual Contents Section Page 1 Features and Overview 3 2 Operating Instructions 5 2.1 Switching ON 5 2.2 Manual self-test 5 2.3 Setting the time and week-day 6 2.4 Setting a JOB 6 2.5 Clearing a JOB 7 2.6 Charging the unit 8 3 Using the Batt-Latch 9 3.1 10 Useful hints from users 4 Safety Information and Trouble-shooting 14 5 Technical Specifications 16 No part of this document may be photocopied or reproduced without the prior written consent of Novel Ways Limited. While every effort has been made to ensure the accuracy of the information in this manual, Novel Ways Limited accepts no responsibility for any errors or their consequences. The contents of this manual are subject to change without notice. Batt-Latch Instruction Manual 2 1 Features and Overview The Batt-Latch is a portable timer which waits until a preset time and week day, then mechanically releases an attached spring/bungy/tape gate using its internal gearbox. It can be incorporated into normal farming practice by swinging standard or any other types of gates open and temporarily replacing them with the Batt-Latch release unit, and the supplied spring or tape gate. The Batt-Latch is a valuable labour-saving tool for herd management, and will also help reduce pasture pugging, stock lameness and fuel costs. The latest advances in technology have been harnessed to develop new circuitry that uses less power to deliver an improved performance. The integrated solar panel on the Batt-Latch maintains battery charge without intervention, eliminating downtime for charging. The already rugged and dependable polycarbonate body has been made even more durable with refinements in design, and the use of a superior waterproofing gasket. The durable webbing belt supplied easily attaches the Batt-Latch to posts and battens. The keypad is simple to use and gives you total control and flexibility to set up and store four release events at a time, for up to two weeks in advance. The full message LCD display screen lets you know exactly what you’ve programmed in. With the increasing trend towards feedpads or supplements on most farms, stock have an extra incentive to leave the paddock. No other product will release the herd to a feedpad near the dairy at 3a.m, for example, saving hours of effort every week. Batt-Latch Instruction Manual 3 What can the Batt-Latch be used for? Release herd for milking – The cows are closed into their paddock with the Batt-Latch, which is programmed to release a spring gate at the morning or evening milking time. As the spring gate is released against a post it will alert the cows that the gateway has been opened. They will then walk up to the dairy on their own, especially with the added incentive of a feedpad or supplements, as is common practice. Depending on the farm's shape and the distance to the rear of the farm, up to 45 minutes per milking can be saved. Hold the herd back after milking – Another Batt-Latch can be used to set up a spring gate at the back of the dairy or nearby race to hold the cows back after they have been milked. At the end of the milking session the farmer can get ahead of the cows to set up gates or feed out supplements, normally using another Batt-Latch to close the cows in with. This will also mean that the cows will be entering the paddock together, so heifers will get less stressed. Out timer is also ideal for ensuring that break-fed maize and other crops are equally available to the whole herd (or allow the first cows in from milking just some of the crop, release more when all cows are milked). Break feeding or Run-offs - One or more Batt-Latches can be set up with spring gates to let stock into an adjacent break-feeding area, or open another paddock off a common race. At the set time the Batt-Latch will release the gateway and the cows or stock will go into the next area for grazing. This can be done for a maximum of fourteen days with multiple units, which will allow the farmer to be away from the farm for longer periods. Using a timer can also reduce pasture pugging, as the stock are less likely to get agitated and walk up and down the fence line as they normally do. Using the Batt-Latch timer, the gate will be opened without prior warning so the stock will simply walk out at their own pace. Visits to the run-off can be made less frequently by using the Batt-Latch. The Batt-Latch(es) can be set up so that they are releasing 2 or 3 days apart and letting stock into a fresh new grazing area. This method can reduce run-off visits to only once in 10 days. Several users have 3 or 4 Batt-Latches that they are using in this manner, which saves them a substantial amount of time and travelling costs. Irrigation and standard gates – The Batt-Latch has enough torque to hold and release a standard border dyke irrigation gate by itself. Some form of adaptation plate may be needed. They could be used in series to release gates one after the other. Some farmers also use rubber isolation or shock cords to attach standard pipe gates to the Batt-Latch timer. When the timer releases, the gates swing either open or closed, pulled by a large spring. You can use this technique to move stock around the farm in various ways at different times of the day, or (for example) to trap feral animals like deer in well-fenced enclosures or paddocks. Batt-Latch Instruction Manual 4 2 Operating Instructions Your Batt-Latch kit should contain: Batt-Latch timer unit incorporating a solar panel, attached webbing strap, extra long spring gate with high tension hook and black clip, manual, and a clip-to-clip energiser lead. Full operation of the Batt-Latch is covered in the following step-by-step instructions. 2.1 Switching ON Press any of the keys on the Batt-Latch, and it will switch on and display the current day and time. The Batt-Latch automatically switches itself off again after 45 seconds of inactivity (no button presses). Remember to check that the current day and time are set correctly - if they are not correct, refer to the section 2.3 Setting the Time. 2.2 Manual Self Test To give yourself an idea of how the Batt-Latch works, try this simple manual release test. Step 1. Press and hold the ENTER key for 3 seconds. You will hear short beeps that will change to the warning gate release sound after 3 seconds. Step 2. You can release the ENTER key now and the Batt-Latch will perform a gate release (cam will rotate 360º and return to original position) and should display [STAND CLEAR!OPEN] then [RELEASE OK!] This is a good way to check that your Batt-Latch is in good working order. If something is not right and the Batt-Latch displays [ RELEASE FAILED ] or [ LOW BATTERY ] then refer to the troubleshooting section at the end of this manual. No job settings will be affected by this release. Batt-Latch Instruction Manual 5 2.3 Setting the Time and Weekday You will only have to do this if the background (or reference) time and day settings are not correct. Check this by turning on the Batt-Latch by pressing any key, and checking the display for the day and time. If you need to adjust the time and day, follow the instructions below. Once you set the time you should not have to set it again (except for daylight saving twice a year) but it is advisable to check the settings are correct every now and then. Press and hold the CLOCK key for 3 seconds to enter clock setup mode: while beeping the display will show [ SET CLOCK ], give a higher pitched beep, then revert to the currently set time, such as the example below: [SET: MON 8:20AM] The correct day and time can be set by pressing the DAY, HOUR and MIN keys. You can only move forward in days or numbers on each key. Use one press, or hold the key down for faster input, especially on the MIN key. Make sure you have the AM/PM setting correct on the HOUR key. When you have finished entering the corrected day and time, you need to press the ENTER key to exit from clock setup mode. The new background time will be displayed briefly, and saved. 2.4 Setting a JOB (Gate Release) Step 1. Switch on the unit by pressing any key. Step 2. Press either DAY, HOUR or MIN to ask the timer to begin setting up a new JOB e.g. [JOB1 MON 3:30PM] Step 3. Set the time and date for a job using the DAY, HOUR and MIN keys. Note: by selecting ALL as your DAY (after SAT), the Batt-Latch will execute the JOB every day of the week at the specified time. This is the most common setting on dairy farms, most will have a morning and afternoon job set to run each day at the same time. e.g. [JOB1 ALL 4.30AM] [JOB2 ALL 2.30PM] Step 4. Press ENTER once you have entered the correct time and day for the JOB. If you selected ALL for your day in the above step then you have finished setting a repeat JOB. Go directly to Step 6. Step 5. Now decide if you want the job to repeat [REPEAT JOB? NO]. If you confirm NO, the JOB will be performed once only. Use any key except the ENTER or CLEAR key to change your answer from NO to YES. If you select YES, the Batt-Latch will perform the JOB at the same time on one selected day every week, until told otherwise. Press ENTER to confirm your answer. Step 6. The JOB is set. The Batt-Latch will now do a gate release at the set time. To set another JOB repeat steps 2 – 5. A maximum of four JOBs can be stored. Batt-Latch Instruction Manual 6 Congratulations -You have just set a JOB! The Batt-Latch will now cycle through displays showing the current day and time and each of the JOBs that are set. It is a good idea to review the JOBs to check that you have set them correctly. If everything is set OK just leave the Batt-Latch and after 45 seconds it will switch off automatically. The display will show: [GOING TO SLEEP..] The internal clock will still be running and the Batt-Latch is always checking to see if it has to perform a JOB. When the time comes to perform a JOB the Batt-Latch will “wake up” and perform a gate release. Points to note: When setting the time, take careful note of AM or PM settings. Repeat JOBs show * next to the day e.g. . [JOB2 TUE* 1:30PM] is a repeat JOB occurring on Tuesday afternoons. To run a QUICK TIMER TEST at any stage, simply wake the unit up with a keypress if needed. Then press the MIN key two or three times to set a job a few minutes ahead. Press ENTER to confirm it’s a one-off JOB. Within the next two or three minutes the timer will at first go to sleep, then wake up and rotate the cam once. That JOB is now finished, and is not held in memory. 2.5 Clearing a JOB You will need to Clear a JOB if: You don’t want a JOB any more (saves battery and release system). You made a mistake in the settings for a JOB. You want to set a new JOB but there are already 4 JOBs set (4 is the maximum) Repeat JOBs are no longer required. Step 1. Switch on the unit by pressing a key, the display will cycle through the jobs currently set. Step 2. When the JOB that you want to clear is displayed on the screen, press CLEAR. Step 3. You will get a message e.g. [CLEAR JOB1? YES] Step 4. Use any key except ENTER to toggle between YES and NO if needed, and then press ENTER when you are sure. That JOB has now been cleared (or left as it was). Note: When storing the Batt-Latch or changing release times, it is a good idea to clear old JOBs, which saves the battery life and the mechanism from redundant release operations. Batt-Latch Instruction Manual 7 2.6 Charging the Unit In normal use you should not have to worry about charging the battery as the sun provides plenty of free energy. However, if the Batt-Latch has been stored indoors over winter, it is advisable to recharge the Batt-Latch before the first use. This will prevent any possible release failure due to the battery being in a low state of charge. You will need to recharge the Batt-Latch if it begins to display the low battery warning message: [ LOW BATTERY! ] To recharge the Batt-Latch place the unit in sunshine or on a windowsill for the day, with the solar panel facing the sun. If the Batt-Latch is used in deep shade it may require to be placed in sunlight for an hour or two to top up the battery. You can always test the state of your Batt-Latch by using the manual self test as described on page 5, this allows you to gauge its capacity as it performs a full cam revolution. Direct sunlight is up to 1,000 times brighter than inside lighting conditions, and the Batt-Latch is always using a small amount of battery power when in storage. Additional self-discharge within the battery pack means that if the Batt-Latch is stored continuously in the dark, it will have a flat battery within 36 months. Try not to let the battery discharge to a level where it can’t turn the Batt-Latch on; it will be harder for the solar panel to recharge the battery pack again. Batt-Latch Instruction Manual 8 2.7 Storage If storing for lengthy periods it is recommended that you clear all JOBS from the memory (see 2.5 on page 7) and place the unit into “Deep Sleep” mode. Follow the steps below to place the unit in Deep Sleep mode: Step 1. Press and hold the Clear button (approximately 7 seconds) until the Batt-Latch displays [DEEP SLEEP? ] Step 2. When the unit displays [DEEP SLEEP? NO] press any of the top keys so that the display changes to [DEEP SLEEP? YES] Step 3. Press Enter to confirm you want to place the Batt-Latch into Deep Sleep To wake the Batt-Latch up from Deep Sleep: Step 1. Press any of the keys Step 2. When the screen displays [WAKE UP? NO] press any of the top row of keys to change the display to [WAKE UP? YES] Step 3. Press enter to confirm you want the Batt-Latch to wake up and return to normal operation. If possible store the Batt-Latch so that some light will fall on the solar panel to overcome the self-discharge of the Ni-MH battery. A windowsill is ideal for this. Note: In deep sleep mode the Batt-Latch will not complete any automatic releases. Batt-Latch Instruction Manual 9 3 Using the Batt-Latch This section is provided to help you use your Batt-Latch on the farm or elsewhere. These are only guidelines to help you to begin using your BattLatch, and changes in the suggested procedure may have to be made to suit your own needs. The Batt-Latch can be used on any farm. All that needs to be done is to open the standard gates (wood, pipe or any other type) so that they are out of the way and temporarily fit a spring/tape gate to one side of the gateway. Hook the Batt-Latch onto the other side of the gateway with the webbing strap and slip the spring/tape gate hook behind the release cam of the Batt-Latch. For a more detailed description refer to the step by step instructions below. Step 1. You need to temporarily replace any existing standard gateway with a spring (preferable) or tape gate. This is done by opening the standard gateway and locking it against the fenceline, or securing it so that any wind or stock cannot move it. Attach the supplied spring gate to one of the posts using the black nylon attachment hook. The best position to attach the spring clip is directly opposite the other gate post, so that when the handle end is let go by the timer, it hits the post in the middle and makes a good noise. Some farmers hammer a gatehook staple to the inside of each of their gateways to make this easier. Step 2. Attach the Batt-Latch to the other post using the webbing strap that comes fitted to the Batt-Latch. Leave enough slack so that on release the Batt-latch unit tilts out of the way of stock, and make sure it will not come into contact with sharp objects. You could also fit a permanent large staple on this post, this time more towards the rear of the post, and attach the strap to that. This ensures the Batt-Latch swings well out of the way. Step 3. Pull the spring gate or tape gate across by the handle and slip its hook behind the cam of the Batt-Latch. Restrict the force applied to the timer’s cam to less than 7kg (you can use a spring balance to check if unsure). Step 4. This step is optional. You can energise the spring/tape gate using the clip to clip lead supplied. Attach one end on the hook side of the spring/tape gate. Loop the middle of the lead around a standard fence wire to keep it from flying off. Attach the other end to a handy live electric fence wire. That’s it! You should have already programmed the Batt-Latch to release at the time you want, so it is ready to go. For detailed instructions on how to program the Batt-Latch see the Operating Instructions, section 2. Batt-Latch Instruction Manual 10 3.1 Useful Hints from users: Training. The cows will be easier to train or entice to the dairy by themselves if they are early in the season (just calved), hungrier than normal, or there is a feedpad or supplements at the dairy or beyond the release point. The normal training period is quite short, 2-3 weeks or even less. Energising the spring/tape gates that are used with the Batt-Latches are optional. Most have found that there is almost no need to energise the gateway. The only time that farmers should need to energise the gateway is during periodic training of younger stock, or during calving and the early part of the season. Automatic release reduces herd stress. Many farmers have noticed that there is less lameness in their dairy herd because cows can pick their own way in the race, which also preserves herd hierarchy. If stock are being handled incorrectly in unsuitable races for long distances, the use of your Batt-Latch for unattended stock movements can reduce herd lameness by up to 70%, it is reported. Spring gates versus Bungy. Some farmers are using a cut down spring gate (less bulky) with a rope or bungy cord to get it to spring out of the way of moving stock. Try the Taragate Bungy or Gallagher’s shockcord G89104. The spring gate we supply is a special export length capable of spanning 8m gateways (Stafix RSG5XL). Do not exceed 7kg of strain (in line with the gearbox shaft) which is quite a high force. Check gate forces using a spring balance if unsure. Once-a-day summer milking: By milking in the morning and utilising a Batt-Latch to free the herd to new pasture in the afternoon, there is no need for workers to come back onto the farm just for that job, saving labour and freeing up leisure time. Spring Gate tips: You can use an empty 15kg acid pail or similar as a receptacle for the spring gate. Simply cut a circle in the base big enough for the spring, position that on the “receiving” post end ahead of the black plastic hook, and the released spring will have a landing point rather than possibly tangling in the wire fence. Makes more noise and also makes a handy bucket for transporting the system to the next gateway on the bike. Some farmers bring the Batt-Latches back to a central point for pickup. Herd health benefits: Many farmers report reduced bullying in the dairy and feedpad area as the “herd hierarchy” is retained, also anecdotal evidence implies that mastitis is reduced by the more leisurely pace and single file walk to those areas. Because the gate release is unattended and at a set time, less manure is deposited on the race, the bulk remaining in the paddock, lessening teat contamination and helping race maintenance. Batt-Latch Instruction Manual 11 Preventing new pasture pugging: Some dairy farmers save major pugging damage to new and susceptible pasture by blocking the gateway to that paddock with a Batt-Latch until all the herd has arrived from milking. About 10 minutes later the gate is released and the herd enters quietly and together with no human intrusion, reducing impact on the sward, particularly in the gateway. Drystock farmers also confirm substantial pugging reduction along fencelines and gateways due to Batt-Latch use. Race layout: With your herd making its own way along the race, it is desirable that there be no sharp angles or visual obstructions in the race where individual animals lose sight of the animal ahead, causing a stoppage or bottleneck. Curved or angled corners work much better than right angles. Further uses: One farmer uses a Batt-Latch attached to a bungy cord to activate a switch on his water pump at the top of his farm, switching it off and saving him a trip every evening. Another use has been to enclose hens safely in their coops in the evening by releasing spring-loaded doors. Runoffs/drystock – The Batt-Latch has a huge potential in this area. It will simply allow stock to move from one paddock or breakfeeding area to the next. An example is detailed below: The stock can be put into paddock # 1 for two days, which can be left open. They will not be able to go into paddock # 2 or paddock # 3 since they are closed off with a Batt-Latch and a spring/tape gate. After 2 days (or any suitable time) the gate to paddock # 2 will be released by a Batt-Latch and the stock will move into new grazing. Another two days later, the gate to paddock # 3 would be released, and the stock would move into that paddock, and so on. In the unlikely event a release should fail, ensure the stock will be able to enter the next released paddock, perhaps by having the first paddock in the centre of the next two. Batt-Latch Instruction Manual 12 Extra For Experts Releasing a week ahead: It is possible to save a one-off JOB (no repeat) that skips the first week after setting, and releases in the next week. In this way the maximum time delay before a release occurs becomes almost two weeks if needed. Go through Steps 1 to 3 in section 2.4 above, Setting a JOB. Step 4: Press CLOCK and ENTER together, to get (for example) [JOB3 WED▲ 2:30PM] The new JOB will show the special character ▲ when reviewed, wait at least 1 week before releasing, and then automatically clears the JOB. Use with care, and ensure stock have water at all times. Holding stock on a feedpad: You might need to hold stock on a feedpad or crop break at some stage, to stop them wandering around the farm. The classic but unusual example is a dairy herd being released to the feedpad by the Batt-Latch in the early hours, but running out of feed before milking starts, and deciding to return to the paddock! One of our customers suggests this technique: stretch a bungy cord across the front of the feedpad (or down the race a bit). Pull the middle of the cord upwards and hold it there with a pulley and rope system attached to another Batt-Latch timer. The herd will move in under this gateway, and when you are fairly certain they will all be there, the timer releases and holds them in for you. This could be a semi-permanent setup – a low cost boom gateway. Split herds: If you have split herds using a feedpad and/or dairy, you will find uses for more than one Batt-Latch. You could number or name these so that the release times follow the same herd, to make it easier for staff. Make sure you have good “lead” cows in each herd. Remote Control Release: We have developed a remote control release for the Batt-Latch, allowing you to activate a gateway release from up to 5 km away. This means you can advance a release when required, helping with the timing for the second herd. We either supply a new Batt-Latch with onboard receiver and aerial as pictured, or can retrofit your own standard Batt-Latch. The 4 channel transmitter and high power aerial are mounted in the dairy or other building. Please ring us on 0800 003 003 for information and pricing. Batt-Latch Instruction Manual 13 Allowing standard pipe gates to open or close by timer is possible, and a few farmers are getting great value out of this idea. Use a large spring or inner tube to swing the gate, and of course there should be no obstacles or misaligned gates. Isolate the gate and any wind or animal pressure from the timer cam, by adding a medium spring or section of inner tube between the gate and the cam attachment. This technique has also been successfully used for feral animal capture. Below, you can see the new standard gate bracket system that we have developed in 2009. This portable bracket clips onto the gate, while holding the Batt-Latch in place, controlling a 200kg latch holding a spare gate hook chain. A special cam on the Batt-Latch opens the latch at the alarm time, which releases the gate from an open or closed position (your choice). The gate is forced into moving by a portable spring (rubber or metal), or a gas strut arm fitted to the gateway. The Batt-Latch can be triggered using the normal internal timer, or by remote control, if that option is fitted. So now you can control any stock movements with the Batt-Latch system – unattended, or from a range of 5km by remote if needed. A lower cost portable remote can be used from a nearby vehicle. The kit includes the zinc plated metal bracket with pins, latch and spare gate hook chain, and gives farmers options for managing sheep, beef, goats, deer and horses. Batt-Latch Instruction Manual 14 4 Safety Information and Trouble-shooting The Batt-Latch unit uses battery power and is itself electrically safe. Should the cam be mechanically prevented from rotating, the motor will switch off within 2 - 3 seconds. Care should be taken with ANY moving parts. Keep fingers away from the rotating cam area. The Batt-Latch has many applications, each posing its own potential safety issues. For example, when using as a spring gate release, the Batt-Latch will display and sound a warning before it releases the gate. However, extra care should be taken when children are around. Stock will generally keep well clear of a spring gate, even if it is not energised. If you are using homemade spring gates (not advisable) make sure that you fit a flange behind the hook for protection, and that all flanges are at least the same diameter as the furthest point of the hook. Note that our spring gate kit uses the Stafix export length spring, (RSG5XL), which is 50% longer than standard NZ springs, handling up to 8m gateways. Warranty Terms Novel Ways manufacture and sell the Batt-Latch direct to farmers in NZ, or through retailers. We offer a return to base warranty on our product for 12 months. International sales are supported by return or with spares held by the agent (e.g. Stradbally Farm Services, Ireland). We can normally repair and despatch the unit on the same day we receive it. This covers any faulty circuitry and components. Please be aware that damage to the gearbox shaft or cam caused by high external force, e.g. too much tension from the spring gate, or drops onto hard surfaces, will not be covered. Internal condensation leading to corrosion (caused by a damaged or pierced front screen panel that hasn't been resealed) will also be outside warranty. We have looked hard at any problems seen in the last sixteen years of farm exposure, and if you take reasonable care of the unit, it will serve you very well. We are always keen to return any units back into service if sent to us outside warranty, for a minimal charge. We welcome any feedback on the Batt-Latch, and greatly appreciate the continuing sales made by word-ofmouth from hundreds of satisfied users. Batt-Latch Instruction Manual 15 Trouble-shooting The unit does not turn on when you press a button. This is possibly due to a flat internal battery. Refer to the Recharging section (page 8) for help. If the 2-3 hours in sunlight has not recovered the battery, return unit to us. The unit displays [RELEASE FAILED] on test after a failed gate release. This can also be due to a flat battery. Try recharging, otherwise return unit to base for repair. If the cam has not returned to its normal position after release, do not use tools to apply turning force, this will only damage the shaft and gearbox. For this and other issues, such as damaged front keypad membrane, broken or black LCD screen, obvious internal condensation, bent, loose or damaged cam or shaft, noisy operation on test etc, Call Novel Ways for information or advice Freephone(NZ) 0800-003-003 +64 7 856 6270 Or return the unit to Novel Ways for speedy repair. Novel Ways, 436 Morrinsville Rd, RD6 HAMILTON 3286 N.Z. Batt-Latch Instruction Manual 16 5 RF Setup Instructions Your remote Batt-Latch will have been setup at the factory. The following steps should only be required if you have ordered a remote Batt-Latch separately from the transmitter/remote or wish to change away from the standard setup to avoid false triggering. 1. Press and hold the CLEAR and ENTER keys together, [SETUP OPTIONS] will be displayed on the LCD. Release buttons immediately when the tone changes and [ALARM ON? NO] is displayed on the LCD. Note: If YES is displayed press any of the keys on the top row to change to NO. 2. Press the ENTER key to move onto the next step. [SET REMOTE? will be displayed on the LCD. NO] 3. Press any one of the top row of keys (DAY, HOUR or MIN) to change the LCD display from [SET REMOTE? NO] to [SET REMOTE? YES] 4. Press the ENTER Key. The LCD will now display the current code followed by the channel number, e.g. [CODE0101010101:1]. This code corresponds to that used by your transmitter or handheld remote. 5. Choose which button on your Batt-Latch Boss (long range transmitter) or Mini Boss (short range remote) you want to operate with your Remote Batt-Latch and press it. The code displayed on the Batt-Latch LCD should now change (if different) to display the new code and the Batt-Latch will beep. 6. Press the ENTER key to store the new code in the Batt-Latch memory. Note: If you wish to use both the Batt-Latch Boss (long range transmitter) and a Mini Boss (short range remote) you will need to complete the steps above using the BattLatch Boss. Then match the code displayed (1 = On, 0 = Off) after completion of step 5 to the DIP switches in your Mini Boss. The DIP switches are located under the battery cover. Batt-Latch Instruction Manual 17 6 Other Novel Ways Products GrassMaster Pro World leading capacitance type Drymatter instrument. Batt-Latch Instruction Manual 18 Brix Kit Complete kit to measure the Brix (sugar content) of grass and other forages. Batt-Latch Instruction Manual 19 7 Technical Specifications Batteries: Internal 5 x AA NiMH rechargeable battery pack Solar Charger: Resin mounted panel, 8VDC 400mW capability Motor and gearbox: 6V DC carbon brush motor 336:1 reduction gearbox with cam 7kg max holding weight in line with shaft Electronics: Low power single chip microprocessor design on a single fibreglass printed circuit board Display: 1 line x 16-character alphanumeric liquid crystal display Power consumption: Standby: less than 50uA Case: Engineering plastic, waterproofed with rubber sealing gasket and O-rings, underwater tested. For your records Batt-Latch Purchase Date: Purchased from: Serial Number: 12 Month Warranty from purchase date. Batt-Latch Instruction Manual 20