1
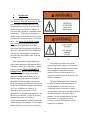
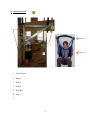
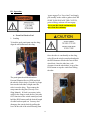
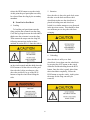
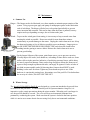
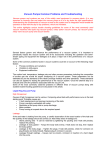
Acceptable User Manual, but why not include a cover page? Need more on the lock. Pictures are
better than in 1st draft, but still could be better. Pretty good warnings and basic operating
instructions, but some additional detail could improve them. Pretty good on maintenance and
troubleshooting, but missing information on replacement parts. Mounting and removal instructions
were not included, so the manual is only for systems already installed that will never be removed.
Table of Contents
I.
Introduction
……………………………………………………………
2
II.
System Overview ............................................................................................
3
III.
Operation
............................................................................................
4
A. Deck to Pool
……………………………………………………………
4
B. Pool to Deck
……………………………………………………………
6
Maintanence
……………………………………………………………
7
A. Summer Use
…………………………………………………………….
7
B. Winter Storage …………………………………………………………….
7
…………………………………………………………….
8
IV.
V.
Troubleshooting
1
I.
Introduction
Congratulations on your purchase of a
new Just a Lil’ Pick ME Up Pool Lift! This
user’s manual is intended provide to you,
the information necessary to operate this
device in a safe and effective manner, as
well as to fully explain it’s capabilities and
functionality. This system is intended to
enable people of all ability levels who wish
to participate in pool activities, to be able to
do so. The Just A Lil’ Pick ME Up Pool
Lift is designed to perform this task by
lifting the pool participant out of their
wheelchair and delivering them safely into
the water. The pool lift is also designed to
assist the pool participants from the pool,
back into their wheelchairs after a fun and
exciting swim.
compromised in any way, DO NOT use the
lift.
This manual also contains important
safety and maintenance information which
will help to ensure your experience with the
Lift is a safe one. IT IS EXTREMELY
IMPORTANT that you know, understand,
and follow all of the safety information
contained in this manual, failure to do so
exposes those using the lift to hazardous,
potentially life threatening circumstances.
Heed all warnings posted in this manual and
on the lift itself and immediately discontinue
use if any violations are observed. In
addition to correct operation, correct
maintenance is of paramount importance for
the safe use of this lift. Failure to properly
maintain the system will result in
accelerated degradation, and will shorten the
usable lifetime of the product. If you suspect
that the integrity of the system is somehow
This guide will outline for you the
common signs and symptoms of structural
distress, and other mechanical factors that
may contribute to diminished system
integrity. Please use this manual as an
inspection reference prior to operation, and
during maintenance.
The pool lift has three basic functions:
Loading, Rotation, and Unloading, all of
which should be used in the course of a
swimming session. It also has a storage
configuration to keep it secure and out of the
elements during the off season winter
months. It is not recommended to use this
lift in winter, or temperatures below
freezing, as water infiltration may cause
significant ice damage
2
II System Overview
1. Truss System
2. Hinges
3. Winch
4. Pulleys
5. Sling Bar
6. Sling
7.
3
III. Operation
“gears engaged” to “free wheel” and simply
pull steadily on the cable to gather slack. BE
SURE TO RE-ENGAGE THE CLUTCH,
prior to lifting, or drum will not engage.
Never run the winch continuously for
more than three minutes.
A. From Pool Deck to Pool
1. Loading
To load the pool participant onto the sling,
align the wheelchair near the sling.
Once the rider is comfortably on the sling,
select IN on the winch control pad and push
the RUN button to lift the rider out of their
wheelchair. Once the rider has a safe
clearance from the wheelchair, let go of the
RUN button to stop the winch from lifting
the rider.
The participant should then don their
Personal Flotation Device (PFD) and lock
the wheels of their chair. Cross the leg loops
between the individual’s thighs once the
rider is near the sling. Then connect the
straps onto the sling bar (Waverly Glen
Sling Manual). If slack is necessary in the
cable for the sling to reach the bar, select the
OUT function on the winch control pad, and
hold the RUN button until the desired length
of cable has been paid out. You may also
disengage the winch clutch by pulling the
lever on the side of the winch housing from
4
2. Rotation
Pull back the wheelchair from the rider and
once the rider is a safe distance from the
wheelchair, rotate the rider over the pool.
This should be done at a moderate pace to
keep the rider from swinging. Use either the
cross-member of the support frame, or the
handle to apply rotary force, and support the
passenger throughout the operation to
3. Unloading
It is highly recommended that two
operators be present, one on the deck
operating the lift and one in the pool ready
to receive the participant and help remove
the lifting sling if necessary. Once the rider
is safely over the pool water, lock the frame
in place and lower them into the pool by
pressing the OUT button and then holding
down the RUN button on the winch control
prevent swinging and potential impacts with
the surroundings or other pool-goers. Be
sure to avoid catching your, or others
extremities in the pinch point between the
upright support, and the vertical frame
member.
pad. Once the rider is completely in the pool
their weight is fully supported by the PFD
and no tension remains in the lift cable
5
release the RUN button to stop the winch.
At this point the pool participant can safely
be released from the sling by the secondary
attendant.
5. Rotation
Once the rider is above the pool deck, rotate
the rider over the deck and above their
wheelchair (make sure the wheelchair is
placed in loading area and wheels are
locked) in a similar manner as was discussed
in the previous section. This should be done
at a moderate pace to keep the rider from
swinging.
B. From Pool to Pool Deck
4. Loading
To load the pool participant onto the
sling, position the swimmer near the sling.
Cross the leg loops between the individual’s
thighs once the swimmer is near the sling.
Then connect the straps onto the sling bar,
following instructions similar to those
outlined in section III.A.1 Once the rider is
6. Unloading
Once the rider is safely over their
wheelchair, lower them onto the wheelchair
by pressing the OUT button on the winch
controller and then holding down the RUN
button. Once the rider is gently placed into
their wheelchair completely, release the
RUN button to stop the winch. At this point
the straps for the sling can safely be
removed.
comfortably on the sling, push the IN button
on the winch control and then hold down the
RUN button to lift the rider out of the pool.
Once the rider’s hips are about two feet
above the pool deck, let go of the RUN
button to stop the winch from lifting the
rider.
6
IV. Maintenance
A. Summer Use
Hinges – The hinges need to be lubricated every three months to maintain proper rotation of the
system. Using a grease gun, apply one pump of multipurpose grease to the lubrication
zerk of each hinge. The hinges will also have to be painted periodically to prevent
water incursion and corrosion. This can be done when the frame is painted, but may
require touch ups depending on usage, due to friction at the joint.
Winch – To prevent the winch gears from rusting, it is necessary to keep as much water from
entering the winch as possible. Do not run winch for more than three minutes
continuously to prevent damage to the motor. Unplug the winch when not in use. Keep
the drum and gearing as free of debris as possible to prevent damage. Inspect prior to
use. BE SURE THE POWER IS DISCONNECTED, and release the clutch before
reaching into the gearing to remove debris. Release the clutch when not in use to
prevent gear binding.
Frame – For the longest lifespan of the system, paint frame once a year to prevent corrosion.
Visually inspect for cracks, loose hardware, or bending of frame before each use. Some
surface defects in the metal are indicative of underlying structural issues, while others
are merely superficial damage. Dents, unless large enough to deform the frame out of
square or deep enough to penetrate the tube, can largely be ignored. Cracks or holes of
any kind are unacceptable, and a lift showing these features should NOT be used.
Bending is also cause for alarm. Tighten any loose hardware prior to use. If the
hardware is consistently coming loose, discontinue use of the pool lift. If in doubt about
the severity of a defect, DO NOT USE THE LIFT.
B. Winter Storage
The Just A Lil’ Pick ME Up Pool Lift was designed as a system not intended to be moved from
its location on the pool deck. To ensure that the pool lift system maintains a long life, it is
imperative to take certain precautions during the winter months. When the pool is no longer in
use, the pool lift should be covered. The cover will keep environmental elements from
prematurely weathering the system. Make sure that the system is locked in the home position
while it is not in use to ensure that it does not swing freely due to environmental conditions.
7
V. Troubleshooting
If the cable is not running up or down when the RUN button is being held:
-
Check that the cable is on both of the pulleys
o If the cable is off one of the pulleys, place the cable back onto the pulley
Check that the Just A Lil’ Pick ME Up Pool Lift is plugged into a proper power source
Check that the cord of the winch is not damaged
Check that the clutch is engaged
Disconnect the power and inspect the gearing of the winch for debris fouling the drum or
gears. If there is apparent tension in the system, use extreme caution removing the
blockage as sudden, violent motion of the mechanism may result.
Cable running slowly, noisily:
-
Check pulley tracking, correct if necessary
Disconnect power to the winch, inspect gearing and drum for debris, use caution, as was
stated above
Ensure clutch is fully engaged
Cable running inconsistently (slowly with occasional jerks)
-
Check pulley tracking, correct if necessary
Disconnect power to the winch, inspect gearing and drum for debris, use caution, as was
stated above
Ensure clutch is fully engaged
Disengage the clutch, pull out roughly 10 feet of slack cable. Engage the clutch and,
while providing significant resistance to the cable, run the winch IN. This is known as
“re-winding the drum”
Slow, difficult rotation
-
Grease hinges
Ensure passenger weight does not exceed operational limits
Check for obstructions in the pinch point area
Check for bowing of upright support, if found, discontinue use immediately
Check for bending of the vertical frame member, if found, discontinue use immediately
Check for loose hinge hardware, or poor hinge alignment. Call the manufacturer if you
are uncomfortable, or unable to re-align and re-tighten the hinges.
Sagging, or bending, creaking or groaning of structure
-
-
Some deflection and creaking cannot be avoided, but if you feel it has gone beyond
reasonable limits, discontinue use.
Check for loose hardware, tighten if possible, otherwise: see above
8