1
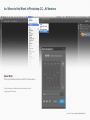
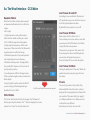
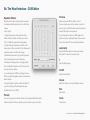
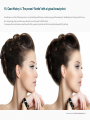
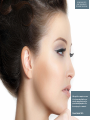
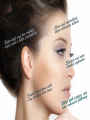
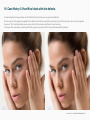
y
d
a
e
R
5
1
0
2
C
C
KNOW HOW TRANSFER
the photography knowledge hub
Wow! Tonal Equalizer - Frequency Separation Plugin
User Manual - Version 1.1.4 - July 2015
KNOW HOW TRANSFER
the photography knowledge hub
Wow! Tonal Equalizer User Manual - Index
1. What’s new
2. Wow Compatibility
3a. Install Wow! - MAC
3b.Install Wow! - WIN
4a. Where to find Wow! in Photoshop CC
4b.Where to find Wow! in Photoshop CS6
5a. The Wow! Interface - CC Edition
5b. The Wow! Interface - CS6 Edition
6a. Use Wow! with Live Preview Off
6b. Use Wow! with Live Preview On
7. How to get the most out of Wow!
9. Wow! is file size sensitive
10.Quick and clean
11.The Wow! Factor
12. The Presets
13-19. Case History
20. About Know-How Transfer
21. A brief Presentation of our Products
22. Our Freeware
23.Links and credits
8.The Equalizer
Wow! is an application developed by KnowHowTransfer
1. What’s new in this release
1. Wow! is now much more faster. Depending from many factors, about three time faster.
2. You can now work in live view. This means that any time you move a slider the preview is automatically refreshed.
3. Two more great presets have been added: “Skin” and “Product”
2. Wow! Compatibility
Wow! works on CC2015, CC2014, CC and CS6 at 64bit only.
For further information visit the Wow! page >
or write to
[email protected] >
Double click or copy and paste this link to email it to a different device
http://www.knowhowtransfer.com/download/wow_manual_en.pdf
Problems? Go to the FAQ Page >
or write to [email protected] >
KnowHowTransfer | Wow! Tonal Equalizer | 4
3a. Install Wow! - MAC
Install Help Page - MAC >
MAC USERS
The Wow! Installation process is easy as a pie.
Simply drag the installer.jsx file onto the Photoshop icon.
THE INSTALLER WILL AUTOMATICALLY UNINSTALL
THE PREVIOUS VERSIONS OF WOW!
Then ok the three further steps and restart Photoshop.
1. Unzip the Install Folder - 2. Drag the Installer.jsx file onto the Photoshop icon - 3. Ok the 3 windows - 4. Restart Photoshop
Ok the three window to start the installation, process,
save the install log and restart
KnowHowTransfer | Wow! Tonal Equalizer | 5
3b. Install Wow! - WIN
Install Help Page - WIN >
WIN USERS
WIN users must run Photoshop as an administrator
(right click and choose “Run as an administrator” option).
1. Unzip the Install Folder and copy its content on Desktop.
THE INSTALLER WILL AUTOMATICALLY UNINSTALL
THE PREVIOUS VERSIONS OF WOW!
4. Ok the 3 windows
2. Run Photoshop as an Administrator
3. Through Filter -> Scripts -> Browse, open Installer.jsx
5. Restart Photoshop
KnowHowTransfer | Wow! Tonal Equalizer | 6
3c. Optional Manual Install
Issues? Go to the FAQ Page >
In case of problems with the main installer use the files stored in the “Optional Manual Install” (WIN odr MAC versions) folder that contains three
sub-folders. Copy the the three folders in the locations as shown. Then restart Photoshop.
Know-How Transfer (Plugins Folder)
Know-How Transfer (Script Folder)
com.knowhowtransfer.wow
ts Plugins (s
Know-How Transfer (Plugins Folder)
Know-How Transfer (Script Folder)
com.knowhowtransfer.wow
CC 2015 - 64 bit: C:\Program Files\Adobe\Adobe Photoshop CC2015 (64 Bit)\Plugins
CC 2014 - 64 bit: C:\Program Files\Adobe\Adobe Photoshop CC2014 (64 Bit)\Plugins
CC - 64 bit: C:\Program Files\Adobe\Adobe Photoshop CC (64 Bit)\Plugins
CS6 - 64 bit: C:\Program Files\Adobe\Adobe Photoshop CS6(64 Bit)\Plugins
NOT TO BE COPIED IN CC 2015
CC 2014 - 64 bit: C:\Program Files\Adobe\Adobe Photoshop CC2014 (64 Bit)\Presets\Scripts
CC - 64 bit: C:\Program Files\Adobe\Adobe Photoshop CC (64 Bit)\Presets/Scripts
CS6 - 64 bit: C:\Program Files\Adobe\Adobe Photoshop CS6(64 Bit)\Presets/Scripts
CC 2015 - CC 2015 - 64 bit: C:\<username>\AppData\Roaming\Adobe\CEP\extensions
CC - 64 bit: C:\<username>\AppData\Roaming\Adobe\CEPServiceManager4\extensions
The user Appdata by default is hidden. To reveal it go to the Control Panel
NOT TO BE COPIED IN CS6
CC 2015 Macintosh HD/Applications/Adobe Photoshop CC2015/Plugin
CC 2014 Macintosh HD/Applications/Adobe Photoshop CC2014/Plugins
CC: Macintosh HD/Applications/Adobe Photoshop CC/Plugins/
CS6: Macintosh HD/Applications/Adobe Photoshop CS6/Plugins/
NOT TO BE COPIED IN CC 2015
CC 2014 Macintosh HD/Applications/Adobe Photoshop CC2014//Presets/Scripts
CC: Macintosh HD/Applications/Adobe Photoshop CC//Presets/Scripts/
CS6: Macintosh HD/Applications/Adobe Photoshop CS6//Presets/Scripts/
CC 2015 - CC2014 User Library/Application Support/Adobe/CEP/Extensions
CC: User/Library/Application Support/Adobe/ CEPServiceManager/Extensions/
The user Library by default is hidden. To reveal it go to Finder/Go menu and press the ALT key.
NOT TO BE COPIED IN CS6
111ts Plugins (s
KnowHowTransfer | Wow! Tonal Equalizer | 7
4a. Where to find Wow! in Photoshop CC - All Versions
Open Wow!
Photoshop/Window/Estensions/WOW! Tonal Equalizer 1
Tip: If you have just installed the extension and don’t see it,
simply restart Photoshop.
KnowHowTransfer | Wow! Tonal Equalizer | 8
4b. Where to find Wow! in Photoshop CS6
Open Wow!
Photoshop/Filters/WOW! Tonal Equalizer Tip: If you have just installed the extension and don’t see it,
quit and restart Photoshop.
KnowHowTransfer | Wow! Tonal Equalizer | 9
5a. The Wow! Interface - CC Edition
Live Preview On and Off
According to your work habits, file size and
CPU performance you can set the live view on
or off using the preference button.
By default the live preview is set on off.
Equalizer Sliders
Wow! has five sliders. Moving them upward
or downward will add contrast or soften the
image.
Left to right:
1. High frequencies: with positive values,
affects the thin details similarly to a classic
100.1.0 USM; the opposite with negative.
2. High/medium frequencies. Affects a bit
larger areas. Often used as the first slider with
negative values to soften the image.
3. Medium frequencies. Plays and important
role sharpening, but more softening.
4. Medium low frequencies. Strongly affects
the overall effect. Because of its structure it’s
mostly used in positive.
5. Low frequencies. Affects the largest areas.
Often used with negative values to reduce the
blacks depth.
6. Opacity slider. Used to reduce the effect if
you are working of the background layer.
By default it is set at 100%.
Live Preview Off Mode
Wow! opens with the sliders set to 0.
Once entered your custom values or selected
a preset, press the RUN button to start Wow!
and get the full screen preview.
The preview is progressive. This means that
if you change the values and RUN again, the
new version will replace the previous.
Press the button ON to see the before/after.
Live Preview On Mode
Setting the preference to “live view” Wow! will
update the preview any time you will move
the sliders.
Presets
Pull this small handle to reveal more presets.
Other Buttons
The “Home” button links to Wow! homepage. The “Preferences”
button open the prefs window. The “?” button displays the version
release. Press “resetl” to reset the sliders to 0.
You can try six presets: Wow, Gentle, Skin,
Enhanced Black Controls Product, or Boost.
designed for an average file size as Wow! is file
size sensitive. This means that if you apply it
to a 4000px wide file or to a 1000px one, the
result will be very different.
Read the preset section for more info.
KnowHowTransfer | Wow! Tonal Equalizer | 10
5b. The Wow! Interface - CS6 Edition
Equalizer Sliders
Preview
Wow! has five sliders. Moving them upward
or downward will add contrast or soften the
image.
Left to right:
1. High frequencies: with positive values,
affects the thin details similarly to a classic
100.1.0 USM; the opposite with negative.
2. High/medium frequencies. Affects a bit
larger areas. Often used as the first slider with
negative values to soften the image.
3. Medium frequencies. Plays and important
role sharpening, but more softening.
4. Medium low frequencies. Strongly affects
the overall effect. Because of its structure it’s
mostly used in positive.
5. Low frequencies. Affects the largest areas.
Often used with negative values to reduce the
blacks depth.
6. Opacity slider. Used to reduce the effect if
you are working of the background layer.
By default it is set at 100%.
Wow! opens will all the sliders set to 0.
Once entered your custom values or select a
preset, press the RUN button to perform Wow!
and get the full screen preview.
If you change the values an RUN again, the
previous version will replaced by the new one.
Press the button ON to see the before/after.
Presets
You can try six presets: Wow, Gentle, Skin, Enhanced Black Controls
Product, or Boost.. Please read the preset section to get more info.
Luminosity
By default Wow! works in luminosity mode.
Uncheck it to work in normal mode.
?
Visit the Wow! page.
On/Off
Switch before/after
Cancel
Reset the sliders or cancel theWow! version
Run
Run Wow!
Close
Close Wow!
KnowHowTransfer | Wow! Tonal Equalizer | 11
6a. Use Wow! in Standard Mode (Live Preview off)
To apply Wow! choose a preset or enter
your custom values then press RUN.
Inspect the result and if necessary tweak
some sliders and RUN again. Wow! will be
applied on the original layer.
If you like the result but the effect is too
strong you can reduce the opacity value
with the slider on the right of the panel
and run again. This make sense if you are
working directly on the background. However we suggest that you work on a duplicate layer as shown on the left.
In this case Wow! was set at 100% opacity.
Eventually we rwill tweak the effect later by
adjusting the opacity of the layer as shown
on the left.
Tip: You can reduce the strength of the contrast by reducing
or increasing opacity. You can do this only if you apply Wow!
on a duplicate layer.
KnowHowTransfer | Wow! Tonal Equalizer | 12
6b. Use Wow! in Live Preview Mode (Not available in CS6)
A New Faster Algorithm
Now Wow! is approximately three times
faster than the previous version and you
can prefer to work with the live preview.
This means that any time you move the
slider the preview is updated.
To enable Live Preview press the
preferences tab, check “Live Preview”
and save.
The Run Tab is now inactive.
KnowHowTransfer | Wow! Tonal Equalizer | 13
7. How to get the most out of Wow! Tonal Equalizer
We strongly recommend you start using Wow! as described below.
Step1. Carefully read this manual.
Step2. Use some of your standard files as a test.
Step3. Apply Wow! using the presets.
Step4. Duplicate the background layers changing some sliders, especially the 1, 4 and 5 and compare them.
Step5. Apply the same values on the same original at different sizes to understand how the file size may affect the result.
Well! At this point you will be ready to explore all the potentials of Wow!
Tips: a recommendation about the export of your color files. Don’t push contrast, clarity and USM. Wow! will manage all this parameters. Wow! will do it better.
KnowHowTransfer | Wow! Tonal Equalizer | 14
8. The Equalizer
Similarly to music equalizer, Wow! allows you to control the tonal values, sharpness and local contrast of your file, working on the higher (finest
details), medium or low, (large areas) frequencies.
You can modify positive or negative values. Use positive (upward) to add sharpness (with higher frequencies) or boost the local contrast (with
lower frequencies). Use negative values moving the sliders downward. This will soften the image with a very pleasant result.
Wow! performs its best when mixing positive and negative values, adding a very personal and powerful look to your images, whether the
subject is a person, a landscape or a product.
From left to right. The sliders set to 0, then the four preset: Wow, Gentle, Enhanced with Black Control and Boost
In the next two pages you can see the comparison between the sliders sets at +10 or -10. The upper row illustrates the difference between the
original layer and the Wow! one. The lower row the Wow! layers.
The first page deals with positive, the second with negative. As you can see the slider on the left acts on the finer details. Proceeding to the right
the affected areas become progressively larger.
KnowHowTransfer | Wow! Tonal Equalizer | 15
KnowHowTransfer | Wow! Tonal Equalizer | 16
KnowHowTransfer | Wow! Tonal Equalizer | 17
Wow! delivers a high quality full screen live view preview, that remains temporary until you proceed to the next history state.
You can apply a preset or your custom values, check the result, tweak the sliders and run again. Wow will delete the previous version and apply
the new one. Each time the layer will be renamed with the used values; for example: WOW! [ +1, 0, 0, +3, +6] 100%.
By default Wow! is applied on the background. We strongly suggest you duplicate the background, work on it and compare the two or more
versions, blend two versions using opacity or add a blank (white) mask on the Wow! layer and remove unwanted parts.
From left to right. 1. Original (lack of detail, a bit noisy and flat overall rendition) . 2. WOW! [ +5, -1, -2, +5, +5] 70% too grainy and noisy. 3. same than previous but +2 instead
of +5 to the first slider (affecting sharpening detail). 4. Last but not least, the blacks are too deep. There are many options to correct this. Here I placed the fifth slider to -10,
add a black mask to recover the blacks detail. Or use WOW! [ +5, -1, -2, +5, -5] to open all the blacks.
KnowHowTransfer | Wow! Tonal Equalizer | 18
9. Wow! is file size sensitive
In the next chapter we will approach using presets. Before starting it is important to understand that they are only a starting point and may vary
in an impressive way with different subjects and at different file size. Below you can see a comparison with the same values applied at 1000px or
3000px. The sliders were set in both versions at +2, -2, -3, +3, +4. In this case the result with the larger file is much more interesting but, in other
cases maybe the opposite. So to get the best from your file apply Wow! only to the final, intended use, file size.
KnowHowTransfer | Wow! Tonal Equalizer | 19
10. Quick and clean: frequency separation according to Wow!
This next pages explains how Wow! works. Like our other tools, Wow! gives you an often excellent starting point simply by picking a preset. You
can tweak it at will to reach what is optimal for you. If you need more control, keep Wow! on a separate layer and play with opacity and layer
masks. The process is quick: in a couple of minutes, we were able to obtain five different versions.
To compare the versions like in Photoshop layers please watch the pdf at full page and go back and forth using the keyboard left/right keys.
KnowHowTransfer | Wow! Tonal Equalizer | 20
GO BACK AND FORTH
USING THE ARROW KEYS
TO COMPARE THE VERSIONS
KnowHowTransfer
| Wow! Tonal Equalizer | 21
Original
GO BACK AND FORTH
USING THE ARROW KEYS
TO COMPARE THE VERSIONS
Straight application of the
preset Wow!
+2, -2, +3, +1, +4
No further changes.
KnowHowTransfer
| Wow!
Tonal100%
Equalizer | 22
Wow
Preset
GO BACK AND FORTH
USING THE ARROW KEYS
TO COMPARE THE VERSIONS
Straight application of the
preset Gentle
+2, -1, -2, +3, +6
No further changes.
KnowHowTransfer
| Wow!
Tonal Equalizer
Gentle
Preset
100% | 23
GO BACK AND FORTH
USING THE ARROW KEYS
TO COMPARE THE VERSIONS
Straight application of the
preset Enhanced Black Control
+2, -1, -2, +5 ,-2
No further changes.
KnowHowTransfer
| Wow!
Tonal100%
Equalizer | 24
EBC
Preset
GO BACK AND FORTH
USING THE ARROW KEYS
TO COMPARE THE VERSIONS
Straight application of the
preset Boost
+2, 0, 0, +3 , +6
No further changes.
KnowHowTransfer
| Wow!
Tonal Equalizer
Boost
Preset
100% | 25
GO BACK AND FORTH
USING THE ARROW KEYS
TO COMPARE THE VERSIONS
Preset Gentle + Preset Boost
on the same layer
Great but over-sharpened
KnowHowTransfer
| Wow! Tonal Equalizer
Gentle+Boost
100% | 26
GO BACK AND FORTH
USING THE ARROW KEYS
TO COMPARE THE VERSIONS
Preset Gentle + Preset Boost
on the same layer
Same than before but with
slider 1 set to 0 in both application
KnowHowTransfer
| Wow! Tonal Equalizer
| 27
Gentle+Boost
100% 1=0
EBC at 100, 70 and 40%
Don’t worry if the effect is too
strong. Simply play with opacity
adjusting the opacity slider.
For a full control we suggest to
apply Wow! on a duplicate layer
and change opacity slider as
shown below.
KnowHowTransfer | Wow! Tonal Equalizer | 28
11. The “Wow Factor”
Any image is made of fine detail and coarser areas. Controlling these independently is the key to the winning look which has “The Wow! Factor”.
How does it work? In the unique Wow! panel, through five dedicated sliders whose values can be either positive or negative you can control
separately sharpening, shape and smoothening. Start with one of our presets, and tweak the sliders to reach what is optimal for you. If you need
more control, keep Wow! on a separate layer and play with opacity and layer masks.
KnowHowTransfer | Wow! Tonal Equalizer | 29
12. The Presets
The new Wow! embeds six new presets designed to meet different requiremets. The values are optimized for a mid-size file. Let’s say from 3000
to 4500px wide and must be considered a starting point. Some of the them, i.e. Wow!, are designed for a straight application, others to be sandwitched. For instance a fantastic combination is Skin+Wow. We strongly invite you to test all the presets with different subjects and play with the
sliders. Don’t forget to play with the opacity. An effect too harsh at 100% may be perfect at 70%.
Wow!
Enhanced Black Control
[ +2, -2, -3, +1, +4] 100%
It’s the basic preset. Simply apply it and often you will get
immediately what we call “The Wow! Factor”,the magic
combination of sharpening and smoothing that helps you add
shape and personality to your images.
It’s the perfect companion of “Skin”.
[ +2, -1, -2, +5, -2] 100%
Add a powerful mood to your images. Increase the fourth slider
value to enhance the effect, decrease the fifth value to control
the black detail.
Pushing the layers values and deforming the image you can get
incredible caricature effects.
Gentle
Product
[ +2, -1, -2, -3, +6] 100%
Tipically to be applied at the end of your workflow. It improves
the tonal transitions end enhance all details. Great for beauty
and portrait in general.
[ +3, +3, -2, 0, 0] 100%
A very versatile preset. We could have called it “Lanscape”
“Birdwatching” or “Automotive”. Similar to an high frequency
HiRaLoam effect but much more versatile.
Skin
Boost
[ -5, -6, -3, +1, 0] 100%
It’s the smoothing preset, great to correct skin imperfections.
You can apply Skin on a first layer and Wow! on a second, add a
white mask, grab a soft black brush and reveal all the parts that
need to be corrected. A great powerful combination
[ +2, 0, 0, +3, +6] 100%
Add power to your image. Reduce the fifth layer value con add
detail to the blacks. Try to add a mask to reduce some parts and
eventually play with opacity to reduce artifacts.
KnowHowTransfer | Wow! Tonal Equalizer | 30
13. Case History 1&2. Add an exclusive look to an already good image.
Wow may add a magic exclusive look to many images. We call this “the Wow! factor”
We applied Wow to two images already good. In both cases we used the preset “Wow”: [ +2, -2, -3, +1, +4] 100%
To compare the results please view the pdf on full pages and go back and forth using the keyboard left/right keys.
KnowHowTransfer | Wow! Tonal Equalizer | 31
GO BACK AND FORTH
USING THE ARROW KEYS
TO COMPARE THE VERSIONS
One of our preferred images.
We are used to seeing her
converted with Vitamin BW, and
in color honestly find her a bit
ordinary.Let’s see if we can get
something better.
Original
GO BACK AND FORTH
USING THE ARROW KEYS
TO COMPARE THE VERSIONS
Straight application of the
preset Wow!
+2, -2, -3, +3, 0
GO BACK AND FORTH
USING THE ARROW KEYS
TO COMPARE THE VERSIONS
Nice shot. Let’s check if we can
improve it
KnowHowTransfer
| Wow! Tonal Equalizer | 34
Original
GO BACK AND FORTH
USING THE ARROW KEYS
TO COMPARE THE VERSIONS
Straight application of the
preset Wow!
KnowHowTransfer
Wow!
| 35
+2,| -2,
-3,Tonal
+3, Equalizer
0
14. Case History 3. Improve an image with a lack of mood, contrast and sharpness.
This original image had a lack of contrast and personality. The straight application of the preset “Wow” changed totally the look and the
printability of this image.
To compare the results please view the pdf on full pages and go back and forth using the keyboard left/right keys.
KnowHowTransfer | Wow! Tonal Equalizer | 36
GO BACK AND FORTH
USING THE ARROW KEYS
TO COMPARE THE VERSIONS
KnowHowTransfer
| Wow! Tonal Equalizer | 37
Original
GO BACK AND FORTH
USING THE ARROW KEYS
TO COMPARE THE VERSIONS
Straight application of the
preset Wow!
KnowHowTransfer
Wow!
| 38
+2,| -2,
-3,Tonal
+3, Equalizer
0
15. Case History 4. The preset “Gentle”with a typical beauty shot
According to our test all these preset are crossed-setting and if proper used are very good from beauty to wedding, from family portrait to boudoir. Surprisingly they work also very well with most of product (still life) shots.
To compare the results please view the pdf on full pages and go back and forth using the keyboard left/right keys.
KnowHowTransfer | Wow! Tonal Equalizer | 39
GO BACK AND FORTH
USING THE ARROW KEYS
TO COMPARE THE VERSIONS
Not easy to enhance this delicate image. We’ll try to improve
the skin gradations. the hair and
the lips. Eyelashes also are a bit
confused.
Original
GO BACK AND FORTH
USING THE ARROW KEYS
TO COMPARE THE VERSIONS
Although the comparison seems
to be less wowing that the previous the image have been improved virtually anywhere. See
the next page for comments.
Preset Gentle 100%
GO BACK AND FORTH
USING THE ARROW KEYS
TO COMPARE THE VERSIONS
16. Case History 5. How Wow! deals with skin defects.
A nice fresh girl with some problems of skin. With Wow! this retouch was very quick and effective.
On two copies of the original we applied first the Wow! presets that was great (but some skin issues still remained); on the second we applied
the preset “Skin”, add a black layer mask, grab a white soft brush and reveal the skin corrected areas.
To compare the results please view the pdf on full pages and go back and forth using the keyboard left/right keys.
KnowHowTransfer | Wow! Tonal Equalizer | 43
GO BACK AND FORTH
USING THE ARROW KEYS
TO COMPARE THE VERSIONS
Nice girl an shot with biig skin
problems. A very common case.
KnowHowTransfer
| Wow! Tonal Equalizer | 44
Original
GO BACK AND FORTH
USING THE ARROW KEYS
TO COMPARE THE VERSIONS
A sandwich of two layers, the
first one with preset “Wow”, the
second one with “Skin”.
Then added a black mask on
“Skin” and reveal the improved
skin areas with a black soft
brush.
KnowHowTransfer
| Wow!
Tonal Equalizer | 45
Wow
+ Skin
GO BACK AND FORTH
USING THE ARROW KEYS
TO COMPARE THE VERSIONS
The intermediate step
KnowHowTransfer
| Wow!
TonalOnly
Equalizer | 46
Skin
Preset
17. Case History 6. Presets “Boost” and “Product” to enhance a still life.
Altought we designed Wow! tergeted to work on people it may excel also with product shots, landscape, architecture, birdwatching.
In this case two different results. The first one with typical “Wow Factor” using the preset Boost. Once compared the test prints the difference
was huge.
To compare the results please view the pdf on full pages and go back and forth using the keyboard left/right keys.
KnowHowTransfer | Wow! Tonal Equalizer | 47
GO BACK AND FORTH
USING THE ARROW KEYS
TO COMPARE THE VERSIONS
KnowHowTransfer
| Wow! Tonal Equalizer | 48
Original
GO BACK AND FORTH
USING THE ARROW KEYS
TO COMPARE THE VERSIONS
KnowHowTransfer
| Wow!
Tonal Equalizer
Boost
Preset
100% | 49
18. Case History 7. Preset “Product” and birdwatching.
The preset “Product” is designed do add sharpening and local contrast adding a smoothing effect with the slider N.3.
In thsi case a great tri-dimensional effect has been added.
To compare the results please view the pdf on full pages and go back and forth using the keyboard left/right keys.
KnowHowTransfer | Wow! Tonal Equalizer | 50
GO BACK AND FORTH
USING THE ARROW KEYS
TO COMPARE THE VERSIONS
KnowHowTransfer
| Wow! Tonal Equalizer | 51
Original
GO BACK AND FORTH
USING THE ARROW KEYS
TO COMPARE THE VERSIONS
KnowHowTransfer
| Wow! Tonal
Equalizer
Product
Preset
100%| 52
19. Case History 8. Preset “Boost” with landscape.
The original image, taken with an Hasselblad digitally speaking is really very good. The problem is that, printing it, many subtle tones, of similar
colors are not properly rendered. The preset “Boost” added a stunning detail greatly improving the print. To really appreciate the difference we
are showing a full size detail. If the result should be too harsh, simply reduce the opacity.
To compare the results please view the pdf on full pages and go back and forth using the keyboard left/right keys.
KnowHowTransfer | Wow! Tonal Equalizer | 53
GO BACK AND FORTH
USING THE ARROW KEYS
TO COMPARE THE VERSIONS
KnowHowTransfer
| Wow! Tonal Equalizer | 54
Original
GO BACK AND FORTH
USING THE ARROW KEYS
TO COMPARE THE VERSIONS
KnowHowTransfer
| Wow!
Tonal Equalizer
Boost
Preset
100% | 55
KNOW HOW TRANSFER
the photography knowledge hub
Know-How Transfer – The Photography Knowledge Hub
A new platform by the same team who developed ALCE, formerly RBG Group or Bigano and associates.
Everyone dealing with photography and digital imaging will find a unique mix of instructional and how-to content here. We offer applications specifically designed by photographers for photographers, as well as effective tutorials and free resources. Our
mission is to create a community, a Central Hub of Photography Knowledge, where photographers can exchange experiences,
share information and grow their skills. Read more about our team here >
Many of them come from the school of the great Dan Margulis and still have a very special relationship with him.
I’m pleased to report here what he wrote about this group taken from his famous post “La Dolce Vita - An era ends”:
They say that Italians get emotional at times like this, and that Italians love beautiful things. I admit to feeling a bit Italian myself as I write
this. I *have* developed an emotional attachment to the country, no doubt. And the relationships I have entered into with several of my students in that country have evolved into something, well, profoundly loving. The old joke has it that in heaven, all lovers are Italian. Right offhand I can think of a couple of exceptions to this generality, but there is no need to go off-topic. The truth is that it is a land of love and great
beauty, made all the more beautiful professionally by seeing the new and sophisticated imaging algorithms being developed by Davide with
Marco Olivotto, and by seeing how Alessandro, Daniele Di Stanio, Tiziano Fruet and others have brought first-class color instruction into a
country where it was rarely found previously.
21. A brief presentation of our Apps for Photoshop.
Wow! Tonal Equalizer - Frequency Separtion Plugin
Channels Power Tool - Advanced Mask Editing
VitaminBW - Single and Triple Tone Black&White Converter
Boost and soft an image in one step detail scales through five dedicated sliders. Positive values, which add detail or shape. Negative value
remove detail and create great, soft transitions.
PS CC 2015, CC2014, CC , CS6 - MAC & WIN.
Buy €32 >
Easily get a preview of all available channels. Create masks from the
channels. Use the powerful Apply Image option to precisely recover the
details of your files. CPT will enhance your color control precision and
productivity. PS CC 2015, CC2014, CC , CS6, CS5 - MAC & WIN. Buy €20 >
An original approach to B&W Conversion with a very clean and simple
interface. Simply press the “Single Tone” or the “Triple Tone” button to
be quickly introduced to advanced conversion techniques.
Double USM - Two Channels Advanced Sharpening
ALCE - Advanced Local Contrast Enhancer
PS Projects - Files Manager for Photoshop
Works separately on Dark and Light halo’s components of an image.
With a double set of sliders and his high quality preview, Double USM
fills the gap. For traditional, HiRaLoam or creative mixed sharpening.
An easy-to-use and powerful Photoshop tool to effectively improve and
finely tune the local contrast of an image. His smart algorithm avoids
the clipping issues typical of methods like shadows/highlights.
A script that lets you create, load and modify Project files – i.e. collections of images in any format, from any folder in your hard drive as file
references, that you might need to open in Photoshop often.
PS CC 2015, CC2014, CC , CS6, CS5 - MAC & WIN.
PS CC 2015, CC2014, CC , CS6, CS5, CS4, CS3 - MAC & WIN.
PS CC 2014, CC , CS6 - MAC & WIN
Buy €12.40 >
Buy €28 >
PS CC 2015, CC2014, CC , CS6 - MAC & WIN.
Buy €26 >
Buy €11 >
KnowHowTransfer | Wow! Tonal Equalizer | 57
Freeware
Premium Raw Scan Service
Floating Adjustments - Restores the old CS3 floating window
False Profile - Tonal range control with low or high gamma
Hasselblad 3F 16bit Raw Scan Service
Restores the Adjustment Layers’ bigger, floating windows look and
behaviour which was the norm back in CS3. It allows the creation of 10
Adjustment kinds as big, floating windows, and the modifications of
existing adj.
PS CC2014, CC , CS6, CS5 - MAC & WIN.
Get Free >
A Photoshop extension to automate the assignment of false RGB profiles
for a full control of the luminosity. Brings new features and refinements
to the process of assigning false profiles. Works in conjunction with the
Dan Margulis’ PPW Tools.
PS CC 2015, CC2014, CC , CS6, CS5 - MAC & WIN.
Get Free >
3F is a raw file obtained froma an analog original. We will scan your
film with the Hasselblad hi-end scanners. Send us you originals from a
35mm to a 13x18cm/5x7”, color or black and white, negative or positive.
All PS Versions, MAC & WIN. Buy 3F 16 bit R
ALL PHOTOSHOP VERSIONS , MAC & WIN
Buy Raw Scan €7 each.>
KnowHowTransfer | Wow! Tonal Equalizer | 58
KNOW HOW TRANSFER
the photography knowledge hub
23. Links and Credits
Wow! © knowhowtransfer.com / bigano srl
VitaminBW is developed by KnowHowTransfer
Manual design by Marco Diodato
Wow! Tonal Equalizer Page >
Buy Wow! here >
Store Home Page >
Products Home Page >
bigano.com >
Images credits: Cover and page page 3, 4, 43 to 46; ©Uri Avitan / age10, 16, 17: ©depositphotos.com / Pandorabox / ©depositphotos.com /
page 19, 31/33 and 20/28: Vitaly Valua / page 15, 19, 25, 26: ©depositphotos.com / Page 29,34,35: Carlo Dapino, ©depositphotos.com / Page
36,37,38 and 39/42: Pawel Sierak, depositphotos.com / Page 47/49 and 53/55: Roberto Bigano