1
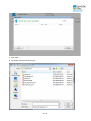
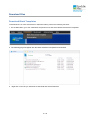
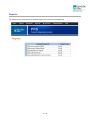
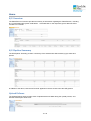
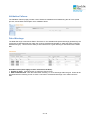
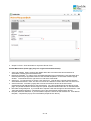
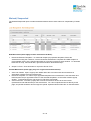
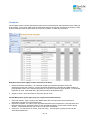
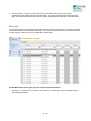
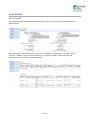
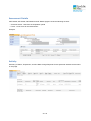
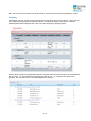
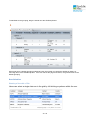
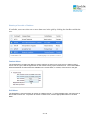
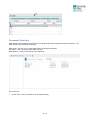
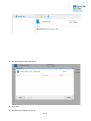
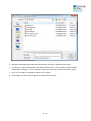
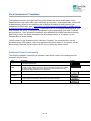
Property Reporting System
Version 1.0
Seller/Servicer Quick Start Manual
Version 3.1
Seller/Servicer Quick Start
Manual
2 / 38
Table of contents
Introduction ........................................................................................................................ 4
Welcome ....................................................................................................................... 4
Workflow Process.......................................................................................................... 5
Getting Started................................................................................................................... 6
System requirements .................................................................................................... 6
Log In ............................................................................................................................ 7
Upload Files ....................................................................................................................... 9
How to Upload one or more files ................................................................................... 9
How to Upload a Bulk File ........................................................................................... 11
Download Files ................................................................................................................ 14
Download Blank Templates ......................................................................................... 14
Download Documentation ........................................................................................... 15
Download Pre-populated Templates ........................................................................... 16
Reports ............................................................................................................................ 17
My Account ...................................................................................................................... 18
Change Password ....................................................................................................... 18
Forgotten Password .................................................................................................... 18
Home ............................................................................................................................... 19
S/S Overview............................................................................................................... 19
S/S Pipeline Summary ................................................................................................ 19
Upload Failures ........................................................................................................... 19
Validation Failures ....................................................................................................... 20
Data Warnings............................................................................................................. 20
Assessment Queues ........................................................................................................ 22
Due .............................................................................................................................. 22
Waived/Suspended ..................................................................................................... 23
Complete ..................................................................................................................... 24
Accepted ..................................................................................................................... 25
Loan Details ..................................................................................................................... 28
Loan Details ................................................................................................................ 28
Assessment Details ..................................................................................................... 27
Activity ......................................................................................................................... 29
Common Controls ............................................................................................................ 30
Grids ............................................................................................................................ 30
Sorting .................................................................................................................... 30
Filtering ................................................................................................................... 30
Grouping ................................................................................................................. 31
Row Selection ......................................................................................................... 32
Selecting a Row with a Click .............................................................................. 32
Selecting a Row with a Checkbox ...................................................................... 33
Context Menu ......................................................................................................... 33
Grid Menu ............................................................................................................... 33
Document Interface ..................................................................................................... 32
Upload Files ............................................................................................................ 34
Excel Assessment Templates .......................................................................................... 37
Additional Excel Functionality ...................................................................................... 37
Upload Criteria ............................................................................................................ 38
3 / 38
Introduction
Welcome
Freddie Mac's Property Reporting System (PRS) has been developed to facilitate the workflow process of
collecting and validating each of the following assessment files for each of its Multifamily loans: Loan
Management, Inspection, Annual Income & Expense and Quarterly Income & Expense. PRS employs
Excel to perform assessment validation and provides immediate feedback to the user. Completed
assessment and attachment files are submitted to Freddie Mac via PRS.
Assessments move through the following workflow statuses:
1.
2.
3.
4.
Due: Assessment is due from Seller/Servicer
Suspended: Assessment is currently suspended
Waived: Assessment has been waived by Freddie Mac
Completed: Assessment and Required Attachments have been submitted and validated by PRS.
Assessments will remain available to by updated by the Seller/Servicer for 5 days.
5. Accepted: Assessment has been accepted by Freddie Mac, can be viewed/downloaded from within
the system, but can no longer be submitted by the Seller/Servicer
4 / 38
Workflow Process
The chart below represents the flow of Assessments and Attachments through PRS.
5 / 38
Getting Started
System requirements
Computer/Processor
•
Computer with a 233 megahertz (MHz) processor or higher (Pentium processor recommended)
Operating System
•
Windows 7
•
Windows XP 32-bit with Service Pack 2 (SP2) or higher
•
Windows XP Professional x64 Edition
•
Windows Vista 32-bit
•
Windows Vista 64-bit
•
Windows Vista with Service Pack 1 (SP1) or higher
•
Windows Server 2003 32-bit with Service Pack 2 (SP2) or higher
•
Windows Server 2003 64-bit with Service Pack 2 (SP2) or higher
•
Windows Server 2008 32-bit or higher
•
Windows Server 2008 64-bit or higher
Memory
•
Windows 7 - 128MB
•
Windows XP 32-bit with Service Pack 2 (SP2) or higher—64 MB
•
Windows XP Professional x64 Edition—128 MB
•
Windows Vista 32-bit—512 MB
•
Windows Vista 64-bit—512 MB
•
Windows Server 2003 32-bit with Service Pack 2 (SP2) or higher—64 MB
•
Windows Server 2003 64-bit with Service Pack 2 (SP2) or higher—128 MB
•
Windows Server 2008 32-bit—512 MB
•
Windows Server 2008 64-bit—512 MB
Hard Disk Space
•
Windows 7 - 150MB
6 / 38
•
Windows XP 32-bit with Service Pack 2 (SP2) or higher—150 MB
•
Windows XP Professional x64 Edition—200 MB
•
Windows Vista 32-bit—70 MB
•
Windows Vista 64-bit—120 MB
•
Windows Server 2003 32-bit with Service Pack 2 (SP2) or higher—150 MB
•
Windows Server 2003 64-bit with Service Pack 2 (SP2) or higher—200 MB
•
Windows Server 2008 32-bit—150 MB
•
Windows Server 2008 64-bit—200 MB
Drive
•
CD-ROM drive (if installation is done from a CD-ROM)
Display
•
Super VGA (800 x 600) or higher-resolution monitor with 256 colors
Peripherals
•
Modem or Internet connection
•
Microsoft Mouse, Microsoft IntelliMouse, or compatible pointing device
Log In
You must have a valid PRS user account to access the PRS application.
The PRS login is located at https://multifamily-prs.covius.com. On the sign-in screen, enter your supplied
Username and Password.
7 / 38
8 / 38
Upload Files
How to Upload one or more files
To upload one or more Assessment or Attachment files, perform the following functions:
1. On the Main Menu, go to the Upload drop down menu and select "Upload Individual Files".
2. This will open the "Assessments and Attachments" upload page.
3. On the menu, click on the blue UP arrow (Upload Files).
4. The Upload Files window will pop-up.
9 / 38
5. Click "Add..."
6. The Select Files window will pop up.
10 / 38
7. Navigate to the appropriate folder and select the files you wish to upload and click Open. You may
select one or more files for upload.
8. The file(s) you selected will appear in the Upload Files window. If you would like to add more files,
repeat steps 3 through 5. If you would like to clear a file, right-click on that file and select "Clear".
9. Once you are ready to complete the upload, click "Upload".
10. Your documents will be immediately processed by the system.
o If successful, the documents will be immediately moved to the proper Assessment folder and
will not appear on this page.
o If unsuccessful, the files will remain on this page and will be added to the Upload Failures list
(accessible by clicking the "View Upload Failures" button below the document window, which
provides feedback on the reason for failure. Failures must be corrected and re-uploaded.
o In addition, when uploading an AIF form, users may be guided in the Upload failures screen to
check the "Validation Failures" via the following message:
Invalid data found while processing the spreadsheet. Please refer to Validation Failures
list.
o To view a file's specific validation failures, close the "Upload Failures" pop-up screen to return
to the "Assessment and Attachment Uploads" screen
o Then, click the "View Validation Failures" button at the bottom of the screen to pop-up the
validation failures screen:
The Validation Failures screen shows each individual field-level validation that failed while
attempting to upload the AIF form. Users can look at each validation failure and address each
one in their source AIF file, or click the "Output to Excel" button at the top of the Validation
Failures display grid to export all validation failures to Microsoft Excel. Once in Excel, users
can sort/filter as desired, while still addressing each validation failure in their source AIF file.
Once all validation failures are addressed, the file can be re-uploaded via the same procedures
as described above.
11 / 38
Note: For the files to properly process in PRS, the document naming convention must follow the following
rules:
File Type
Document Naming Convention
Notes
Annual Income and Expense
xxxxxxxxx_AIE_Form_MM-DD-YY_S-YYYY.xls
xxxxxxxxx = loan number; MM-DD-YY = due date of financials;
YYYY = Submission Period Year
AIE - Other Attachments
xxxxxxxxx_AIE_Other_MM-DD-YY_S-YYYY.xls
xxxxxxxxx = loan number ; MM-DD-YY = due date of financials;
YYYY = Submission Period Year
AIE - Borrower Operating
Statement
xxxxxxxxx_AIE_FS_MM-DD-YY_S-YYYY.xls
xxxxxxxxx = loan number; MM-DD-YY = end date of statement;
YYYY = Submission Period Year
AIE - Rent Roll
xxxxxxxxx_AIE_RR_MM-DD-YY_S-YYYY.xls
xxxxxxxxx = loan number; MM-DD-YY = date of Rent Roll; YYYY
= Submission Period Year
Quarterly Detailed/Abbreviated xxxxxxxx_QIE_Form_MM-DD-YY_S-YYYYQn.xls
Income & Expense
xxxxxxxxx = loan number; MM-DD-YY = due date of QIE; YYYY =
Submission Period Year; n=Quarter(1,2,3 or 4)
QIE - Other Attachments
xxxxxxxxx_QIE_Other_MM-DD-YY_S-YYYYQn.xls
xxxxxxxxx = loan number; MM-DD-YY = due date of QIE; YYYY =
Submission Period Year; n=Quarter(1,2,3 or 4)
QIE - Borrower Operating
Statement
xxxxxxxxx_QIE_FS_MM-DD-YY_S-YYYYQn.xls
xxxxxxxxx = loan number; MM-DD-YY = due date of QIE; YYYY =
Submission Period Year; n=Quarter(1,2,3 or 4)
QIE - Rent Roll
xxxxxxxxx_QIE_RR_MM-DD-YY_S-YYYYQn.xls
xxxxxxxxx = loan number; MM-DD-YY = Date of Rent Roll; YYYY
= Submission Period Year; n=Quarter(1,2,3 or 4)
Inspection
xxxxxxxxx_Inspection_MM-DD-YY_S-YYYY.xls
xxxxxxxxx = loan number; MM-DD-YY = due date of Inspection;
YYYY = Submission Period Year
Inspection - Other Attachments xxxxxxxxx_ALI_Other_MM-DD-YY_S-YYYY.xls
xxxxxxxxx = loan number; MM-DD-YY = due date of Inspection;
YYYY = Submission Period Year
Inspection - Rent Roll
xxxxxxxxx = loan number; MM-DD-YY = date of Rent Roll; YYYY
= Submission Period Year
xxxxxxxxx_ALI_RR_MM-DD-YY_S-YYYY.xls
Inspection - Photos Attachment xxxxxxxxx_ALI_Photos_MM-DD-YY_S-YYYY
xxxxxxxxx = loan number; MM-DD-YY = due date of Inspection;
YYYY = Submission Period Year
Loan Management
xxxxxxxxx = loan number; MM-DD-YY = due date of LMF; YYYY
= Submission Period Year
xxxxxxxxx_LMGT_MM-DD-YY_S-YYYY.xls
On AIF Assessments if Data Errors were found within the Excel Document an Upload Failure Message of
"Invalid data found while processing the spreadsheet. Please refer to Validation Failures list." will appear.
Navigate to the Validation Failures page to see a list of Data Errors per file uploaded.
12 / 38
How to Upload a Bulk File
To upload a bulk LMF, AIE or QIE file (Excel format), perform the following functions:
1. On the Main Menu, go to the Upload drop down menu and select "Upload Bulk File".
2. This will take you to the Upload Bulk File page.
3. Either enter the file path or click Select and locate your Excel file that is ready for upload. Once you
have entered the path, click Submit.
The filename of any bulk file must begin with one of the following file naming convention prefixes:
a) Bulk_AIE
b) Bulk_QIE
c) Bulk_LMGT
4. The bulk file will upload and you will be provided with a report outlining any errors.
13 / 38
Download Files
Download Blank Templates
To download one or more Assessment or Attachment files, perform the following functions:
1. On the Main Menu, go to the "Download" drop down menu and select "Blank Assessment Templates".
2. The following page will appear with the latest Assessment templates for download.
2. Right-click on the file you would like to download and select Download.
14 / 38
Download Documentation
To download the latest system documentation, perform the following functions:
1. On the Main Menu, go to the "Download" drop down menu and select "Documentation".
2. The following page will appear with the latest system documentation available for download (specific
filenames may vary).
15 / 38
Download Pre-populated Templates
Pre-populated templates can be downloaded from the Due queue menus in the system.
To download an individual assessment:
1.
2.
3.
4.
On the Due queue grids, hover over the row of the particular Assessment
Right-click to open the Context menu
Select "Download Template"
A document interface window will open with the file you've requested ready for download
To download multiple assessments:
1. On the Due queue grids, select the desired Assessments by clicking the check-box next to each
assessment that you'd like to download
2. On the Grid Menu, select "Download Selected Templates"
3. A document interface window will open with the files you've requested ready for download
4. Hold shift and select the requested files, then click the down-arrow to begin the download
16 / 38
Reports
The reports menu shows the list of available reports that can be previewed/printed.
17 / 38
My Account
Change Password
To view or update your User Profile, perform the following functions:
1. On the Main Menu, go to the "My Account" drop down menu and select "Change Password".
2. Enter your current password, and new password twice. Click "Change Password"
Forgotten Password
1.
2.
3.
4.
5.
6.
Go to the Login page
Click Forgot your password?
Enter your username
Click Change Forgotten Password
An email will be sent to the address associated with your account that includes a temporary password.
Use this temporary password to log into the system. If the temporary password is accepted, you will be
immediately asked to provide a new password.
If you have forgotten your username or are unable to access your login page, please contact your
administrator.
18 / 38
Home
S/S Overview
The Seller/Servicer Overview provides a summary of information regarding the Seller/Servicer, including
any current/meaningful system notifications. Click Add New on the respective grid to add new Office
Locations or Contacts.
S/S Pipeline Summary
The S/S Pipeline Summary provides a summary of the Assessment status totals by type, status and
quarter.
In addition to the above, both the AIE and AIF pipelines would be shown below the QIE pipeline
Upload Failures
The Upload Failures page provides a list of uploads that have failed during the upload process, and
includes a description of the error.
19 / 38
Validation Failures
The Validation Failures page provides a list of field-level validations that failed during the AIF form upload
process, and includes a description each validation failure.
Data Warnings
The Data Warnings screen allows Seller / Servicers to view individual file upload warnings generated by the
system due to data discrepancies within the incoming assessment template vs. data that exists in PRS (by
Assessment type). Users have the ability to add comments to a given warning for interaction with Freddie
Mac.
Grid Menu Items (these apply to items selected on the Grid):
1. Output To Excel: Click this button to output the Grid to Excel
2. Add Comments Bulk: Click this button after selecting 1 or more warnings within the grid. Users will be
presented with the following screen to enter a comment to all selected warnings in the "Add Comment"
field:
20 / 38
Context Menu Items (these apply only to a single selected Assessment):
1. View Seller/Servicer Details: Opens a popup with details about the Seller/Servicer, including office
locations and contacts
2. View Loan Details: Opens a popup with details about the Loan with which this Assessment is
associated, including previous Assessments
3. View/Add Comments: Opens the "Comments View/Add" pop-up screen where users can add a
comment to the selected warning
21 / 38
Assessment Queues
All Assessment Queues in the system use the Grid control. Basic functionality of the Grids is described in
the Common Controls section of this User Manual. Functionality specific to each page is described below.
For your convenience, the Assessment Queues are grouped by Assessment Type (All, Loan Management,
Annual I&E, Quarterly I&E and Inspection). The All Assessments queue contains the same assessment
from the subsequent queues.
1. Due: The Due queue includes all Assessments that are Due. This includes assessments that are due,
late, don't have the necessary documentation, have been returned by Freddie Mac and have a Waiver
or Extension request pending with Freddie Mac. The sub-statuses are indicated in the grid.
2. Waived/Suspended: The Waived queue includes all Assessments that have been waived or
suspended by Freddie Mac.
3. Complete: The Complete queue includes Assessments that meet all submission requirements and are
waiting to be finalized.
4. Accepted: The Accepted queue includes Assessments that are being reviewed by Freddie Mac.
These assessments are no longer available for upload.
Due
The Due queue includes all Assessments that are Due. This includes assessments that are due, late, don't
have the necessary documentation, have been returned by Freddie Mac and have a Waiver or Extension
request pending with Freddie Mac. The sub-statuses are indicated in the grid.
22 / 38
Grid Menu Items (these apply to items selected on the Grid):
1. Download Selected Templates: To download multiple pre-populated templates, Select the
Assessments using the checkbox, click the Download Assessment Templates and PRS will place a
pre-populated version of the selected templates in a Document Interface popup window. To download
these files as a zip, selected all files, right-click and select "Download as Zip".
2. Due Date Change Request If you would like to simultaneously request Due Date Change for multiple
Assessments: Select the Assessments using the check-box, click "Due Date Change Request",
complete the popup. For date change request, enter the requested date and the justification in the
comments section and click "Submit". Freddie Mac will review the request and approve or deny the
request.
3. Request Waiver for Selected: If you would like to simultaneously request a waiver for multiple
Assessments: Select the Assessments using the checkbox, click "Request Waiver for Selected",
complete the below pop-up by selecting the reason and entering comments for waiver, then click
Submit.
23 / 38
4. Output To Excel: Click this button to output the Grid to Excel
Context Menu Items (these apply only to a single selected Assessment):
1. View Loan Details: Opens a popup with details about the Loan with which this Assessment is
associated, including previous Assessments
2. Download Template: To retrieve a pre-populated template for this Assessment, click this button and
PRS will place the pre-populated version of the selected templates in a Document Interface popup
window. To download this file, right click on it and select "Download".
3. View Form. To view the form on-screen, click View Form. This will open a popup window with the
associated Assessment. Note: The AIF form cannot be viewed on-screen due to the size of the form.
4. View Documents: Provides a popup with a Document Interface window to the documents
(Assessments and Attachments) for the Assessment. You cannot upload documents directly to this
page, all uploads should be done through the Upload: Upload Individual Files item on the Main Menu.
5. Due Date Change Request: If you would like to request a due date change for this Assessment: Click
"Due Date Change Request", complete the pop-up and click Submit (sample shown above).
6. Request Waiver for Selected: If you would like to request a waiver for this Assessment: click "Waiver
Request", complete the pop-up and click Submit (sample shown above).
24 / 38
Waived/Suspended
The Waived/Suspended queue includes all Assessments that have been waived or suspended by Freddie
Mac.
Grid Menu Items (these apply to items selected on the Grid):
1. Download Selected Templates: To download multiple pre-populated templates, Select the
Assessments using the checkbox, click the Download Assessment Templates and PRS will place a
pre-populated version of the selected templates in a Document Interface popup window. To download
these files as a zip, selected all files, right-click and select "Download as Zip".
2. Output To Excel: Click this button to output the Grid to Excel
Context Menu Items (these apply only to a single selected Assessment):
1. View Loan Details: Opens a popup with details about the Loan with which this Assessment is
associated, including previous Assessments
2. Download Template: To retrieve a pre-populated template for this Assessment, click this button and
PRS will place the pre-populated version of the selected templates in a Document Interface popup
window. To download this file, right click on it and select "Download".
3. View Documents: Provides a popup with a Document Interface window to the documents
(Assessments and Attachments) for the Assessment. You cannot upload documents directly to this
page, all uploads should be done through the Upload: Upload Individual Files item on the Main Menu.
25 / 38
Complete
The Complete queue includes assessments that have meet all submission requirements and are waiting to
be processed. At this point, PRS holds the Assessment files for 5 business days before Accepting in order
to allow Seller/Servicers the opportunity to provide any updates or make any corrections.
Grid Menu Items (these apply to items selected on the Grid):
1. Download Selected Templates: To download multiple pre-populated templates, Select the
Assessments using the checkbox, click the Download Assessment Templates and PRS will place a
pre-populated version of the selected templates in a Document Interface popup window. To download
these files as a zip, selected all files, right-click and select "Download as Zip".
2. Output To Excel: Click this button to output the Grid to Excel
Context Menu Items (these apply only to a single selected Assessment):
1. View Loan Details: Opens a popup with details about the Loan with which this Assessment is
associated, including previous Assessments
2. Download Template: To retrieve a pre-populated template for this Assessment, click this button and
PRS will place the pre-populated version of the selected templates in a Document Interface popup
window. To download this file, right click on it and select "Download".
3. View Form. To view the for on-screen, click View Form. This will open a popup window with the
associates Assessment.
26 / 38
4. View Documents: Provides a popup with a Document Interface window to the documents
(Assessments and Attachments) for the Assessment. You cannot upload documents directly to this
page, all uploads should be done through the Upload: Upload Individual Files item on the Main Menu.
Accepted
The Accepted queue includes Assessments that are being reviewed by Freddie Mac. Document uploaded
to these assessments is not available and will fail. If you need to re-upload a file to any Assessment in the
Accepted queue, please contact your Freddie Mac representative.
Context Menu Items (these apply only to a single selected Assessment):
1. View Form. To view the form on-screen, click View Form. This will open a pop-up window with the
associated Assessment.
27 / 38
Loan Details
Loan Details
Loan Details provides information regarding the loan. Data on this page is being populated from the
Population File.
Upon opening the Loan Details screen, users can view details for individual LMF, AIE, QIE, and AIF
records. In addition, users can view the activity (i.e., Due Date changes, Waiver requests, and
suspensions) that's occurred on the selected loan.
28 / 38
Assessment Details
LMF Details, AIE Details, QIE Details and AIF Details pages include the following sections:
- Overview section: Data from the Population upload
- Forms: List of forms for this Assessment
Example:
Activity
Summary of Waiver, Suspension, and Due Date Change Requests for this particular assessment are listed
on this page.
29 / 38
Common Controls
Grids
Many screens in PRS are grid based that include similar functionality. This functionality is enabled as
needed on each grid and is not be available on all pages depending on required functionality. This
section reviews the basic functionality of the grids that applies across the system.
Sorting
If sorting is enabled, users are able to sort the grid by any column by clicking on the column header.
The sorting function toggles between three modes:
• ascending
• descending
• no sort
Some grids have a default sort enabled and the user is able to override this default by clicking the header
to sort by a different column. If the user leaves the page and returns, the grid will return to the default sort.
Filtering
When filtering is enabled, a filtering item appears below the column header. The user can enter a filter
criterion in the filter box. A drop-down list allows the user to select a filter expression that is applied to the
criterion for the column. When the user presses the filter button (next to the filter box), the grid displays only
the records matching the filter criteria specified using the filter boxes:
All filters in a single table are applied using AND operator. That is, only items (grid rows) that comply with
all filters are displayed.
30 / 38
Note: When you have more than one value to filter on, values should be entered separated by a space.
Grouping
If enabled on the grid, the grid can be grouped based on the value of a particular column. Users can also
have multilevel grouping based on different criteria. To facilitate grouping, a special area called the
GridGroupPanel will be displayed at the top of the grid to display the grouping options.
When a table is grouped, all group fields appear in this group panel as elements with an icon that indicates
the sort order. To remove a field from the grouping, click the "X". To change the sort order of the
grouping, click the down-arrow in the GridGroupPanel for that item.
31 / 38
To add fields to the grouping, drag the header into the GridGroupPanel:
Some grids have a default grouping enabled and the user is able to override this default by adding or
removing items to the GridGroupPanel. If the user leaves the page and returns, the grid will return to the
default grouping.
Row Selection
Selecting a Row with a Click
Users can select a single data row in the grid by left clicking anywhere within the row:
32 / 38
Selecting a Row with a Checkbox
If available, users can select one or more data rows in the grid by clicking the checkbox within the
row:
Context Menu
The Context Menu or Right-click Menu is used to perform an action on a single record. While hovering
over a row on a grid, click the right button on the mouse to bring up the Context menu. The Context Menu
offers a limited set of choices that are available in the current state, or context, of the items on the grid.
Grid Menu
The Grid Menu is used to perform an action on multiple records. To select multiple rows, check the box on
the left side of each row. To perform an action on these rows, click the appropriate button on the Grid
Menu.
33 / 38
Document Interface
PRS utilized a standard document interface to manage all document repositories within the system. The
basic functionality includes the following:
Menu Items: Up One Level, Create New Folder, Download and Upload
Left Panel: Tree view showing the folder structure
Main Window: Listing of documents in the repository
Upload Files
1. On the menu, click on the blue UP arrow (Upload Files).
34 / 38
2. The Upload Files window will pop-up.
3. Click "Add..."
4. The Select Files window will pop-up.
35 / 38
5. Navigate to the appropriate folder and select the files you wish to upload and click Open.
6. The file(s) you selected will appear in the Upload Files window. If you would like to add more files,
repeat steps 3 through 5. If you would like to clear a file, right-click on that file and select "Clear".
7. Once you are ready to complete the upload, click "Upload".
8. If successful, your document will appear in the Document Interface.
36 / 38
Excel Assessment Templates
The Assessment forms are in Microsoft Excel 2003 format and can be downloaded via the
Download menu from within PRS (http://multifamily-prs.rrd.com/). Once downloaded, users must
enable Macros in Excel for all validations and conditional formatting to work properly (see
instructions for Excel 2007 here: http://office.microsoft.com/en-us/help/enable-or-disable-macrosin-office-documents-HA010031071.aspx). Assessments are to be completed and stored on your
local machine, file server, or document management system (depending upon local IT policies
and procedures). Upon successful completion and validation that all fields have been correctly
entered by the user, the Excel Assessment file will indicate a status of “Complete” on the
Progress Bar (as shown below).
Once the status of the Assessment form indicates “Complete”, the completed form can be
uploaded into the PRS system, where any Assessment(s) with a status of “Incomplete” will be
automatically “Rejected” by the system, for the user to correct any critical issues.
Additional Excel Functionality
The following validation functionality is included in each Excel version of the Assessment file
(except for the AIF form):
Name
Progress Bar
Required
Field
Validate
Clear
Answers
Show Errors
Hide Error
Description
Indicates % of required fields that are complete. PRS will not accept
incomplete assessments.
Red outline on field indicates a response is required. Once data is entered into
the field, the red outline is removed. Please note that the requirement criteria
for certain fields is dependent on the response to other questions and will
automatically change based on those responses.
Runs the field formatting validation
Delete all data on the worksheet
Shows all Errors on a worksheet. This is helpful if there are incomplete fields
or other errors that are hard to find with the red outline indicator.
Hides all Error comment boxes on a worksheet.
37 / 38
Example
Upload Criteria
Checklist for successful upload of an Assessment form to PRS:
1.
File Name in one of the following formats:
Loan Management: [Freddie Mac Loan No]_LMGT_MM-DD-YY
Annual Operating Statement: [Freddie Mac Loan No]_ AIE_Form_MM-DD-YY
Quarterly Operating Statement: [Freddie Mac Loan No]_ QIE_Form_MM-DD-YY
Property Inspection: [Freddie Mac Loan No]_Inspection_MM-DD-YY
2.
All Required Fields are complete, as indicated on the Progress Bar in the Excel file for the AIE,
QIE, and LMF forms and/or no validation errors noted on-screen during submission of an AIF
form.
3.
Version is active in PRS
4.
Freddie Mac Loan number is available in PRS
5.
Effective Period is available in PRS
38 / 38