1
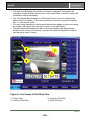
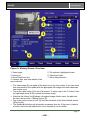
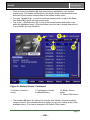
Rev: 1.0
L-3 Mobile-Vision
AlertVU Mobile
User Manual
Confidential
This document is the sole property of L-3 Mobile-Vision, Inc.
It is for the exclusive use of L-3 Mobile-Vision, Inc. and its customers.
- 18731 -
User Manual
AlertVU
1.0 Contents
1.0 Contents ...................................................................... 2
2.0 INTRODUCTION ......................................................... 3
2.1 Conventions used in this document ......................... 3
2.2 Companion Programs for L3 AlertVU Mobile ........... 4
3.0 GETTING STARTED ................................................... 5
3.1 Log on ...................................................................... 5
3.2 Touch Screen ........................................................... 5
4.0 USER INTERFACE ..................................................... 6
4.1 Login Screen ............................................................ 6
4.2 Live Screen .............................................................. 7
4.3 History Screen........................................................ 10
4.4 Hotlist Screen ......................................................... 17
4.5 The Check Screen ................................................. 22
4.6 Manual Screen ....................................................... 23
4.7 Alarms Screen........................................................ 25
4.8 Camera Screen ...................................................... 27
4.9 Session Dialogue ................................................... 28
5.0 APPENDIX................................................................. 29
5.1 Troubleshooting ..................................................... 29
5.2 Glossary ................................................................. 30
Page 2
- 18732 -
User Manual
AlertVU
2.0 INTRODUCTION
L3 AlertVU Mobile is one in a range of leading edge products designed for Microsoft
Windows™.
L3 AlertVU Mobile is an (normally for use on Laptops with Touch Screens) ALPR
(Automatic License Plate Recognition) system, allowing you to keep track of vehicles.
Once installed and running, you will have the ability to connect live video input to your
system and carefully monitor vehicle movements with the use of L3 AlertVU Mobile.
Each vehicle’s license plate which is captured will be saved to a history file along with
the date and time of capture, camera details, and images will be stored to disk for
retrieval. Later, an administrator can obtain and manipulate this database of images,
analyzing for records using a wide range of search methods, including searches made
with only partial criteria.
The L3 AlertVU Mobile system has visual screen alert and audible alert tones – to
inform you of any vehicles entering the camera’s field of view which are Wanted. This is
done via the use of Hotlists; i.e. the system will re-act to pre-configured alarm events
which it obtains from an Administrator or back office system. You may also write to your
own Manual Hotlist in order to keep track of real-world current-session happenings.
2.1 Conventions used in this document
As L3 AlertVU Mobile is normally used with a Touch Screen, this mode is assumed
throughout. The words ‘tap’ as in ‘tap on the screen’ (with a finger) means the same as
‘click’ as in ‘mouse click’ would do on a desktop system.
The terms Window, Screen and Page refer to full screen or non-full screen
dialogues/interfaces that come up during use of the software at various times.
The figures (screen-shots) show different skins. The default skin is called Blue.
The terminology Number Plate, License Plate and just Plate mean the main identifying
plate of the vehicle that the ALPR system finds and recognizes.
History, History lists. Hits, Matches, etc refer to an event or sequences of events. Each
event is an image capture of a live passing vehicle. Each event is not necessarily an
actionable incident depending on circumstances or the information in a Hotlist.
Importable Hotlists are obtained pre-configured and unalterable from a central authority
or database.
Page 3
- 18733 -
User Manual
AlertVU
Use of actual license plates and vehicle pictures within this document is of random
events only, captured in the course of development/test of cameras or of the
software. No actionable incident is ever involved or implied. Alarms, text entries and
Hotlists seen in any screenshot are for example purposes only and are entirely
fictitious.
2.2 Companion Programs for L3 AlertVU Mobile
•
•
L3 AlertVU Mobile Administrator – Administrators log into this part of L3 AlertVU
Mobile to add/change users and Hotlists.
L3 AlertVU Review – The ALPR back office software. Allows fast, easy searching of
history files based on full/part plates, time & date ranges, etc.
Page 4
- 18734 -
User Manual
AlertVU
3.0 GETTING STARTED
3.1 Log on
•
•
Your Administrator should have supplied you with a username and password.
Please do not use blank passwords, particularly for administrators.
Some police forces may use the officer’s own unique ID, as a username.
3.2 Touch Screen
•
•
•
L3 AlertVU Mobile is designed to be used with a Touch Screen, therefore users
should just tap on the screen to select items, tap on navigation buttons to change
screens, and write text using the on-screen keyboard.
Most button presses need only one tap. Double-taps are needed to view images full
screen and to sometimes to act on events.
Users may keep their finger in contact with the screen and then slide up and down to
move up and down lists.
Figure 1: On-screen Keyboard Screen
1. Text entry box
2. Keyboard buttons
3. Symbol button
4. Alphanumeric button
5. Next Field button
6. OK (Exit button)
Page 5
- 18735 -
User Manual
AlertVU
•
•
•
•
•
•
Tap on any text entry box (including the Username and Password Login boxes) and
the On-Screen keyboard will come up.
Your text appears in the text entry box (1) as you use the keyboard buttons (2) to
type.
Choices of other characters (e.g. brackets, punctuation marks) are available by
tapping the Symbol button (3).
An Alphanumeric alternative to the QWERTY keyboard is available by tapping the
Alpha button (4).
Once finished typing, you can often jump to the next piece of input the system
expects by using the Next Field button (5), (e.g. when in the ‘Manual Screen’).
Tap on OK (6) when finished to return to the L3 AlertVU Mobile screen.
4.0 USER INTERFACE
4.1 Login Screen
•
•
•
•
You must log onto L3 AlertVU Mobile before use. If Windows is opening L3 AlertVU
Mobile for the first time since power up, please wait (for no longer than one minute)
while the ALPR detect engine. On subsequent launches of the software, it will be
quicker.
If you see any messages about Dongles, e.g. ‘Please insert a Dongle....’ or ‘An
Imprint Dongle has been detected...’, please make sure that the USB dongle key is
plugged into the USB port on your computer.
Log in with a tap on the ‘Warrant number’ or ‘Username’ Input box, this will bring up
an Onscreen keyboard.
You may use the ‘Next Field’ button in the On-screen keyboard to expedite logging
in.
Page 6
- 18736 -
User Manual
AlertVU
Figure 2: Login Screen
•
•
•
•
•
Input your unique login ID.
Likewise, input your password.
Tap the Login button to log in.
Should you input the wrong username or password, an error message box will pop
up.
Beware, when trying again, that there is a limited number of login attempts allowed.
4.2 Live Screen
•
•
The first screen L3 AlertVU Mobile shows is the Live Screen. In this you should see
one or more Video boxes and a History list. The History list will show the events as
they happen, and earlier ones.
Toolbar buttons allow navigation to other screens/windows, see Figure 3.
Page 7
- 18737 -
User Manual
AlertVU
1
2
3
6
4
5
Figure 3: Live Screen
1. Current View
2. Video box
•
•
•
•
•
3. History list
4. Plate patch
5. Plate text
6. Total reads
Tap on Current View (1) to see a still image (note the change from ‘ALPR Live’ to
‘Still Image’). You will not see live video until you tap on ‘Current View’ (1) again. As
new events occur, they will be shown, as still images.
Tap on the Video box (2) to see that image full screen. To return, tap on the ‘X’
button in the top right hand corner of the resultant full screen image.
Note that the History List (3) shows 3 things: a thumbnail image of each event, the
plate text, and the time.
Double-tap on an event in the History list to jump to the History screen for more
extensive viewing of that, and other, events.
The plate patch (4) shows the best image the system used to read the plate.
- 18738 -
User Manual
AlertVU
•
•
•
•
The plate text (5) displays the system conclusion it calculated. The system will
sometimes not be accurate with very far or very close Plates, however. Position the
surveillance vehicle accordingly.
The Total Reads (6) will change to a ‘Show Last’ button if you have selected an
earlier event in the history. Tap on this new button to return to normal and see the
last, i.e. most recent, event.
You may Jump (navigate) to other screens/windows by tapping on any button along
the toolbar. Just tap on the Live button to return to this start screen.
The plate patch and the plate text will not show new details until updated when
another event occurs. (Do not worry if you see the patch and the plate but with no
car, that car is now in ‘history’).
8
7
9
10
Figure 4: Live Screen in Film-Strip View
7. Current View
8. Camera in Film Strip
9. Camera in Film Strip
10.Cycle All button
Page 9
- 18739 -
User Manual
AlertVU
•
•
•
•
•
•
•
•
•
If L3 AlertVU Mobile has two or more cameras, then it there will be an option to be
set up in ‘Film-Strip’ View. This can be done by going into the L3 AlertVU Mobile
Administrator and on the General tab checking the option “Use Film Strip view on
Live page”
One camera has the focus of attention in center-screen (7), and any other cameras
appear in a Vertical Film-strip bar to the left (8), (9).
All the events will still appear in the History list.
If you wish to make another camera appear center-screen, then tap on its film-strip
video box (8) or (9), and the cameras will swap places.
Tapping on the Cycle All button (10) will cause all video boxes to go into ‘still’ mode.
Still mode cycles to the latest event. As new events occur, they will replace the
previous one, as a still image.
Tap on the ‘Cycle All’ button (10) again to return to live video.
If a camera is unchecked in the Camera screen, it will not appear in the Live screen.
The Camera Toolbar-button only appears if you have more than one camera.
4.3 History Screen
•
•
In this you should see one Video box, the Events Details text box, and a large
History list. It will show the last, i.e. most recent, events, from all active cameras.
This History list will only show the events that have occurred since the software
started, until you change the length of viewable history (this is configured in the
Search Filter window, see below).
Page 10
- 18740 -
User Manual
AlertVU
Figure 5: History Screen: Overview
1. Video image
2. History list
3. Event Details text box
4. Camera, time, and other details of the
event selected
•
•
•
•
•
5. The selected (highlighted) event
6. Show Last button
7. Add to Manual button
The video image (1) is a repeat of the same box in the Live screen. If you have more
than one camera it will update with the appropriate still image from each camera as
new events occur.
Tap on the video image (1) to see it full screen. To return, tap on the ‘X’ button in the
top right hand corner of the resultant full screen image.
Note that the History list (2) shows a thumbnail image of each event, the plate text,
the time, and an extra ‘+ Manual’ button (7).
Tap on an event to show its ‘still’ (1) and view its details in the Event Details section
(3) on the left.
The Details (4) include such information as camera, time etc. If the event is listed in
a Hotlist, some text will indicate this. Here, the plate is not in a hotlist.
Page 11
- 18741 -
User Manual
AlertVU
•
•
•
Once an event is highlighted (5), that event will stay highlighted, even as other
events occur. This means that the history list will get longer underneath that event
while this History screen concentrates on the human-chosen event.
You may Tap and Drag... to scroll to see these newer events, or tap on the Show
Last button (6) to get to the most recent event.
Tap on the ‘+ Manual’ button (7) to jump to the manual screen and create notes
about the highlighted event. (If the event has a red font then it already has notes or
is on a Hotlist, you may still edit it).
Figure 6: History Screen: Continued
8. Number of events in
history
•
9. Type/length of events
in viewable history
10. Mosaic Screen
button
11. Search Filter button
The numbers (8) above the History list show the total number of events currently
shown in history. If the second number is higher, you are only looking at part of the
available history. (This can be changed in the Search Filter screen).
Page 12
- 18742 -
User Manual
AlertVU
•
•
•
•
The text (9) above the History list shows the type and/or length (longevity) of events
currently shown in history; in this case ‘All current events’ means all events ’This
session’ (i.e. since logon).
Alternatives are Today, Last 7 days, Last 30 days, Entire History, etc.
Tap on the Mosaic button (10) to obtain an alternate view of history.
Tap on the Search Filter (11) button to do a search, or to alter the criteria for which
events appear in the History list.
Figure 7: Mosaic Screen
1. Thumbnail view of an
event
•
•
•
2. Thumbnail view of the
most recent event
3. Tap and Drag... to
Scroll
The Mosaic Screen is a quick, visual, way to scan through the History list when you
are looking for a particular event.
Tap on the Thumbnail (1) of any event to jump to that event in the History Screen.
This is the same as if you had selected that event in the History list.
The most recent event will appear at the bottom of the Mosaic Screen (2).
Page 13
- 18743 -
User Manual
AlertVU
•
•
You may move up or down the Mosaic history using the ‘Tap and Drag... to Scroll’
(3) method; a very quick drag (or flick) allows accelerated vertical movement through
the mosaic of thumbnails.
To return to the normal History screen just tap on any event’s thumbnail (you could
then tap on the Show Last button so that you don’t get lost).
Figure 8: Search Screen
1. Toggle through
different time periods
2. Current selected time
period
3. Input box
•
•
•
•
•
4. Hits: Search for any
vehicle
5. Hits: Search for any
hit
6. Jump back to the
Hotlist screen
7. OK button
8. Reset All to Default
button
The default Time Period (2) is ‘This Session’. This will show all events since you
logged in to L3 AlertVU Mobile.
Toggle to Today. This will show all events since midnight.
Toggle to Last 7 Days. This will show all events for the past week.
Toggle to Last 30 Days. This will show all events for the past month.
Toggle to Entire History. This will show all events ever seen (that have not been
deleted).
Page 14
- 18744 -
User Manual
AlertVU
•
•
Toggle to Custom. This will show a new Choose button. Tap on this to select an
exact time/date period via the Calendar screen.
The Toggle process is a cycle; it will return to This Session then step through them
all again.
Conducting a Search:
• In the Search for Plate input box (3), tap in (using the Touch Screen keyboard) part
or all of a plate number you are interested in.
• Be aware that searching using only a few characters may return a large number of
results!
• Use the Any Vehicle button (4) to find a match with any event that the camera has
seen.
• Use the All Hits button (5) and find a hit with any event that coincided with a Hotlist.
• Any hits would have caused an Alarm.
• Use the Hotlist Filter button (6) to jump to the ‘Hotlist Screen’ and change which
hotlist/s will be used for the search.
• When ready, tap on the OK button (7). It will jump back to the History screen and
show you the results.
• To go back, i.e. return the History list to normal, tap on the Reset All to Default
button (8).
• Alternatively, tap on Cancel to start your selection over.
Page 15
- 18745 -
User Manual
AlertVU
Figure 9: A Sample Search
9. Type/length of Events
in History
•
•
•
•
•
10. The Cancel Filter
button
This composite picture shows the Search screen and, beneath it, the results it got in
the History Screen.
In this example, 2 hits were obtained.
The text above the History List (9) confirms what search parameters you were using.
If you see the Cancel Filter button, you know you are in a Search because this is
normally the Show All button.
To go back to normal, i.e. return the History list to ‘This Session’, tap on the Cancel
Filter button (10).
Search for all Hits/Events that caused an Alarm
• Leave the Search for Plate input box blank.
• Tap on All Hits.
• Choose what hotlists should be used in this search with the Hotlist Filter button.
• Choose what time period should be used in this search with the Time-Period button.
• Tap OK.
• It will jump back to the History screen and show you the results.
Page 16
- 18746 -
User Manual
AlertVU
Figure 9: Choose button & Calendar screen
11. The Choose button
•
•
•
•
•
•
•
•
•
•
•
12. The Calendar screen
13. The OK button
The Calendar screen only appears if you tapped the Choose button (11) (which
appears when you start a custom search).
All buttons in the Calendar screen (12) cycle by toggling through
date/month/year/hours/minutes.
The Days buttons increment each figure separately, i.e. you have to adjust the ‘tens’
and then the ‘units’.
Make sure the start day is less than the end date!
The Month buttons cycle between all 12 months.
The Year buttons cycle between years.
The Hours buttons increment in a 24-hour clock cycle.
The Minutes buttons cycle in 10 minute increments.
Make sure the start time is less than the end time!
Tap on the OK button (13) to return to the search screen and conduct the search.
Alternatively, click on Cancel to start your selection over.
4.4 Hotlist Screen
•
•
•
•
The Hotlist screen is the only screen with tabs, i.e. it is split into 3 parts:
The Manage tab shows all currently available Hotlists, brief information about them,
and whether they are in use or not.
The Import Tab shows all Hotlists ready to be added (i.e. ‘imported’) for use with L3
AlertVU Mobile.
The Delete Tab shows all hotlists ready to be deleted (when obsolete).
Page 17
- 18747 -
User Manual
AlertVU
4.4.1 Hotlists
• A Hotlist is a computer file containing lists of plates that are suspect or wanted by
police forces and perhaps other authorities. There may be several hotlists being
used at the same time.
• L3 AlertVU Mobile uses hotlists to generate a warning (alarm) to officers when a
passing plate matches an entry in any loaded hotlist.
• L3 AlertVU Mobile systems connected to BOF services usually have their hotlists
managed remotely. However, it is still useful to see what hotlists are being used.
Figure 10: Hotlist Screen: Manage
1. Alarm column check
box
2. Priority column slide
Indicator
•
•
•
3. Hotlist Name column
4. Updated column
5. Select All button
6. Deselect All button
7. Fuzzy button
8. Save button
In the Alarm column you may check (1) or uncheck each hotlist, causing it to be
used or not used. A hotlist with a check next to it will cause an alarm when L3
AlertVU Mobile sees any plate in the list.
If the acronym BOF appears in the check box, then that hotlist was imported from
BOF.
In the Priority column you may toggle (2) the priority (i.e. importance) of that Hotlist.
Page 18
- 18748 -
User Manual
AlertVU
•
•
•
•
•
•
•
•
•
•
The different priorities are: Low (Green): Medium (Yellow): High (Red): Critical
(Crimson). BOF hotlists come with their own priority.
Each hotlist has a unique name (3). You may have to use the ‘tap and drag’ scrolling
method to see all the hotlists.
Note that the top hotlist is always the Manual hotlist.
The time and date of creation import of the hotlist is shown in the Updated column
(4).
Tap on the Select All button (5) to put a check next to all hotlists.
Tap on the Deselect All button (6) to un-check all hotlists.
The Fuzzy button (7) changes the accuracy (fuzziness) of Plate searching/matching.
The default is 1 (see the Glossary for an explanation of fuzziness).
Large fuzzy numbers will cause miss-hits, please try and always have 0 or 1 as the
fuzzy number.
If you have made changes to the hotlists, the Save button (8) will be highlighted. Tap
on Save to activate the new configuration of Hotlists.
Alternatively, click on Cancel to start your selection over.
Figure 11: Hotlist Screen: Import
1. Select column Check
box
2. Hotlist Name column
3. Select All button
4. Rescan button
button
5. Import
Page 19
- 18749 -
User Manual
AlertVU
•
•
•
•
•
•
•
•
In the Select column you may check (1) or uncheck each Hotlist. A Hotlist with a
check next to it will be imported, that is, saved locally and checked against for
vehicles.
Note that Hotlist names (2) can be .txt, or .csv files.
The Select All button (3) puts a check in all the hotlist boxes for you, the Deselect All
button removes all the checks.
Tap on the Rescan button (4) to refresh the list of available hotlists.
The import of hotlists will not actually occur until you tap on the Import button (5).
You should then receive a message telling you how many hotlists/plates have been
imported.
The Hotlists should then appear in the Manage tab.
Alternatively, tap on Cancel to start your selection over.
Note that any BOF services that L3 AlertVU Mobile is/has connected to may have
imported Hotlists for you.
Figure 12: Hotlist Screen: Delete
1. Select column Check
box
•
2. Hotlist Name column
3. Select All button.
4. Deselect All button.
5. Delete button.
In the Select column you may select or unselect (1) each Hotlist. A Hotlist with a red
X next to it will be deleted.
Page 20
- 18750 -
User Manual
AlertVU
•
•
•
•
•
•
Information will be lost if you delete a Hotlist.
The list of Hotlists appears here (2).
The Select All button (3) puts an X in all the Hotlist boxes for you; All the Hotlists will
be deleted.
The Deselect All (4) button removes all the X’s.
The deletion of hotlists will not actually occur until you tap on the Delete button (5).
Alternatively, tap on Cancel to start your selection over.
Figure 13: Leaving the Hotlist Screen
1. Save – Import –
Delete button
•
•
•
•
2. Continue Editing
button
3. Hotlist Toolbar button
If you are editing something in one of the Hotlist screens and you suddenly need to
jump to another screen, a warning dialogue window will pop up.
The left-hand button (1) will make the changes you selected so far, then ‘jump’ you
to where you wanted.
Information will be lost if you delete a Hotlist.
The right-hand button (2) will cancel the jump and take you back to the Hotlist tab
you were working in.
Page 21
- 18751 -
User Manual
AlertVU
•
•
•
Alternatively, just ignore the warning dialog by tapping again on the same Live,
History, Manual,etc button you already just tried jumping to.
In this case, the Hotlist button (3) will now have an asterisk as a reminder that you
have unsaved changes in one of the Hotlist tabs.
Come back later to that Hotlist tab and finish editing.
4.5 Check Screen
•
•
The Check screen has an Input Plate box, a Check button and an Output box.
It is used to check any plates against the BOF (if a connection is setup and
available). Otherwise, it searches the local hotlists.
Figure 14: Check Screen
1. Plate Input box
2. Check button
•
3. Reference
4. Details
5. More Detail
If you want to check a vehicle, type the plate number in the Plate input box (1).
Page 22
- 18752 -
User Manual
AlertVU
•
Tap on the Check button (2), the results will appear in the large output box as
follows:
1. The reference source of the details (3).
2. Any details about the car (4).
3. More details, e.g. Insurance (5), if available.
4.6 Manual Screen
•
•
The Manual screen can be thought of as the manual hotlist area; you may create
your own hotlist, see its entries and edit and delete them.
The Manual hotlist is not transferable between computers. It is ideally used as either
a list of events or notes used on a per-session basis, or could be an emergency
temporary hotlist.
Figure 14: Manual Screen
1. Plate text Input box
2. Priority button
3. The Description Text
box
4. Save button
5. Add button
6. An Entry
7. Edit button
8. Delete button
Page 23
- 18753 -
User Manual
AlertVU
To create a Manual Hotlist entry:
1. Enter the license plate in the Plate text input box (1). (If this box still shows the
last entry, tap on the Add button).
2. Assign a priority to the Entry by toggling through Low: Medium: High: Critical (2).
3. Enter some descriptive text (3).
4. The Save button (4) will not be highlighted until some descriptive text is written.
5. Tap on the Save (4) or Add (5) buttons to save the new entry, it should appear in
the entry box (6).
6. Highlight an Entry (6) by tapping on it to see the full descriptive text in the
Description text box (3).
7. You may edit an entry by highlighting it with a tap then tapping the Edit button
(7).
8. You may delete an entry by highlighting it with a tap then tapping the Delete
button (8).
9. By tapping the Next Field button in the On-screen Keyboard you may jump from
the Plate text to the Description text box.
Figure 15: Leaving the Manual Screen.
1. Finish Now button
•
•
•
•
•
•
2. Finish Later button
.
If you are editing something in the Manual screen and you suddenly need to jump to
another screen, a warning dialog window will pop up.
The left-hand button (1) will make the changes you selected so far, then jump you to
where you wanted.
Information will be lost if you delete an entry.
The right-hand button (2) will cancel the jump and take you back to the event you
were working on.
Alternatively, just ignore the warning dialog by tapping again on the same Live,
History, Hotlist button you already just tried jumping to.
In this case, the Manual button in the toolbar(3) will now have an asterisk as a
reminder that you have unsaved changes in one of the Manual hotlist entries.
Page 24
- 18754 -
User Manual
AlertVU
4.7 Alarms Screen
•
•
•
•
An Alarm is an event which triggers a response from L3 AertVU Mobile because it is
a match to a hotlist.
The vehicle involved is on a Hotlist or manual Hotlist. The system will alarm with a
sound.
The Alarm toolbar button will highlight, and all screens will be alerted by a flashing
border.
Therefore, should an alarm occur, tap on the Alarm toolbar button to take
appropriate action.
Figure 16: Alarms Screen
1. Text box title
2. Text box
3. Previous button
•
•
4. Next button
5. Dismiss button
6. Dismiss All button
7. Flash border
8. Mute toolbar button
The information at the top of the screen shows the number of current Alarms (1),
(here there is only one alarm).
The details of the alarm appear in the Alarm Details section (2). Camera, time, hotlist
and description details are presented.
Page 25
- 18755 -
User Manual
AlertVU
•
•
•
•
•
•
•
•
•
Tap on the Previous button to see older alarms (3).
Tap on the Next button to see newer alarms (4).
Tap on the Dismiss button (5) to cancel the currently viewed alarm.
Tap on the Dismiss All button (6) to cancel all alarms.
A border (7) will flash in all screens to remind you that there is an alarm.
The flashing will continue until all alarms are dismissed.
A cancelled, or dismissed, alarm is not forgotten about; it will appear in the history
list in a red font.
An alarm will have caused a ‘Hit’. You can search for hits in the Search screen.
Tap on the Mute toolbar button (8) to stop the alarm sound. (All subsequent L3
AlertVU Mobile sounds are muted while this button has a red font).
Page 26
- 18756 -
User Manual
AlertVU
4.8 Camera Screen
Figure 17: Camera Screen
1. Camera box
•
•
•
2. Selection text
3. Save button
Each installed camera will be represented by its own box(1) with a check mark. You
can tap on each box to disable the camera. A disabled camera will have a red ‘X’.
Only currently enabled cameras will be listed in the main part of the screen (2).
Tap on the Save button to save any changes. Only the cameras enabled will appear
in the Live screen.
Leaving the Camera Screen
• If you are editing in the Camera screen and you suddenly need to jump to another
screen, a warning dialog window will pop up.
• The choices are similar to leaving other screens.
• In this case, the Camera toolbar button will now have an asterisk as a reminder that
you have unsaved changes in your selection of cameras.
Page 27
- 18757 -
User Manual
AlertVU
4.9 Session Dialogue
• The Session toolbar button does not bring up a new
screen, but a stack of buttons:
Figure 18: The Session buttons
1. Skin button
2. Blackout button
3. Logoff button
• Change skin (1). The default skin is Blue, standard
skins are Night, Red and Yellow. Other custom skins may
appear.
• Blackout the screen temporarily (2) to briefly hide the
screen from inquisitive eyes. Tap anywhere on the screen
to cancel and return to L3 AlertVU Mobile.
• Exit L3 AlertVU Mobile (3) via the Logoff screen.
Figure 19: Logoff button
1. Exit button
2. End Shift button
3. Login button
•
•
•
You may be required to login first (3) before logging off! This ensures that only
persons with the correct credentials can stop the system.
You may be required to End Shift first (2) before logging off! This helps BOF
recognize a shift or user change.
Exit by tapping the Exit button (1). This will shutdown the system on most L3 AlertVU
Mobile systems for security reasons
Page 28
- 18758 -
User Manual
AlertVU
5.0 APPENDIX
5.1 Troubleshooting
The following pages categorizes common problems, if, after checking these lists, you
still have problems, please contact L-3 Mobile Technical Support for help.
5.1.1 Hardware
Cameras
Has the camera been set up correctly, i.e. seen working before?
Is there any dirt on the front of the camera / IR lamp?
Is the IR lamp working (place hand in front – should feel warm)?
Cabling
Is the cable to the camera in good condition? No kinks, not trapped etc.
Power Supply
Is there any possibility of power fluctuations to any of the cameras, or to the laptop?
5.1.2 Cameras
Camera screen video faults
Check camera voltage.
Defragment hard drive.
5.1.3 Dongles
The dongle has expired
Requires update from supplier to renew.
The dongle isn't working
Check dongle condition, check USB port, try another USB port, or contact supplier to
check dongle settings.
L3 AlertVU Mobile reports "No permission to run ..." when started.
Dongle not enabled to run this application - contact supplier.
Dongle isn't connected to PC - ensure it is connected properly.
L3 AlertVU Mobile reports "Dongle failure! Please check the dongle ..."
Dongle isn't connected to PC - ensure it is connected properly.
L3 AlertVU Mobile reports "PC Identification changed.....! Please plug in the
original dongle ..."
The hardware has changed/a different LAN network has been set-up – contact your
administrator.
5.1.4 Software
I start the program and get ‘ANPR init failed’
The ANPR engine is already started OR wrong dongle.
L3 AlertVU Mobile crashes on Hotlist recognition match
Possible corruption of hotlist file - check original hotlist file, reload from BOF services.
System locks up periodically, requiring machine reboot
Compatibility issues with some Laptop PCs VGA chips have been found, which can
cause them to lock up. Try and obtain the latest drivers.
Page 29
- 18759 -
User Manual
AlertVU
L3 AlertVU Mobile takes a very long time to load
The log is very large – ask your administrator to set up auto-purging to keep the log at a
reasonable size.
L3 AlertVU Mobile missed/misread a plate
Check that the plate is not dirty/cracked/broken/using illegal fonts.
Make sure you can read the number plate on the monitor before expecting the software
to read it.
Ask your Administrator to check the recognition settings.
CPU usage is at max, or the system is very slow, and events are being missed
Ensure no other applications are running.
I have lost my login password, how do I reset to defaults?
If you have lost all your passwords, you will need to get an unlock code from your
supplier.
L3 AlertVU Mobile Reports: "Out of disk space or no access to temp directory" or
"Cannot write sync log file"
Running out of hard drive space – contact your administrator.
5.2 Glossary
Active – A current setting, something in use, or a ‘Live’ event.
Alarm – A live warning that a ‘hit’ is occurring.
ANPR engine – The Plate Detection software module.
Audit - L3 AlertVU Mobile tracks changes that users have made to the system.
BOF, BOF2 - A Back-Office System at Headquarters that can import hotlists
from/export data (i.e. history) to.
Capture – A still image from a video. A car and it’s plate have been found and recorded
by the system.
Client - An ANPR PC doing local live recognition, L3 AlertVU Mobile on a Laptop is a
client.
Cycle All – In ‘Film strip’ view, causes video boxes to show still images (events) as they
occur. It may be easier to keep track of events this way.
Detection - The piece of software that analyzes video frames for possible number
plates, then works out the plate text.
Dongle - A hardware device which attaches to a USB port on a PC. This device is a
method of software protection, and prevents the software being operated on an
unauthorized PC.
Page 30
- 18760 -
User Manual
AlertVU
Entry – An event in the History list, it should include the main video image, the Plate
patch and the Plate text.
Evidence File – A method of saving events on the local hard-drive for later retrieval.
Event – A capture of a vehicle. It will have its own patches and its own line entry in the
history list.
Film-Strip - A view mode in the Live screen which allows users to have a main camera
but still monitor any others.
FPS - L3 AlertVU Mobile works at various ‘frames per second’ depending on the
camera and video type used.
Frame – An individual video shot. The Frame kept in History is the one that ANPR used
to identify the plate with.
Fuzzy Match - A match of a number plate using approximation techniques. Certain
characters are allowed to be ‘fuzzy’, i.e. guessable, but still using syntax rules. Fuzzy
matching can be used when only part of a plate is known.
GPS - Global Positioning System. GPS devices can be used by an ANPR system to
give the position of an event.
HD - High Definition; in relation to ANPR, a type of camera that gives a high resolution
image stream.
History – The stored sequence of events.
Hit - A Plate which is on a Hotlist.
Hot Tag - A category assigned to a hotlist entry.
Hotlist - A list of suspect/wanted/etc vehicles. If a plate is matched to a hotlist entry,
certain actions can be taken by the system, e.g. sounding of an alarm.
Image - In the context of ANPR, this is usually a single video frame from a video
source.
Import – Obtaining hotlists from an external source.
Input Text box – A screen area in which you may tap and enter data (the On-Screen
keyboard will be activated).
Jump – Navigation to another screen.
Page 31
- 18761 -
User Manual
AlertVU
Lane - The use and view of one video image from a camera.
Live – Real-time events.
Manual – The screen where you make the Manual Hotlist.
Match – A plate which was found in a search of History.
Mosaic – A version of the History screen showing a thumbnail for each event.
On-Screen keyboard - A screen which allows character entry using the touch-screen.
Page – Same as Screen.
Patch - An extracted area of a video image.
Personality – A settings backup program.
Plate – A license plate.
Plate Patch - The image of the actual license plate captured by the ALPR engine.
Plate Text – The characters on the license plate as interpreted by ALPR.
Purge – The deletion of old History files.
Recognition - When a number plate is read by the system, this is called a 'recognition
event' or just ‘event’.
Server – A PC or web service receiving events from a client, e.g. laptops, and possibly
sending them on to a BOF.
Screen – In L3 AlertVU Mobile, the current part of the system being viewed. A GUI
window.
Session – A period of operation, a shift. If L3 AlertVU Mobile is restarted, a new
session begins.
Skin - The color scheme/background images used in L3 AlertVU Mobile.
Toolbar-button – The buttons along the bottom of the screen that allow jumping
(navigating) to other screens.
Total Reads – The total number of captures obtained since session start.
Web Service - A method of sending data from an application on one machine to
another machine, e.g. BOF.
Page 32
- 18762 -
User Manual
AlertVU
Contact Information
Our goal at L-3 Mobile-Vision is to provide you with the most dependable, rugged
equipment for your mobile workforce. To ensure that you get the most from your
investment, L-3 Mobile-Vision technical experts are available for training and any
questions. We take pride in our ability to provide you with the most comprehensive
support available so you can minimize any downtime and allow your workforce to
concentrate on their task at hand.
Technical Support
(800) 336-8475 ext. 3
Service
(800) 336-8475 ext. 3
fax: (973) 316-9509
[email protected]
End of Document
Page 33
- 18763 -