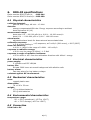
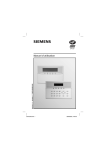
1
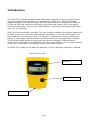
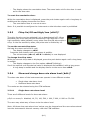
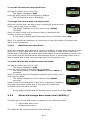
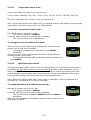
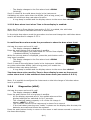
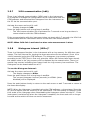
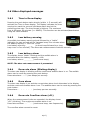
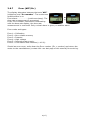
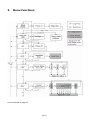
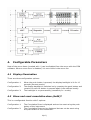
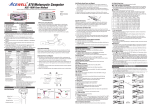
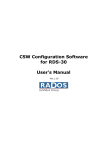
RDS-30 Survey Meter
User’s Manual
Ver. 1.11
LAURUS Systems, Inc. - Ph: 410-465-5558 - Fax: 410-465-5257 - www.LaurusSystems.com
NOTE
This document and the information herewith are copyrighted material as mentioned in the Copyrights Act.
No part of this document may be copied without written authorization from the manufacturer.
The manufacturer withholds the right to make changes in the contents of this document without prior
notice.
If you have any comments or suggestions for additions concerning either the products or this document
please send them to the address on the back cover. There is a feedback form at the end of this document.
Copyright © RADOS Technology Oy 1995-2006
Document No.
Version
Issue date
2096 5600
1.11
3.5.2006/MW
Table of Contents
Introduction ...................................................................................................... 2
1. Taking the instrument into use for the first time........................................... 3
1.1 Inserting batteries.................................................................................................................. 3
2.
Operation ................................................................................................. 3
2.1 Indication of the display unit............................................................................................ 3
2.2 Switch on.............................................................................................................................. 3
2.3 Display illumination ............................................................................................................ 4
2.4 Operating the instrument.................................................................................................. 4
2.5 Menu items .............................................................................................................................. 4
2.5.1 Switch off (oFF)............................................................................................................ 4
2.5.2 Show and reset cumulative dose (doSE)* ............................................................. 4
2.5.3 Chirp On/Off and High/Low (cHirP)* ....................................................................... 5
2.5.4 Show and change dose rate alarm level (drAL)*.................................................. 5
2.5.4.1 Single dose rate alarm level:............................................................................. 5
2.5.4.2 Multilevel dose rate alarm: ................................................................................ 6
2.5.5 Show and change dose alarm level (doSEAL)* ..................................................... 6
2.5.5.1 Single dose alarm level: ..................................................................................... 7
2.5.5.2 Multilevel dose alarm: ......................................................................................... 7
2.5.5.3 Dose alarm level when Time to Dose display is enabled: ............................... 8
2.5.6 Diagnostics (diAG)....................................................................................................... 8
2.5.7 IrDA communication (irdA) ....................................................................................... 9
2.5.8 Histogram interval (HiSto)* ...................................................................................... 9
2.6 Other displayed messages.................................................................................................. 10
2.6.1 Time to Dose display ................................................................................................ 10
2.6.2 Low battery warning ................................................................................................. 10
2.6.3 Low battery alarm ..................................................................................................... 10
2.6.4 Dose rate alarm (Blinking display) ........................................................................ 10
2.6.5 Dose alarm.................................................................................................................. 10
2.6.6 Dose rate Overflow alarm (oFL) ............................................................................. 10
2.6.7 Error (dEF/Err) ........................................................................................................... 11
3.
Menu Functions ...................................................................................... 12
4.
Configurable Parameters........................................................................ 13
4.1 Display illumination .......................................................................................................... 13
4.2 Show and reset cumulative dose (doSE)*................................................................... 13
4.3 Chirp on/off and chirp rate (cHirP)* ............................................................................. 14
4.4 Show and change dose rate alarm level (drAL)* ....................................................... 14
4.5 Show and change dose alarm level (doSEAL/doAL.ti)*............................................ 14
4.6 Battery and display test (diAG)* ................................................................................... 14
4.7 Histogram (HiSto)* .......................................................................................................... 14
4.8 Indication unit ................................................................................................................... 15
5.
Maintenance and Decontamination ........................................................ 15
6.
RDS-30 specifications ............................................................................ 16
6.1 Physical characteristics.................................................................................................... 16
6.2 Electrical characteristics .................................................................................................. 16
6.3 Mechanical characteristics .............................................................................................. 16
6.4 Environmental characteristics ........................................................................................ 16
6.5 Connection ......................................................................................................................... 16
6.6 Detector position .................................................................................................................. 17
7 Accessories ................................................................................................................................ 17
7.1 Configuration software .................................................................................................... 17
*) Configurable parameter; configuration with configuration software.
1(17)
Introduction
The RDS-30 is a Digital Handheld Dose Rate Meter designed for use by personnel who
may be exposed to gamma and/or X-ray radiation in their work. RDS-30 provides
sequential alarms for fixed dose rate values (programmable by configuration software
(CSW) via IrDA link) and the possibility to store dose rate events into the histogram
memory of the meter. The use of a CSW software is required for downloading the data
into a PC via IrDA port.
RDS-30 is microprocessor controlled. The user interface consists of one push button and
an easy-to-use menu structure that displays information in the LCD of the meter. The
push button gives a beep each time it is pressed. To complete an action, release the
button or press again (beep) and hold the button down until a second beep is audible.
The six-digit display shows the dose rate and various messages. Different alarm
situations are indicated by a combination of audio-visual effects in the LCD and a buzzer
(dose rate 1, dose rate 2, low battery, defect, dose rate overflow).
The RDS-30 is ready for use after the batteries (2 x IEC LR06/AA) have been installed.
RDS-30 Front view
IrDA link
Push Button
Battery Cover
2(17)
1. Taking the instrument into use for the first time
1.1 Inserting batteries
Open the cap of the battery compartment. Release the fixing
screw, pull the cap out and turn it up simultaneously.
The instrument uses two IEC LR6/AA-size batteries. The use of
alkaline batteries is recommended. The polarity of the batteries
can be seen in the picture on the right. Insert the batteries and
lock the battery cap. The instrument is now ready for use. To
turn the instrument on, press the push button shortly.
Note: The operation of the instrument is optimized for alkaline
batteries. The use of NiCd or metal hydride batteries may cause
the wrong battery capacity indication or false battery alarm.
2.
Operation
The parameters of the instrument can be changed using the menu functions described
below. The CSW software is required to change some of the parameters. Also, some of
the menu functions can be disabled with the software. If the push button is not pressed
for seven seconds during the menu operation, the display returns to the dose rate
display.
2.1 Indication of the display unit
The RDS-30 has two optional dose rate units available;
µSv/h and mrem/h. The selected unit is indicated by a blinking
segment on the left side of the display. The selected unit in the
picture on the right is µSv/h in the upper frame and mrem/h in the
lower frame.
2.2 Switch on
Press the push button until all the segments are displayed. The
meter performs a self test function:
•
•
•
•
•
•
All the display segments are lit
The buzzer is activated
The display backlight is switched on
The battery condition is tested
The HV-generator is tested
The IrDA-link is activated for three seconds
The prevailing dose rate will be displayed within 10 seconds.
NOTE: Do not push the push button again until the backlight is off.
3(17)
2.3 Display illumination
To switch the illumination on, press the push button once.
- The display backlight is lit for 10 seconds.
2.4 Operating the instrument
The instrument has one push button. In order to change the operational parameters of
the instrument, the menu has to be activated (see also the menu flow chart on pages
11-12). A short beep is audible when the push button is pressed.
In order to activate the menu:
Press the push button (about three seconds) until a long beep is audible and
the display changes to the first menu item “oFF”. Release the button. Now the
menu is activated for four seconds and the menu items can be scrolled by
pressing the push button shortly (i.e. release the button immediately when a
short beep is audible).
In order to activate the menu item:
Scroll the menu until the desired menu item is displayed. Press the push button
(a long press) until a long beep is audible and the desired menu item is
activated.
If the push button is not pressed for seven seconds, the menu and the menu
item will be deactivated automatically and the display returns to the dose rate
display.
2.5 Menu items
In the following sub-clauses, the asterisk (*) at the end of the title indicates that the
feature is optional (through configuration).
2.5.1
Switch off (oFF)
Activate the menu.
- The display changes to oFF.
Release the button and push it again until a long beep is audible.
- The display goes blank. The instrument is now switched off.
2.5.2
Show and reset cumulative dose (doSE)*
The instrument continuously integrates the cumulative dose into a dose register when
switched on
To see the cumulative dose:
Activate the menu and scroll until
- The display changes to doSE.
Press the push button until a long beep is audible.
4(17)
-
The display shows the cumulative dose. The same basic unit for the dose is used
as for the dose rate.
To reset the cumulative dose:
While the cumulative dose is displayed, press the push button again until a long beep is
audible and the display shows the zero dose.
- The cumulative dose is now set to zero.
Note: It is possible to configure the instrument so that the dose reset is prohibited.
2.5.3
Chirp On/Off and High/Low (cHirP)*
The chirp function can be activated (on) or deactivated (off). When
activated, the chirp rate has two sensitivities: high and low. In the
high sensitivity state (default) every pulse from the GM-tube emits a
chirp. In the low sensitivity state, the pulse rate is divided by 16.
To see the current chirp state:
Activate the menu and scroll it until
- The display changes to cHirP.
Press the push button until a long beep is audible.
- The current state (cHr oF, cHr Hi or cHr Lo) is now displayed.
To change the chirp state:
While the current chirp state is displayed, press the push button again until a long beep
is audible.
- The display changes to the first option: cHr oF (blinking).
Scroll the options until the desired value is displayed and validate it with a long press.
- A long beep is audible and the display returns to the menu item cHirP.
2.5.4
Show and change dose rate alarm level (drAL)*
The dose rate alarm of the instrument can operate in two different modes:
•
•
Single dose rate alarm level
Multilevel dose rate alarm
The mode can be selected using the CSW software.
2.5.4.1
Single dose rate alarm level:
There are 8 different levels for dose rate alarm:
µSv/h or mrem/h: disabled, 10, 50, 100, 500, 1 000, 5 000, 10 000 or 50 000.
The user may select any of these to be the alarm level.
Note: All these dose rate alarm level values may be changed and the new values stored
into the instrument’s internal memory with the CSW software.
5(17)
To see the current dose rate alarm level:
Activate the menu and scroll it until
- The display changes to drAL.
Press the push button until a long beep is audible.
- The current alarm level is displayed.
To change the current dose rate alarm level:
While the current dose rate alarm level is displayed, press the push
button until a long beep is audible.
- The display changes to the first alarm level: diSAbL
(blinking).
Scroll the alarm levels until the desired value is displayed and
validate it with a long press.
- A long beep is audible and the display returns to the menu item drAL.
Note: It is possible to configure the instrument so that the change of the dose rate
alarm level is prohibited.
2.5.4.2
Multilevel dose rate alarm:
When the multilevel dose rate alarm function is enabled, all eight dose rate alarm levels
(same as in “single dose alarm level” case) will be active in order of size. When the
lowest level is exceeded, the alarm signal is activated. It can be muted by pressing the
push button and the second lowest level becomes active. If the second lowest level is
also exceeded and muted, the third lowest level becomes active etc.
To enable/disable the multilevel dose rate alarm:
Activate the menu and scroll it until
- The display changes to drAL.
Press the push button until a long beep is audible.
- The current status (enabled=EnAbLE/disabled=diSAbL) is
displayed.
While the current status is displayed, press the push button until a
long beep is audible.
- The display changes to the first alarm level: diSAbL
(blinking).
Scroll to see all the valid alarm levels in the instrument. Validating
any other value than diSAbL with a long press will enable the
multilevel dose rate alarm function.
-
A long beep is audible and the display returns to the menu item drAL.
2.5.5
Show and change dose alarm level (doSEAL)*
The dose alarm of the instrument can operate in two different modes:
•
•
Single dose alarm level
Multilevel dose alarm
The mode can be selected using the CSW software.
6(17)
2.5.5.1
Single dose alarm level:
There are 8 different levels for the dose alarm:
µSv or mrem: disabled, 100, 500, 1 000, 5 000, 10 000, 50 000, 100 000, 500 000.
The user may select any of these to be the alarm level.
Note: All the dose alarm level values can be changed and the new values stored into the
instrument’s internal memory with the CSW software.
To see the current dose alarm level:
Activate the menu and scroll it until
- The display changes to doSEAL.
Press the push button until a long beep is audible.
- The current alarm level is displayed.
To change the current dose alarm level:
While the current dose alarm level is displayed, press the push
button until a long beep is audible.
- The display changes to the first alarm level diSAbL
(blinking).
Scroll the alarm levels until the desired value is displayed and
validate it with a long press.
- A long beep is audible and the display returns to the menu
item doSEAL.
2.5.5.2
Multilevel dose alarm:
The multilevel dose alarm function can be enabled using the configuration SW. When it
is enabled all eight dose alarm levels will be active in order of size. When the lowest
level is exceeded, the alarm signal is activated. It can be muted by pressing the push
button and the second lowest level becomes active. If the second lowest level is also
exceeded and muted, the third lowest level becomes active etc.
Note: When the highest dose alarm level value is exceeded, it will be displayed as a
reminder for one second at 10 second intervals.
To enable/disable the multilevel dose alarm:
Activate the menu and scroll it until
- The display changes to doSEAL.
Press the push button until a long beep is audible.
- The current status (enabled=EnAbLE/disabled=diSAbL) is
displayed.
While the current status is displayed, press the push button until a
long beep is audible.
7(17)
The display changes to the first alarm level: diSAbL
(blinking).
Scroll to check all the valid alarm levels in the instrument.
Validating any other value than the diSAbL (with a long press) will
enable the multilevel dose rate alarm function.
- A long beep is audible and the display returns to the menu item doSEAL.
-
2.5.5.3 Dose alarm level when Time to Dose display is enabled:
When the Time to Dose display (see section 2.6.1) is enabled, the valid dose
alarm level is used to calculate the time to dose alarm.
In the single dose alarm mode the procedure to show and change the valid dose alarm
level is as described in chapter 2.5.5.1.
In multilevel dose alarm mode the procedure to show the dose alarm level:
Activate the menu and scroll it until
- The display changes to doAL.ti.
Press the push button until a long beep is audible.
- The current status (the value used for Time to Dose display
/ disabled=diSAbL) is displayed.
While the current status is displayed, press the push button until a
long beep is audible.
- The display changes to the first alarm level: diSAbL
(blinking).
Scroll to see all the valid alarm levels in the instrument. Validating
any other value than diSAbL (with a long press) will enable the
multilevel dose rate alarm function.
- A long beep is audible and the display returns to the menu item doAL.ti.
The dose alarm value used for Time to Dose display is same as the current
active alarm level in the multilevel dose alarm mode (see section 2.5.5.2).
Note: It is possible to configure the instrument so that the change of the dose alarm
level is prohibited.
2.5.6
Diagnostics (diAG)
Activate the menu and scroll it until
- The display changes to diAG.
Press the push button until a long beep is audible.
- All the display segments are lit, the audible alarm and the
display backlight are switched on for 5 seconds.
- The remaining battery capacity in % of the full charge is
shown: cAP67 (= 67%).
- The firmware version of the instrument is shown for a second
- If the low battery warning text “LobAt” is shown on the display after the test, the
batteries are weak and should be replaced.
Press the push button shortly to return to the menu or wait seven seconds to return to
the dose rate display.
8(17)
2.5.7
IrDA communication (irdA)
There is an infrared communication (IrDA) port in the instrument.
It is possible to change the configuration of the instrument with the
CSW software and download the histogram from the instrument to
the PC via the communication port.
Activate the menu and scroll it until
- Display changes to irdA.
Press the push button until a long beep is audible.
- The IrDA communication link is activated for 7 seconds or as long as there is
communication with the CSW software.
If the communication with the instrument does not start within 7 seconds, the IrDA link
is deactivated and the instrument returns to the dose rate measurement.
NOTE: When IrDA link is activated no dose rate measurement is done.
2.5.8
Histogram interval (HiSto)*
There is a histogram function in the instrument with a ring memory for 480 dose rate
values. The time interval for logging the dose rate value can be selected (from 10 to
14 400 seconds) using the CSW software. The histogram ring memory operates
according to the FIFO (first in first out) principle. When 480 values have been stored,
the oldest value in the ring memory will be replaced by the newest value. There is a
special ring counter indicating how many times the ring memory has overflown. The
histogram can be downloaded into a PC.
To see the Histogram Interval:
Activate the menu and scroll it until
- The display changes to HiSto.
Press the push button until a long beep is audible.
The current histogram interval (seconds) or diSAbL (when
disabled) will be displayed.
Press the push button shortly to return to the main menu or wait 7 seconds to return to
the dose rate display.
NOTE: When the histogram is enabled using the CSW software, a time stamp (from the
PC) will be stored into the memory of the instrument. The time stamp is used to fix the
time scale of the histogram when downloading the histogram values into the PC. If the
instrument is switched off when the histogram is enabled, the time scale will no longer
be valid as the switch-off time can not be measured.
9(17)
2.6 Other displayed messages
2.6.1
Time to Dose display
Pressing the push button twice shortly (within 1- 5 seconds) will
activate the Time to Dose display. The display indicates the time
required to reach the current valid dose alarm level at the
prevailing dose rate. The time format is hhHmm. The maximum
time is 99 hours 59 minutes (i.e. 99H59). This function can be activated/deactivated
using the CSW software
2.6.2
Low battery warning
An audible low battery warning signal followed by a "LobAt"
indication for two seconds will be repeated every five minutes when
the battery capacity < 30% but >10%.
(a short beep followed by a long
Low battery warning: _ _______
beep once in five minutes). The dose rate measurement continues normally.
2.6.3
Low battery alarm
The display shows "bAtAL" blinking and the audible alarm is
activated when the battery capacity <10%.
Low battery alarm: _____________ (continuous beep).
NOTE: The dose rate measurement is prevented.
2.6.4
Dose rate alarm (Blinking display)
The dose rate display is blinking and the continuous audible alarm is on. The audible
alarm can be reset by pressing the push button.
Dose rate alarm: ------ (two beeps per second).
2.6.5
Dose alarm
The dose rate display is on and the current dose alarm level alternates in the display
and the continuous audible alarm is on. The audible alarm can be reset by pressing the
push button.
Dose alarm: - - - - - - (one beep per two seconds).
2.6.6
Dose rate Overflow alarm (oFL)
When the measurement limits are exceeded, the display shows
“oFL” (blinking). The continuous audible alarm is on.
Dose rate overflow: ____------____ (continuous beep, two frequencies).
The overflow alarm cannot be reset.
10(17)
2.6.7
Error (dEF/Err)
The display alternates between the texts "dEF"
(defective) and "Err+number". The continuous
audible alarm is on.
Error alarm: _____________ (continuous beep). The
dose rate measurement is prevented.
If the "Err+number"-text alone is alternating
with the dose rate display, the dose rate
measurement is continued. Only a visual alarm is given, no audible alarm.
Error codes and types:
Error1
Error2
Error3
Error4
Error5
Error6
=
=
=
=
=
=
Calibration
Non-volatile memory
Detector
High voltage
Internal power supply
Cumulative dose overflow (>10 Sv)
Should an error occur, write down the Error number (Err + number) and return the
meter to the manufacturer (contact info: see last page of this manual) for servicing.
11(17)
3.
Menu Functions
to be continued on page 12
12(17)
4.
Configurable Parameters
Most of the menu items (marked with *) can be disabled from the menu with the CSW
software. When a menu item is disabled, it is not visible in the menu list.
4.1 Display illumination
There are three configuration options:
Configuration 1:
Configuration 2:
Configuration 3:
When the push button is pressed, the display backlight is lit for 10
seconds (timeout mode).
The display backlight is switched on by pressing the push button and
remains lit until the button is pressed again (user-defined mode).
The backlight is on permanently (constantly on –mode).
4.2 Show and reset cumulative dose (doSE)*
This is a configurable function with 2 options:
Configuration 1:
Configuration 2:
The Cumulative Dose is displayed and can be reset using the push
button of the instrument.
The Cumulative Dose can be displayed but can not be reset using
the push button of the instrument.
13(17)
4.3 Chirp on/off and chirp rate (cHirP)*
The cHirP function can be enabled or disabled. When disabled, it will not be displayed in
the menu of the instrument. This is a configurable function with 3 options:
Configuration 1:
Configuration 2:
Configuration 3:
Off
High sensitivity
Low sensitivity
See 2.5.3 for details.
4.4 Show and change dose rate alarm level (drAL)*
This is a configurable function with 3 options:
Configuration 1:
Configuration 2:
Configuration 3:
The Alarm Level is displayed and can be changed using the push
button.
The current alarm level can be displayed but can not be changed
using the instrument’s push button.
Disabled.
4.5 Show and change dose alarm level (doSEAL/doAL.ti)*
This is configurable function with 3 options:
Configuration 1:
Configuration 2:
Configuration 3:
The Alarm Level is displayed and can be changed using the push
button.
The current alarm level can be displayed but can not be changed
using the instrument’s push button.
Disabled.
4.6 Battery and display test (diAG)*
The battery condition and display test can be enabled or disabled. When disabled, it will
not be displayed in the instrument menu.
4.7 Histogram (HiSto)*
This is a configurable function with 4 options:
Configuration
Configuration
Configuration
Configuration
1:
2:
3:
4:
Stores the instant dose rate value.
Stores the average dose rate of the histogram interval.
Stores the maximum dose rate during the histogram interval.
Disabled
14(17)
4.8 Indication unit
Configuration 1:
Configuration 2:
5.
µSv/h
mrem/h
Maintenance and Decontamination
No specific maintenance is required except for a periodic check of the calibration.
Cleaning and decontamination may be carried out by using decontamination solutions
suitable for use with ABS polymer and polycarbonate materials.
Replacement of the batteries:
Open the battery compartment cover with a suitable screwdriver. Remove the old
batteries and replace with new ones. Note the correct polarity. The use of AA alkaline
batteries (IEC LR06) is recommended. Close the cover.
Note! After fitting fresh batteries, it is recommended to perform the functional test
(diAG). If the low battery sign “LobAt” appears in the display after the test, refit the
batteries.
15(17)
6.
RDS-30 specifications
Order number RDS-30 µSv/h:
1233-244
Order number RDS-30 mrem/h: 1233-250
6.1 Physical characteristics
radiation detected:
gamma and x-rays, 48 keV...1.3 MeV
detector:
energy-compensated GM tube. Energy response according to ambient
dose equivalent H*(10)
measurement range:
dose rate 0.01 – 100 000 µSv/h or 0,001 – 10 000 mrem/h
dose 0.01 – 1 000 000 µSv or 0,001 – 100 000 mrem
alarm levels:
adjustable alarm levels for dose rate and accumulated dose
calibration accuracy:
± 5 % of the reading in 137Cs exposure, at 3 mSv/h (300 mrem), +20°C (68°F)
dose rate linearity:
±10 % ± 1 digit in the range of 0.0001 - 100 mSv/h
response to radiation energy:
±30 % over the range of 48 keV - 1.3 MeV
response to angle of radiation incidence:
±25 % within ± 45° from the calibration direction with 48 keV energy
6.2 Electrical characteristics
power supply:
2 x alkaline cell IEC LR6/AA
battery life:
at least 2000 hours at normal background with alkaline cells
battery alarm:
two-step alarm for low battery voltage
resistant against RF interferences
6.3 Mechanical characteristics
case:
rugged plastic case
dimensions:
78 x 126 x 32 mm
weight:
170 g without batteries
220 g with batteries
6.4 Environmental characteristics
temperature range:
-25...+55°C operational (-13°F to 131°F)
-40...+70°C storage (-40°F to 158°F)
6.5 Connection
IrDA link to PC
16(17)
6.6 Detector position
The location of the GM-detector central point is marked on the surface of the case (a
star on the pictures below).
DETECTOR CENTRE
7 Accessories
7.1 Configuration software
Order number:
1233-246
The Configuration Software (CSW) is used to check the status of the instrument, to
change its operational parameters and to set-up the histogram operation (for details see
the CSW Configuration Software for RDS-30 User’s Manual)
17(17)
As standards, specifications and
design are subject to change
over a period of time,
please request for the confirmation of the
information given in this publication.
Lamanon – France
Tel +33 (0)4 90 59 59 59
Smyrna (GA) – USA Tel +1 (770) 432 2744
Turku – Finland
Tel +358 (0)2 4684 600
Other countries
Hamburg – Germany Tel +49 (0)40 85193-0
Tel +33 (0)4 90 59 60 41
RADOS Doc.No 2096 5600 v. 1.11
18(17)
FEEDBACK FORM
We are continuously working hard to produce correct and easy-to-read technical documents. However,
complex systems are difficult to explain or understand, and thus sometimes there may be mistakes or
inadequacies in the documentation. To correct these errors we would like to hear your opinion about this
document.
If you have noted mistakes, or if there are parts that are unclear, please let us know. Take a copy of this
page, describe the problem and send the copy to us here in RADOS.
To:
RADOS Technology Oy/ Technical Documents
P.O. Box 506, FIN-20101 Turku, Finland
Fax: +358-2-468 4601
This way you help us to supply you even better documents. The best feedback will be rewarded.
Notes on this document
Name of the document:
--------------------------------------------------
Issue date: ----------------------------------
----------------------------------------------------------------------------------------Description of the mistake or problem:
Page no.
Correction:
-------------------------------------------------------------------------------------------------------------------------------------------------------------------------------------------------------------------------------------------------------------------------------------------------------------------------------------------------------------
-----------------------------------------------------------------------------------------------------------------------------------------------------------------------------
Notes on the product
Name of the product:
-----------------------------------------------------------
Description of the mistake or problem:
-------------------------------------------------------------------------------------------------------------------------------------------------------------------------------------------------------------------------------------------------------------------------------------------------------------------------------------------------------------------------------------------
Version: --------------------------------------Correction:
-----------------------------------------------------------------------------------------------------------------------------------------------------------------------------------------------------------------
General Notes
---------------------------------------------------------------------------------------------------------------------------------------------------------------------------------------------------------------------------------------------------------------------------------------------------------------------------------------------------------------------------------------------------------------------------------------------------------------------------------------------------------------------------------------------------------------------------------------------------------------------------------------------------------------------------------------------------If you need more room, please use attached pages.
Name:
Company:
Address:
19(17)
Position:
Telephone:
Fax: