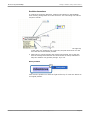
1
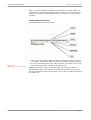
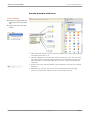
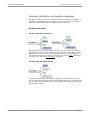
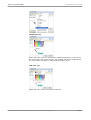
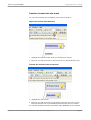
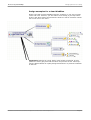
MindPlan Brainstorming with MindMaps User Manual Part I ▪ Status as of November 2008 Contact: [email protected] ▪ www.weilgut.com www.mindplan.com Brainstorming with MindMaps Mind Maps are the structuring elements of Weilgut's MindPlan. In this chapter, you will read how to create and develop a MindPlan. You will learn the most important principles for designing, structuring, arranging and positioning the elements of a MindPlan. You will receive examples on how to arrange information more clearly. You can quickly make a concept from an idea with MindPlan, which you can readily make available to others - in the form of various files, of electronic prints or in paper form. IN THIS PART: Create new MindPlan.........................................................................3 Open the program and create a new MindPlan...................................3 Define the characteristics of the MindPlan.........................................5 Introduction to the control elements.................................................7 Introduction to control elements on branches....................................7 Introduction to the sidebar menus...................................................8 Create and design branches............................................................10 Collect information in the Map.......................................................10 Provide branches with icons..........................................................12 Create several branches................................................................13 Arrange, distribute, and position branches......................................14 Arrange branches ........................................................................14 Position branches.........................................................................16 Copy, open, and close branches.......................................................17 Copy several branches..................................................................17 Open and close branches in a Map.................................................17 Design options for more clarity.......................................................19 Create node style with the sidebar menus.......................................19 Transfer formats with the brush.....................................................22 Design examples for a clear MindPlan.............................................23 Exports............................................................................................24 Start the concept export...............................................................24 Additional exports........................................................................25 Send links to notes via e-mail........................................................25 Print a MindPlan..............................................................................26 Overview of printing options..........................................................26 Print a MindPlan on paper.............................................................27 Print, archive, or send a MindPlan in file..........................................28 MindPlan User Manual Part 1© Haus Weilgut ▪ November 2008 ▪ www.mindplan.com Page 2 Brainstorming with MindMaps Create new MindPlan Create new MindPlan Open the program and create a new MindPlan The following description will guide you step-by-step on how to use Weilgut MindPlan. Keys: CTRL+ N 1 Start the Weilgut MindPlan. Please note that Lotus Notes must be open. 2 Click on file – New MindPlan. Enter the required information. In these fields you will define the description, folder and type of your MindPlan: MindPlan database: Select a MindPlan in the dialog window from the list of your Lotus Notes1 databases. The databases are located on your local PC or on your Lotus Domino1-Server, which are shown in this dialog. Please note the following: If you are using the demo environment of Weilgut MindPlan, the database will have the name »MindPlan« and the file name »wMindPlan.nsf« and will be located within your Lotus Notes1 data folder in the »MindPlan« directory. MindPlan User Manual Part 1© Haus Weilgut ▪ November 2008 ▪ www.mindplan.com Page 3 Brainstorming with MindMaps NOTE: 1 Lotus Notes and Domino are registered trademarks of IBM. ² P2Drop is an imaginary description for a product. Any similarities with actually existing product descriptions are purely coincidental. Create new MindPlan Description: Enter a clear description for the MindPlan. The MindPlan in our example is »Communications program for the introduction of P2Drop².« When the MindPlan opens, you will find this description in the top tab, located in the main node of the map and in the Gantt chart. Categories: This field assigns the file to a certain topic or database directory. Select an existing directory in the selected database or enter a new key word, for example »Marketing« and you will automatically receive a new directory. This will simplify finding the MindPlan in the database storage. Define the new MindPlan type PLEASE NOTE: The display of types can vary depending on the version. We recommend using the »Project« type for your first steps. All functions are then available to you, especially the Gantt editor for your project, time and resource planning. The node type agenda, meeting and MindPlan will be explained at another point of this manual. Begin with the templates TIP: Use the many sample templates in the demo version, in order to obtain an overview of the options of the Weilgut MindPlan. If you have already created templates for MindPlans within the team, you can call these up here and use all previously created information, evaluations and the structure for the development of a new MindPlan. MindPlan User Manual Part 1© Haus Weilgut ▪ November 2008 ▪ www.mindplan.com Page 4 Brainstorming with MindMaps Create new MindPlan Define the characteristics of the MindPlan Tab »Project« 1 Double click on the main node to open the properties window. 2 Enter a random project number in the tab Project. 3 Select the Status from the menu, which you can open by clicking on the right arrow. 4 Enter the name of the manager. ADVANTAGES: These persons can be selected when assigning activities. 5 Enter Members either manually or open the dialog window Resource selection with the right button. The example shows an application linked with Lotus Notes. Select the required resource from the list and confirm with OK. MindPlan User Manual Part 1© Haus Weilgut ▪ November 2008 ▪ www.mindplan.com Page 5 Brainstorming with MindMaps Create new MindPlan Brief description in tab »General« Click on tab»General«. Enter additional information for the project here, i.e. the essential program parts. Enter additional important information that describes the project in more detail in the brief description field. Confirm with OK. The central node of the MindPlan now generally displays the information that you have previously entered. MindPlan User Manual Part 1© Haus Weilgut ▪ November 2008 ▪ www.mindplan.com Page 6 Brainstorming with MindMaps Introduction to the control elements Introduction to the control elements Introduction to control elements on branches A project structure can now be created with a great degree of flexibility. The MindPlan should contain all activities that must be completed in the project. A clear structure is therefore very helpful. We will briefly explain the most important operating steps and develop the first basic structure with you. Proceed as follows: 1 Mark the area of the central node with the cursor. A dark blue frame with function keys will appear, as described in the illustration above. These functions will be available to you for all nodes that you create in MindPlan. 2 Information will appear automatically in the field under the node in the subsequent steps. These can be hidden and/or they can be activated again with a click on the i-button in the dark blue frame on the left bottom. All displayed functions can also be called up in a sidebar located on the right except the information fields. We will explain this in more detail in the following text. MindPlan User Manual Part 1© Haus Weilgut ▪ November 2008 ▪ www.mindplan.com Page 7 Brainstorming with MindMaps Introduction to the control elements Introduction to the sidebar menus In MindPlan 3.x you can flexibly open and close the sidebar menus. These are the menus in the sidebar: Your next steps This menu will lead you - depending on context - to the most frequently used MindPlan functions. First mark one or more nodes and select the generation of a Lotus Notes invitation for an agenda, for example, from the functions and data exports offered. Outline With this structural overview you have additional support, especially for MindPlans with a high number of nodes (MindMap branches), in order to maintain the overview of the over all content structure. This is illustrated in a tree view. Focus the node in the map or in the Gantt view via a double click on an entry. Map-fragments Create your own library of parts of a MindPlan that you want to reuse. For example, file your standard project as Map fragment, i.e. a part tree with the phase structure, attached files and documents. Insert the fragment into any MindPlan via a double click. MindPlan User Manual Part 1© Haus Weilgut ▪ November 2008 ▪ www.mindplan.com Page 8 Brainstorming with MindMaps Introduction to the control elements Bookmarks Create personal bookmarks for frequently used MindPlans or for certain nodes. Comfortably manage the bookmarks in a categorized tree, which is structured according to topics. Find Use the full text search, with which you can also continue to work in the application after a search process, but with which you will continue to have access to your search results. MindPlan training Use online help references and automatically run demo videos to quickly familiarize yourself with MindPlan. Additional demos and product information may be found under www.mindplan.com. Image library Approximately 2,000 icons from various categories, and in five sizes now provide you with even more personalized design options for your maps. The icon selection familiar from the former product version may be found in "MindPlan selection". Node style With this menu, you will initially create a style in a preview window and confirm it by clicking on the import button. Style templates Save yourself time and effort and store your node styles as style templates, which you can use again - i.e. color values, node icons or fonts. By double clicking on a style, you will import this style template to marked nodes in any MindPlan. MindPlan User Manual Part 1© Haus Weilgut ▪ November 2008 ▪ www.mindplan.com Page 9 Brainstorming with MindMaps Create and design branches Create and design branches Collect information in the Map 1 The MindPlan displays a field with the description of the MindPlan that you have previously entered. This field, the so-called main node - represents the central element of your map. Click on this: the text field is now highlighted in light blue. 2 By clicking into the blue field, you will reach an editing mode and can change the node description. Caution: You will therefore automatically change the name under which the MindPlan is filed in the database. Therefore, only change the description of the existing MindPlan with the agreement of other individuals involved, so that the file can be retrieved again. 3 Press the Enter key or click on the outer blue frame to exit the editing mode. Caution: If you delete this central node, you are removing the entire MindPlan from the database memory. Please note: The database in the background immediately stores every action that you perform in the program. This means that you never have to cache. If you would like to reverse a deletion process, you can accomplish this via the waste basket, which you can call up in the menu bar on the right top. Create branch location Now collect the topics that become relevant for the project, such as the event location. Create the branch »Location« for this. 1 Select the menu »Your next steps« in the right sidebar. When the sidebar is not visible, select the item »Sidebar« in the upper menu »View« and then select the menu »Your next steps.« Insert key: Branches below 2 Click on the link »Create new branch«. Alternatively, you can activate the insert key on your keypad to create a branch. 3 Enter the word »Location« and confirm it with »Enter.« The menu »Your next steps« always shows you the most important processing options offered in reference to the marked node. It is easy to create new MindPlan User Manual Part 1© Haus Weilgut ▪ November 2008 ▪ www.mindplan.com Page 10 Brainstorming with MindMaps Create and design branches nodes or perform analysis and assign certain function to nodes, which are necessary for project management using this method. Use the menus in the sidebar to work quickly with MindPlan. Next, we will show you the sidebar functions. Create additional branches Create additional branches as follows: 1 Click on the central node again and select »Create new branch« again in the sidebar. This function always creates a new branch under the branch. Enter key: Branches at the same level 2 It can be done faster with a key: Mark a branch, press Enter on your keypad and thereby create a branch at the same level. Additional key words in form of branches can now be easily created by pressing Enter again, enter another key word and repeat this process. You will use the Enter key always in the future, if you want to create branches at the same level. MindPlan User Manual Part 1© Haus Weilgut ▪ November 2008 ▪ www.mindplan.com Page 11 Brainstorming with MindMaps Create and design branches Provide branches with icons ICON CATALOG Closing and opening with the small arrow in the right push bar Click on the menu bar »Icon library« 1 Mark a branch with the cursor. Select a suitable icon on the right from the icon library and click on it. 2 The icon appears in a certain size in front of the key word. You can determine the position with the buttons under the icon selection window (see left illustration) - before and after the key word - and the side with the controller. 3 Remove the icons with this button (see illustration to the left) in marked branches. 4 Alternatively, you can click on the icon on the branch with the right mouse key and select »Remove icon« or determine the size. MindPlan User Manual Part 1© Haus Weilgut ▪ November 2008 ▪ www.mindplan.com Page 12 Brainstorming with MindMaps Create and design branches Create several branches Use the following function, if you would like to create several branches in an action: Insert key: New branch below Key Enter: Branches at the same level 1 Mark a branch and select the function »Create several nodes« in the sidebar under »Your next steps«. An entry window will open. Alt and insert key: create once in the text input window of several branches 2 Enter single key words underneath each other (line break with the Enter key) and confirm by clicking on »Create.« You can copy a text list from an existing document into this input field as an alternative. 3 You can define the hierarchy of the nodes already in the list by moving certain key words with the space bar or with Tab. Another space assigns the item at the third level, etc. Try it out. MindPlan User Manual Part 1© Haus Weilgut ▪ November 2008 ▪ www.mindplan.com Page 13 Brainstorming with MindMaps Arrange, distribute, and position branches Arrange, distribute, and position branches MindPlan provides you with the option to arrange branches in a sequence or hierarchy, to distribute it on both sides or on one side to the main node or position individual branches at a distance from the others. Arrange branches Arrange branches in sequence Arrange branches in sequence by clicking into the blue area of the branch and putting it under or over another branch with the mouse button pressed. Observe the blue line, which serve as a navigation aid: The illustration on top shows that the branch »print« on the left is arranged below »Mailings«, and the one on the right moves above »Mailings«. Arrange branches hierarchically Arrange the branches hierarchically by pulling the marked nodes to the corner of another branch. Observe the small triangle that serves as a navigation aid: The branch »Design« is pulled one level below the branch »Mailings« in the illustration above. MindPlan User Manual Part 1© Haus Weilgut ▪ November 2008 ▪ www.mindplan.com Page 14 Brainstorming with MindMaps Arrange, distribute, and position branches Distribute branches You have a Distribution icon in the top icon bar. If you click on this, you can select between the options »to the left«, »to the right« and »evenly distributed«. By this, you are evenly distributing the branches around the central node or align the entire map on one side to the left or right. Scale MindMap Enlarge the map with the Scaling aids or adjust the entire map to your window size with the icon on the right of the zoom levels. MindPlan User Manual Part 1© Haus Weilgut ▪ November 2008 ▪ www.mindplan.com Page 15 Brainstorming with MindMaps Arrange, distribute, and position branches Position branches In contrast to arranging branches, position the branches in the MindPlan work area by pulling them out of the structure. The connecting line and the sequence remain. 1 Then click exactly onto the position icon with the mouse on the right top of the node (see enlarged icon on the left) and pull the branch over the area with the mouse button pressed. 2 Note that you cannot position the branch intercrossed, due to the fact that the arrangement between the two branches is always maintained. Only the distance may possibly change. Try it out. Reset position Click onto the position icon with the right mouse key to return the branch to its original position. MindPlan User Manual Part 1© Haus Weilgut ▪ November 2008 ▪ www.mindplan.com Page 16 Brainstorming with MindMaps Copy, open, and close branches Copy, open, and close branches Copy several branches 1 Highlight several branches by applying the pressed mouse key on the left above a branch and pull it down to the right. Release the mouse key - all branches are now highlighted in blue. 2 Press the CTRL key, pull the highlighted branches to the corner of a branch.»Press« with the pressed mouse key and release the mouse. MindPlan will copy the desired branches including the sub-branches below. Open and close branches in a Map MindMaps are especially practical, because individual areas can be opened and closed: 1 Use the functions within the menu view when opening and closing the branches, detail levels, or so called smart icons within the upper menu bar, see illustration above. Caution: This action always refers to the selected node. If you would like to use the action on the entire MindPlan, highlight the central node. If you only want to open and close one area, highlight the respective node with a mouse click. MindPlan User Manual Part 1© Haus Weilgut ▪ November 2008 ▪ www.mindplan.com Page 17 Brainstorming with MindMaps Keys + (Plus) and – (Minus) for opening individual branch levels for highlighted branches Copy, open, and close branches 2 Select »Show one level more« to display individual levels of branches. 3 Select »Show one level less« to remove and/or »close« individual levels of branches. You can open the branches again with the plus icon which then appears on the node. 4 Select »Show all sub-branches« to open all branches that are located below. 5 Select »Hide all branches«, If you only want to see the highlighted node, but not its sub-branches. MindPlan User Manual Part 1© Haus Weilgut ▪ November 2008 ▪ www.mindplan.com Page 18 Brainstorming with MindMaps Design options for more clarity Design options for more clarity Create node style with the sidebar menus MindPlan offers you extensive design options to obtain more clarity. You already know the icon catalog; we will explain how you can design your nodes and/or branches on a few examples in the following. Highlight several branches with a mouse click and a pressed CTRL key 1 Highlight the central node and open the »node style« menu in the right sidebar. Node style functions can also be called up via the right mouse key or in the top menu bar. 2 An illustration of the node style of your highlighted branches appears in the preview window. The preview changes according to your design and become effective by clicking on »Apply«. You can reset the preview image to its origin by clicking on »Reset«. Please note that all design settings that you have performed can be undone and returned again to their previous form. 3 Familiar elements for text design are located on top, as well as MindPlan typical elements, which will assist you in the design: 1 – Font and color 2 – Fill color 3 – Frame color (this only appears, if a frame was selected under the frame type) 4 – Line color (connecting lines between nodes) 5 – Frame type 6 – Call up image library A wide color pallet is available to you when clicking on »Additional ...« in all menus that provide a color selection. MindPlan User Manual Part 1© Haus Weilgut ▪ November 2008 ▪ www.mindplan.com Page 19 Brainstorming with MindMaps Design options for more clarity Font and color (1) You will set the font thickness to bold with CTRL + B You will set the font to italic with CTRL + I Define the font and color, for example, Comic Sans MS, size 16, color dark blue, italic (by clicking the »i« button). Fill color (2) Define the fill color A light color is recommended for dark lettering, a dark one for light lettering. Frame type (5) Define the frame type. In this example, we select processing arrows, for example, if we would like to illustrate successive project phases. Select a frame type to visually differentiate or emphasize hierarchy levels or topics. MindPlan User Manual Part 1© Haus Weilgut ▪ November 2008 ▪ www.mindplan.com Page 20 Brainstorming with MindMaps Design options for more clarity Frame color (3) Define the frame color. You will produce a harmonious picture, if you select the same frame color as the fill color, but perhaps one or two shades darker. You can produce contrasts by different fill and frame colors. Line color (4) Define the color of the lines between branches. MindPlan User Manual Part 1© Haus Weilgut ▪ November 2008 ▪ www.mindplan.com Page 21 Brainstorming with MindMaps Design options for more clarity Transfer formats with the brush You can easily transfer the formatting of one node to another. Import the format with the brush 1 Highlight the branch format which you would like to import. 2 Click the icon with the brush in the top menu bar (left illustration, top). Transfer the format to the new branch 1 Highlight the new branch. 2 Click the icon with the brush on the pallet in the top menu bar. The format and inserted icon are immediately transferred to the new branch. You can also transfer formats from another open MindPlan by this method. MindPlan User Manual Part 1© Haus Weilgut ▪ November 2008 ▪ www.mindplan.com Page 22 Brainstorming with MindMaps Design options for more clarity Design examples for a clear MindPlan Please note that complex MindPlans become confusing, if you use too many colors and icons. However, you will achieve more clarity, if you keep entire areas in the same design and provide the observer with an excellent orientation in the color or the icons. Illustration: Example of a clear design. Main nodes are framed, project phases are clearly projected with fill colors and process arrows. Icons support the differentiation of equally designed branches in a pictorial correlation to the text. MindPlan User Manual Part 1© Haus Weilgut ▪ November 2008 ▪ www.mindplan.com Page 23 Brainstorming with MindMaps Exports Exports You have now developed your first MindPlan and want to forward it as a concept. Start the concept export 1 Highlight the central node and click on »Concept export« in the right sidebar. 2 Wait until MindPlan generates and displays the concept. Store it in a memory and make it available to the appropriate individuals. MindPlan User Manual Part 1© Haus Weilgut ▪ November 2008 ▪ www.mindplan.com Page 24 Brainstorming with MindMaps Exports Additional exports Use the »Concept export according to Word/Open Office« function to import the content of a MindPlan to a document of your standard text processing program. Use the »Additional exports« function to export your MindPlan in various data formats. Send links to notes via e-mail Instead of sending a file, you can also send a link to the MindPlan or a node in your MindPlan via e-mail. In order to do this, click on »Send link to node via mail« in the right sidebar. MindPlan opens an e-mail in Lotus Notes, in which you enter the recipient and possibly include additional information. Then click »Send.« MindPlan User Manual Part 1© Haus Weilgut ▪ November 2008 ▪ www.mindplan.com Page 25 Brainstorming with MindMaps Print a MindPlan Print a MindPlan Overview of printing options Use the comprehensive print functions to print your MindPlan precisely to a particular paper size or store it electronically as a pdf and send it. You have various options: Print preview The print preview is your central print control, in which you can adjust the print options via a preview of the print. Poster print The map and Gantt view can be distributed over a random number of pages. The individual prints are easily combined to a poster via edge cutting and page number indicators. PDF copy As an alternative for printing on paper, you can store an electronic file (Adobe pdf format), if you want to send the current project plan to other users via e-mail. The same number of functions are available for the PDF version as for the output on the printer. MindPlan User Manual Part 1© Haus Weilgut ▪ November 2008 ▪ www.mindplan.com Page 26 Brainstorming with MindMaps Print a MindPlan Print a MindPlan on paper 1 Click on the central node and then call up »File« - »Print« in the top menu bar. A window with a printer configuration bar appears on the left and the preview window on the right. 2 Select the suitable item in the upper left window »Scaling«: Distributed over several pages (poster assembly) or »Fit on one page«. 3 In the »Page settings« menu, select the printer and adjust the page settings, if necessary. For this, open the menu and note that you should not select the printer there. 4 You can store the author, date, version, etc. easily in the page margins. For this, select the tabs »Header« or »Footer« under »Page margins« and enter the appropriate text. 5 Each print automatically receives page number indicators, which you can use to orient yourself while assembling the poster. Define additional indicators in the »Attached pages« tab. 6 Zoom in or out of the print preview with the top bar in the right preview window. 7 Confirm the print by clicking on the »Print« key. Caution: If you have to leave the menu early without confirming the print, we recommend that you close the window due to particular characteristic of Windows. Otherwise, you can no longer call it up and must close and restart MindPlan via the Task Manager (CTRL + ALT + DEL). MindPlan User Manual Part 1© Haus Weilgut ▪ November 2008 ▪ www.mindplan.com Page 27 Brainstorming with MindMaps Print a MindPlan Print, archive, or send a MindPlan in file Use the electronic PDF print to document a status of your MindPlan or to provide the MindPlan to individuals that do not have MindPlan software installed. Electronic prints are created in Adobe PDF format and can be archived or subsequently printed easily on paper. Use the menu item »File« – »Print as PDF.« Proceed in the same manner as for the paper print-out; see the previous description for this. Start the PDF print by clicking on the »Print PDF« button. Caution:If you have to leave the menu early without confirming the print, we recommend that you close the window due to particular characteristic of Windows. Otherwise, you can no longer call it up and must close and restart MindPlan via the Task Manager (CTRL + ALT + DEL). MindPlan User Manual Part 1© Haus Weilgut ▪ November 2008 ▪ www.mindplan.com Page 28 © 2008 Haus Weilgut GmbH Computer Conception, 76275 Ettlingen, Germany Printed in Germany All rights reserved Contact: [email protected] ▪ www.weilgut.com www.mindplan.com