1
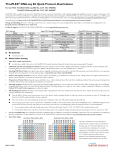
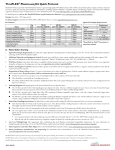
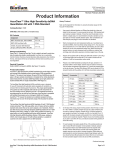
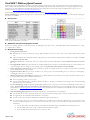
PicoPLEX™ DNA-seq Quick Protocol PicoPLEX™ DNA-seq Kit (Cat# R300381, 48 reactions) is intended for amplifying genomic DNA from single cells to reliably detect chromosomal aneuploidies and copy number variations (CNV) on Illumina's Next Generation Sequencing (NGS) platforms. Applications include pre-implantation genetic screening (PGS) using blastomeres and trophectoderm cells. Other applications include NGS-based CNV detection in Circulating Tumor Cells (CTCs) where single cell amplifications are required. For more information visit www.rubicongenomics.com/products/PicoPLEX-DNA-seq/. For detailed information, please refer to the PicoPLEX DNA-seq user manual at www.rubicongenomics.com/resources/manuals/. Storage and Handling: Store the kit at -20°C upon arrival. Transfer enzymes to ice prior to use and centrifuge briefly. Thaw the buffers, vortex briefly and centrifuge prior to use. Store on ice until used. A. Kit Contents NOTE: PicoPLEX DNA-seq is provided with one index plate (above right) and contains sufficient reagents to accommodate 48 reactions at once or up to 4 uses of the plate as described in the PicoPLEX DNA-seq user manual. B. Additional materials and equipment needed Thermal cycler; centrifuge; PCR tubes or plates; PCR plate seals; low binding barrier tips; fluorescent dyes; 10X Phosphate Buffered Saline (10X PBS buffer; free of Mg2+, Ca2+, and BSA); 80% v/v Ethanol. C. Notes before starting 1. Starting material requirements Mammalian cells (1-10 cells) or isolated DNA (15-60 pg). Single mammalian cells from sources such as embryos, tumor cells and cultured clonally expanded cells. Single cells obtained by micro-manipulation and flow-sorting as well as flow-sorted cells that are stained with surface antibodies are also suitable. Avoid cell fixation for optimal results. 2. Washing the cells: Wash the cells with sterile, nuclease free 1X PBS, freshly prepared from a 10X PBS stock. Carryover PBS volume must not exceed 2.5 µL. 3. Selecting PCR Plates/Tubes: Select plates/tubes that are compatible with the thermal cyclers and/or real-time PCR instruments used. Ensure that there is no evaporation during the process by using proper seal/caps during cycling as evaporation may reduce robustness and reproducibility. 4. Positive and Negative Controls: Including a positive control DNA (15 pg) and a No Template Control (NTC) as a negative control in parallel is recommended to ensure that the reaction proceeded as expected. 5. Preparation of Master Mixes: Keep all enzymes and buffers on ice. Always prepare a master mix immediately prior to use and keep on ice while pipetting. Assembling the reactions on ice is recommended. 6. Illumina® Dual Indexes in 96 Well Plate: PicoPLEX DNA-seq uses Illumina dual indexes (8-nucleotide). The index plate map with well locations for each of the 48 specific dual (i5 and i7) index combinations is indicated below. 7. 8. Wells corresponding to columns 7 to 12 are empty. Each well contains sufficient volume of dual index combination for single use. This plate is sealed with pierceable sealing foil. Refer to the plate handling instructions below for more information. Low level multiplexing: This kit is designed for high throughput applications; however, it can also be used for low level multiplexing of smaller numbers of samples. The Index Plate can be frozen and thawed no more than four times. For instructions on low level multiplexing, please refer to the detailed manual available at www.rubicongenomics.com/resources/manuals. Select appropriate dual index combinations that meet Illumina recommended compatibility requirements. Index Plate Handling Instructions: Follow the instructions given below to avoid potential index cross contamination. Thaw the index plate for 10 min. on the bench-top prior to use. Once thawed, briefly centrifuge the plate to collect the contents to the bottom of each well. Thoroughly wipe the foil seal with 70% ethanol and allow it to dry completely. Pierce the seal above the specific index combination with a 200 µL filtered pipet tip; discard the tip. Use a new pipet tip to collect 5 µL of a specific index combination (i5 & i7) and add it to the reaction at the amplification step. If several reactions are being assembled, a multichannel pipette may be used. If indexes from the entire plate are not used at the same time, follow the instructions below to avoid contamination: QAM-111-001 Cover any pierced index wells with scientific tape (such as VWR General Scientific Tape 0.5" Cat# 89097-920) to mark the index as used. Once the dual index plate is used, wipe the seal with 70% ethanol and let it dry completely. Replace the plastic lid and return the plate to its sleeve and store at -20°C. D. PicoPLEX DNA-seq Quick Protocol I. Cell Lysis Step II. Pre-Amplification Step 1. 1. 2. Prepare a PCR plate where each experimental well contains individual single cells or genomic DNA dilutions in 5 µL of buffer (refer to User Manual for detailed instructions for preparing the single cell or diluted DNA samples). Wells containing 5 µL of NTC negative control buffer sample(s) are also recommended. Depending on the number of reactions, prepare Enzyme Extraction Master Mix as described in the table below. Mix gently several times. Enzyme Extraction Master Mix Component Cap color Volume/Reaction Extraction Enzyme Violet 4.8 µL Dilution Buffer Cell Extraction Enzyme Yellow 0.2 µL 3. To each 5 µL equilibrated sample from step 1 above, add 5 µL of the Enzyme Extraction Master Mix, taking care not to disturb cell. Note: Final volume at this stage will be 10 µL. 4. Seal the PCR plate using proper sealing film and centrifuge briefly to ensure entire volume of the reaction is collected at bottom of each well. 5. Place the plate in a thermal cycler with a heated lid set to 105°C and perform the Lysis Reaction using the protocol in the table below. Lysis Reaction Temperature 75 °C 95 °C 22 °C 6. Time 10 min. 4 min. Hold Prepare a pre-amplification master mix as described in the table below. Mix gently several times. Store on ice until used. III. Library Amplification Step 1. Amplification Master Mix Component Cap Color Volume/Reaction Amplification Buffer Orange 25.0 µL Amplification Enzyme Blue 0.5 µL Fluorescent Dyes* 2-5 µL Nuclease Free Water Clear Varies Total 30 µL/Reaction Pre-Amplification Master Mix Component Cap Color Volume/Reaction Pre-Amp Buffer Red 4.8 µL Pre-Amp Enzyme White 0.2 µL 2. Remove the seal on the plate; add 5 µL of the preamplification master mix to each well. Note: Final volume at this stage is 15 µL. 3. Seal the PCR plate using proper sealing film and centrifuge briefly to ensure entire volume of the reaction is collected at bottom of each well. 4. Return the plate to the thermal cycler with a heated lid set to 105°C and perform Pre-Amplification Reaction using the cycling conditions from in the table below. Step Step-1 Step-2 Step-3 5. Pre-Amplification Reaction Temperature Time Number of cycles 95 °C 2 min. 1 cycle 95 °C 15 sec. 15 °C 50 sec. 25 °C 40 sec. 12 cycles 35 °C 30 sec. 65 °C 40 sec. 75 °C 40 sec. 4 °C Hold 1 cycle Remove the plate and centrifuge briefly; continue to the Library Amplification Step in the same plate. Fluorescence dyes* (detection and optical calibration) are added when monitoring the amplification in real time during cycling. Please refer to the Real Time PCR Instrument's user manual for calibration dye recommendations, and add an appropriate amount of the detection and calibration dye. If a regular thermal cycler is used, there is no need to add the dyes; substitute with appropriate amount of nuclease free water instead to adjust the final volumes. Example: EvaGreen/Fluorescein dye mix. Prepare by mixing 9:1 v/v ratio of 20X EvaGreen dye (Cat#31000-T, 20X in water, Biotium Inc.,) and 1:500 diluted Fluorescein (Fluorescein Calibration Dye Catalog # 170-8780, Bio-Rad Laboratories); add 2.5 µL of this mix per reaction. 2. Remove the seal on the PCR plate and add 30 µL of the amplification master mix to each well. 3. Add 5 µL of the appropriate index combination from the index plate to each well and mix gently several times with a pipettor avoiding introducing excessive air bubbles. Follow the index plate handling instructions (C.8) to avoid index cross contamination. Note: Final volume at this stage is 50 µL. 4. Seal the plate tightly and centrifuge briefly to collect the contents to the bottom of each well. 5. Return plate to the real time PCR cycler/thermal cycler with a heated lid set to 105°C and perform Amplification Reaction using the cycling conditions from the table below. Remove the plate and centrifuge briefly; continue to the PreAmplification Step in the same plate. Amplification Reaction Temperature Time Number of cycles 95 °C 4 min. 1 cycle 95 °C 20 sec. 63 °C 25 sec. Step-2 4 cycles 72 °C 40 sec. 95 °C 20 sec. Step-3 7 cycles* 72 °C 55 sec. Step-4 4 °C Hold *Acquire fluorescence data at this step, if monitoring amplification in real- time. Step Step-1 For technical support contact [email protected] or call (734)-677-4845. PicoPLEX™-DNA seq kit is for research use only. It may not be used for any other purposes including, but not limited to, use in diagnostics, forensics, therapeutics, or in humans. PicoPLEX DNA-seq may not be transferred to third parties, resold, modified for resale or used to manufacture commercial products without prior written approval of Rubicon Genomics, Inc. PicoPLEX DNA-seq is protected by US Patent 8,206,913; other US and foreign patents pending. Trademarks: PicoPLEX™; Bio-Rad® (Bio-Rad laboratories, Inc.) illumina® (Illumina Inc.); Eva Green® dye (Biotium Inc.). Prepare Amplification Master Mix as described in the table below. Store on ice until used. 6. At the end of library amplification, remove the plate from the cycler and centrifuge briefly. At this stage, samples can be processed for library purification immediately or stored frozen at -20°C and processed later. 7. Refer to the detailed user manual (available online) for recommendations on library purification, subsequent quantification and next generation sequencing (NGS).